SlimW
-
Posts
63 -
Joined
-
Last visited
Content Type
Profiles
Forums
Articles
Gallery
Downloads
Events
Everything posted by SlimW
-
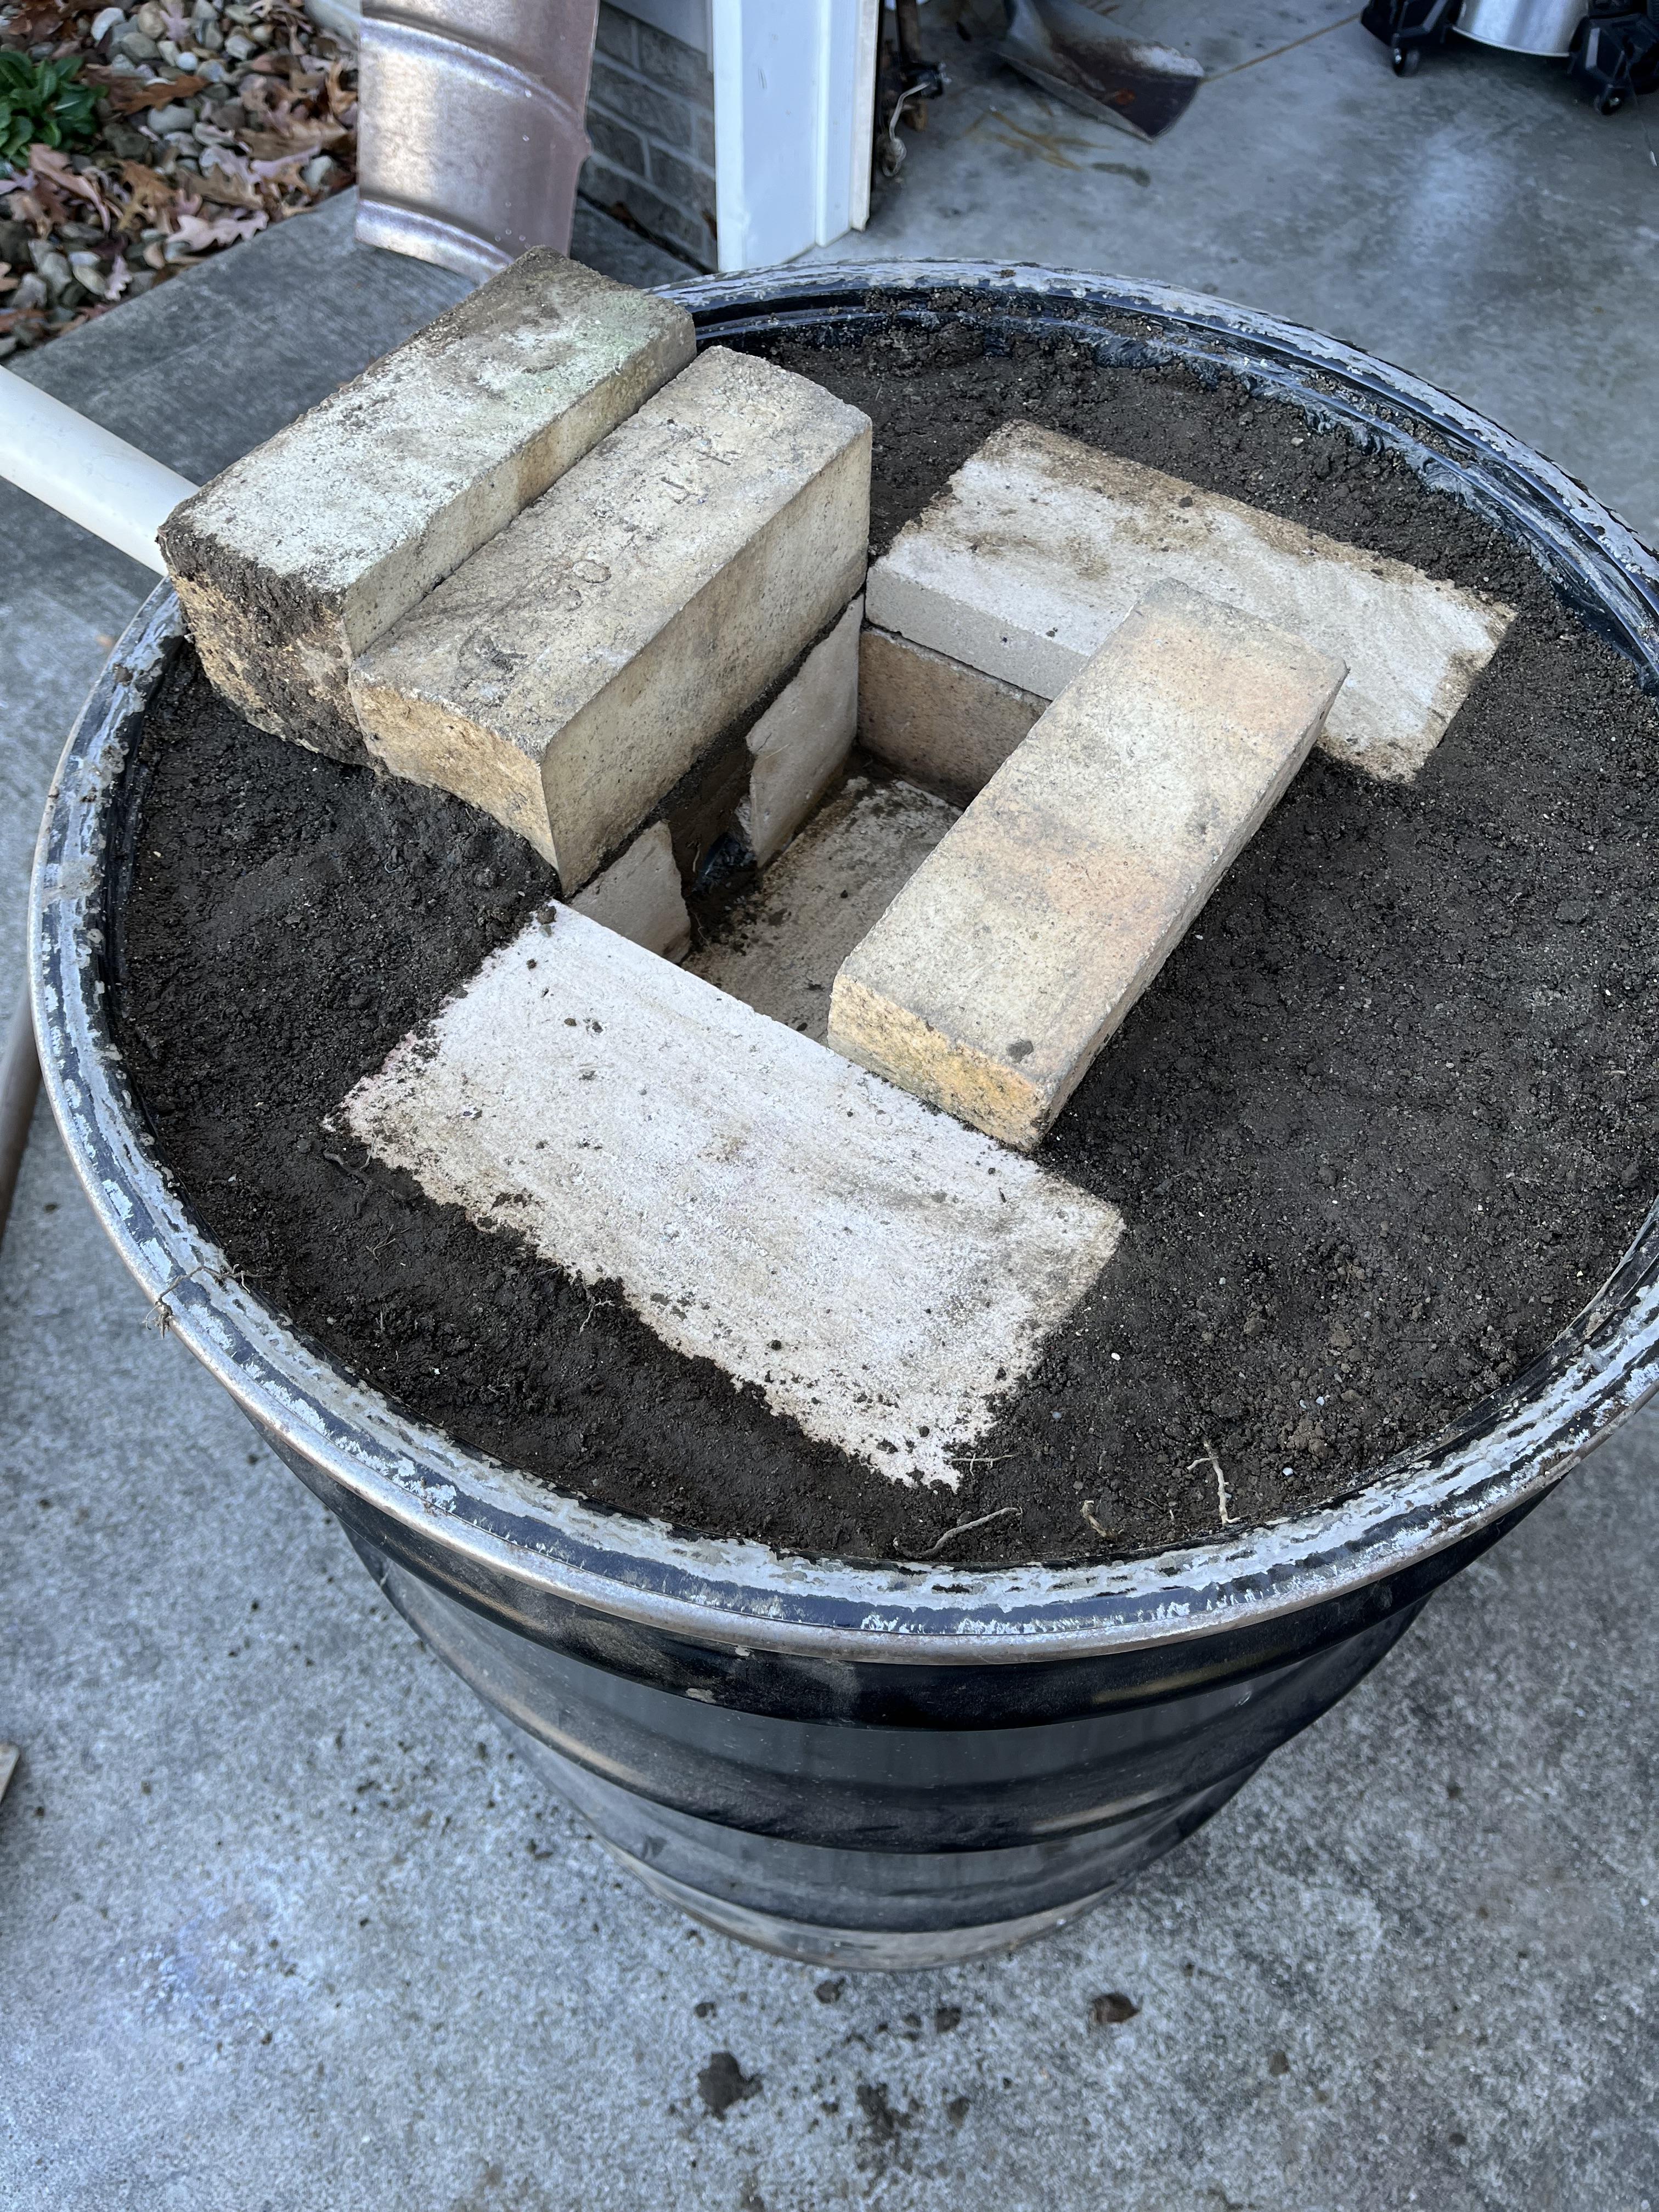
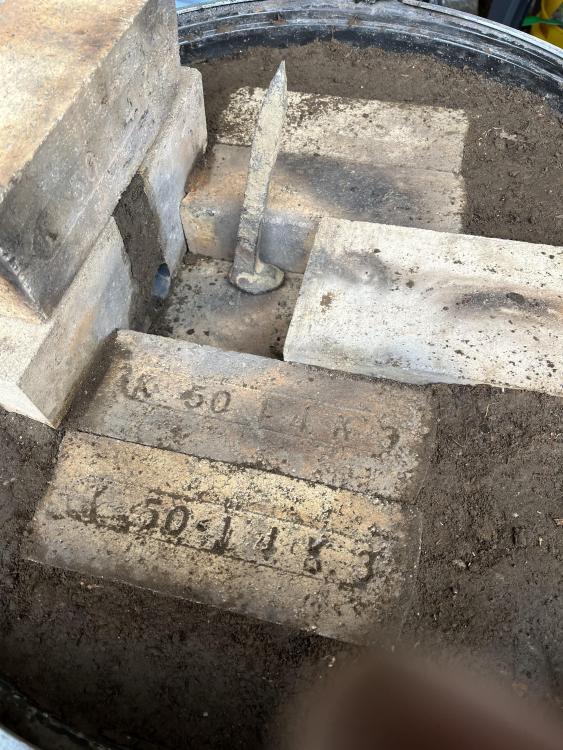
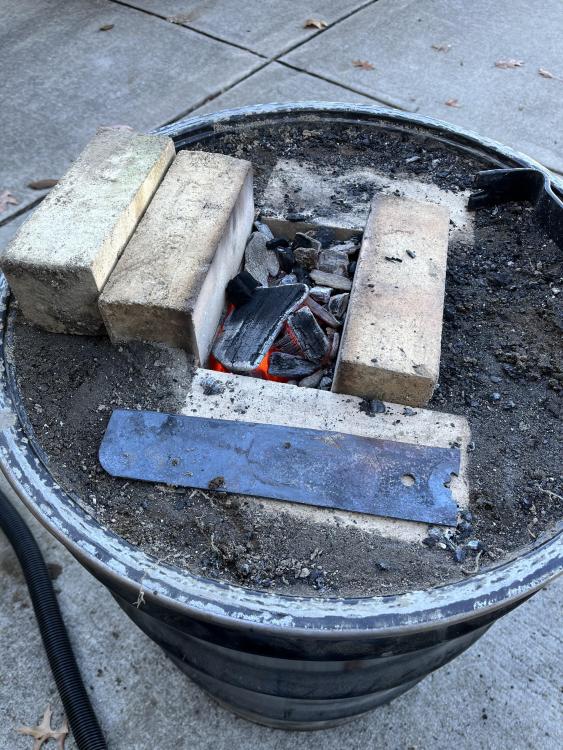
I made the bed more shallow because I did indeed have problems reaching the heart of the fire. I usually ended up way to high on the pile where oxygen scaled up the metal pretty bad. The only way to fix this was to make a huge heaping mound of fuel, which then burned up quickly, which wasn't efficient at all. I think this is why corn didn't work well for me. I actually have already changed the latest picture since I can't leave well enough alone. the straight walls of the firepot make it hard to scoop out ash, so I cut one of my bricks in half with a chisel (ran a line the whole way around, it broke pretty evenly), and have angled the sides. Of course my changes mean I need more dirt since I'm using fewer bricks now, and it's dark and snowy right now so it will wait till later to finish. my fingers were freezing up. I also need to lower the whole bed half an inch or so, I have it built up too high and my fuel will just slide off the edges.
-
boy is this a slick setup. I'm always jealous of how inventive other people are, like those door slides and the burner hanger.
-
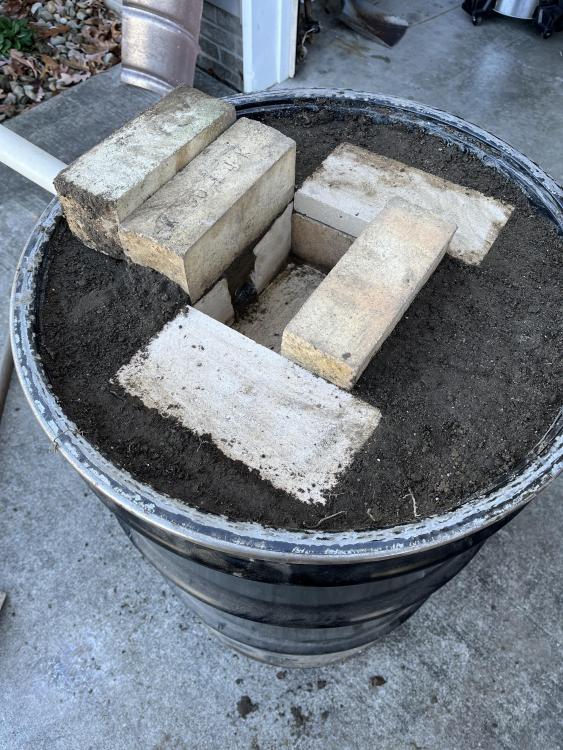
Honestly, clay dirt really is the best. I'm in SW Pennsylvania, so we have no shortage of it. I should not have even bothered with the cat litter. Oh well, I have a cat, so it won't go to waste. The bricks are nice as a table so you don't rake too much dirt into your fire. All I had to do to rebuild the thing was to get a little more dirt, and add some water to the broken-up original dirt. I was showing the forge off to my kids and my nephew when I got done forging the other day, they were "oo-ing and ahh-ing" over the red-hot glowing brick on the side, they didn't know you could make a brick glow.
-
I tore apart my brick layout and built up a new fire pot that is much more shallow. Lucky for me, more dirt fits in my budget. spike for scale. I figure I can set another brick on the opposite side of the tuyere with a little dirt under either end to make a proper trench.
-
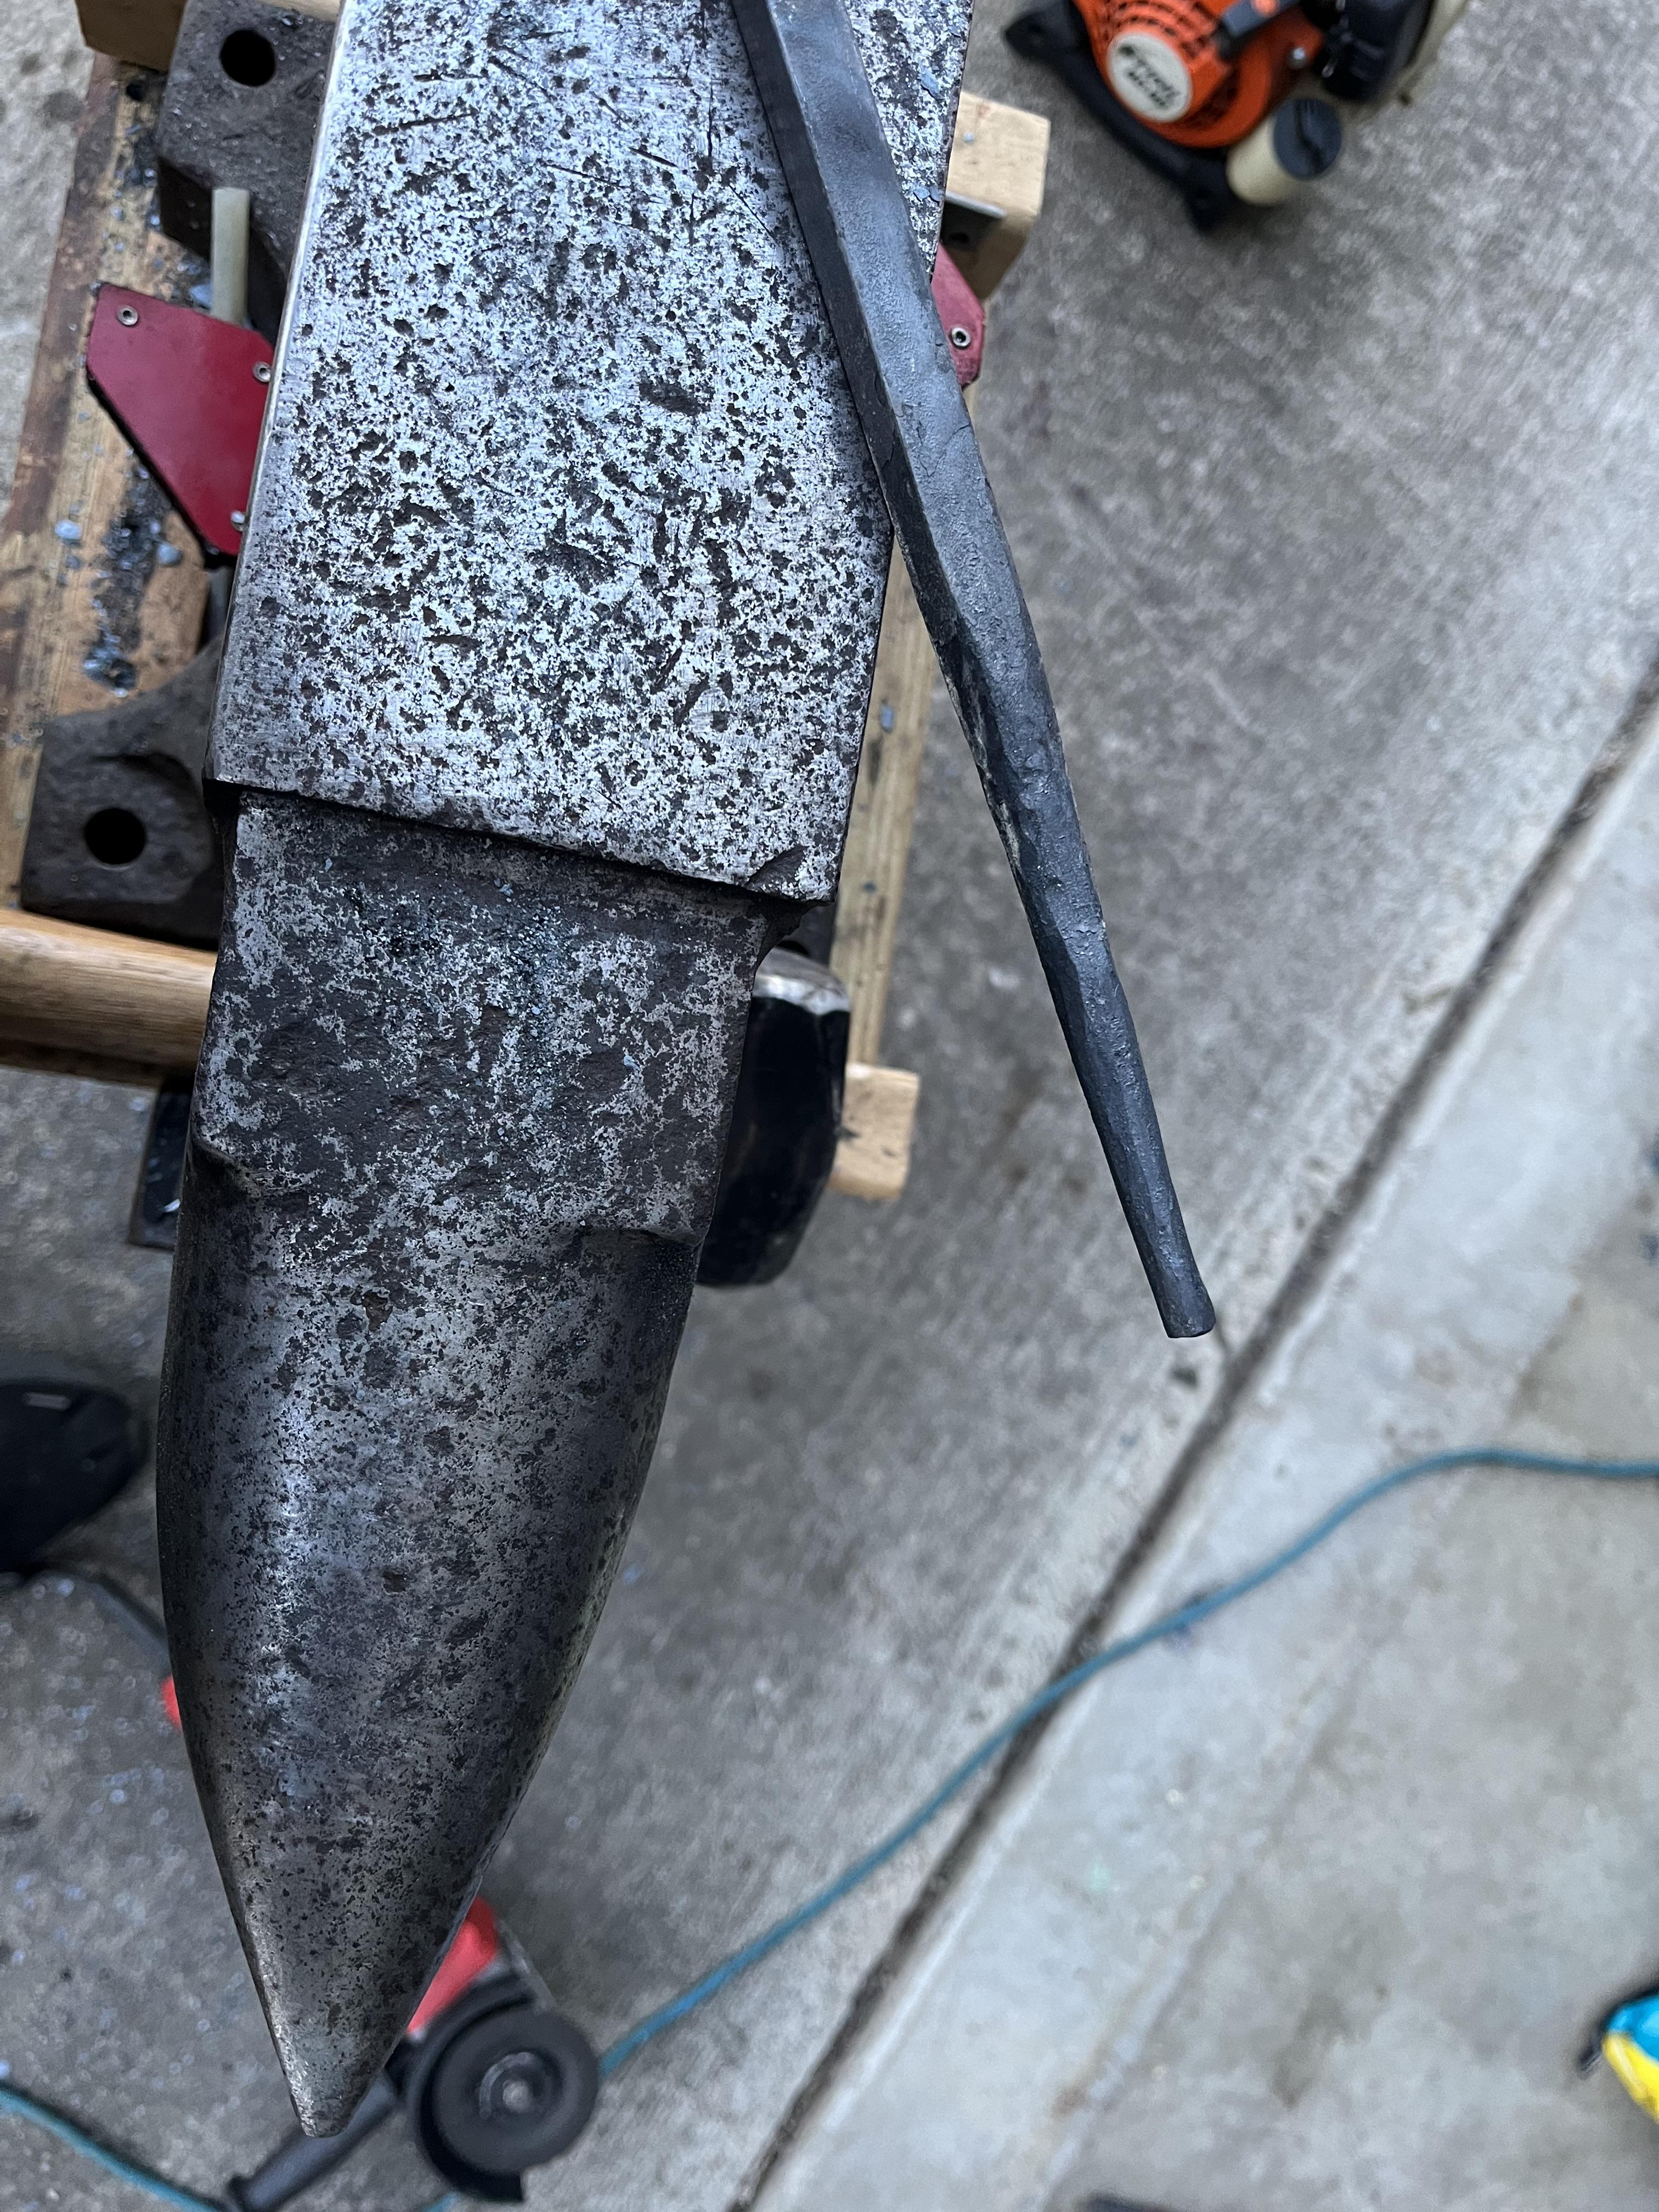
After doing some reading of various pinned threads, I think my forge is much too deep, and I don't think I have my work placed correctly in the coals - I do get a lot of scale. Also, because it's so deep, it's hard to heat the middle of a piece of work without really heaping on the coal. I think I'm going to re-shape the bed, maybe in a "V" shape. The good thing here is, the forge is just bricks and dirt/sand, so I haven't really lost anything but a little time.
-
Yeah, I'd be interested in that mod. I assume it involves cutting off a bunch of the rectifying diodes from the blower motor and removing the heating coils, which is just fine by me. I really think I need to find a local smithing class so I can have someone experience correct my hammer technique. I don't think I'm moving metal nearly as efficiently as I could be, and I know I'm creating "fish lips" near the ends of my work, among other things. I was pretty happy with the coal. I burned for a few hours and only had a couple small pieces of clinker, and one small rock that found its way in somehow. I wonder if coal is happier with bottom blast rather than side blast. I also wonder if my bed is a little too deep.
-
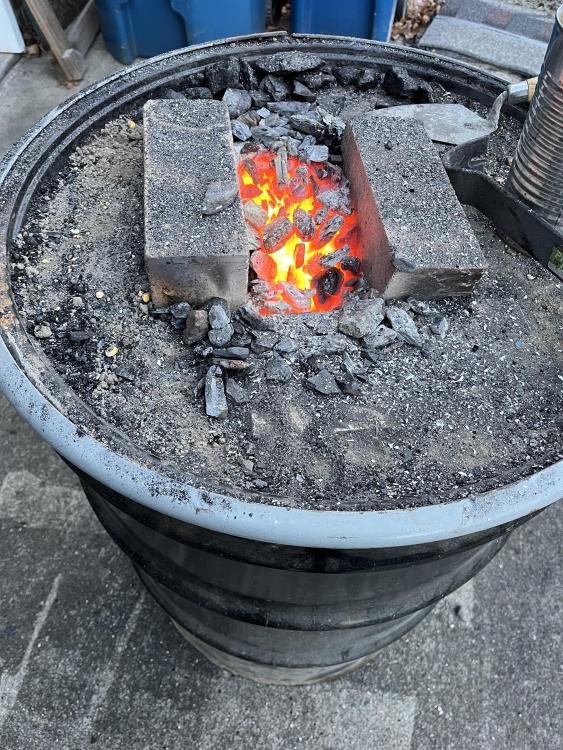
Now that Thanksgiving is over, I had some time to try out this thing for real. Today, I bought corn, and anthracite (nut) coal, so I could compare them to each other and charcoal in this forge. I bought a cheap hairdryer with two speeds, and a "cool" button, which I taped down so I didn't blow hot with the hairdryer. This I attached to the tuyere with a section of dryer hose and that aluminum tape you use on furnace ducts. I tested it with a 1/2" rod of mild steel, and a couple sections of old leaf spring. Charcoal was the most expensive, $22 bucks for a 20lb bag of Cowboy lump charcoal. It was the easiest to light, and needed the least amount of air in general. It did spit lots of little sparklers everywhere, and I couldn't use the hairdryer on high as it tended to blow the smaller pieces of charcoal out. Charcoal did bring even larger sections of metal (leaf spring) up to temp pretty fast, and was pretty easy to manage, though it does burn fast. One other negative was that I had to sit and break up lots of bigger chunks so they were usable in this forge, which was dirty and tedious. Corn was the least expensive, $11 for a 50lb bag. Since I already had a charcoal fire going, I waited until it burnt down a ways, then raked a bunch of corn on. Corn made a lots of tall flames. I couldn't use the high air setting because that blew lots of little flaming bits of corn everywhere. It was not nearly as hot as charcoal, and it made a lot of smoke when coking up. I had to keep raking corn in, as it burns off pretty fast. Even at the low air setting, it tended to blow out burning corn, and it took a very long time to get my leaf spring sections up to temp, relative to charcoal. It was pretty easy to manage, but it had the strongest smell of any of the fuels. Between that and the smoke, I don't think it's fancy neighbor friendly. I figured I'd give coal a try, and used anthracite since I do have neighbors that might think they're too fancy for billowing coal smoke. The local place up the road was closed today, but Tractor Supply had it, at $12 for 40lb. I didn't have any trouble getting it started since I already had a lot of hot coals. It did take a while to get burning, and it certainly likes lots of air. I could run the hairdryer at high speed without any issues of coal blowing around. Coal was clearly the hottest, and took the least amount of fire management. I had no trouble bringing metal up to temp, and in fact I overcooked one piece of metal when I walked into the garage to get my soapstone marker. Once the bed was up to temp, I could use the low air setting for smaller pieces of metal and they still came up to temp very quickly. Anthracite coal gave off little or no smoke at all, and very little smell (at least relative to corn). I also didn't use nearly as much coal as I did charcoal, and far less than corn. In the end, I had two sections of more-or-less flat pieces of leaf spring I can now use for practice knives, one piece of mild steel that's taking the shape of tongs (slowly), and three semi-finished knife blades that got heat treated. A successful day, I think. Here’s a couple pics, i was pretty busy and didnt get a lot. I would welcome any critique or suggestions people might have.

-
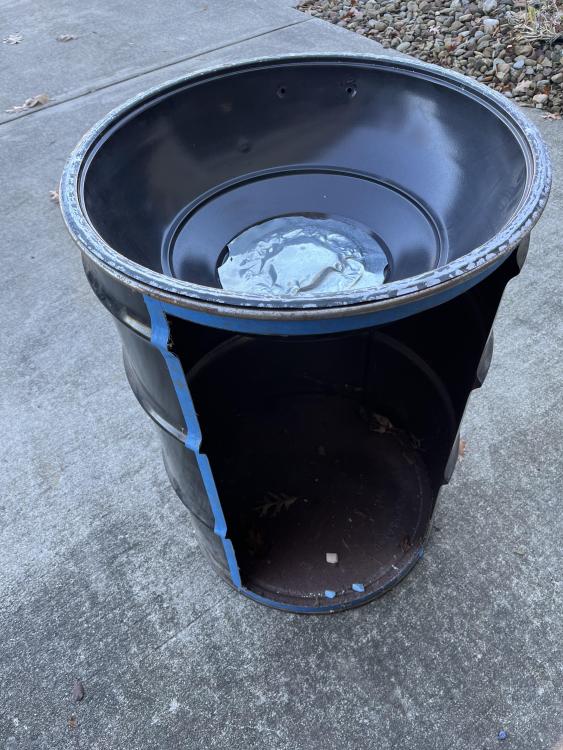
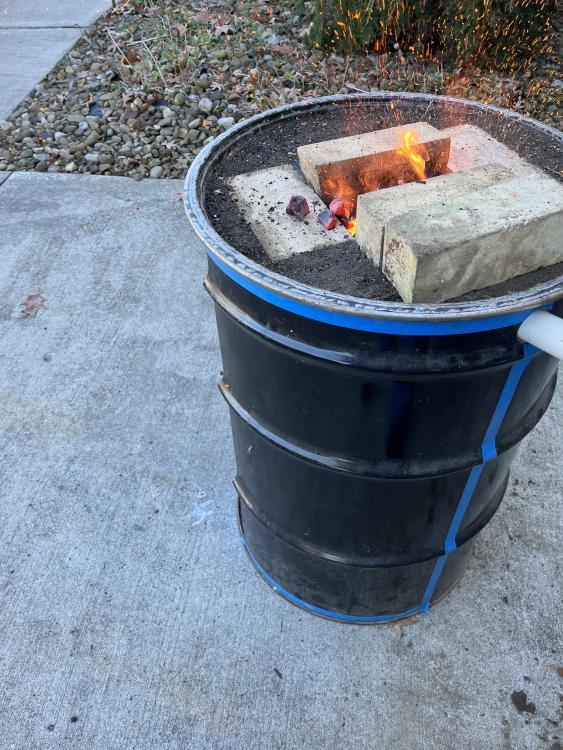
finally, my own solid fuel forge. It’s certainly better than a barbecue chimney full of charcoal. feedback will be very welcome. This forge is made from a 55 gallon drum and a 22 inch charcoal grill as the forge bottom. I started filling it with a mixture of kitty litter and sand but it was dry and didn’t mold well so I decided to mix local clay and sand instead, and that worked a lot better. I had some old fire bricks that were laying around in my garage for a couple years, so those became part of the build. It survived its first firing and I even managed to hammer an old lawnmower blade flat. my high-tech Harbor freight prybar served as a fire rake but I really need a set of decent tongs, vice grips aren’t gonna cut it. I used lump charcoal for the first firing. It was somewhat vac as the air source although it’s way too powerful and so I will need something smaller. I managed by directing air at the tuyere but not directly connecting the shop vac. The tuyere is angled down into the fuel and is a scrap piece of tubing, fairly thin-walled. it seems to have survived the first use without much issue.
-
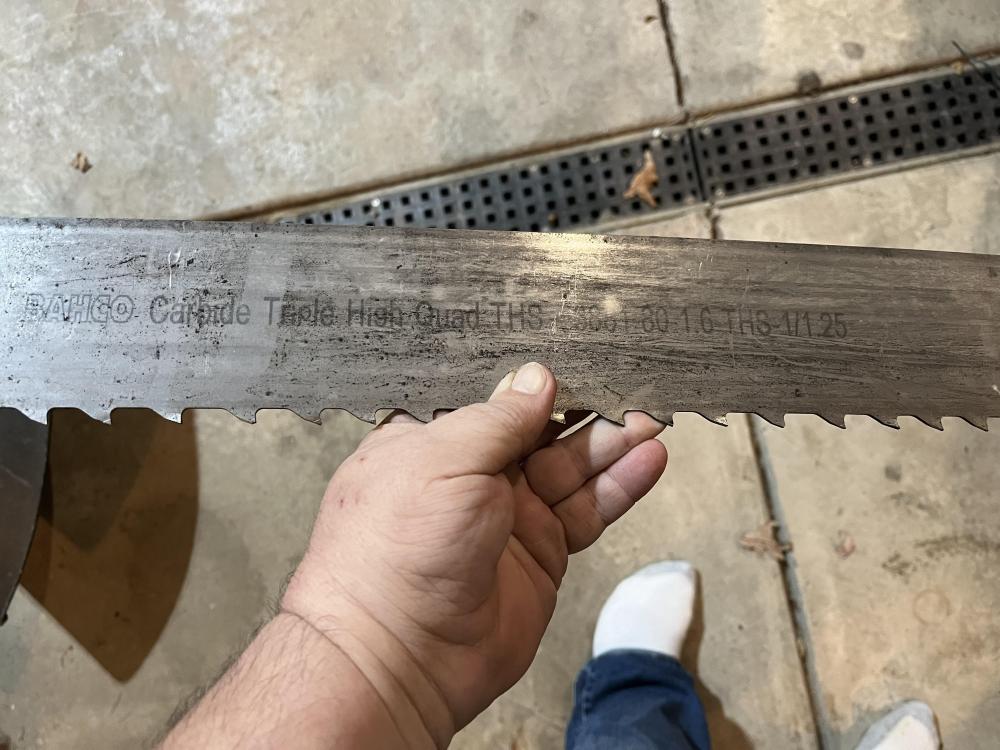
things grow more knife shaped: also, a friend dropped off about a dozen sections of bandsaw blade, used to cut stainless. it seems the teeth are M42 steel, but the blade is something else very tough. makes fine sparklers on the grinding wheel. if nothing else it will make fine side plates on folders, and maybe if i am lucky i can use it in layers with other steel. please disregard the safety socks.
-
while I wait for daylight, materials, and time to finish my JABOD, I am filling some of my scarce weekday time to start a folder. Never did one before, so I think I will start with a friction folder, though I have some ideas for locking knives. This is a design by Tim Troyer called "Little Friction Folder" that he kindly uploaded somewhere that I forget. Side plates are mild steel, blade is 5160. As a side note, if anyone could recommend a good book on folding knife geometry, I would appreciate it.

-
they're just scratches - I hadn't fully-sanded. you can see scratches on the ricasso as well. I was unhappy with the current edge thickness, so I draw-filed the blade to thin it out a bit, re-sanded, and those scratches are gone. I just need to heat-treat now, which is waiting on a better forge than a bbq chimney. I have an old charcoal grill bottom that will fit just fine in the top of a 55-gallon drum that I think will make a fine forge once I get some kitty litter and a couple old firebricks in it. I've been delayed because I hurt both my lower back and my knee (torn meniscus) so I'm slower than usual. I can file/grind/sand blades sitting down, lol.
-
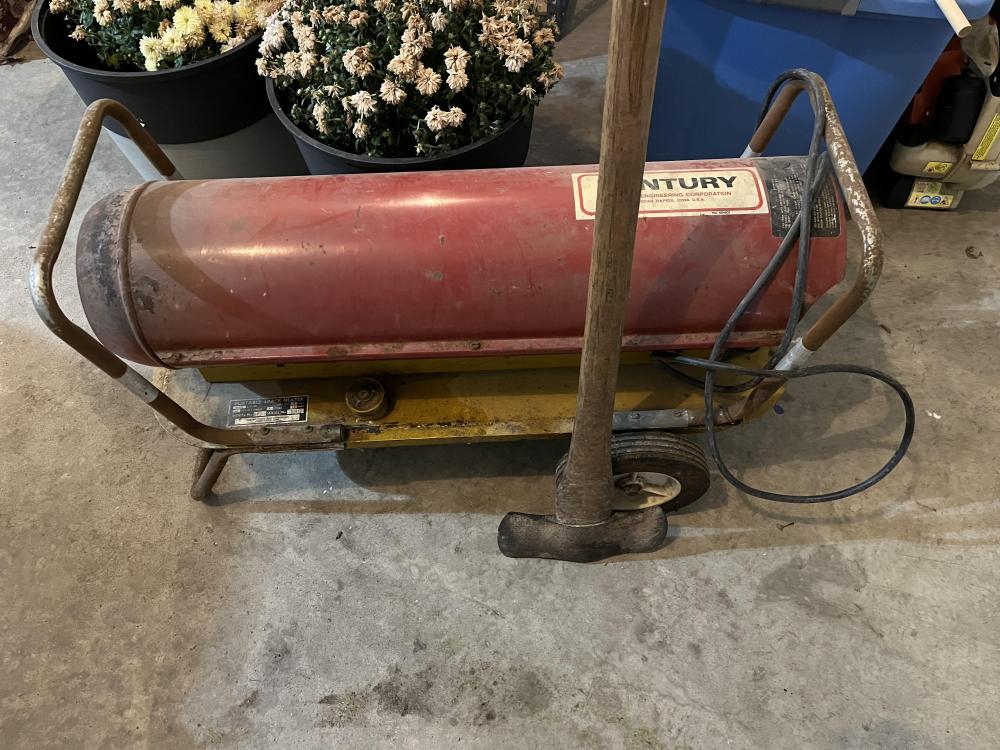
i had a torpedo heater and a somewhat rusty but solid axe follow me home. pretty sure both are older than me but seem usable.
-
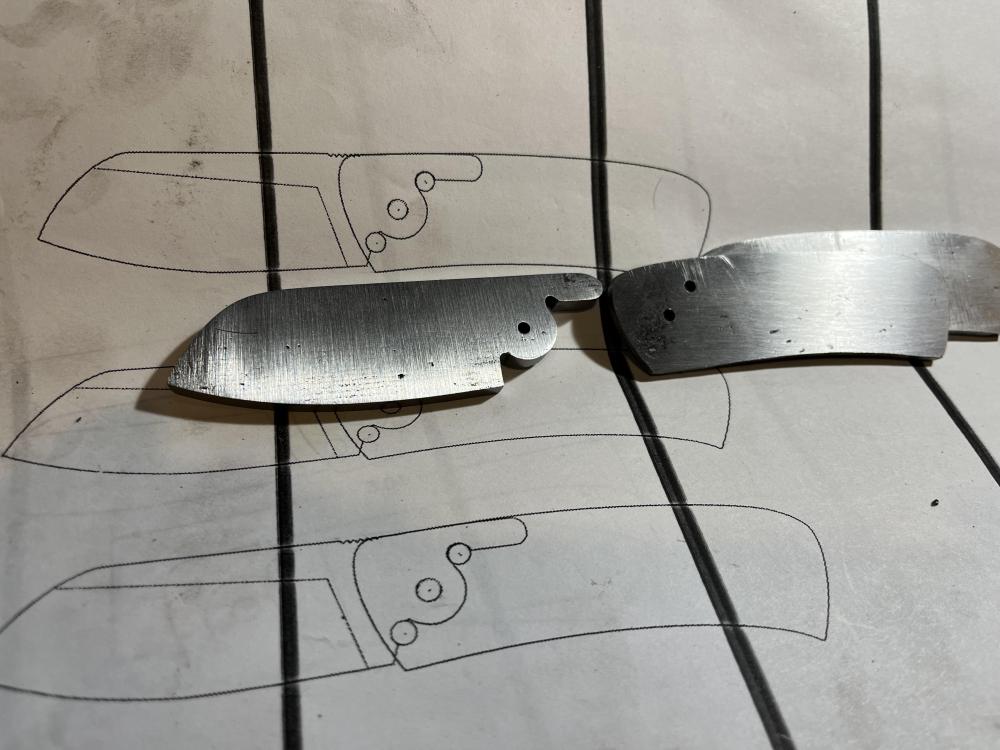
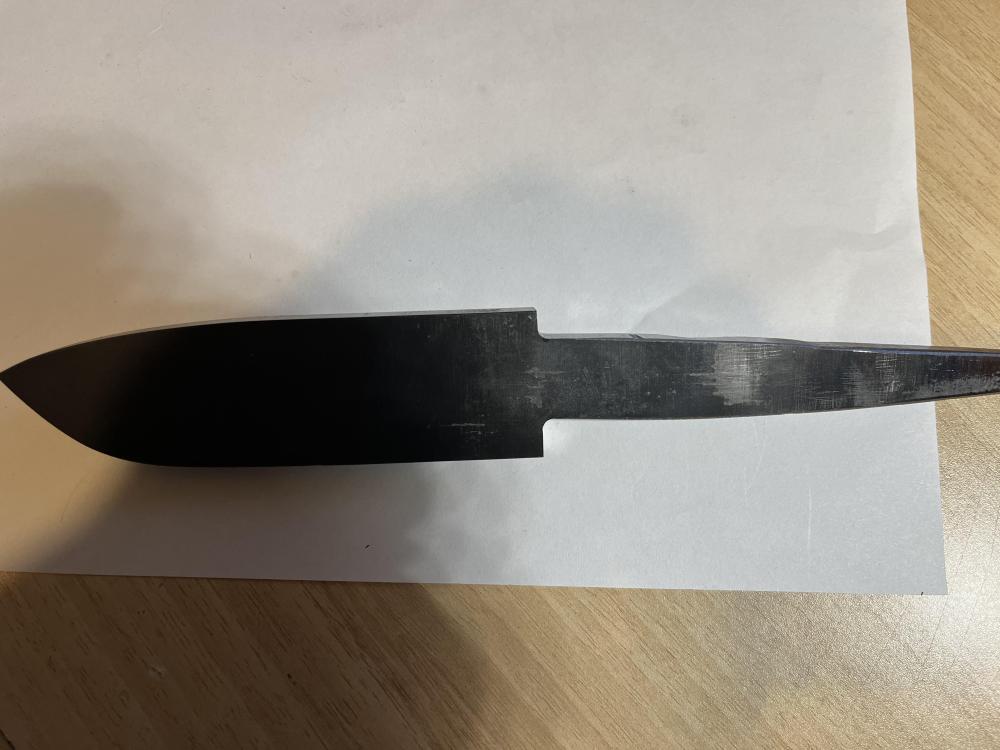
knife shaped object, now with 50% more knife shape: this is only sanded to 120. i may have to reprofile a bit, the edge is once again a bit too thick.

-
a better fit than last time for sure:
-
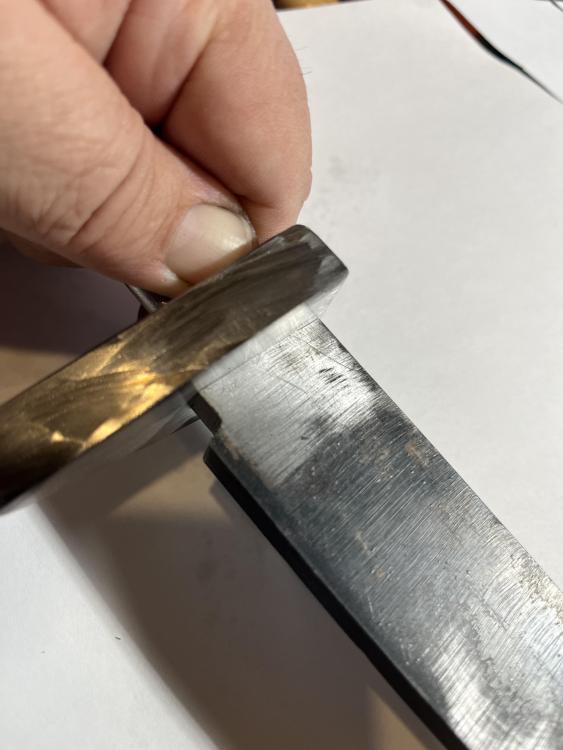
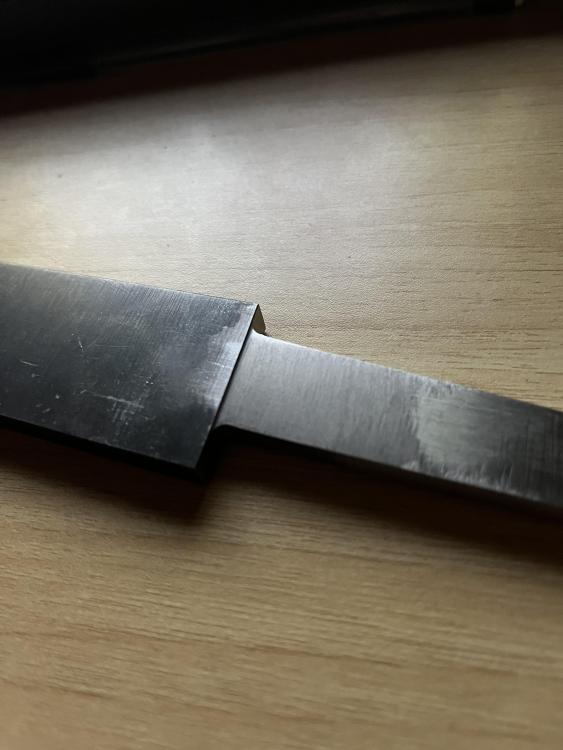
it may be silly but i am gleefully pleased with the shoulder i’ve filed on this blade - its the most precise thing i have ever done, and with only half a file jig. On a side note, someone gifted me with 12 soft firebricks (rated 2800F, I think), so I am going to say goodbye to my bbq chimney/leafblower forge and build a real forge.
-
-
I tempered the remaining file guide at 275 for an hour. Files still skate easily on it, and it held up to the stresses of clamping in a vise, even half a file guide is better than none at all. I filed those sharp corners out that Steve mentioned, and I only have some very fine scratches on the guide.
-
well, attempt number 1 at a file guide failed; both sides made it out of the quench just fine, the parallel surfaces remained parallel. My files skated on the surface completely. I put a polish on the guide faces on my sanding disk. it was getting a little warm to hold, so I dunked it in my water can, and PING, one half cracked through. I guess I should have tempered it, but I read a few posts here and other places where people had used them full hard, so I took a chance and failed. I'm not too sad, the next one I'll do with guide rods and more substantial cross-sections.
-
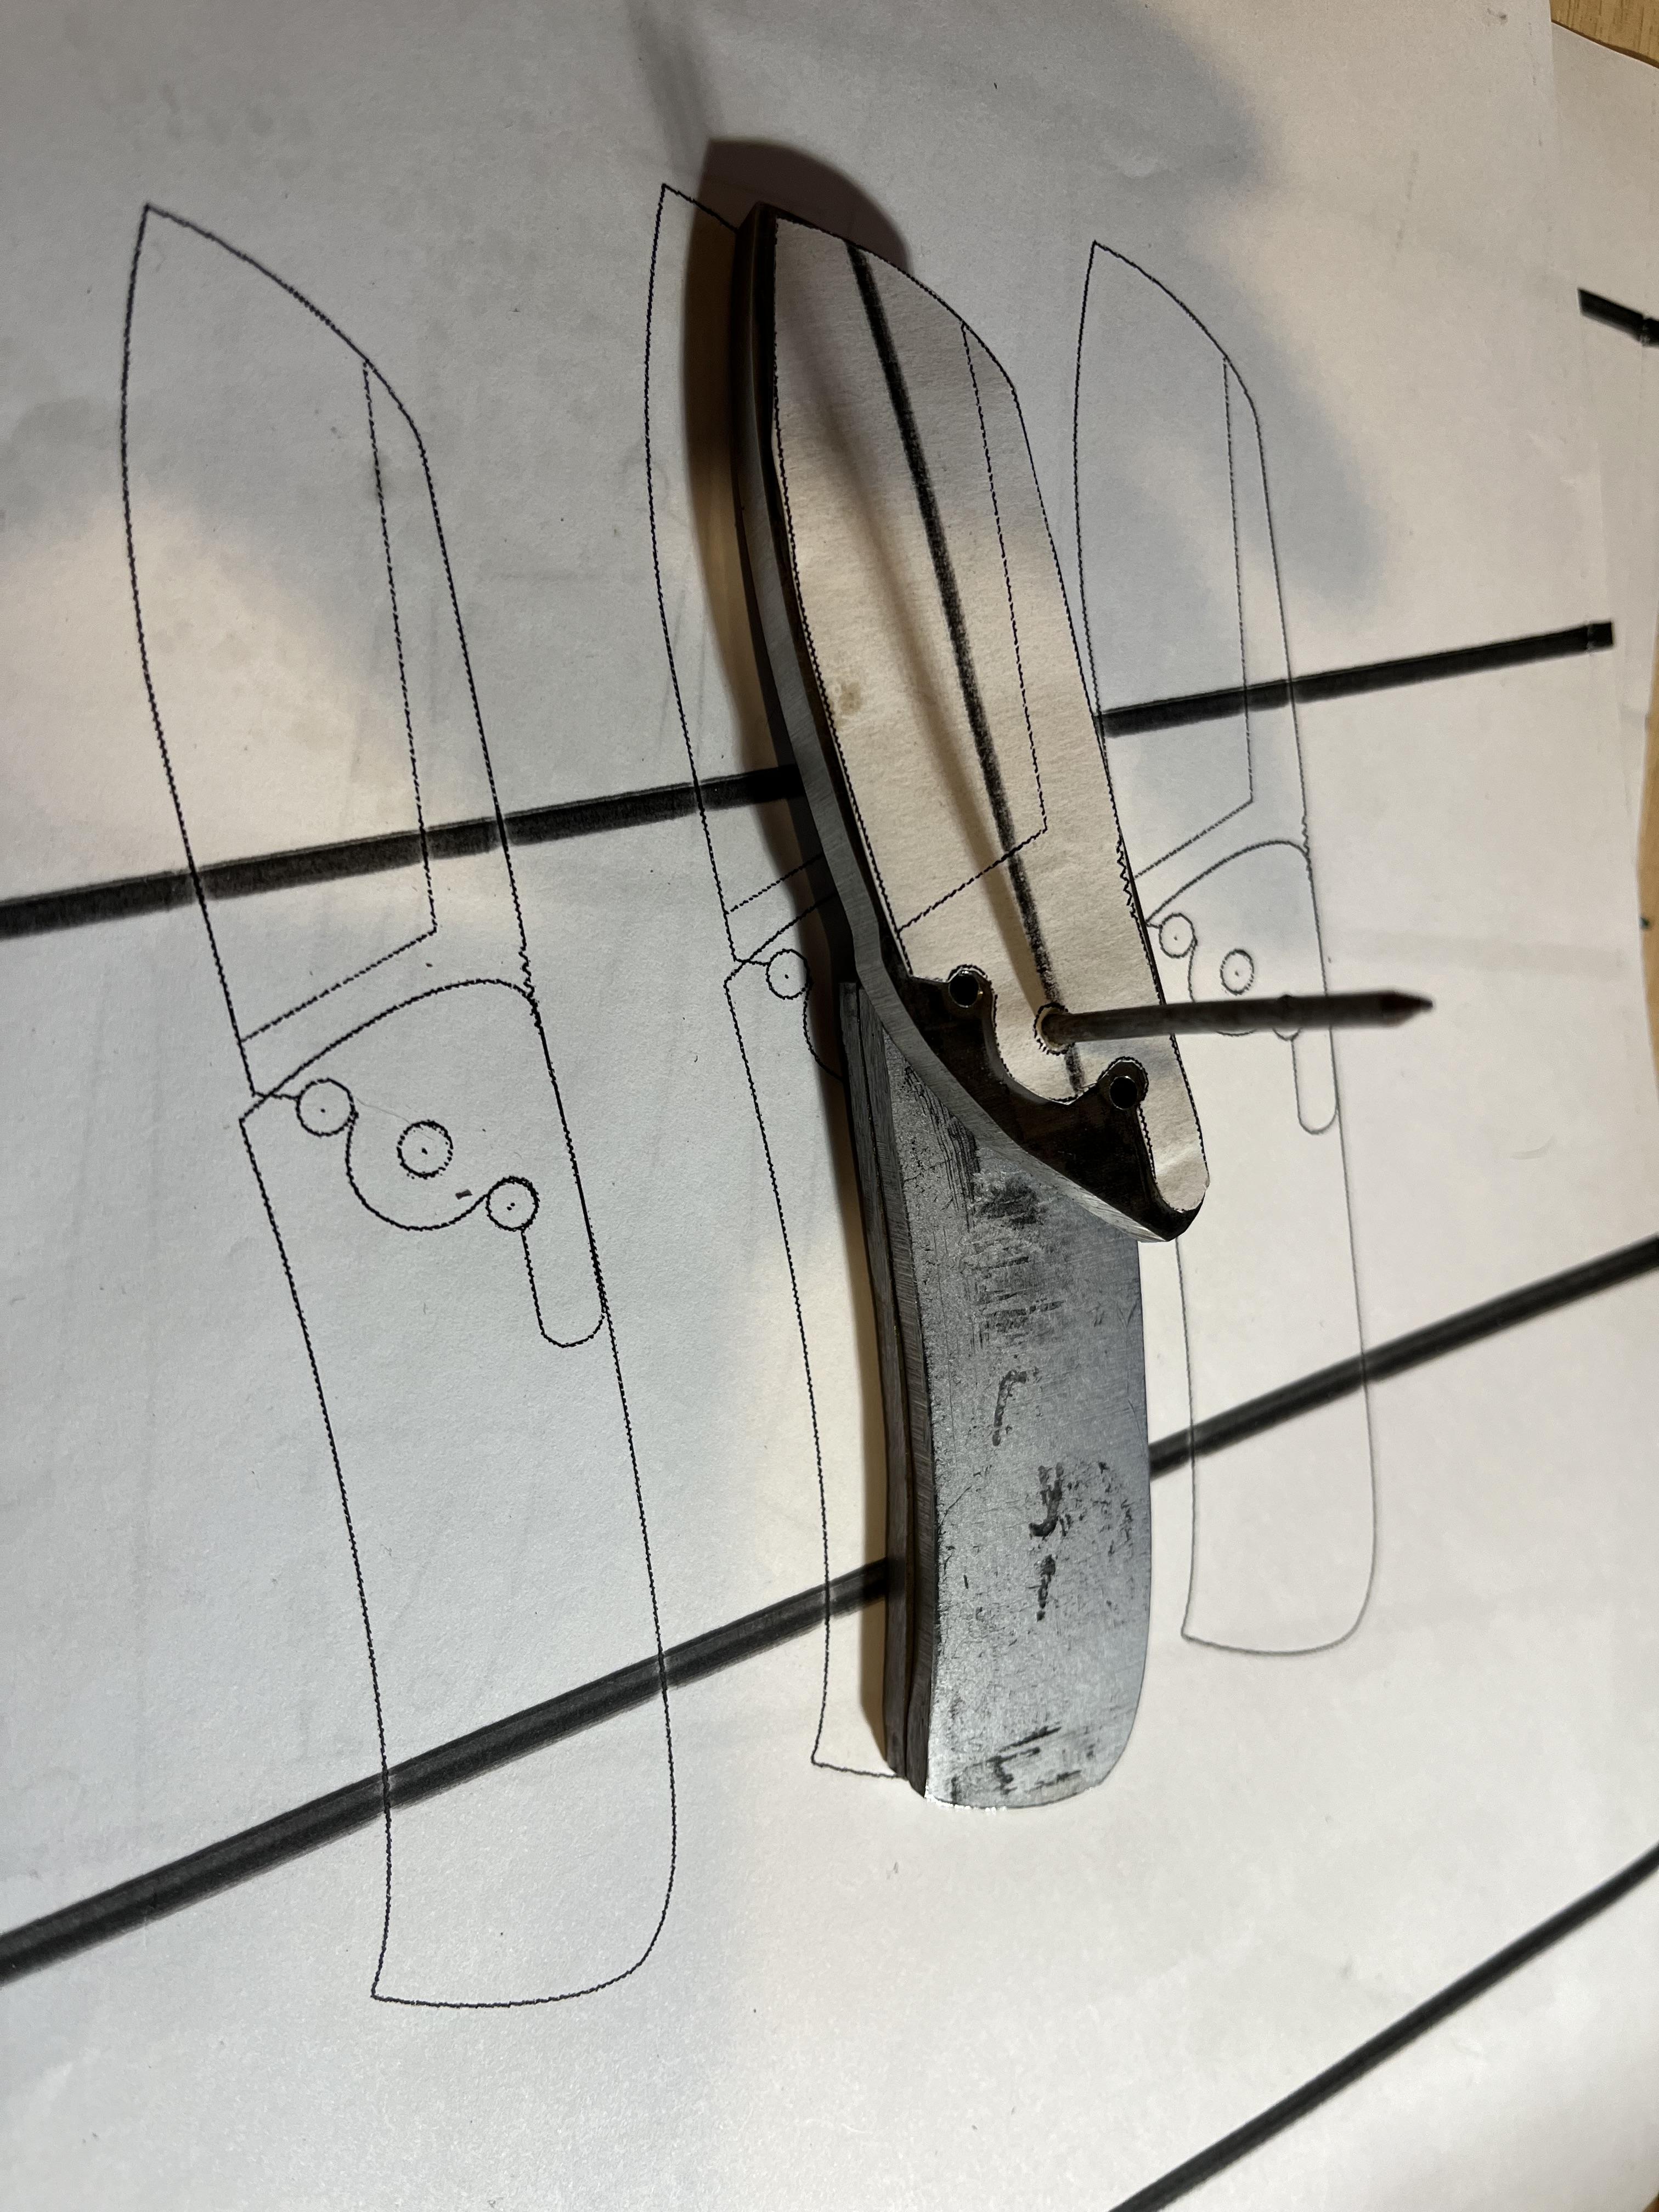
I started Mk.II of this knife. Going to use the same handle setup, but improve the guard and widen the tang. I'm also adding some length to the blade. While I was filing some rough cuts out of the tang, I noticed that the file was skating pretty hard on some bits that overheated when I cut the steel. I re-annealed the steel, and am making a file guide out of the scraps as metal clearly hardens enough to serve here. I also nearly lost some fingerprints pulling the blade out of my can of vermiculite. it's amazing how well that stuff insulates, even hours after heating.
-
the taper was intentional, but I will do it differently next time. I think I'll make the same knife again, but fix the things I didn't like.
-
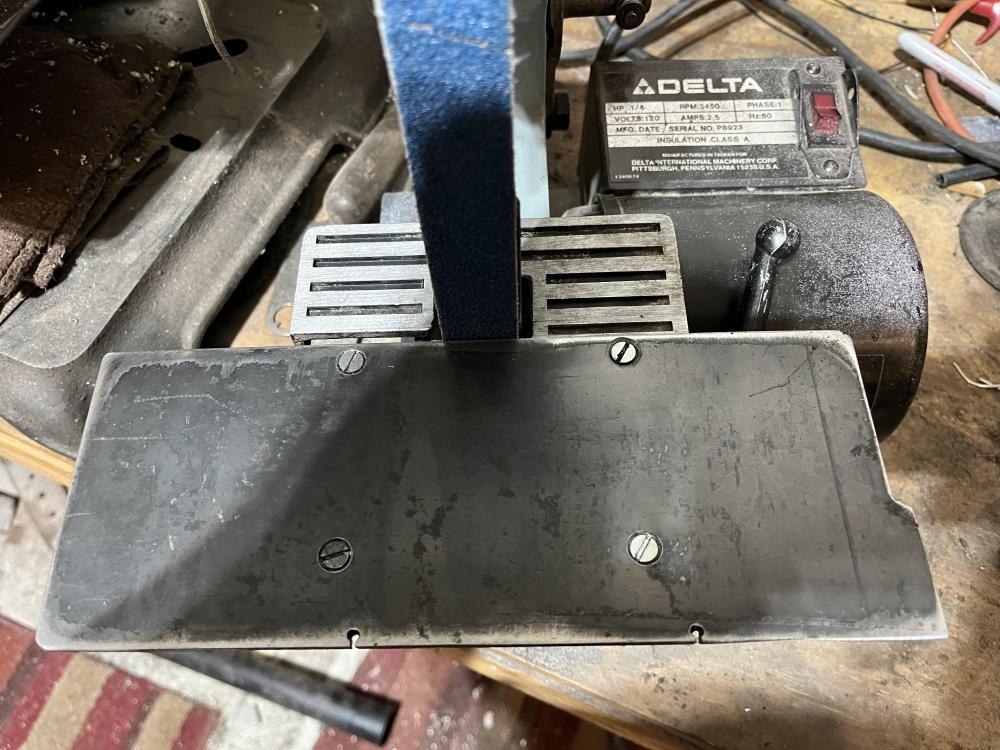
also: one important thing that I learned was that while 1x30 grinders can work just fine, you have to tune them a bit. I've been using my for 3 years now and didn't realize the tensioner arm was too tight and didn't pivot - apparently this is very common. because of this, the tracking knob couldn't really work correctly, and this caused uneven wear on the tracking idler wheel, which meant that even after I fixed the tensioner, the thing still wouldn't track correctly. This made accurate plunges impossible to grind, I couldn't line up the belt on the platen at all. I chucked the wheel in my lathe and reprofiled it, and it worked *much* better after that. the last thing I did was to add a steel plate to the table because those stupid grooves on the table made accurate grinds very very difficult.
-
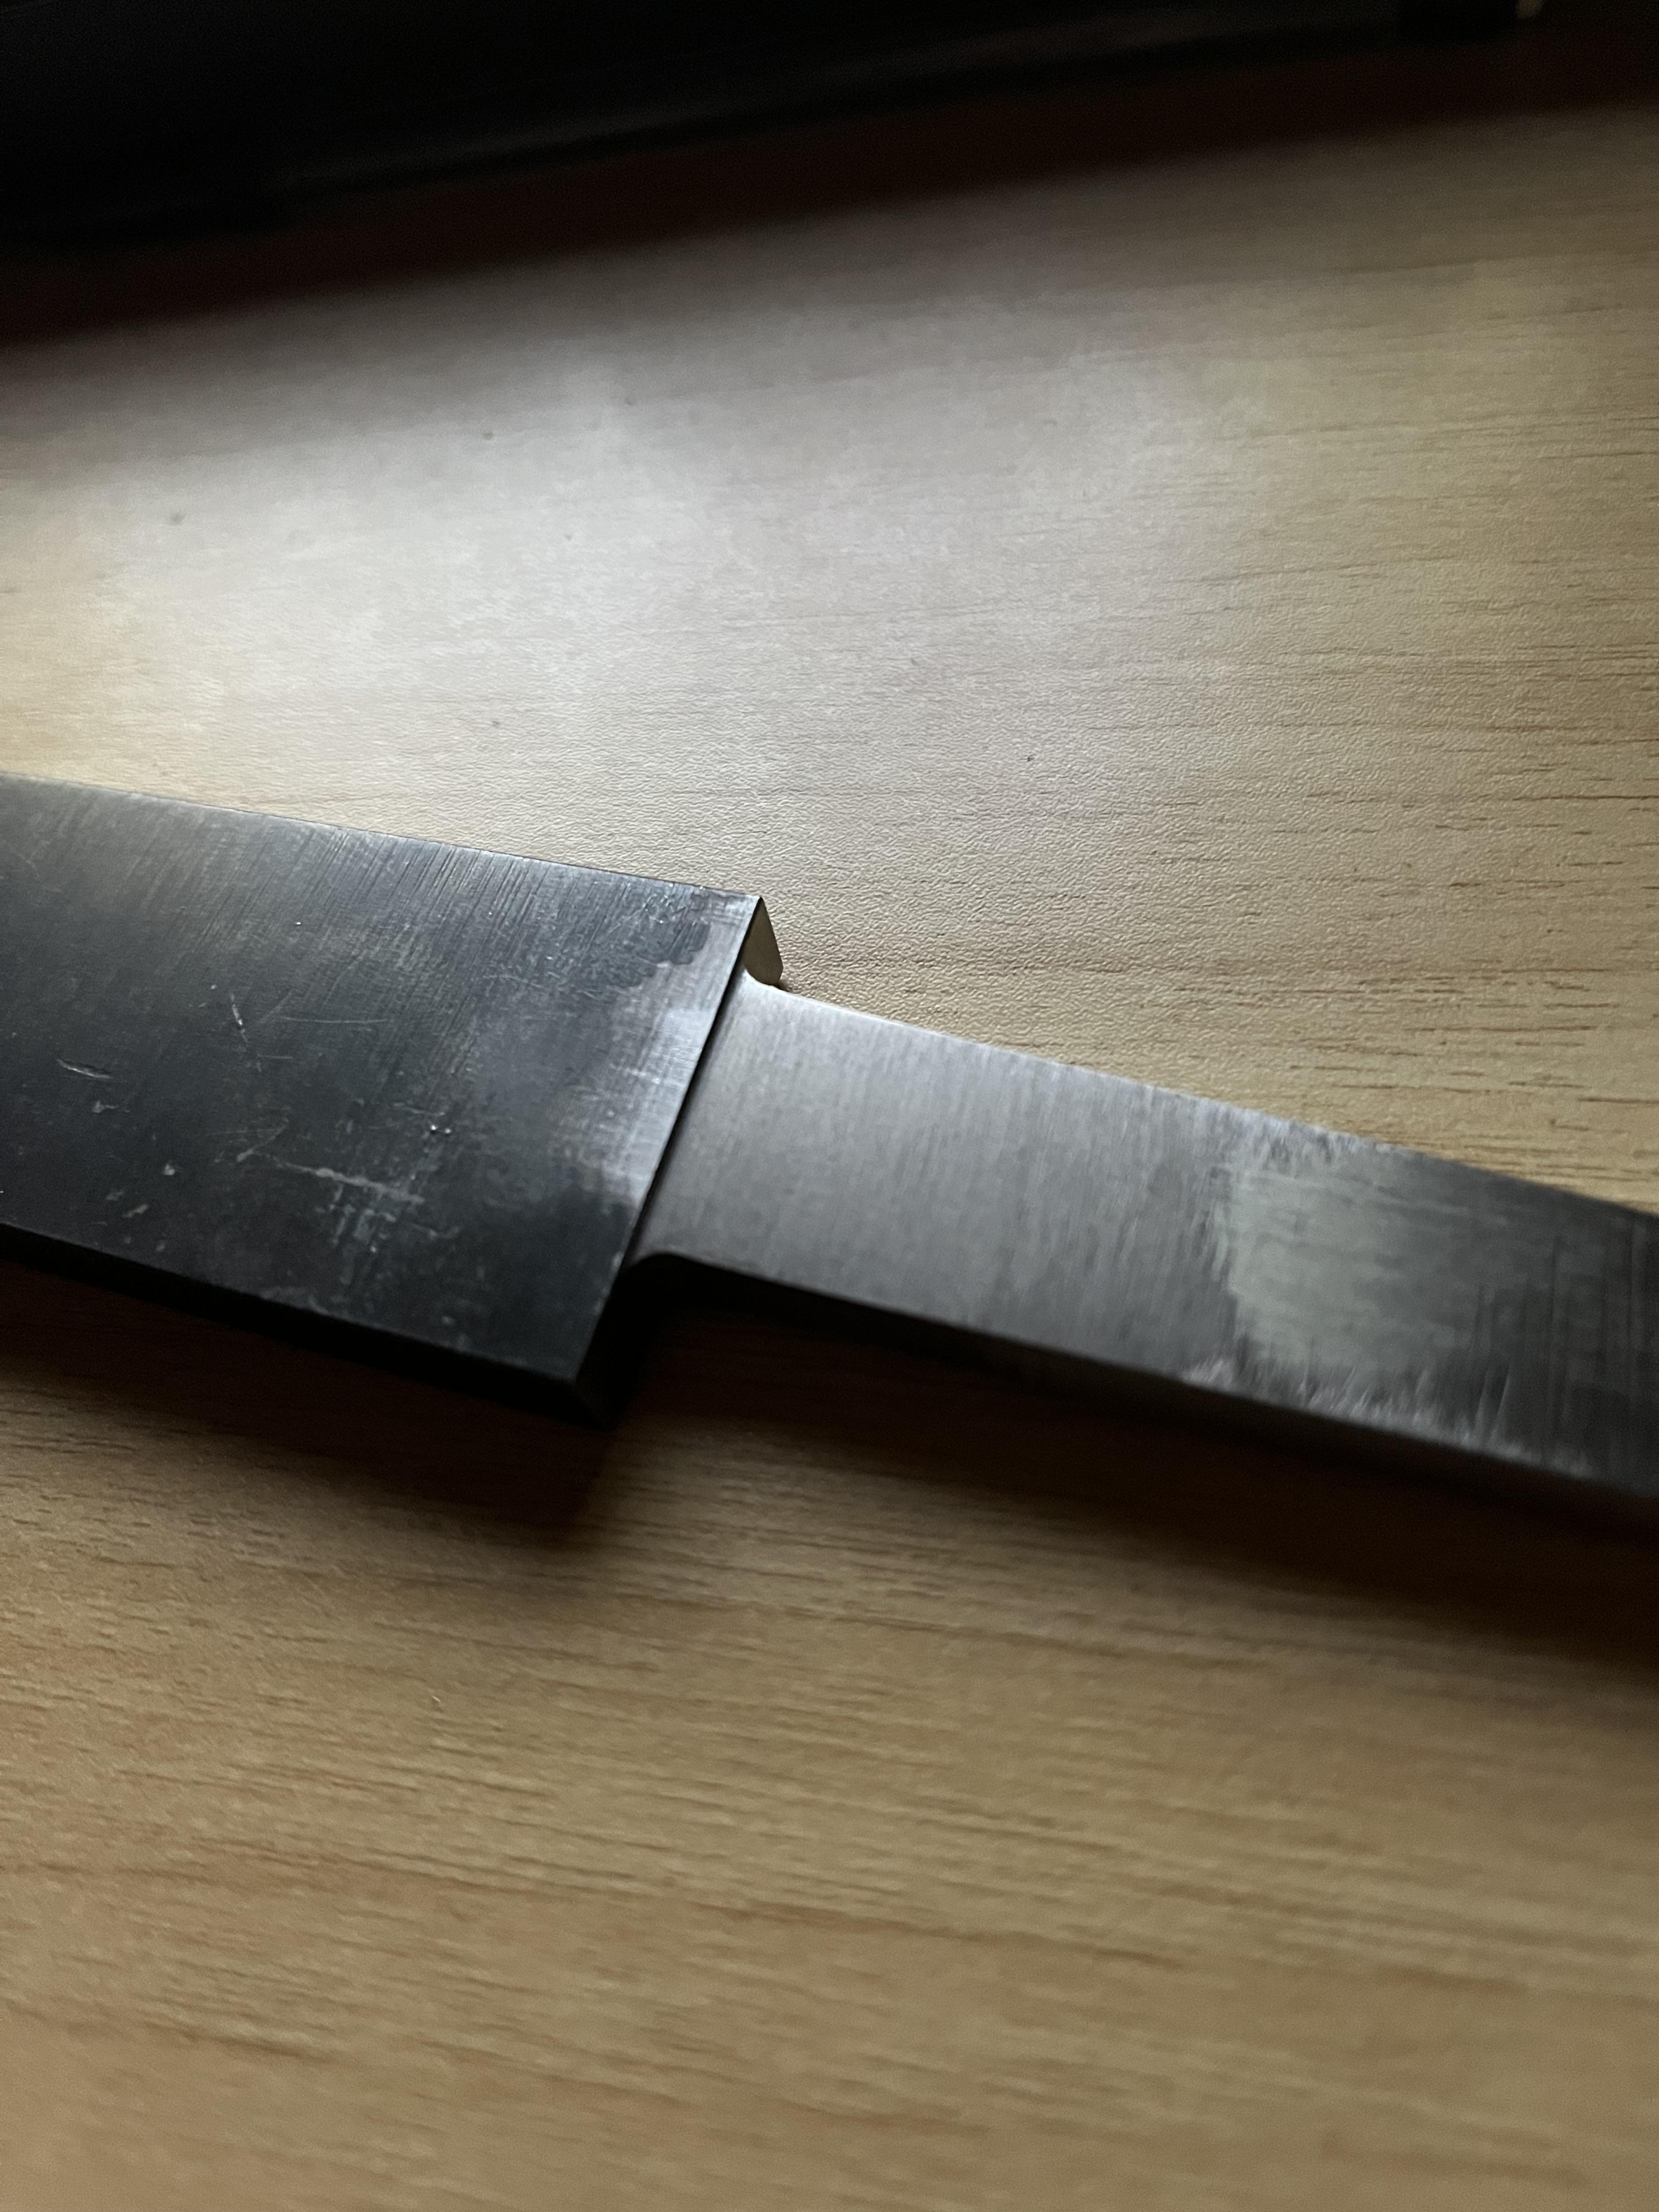
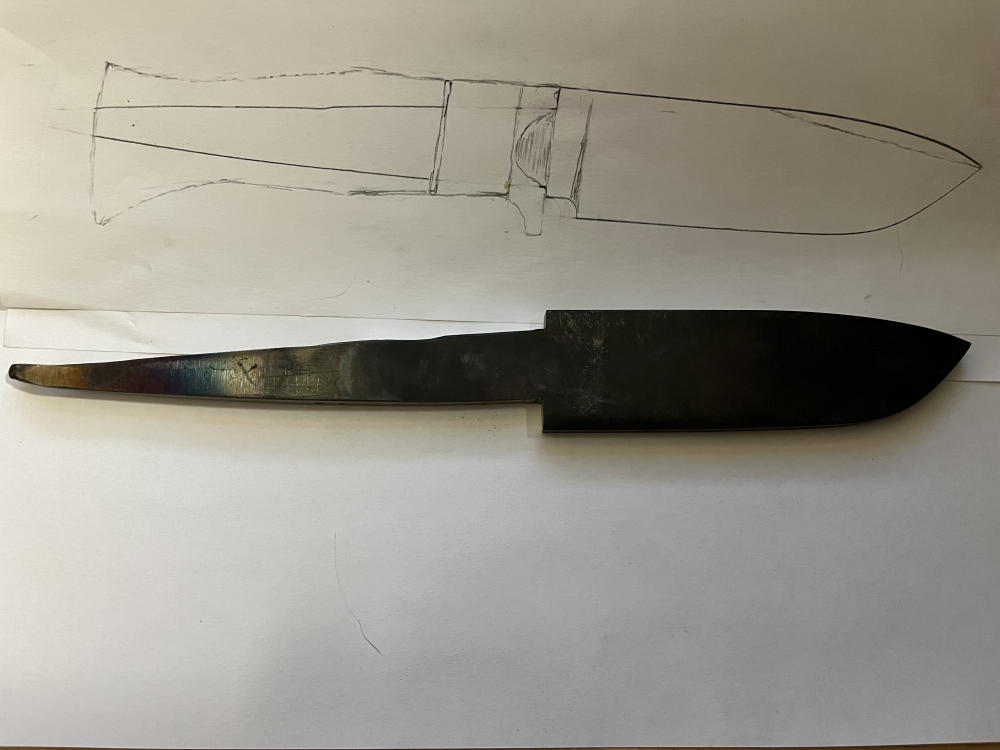
The tang is in fact the whole way in. what you see there is my inability to file a 90 degree angle accurately on both sides of the tang. I'll get it better next time. the gap isn't actually that bad, it's a trick of the light due to my inability to take good pictures. that's one of the things I don't like about this knife. I also think the guard is too thick; it could have used some sculpting. I couldn't figure out how best to do that with the tools I had, and after two years of sitting on it I got a little impatient. the handle shape isn't bad, but I should have moved the thicker transition portion further up towards the guard. I should also have narrowed the back end of the handle a bit, I think. I just freehanded the thing on my 1x30 sander. the blade finish wasn't bad, but there were some fine scratches that I should have spent more time on. I am happy about the blade shape. In all, it's the best job I've done so far, but there is a lot I could do to improve it. I gave the knife away to a guy that had donated a bunch of metal and walnut to me. The other I gave to a guy that gave me a bunch of antler to work with. I don't think I've made anything yet I would feel good about charging money for, so it's just practice so far. templehound: do you have a rule of thumb for tang width?
-
Guys, I apologize for my outburst, it isn't like me. I've been so touchy the last couple of days, I've been like a moody teenage girl. It turns out the medicine I'm on for an infection has some serious side effects on mood, and I had to stop taking it today (levaquin). I've been making mountains out of molehills instead of knives, sorry.
-
fair enough, it's in the terms. their site, their rules. it rubs me wrong that I had posts recently (and not so recently) removed entirely and silently, no warning, no message at all, and this was just a final straw. no offense intended to anyone here otherwise.
-
There were no actual swear words in my post, and it's not the only time I've had content changed. I'd like to think I've been polite, but oh well. good luck with your site, I'm out. feel free to delete my content.