JCloss
-
Posts
27 -
Joined
-
Last visited
Content Type
Profiles
Forums
Articles
Gallery
Downloads
Events
Everything posted by JCloss
-
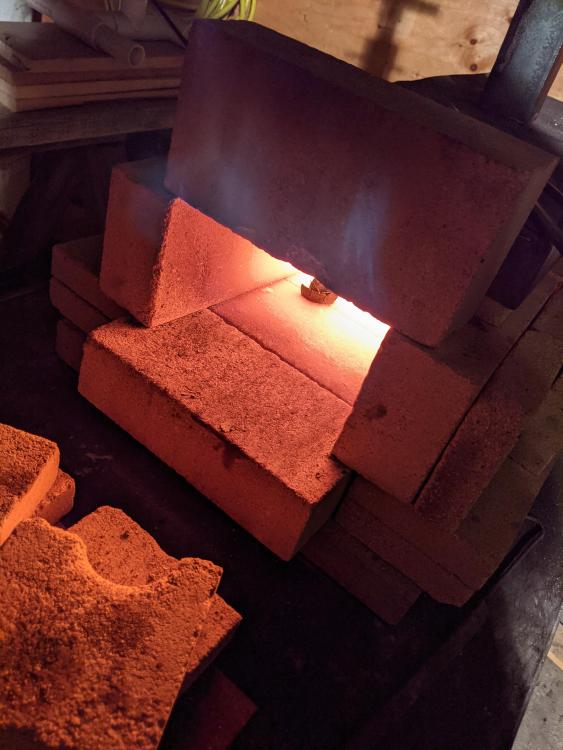
I notice the dragon's breath from the back of the forge appears to be burning burning rich, although the front is blue (which I understand to be ideal or possibly lean) My understanding is that blue=gooder, yellow=badder, as yellow flames are an indication of CO formation? Likely this difference is because of the difference in pressure between the two exhaust ports. The front is further and as such the propane must mix with the rest of the hot air in the forge as it comes out the mouth, possibly resulting in a cleaner burn? The rear, where I've moved those bricks closer means that some unburnt fuel is likely rising and burning off before it has a chance to mix with the extra air in the chamber and is combusting as soon as it finds enough outside air to mix with to allow it to burn. I'm kind of just spitballing here as I try to understand - please anyone feel free to correct me. I should qualify the blower I mentioned too. I called it a leaf blower, but that might be generous. It's a variable speed blower motor from Amazon, marketed as a small corded leaf blower. It is running about half speed (I know that doesn't mean much) and has a 1.5"-ish outlet. That is redneck gasketed to some 2" PVC with a ball valve set to about 1/4 open , then runs through about 8" of PVC. The PVC runs into iron pipe for about 36", hits a 90* elbow and runs through a reducer into the burner nozzle.
-
Last night we turned down the air a bit and turned the fuel down a little bit as well. I think it helped with the scale. We had more dragons breath, but it was softer looking if that makes sense. I may have flubbed my testing because I also moved some half size slabs of fire brick inside the rear of the forge to cut the length down closer to 18". This did seem to move the heat further out front and didn't get in the way of anything we were doing.i took pictures once it was hot, I forgot to take pics when it was running cold before it came up to heat.
-
A new horse-head. Last night I tried a new "2-heat" horse head. I can see doing it in two heats if you have enough practice and the right tooling, for me it took closer to 6. I need to make a better cutting chisel, the one we have now doesn't seem to work very well, probably because it's meant to be a cold chisel, and it's very cheap. The first one I made turned out pretty ok, the next two hit the scrap pile. I managed to improve certain aspects, but ruin others. Usually related to how messy my chisel cuts were. I was using a piece of plate on top of the anvil to cut on, as our anvil doesn't have a cutting shelf. Let me know what you think of this method, I found it as a set of written instructions with diagrams on iforge.

-
I'll try and spark test one as soon as I get the chance and report back. For some reason I suspect mild though.
-
Duncan, that's awesome, thank you for the offer. In return, once restrictions relax, if you'd ever like to join us to hit metal at our smithy just let me know. We usually get together Wednesday evenings and Sunday afternoons, but our schedule is pretty flexible.
-
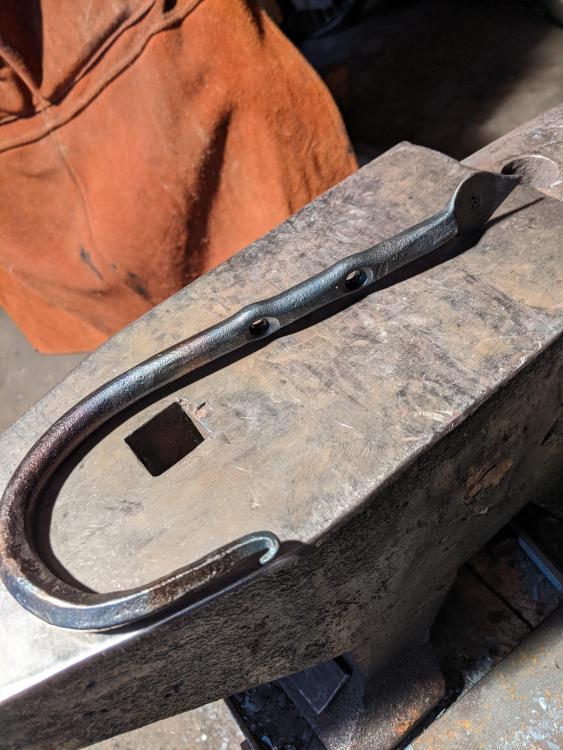
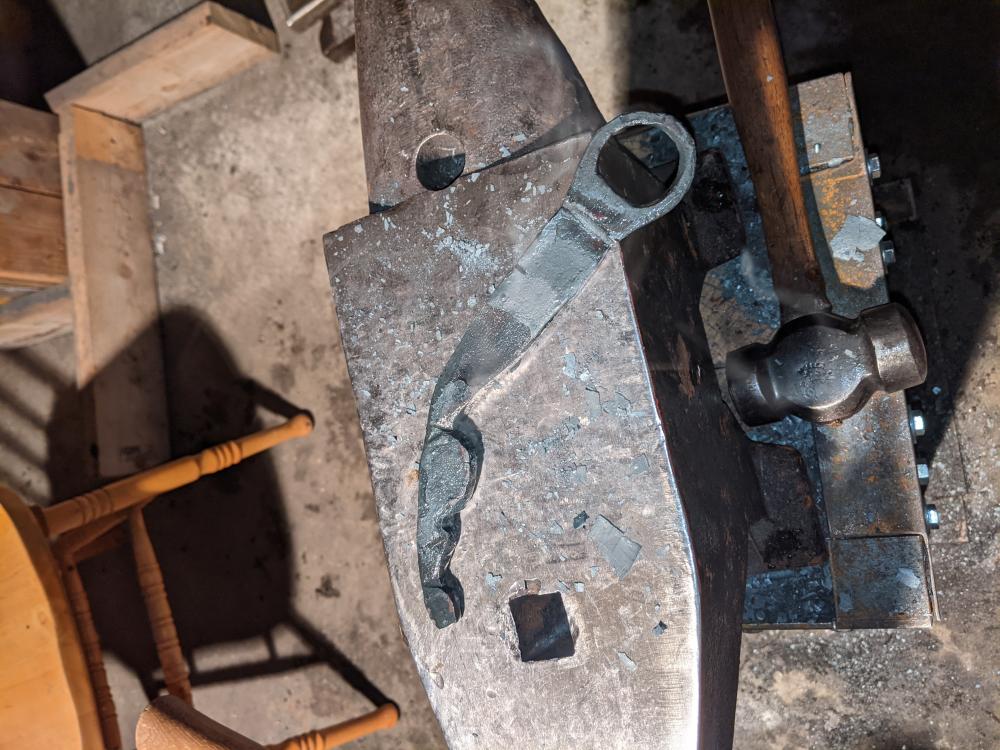
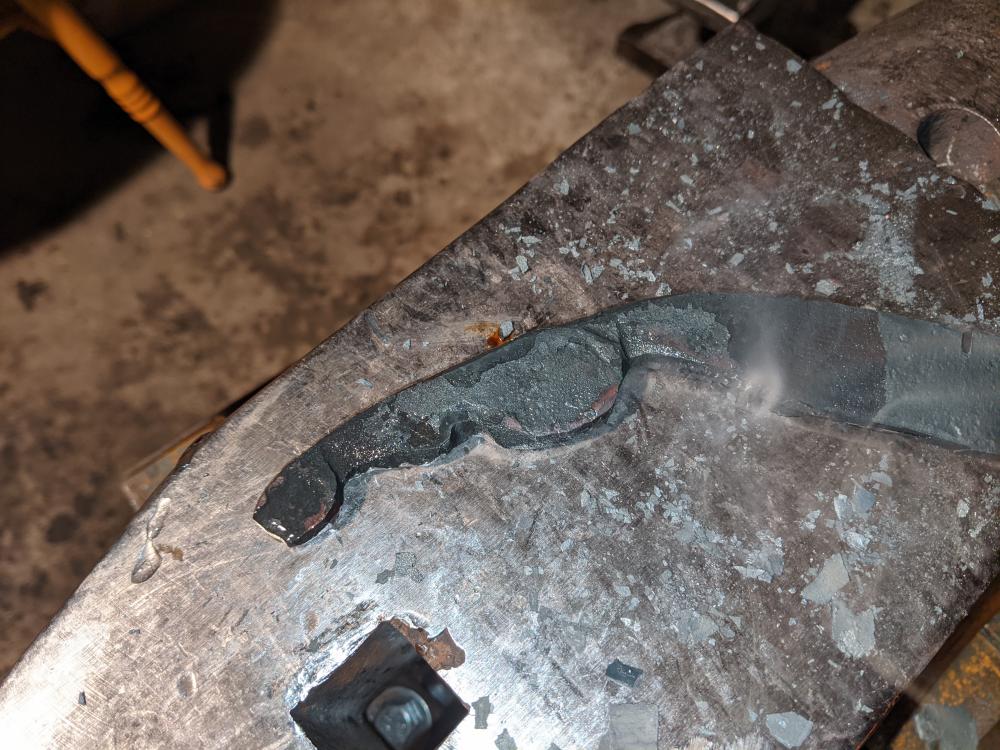
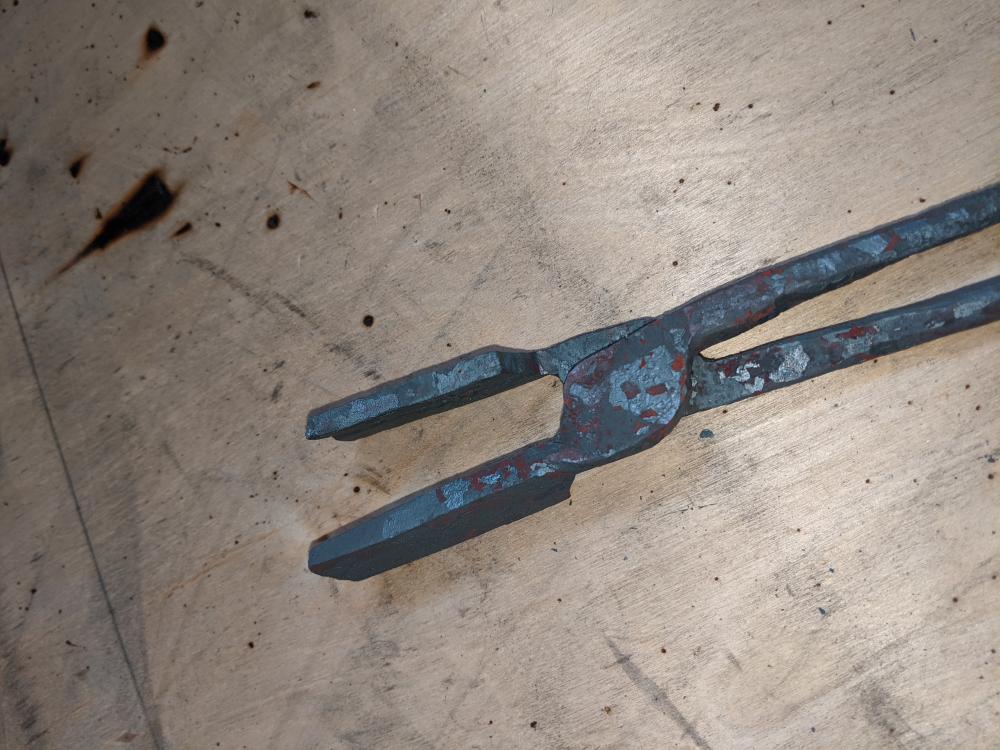
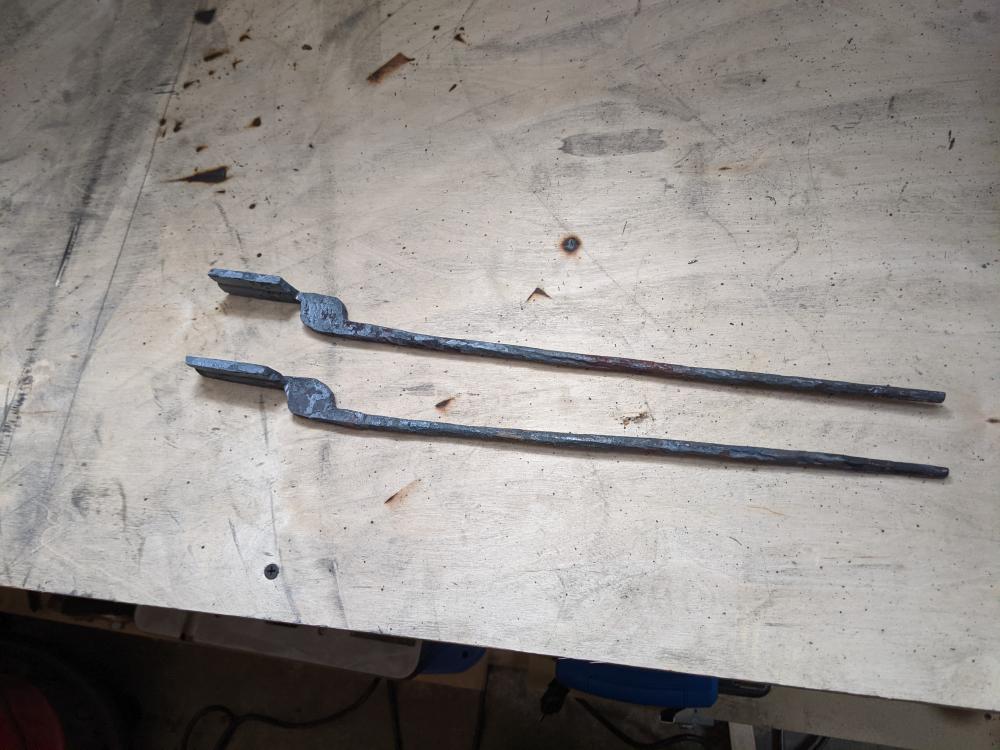
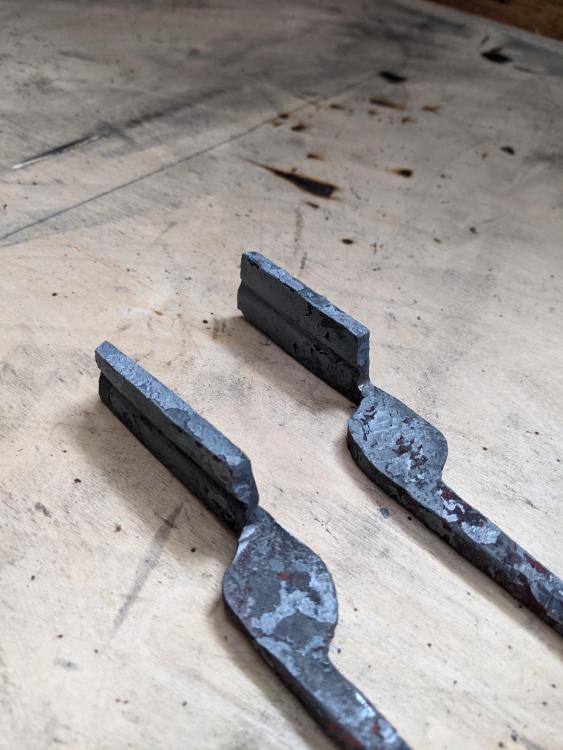
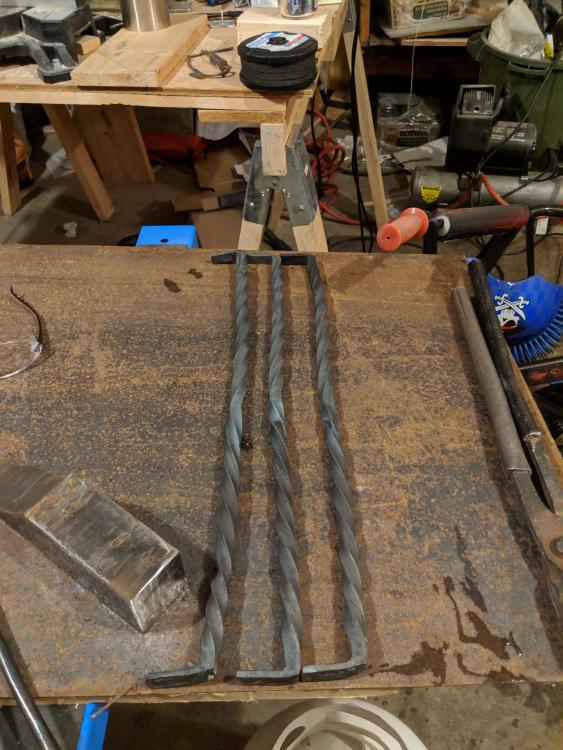
I hope it's ok to create another one of these types of posts. I'd like to share things I have made and continue to make, but don't want to make a new forum thread every time I have a success or failure to share. I'll start with something recent - this is what is probably the nicest plain hook I've ever made. It started out as just something to do from the scrap bucket but the spade turned out so nicely I decided to try something new and punch holes in it. It seems weird that I've been blacksmithing for 4 years or so and this is the first time I've ever hot-punched holes. I'm quite proud of how it turned out - I feel like it shows my development because there's no way I could have done something like this when I started. The following is in my introduction post as well, but it might relate here so I'm re-typing it. About 4-5 years ago I got quite into watching different blacksmiths on youtube. Eventually I figured I could do this too so I took my propane swirl construction heater, a ball-pein hammer and a chunk of mild steel and tried to make my first taper. It was a resounding failure. My enthusiasm soon turned my friends onto the idea and as one friend had a mostly unused shop and an oxy-acetylene rig we decided to try things. We found a scrap of steel to use as an anvil, a couple of firebricks and made a corner to shoot the flame from the torch into. We were able to make some janky looking leaves and from there we expanded our new hobby. One of those three friends, Ken, passed away last year. The smithy we have built in his shop continues to be an ever expanding thing. We just finished a basic renovation and cleaning and are working on plans for our third forge iteration. (not counting the heater or the oxy torch rig). His daughter has been spending a bit of time in the shop recently learning some basic things to make some projects for school. My oldest daughter as well has experimented with forging school projects and thinks it's pretty cool. Originally I just wanted to make knives (I was hand filing knives then), but since dipping my toes into blacksmithing I've kind of wandered away from the idea of bladesmithing, but I hope to get back to that one day. I like doing cool mild steel projects like the quilt ladder I posted here earlier today in it's own thread. On the go right now are a 2x72 grinder build, a post-vise I inherited from my step-father that I need to go collect and re-habilitate and a lot of tool making as we revisit the basics and attempt to actually get better. Right now I'm too green to even be called an amateur, but I'm doing my best to get all the knowledge and practice I can to improve. I really enjoy teaching people things, so one day I'd like to be good enough to teach classes or do live demos. My first horse-head. My friend has made a few of these that he's not happy with over the last two years. I decided to follow his hand-drawn instructions and see if I could make it work. When I showed my wife the pictures she asked what it was supposed to be. I think I understand the concepts though, and I feel like I could improve the techniques with practice, so this is going to probably be an ongoing exploration of mine. I enjoy horses in RL, in fact I used to work at a guest ranch and help with trail rides and whatnot. (I even dressed like a cowboy, but when I got tired of it (I was only 18) I shaved my hair into a mohawk and dyed it green right before I quit in the late 90s.) The other end was supposed to be a bottle opener, but it's pretty rough forging - this whole thing is a scrap practice piece. I think I'll cut this head off and do another with the material that remains. First tongs About 3 years ago we started on a pair of tongs from flat bar following John's tutorial from Black Bear Forge. Before that we were holding everything with vice-grips. I picked up some tongs from a closed school metal shop and so since we now had some, we stopped working on the ones we started. After cleaning the shop over the last few months we found that abandoned project and decided to finish it. We ended up fairly close to even being that one of us worked on each boss and bit. These will hopefully get finished at tonight's session if I clean them up on the grinder at home before I head to the shop. They're light, they're rough (especially the drawn out reins) but I have a feeling we can make them work with a bit of filing and grinding.

-
Thanks folks. JME1149 - yeah, this is one of the reasons we overbuilt the length in our forge, it's nice to be able to evenly heat long stock. JHCC - indeed, and I did do that, but wasn't able to (or gave up on) getting them completely straight. One side clamped in the vise and the other end held by a "voice activated stand" (ie, friend with a wrench) meant they were severely out of whack when I was done twisting them. I never thought of a baseball bat as a wooden mallet substitute. At this point we didn't have a wooden or leather mallet, and still don't, so the top was a small piece of board held in tongs hit with a cross-pein, the bottom was a larger scrap of board on the concrete floor (which is the same way I dish things as I don't have a swageblock). Time to solve that missing tool problem!
-
Planning a new forge - comments and suggestions welcome
JCloss replied to JCloss's topic in Gas Forges
Those thoughts will be kept in mind - thank you! -
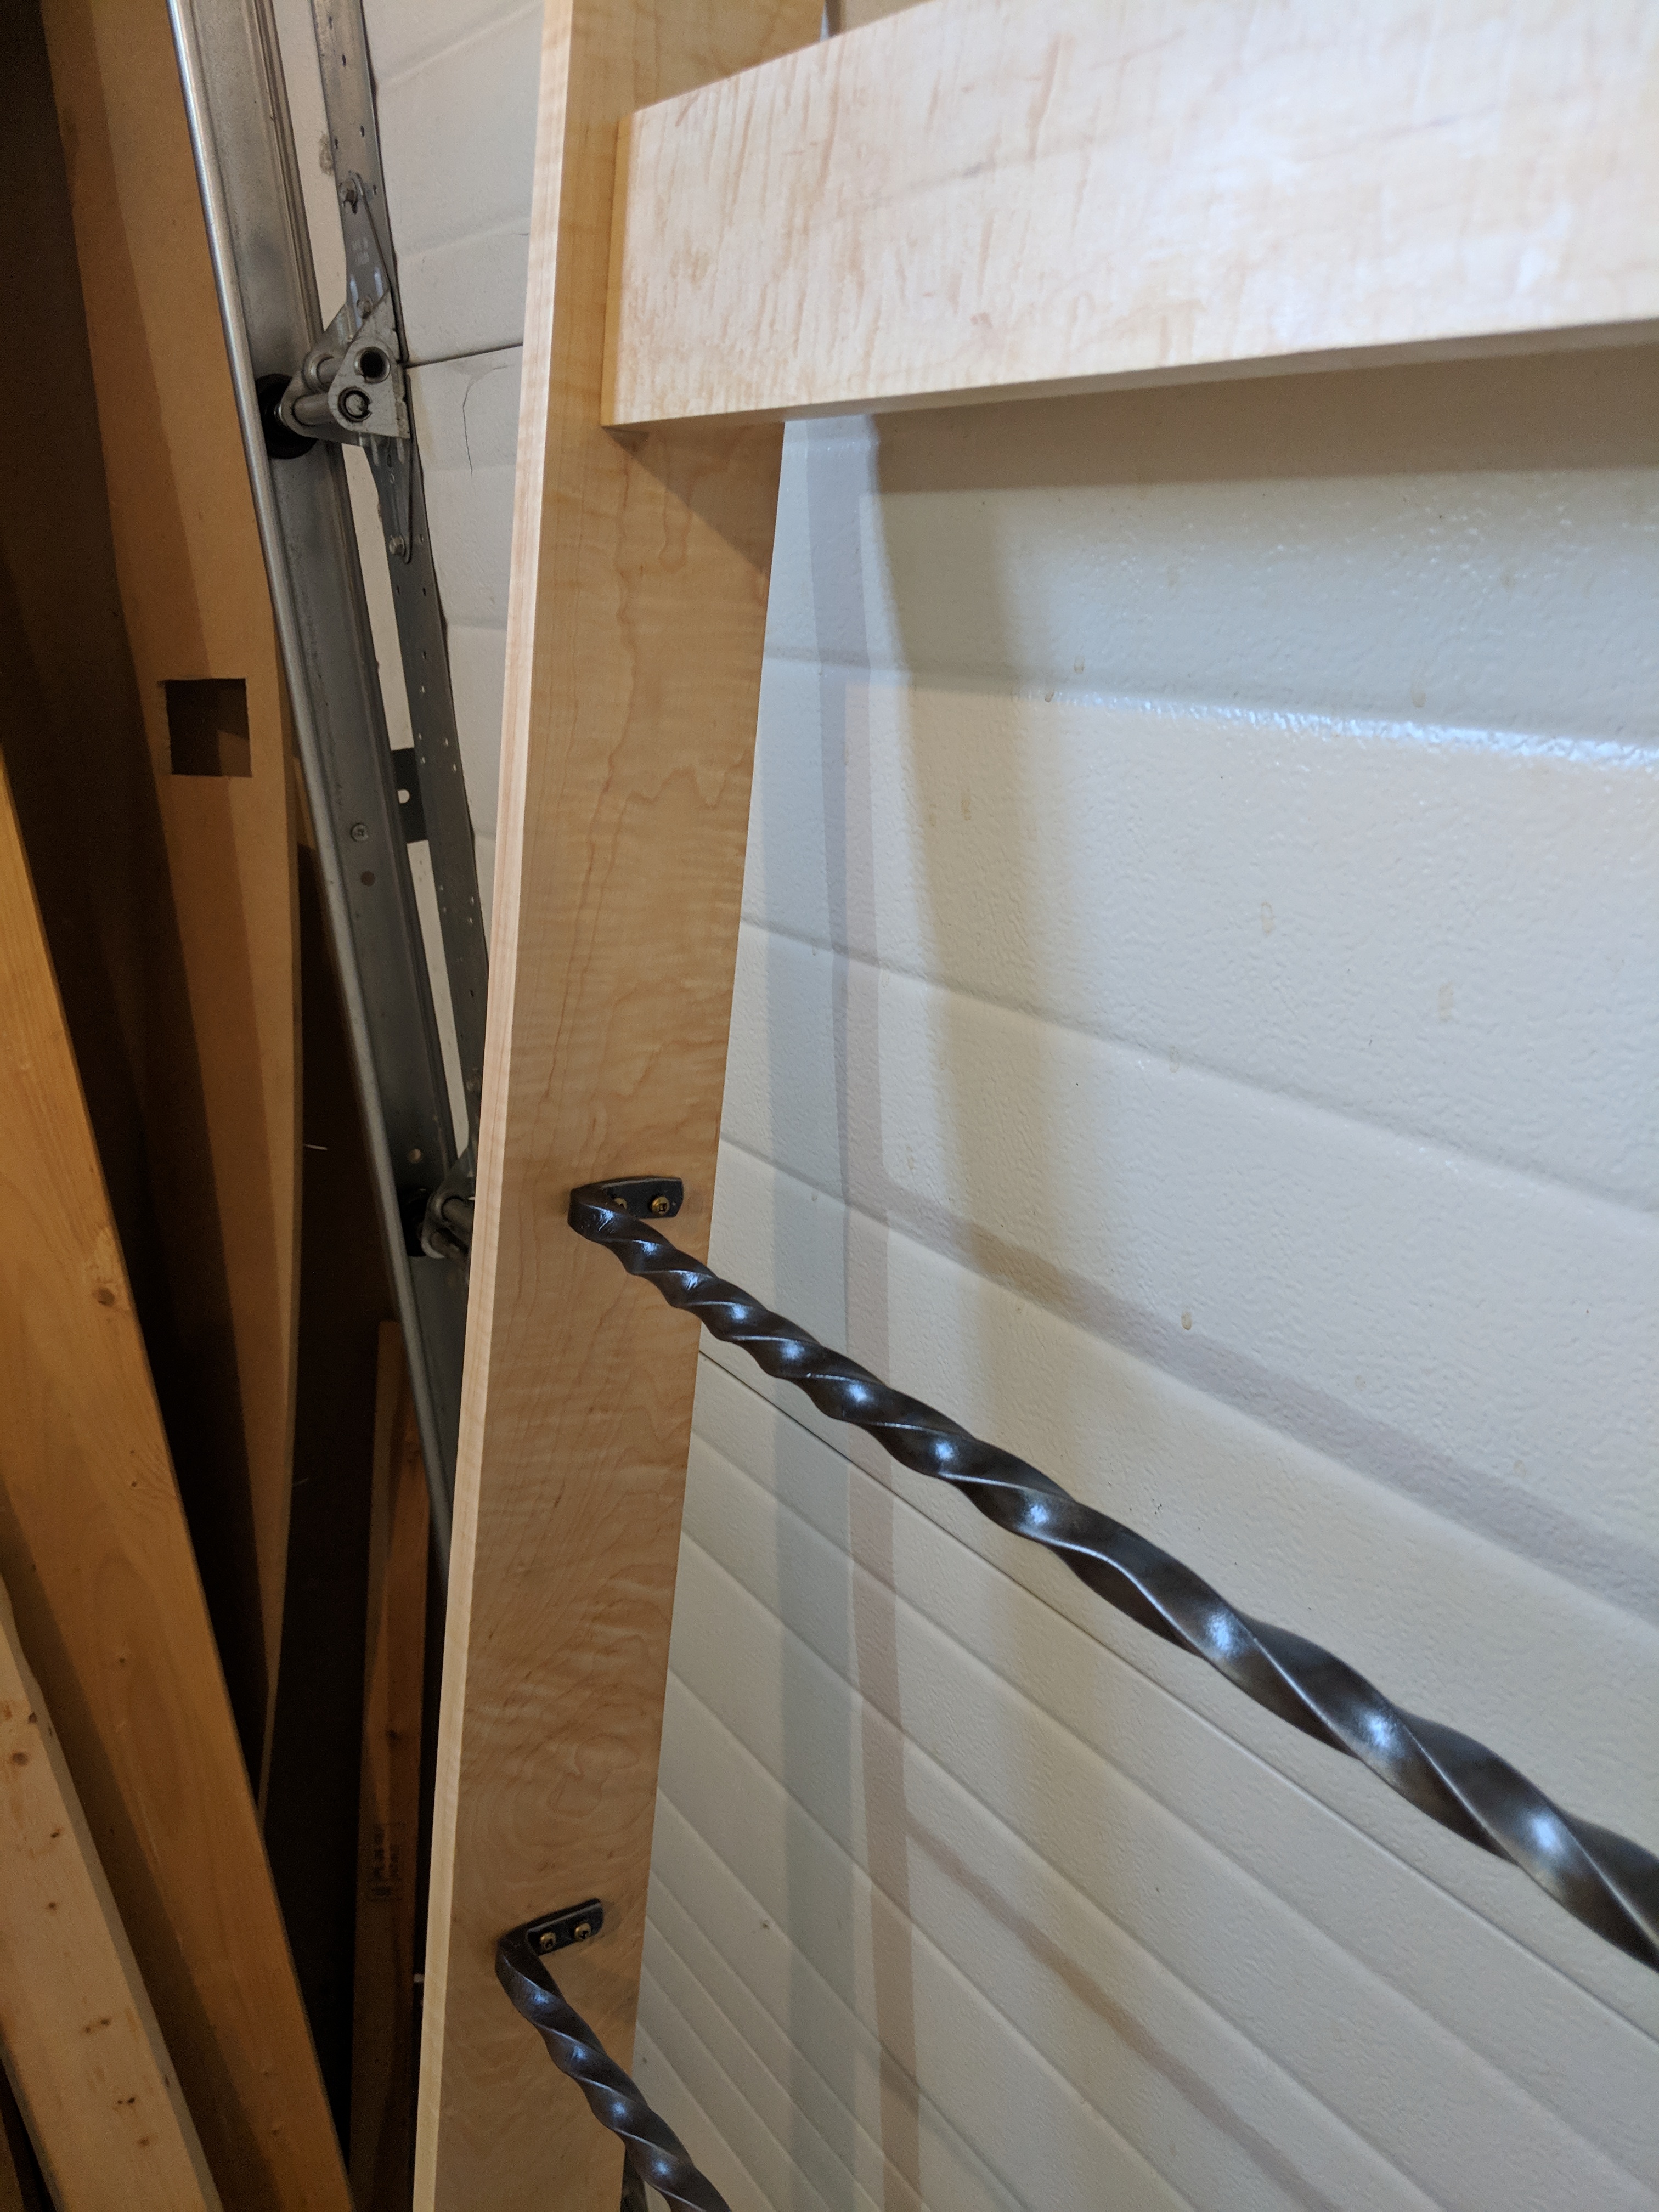
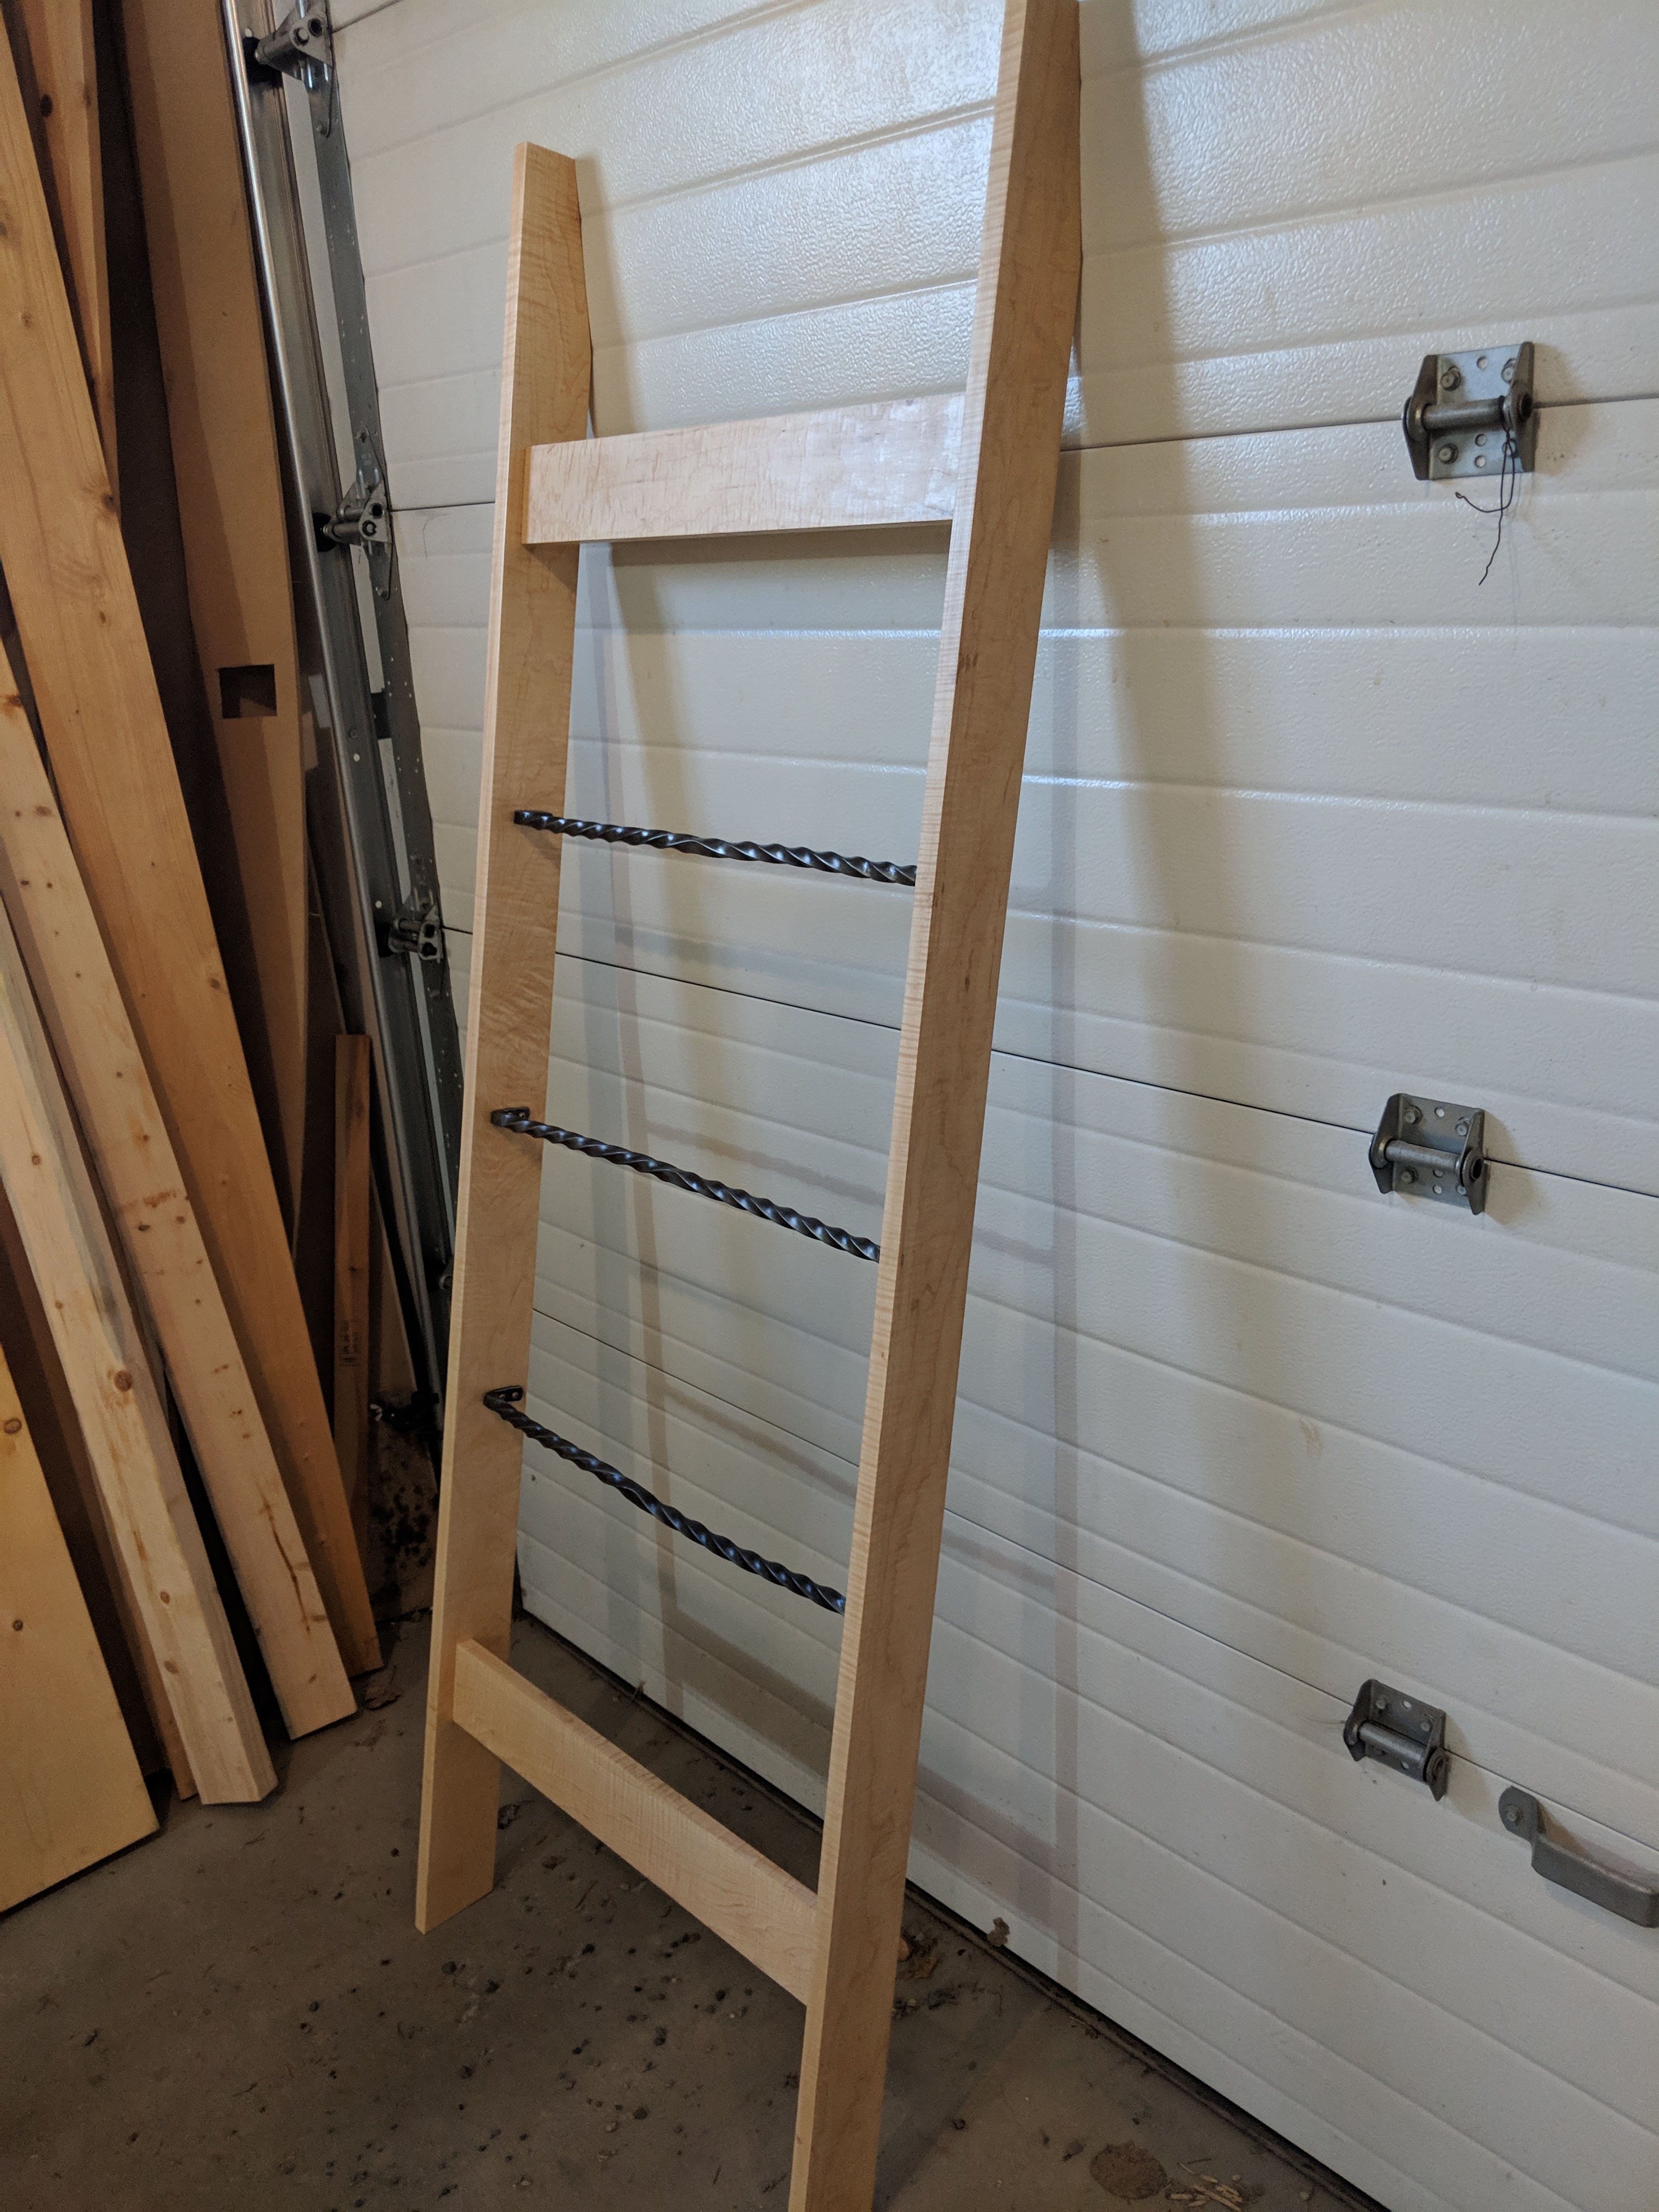
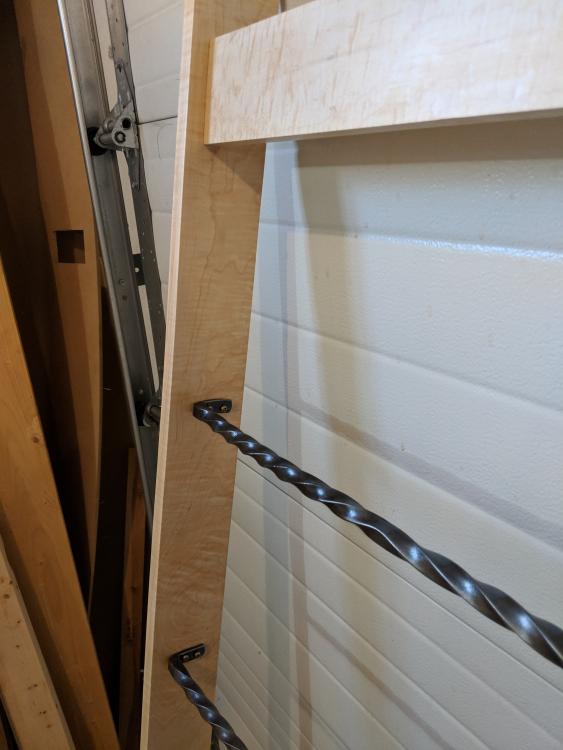
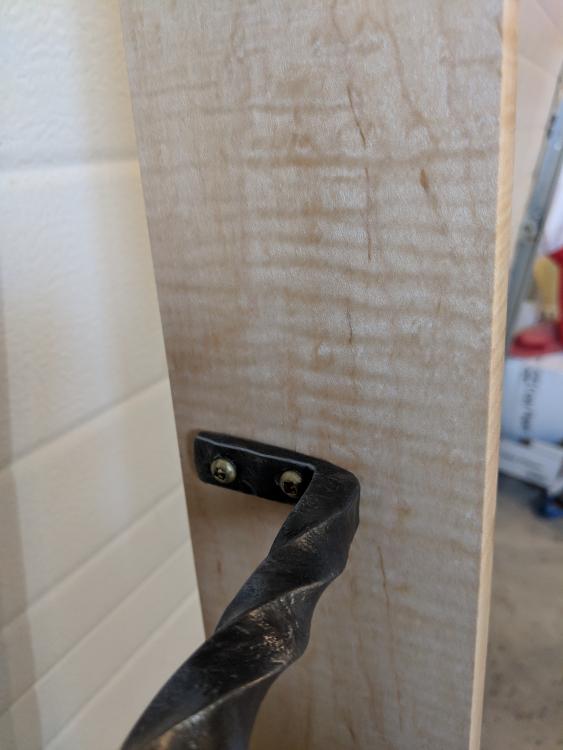
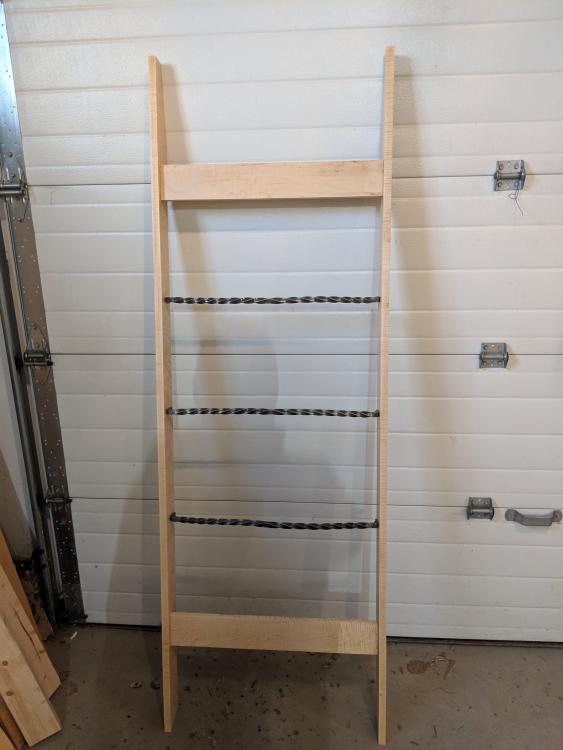
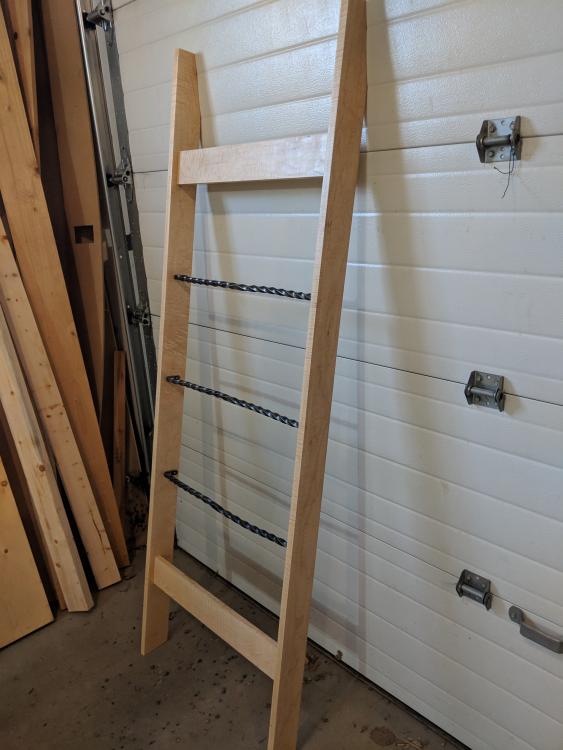
This is an older one of my "weird" projects. My MiL wanted a quilt ladder for Christmas and I decided to combine my interest in blacksmithing with making things from wood, my other expensive hobby. I know there are some I'm straight bits, but I did the best I could to invent the pieces here as I went. 1/2" square, not much forging involved other than the twists and isolating some pieces on each side to fold up for the screw flanges. This was pretty early on in my work and so I was just pleased as punch to have managed to craft them with only a very small variation in length. Finish was wire brushed and sprayed with a transparent coating, can't remember what I used for sure.
-
It occurs to me that welding a roller on the bent part and using it as a stand would mean if you tipped the thing backwards it could lever up onto the roller/caster and be mobile. Good idea. Thanks for all the good ideas so far folks!
-
We have four of them, so that's a solid chunk (about 160 -200lbs) worth. They don't take up too much space and we have our shop recently cleaned and renovated with some actual steel storage area, so for now it's not hurting them to sit in the 'do something with one day' pile. The idea of trading them in at a scrap yard is maybe a good idea, but I'm not sure if there's conditions attached to the salvage ticket he had to get from the mill to take them. (he might not be able to re-sell them, but trading might be ok) I live and have grown up along the "Gold Rush Trail" in BC, so "leaverite" is a common term here for anything shiny and looks like gold, but isn't. I'll start using it in it's more holistic meaning.
-
Planning a new forge - comments and suggestions welcome
JCloss replied to JCloss's topic in Gas Forges
The advice here has been helpful folks. The new plan (better than the old plan, but still rough) is to trace the shape onto some thin steel, shorten the height and shorten the overall length. The floor will be ceramic blanket insulation with castable refractory insulation (we're debating Mizzou for this vs Kast-O-Lite) instead of replaceable brick and the internal insulation will be 2 1" thick ceramic blankets, rigidized and coated with about 1/2" castable refractory insulation. (This will probably be Kast-O-Lite 30?) We're still wanting to do a multi-port (ribbon) burner or two, blown not NA at this point but I'm still researching burners in the appropriate threads. I'll continue to update this as we continue to plan. Right now the dimensions look like they'll be 16" long vs the 20" we were originally planning (we have 27" length now), the D-shaped opening likely to be 4" vertical plus 2.5" diameter and 7.5" wide. (I'm still trying to convince my friend that the cubic inches saved going to 4+2 high, by 6 wide is worth it.) Essentially, I wanna build it smaller and he wants to build it bigger. He is very much against any exposed ceramic wool for obvious safety reasons, which I am too. He's seen a lot of pictures on the internet of bottle forges etc that don't have the wool properly covered with castable refractory and for that reason has the idea that that's the only way they turn out. I'm still trying to convince him that ours doesn't have to be like that. We haven't debated the floor completely. He would like to do Mizzou (spelling?) as that's what we're planning on getting to cast the burner(s) out of, and we understand it's wear/impact resistance is better than kast-o-lite. I've been reading about high alumina kiln shelves, and so will be doing more research in that direction. I think either will be better than hard firebrick. (I did like the idea of being able to pop worn firebricks out and replace them over time though, any reasons for keeping that idea that I'm missing?) We have wanted to do a re-emissive coating in our current brick pile forge for a while now but haven't been able to get hold of any ITC-100. Mikey pointed me toward some other options, so our new forge, when eventually built, may have a further re-emissive coating applied to the inside. (Although we're not likely to get fancy and mix it into the castable refractory insulation like some people around here have tried that are both smarter and more experienced than me) -
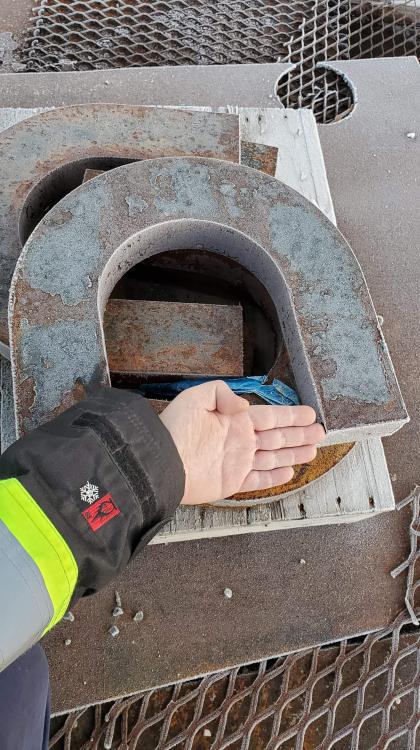
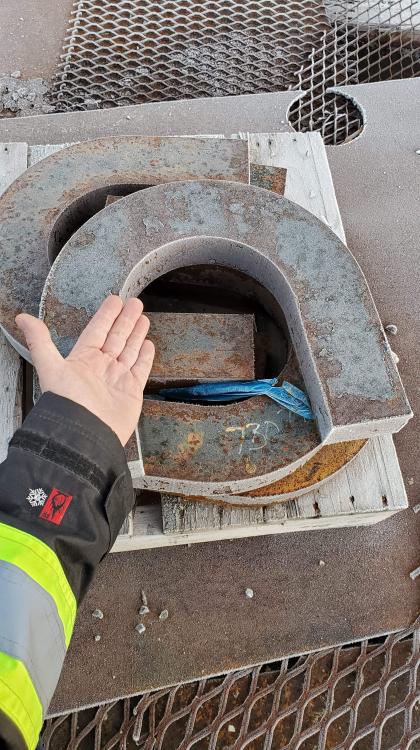
My friend works at a pulp mill and got a salvage ticket for these things from the boneyard. Originally he wanted to use them as the front and rear of a forge opening, but we've been enlightened as to how much of a heat bridge that will cause and are in the middle of re-designing to use much lighter steel in a much smaller enclosure. Someone mentioned making an anvil bridge out of these, or a swage. I can definitely see the opportunity for a swage if we need something with about the diameter we already have. What else would someone make out of these? I haven't spark tested them yet, but I kind of think they're going to be mild steel. They're beefy, about 3.5" wide metal, about 2" thick and the height to the top of the inner radius is about 9.5" (that makes about 13" top to bottom) They weigh somewhere about 40 lbs, and are way too big to put in the forge as we have it now. We don't have an oxy torch or a bandsaw. We do have angle grinders, files and patience. We have 4 of them. (I do work for a school district and have sometimes access to the highschool metal shop, and sometimes the students to do simple jobs that are educational. That has a whole host of every sort of tool, but access isn't reliable.) If anyone has a genius idea that requires the HS metal shop, then maybe I can donate one or two to them in exchange for help. My friend has since some to the consideration that they might make half decent DIY fullers for when/if we ever build our mechanical power hammer. I'm not sure his plan, but I bet it requires a lot of work. Maybe Frosty was right when he told me they looked like Leaverites.(As in, leave 'er right there) I've only heard the term applied to geology, but I can see how it applies to steel salvage as well. Also, just in case someone is a Millwright or for some other reason recognizes what these are, please share. I'm curious. The work order # written on them isn't able to be looked up at the mill anymore, so I can't find out what they were originally for.

-
So, "D" shape forges are what I was calling oblong semi-circle. Box forges are easy to calculate and so are easy to add. "There are no triangular forges." - that made me chuckle for some reason. Clam-shell forges seem like they would be tough to calculate, but I'm sure I can figure it out with enough thinking. Tunnel forges will be very complicated to calculate because of the challenge of calculating the volume of the cylinder, then removing the odd shape taken up to make the floor. I'll have to spend some time with google to figure out the best way to make that work. Thanks for the input Mikey - it's very appreciated!
-
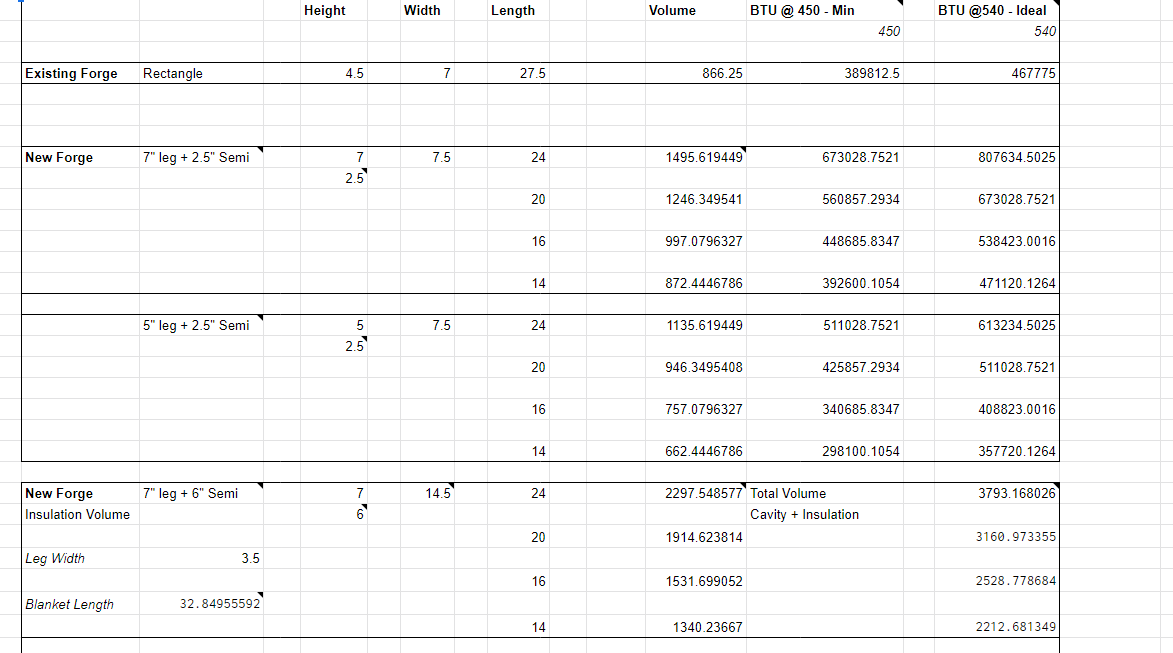
Hi All, In planning for a forge my friend and I want to construct I started to build a spreadsheet that would calculate things like internal volume of a forge cavity in various shapes, amount of ceramic blanket needed, BTU per inch to reach forge welding temperatures etc. It's a bit rough right now, but I'd like to polish it and consider releasing it for public consumption. I've included a screenshot of most of what I have right now - ignore the numbers, they're for a forge that will never exist - we have already re-worked our plans since this was made. Some of the calculations also aren't correct because of incorrect assumptions on my part. (Like that hard firebrick would make a good floor because it's wear and flame-face resistant, I hadn't considered that it's a huge heat-sink too.) I'd like input from the community as to what could/would make this useful to you or someone you know. Right now it only calculates two shapes, rectangular prism and oblong semi-circle. I think it would need at least: Rectangular Prism, Oblong Semi-Circle (this is an arch with legs taller than the radius), semi-circle, circle and in the Forges101 thread I believe I read about D-shaped forges. Would that be a half-dome with a flat front or back shaped like the letter D, and the opening on the flat side of the D? If I can calculate volume, I can also include somewhere to specify the approx. thickness of the insulation, then I can figure out length of ceramic blankets, volume of castable refractory insulation and some other things. Of course, this would all be approximate, and garbage in, garbage out. Perhaps the greatest part of it for me, and the reason it might appeal to those of you who haunt this forum and answer the same questions all the time, is that by changing things like the length, height, width etc of the forge, you can directly see how much cubic inch difference it makes to your plan. And when you're multiplying that cubic inch difference by say, 540BTU (which is from one of the threads the higher of the two BTU amounts req'd to reach satisfactory forge welding temperature) you can see how much changing size changes heating requirements. In fact, in the same thread where that 450/540 BTU numbers are discussed, Frosty did some calculations and put some info about what size/how many burners to cubic inch for a reasonably square space you should plan on, so this could go on to include that info as well. Would anyone use such a thing if it existed? And if you would, what would you want it to spit out at you?

-
Planning a new forge - comments and suggestions welcome
JCloss replied to JCloss's topic in Gas Forges
You aren't wrong about how simple it can be to build a coal forge. I'd like to cobble together something in the intermediate zone - brake drum in a table sort of thing. However, the shop we have access to isn't conducive to burning coal inside, and we don't have access to the outside of it - it's in a friend's yard in a residential area. I have great plans for a pole-barn on my property eventually, but that's a few years down the road as electrical will need to be run first. (Well, I *could* do without electrical, but I don't actually *want* to.). Previously our local antique machinery museum asked me if id be interested in spending some time at their coal forge, as they don't have a demonstrator anymore. However, I don't want to learn to run a fire in front of spectators without practice, and then covid hit so they're shut down now. Perhaps this summer/fall I'll be able to work out some access there. -
Planning a new forge - comments and suggestions welcome
JCloss replied to JCloss's topic in Gas Forges
This forge plan isn't really just mine - it's more the brainchild of my forging partner, but I have some input. I'm coming here to get more experienced input, as I've successfully helped build 2 forges, together the members here have built hundreds at least. I'd like to benefit from that knowledge. To help clarify, I thought I would share the shapes that he salvaged and wanted to use as the ends of the forge. I'm coming to the conclusion that it's a bad idea, but I need to talk to him and have a brain storming session. His plan may still work if he was planning to round the two mouths, and in that case there would still be 2" of blanket and 1/2"+ castable refractory insulation over the end pieces, with just the "mouth" not covered. I'm still not convinced it won't create a really bad heat bridge though. He's pretty convinced on this because he has been looking at these shapes for a year in the salvage yard and thinking about how they're perfect for him to turn them into a forge. However, I think I can convince him that we can use something like 10ga sheet cut on the plasma CNC that I have intermittent access to as the ends of the forge skeleton instead of these beefy things. Makes the whole shell about 80lbs lighter too, and mostly eliminates the heat bridge to the outside as the 10ga would be more fully insulated.
-
We have considered a re-emmissive coating for a while. (If by that you mean a product like ITC-100) The suppliers my friend has found have not had any in stock or available to purchase for over a year though. He was on their email list to get notified when they re-stocked and they didn't email when they did, probably because it was all sold out in pre-sales.
-
Planning a new forge - comments and suggestions welcome
JCloss replied to JCloss's topic in Gas Forges
Thank you Latticino for a really comprehensive reply. With the feedback I've gotten so far and the ideas that were floating around in my head already, I'm going to be recommending some changes to our plan. The examples of what you would look for in thickness of insulation over the metal was exactly the sort of experienced tip I was looking for, and gives me something to go with for planning, or convincing to change plans. The suggestion to account for differences in thermal expansion is also helpful. Yes, I'm learning the drawbacks of gas forges vs solid fuel forges. I would like to have access to a coal forge, but I don't at the moment, nor do I have an appropriate location to put one, so I'll have to make do. Oh, and yes, DOORS! Doors will happen no matter what, however they might be stacked firebrick for a few years. -
Hard Firebrick, which is why it takes so long to get to temperature. It's however stood up well and I'm looking to probably use it as a replaceable floor for the next forge. We dont' have excessive dragon's breath, we have very little. I think that's because the burner is so far inside. I try and adjust the mixture so that there is some dragon's breath, which I interpreted as extra fuel that was unable to burn inside the forge due to not enough oxygen to mix with, so I could absolutely be wrong about that. (Meaning, I thought I had the atmosphere rich enough to be reducing) Hmm, do we need one this big? Probably not. We don't use the back half much at all. I'd be down for a smaller forge than we have, but I would like a wider and taller chamber, just not as long. We often seem to end up doing projects that are curved, curled, or otherwise oddly shaped that take up the full amount of the opening in one dimension or another, and/or long projects that need to be passed through. (Twisting ladder rungs for a quilt ladder I built two years ago comes to mind.) My buddy is the main driver of a new forge and was the one that designed this one, I was mostly just labour, realism and troubleshooting. Evidently I didn't do enough of the last two.
-
Planning a new forge - comments and suggestions welcome
JCloss replied to JCloss's topic in Gas Forges
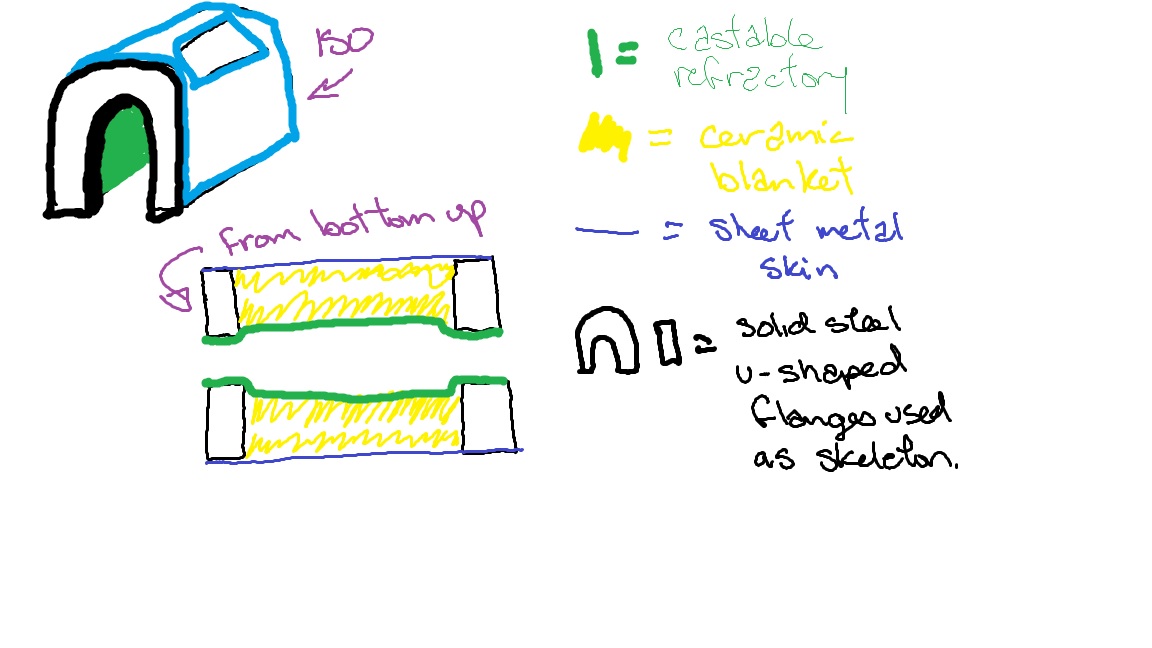
My sketching skills are not good, but this is what I cobbled together. Hopefully that helps illustrate my purpose. Exactly! Thanks Thomas. I've since come to the conclusion that some insulation will be needed and am trying to figure out how much will be needed, and as such, how much I'll need to shrink the opening. Perhaps this forge design is not going to work as well. It's kind of my buddies baby though, I'm just trying to be the realist where possible. (Like explaining that the bare steel structure inside the forge will conduct heat to the outside.) A smaller forge may be the better option, or two forges. We already have one burner that we could use for a smaller forge and probably reach consistent forge welding temperatures, the problem is space more than materials.
-
Planning a new forge - comments and suggestions welcome
JCloss replied to JCloss's topic in Gas Forges
Sorry, my bad for using the improper terminology. I have been reading through those two forums, mostly the pinned discussions. I do understand the difference between the two different types of refractory. I accidentally used the term cement when what I meant was castable refractory. (I haven't found refractory cement used much in gas forges in my research, usually just in lower temperature applications like pizza ovens.) I should have been more aware of the terminology I was employing. I understood castable refractory to perhaps be a better insulator than it is, I thought it was used as an insulator as well as being used to coat ceramic blanket insulation (which I do know needs to be rigidized and coated and am cognizent of the health concerns). I guess I was hoping that covering those metal parts that are at the front and back inside of the forge with *just* castable refractory when we do the interior would be enough to mitigate enough of the heat transfer outwards to not have to narrow the opening further with ceramic blanket insulation. I totally understand that. What I'm not explaining clearly enough, I think, is how the pieces of metal that form the outer ends of the forge would go through into the internal space because they are so big/thick, and thus transfer heat to the outside of the forge if they aren't protected, becuase they are both the inside *and* the outside - and then how much insulation I'll need to realistically think about applying to those pieces to keep that from happening. I'm going to see if I can make a diagram that helps ask the question I have. -
Hi Mikey, thanks for your responses! I didn't mean the leaf-blower is underpowered, just that the single burner for that cavity space probably isn't generating enough BTU to raise the entire cavity to a proper temperature. (1) Too much air - that's an easy thing to test and I'll make some modifications next forge night. We have a ball valve in front of the leaf blower, I'll turn the blower down and close it off a bit more if needed to try and get the fuel/air mix richer. (Richer is right, right? Leaner means less fuel, richer means more fuel?) (2) This becomes quite testable too as it's related to #1, so I'll try to fix the first problem and then work on this. (3) This mystery has been bugging me for a long time...I can't find anything about glitttery forge scale anywhere....
-
Planning a new forge - comments and suggestions welcome
JCloss replied to JCloss's topic in Gas Forges
I'm not sure I understand...or I do, but maybe I'm explaining incorrectly. Our original plan was to use those thick metal pieces to make the front and back wall, and sheet welded to the outside of them. The gap would be filled with insulation/refractory, and we weren't going to cover the metal on the U shapes making the front and back wall. Then I realized the metal will get really hot, so I thought we should cover those metal pieces with refractory cement on the inside. Would 1/2" of refractory be enough to keep them from conducting a ridiculous amount of heat outward and making the outside of the forge glow, or would we need to narrow the front and back so that we can put 1" or more of wool over the inside of them and cover that with refractory cement? I still don't know if I'm explaining well enough, maybe I need to draw it. ;) The difference between the "skeleton" end pieces and the outside is about 3.5 inches, so we were planning on 2" of wool and 1/2" of refractory. That still leaves an inch of bare metal, so we were going to add refractory to cover that. When I said: "do we need to consider narrowing the inside cavity and put 1" thick kaowool over the entire interior including the skeleton pieces" I meant making the wool thicker throughout so that theres at least 1" over those end pieces, and then 1/2" of refractory over that, which narrows the opening and makes it actually smaller than the current forge we have now. I just don't know how much insulation we need and of what types, to keep those metal pieces from making the skin of the forge do things we don't want it to do, like glow. ;) -
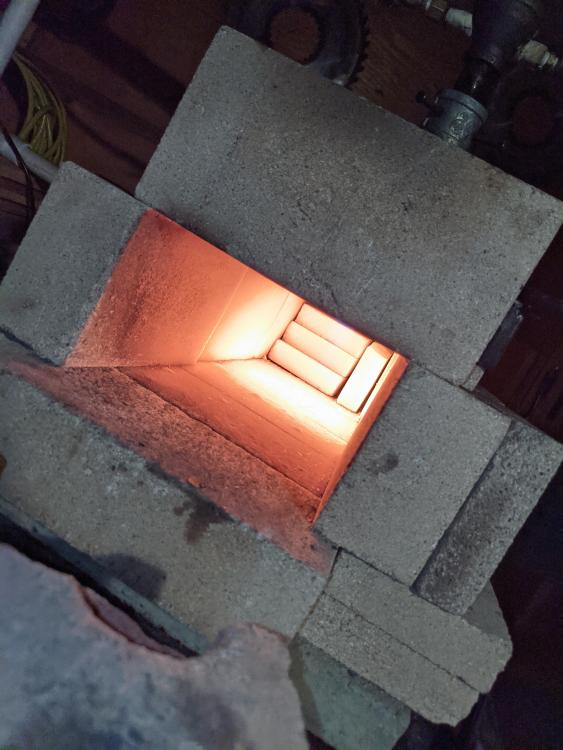
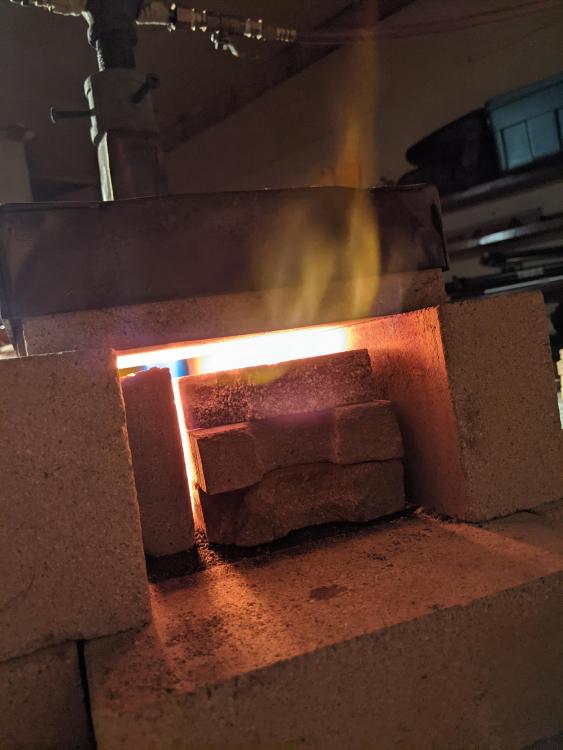
Hi All, I'm attaching pictures of our current "brick pile" forge with a blown propane pipe burner. I have some questions and I'm hoping some of the knowledgable members might be able to help me clear up some questions and/or make suggestions of how we can do more/be better with what we have until we have v3.0 planned and built. This forge has an internal space of H4.5xW7xL27.5, so an internal measurement of about 866.25 inches^3. We can and have forge welded in it, but we have to hold our tongue just right and turn the gas up quite a bit. I know the burner, being a 1" pipe burner modified from a N/A venturi design and now blown with a leaf blower, is underpowered. I have three big questions: 1) We make a lot of scale. Like, ridiculous amounts. People I see online don't make that much scale even in propane forges. Is there something about having such a big space with not enough heat that causes us to make huge amounts of scale? 2) Is there any way, without adding more burners, to get a "short" heat on something? I interpret this phrase to mean a heat that is located in a particular part of a piece, especially the end, that doesn't travel all the way up. Right now, to get something say 12" long to have enough heat to be easily forgable (bright orange, dark yellow...ish) in the 2" at the end, the heat will be bright red at least 6-7" away from there. It means that the whole things is very "floppy" as I call it, bends easy when stressed with tongs and moved etc, and makes everything take more heats to straighten up properly after you're done the forging on the portion you wanted to heat. I want to focus on making more tongs, and lots of them call for "short" heats so that you can work just the bit without affecting the reins or boss too much. 3) What is the glittery scale? Is that a sign of burning metal? Most of the scale we make is essentially dark brown/black. But sometimes, especially on smaller pieces, we get scale that looks almost like it is covered in sparkly glitter. If it's brushed away the metal underneath is duller than normal, but it still seems to brush/file up fine. I've never managed to get a good picture of this phenomenon and google as I might I can't find anyone talking about it. I feel like it's a sign the metal is getting too hot and some part of the steel alloy is sublimating out and then solidifying or something, but I just don't know. FWIW regarding safety. The dragons breath is not very bad on this forge, probably because the burner is centered in such a long cavity. The top gets hot, hot enough to melt wax, but not enough to cause beeswax to smoke. You don't want to lay your hand on it after a couple hours, but if you brush it with un-gloved hands you don't burn. The burner pipe has never (according to my IR thermometer readings) exceeded 33C, and the brass gas fittings and hose have never exceeded 21C when measured. The forge is hard kiln brick sitting on concrete paving stones on a metal table. The table does not get hot, it gets uncomfortably warm, but still touchable, directly under the center. The square tubing around the burner is our DIY method of holding the burner in place to the top piece that holds the roof together. The burner nozzle is almost all gone now....it lasted years but is now losing pieces regularly. it used to be a black iron reducer. Now it's...scale. The flame is a bit more jagged and not as smooth as in this picture, and we know it needs to be removed, refitted and replaced eventually. There is no wool insulation or refractory cement in this build, just high temperature rated kiln bricks. That means it takes a fairly long time to get to real heat, about an hour or more. You can easily forge before then, but not attempt anything fancy like forge welding.