wirerabbit
-
Posts
139 -
Joined
-
Last visited
Content Type
Profiles
Forums
Articles
Gallery
Downloads
Events
Everything posted by wirerabbit
-
Hee Haw. That's why you should never hit two hammers together very hard, right? Of course I'm learning not to hit the anvil and instead hit the forge-able metal on top. I'll try to do the same with the rivet maker. Keep me safe. Taylor
-
Don't let this get out, Frosty, but I was planning on using my bench grinder before you made the suggestion. I don't want the forum to realize that they let in a hack. Now, I wasn't planning on heat treating the punch as it will be sunk into hot metal. I've read and I assume the punch will anneal with all the heating and slow cooling. Is this not the case? I'll forgo the rivet sets for now and just make a jig to head one side of the rivet stock as Frazer suggested. I found a simple example on the interwebs that used an old hammer head and a drill press. Seems simple enough. Still looking on IFI for more examples. Have run through the tong section for the first time, so I have a good idea on what I should make first for holders. Thanks everyone, Taylor
-
Thanks, Frazier. That's a practical answer. I have a few old counter sets that are about that size. I'll make a small drift out of those and a punch out of the old stone chisel. I'll have to research a rivet heading tool, but I think I understand the concept. Yee haw! Taylor
-
Hey all: My latest forging session has me convinced that I need to make some tongs so that I can place shorter stock into my steel wheel charcoal forge. I'm a beginner, so my tongs will not be anything very big. Even if I use a large piece of stock and fashion both sides from a single bar, I still will need to make a hole for the rivet. Right now, I do not have any punches, so I thought I would make one. What is a reasonable rivet size for such tongs? 5/16"? 3/8"? 1/2"? I don't have rivets, so I will be making stock out of what I have. I guess I can drill out the rivet hole, but that would be missing an opportunity. I just checked my scrap bucket and all I have besides mild steel is a few hex keys and a brick chisel or two. I really need to find some high carbon stock somewhere. Taylor
-
Steel wheel JBOD charcoal forge project
wirerabbit replied to wirerabbit's topic in JABOD - Just A Box Of Dirt
2 hour forge session today with some very small modifications to the forge. I had pieces of IFB at the ends of the forge level with the side bricks, but about 1/2 inches above the hearth. That makes sense as these bricks are 4.5 series. However, after cutting the end bricks down to make them level with the hearth, I saw little improvement. This session I heard the roar of the true iron less frequently and had to use the poker often to open the air back up. The blow pipe is too low in the firebox I think. the bottom of the iron is almost at the bottom of the pot. It seemed that the heart of my fire was about an inch lower than the hearth and once I broke the rule and placed my iron down at a very shallow angle, I was able to obtain a hot forging temperature. I was heating 3/4 inch round and trying to square it up to 1/4 inch before trying to make some s hooks. Nothing to show for all the work, alas, but I was able to bang on some hot metal nonetheless. I put less charcoal onto the fire each heat from my previous forging days and I seemed to have cut the usage down by 50%. I was till operating at about 40 on the motor controller. Higher air didn't seem to actually help heat up the metal. I think I will need to bring the iron up another inch, giving me about three inches to the hearth and see how that does. taylor -
Steel wheel JBOD charcoal forge project
wirerabbit replied to wirerabbit's topic in JABOD - Just A Box Of Dirt
The motor controller worked great. My initial setting was at 70% of maximum speed and that had very little fire fleas dancing about. This session was to see how low of an air flow I could use and still obtain forging temperatures in a reasonable time. I finally settled on a setting of 40% using an 18v battery. With that setting, I was able to easily get the 5/16ths? bar to forging temperatures. Once I found my rhythm, it was easy enough to switch off the blower, pull the stock out of the fire, forge, return the iron to the fire, grab a handful of charcoal and toss on the top while I punched the blower back on. I still need to learn how the fire works, but to my eyes the bright hot portion of the fire is well below the level of the hearth. Not sure if that is okay or not. I do have the true iron a tad deeper that 4 inches in the pot. When I cleaned out the fire, I raked all the coals into a bucket of water and the IFB at the blowpipe side was glowing. The opposite side was not. This may not have been the case earlier in the session, but it certainly was at the three hour mark. My new fire rake pulled out the unconsumed charcoal and ash very easily. This morning I found very little ash in the pot. I need to make a charcoal chopper next as my kindling hatchet crushes too much of the charcoal into dust. I want to maximize usable charcoal. A shovel of some kind is next and I may have to pull out the stick welder to finish that fire tool. Hope to do some more forging soon. BTW, today was 103 deg F...in the shade. Taylor, near Jeddo TX.thumb.jpg.ac19a2fb45f44e733b5a8c572793a38d.jpg)
-
Thanks irondragon. So far I have not needed to sprinkle my charcoal forge. The fire is very contained with the narrow Firefox, but I will need one for cooling steel for twists etc. I'll check out options.
-
How to get started black smithing ?
wirerabbit replied to Jacob1's topic in Blacksmithing, General Discussion
I spent two decades scrounging stuff for my other craft. It was educational, it was empowering, but now that I'm fifty-bazillion years old, I'm all about limiting the variables. I hammered two pieces of rebar to mark it off my list, then went to the closest steel place and bought several rounds, flats and bars of hot rolled mild steel. I I can worry about one or two things at a time these days, so limit the unknowns is my new montra. Later on I can go scrap yard exploring, but right now material that will behave and be forgiving of this newbie is where it's at. I'm so new, I still haven't had the swing-time of a Lizzie Borden! Taylor, near Jeddo TX -
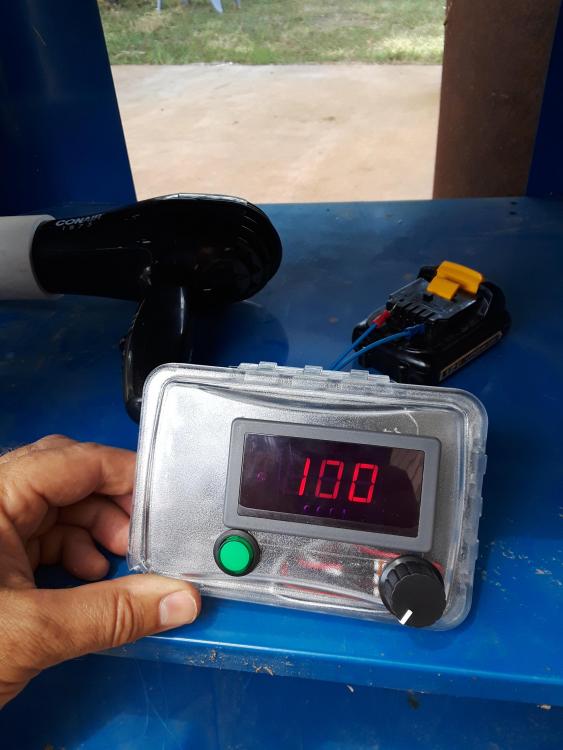
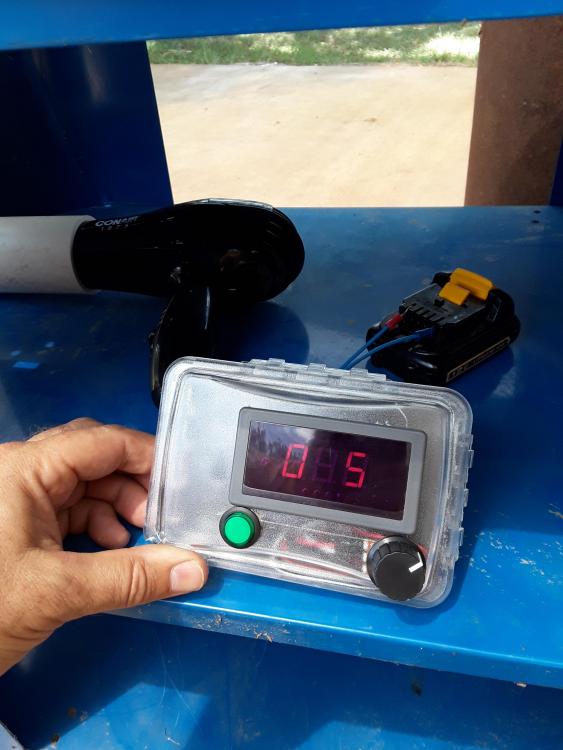
LED display shows percent pulse width from 000 to 100. In effect, it shows motor speed. Max speed is relative to battery voltage. Taylor
-
What did you do in the shop today?
wirerabbit replied to Mark Ling's topic in Blacksmithing, General Discussion
Finished lengths: 21 3/8'' on the practice rebar and 38" on the newest one. -
What did you do in the shop today?
wirerabbit replied to Mark Ling's topic in Blacksmithing, General Discussion
Well in my shop (a.k.a. driveway) today I tried out my controlled dc air source on my charcoal JABOD and forged a second coal rake. This time I used mild steel and I had better control of the air. I learned quite a bit during my second 3 hours of forging ever: I'm starting to learn how to read the flames off the coals. I've been shooting for meandering, curvy flames rather than aggressive, sharp ones. Still need to reduce the depth of the fire pot. Right now I feel I am a bit too high. Controlled the size of my charcoal better this go around and was able to feed the fire with much fewer firefleas. I handled the coal rake much more that I did my hammer. First coal rake from rebar was too wide and too short. It was also unpleasant to hold. I hope that I've corrected those problems.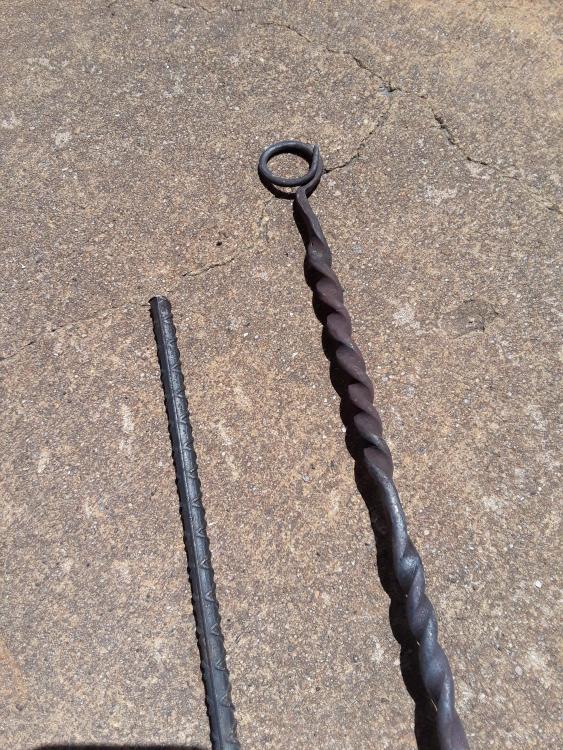
.thumb.jpg.8dfcd0948d5b641abc17ef7044a19f4a.jpg)
-
Often non-red house brick is made with clays that hold up a bit better than the red brick, which are made predominantly with earthenware clays. This is not always so, but worth keeping in mind. Many times the tan bricks have a percentage of buff stoneware or fire clay to make them lighter in apperiance. These types of brick are sometimes fired soft and so can take a bit more. Still, finding a stash of low quality firebrick is perfect. Taylor
-
Steel wheel JBOD charcoal forge project
wirerabbit replied to wirerabbit's topic in JABOD - Just A Box Of Dirt
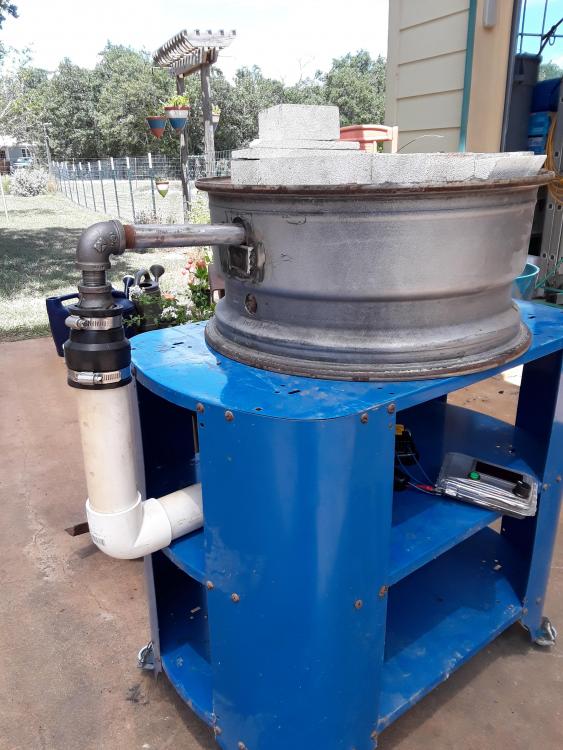
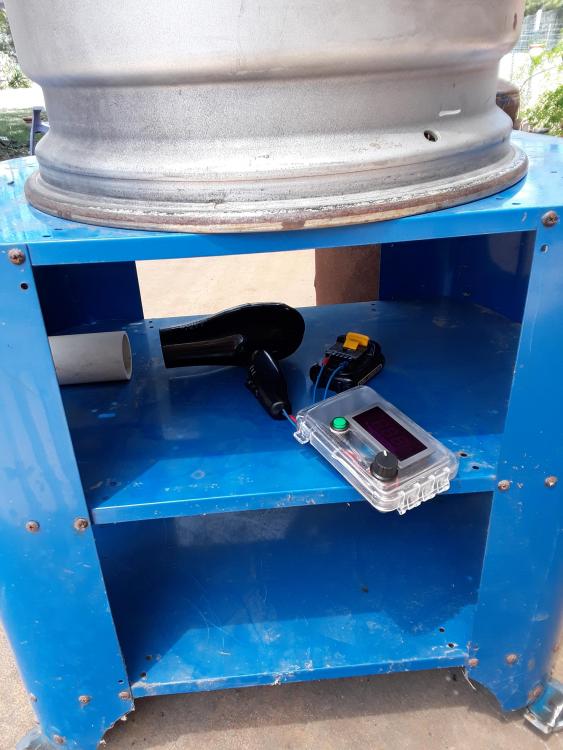
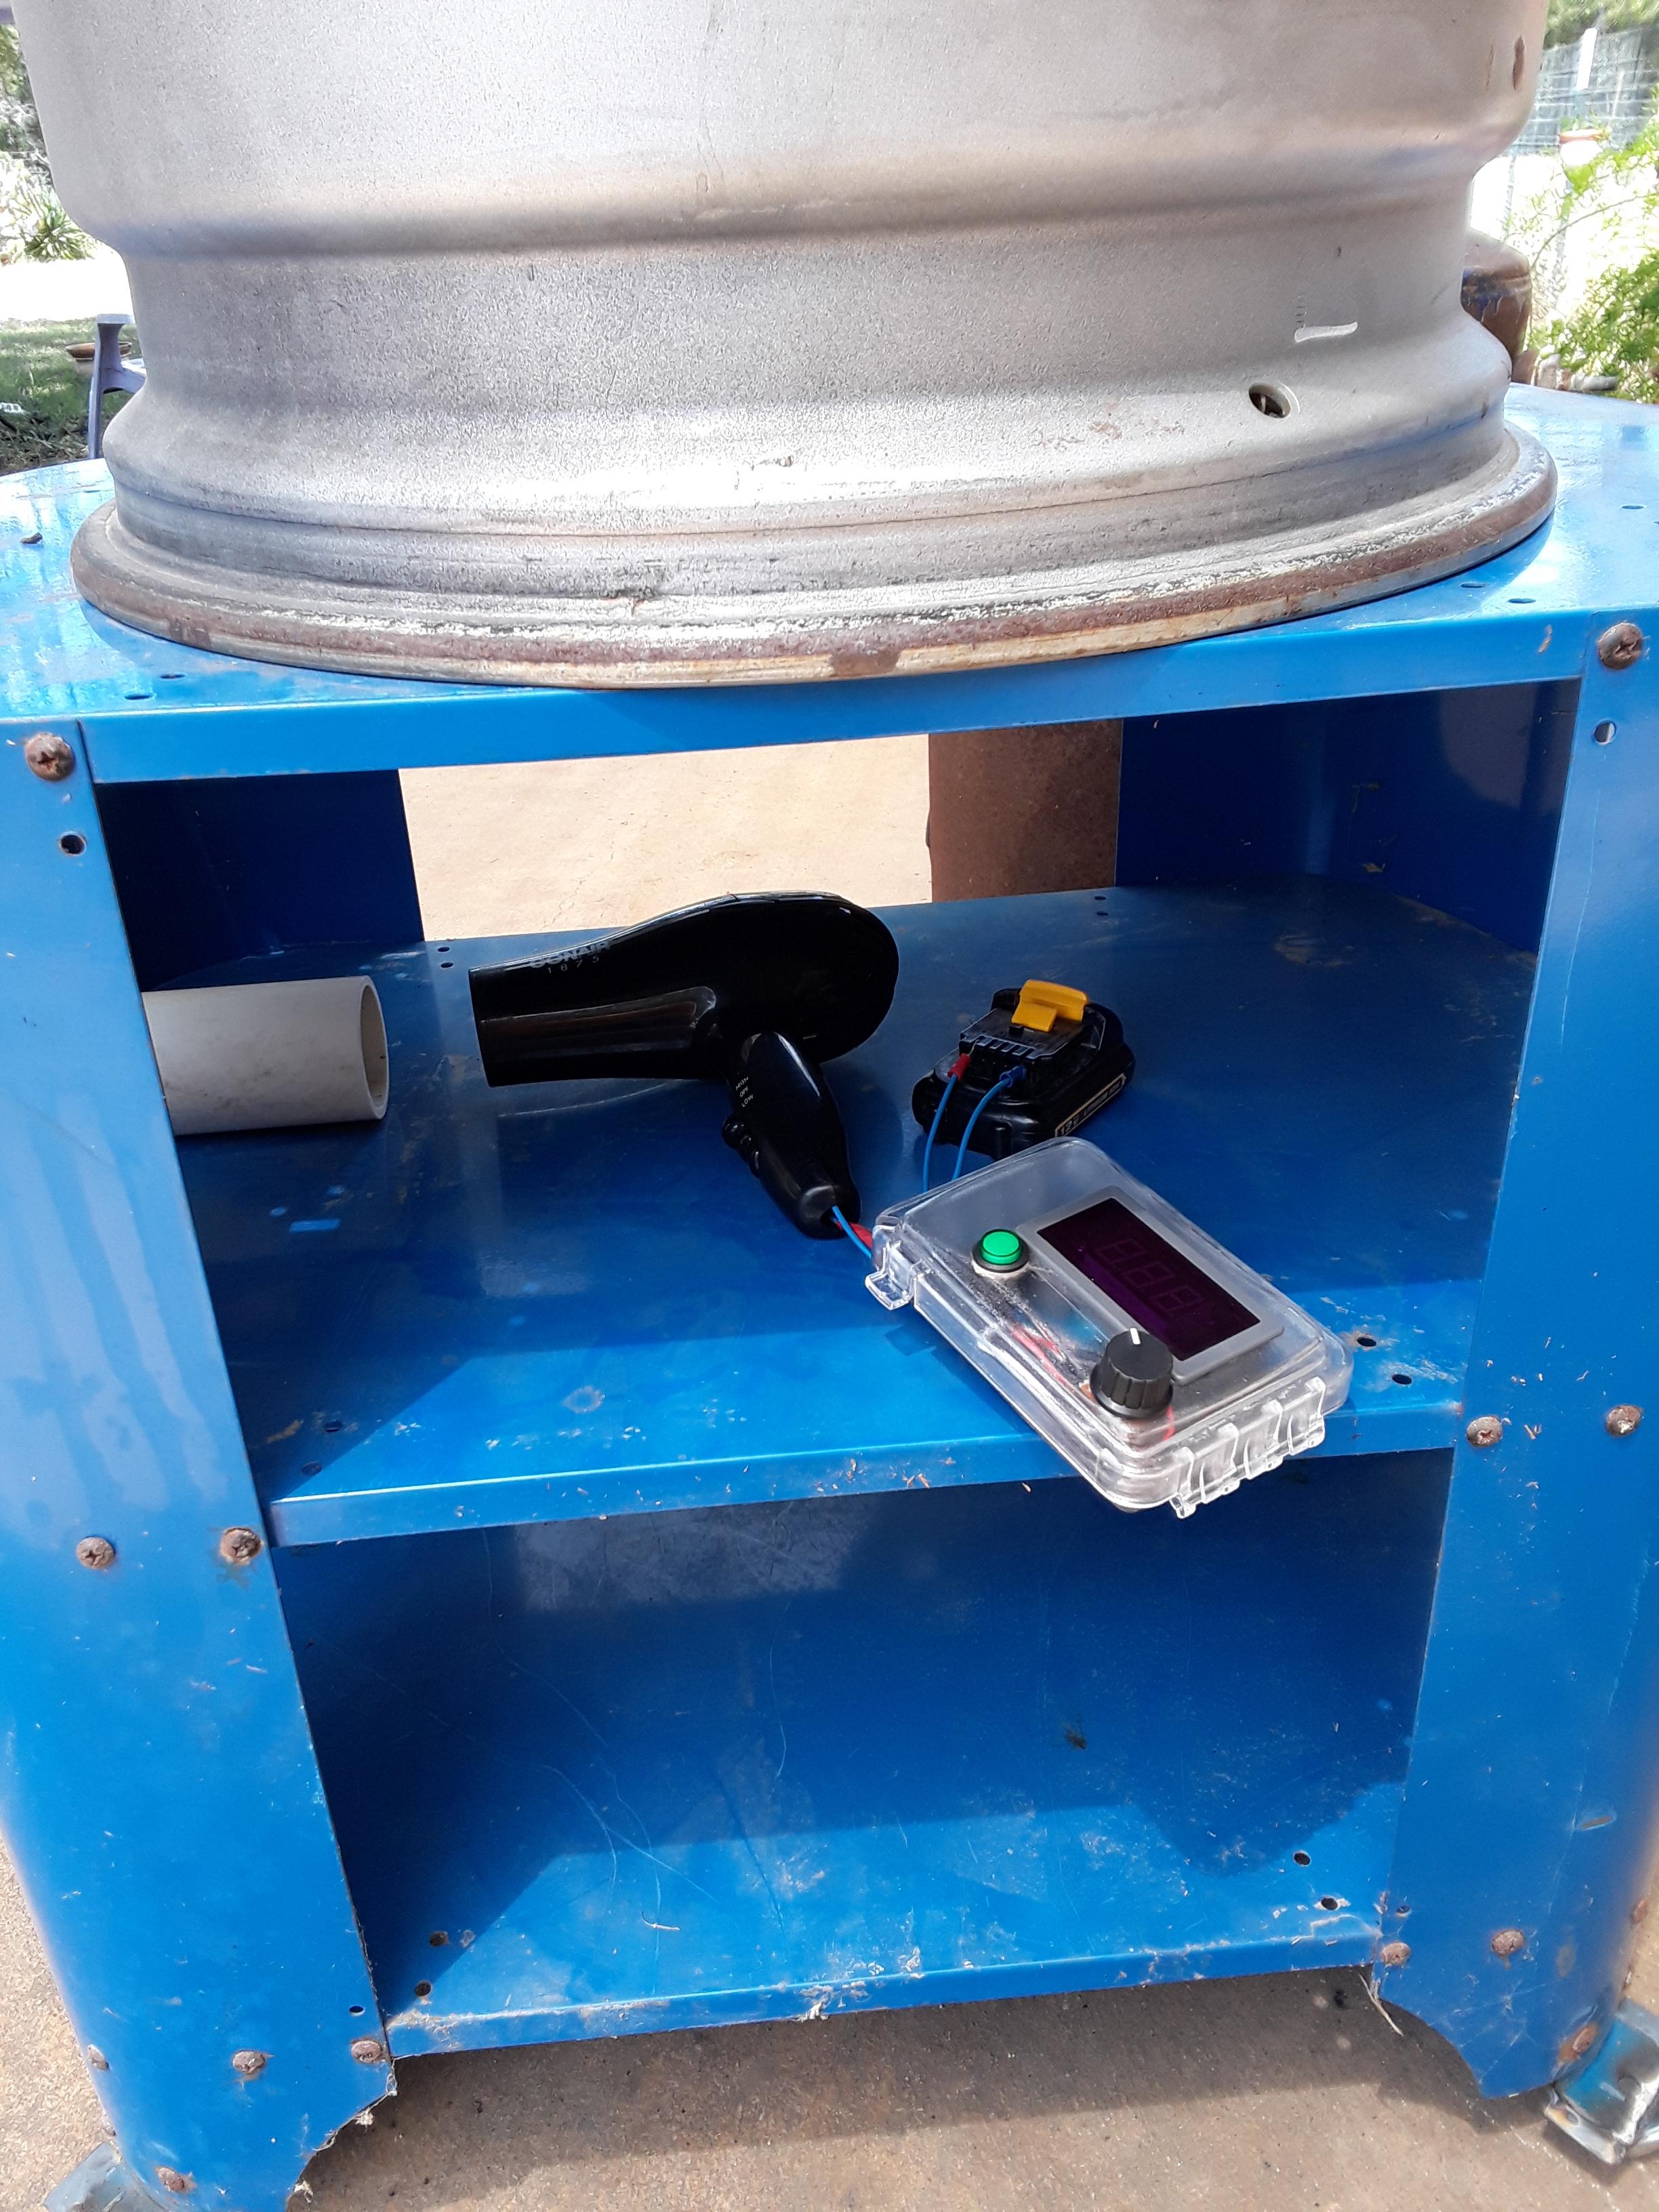
Finally received the parts I needed to wire up a controller for the hairdryer motor with fan. I sill need to wire something more permanent and mount the controller box to my new forge stand. The stand is an old Harbor Freight tool stand for a long dead router table. I found some cheap bearing rollers and welded them to the feet pads. I hope they hold up. In the shot you can see how I have run the air down and under the forge to the modified hairdryer. Here is the hairdryer next to the pvc pipe. It is just a friction fit. Next to the dryer is a 12v battery and my controller box. This is a close up of the controller I put together from a PWM, a weather-proof receptacle cover and a 12v battery. Here it is set to 100% power. At that speed the tuyere was blowing dust and ash from the empty firepot. Note in addition to the the speed control nob, it has a handy dandy on/off switch. I can set the speed from 0 to 100 and leave it alone. The switch will allow me to cut off the air while I'm forging. Once the iron is back in the fire, I can switch on and the fan returns to my selected speed. I have not had a chance yet to fire up the forge. Lots of things going on around here including a new concrete slab for my kilns and now forging things. I need to get a cover over it before I move things but until then, look at what I have for me to practice my forging with? I'll update soon as I can. Taylor, near Jeddo TX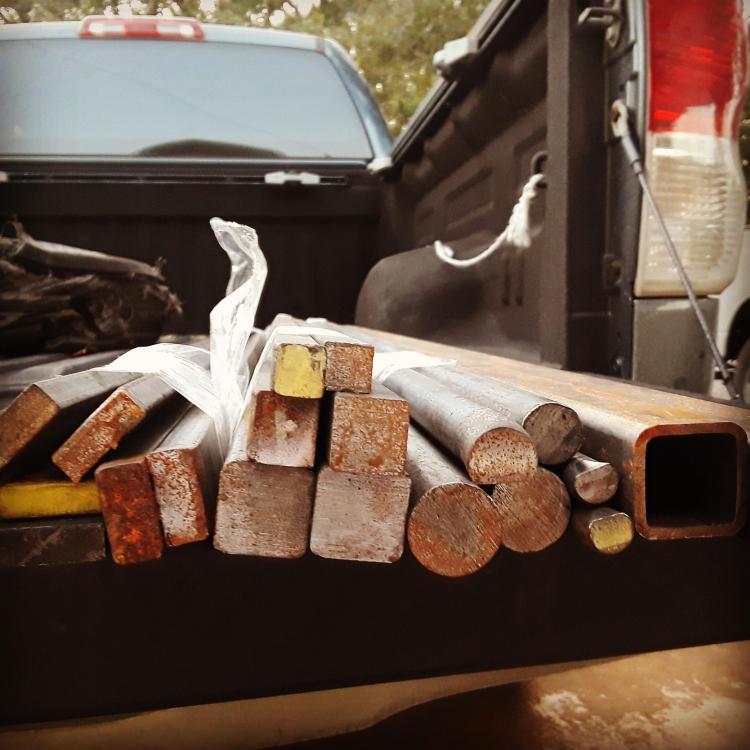
-
Nolan, Here is a picture of my fan controller hooked up to a 12v battery pack from the wife's power driver. You can see more pictures on my JABOD thread. Sorry I don't know how to put a link to that thread. The controller I purchased (black bezel display with controls) has both a pot for speed and a green, on/off switch. I put everything into a weather proof plug cover. Taylor, near Jeddo TX
-
The great thing about using a dc motor is that you should be able to use different voltage batteries. More volts, faster fan. Less volts, slower fan. See the possibilities? When I checked the hair dryer motor, I used a 9 volt battery. When I tested the speed controller with the 18 volt battery, it was smoking at 100% peak voltage. Those computer fans should be able to run off lower voltage batteries. I'm not sure how long they will last. The PWM can make a motor produce more annoying sounds. If you hate that sort of thing, try lower voltage battery and air gate methods for control. I still didn't pick up charcoal for my forge, so I'm sidelined for a bit. Hope to hook things up soon. Taylor
-
Are there any Texas blacksmiths on the list that are making their own charcoal? I live in the Post Oak Savanna and have pretty consistent access to post oak and Yaupon holly (Ilix vomitoria) I know, yuck. I was wondering if anyone has tried to make forging charcoal from this native tree/bush. My first experiments with using charcoal is with store bought lump charcoal, but I will need to find a more ready source if I wish to continue the adventure. This tree is fast growing, so I think it might be a type of softwood. If that translates into charcoal similar to pine, I do not know. That is why I am asking. Funnily, I live perhaps 10 minutes away from a charcoal plant. I am hoping to see if they sell directly to the public. Taylor, near Jeddo TX
-
Steel wheel JBOD charcoal forge project
wirerabbit replied to wirerabbit's topic in JABOD - Just A Box Of Dirt
Quick update: I have received the DC motor speed controller and a quick wire up test was great. I grabbed an 18 v battery from a drill and tested things out. I'll post pictures and info soon. I seem to have run out of charcoal at the moment. I have purchased some mild steel for practice, so I should have a forge day here pretty soon. Thanks for all the help and suggestions. I'm taking them all to heart. T, near Jeddo TX -
Interesting question. I'm not sure that would be a problem, but others might have notes.
-
Steel wheel JBOD charcoal forge project
wirerabbit replied to wirerabbit's topic in JABOD - Just A Box Of Dirt
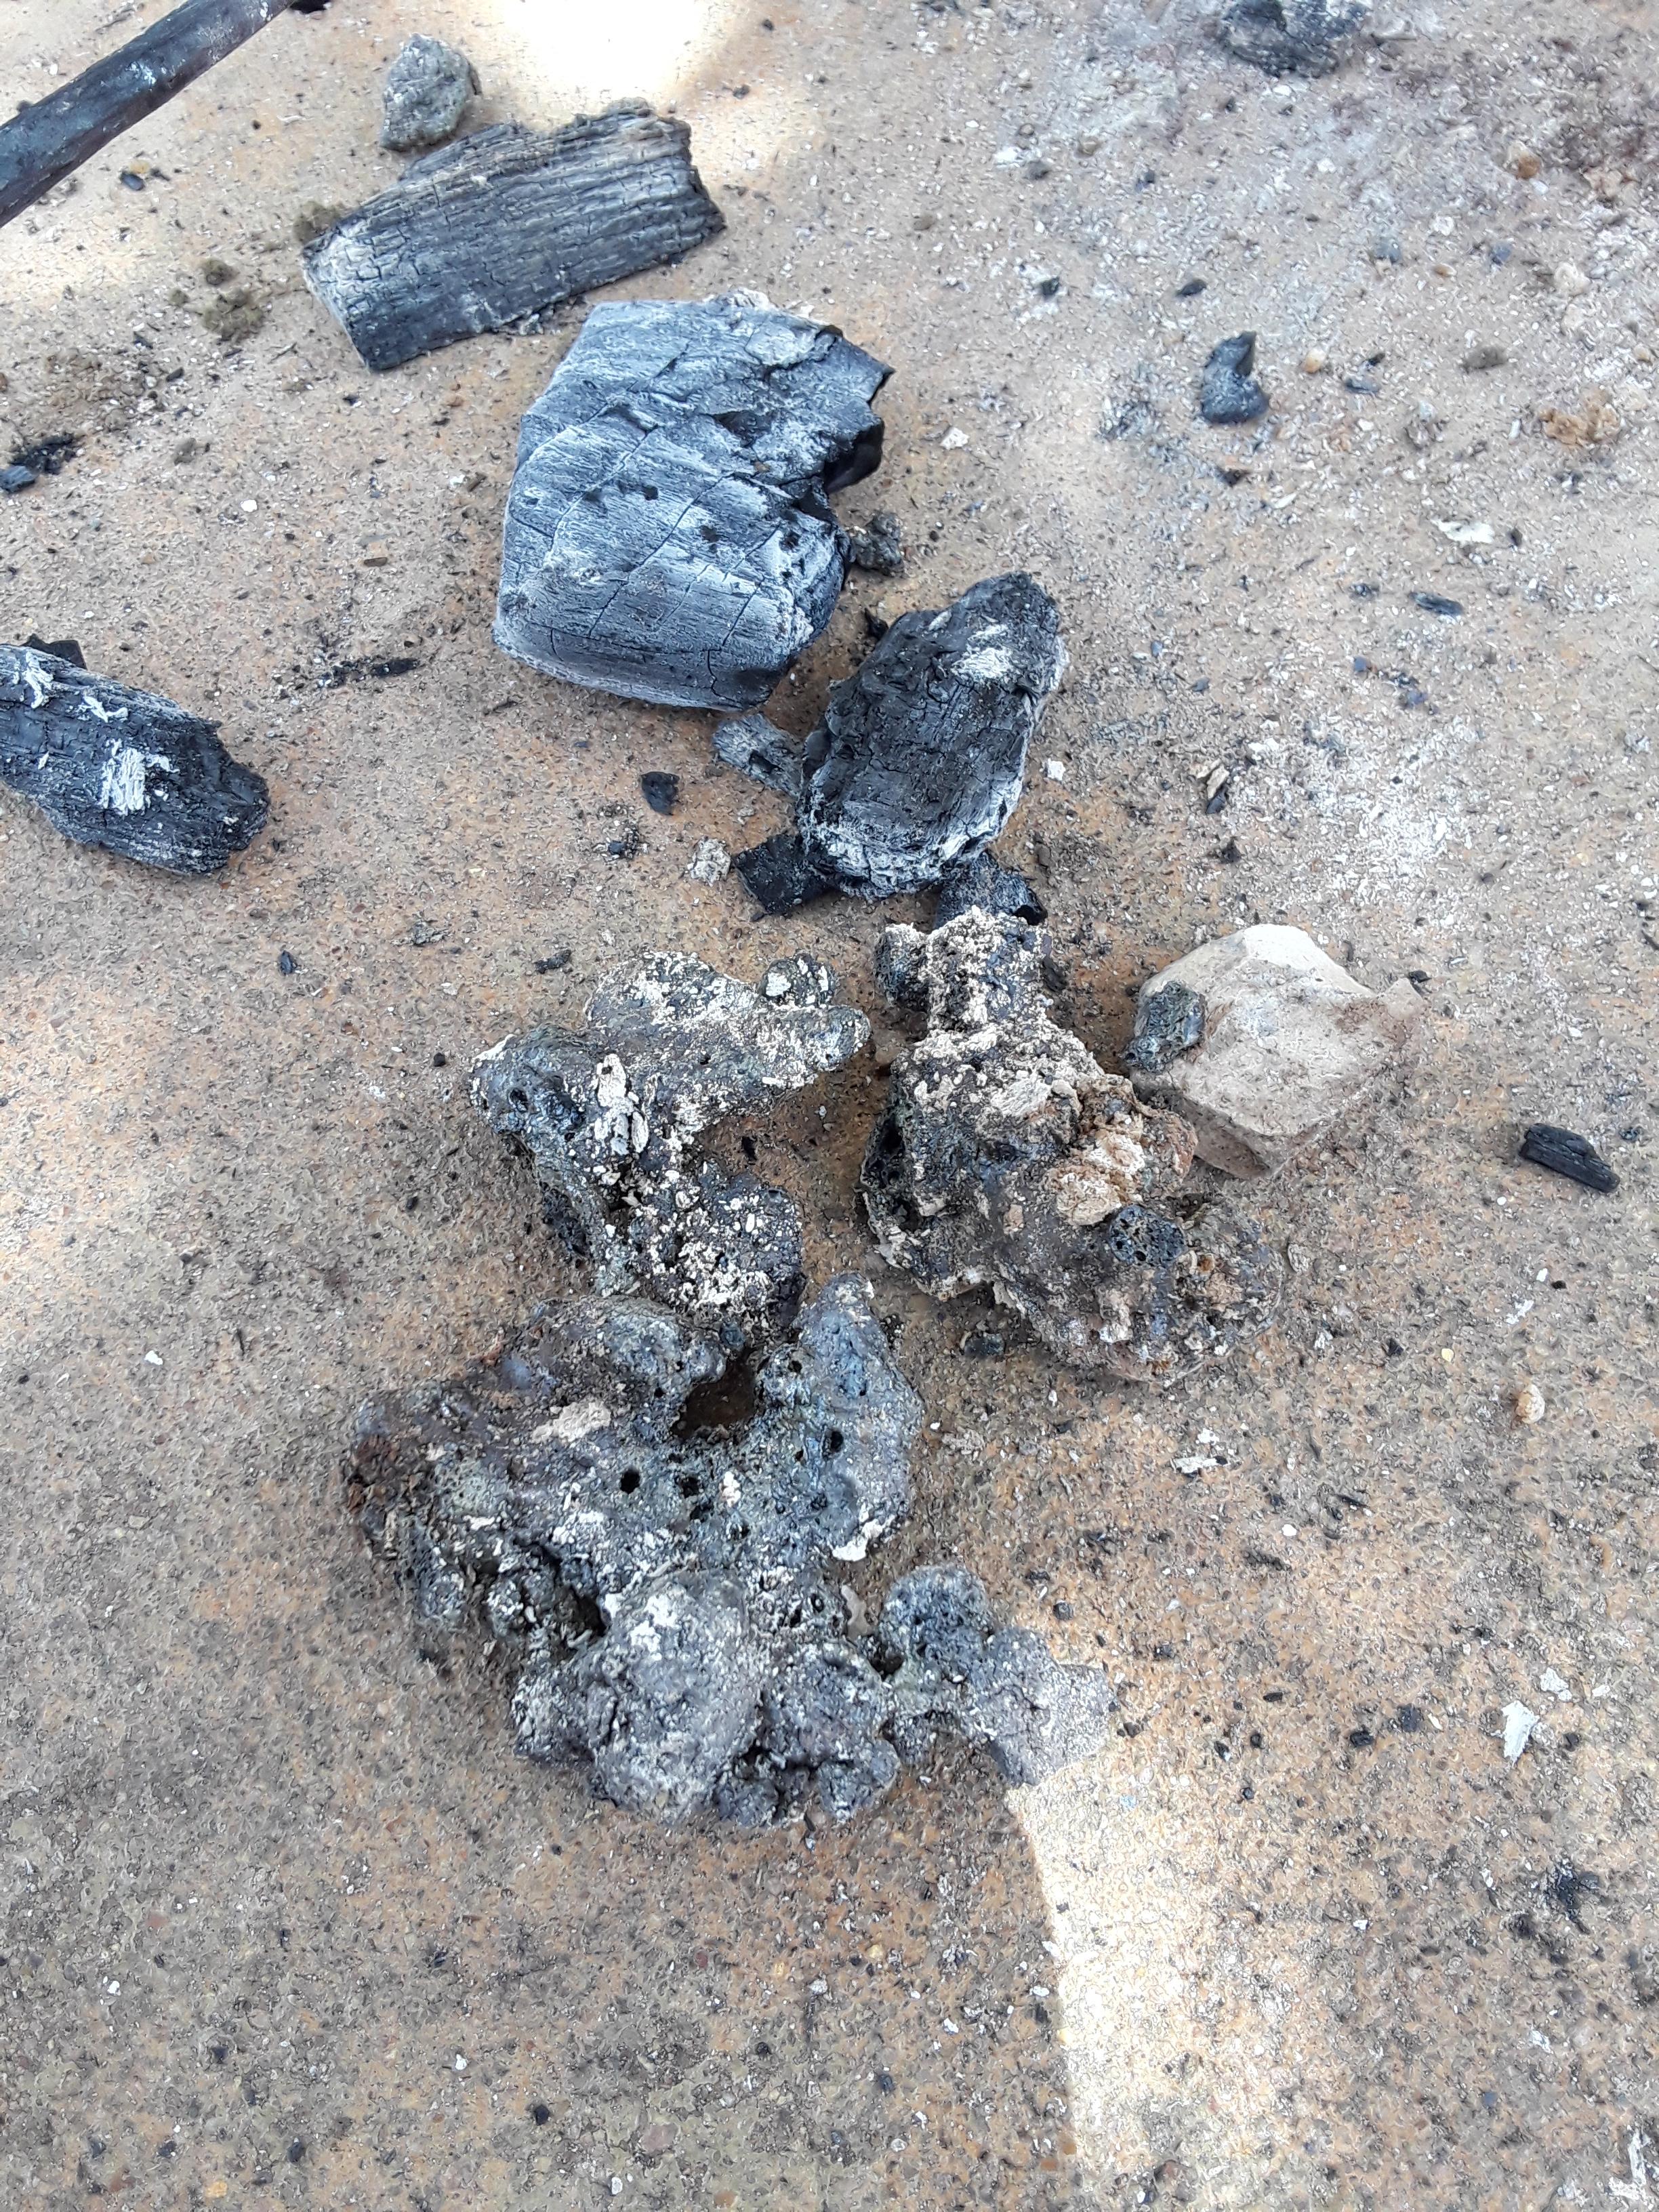
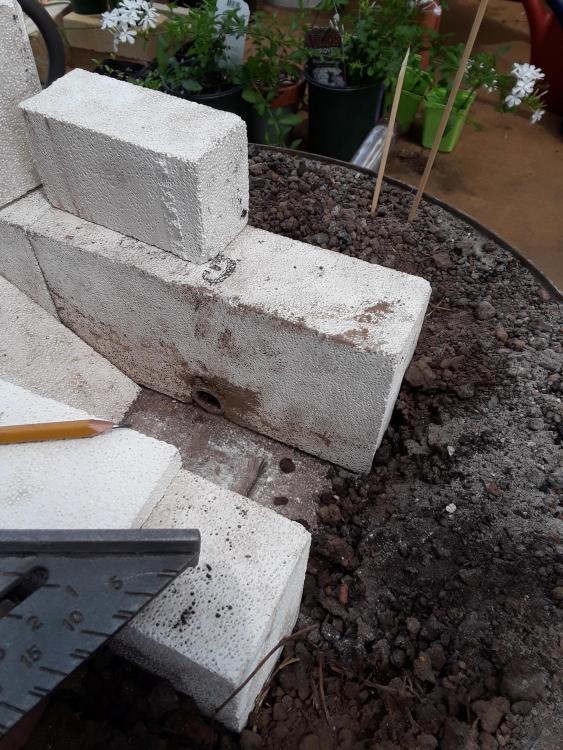
I did fish out some small pieces of limestone. That must be where they came from. The initial JABOD was fun, but I'm in it for the long haul and my packed soil was too easily melted. I have upgraded the firepot with IFB 28s. This will stabilize the pot's dimension while i learn the basics of fire management and forging. After about only 5 hours of firing. Insulating fire bricks taking the place of the soil at the fire pot. Fire pot finished. Sloping sides to feed the charcoal down to the tuyere. Approx. 8 inches long at the top, 4 inches wide. Depth is about 4.5 inches, the width of these brick. Taylor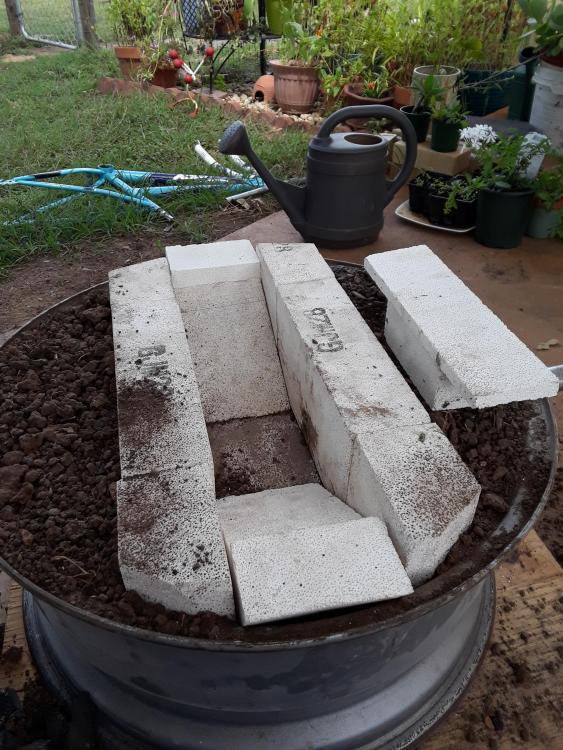

.thumb.jpg.122f843b507885b35ec0776b58e86f95.jpg)
-
PWM will be here Monday. 12v battery=easy peasy. Already earned my how-a-hairdryer-works degree from the Tubes. Gutted the wife's hairdryer before I realized I could use it as is just to see how it worked. Oh well. I'll post the set up in my JABOD thread when I finish it. The air compressor hose is a real pain. T
-
Steel wheel JBOD charcoal forge project
wirerabbit replied to wirerabbit's topic in JABOD - Just A Box Of Dirt
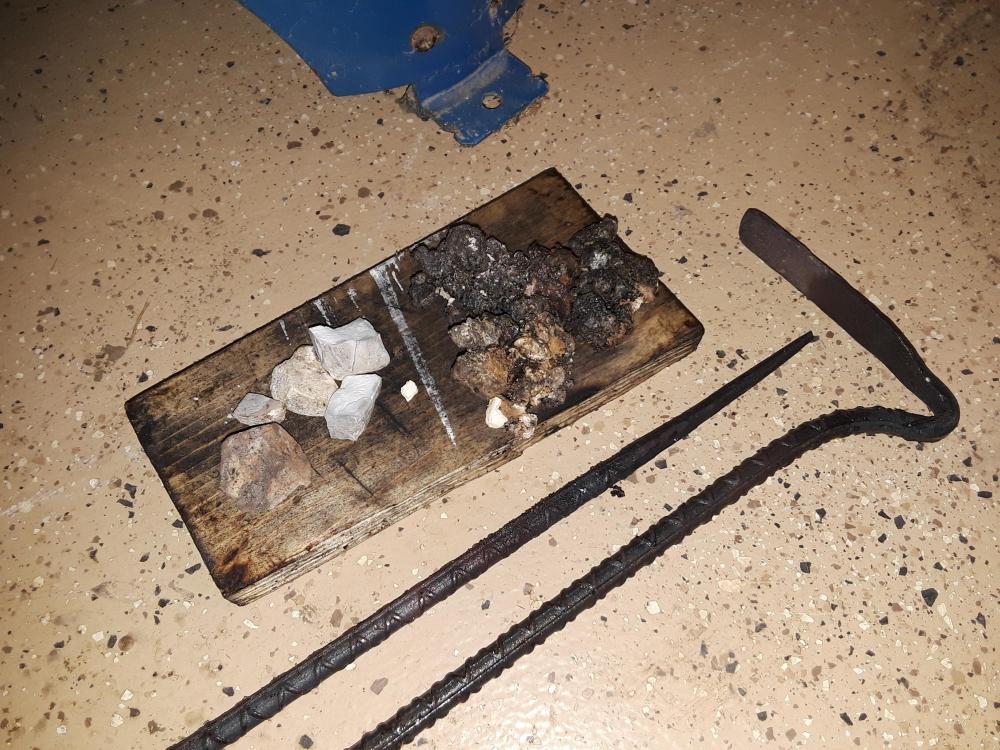
Have just come running back inside after scampering to put, anvil, tools, and JOBOD forge undercover! We have a gully-washer for sure. I had gone back outside after posting my last to try my hand at a better rake for the forge and was able to restart new charcoal just from the residual heat of the firebox. I had scraped out most all of the charcoal and let it cool on the top of the forge. Other things I have learned Rebar fire tool practice along with junk from the firepot. The forge stays hot for a very long time, so a plate cover is in order I was able to reduce my charcoal usage by allowing the mound to drop below the level of the bricks sitting on the hearth. When I uncovered the fire, I saw what I thought was the heart of the fire well below the level of the hearth, so I don't know what a charcoal forge fire should look like. While charcoal is not supposed to form clinker on its own, I fished out pieces of the packed soil, slagged by the heat. My soil is definitely a terra cotta. The clinker is classic over fired student earthenware. I have a long way to go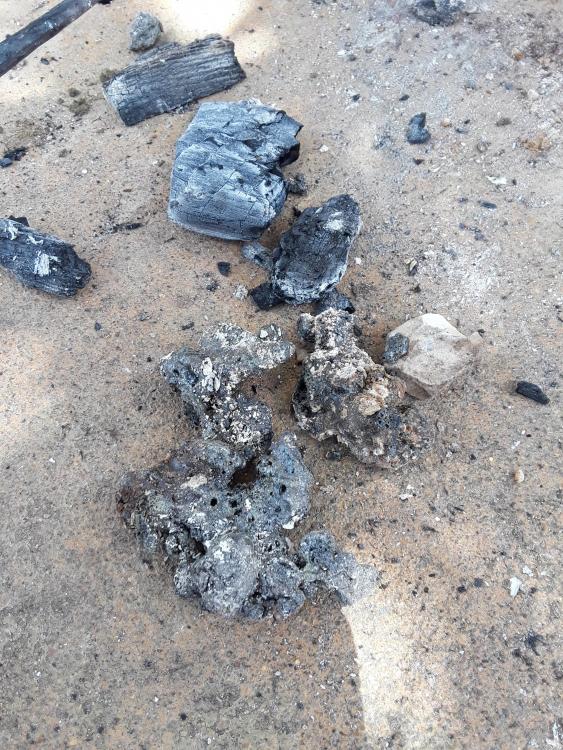
-
I ordered one off ebay for a little over 8 bucks. I searched for DC motor speed controllers. Works for 8 to 60v or something like that. I bought one with an on/off button and a display that will show me 0 - 100% modulation. It will be worth it to discover the minimum of air needed for a particular heat. I'm sure I'm burning up charcoal faster than I need to airing by hand. Oodles of information on the interwebs regarding making your own PWM board as well. Ain't nobody got time for that. Taylor, near Jeddo TX
-
Steel wheel JBOD charcoal forge project
wirerabbit replied to wirerabbit's topic in JABOD - Just A Box Of Dirt
Indeed. I have read in several threads about the size of charcoal for forging, and I had walnut sized chunks for the most part. Fired it for a second time with just the air compressor with a stick blower. I have learned quite a lot of things in that three hours. I burned perhaps a third of the bag of charcoal in three hours. I could get a very nice bright orange which I thought was a bit too cool, but I was able to move steel. Worked my very first taper which turned out meh. In the process I confirmed that... my anvil edges are still too sharp. I will need to grind them with a wider radius at least on one of the two sides. I learned my anvil can indeed be dented by my hammer after two errant blows on the edge. That orange I talked about which was perhaps too cold. Well, I pulled out a nice start to a coal rake to see how glossy that orange was and oh look a drip. AARG! I can burn scrap rebar in this forge in mere seconds. All this working today was on scrap rebar, never intended to keep. I just needed to make my first swings on some hot metal. I enjoyed it and will do much better I'm sure. Taylor -
I'm finding a bucket to drop the unfinished coals into. I like the shaker shovel. Would expanded metal to the trick? Taylor
-
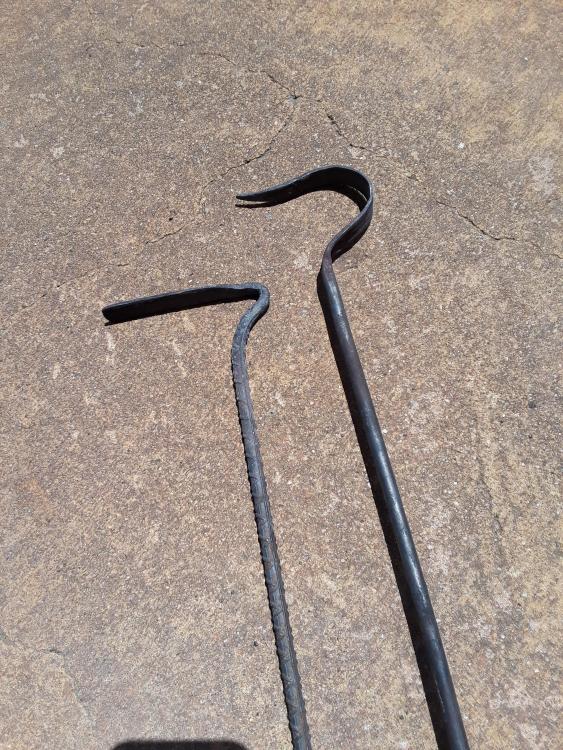
One of the things that has drawn me to backsmithing like it did to clay work was folks make their own tools. Blacksmithing seems particularly fond of tools to make tools idea. I know that I have quite a few tools I will need to make for myself and have decided that I might as well start with the forge fire tools before I attempt, punches, cuttoffs, tongs and so on. My forge is a JABOD made from a steel tire (17 inches in diameter) fired with charcoal. The firepot is 4 inches wide, ~5 inches deep, and 8 inches long at the hearth surface. The four-inch ends slope down towards the 3/4 inch tuyere. My make list is as follows: poker rake shovel or scoop If anyone has other suggestions or ideas about how I should design these fire tools, please let me know. I'll spend a few days looking at pics of exemplars for each of these before I sketch something up. I know I will have questions then. I fired the forge for the first time today and I didn't want the charcoal to burn itself out so I grabbed an old piece of leafspring and raked the coals up and out onto the hearth to cool. I'm thinking I will need to be sure any tool design works for my set up. For example, a rake that will help me shut down the forge. Austin has more than one steel supplier, and I will be making a trip to buy clean stock and some drops. Really looking forward to that. Thanks for the help y'all. Gracias T in J TX
.jpg.80f908dbee0ac5d4f39d9614f98c3fdd.jpg)

.jpg.3ca4dbe3657f2dd08e680f82a12f0ca1.jpg)


.jpg.4abc5d4b15b4d6efc4370853019be553.jpg)