
FeyWest
-
Posts
9 -
Joined
-
Last visited
Content Type
Profiles
Forums
Articles
Gallery
Downloads
Events
Everything posted by FeyWest
-
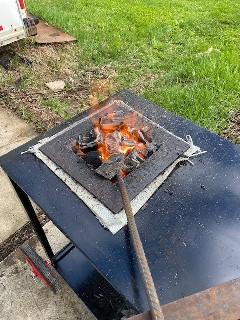
UPDATE: So today had a chance with some coke to try forging and I’m thinking I need a better air supply and to shallow out my forge a bit. The 6” of depth seemed to be too much for my hair dryer to handle and either burnt itself out or the heat from the coke over temped and roasted it. Either way, I’ve got a new fan/ducting I’m going to modify in so it’s not so close to the heat and hoping it’ll be a bit better at supplying air. Will try to have a better air gating/bleed system to not over tax it too. Will look at forming in some clay or litter mix to shallow out the pot with a sized brick or tile (unless you think a Steel plate would be better.). Reasoning: I was finding it would get hot in the heart of the forge but not where my stock is laying across. Thinking just not enough air getting up to the top for coke where I need to heat stock. In the mean time I got to work building my very own JABOD for charcoal with everyone’s encouragement! Got rained out... need to finish digging up clay and building legs to raise up the forge to a reasonable height. Either going to use a Double-Action Mattress Pump or a controllable mattress inflator/bleed system, I’ll experiment and see what works best! Figured this has now evolved to be better suited for this thread over the other thread.
-
Has only taken about 4 years of long, arduous effort to get well within their good books. I count myself very lucky hahah probably helps I’m pretty handy around the place and know what he likes to drink. Pretty darned cool stuff in there, if you like I can come over and scrounge up some long lost items, post vises, anvils, etc... for you! Oh and trust me Frosty I’m sure there’s bound to be lots of birthdays, Christmas’s of hand crafted goods to go around. Just have to get some free time now! And you make a fair point there... hmmmmm.
-
 Frosty I meant to ask for clarification on your charcoal sizing recommendation... When you mentioned "Peanut" sized is that shelled or unshelled, just for visualization sake, because shelled peanuts are relatively small (smaller than coal/coke generally should be or about the same?) For breaking up charcoal, what do you find the most efficient way, is it just best to crack it by hand or should I get a small centerpunch/screwdriver, I know it's pretty "flakey" so maybe just by hand is the best way to do it. I also want to then put it all in a solid container that I can easily dispense with a feed scoop or something into a steel pail for transport I think. Just brain machinations though. I KNOW right? multiple forges seems pretty extreme, and no amounts of convincing from you lot will sway me otherwise I'm gonna have a problem.... This is a safe space with no judgements right?! Wow Thomas that's incredible, gotta say I'm jealous hahah, with almost unlimited possibility at my girlfriend's farm I imagine it won't help me with collecting stuff like you've got eh? Love seeing all the new and old stuff in a good home rather than rusting away in some junk pile, gives some purpose again!
 -
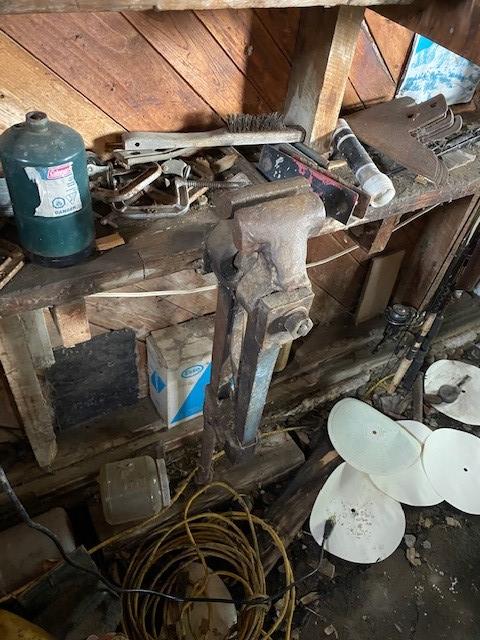
I've used lots of bench vises, however, I had seen this "Vise" in my Girlfriend's Father's garage at the farm and thought to myself "Huh that's kind of a neat vise, never seen that before" while I had been looking for a wrench or something. Then while I was listening to the ForgeCast podcast on Spotify trying to engorge myself in everything blacksmithing as I start my own journey in smithing, and they had mentioned how important and helpful a leg/post vise was for blacksmithing and that they tended to be hard to find. Looked up an image of a post vise and holy crap that's the type of vise in the garage! Long story short, I inspected it a bit further and other than a missing sliding Tee-handle that's been rickshawed with a large nut (I think or maybe the original handle is just missing), it still works wonders. Even with the missing handle the screw turns easily by hand, thought I'd share my little story and see if there's any tips for mounting and potential repair items I need to look at before using it. I'll try to get some more pictures this weekend. I really enjoy seeing everyone's vintage vises and other cool tools browsing this sub-topic!
-
A collection of improvised anvils
FeyWest replied to Charles R. Stevens's topic in Anvils, Swage Blocks, and Mandrels
Just figured since I just joined I'd add to the menagerie of Impro Anvils. I was lucky my girlfriend's grandad had acquired a Railtrack Anvil on his farm, not sure what it was used for but it's definitely usable. Only had one day to play around with it, had to resurface it a bit as it had pitted and rusted quite a bit from not being used and being in the elements for so long. I modified it a little bit but after perusing the forums I read hard 90 edges aren't the best so that portion I'll try to modify and soften those just a touch. Added a round shoulder to half the length of it though, felt pretty proud for not having too much experience with angle grinders. Before: After: Modified Edge about halfway: It was inherited so if there's any additional mods or anything that's relatively easy let me know, I was formulating a plan in my head to somehow dull the ring, found some vise-grip clamps helped as a temporary solution. Thinking a chain wrapped around the neck of the track and turnbuckled may do the trick.
-
Hahah well I definitely think it’s skill mostly, it was only the first chance I’ve had to heat and beat steel! Which was great, I just knew from what I was experiencing there was something I had been missing and such why I’m here now. My original design had intended to be more framed with the angle iron (With a notch front and back for laying stock across) but I had no understanding to why until afterwards seeing some of the coal forges being run. This is an easy enough mod which I intend to do. I’m also going to procure some good coal from a nearby farrier supplier, this definitely seems more suited to coal, I’m sure I can figure out a way to mod to work better with charcoal, am glad I’ve got that direction now thanks to you all. Definitely makes sense and probably why it felt like I had to dig deeper down since I was cooling higher with too much air flow. I have an air bleed hole in my supply line that I need to introduce a gate to reduce/redirect how much air is going through and hopefully having a better Fuel:Air ratio. I also think I’m going to try your JABOD design, in the background of my forge you can see there’s a movable wooden crate which I think may work wonders. This way I’ll have a coal forge and a charcoal forge. *EDIT* Thought I should mention also I booked a blacksmithing 101 class at a local school in September which I’m looking forward to now! Thanks for the encouragement there.
-
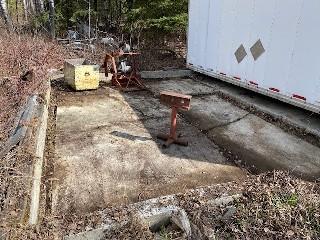
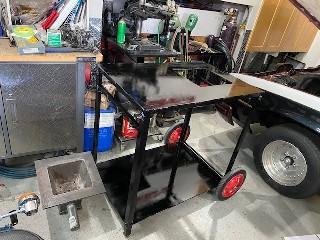
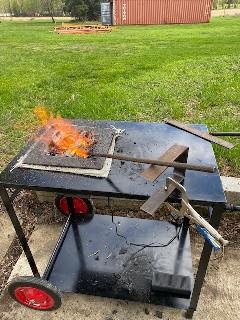
Thanks to both of you, I really appreciate the time taken to give some support. Thank you Irondragon for directing me to the "Read Me" it's very useful Now that I'm here I'm hoping to contribute and peruse around, be an active member of IFI! Just some pictures for reference to give some context:
-
That looks awesome, I’m looking forward to getting back to my own setup to try and do my first batch. Do you have lots of dead fall and such to pyrolize? What kind of wood are you working with?
-
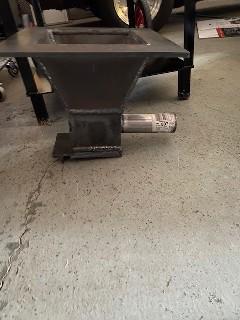
My Question (TLDR) - Whats the best method for Charcoal Forge Management and heat isolation in material? My Forge: Liam Hoffman inspired Firepot (5”x5” - 6” deep) with a tuyere and hair dryer blower. (See Pictures) Just started blacksmithing for the first time last week and giving my homemade forge its maiden voyage. With the design as it stands and just starting out I decided charcoal would be the easiest, accessible fuel for me. Unfortunately, I’ve noticed there’s a lot more smiths who either use propane or coal forges in comparison, info seems a little harder to come by lurking around. Is it best to heat stock, similarily to coal, in which you lay it across and pile charcoal over top? Should I size the charcoal smaller like 2”-3” or is there reasons to keep some of the large chunks for deeper in the fire? Do I control the heat tighter to the center using a spritzer of water on the outside pieces or easier to shrink the ID of my forge? I’m working with 15mm Rebar, which I’ve cut to 2-1/2 foot lengths, to learn and practice on. Thinking I need to shorten them a bit to work on a little easier given the depth of my forge potentially. (Will post photos when I’m on my computer... doesn’t like my phone) Any information is good, I anticipate a lot will be just through experimentation but I hope to be doing this for a long time. You all seem to be full of useful info and very helpful!