ipsullivan
-
Posts
19 -
Joined
-
Last visited
Content Type
Profiles
Forums
Articles
Gallery
Downloads
Events
Everything posted by ipsullivan
-
Rough draft forge design, sanity check. W/ drawing
ipsullivan replied to ipsullivan's topic in Gas Forges
No change with the properly deburred jets. -
Rough draft forge design, sanity check. W/ drawing
ipsullivan replied to ipsullivan's topic in Gas Forges
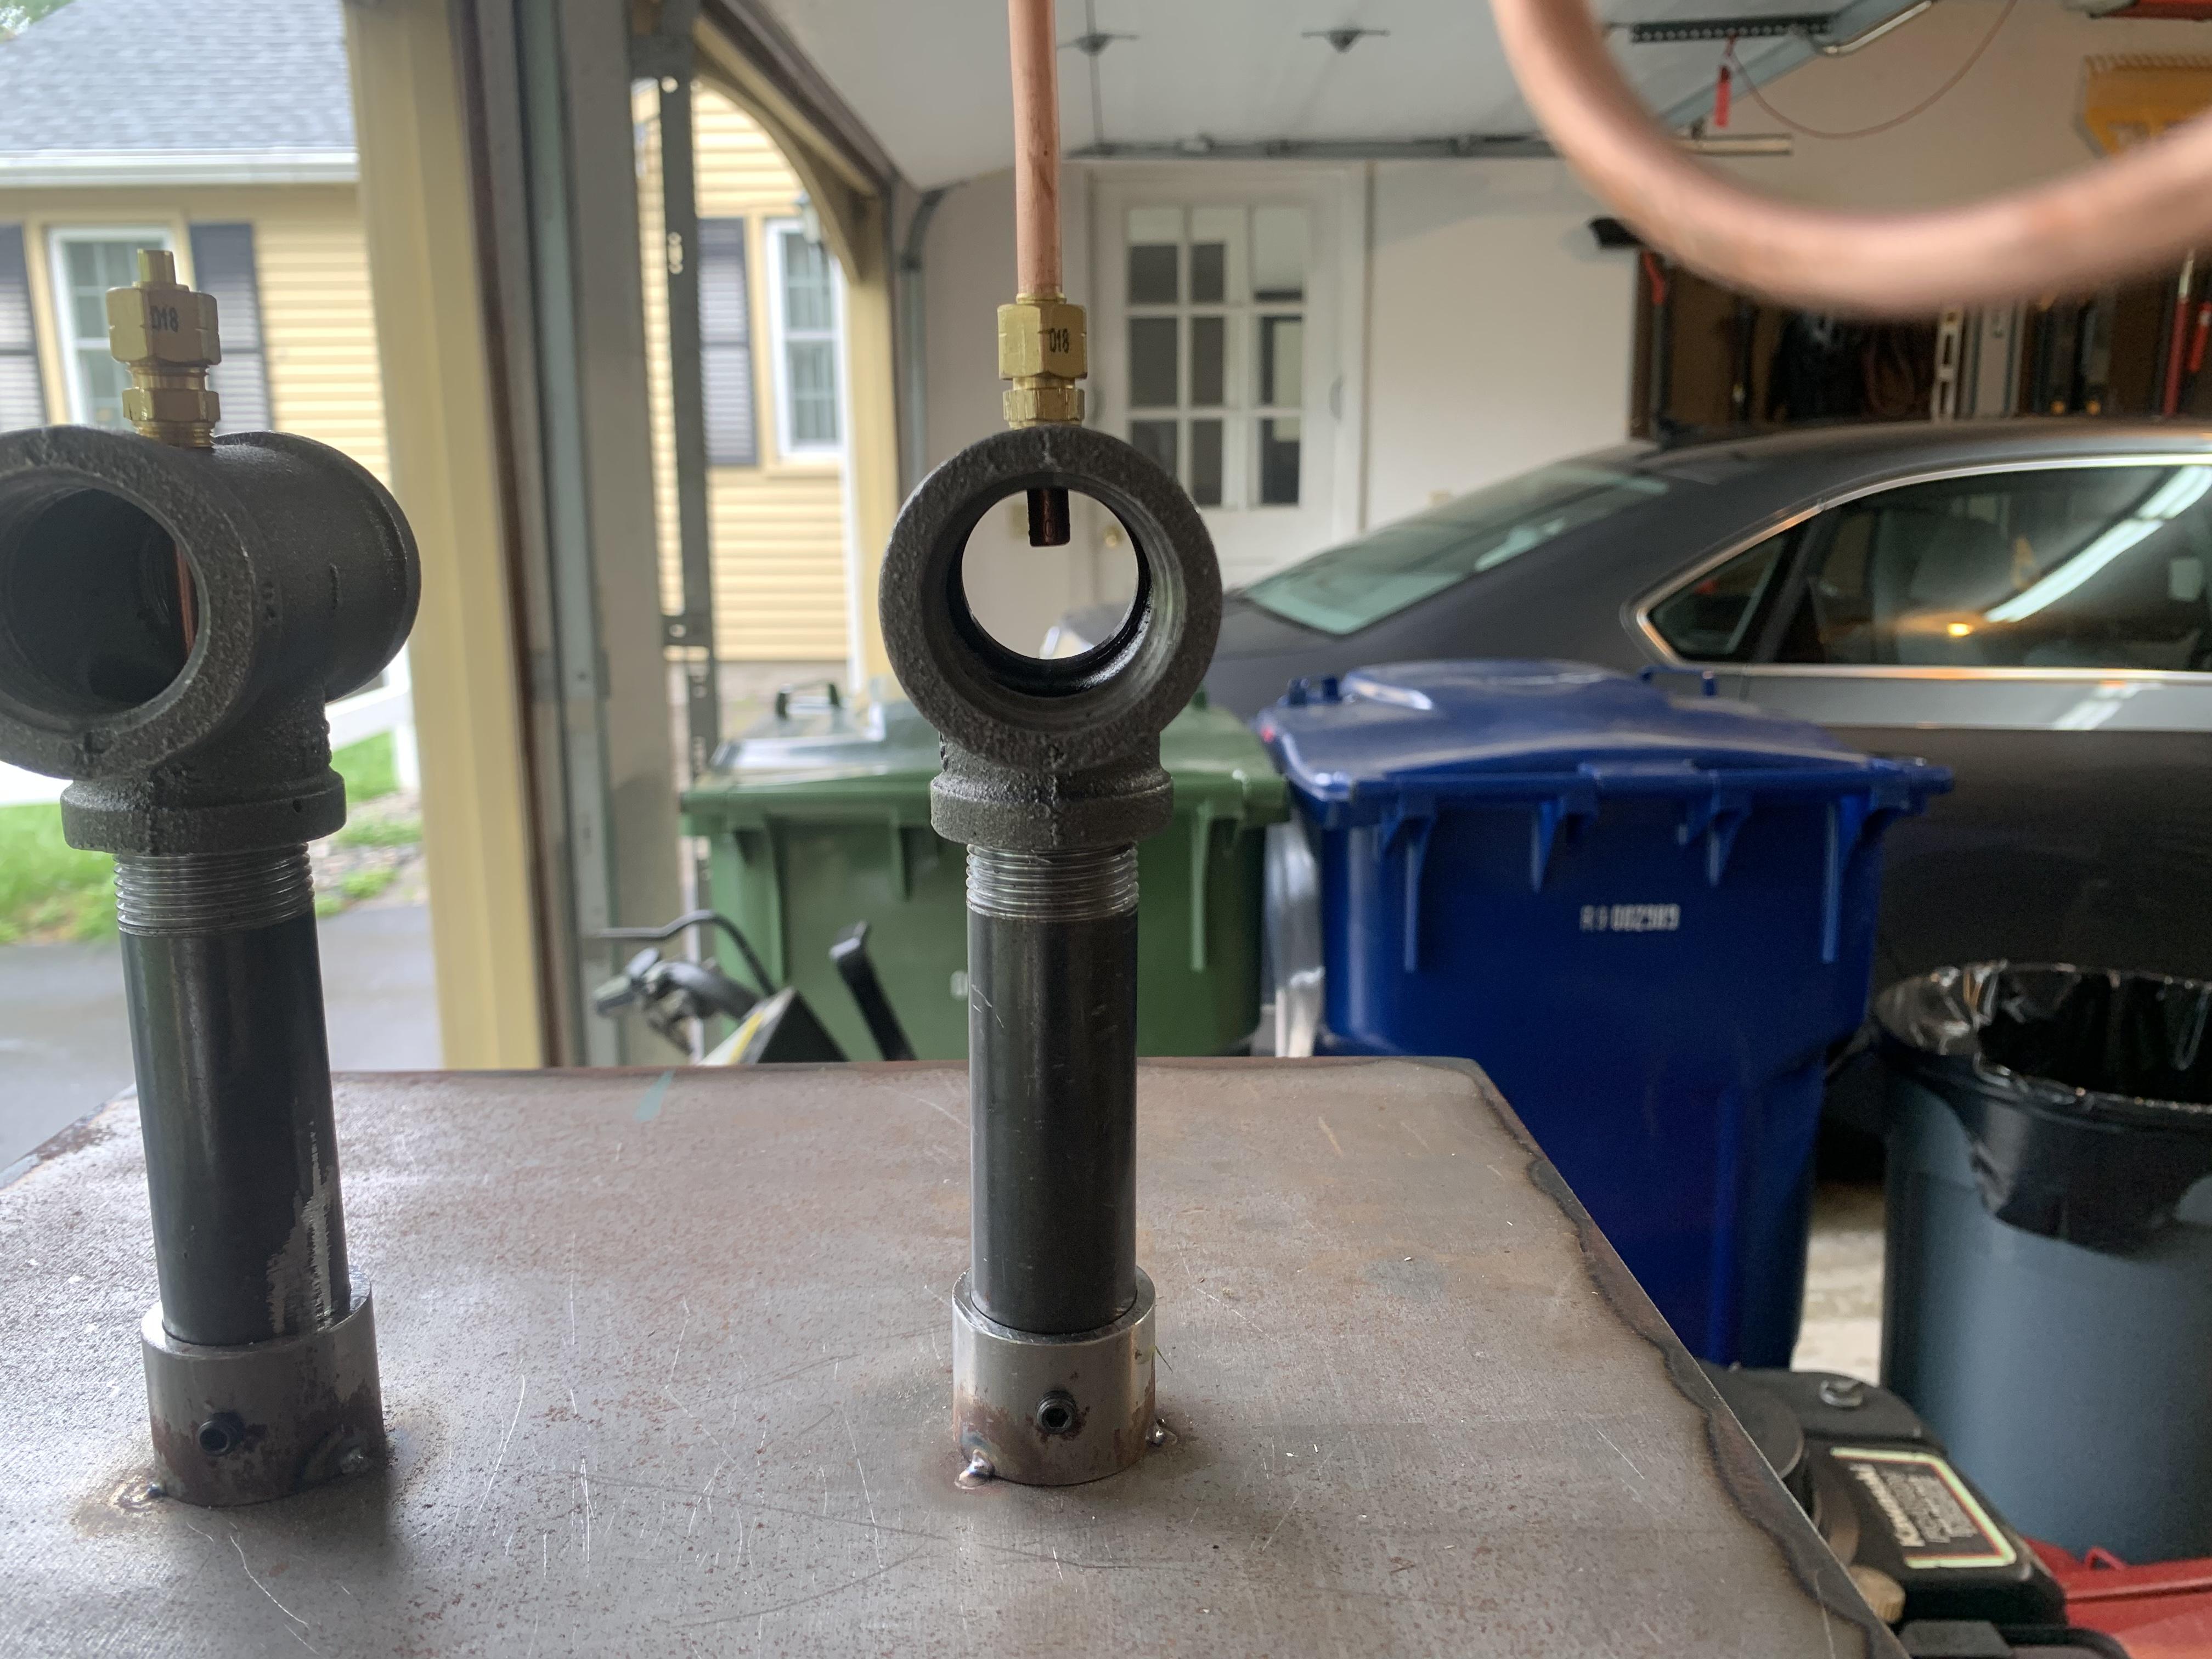
Believe it or not, the mig tips accept gage pins up to .041”. They are marked .035”. These were an Amazon buy. I did find some small burrs a still in the orifice when checking with the gage pins. Looks like I need more attention to detail when trimming and deburring the jets. I will re-test with these jets today without changing anything else. -
Rough draft forge design, sanity check. W/ drawing
ipsullivan replied to ipsullivan's topic in Gas Forges
Frosty, Your direction to open up the port in the shell has been noted! No need to yell. I am not a magician, and things take more than 24hrs to get done. I will report back later in the week. Thanks for the help so far. -
Rough draft forge design, sanity check. W/ drawing
ipsullivan replied to ipsullivan's topic in Gas Forges
Frosty, As you previously suggested, I plan to remove the thread protectors all together and utilize the burner port as the final flare. I am a seeing now that it will be best to tune these burners with the insulation complete. Also, good to know I don’t need to focus on the pressure too much. -
Rough draft forge design, sanity check. W/ drawing
ipsullivan replied to ipsullivan's topic in Gas Forges
I will check the MIG tips with gage pins tomorrow at work. I’m curious if the Amazon.com regulator could be junk and not accurate. Maybe I should verify the pressure with another gage. In the mean time I am going to work on the insulation. If I’m feeling productive, I might get the refractory done by the weekend. Still need to buy some kiln wash. -
Rough draft forge design, sanity check. W/ drawing
ipsullivan replied to ipsullivan's topic in Gas Forges
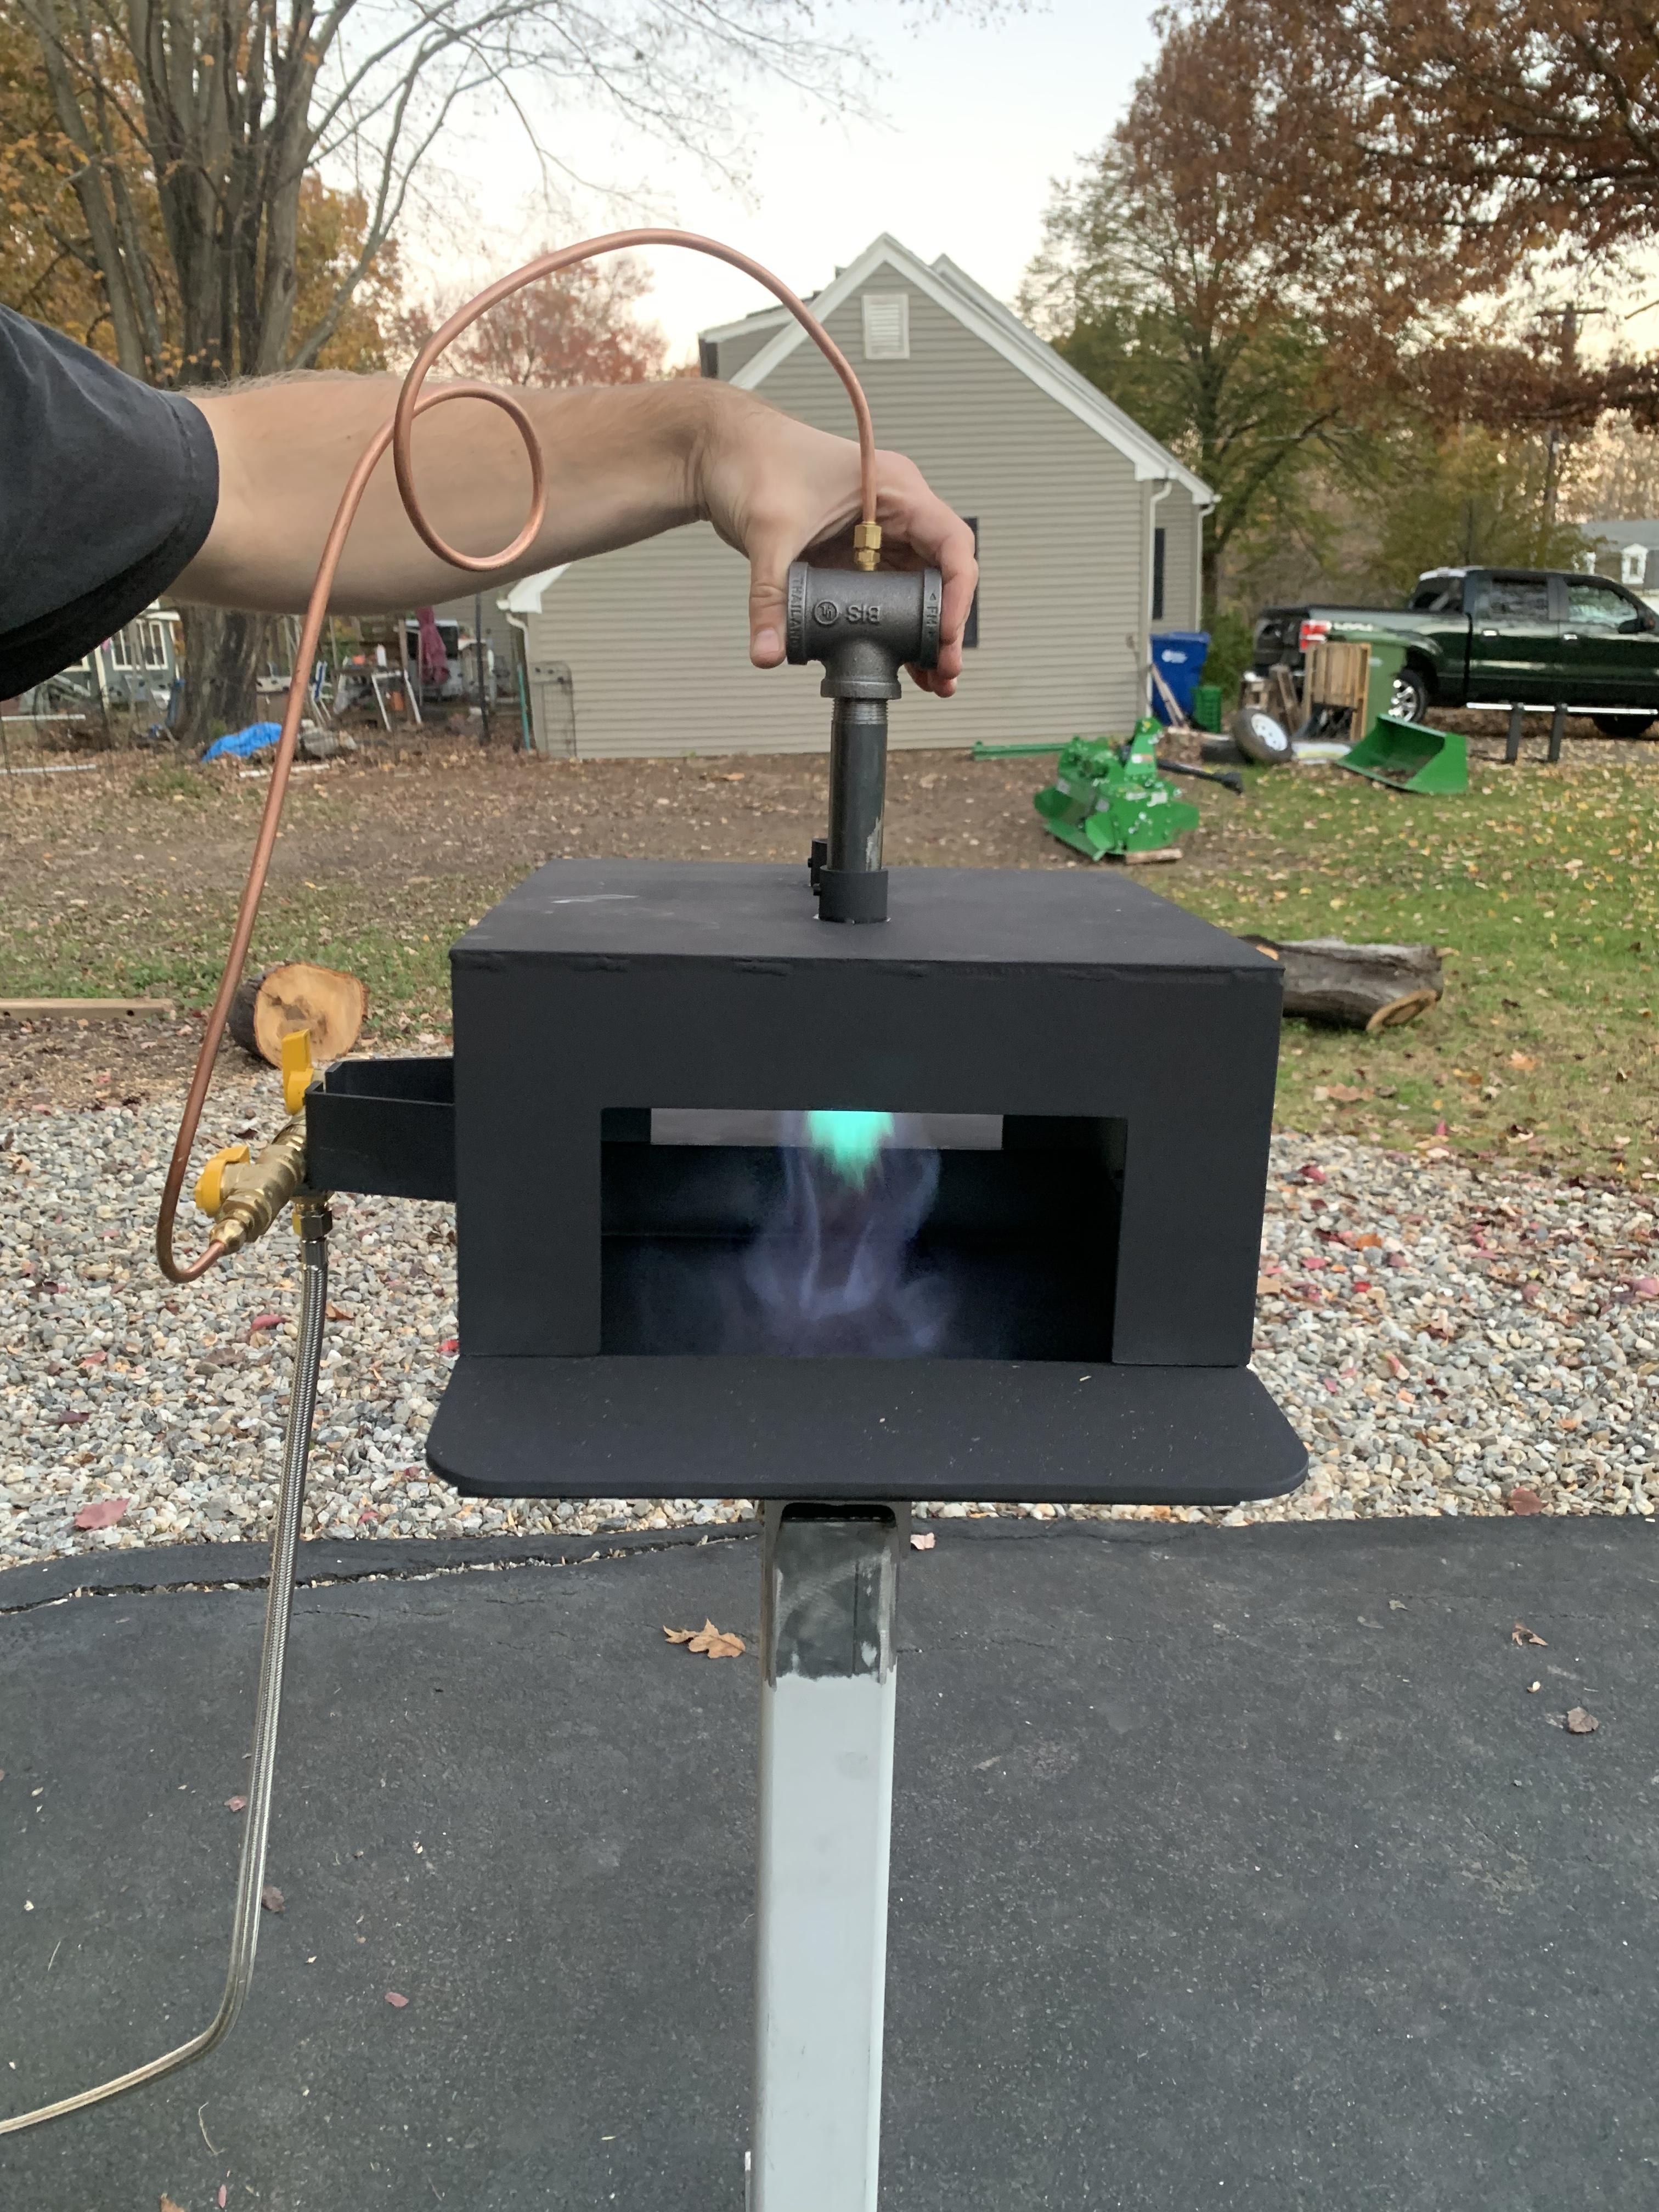
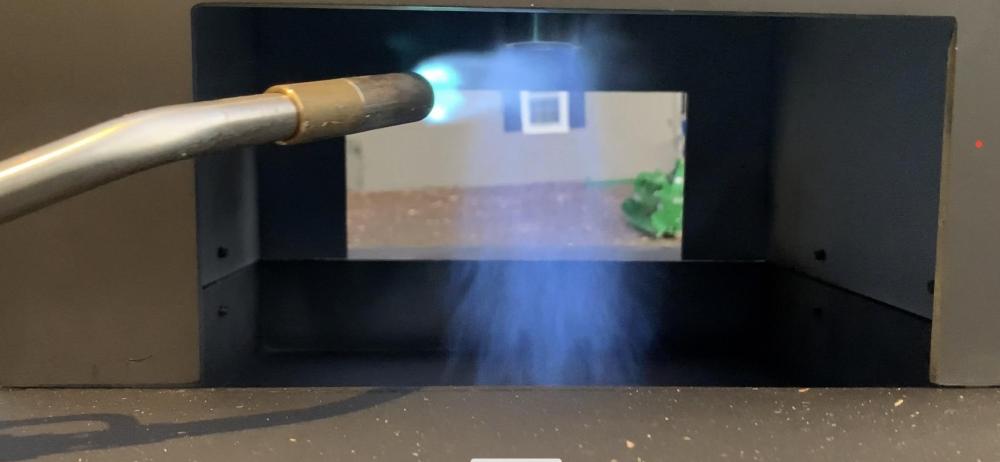
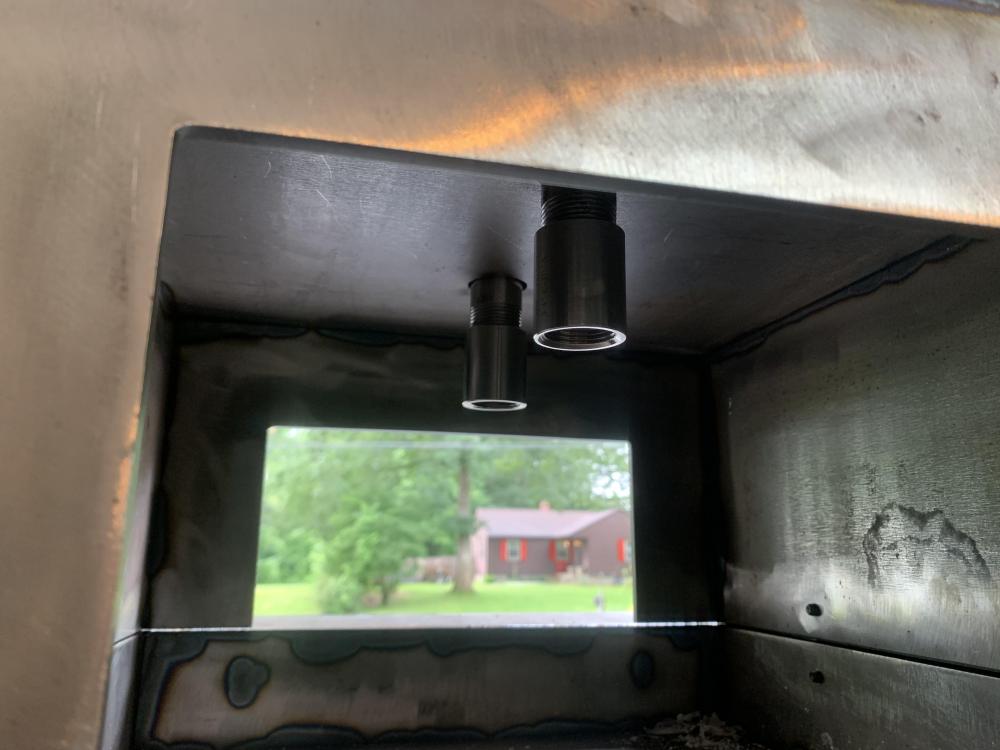
Attached is a photo of keeping the flame lit with a torch (because it can’t maintain a flame on its own). The intake ports are unobstructed when taking this photo. Pressure was about 7 psi. I also attached a photo of the intake ports. That MIG tip has been trimmed about .350”.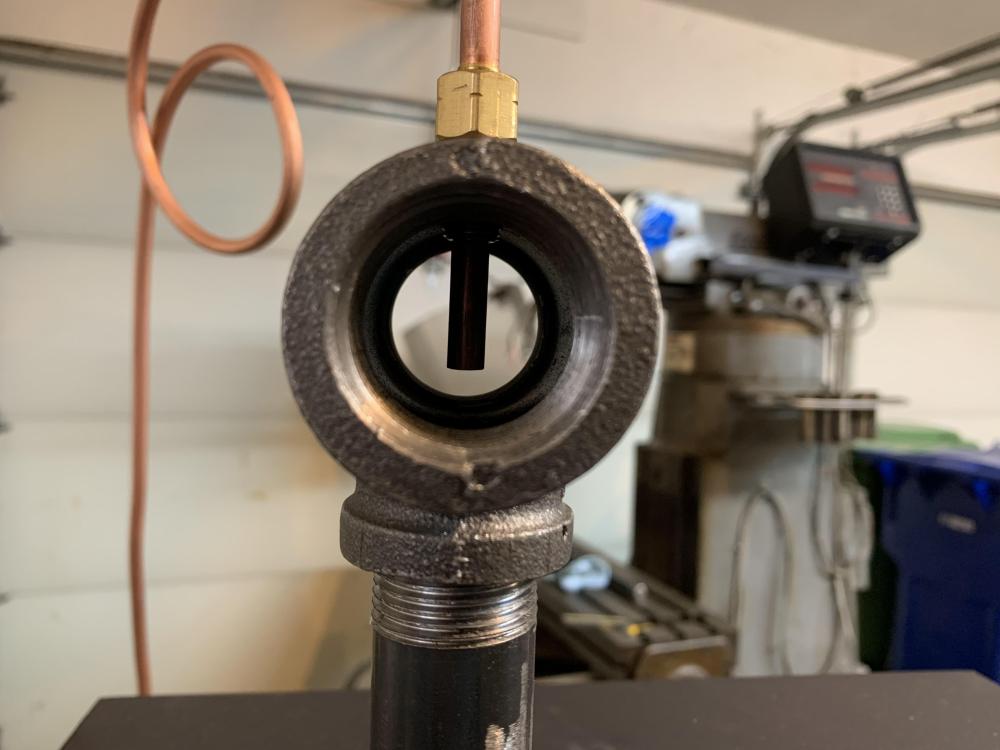
-
Rough draft forge design, sanity check. W/ drawing
ipsullivan replied to ipsullivan's topic in Gas Forges
I am working on this project when I find time. I do appreciate the feedback and advice. I just attempted firing it up this weekend after finally painting it the week prior. I used the following: -1”x3/4” tee -6” nipple (3/4”) I followed your PDF when building. Would you recommend trying a MIG tip with a larger orifice? -
Rough draft forge design, sanity check. W/ drawing
ipsullivan replied to ipsullivan's topic in Gas Forges
I’m using a .035” MIG tip. Not finishing the insulation would allow me to still change the burner tube diameter if needed. -
Rough draft forge design, sanity check. W/ drawing
ipsullivan replied to ipsullivan's topic in Gas Forges
I snapped some photos and video. I have started with a fresh MIG tip and tediously removed length (including deburring the orifice). No luck in getting it to hold a flame. I tested pressure between 2-10psi. I can only get it to hold a rich flame when almost choking out the t-burner completely. The 2nd video shows me gradually decreasing the choke amount until the flame pushes out too fare and extinguishes. The 1st videos shows attempting to light the burner with no choke. Maybe I need a different orifice size? I family painting it with some high temp paint. I haven’t done the insulation yet, as I would like to confirm the burners will work. Just trying to avoid tearing the thing apart after insulating. IMG_6693.MOV IMG_6691.MOV
-
Rough draft forge design, sanity check. W/ drawing
ipsullivan replied to ipsullivan's topic in Gas Forges
Frosty, I am referring to the burner port. With your added advice, I will plan to have the burner port lined with at least 3/8” of refractory and the same kiln wash as the forge chamber. -
Rough draft forge design, sanity check. W/ drawing
ipsullivan replied to ipsullivan's topic in Gas Forges
I will take a look at the T and see if the 1/8” pipe thread is misaligned or 1/4”-28 mig tip threads are tweaked. I am going start over with a fresh mig tip and ensure to deburr the orifice thoroughly each time. Also, will go with smaller increments if I can manage to hold a flame. Frosty, I do plan on moving the burners up once I have the insulation completed. I was planning on 1/2” of refractory to be exposed In the bore or potentially the entire nozzle bore to be lined with refractory if I can pull it off. Thanks for the tips, will report back later in the week with results. -
Rough draft forge design, sanity check. W/ drawing
ipsullivan replied to ipsullivan's topic in Gas Forges
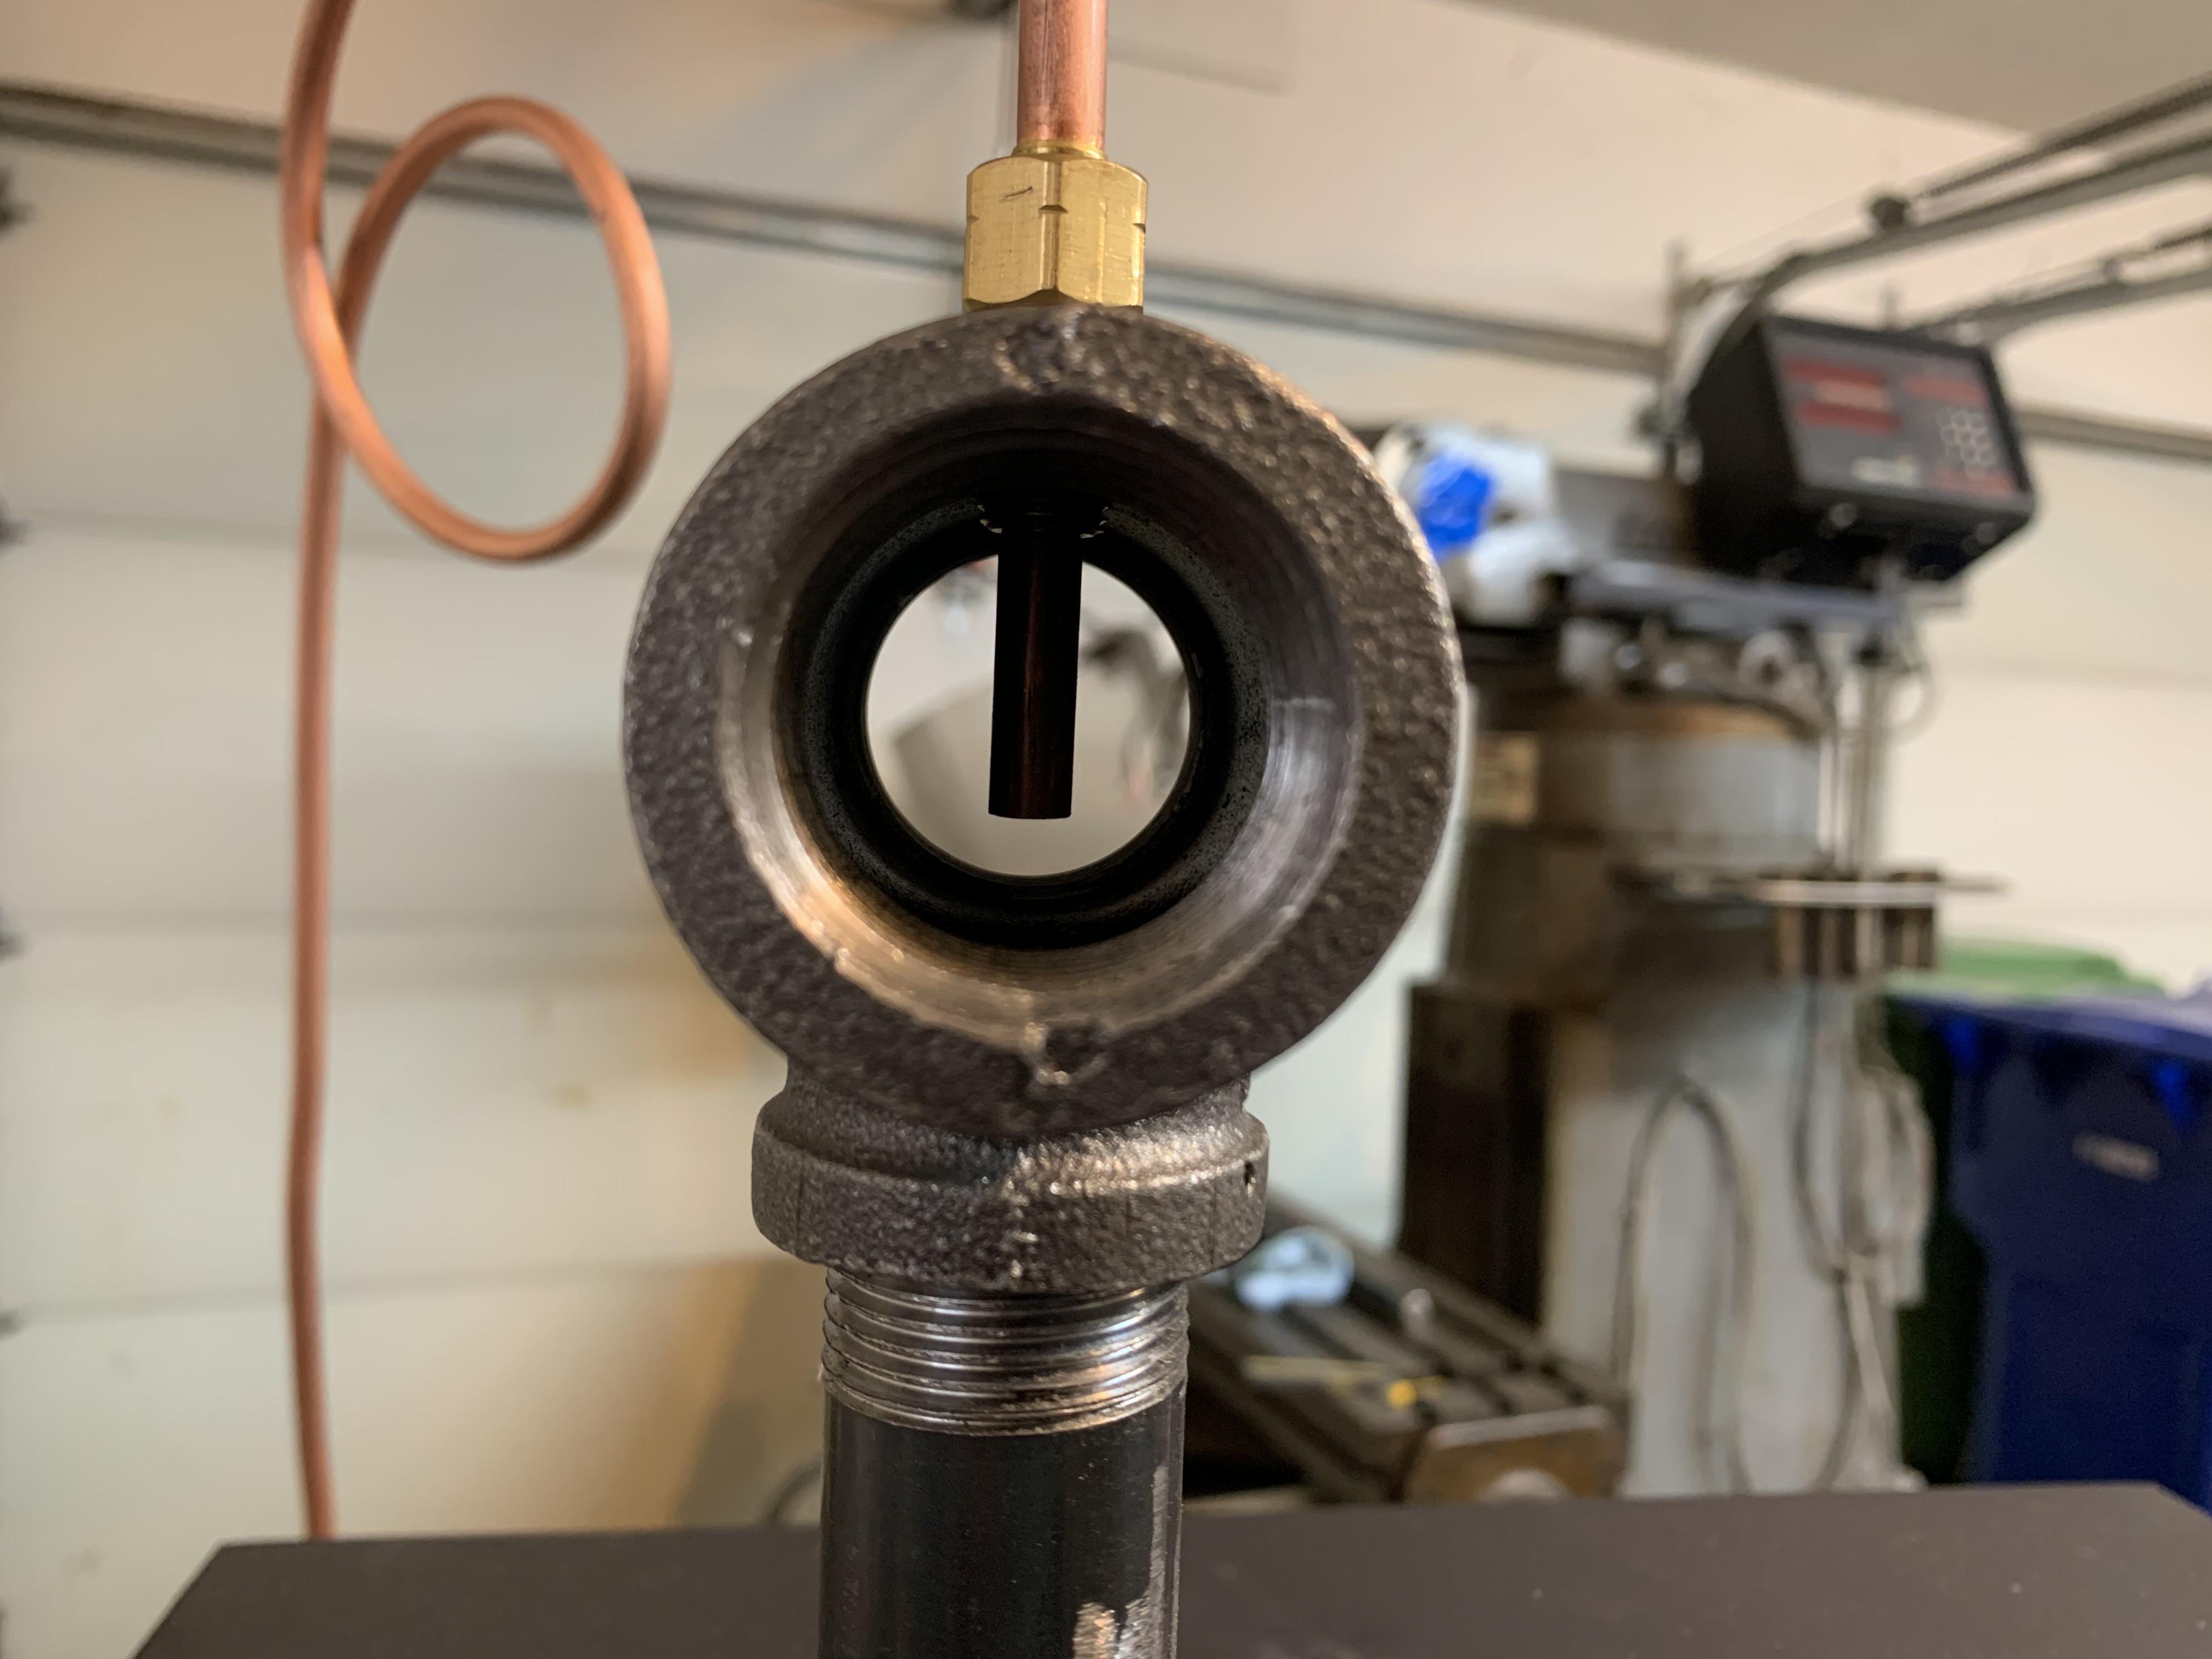
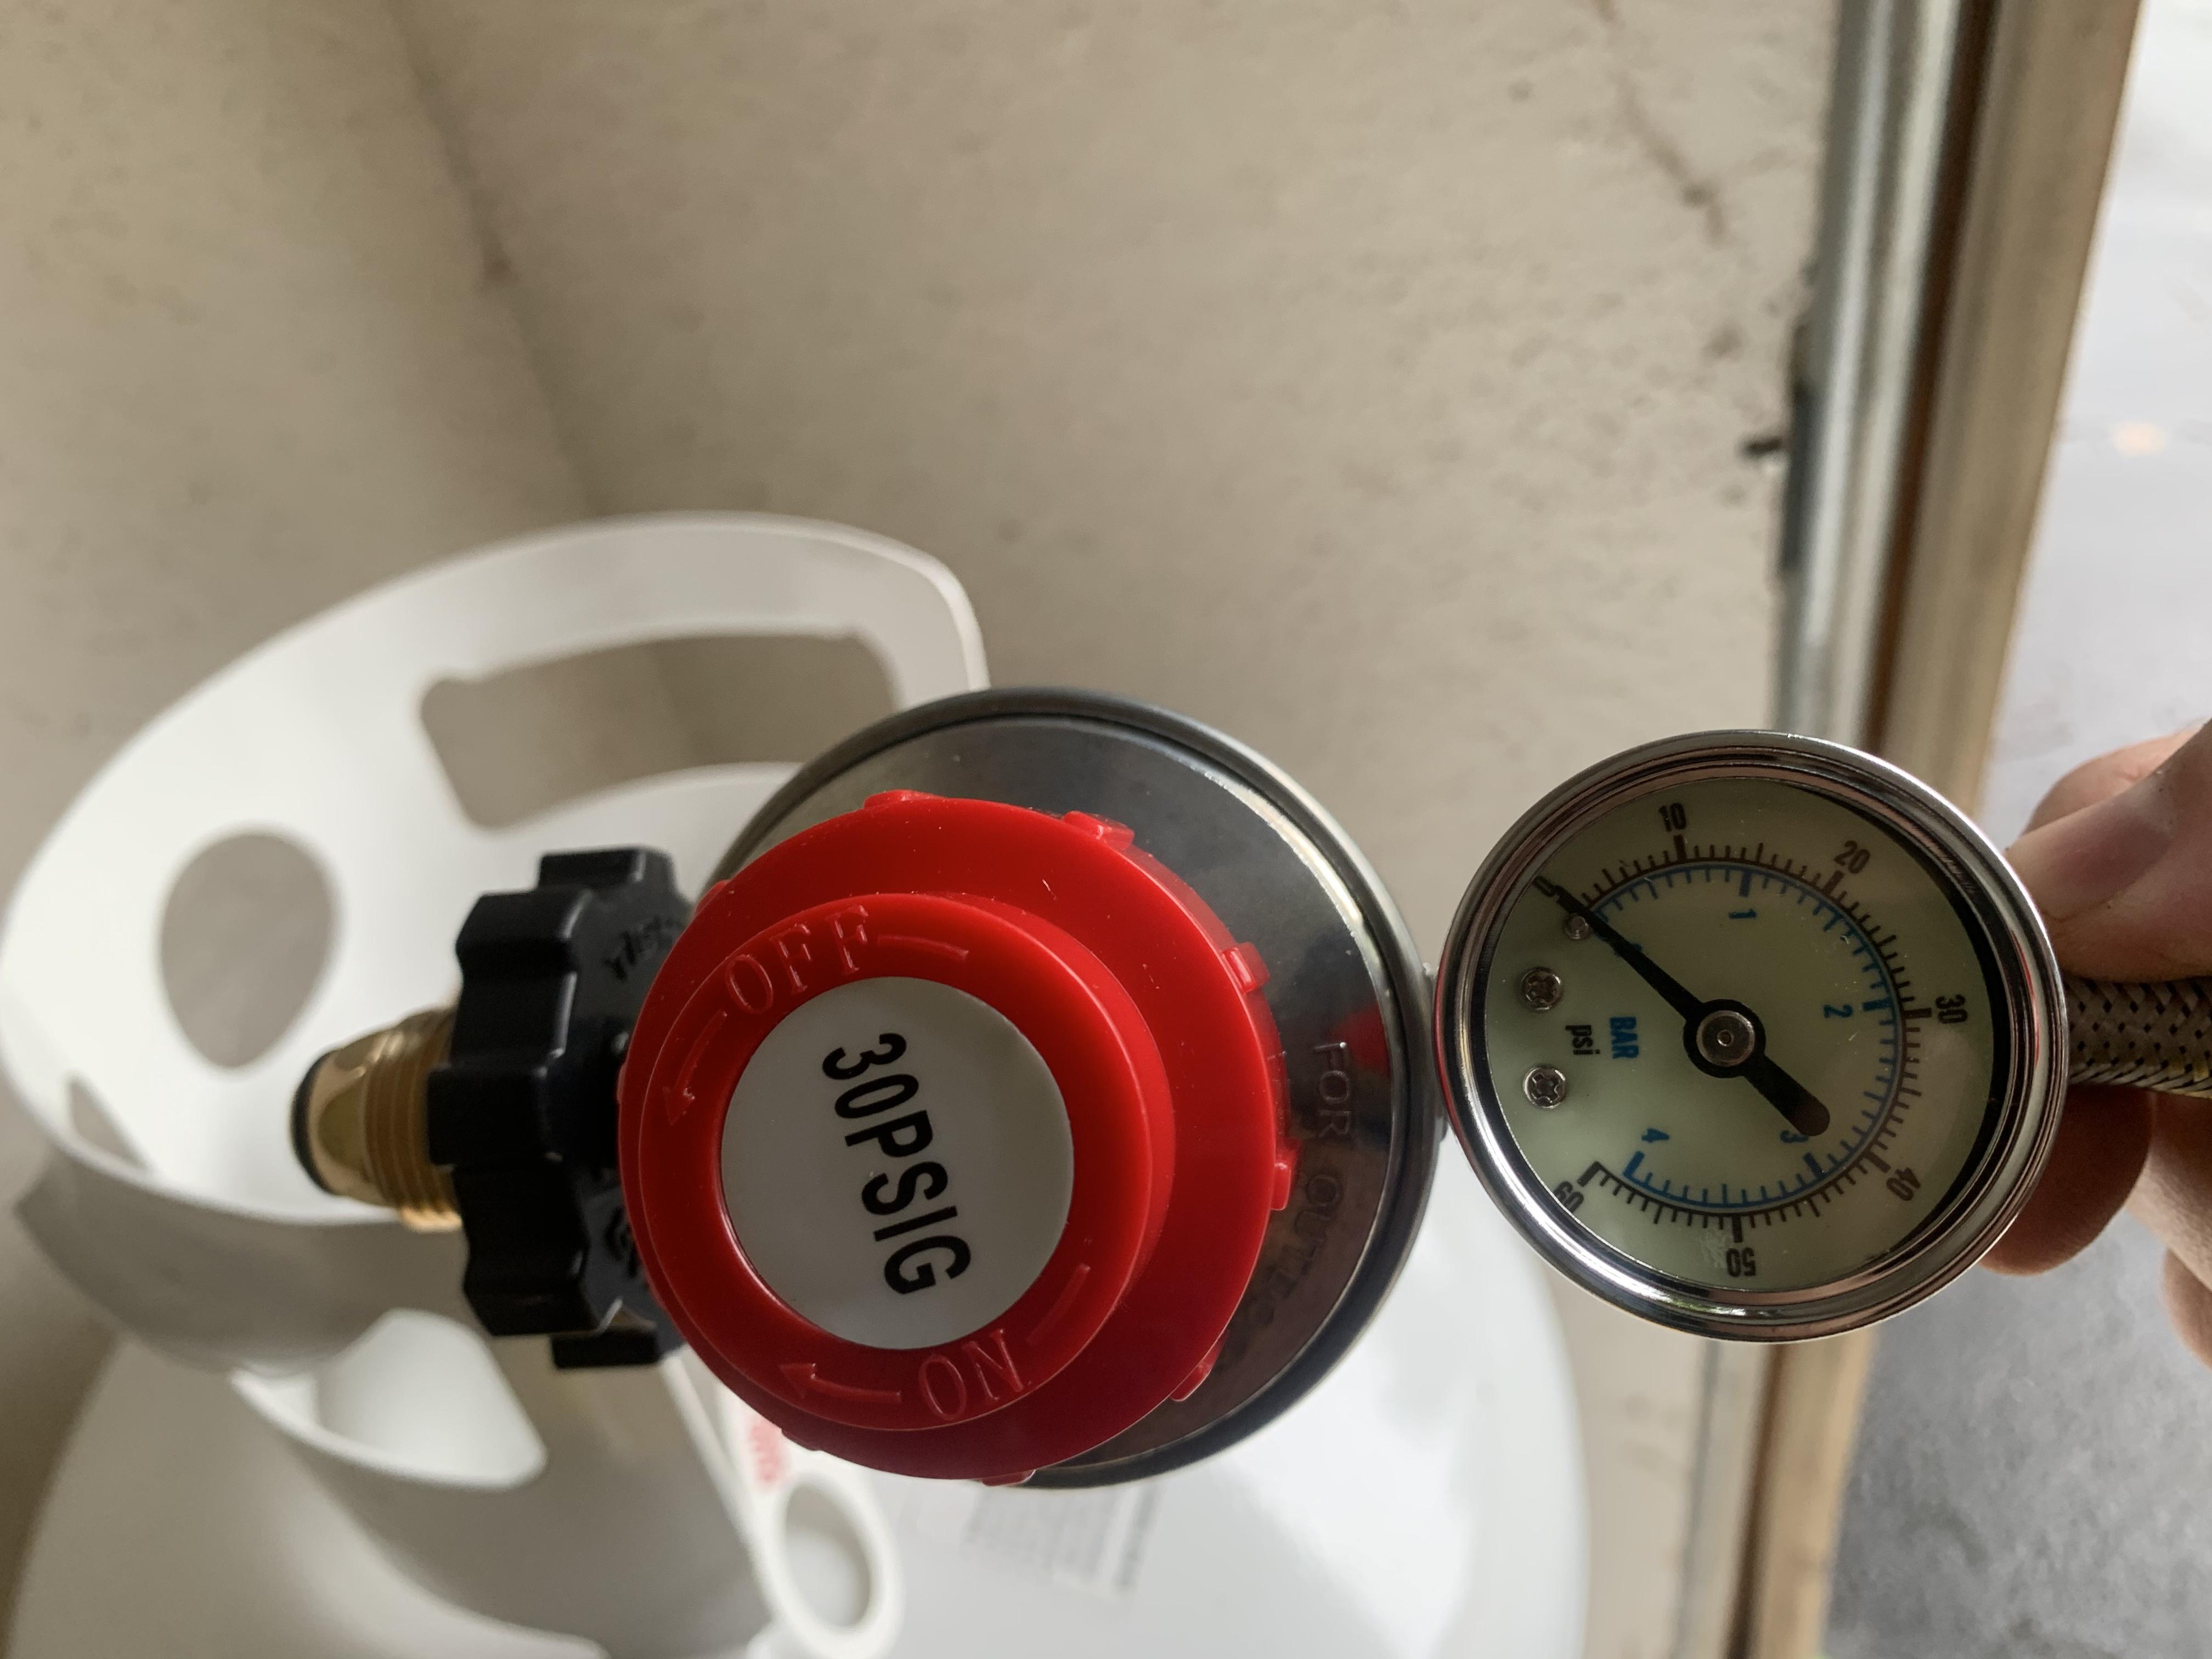
Got the plumbing hooked up and test fired one burner. I am having issues keeping the burner lit. I followed The Frosty T Burner Build PDF. -1”x3/4 T -3/4”x6 nipple -.035 mig tip -using a stainless 3/4” coupler for a flare -0-30 psi regulator -manifold setup as shown -compression fitting on the top of the burner are temporary. Switching to flare once I tap them. I started with a full length jet (.035” tweco) and attempted varying pressures up to 10 PSI, with and without the burner flare. No luck. I then shortened the jet about 1/8” and repeated the process. No luck. I continued the shortening and testing process about 1/8” or so at a time. No luck. The air/fuel seems to rich as choking the burner does not help. I got the jet to where it is shown in the photo and stopped. I was using a MAP gas torch to ignite. Any ideas?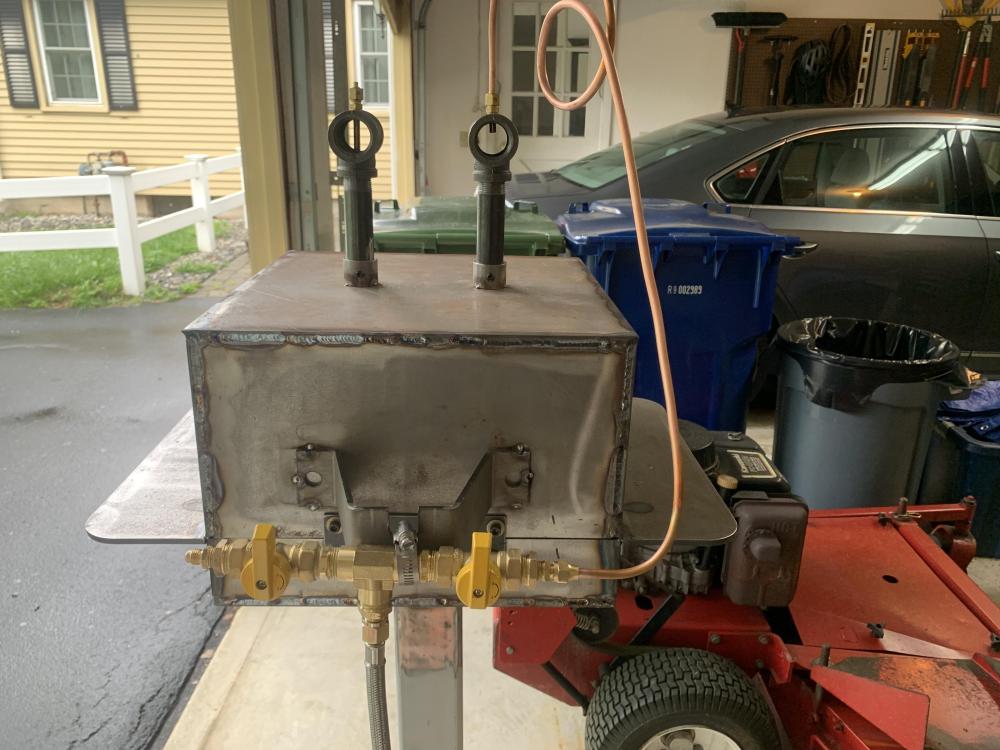


-
Rough draft forge design, sanity check. W/ drawing
ipsullivan replied to ipsullivan's topic in Gas Forges
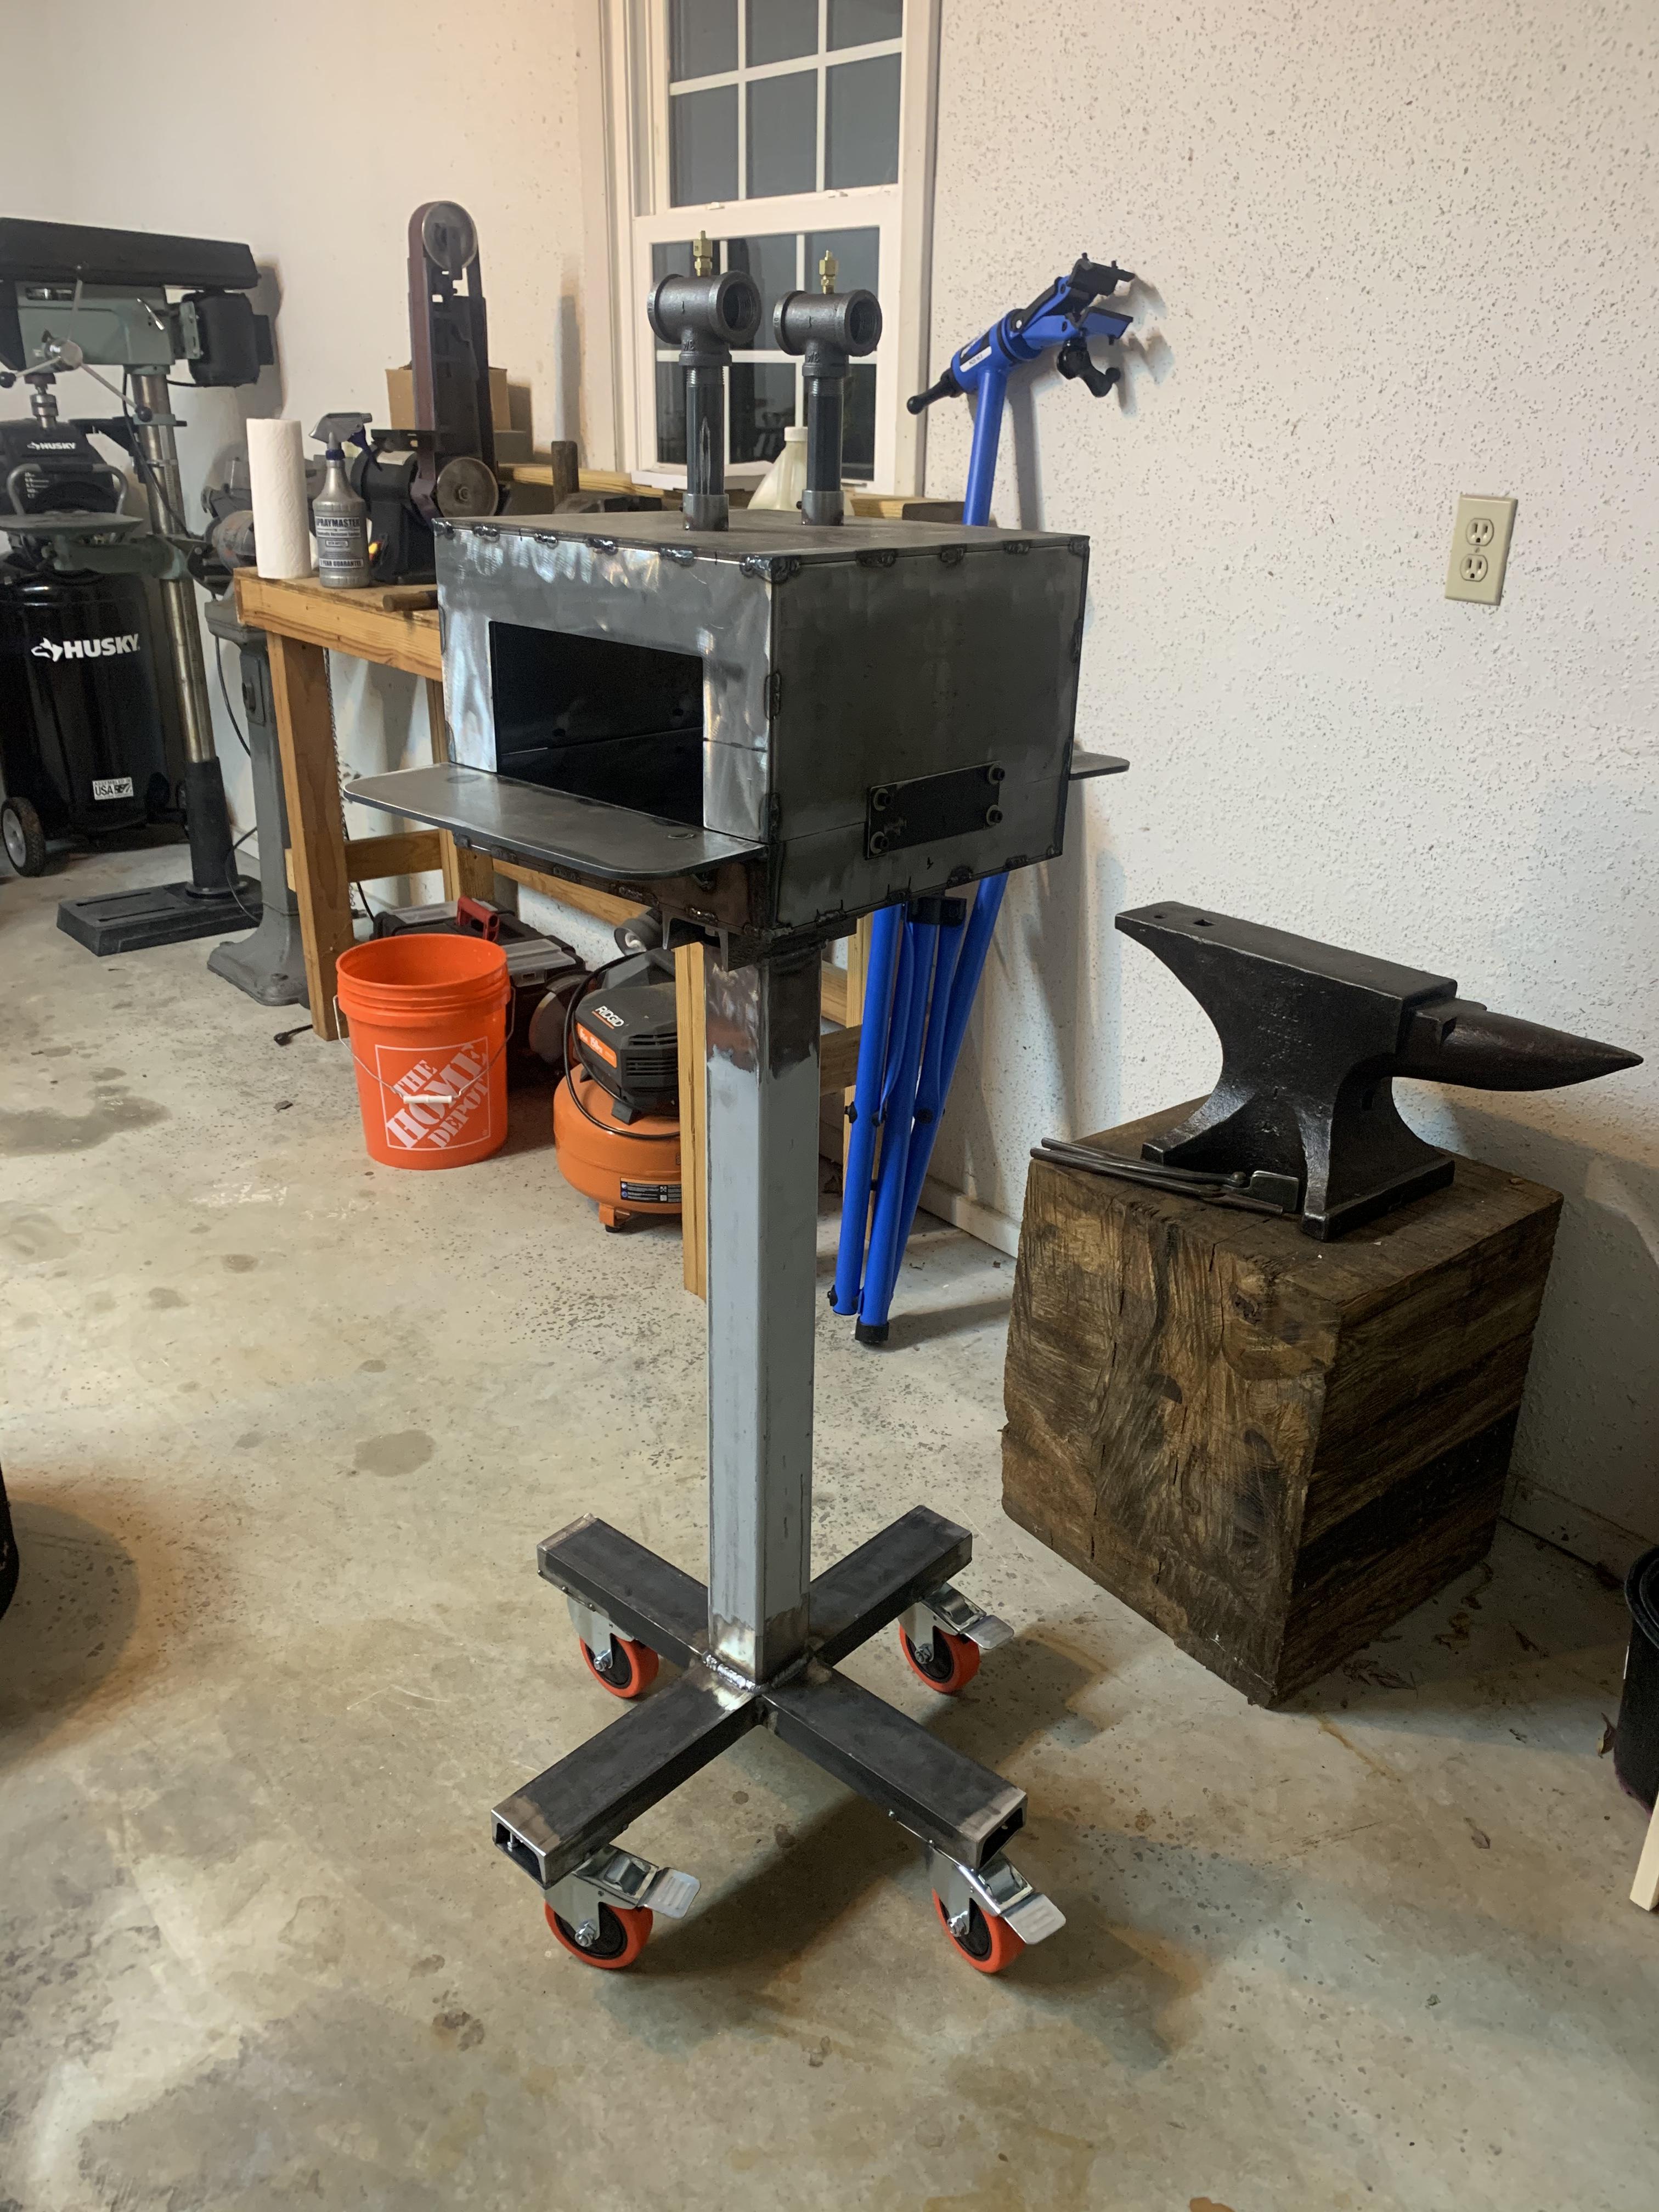
Update! This project was put on the back burner for most of the warm months. Knocked out a mobile stand last week. I wanted to be able to store the forge against the garage wall and move into place in the overhead door opening. Originally it wasn’t going to have casters, but it was pretty heavy to be sliding around the garage. Managed to make it from free material. Finalizing plumbing is next, followed by paint and insulation.
-
Rough draft forge design, sanity check. W/ drawing
ipsullivan replied to ipsullivan's topic in Gas Forges
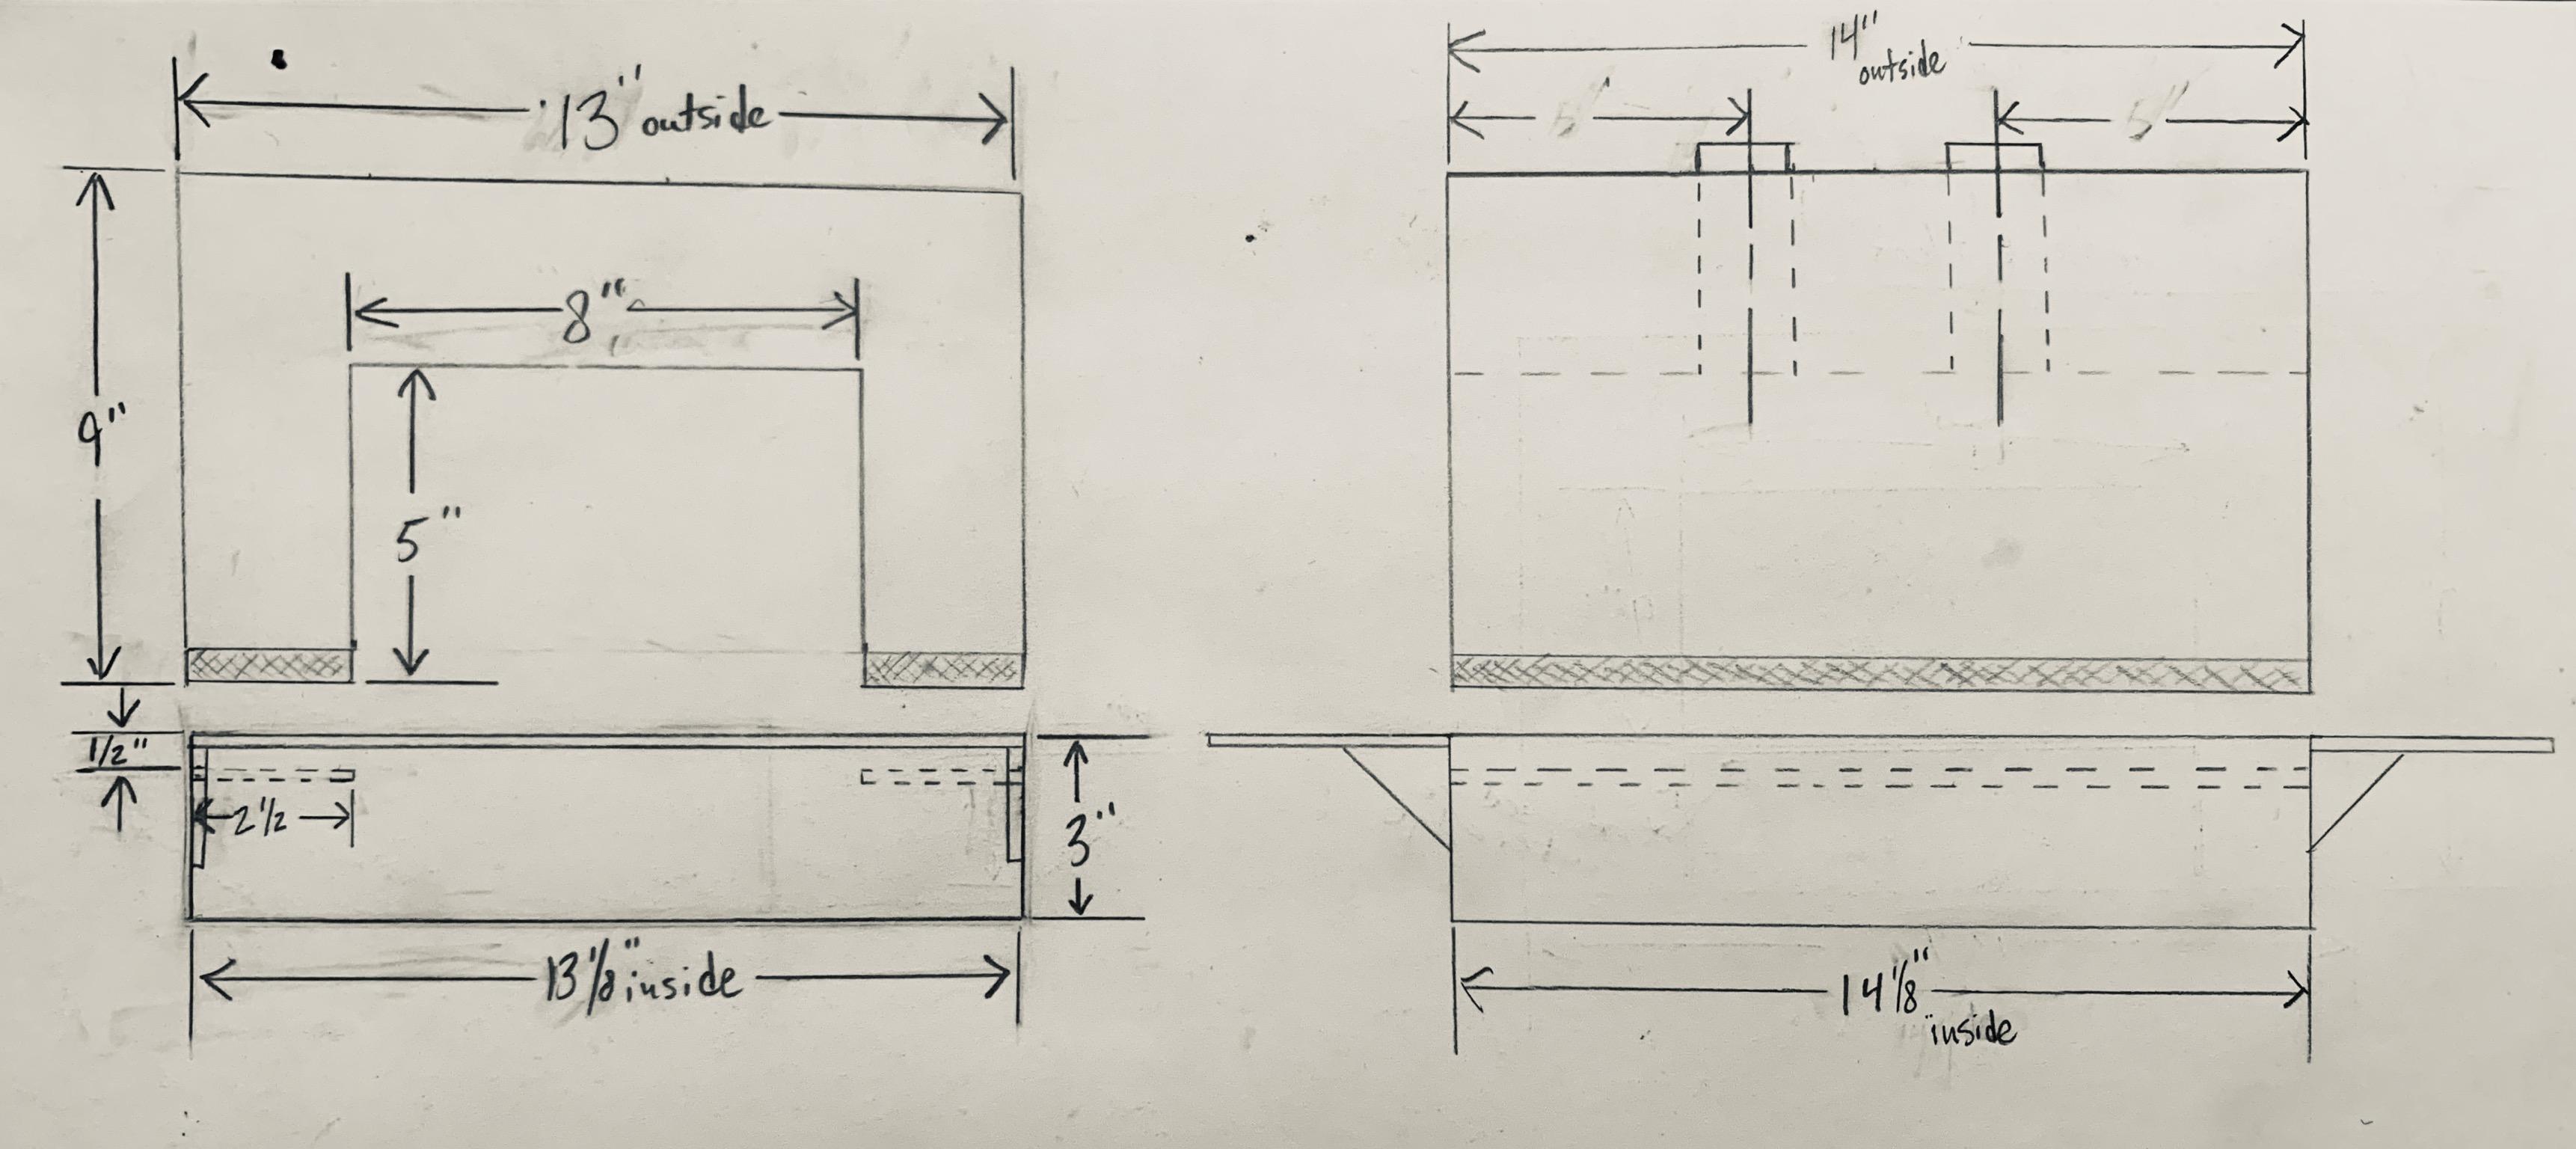
Frosty, I did gloss over the 2 layers of 1” previously. I now understand the advantage and will apply that on any future forges. Thanks for the buttering tip. I remember reading that a couple weeks ago, it makes more sense now. I made some progress on the forge body today. Photo below. The shell is all tacked together. Next weekend I will be adding brick shelves and some sort of tabs to prevent the two halves from shifting during use. I strayed from the original plan: - 4.5x9x14” volume, 567 ci -.250” plate for body(had material laying around) - for simplicity of fabrication, the two halves sit flush on each other instead of recessing the top. I purchased everything to make two 3/4” T burners. I am trying to figure out the flare, I would like to just get a couple of thread protectors but I can’t seem to locate any locally. I was thinking of modifying a coupler. Thanks, Ian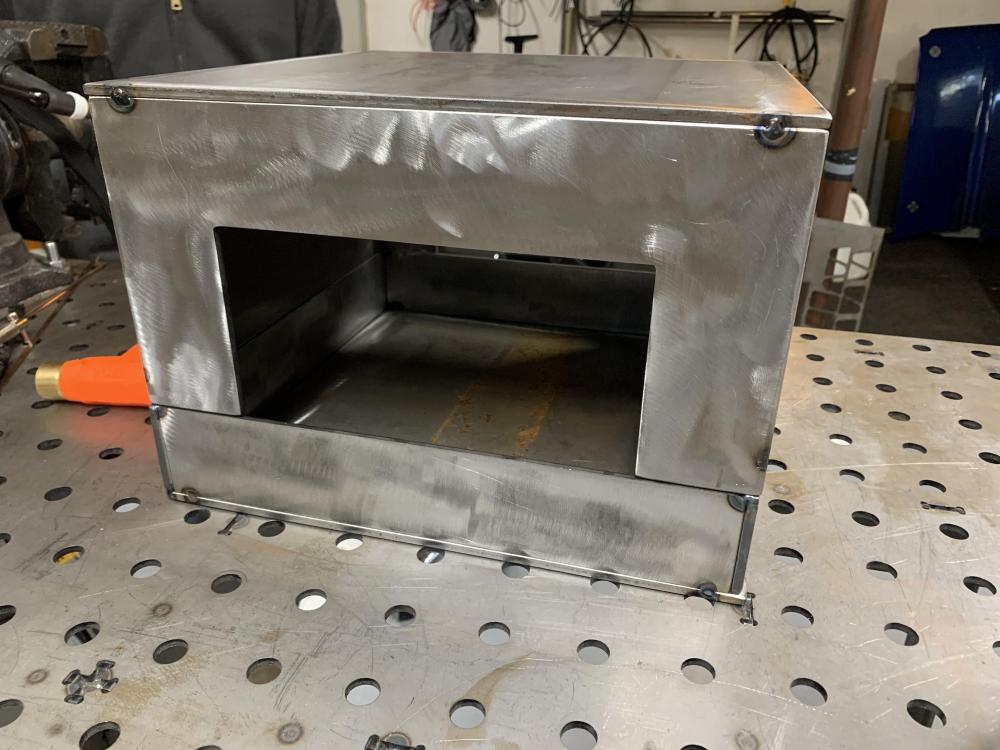
-
Rough draft forge design, sanity check. W/ drawing
ipsullivan replied to ipsullivan's topic in Gas Forges
Ordered 2” Kaowool, rigidizer from Glenn, and Kast-o-lite 30. Should have enough insulate all interior with 2” Kaowool and 1/2” of refractory. For the time being, I will be getting some K26’s for doors. Trying to find somewhere local to buy them. Is it recommended to put some sort of reinforcement between the blanket and refractory? Just thinking in terms of having something for the refractory to grab on to. -
Rough draft forge design, sanity check. W/ drawing
ipsullivan replied to ipsullivan's topic in Gas Forges
I can see the floor and walls working with bricks. Are you suggesting the same for the ceiling? Not sure how you could span the 9” width of the chamber with a 9” brick. Maybe I am misunderstanding what you are saying. Also, Would 2.5” of IFB be better than 2” Kaowool + refractory? -
Rough draft forge design, sanity check. W/ drawing
ipsullivan replied to ipsullivan's topic in Gas Forges
My mistake, the plan is to use IFB for the sides. I am currently working my way through the Forges 101 thread. -
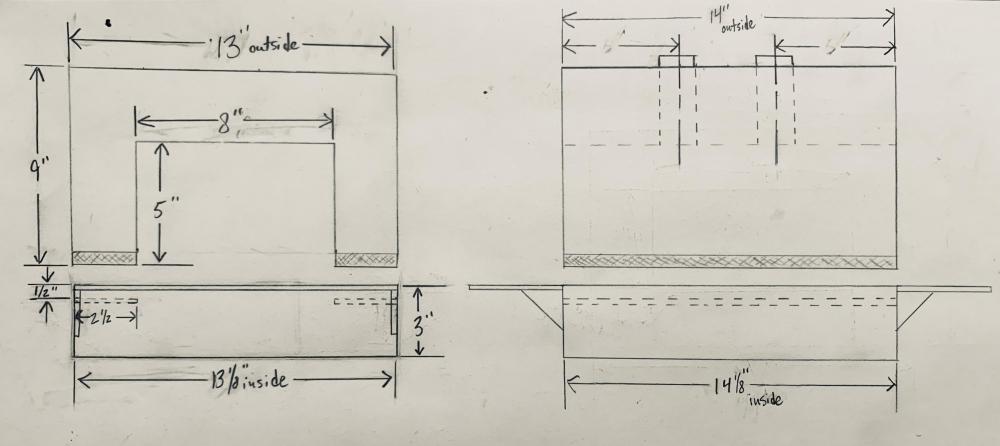
Hello, New the the forum, aspiring blacksmith. I just purchased an anvil and I am starting to put the next piece of the puzzle together. I have been surfing around looking at different options regarding forge size, shape, burners, insulation etc. Originally my first instinct was to build a simple forge that accommodated an all fire brick liner. Soft walls and ceiling with hard shelf/floor. Quickly realizing my dimensions would be more limited without having a puzzle of fire bricks. Attached is a rough draft of the forge body design. My goal is to build a forge that will have a good life span and the ability to support growth in my currently non-existent skill set. I don’t have any specific focus on what I want to make, would rather gain skills by starting with the basics. -4.5x8x14” interior or 504 ci., with the ability to run 1 burner and block off the back 5”. More or less, approximately reduces the size to 4.5x8x9” or 324 ci. -3/16” plate for body, 3/8” full width exterior shelves, depth to be determined. - base and ceiling:2” Kaowool + 1” refractory cement -Left and right walls will be soft fire brick -2x 3/4” Frosty T burners, held in places with a collar with set screws. -The top will recess into the base 1/2” and sit on a shelf, making for a sturdy structure without permanent welds between the top and bottom. As far as burner placement, I am thinking 5” from the doors, leaving a gap between the burners of 4”. Is this adequate spacing for a forge this size? Would angled offset burners benefit me? I like the idea of being able to run 1 burner and filling the back half with fire bricks when working on smaller items. Any and all feedback will be much appreciated! I won’t move forward until I have a solid design. Thanks, Ian
-
Hello all, Looking to get into blacksmithing. No particular focus at this time, just trying to get up and running in the next month or so. Just purchased a decent Peter Wright 140 lb. anvil. Working on a forge design now. Located in Hartford County, CT. Thanks, Ian