

5S forge (Clint)
-
Posts
10 -
Joined
-
Last visited
Content Type
Profiles
Forums
Articles
Gallery
Downloads
Events
Everything posted by 5S forge (Clint)
-
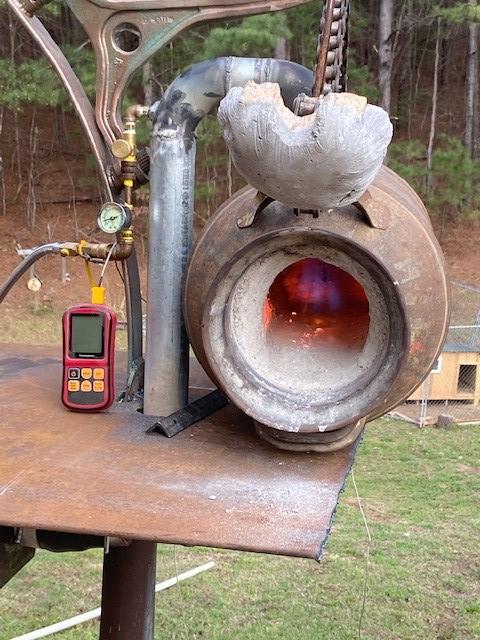
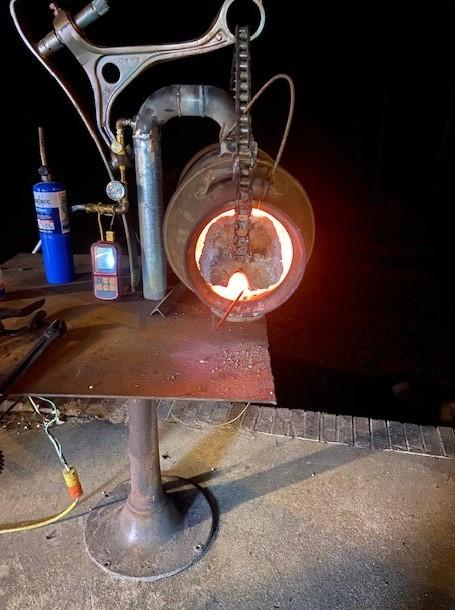
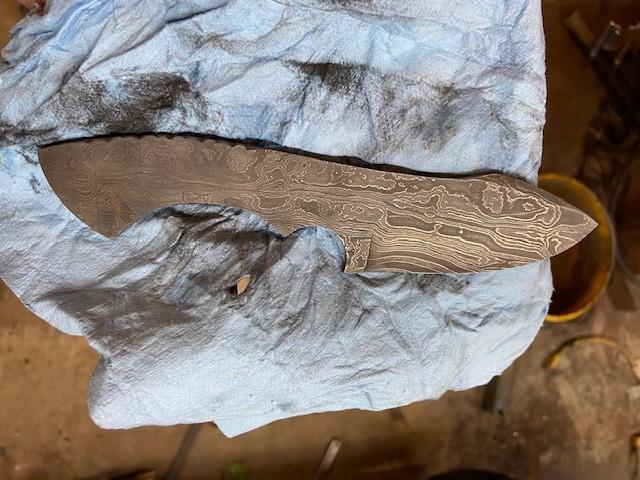
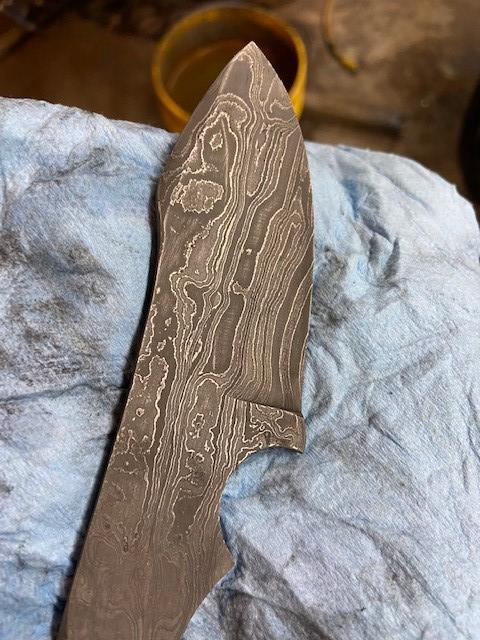
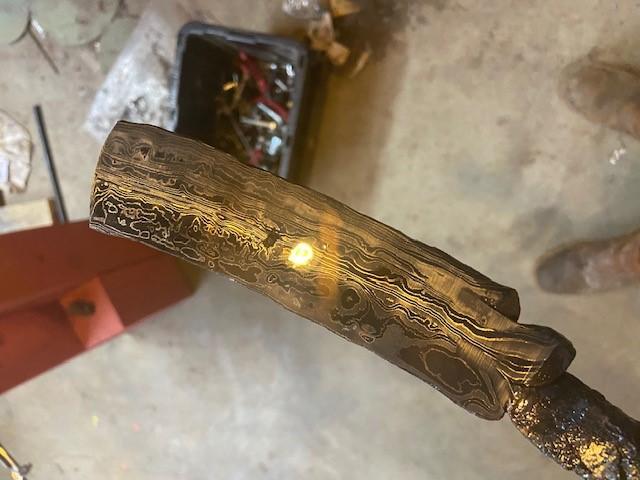
The lowest I can run is around 1300 F and on the high side I have ran it up to 2400 but I always back off a little if i see it get that high. pretty cheap set up actually, Less than $45 on amazon , The meter was around $26 and the K type thermal couple was $15 or so. WelshJ you are correct about the car part, It also has a F350 leaf spring with some axle pieces welded on. I have some paint to make it look like aged tarnished copper but who wants to paint when you can make damascus. maybe i will get around to painting it one day.
-
I actually looked this one up before I cut it to make sure it wasn't a rare priceless piece and going price for them on ebay was about $85 My wife was almost in tears when she screamed YOUR MOTHER GAVE ME THAT!!!!!! My comeback was ... You don't even like my mother. My dad picked it up at a yard sale for $25.
-
I agree with you on the dragons breath , I have seen some that require 4 foot tongs to get things in and out. I have used oxy/acetylene torches for years and never really applied that to a forge until i built this one. A torch can be way out of adjustment on the mixture and still heat something up or cut steel but when its adjusted perfect it sure makes a nicer cut and more efficiently
-
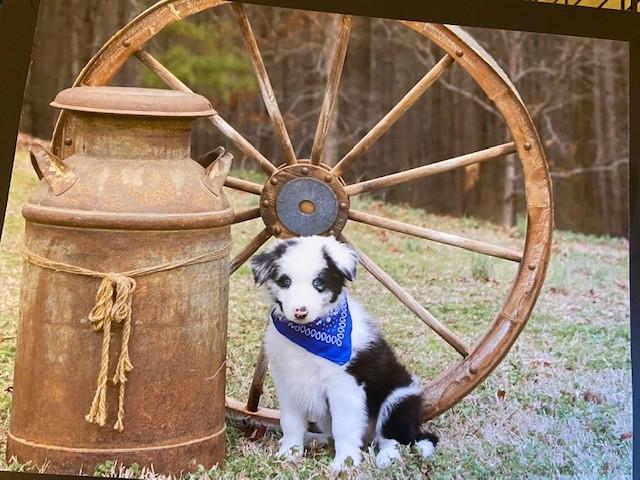
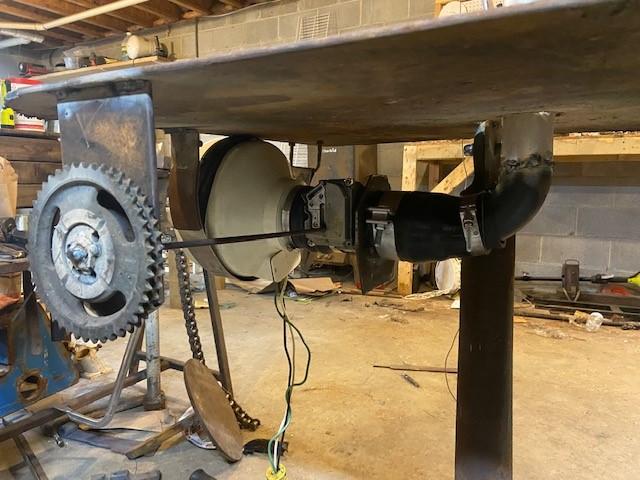
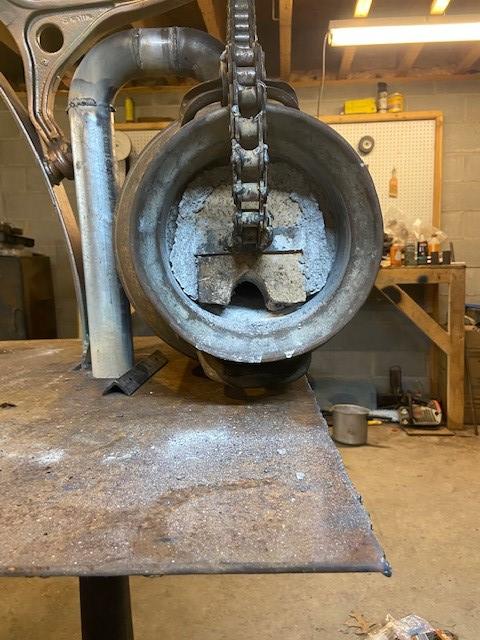
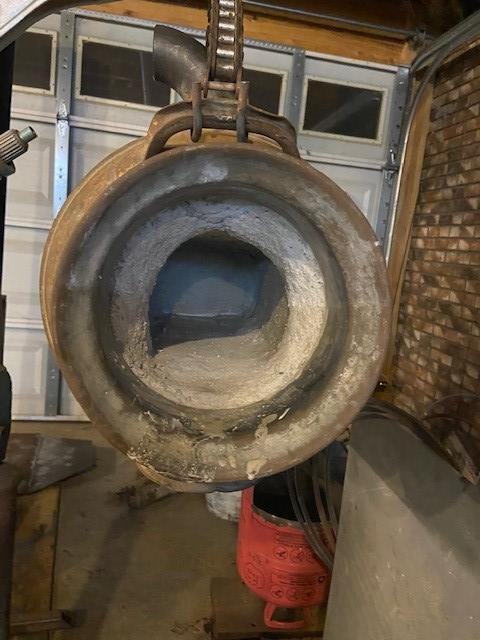
Thanks Frosty. I used the roller chain as a adjustable hanger for the forge in case I go do a demo or something with the ground a tad unlevel I could adjust it a little by pushing up or down on the front, Not much wiggle room anymore after it was all tied together. My original design was to have it fairly easy to disassemble into 3 or 4 pieces so it could be a little more portable than my big forge. I need to go back and make sure it will all still come apart as i had planned. The damper was actually a OEM part going to my turbo on my 2008 Ram 3500 cummins truck . It was originally electronic butterfly valve mechanism with gears in it so i drilled a hole and welded a 1/4" rod to the main gear and out to and old timing gear from a car. by turning the timing gear I'm able to really get precise with my air/propane mixture , I can run forever on a forklift bottle (adapted to vapor instead of liquid) The base was an old hand crank blower stand that I left original in case I ever wanted to put it back together. My daughter actually won second place for the picture. We gave a 10x13 copy of it to the family that bought the pup.
-
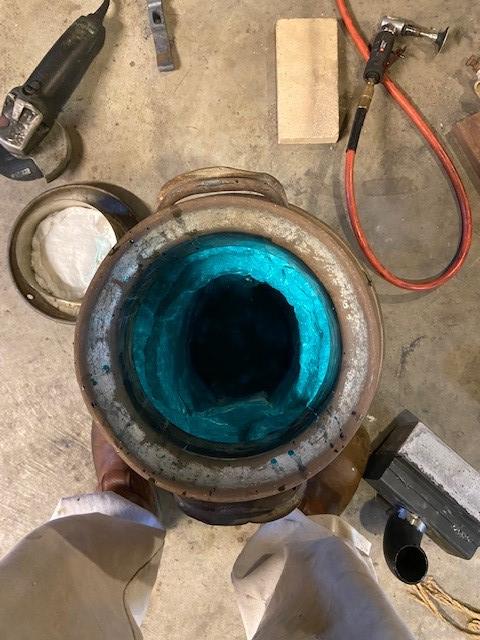
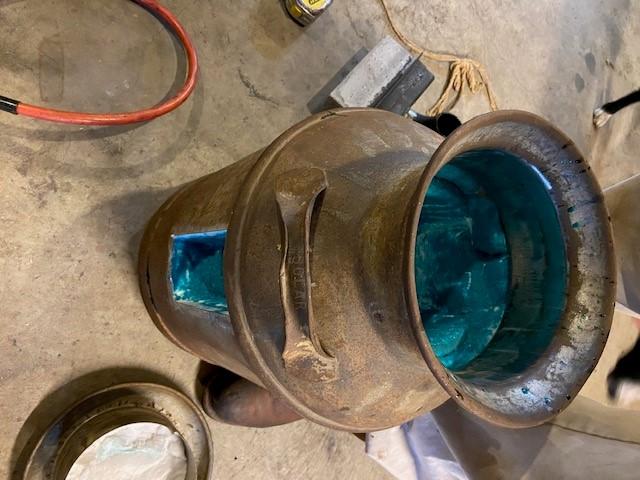
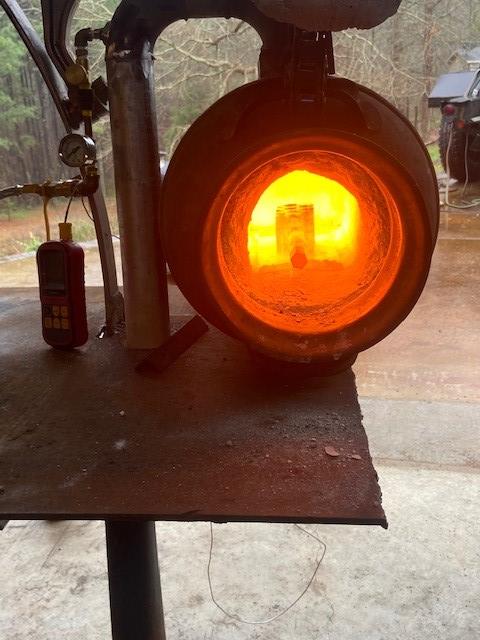
Hi Guys and Gals Now that most of the swelling has gone down and my cast is off I figured I would post a forge build that I did a couple months back. After trying to forge weld Damascus billets in a big ribbon burner forge I decided It would save me tons of money on propane if I built one that was 1/4 of its size. I wanted something kinda unique , something different than anything else i have seen so i started digging through all of my scrapyard junk putting random pieces of car parts together. I had a couple old party balloon helium tanks laying around that would be about right after putting some extra Kawool inside to close up my overall ID. The afternoon that I cut my tank and got it all prepped up my wife ask me if I would grab the Prettiest pup from our recent border collie litter and a few rustic props for a 4H photo contest that my Oldest daughter had entered . I was instructed to get some loose hay , wagon wheel, saddle , old boots, and the milk can off of the front porch..... MILK CAN !!!!! I knew right then that milk can was fixing to be my new forge lol But I never said a word because I knew xxxx would be frozen over before my wife gave me her early 1900's milk can with no dents and a lid that fits perfect. So I did what any rough tough head of the household would do..... I waited until about 2 in the morning and tiptoed outside and like a ninja I snatched up MY milk can and ran down to my shop. I covered it up in the corner for a couple days to see if she would notice it missing. I finally got up the nerve to cut in to it and weld in a plate to create a new back wall to cut down on size. with it being galvanize coated I knew it was better to weld it at the entrance of the shop with the door open for ventilation. Holding my breath , Hood down , bent over trying to get two arms and my gun down in this tiny space i'm rehearsing in my head how the conversation will go in a week or two when she finally discovers what I had done ..... About that time I hear WHAT IN THE XXXX ARE YOU DOING WITH MY MILK CAN???? If it wasn't for my hood i think I would have dove all the way in the can. I thought, I can still pull this off.... I said honey i'm making something special for you. Of coarse she seen right through that BS , I will spare you the rest of the conversation but leave you with this ... If I don't screw up anymore this week I can come back in house starting Monday. Here is a few pictures of the build.


-
Good morning guys, sorry if I was a little unclear in my original post. First of all to the question about free or selling videos. Absolutely free as long as you can get on youtube. also I was not wanting to use your actual picture or videos , It was more for tips or new ideas to include in me making tooling in my shop. I started almost 21 years ago with a wheelbarrow tub and a hairdryer for a charcoal forge, and of coarse the infamous RR track anvil. In those 21 years I have learned many cool little tricks from old timers and i'm sure you guys have too, I'd like to share some of those with people that are just starting out or people that just finished a press and need to make tooling . most anybody that has ever looked at a press can automatically see that they need flat dies and drawing dies but i think we can dig way deeper than that. like maybe a snazzy little tool for making tongs or a tapering die that actually works. I have a good bit of S7 laying around and some 4140 that I was thinking of using for this project. A lot of my dies were made in a hurry with whatever I could find laying around because I was so anxious to start squishing things. I'd like to go back and make some really nice dies , maybe even a shelf of caddy to hold them instead of being piled up at the base of my press. Thanks, Clint.
-
Good day fellow smiths I am researching dies, tooling, jigs, etc. for hydraulic presses for the purpose of creating a video about making and using said tooling. Looking through post , pictures and videos I have found a few scattered bits of info , But not a great source that goes into detail like I think would be helpful to people. My intentions are to have a video with a general overview of different types of tooling and there purpose, maybe a few safety tips or do's and don'ts Then have a series of videos making and using each of the dies, tooling etc. I know from reading thousands of post on here that there is lots of sharp people on this forum and i'd like to borrow your knowledge for making a helpful source of information that we can all learn from. Please post pictures of your Dies, tooling , jigs or anything else that may fall into this category. Thanks, Clint
-
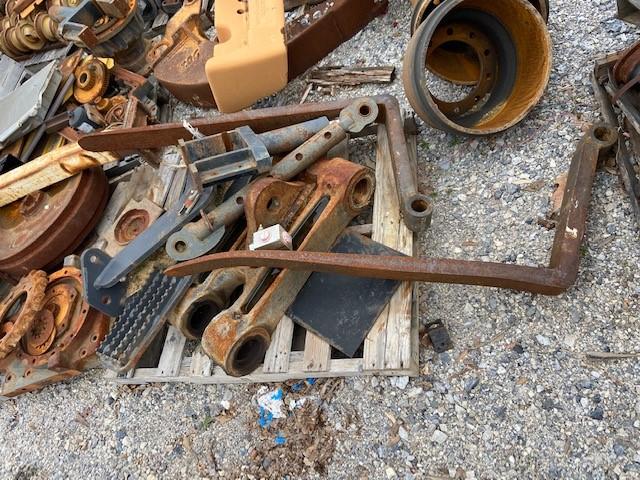
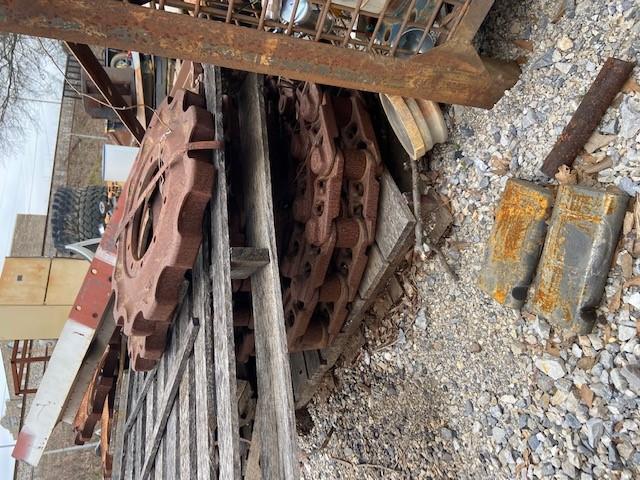
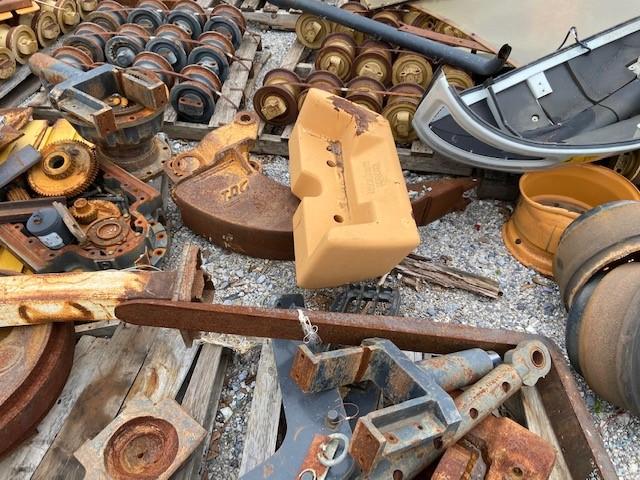
Thanks for your reply Chris. I think you are correct about keeping them separate , I have plenty of room in my shop so why not have both. A friend of mine told me that I could come did through his heavy equipment scrap pile to see if I can find anything useful for making things in my shop, Here are the pictures he sent me.... (i'm probably gonna need the gooseneck)

-
Thanks JHCC I did read the READ THIS FIRST info Hope I didnt miss anything important that will get me lashes . The Marco post you metion is actually one of the 7,289 post and pictures that I have looked at that inspired this new project. Very good info in that one. Thanks for your reply. Clint
-
Hello guys, This is my first time posting although I spend roughly 15-20 hrs per week browsing the forum because my job is equipment maintenance in a automotive factory. So i can sit in my area and browse around the web while equipment is running good. First off , Thank you to the people that spend so much time posting projects and information and most importantly guidance to people of all levels of knowledge so that they may be more proficient at whatever it is that there heart desires. A little background on me , I have been a knife maker for almost 20 years now, mostly stock removal but after completing horse shoeing school back in 2005 on occasion I would hammer a few things out on my NC big face 78# farriers anvil but not many big projects. After building a new ribbon burner forge to replace my old inefficient NA 2 burner , I found that I was really enjoying the time i was spending doing general blacksmith work . maybe being simply burnt out on making knives from stock removal has played a significant roll in my sudden interest in being more proficient in the blacksmith area . Making damascus/pattern welded steel , hammers and drifts etc. on my little anvil presents its challenges. So now to the meat and potatoes of my post.... The sudden spike of interest of the general public wanting to do what they are watching on a certain Forging show every week The price of anvils are going for 10 times what they are worth I have decided to build a Anvil/swage block to aid in some of my future projects which include ornamental things like Hooks, Bottle openers , hammers , drifts, punches, hatchets , and of coarse knives. I am a certified welder as well as pretty proficient on a mill and lathe. The material I have on hand that i'm thinking about using for this project are as follows. 2 Fork lift tines with solid 2" round stock on them. 6 weld on wear plates for track loader (assuming AR plate ) 4" wide X 1/2 thick X 20" long 2 pieces of 1/4" thick AR400 plate aprox 18" X 20" 6 pieces of heat treated (56 RC ) S7 shear blades that are 3/4 thick 8" wide and I think 22" long Also have plenty of mild steel available for frame work of fill in material , swage shapes etc. What are your suggestions on arranging this material to best suit my needs? I"m guessing that the S7 would be my best bet for anvil face but would like some input from the group. I have seen several pictures in the post that looked useful but dont have first hand experience with a anvil/swage combo? Thanks, Clint