-
Posts
16 -
Joined
-
Last visited
Content Type
Profiles
Forums
Articles
Gallery
Downloads
Events
Everything posted by ThoffmanApis
-
Forge update: Cart is holding up well, handle works amazing for a hammer and tong holder. Blower is amazing, I feed it a few drops of oil after a day of use. Clay lining is shot xx xxxx. I haven't been at it every single weekend but I'd guess 10-12 of the past 14 I've been out there. If a handful of clay once a quarter is the only upkeep it needs I think it's doing pretty good but what do I know. It does pretty good, performance wise, at least for what I've been heating. So far just beating some hooks to shape and made an anvil hold down out of 3/4 rod. No issues with 3/4 getting to temp. I haven't forge welded anything yet, but that may be on the agenda for next weekend. Side note: I had my first experience at the local steel supplier. I told them I was a hobbyist blacksmith and wanted to make a small purchase(about $100 worth of material) They were very friendly and accommodating. Only draw back is they deal pretty much entirely in a36, they've got every size under the sun but if I want anything else I'll have to check out the other supplier in town. Hopefully they're just as easy to deal with. But for now I've got plenty to practice on without feeling like I'm wasting stock.
- 19 replies
-
- solid fuel
- forge
-
(and 4 more)
Tagged with:
-
Update on this build: It's been a fast fall and haven't had much time to play with this. Bottom line on the build, it sucks. Ha ha. As noted above, it takes forever to heat up. 30-40 minutes to even get the forge to temp and then the clay just wicks the heat away from the metal. It's just not worth the propane to continue use. Of the few times I fired it up I ended up lighting up the charcoal too as I had projects to get done and didn't have hours to spend waiting around. It was a fun experiment regardless. It certainly hasn't dissuaded me from going to gas in the future but it will have to wait until I can either invest the proper time in a build or invest the money going the commercial route.
-
I'll counter that with it's absolutely not identical except not different. Unless we're talking of the areas where the flow is multi-directional except where is only one direction. LOL!!
-
I’ve spent a lifetime in the aviation industry, specifically maintaining, repairing, and building aircraft, everything from high lift designs, like STOL bush planes, to high altitude, high speed aircraft. The raised tabs you saw are called vortex generators and they are used industry wide for a couple of different reasons depending on the application. They are typically straight into the airflow or angled slightly, never completely perpendicular to the airflow over the wing. The dynamic function of creating a bounty layer is as you describe but in order for it to work it must be over a curved surface which a t-fitting is not, it’s straight on the inside. While the airflow is bending through the fitting it’s the surface curvature that counts in Bernoulli’s Principle. If your supposition were true I think we would see every throttle body in every high performance installation threaded as such. But I’ve rebuild a lot of carburetors, aviation, automotive, etc. and I’ve never seen a threaded one. The other similar situation would be high performance intakes of combustion engines. Porting and polishing to create the smoothest surface is the way to go, I’ve never heard of porting and threading to increase airflow. Don’t get me wrong, I’m not saying you didn’t get the results you did with threads vs no-threads. I’m just saying I don’t think your logic is supported by aerodynamic theory. I’d love to see a smoke chamber test on high speed camera to show the airflow through a t-fitting to see what’s really going on because I agree that your results are nuts, very counter intuitive if you ask me. My soapbox aside, I just finished some touch up clay work on the forge. I am in complete agreement for anybody who’s thinking it, clay was a bad idea, but it was left over so oh well.... As for the burner, I think my first change will be to shorten the tube, it’s 6 inches as that’s what I had laying around, but based on Frosty’s design it should be 4 inches, i.e. 8D on a 1/2 inch diameter. So we’ll see how a shorter body changes things. If it’s still on the rich side I’ll be shortening up the MiG tip to hopefully draw in a little more air. I’ve still got to rivet together the cradle I forged up and then we’ll call this experiment done.
-
Why is removing the threads a waste of time in a t burner?
-
And let the cracking begin. It's a fun experiment at any rate. I think if I get the burner tuned before the whole thing falls apart I'll call it a success. Replaced my broken torch files and cleaned up the cut from yesturday. It's running really rich at the moment so more trimming on the tip is in order. I've got no flare on the burner pipe right now, just relying on larger size of the hole through the forge wall. Thoughts? Should I flare it out slightly or just not worry about it with such a rudamentary build?
-
The clay is the big question for me at the moment. I figure if it doesn’t hold up I’ll still have a burner that can be transferred to another forge.
-
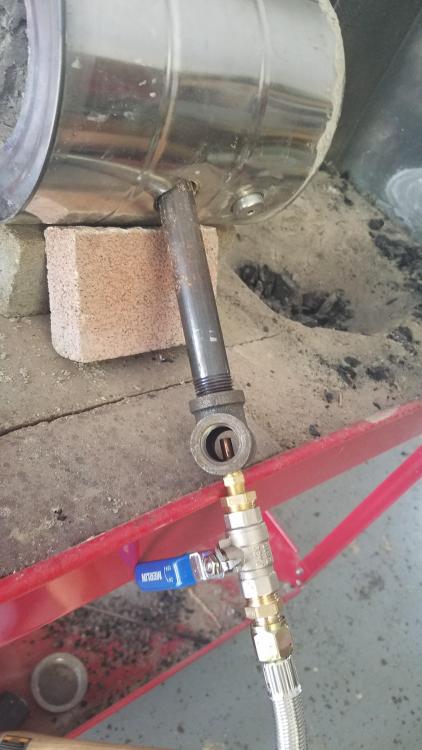
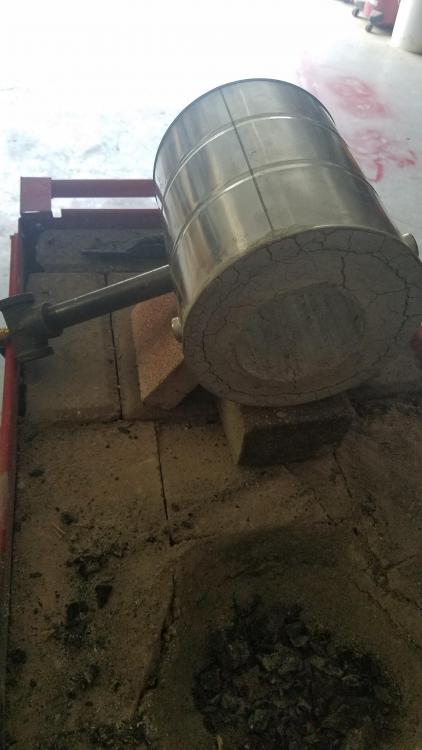
Working in the garage this weekend doing some cleaning and straightening, I found enough parts to cobble together a horrible version of a propane forge. Pictures are still to come but to get your cringing to start early I’ll give you a little description. The body is an unused 1 gallon paint can from another project. Cut a couple holes in it and used a scrap piece of PVC for the center. I mixed up some homemade refractory from left over clay from building my charcoal cart forge, and filled the can around the pvc and a 1/2 inch pipe for the burner hole. Whipped up a T-burner with a 0.025 MiG tip. Really the only thing I had to purchase was a regulator and a couple of fittings. All in all I’ve got about an hour of labor involved and was able to mostly use scraps laying around the garage. Fired it for the first time last night to start tuning the burner. Trimmed down the MiG tip only to realize my welder tip file for .025 tips is broken. Ah well, guess it can wait a day or two until I run past the store. Hopefully by then I’ll have pics as well. Up next is to forge a small cradle for it to sit on.
-
Forge update: Smaller fire seems to be working better. With the charcoal pile only slightly above the the rim the material can lay flat. My first pair of tongs are complete, ugly, but complete. They’re asymmetrical, covered in cold shuts, and I can see at least 2 crack, but by god I made them myself with fire and a hammer. My significant other immediately gave me a nice compliment on them......then asked if it would have been better to just buy a pair. I took the compliment and then told her it was more of an an educational experience making it much more valuable then bought pair. She then returned to the house. Ah well. Anyways, back to the forge. By keeping the fire fairly small I have to feed it a handful of charcoal every 3 or 4 heats. I have zero idea if my fuel consumption is good, bad, or normal for lump charcoal. Any opinions out there? When I had to heat the middle area of the rod the heat shield prevented proper placement. I had to go across the cart which is why I trimmed the shield back in the first place. But I found the raised edges of the cart holds the material just a little higher and with a smaller fire I had to throw a couple more handful of fuel on to move the heat up. I’ve considered either trimming or hammering the sides of the cart down to level with the brick but I worry about weakening the rolled edge’s purpose. Very happy with the forge’s performance as well as my own. Fire+hammer+steel=tongs, that’s so cool, sorry, no matter how ugly they are, they’re still the first thing I’ve blacksmithed in steal. The largest material has been 1/2 inch which it heats with no problem. Next test for the forge will be a 1 inch round bar to see how it handles slightly larger stock.
- 19 replies
-
- solid fuel
- forge
-
(and 4 more)
Tagged with:
-
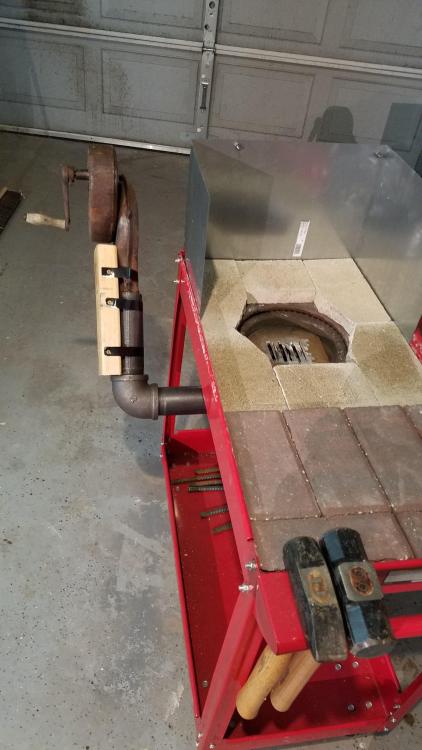
Update on the forge. Claying the pot helped eliminate the hot spot issues underneath. I trimmed back the wind break to just past the center line of the pot on each side so I can lay material straight across the cart, which I ended up doing today while drawing out the first half of a set of tongs. The wind block is still large enough I can stand slightly off to the side while cranking the blower and get no radiated heat towards me which is nice. I also hit the wind break with a dusting of flat black paint to cut down the reflectivity. It’s not high temp stuff and probably won’t last more than a few days of forging but it was on hand. I doubled down and took Mr.T’s suggestion and stood a brick on edge in front of the hammers. Between the paint and the extra brick, the handle end of the cart is remaining cool, as cool as South Georgia is in the summer at least. Lastly I dressed up the faces of my hammers. Quite an education today. A few of my takeaways: Metal moves much easier at the correct temperature. At the start of the day the forge was in the sun, on more than one occasion the sunlight prevented me from seeing the color of the material. OR, I can quit with the sun was in my ear excuse and just admit I have to be more patient in waiting for it to reach the correct temp. I am sadly out of shape. I’m using muscles I haven’t uses in years. If I had to go back to working a shop floor repairing airplanes I would probably call in dead on day 2. At least I don’t have a paycheck riding on my blacksmithing and can take my time rebuilding those arms. On the second heat I put the 4 pounder down and used the 2 pounder the rest of the day. My feet can move really fast when hot metal is accidentally dropped towards them. Too much fuel is bad, not enough fuel is bad, and not clearing the bottom of the pot occasionally to ensure air can get through is also bad. I think it will come naturally the more I use this forge, but it was obvious my fire tending skill were lacking at times today. When the fuel was good and the airflow was good this little thing seems to do it’s job with ease. While tongs are project number one, I think a proper fire tending tool is in order for project number two. Thus far I’ve been using a scrap piece of rod to poke the coals around. The blower could use a cross brace. Twice it twisted in the pipe, not much and easily twisted back to straight, but if I put a single stand-off from one of the case bolts to the cart it will eliminate the potential. All in all, it was a good day moving metal around.
- 19 replies
-
- solid fuel
- forge
-
(and 4 more)
Tagged with:
-
That's an interesting theory Thomas. I'm planning to trim the wind break anyways to accommodate longer stock so I may as well fire the forge up with it out and see if there there is less heat at the handle end. If it is in fact reflected heat I was getting I'll probably try a high temp paint on the inside of the wind break to see if that cuts the reflective nature of the bare metal. I also like MrT's suggestion of a simple line of bricks standing up blocking the heat.
- 19 replies
-
- solid fuel
- forge
-
(and 4 more)
Tagged with:
-
MrT, It was indeed HF. I had a few goals in mind when I started this build and economics was certainly one of them. With the explicit intention of cutting a big hole in the middle of a brand new cart HF proved to be the best option. If the whole thing falls apart I'm out a whole $30, everything else can be salvaged and put into a different platform. Ultimately, if this proof of concept works and I decide to continue blacksmithing I'll be building a full brick forge off my barn, or maybe in my barn, it'll just depend on a couple of other shop item placements first.
- 19 replies
-
- solid fuel
- forge
-
(and 4 more)
Tagged with:
-
Thanks pnut. Good advice on the hammers, it's now on my to do list for the weekend. I was just over to the hammer section and there are a couple of good posts on dressing hammers. To relate it back to the forge topic, the handle on the cart seems to be a great place to hang the hammers. But I did notice some decent heat making it's way to that end, 200-300 degrees at the hammer faces towards the fire according to my laser thermo. Do you think there is any risk to the hardness by leaving the hammers here, especially over a full day of exposure?
- 19 replies
-
- solid fuel
- forge
-
(and 4 more)
Tagged with:
-
In what I can only imagine is a near unforgivable breach of forum etiquette, I posted over on the solid fuel forge forum before introducing myself. Check out my new cart forge over there and let me know what you think, good and bad. As for me, I’m just getting into this type of metal working. I’ve spent a lifetime in the aviation industry and early on in my career had the opportunity to stand in front of a couple metal lathes, as well as beating soft metals into specialty tools as jobs required. Not to mention the pure sheet metal work of re-skinning airplanes after they’ve crashed. Oh the hours, days, months, and years of time I’ve spent bent over a sheet of aluminum, drilling holes, and driving rivets. But I’ve just never taken the leap to go full blacksmith. Well over the forth of July I just couldn’t hold my wallet back any longer. A week later my brand new 110 lb Kanca showed up at the door. It’s a thing of beauty. That led to the obvious conclusion, I need a forge too. Sooooo, I built one and now can annoy the neighbors with incessant banging, bwahahaha. Actually I focus much of my time after the normal work week is over playing with honeybees and working other homesteading projects. Retirement from corporate America is right around the corner and I’ve got lots to do and always lots to learn so I’m happy to be here.
-
Thanks Frosty. I remeasured and after claying the pot I’m sitting right at 3 inches deep now. It was a hard decision on how deep to aim for. I looked at the dimensions of the Vulcan pots to get an idea for the depth, theirs are 4” deep for the square coal forge and 3” deep for the round coke forge. After that I hit up the ol’ internet for searches and found pot depth recommendations from 0” all the way to 6”. I’m a beekeeper and if you ask 10 beekeepers the same question you’ll get at least 15 answers. Blacksmithing seems to be on par with that adage. As for the wind break I agree 100% that it’s going to need trimmed back 4-6 inches on each side. Luckily it’s just held in place with the clay and bricks. I wanted to make sure I was happy with it before I bolted it in so I should be able to just slide it out.
- 19 replies
-
- solid fuel
- forge
-
(and 4 more)
Tagged with:
-
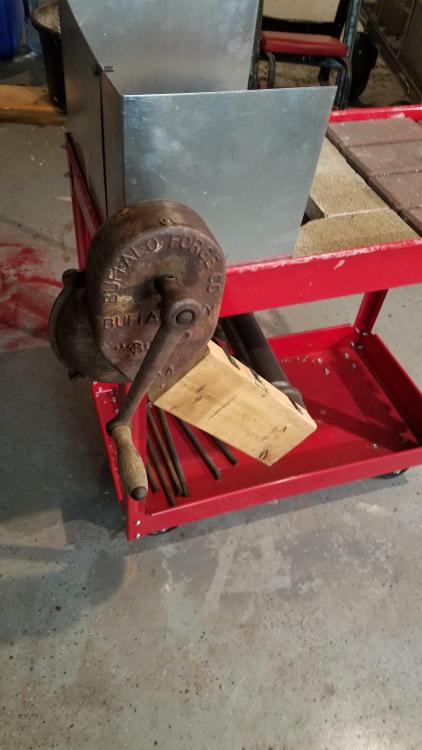
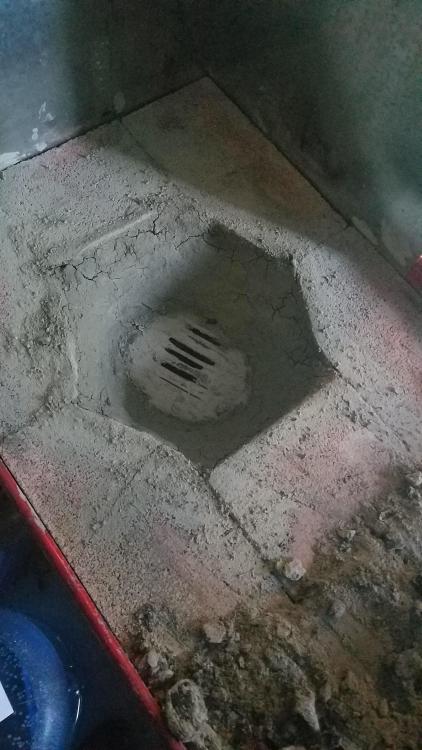
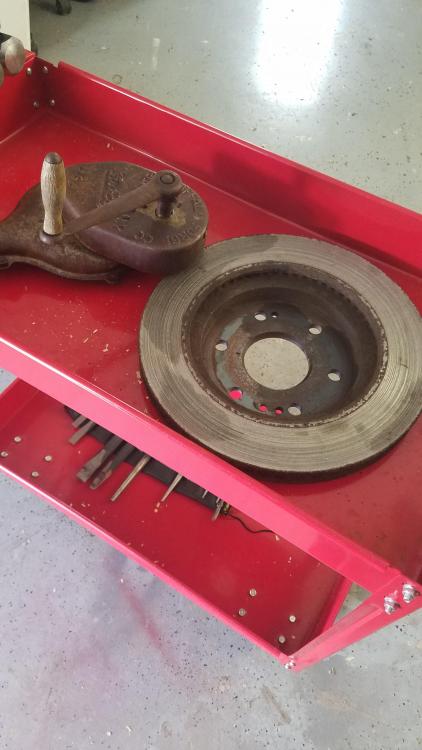
Hello IFI, I've been passing through this forum for quite some time and as I just fired my first home built forge I though it time to join. Here's the build out list: Brake Disc, 16x30 metal cart, Buffalo blower, 2 inch piping for tuyere, clay, fire brick, and regular brick. sheet metal. I clayed the entire cart around the disc under the bricks, this leveled things out for the brick mostly, but also added a nice added layer of thermal protection to the cheap cart metal. Fire brick is cut around the disc face, giving me a pot 3.5 inches deep and 7 inches wide. Picked up the blower for a steal on auction, ugly on the outside but beautiful on the inside, once I cleaned it out and re-lubed it turns like brand new. Currently I've got a 2x4 and metal straps holding it rigid with the piping but plan to swap that for some metal brackets in the future, it was just all I had laying around at the time. Lastly I added the simple metal surround for wind protection plus the added benefit of being able to pile extra fuel up that back wall in the corners. Fired for the first time Sunday with some nice lump charcoal, wally world was having a sale so why not... As it was over 100 degrees out I mostly just beat up some rebar I had laying around before shutting things down, test firing was a huge success. I noticed a few odd hot spots underneath the cart and decided to clay in the interior of the pot as well which I should have done it to begin with anyways, but that should take care of my errant heat. We'll see in a few days when I have time to light it up again. Outside of heating things up with a torch and beating them until they submit to my will around the homestead I've only ever worked steel on a lathe and that was a few (read 20) years ago. I've done some forging of specialty tools made out of soft metals like copper and bronze in the distant past as well but never what I would call blacksmithing of anything. I've been wanting to get into this side of things for quite awhile so I'm excited about this forge build and can't wait to see how ugly my first projects turn out. Ha ha. Attaching some pics for your pleasure or verbal destruction, whichever your bent.
- 19 replies
-
- solid fuel
- forge
-
(and 4 more)
Tagged with:


