

Cedar Crest Forge
-
Posts
114 -
Joined
-
Last visited
Content Type
Profiles
Forums
Articles
Gallery
Downloads
Events
Everything posted by Cedar Crest Forge
-
The interesting thing about blacksmithing is there are always new techniques to learn, "beginner questions" to ask, no matter how long we have been at it. I've had the same question, but about the hex and triangle sized holes I see in the newer blocks,. I don't have much oblong triangle stock lying around to use in those. I have used my industrial block (500+ lbs) holes to help bend stock. Mostly I use them as tables , or to store bar stock Honestly, I have found the smaller blocks to be much more useful, as they can be moved around easier, and have bowl shapes etc. I was told that bar stock was not uniform, back in the day. So the smith would run it through a swage block to get it to an exact size, for use in wagon/buggy making etc. Good point! I mostly do knives, not hammers, so I have not used them for that.
-
Finish for an object that is to be worn?
Cedar Crest Forge replied to Jeff-Orl's topic in Finishes for Metal
Minwax has worked for me , for pendants. With the surface cleaned up and optionally blued, wax looks nice and holds up nicely. I have some forged pendants that are 20+ years old now, and are still looking good. I have never, nor will I ever, spray paint a wearable forged item. When the paint starts to flake off, it will become a throw away item to many consumers. -
Rust removal from very old butchering knives
Cedar Crest Forge replied to SoCal Dave's topic in Finish and Polish for Knives
I am not the professional on these matters, but I would assume that the butcher industry has quality new tools for purchase. Why do they want to use rusty old ones? -
Look at the rect. holes on this block. They are arranged to minimize the effect of the forces coming from the sides. My ipad wont let me reduce the size of this image using the + button.

-
Some ideas: 1. Keep your holes away from the edges , or it weakens the block. The lower two corners look fine. 2. Use symmetry for the holes near the edges. To look good, and not trigger the ocds, they should probably be equally distant (equal thickness) from both edges.. 3. Square holes can hold hardies. Think about their position , with hardies in them. What if you have 3 hardies going, where do you want them situated for forging a progressive shape? Your pattern with the squares diagonal to each other is almost a german pattern. If your two smallest circle holes in the upper half of the block move down a bit, you now have the classic german "X" design. Do you have a purpose for the longest bar hole? Aesthetically it looks good, but it removes much of the support under the half round. Your outer pattern is 3-7-4-5. Some blocks are more mathematical: 3 5 7 9 or 3-4-5
-
Might work, until you get into the 7 and 8 inch range. Out here, at least 20$ an inch is more typical for the smaller vises.
-
In theory, it is not a bad idea. Adding an Induction forge next to an anvil comes to mind.
-
Starting a Forge
Cedar Crest Forge replied to Forge_man's topic in The Business Side of Blacksmithing
This is interesting. Thanks for taking the time to write all that in detail! -
1A5E0548-1FE6-4127-9724-15D01DA075A7.jpeg
Cedar Crest Forge commented on Nd21's gallery image in Members Gallery
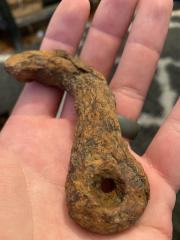 Maybe a piece that fell off some antique farm machinery. Looks like real wrought iron. Perhaps the rest of the machine is still sitting around somewhere nearby, in a farmer's old machinery graveyard.
 -
If you really want to flatten the steel with precision, as a professional knifemaker, use a surface grinder. You can buy an old industrial one, to save money. To take it to the next level, you can replace the grinding wheel with a 2x 72 belt design, so you can mix and match belts to your 2 x 72 belt sander. As a hobbiest, you don't need any of that to get started.
-
..proper depth also depends on whether or not you are forge welding.
-
One thing these old blacksmith tools have taught me is that we do not own these tools forever. At our best, we are just stewards, until the next smith comes along. That being said, good job!
-
Starting a Forge
Cedar Crest Forge replied to Forge_man's topic in The Business Side of Blacksmithing
First time I heard of that. Black Bear Forge is well known, for example. That is the one I copied from I guess one could use 'Ironworks' instead? -
Is this a cast steel anvil.
Cedar Crest Forge replied to Kris-D's topic in Anvils, Swage Blocks, and Mandrels
A picture or two would help. Video not usually needed -
Most people would be happy to have a 100 lb vise. If you have the space, store it in the corner of the shop until a repair plan, or parts, comes into view. It is not like a modern chinese throwaway; it will not lose its value over time. Look up what a modern Kanca vise of that weight goes for, and you should start to feel better. If it is only threads that needs replacing, then no big deal; there are many ways to fix this common problem. The vise looks american, not european, and the square bolt indicates it is an antique. I read once that the threads on some of these old vises were not cut into the steel bar, but were added afterwards using a softer material.
-
Yes, I know. I was just adding to the topic, after thinking how the bolts on my bader grinder were setup. It was a good suggestion to make sure the nuts don't come loose. And congrats on building your own grinder. I have always bought commercial , because building my own looked difficult. Although, I do modify them from time to time. For instance, I built an extension arm with an idler so I can also run 2 x 132 belts on my 2 x 72.
-
What did you do in the shop today?
Cedar Crest Forge replied to Mark Ling's topic in Blacksmithing, General Discussion
Or for the brave, heat up most of the spring , drop it onto a secured mandrel,, and use an electric winch until it is almost unraveled. I have never tried this, but it sounds like fun, and perhaps a bit dangerous I would not want to be standing anywhere near the winch. -
What did you do in the shop today?
Cedar Crest Forge replied to Mark Ling's topic in Blacksmithing, General Discussion
As a suggestion, search your favorite marketplace for a "squirrel cage blower" , maybe you can find a nice baldor. I found a few from a local surplus store, for 10$ each, a while ago. They said they were from an old mainframe. I had to add wire with a 110v plug, but that was easy enough. They are quiet compared to a hair dryer! -
Help me make my daughter happy!!!
Cedar Crest Forge replied to Cannon Cocker's topic in Problem Solving
It would probably be a missed opportunity to not get her involved. Maybe have her put the metal piece in the forge as part of the process, so you get a blacksmith out of her in a few years. -
Help me make my daughter happy!!!
Cedar Crest Forge replied to Cannon Cocker's topic in Problem Solving
On that theme..a base for a hair piece. Attach a simple barrette on one side, and a flower on the other, with paint that matches the flower. Maybe have her help you add sprinkles and gems, from the craft store. -
Double head nails work best for that. Just flatten the nail and you are mostly done!
-
Can Mystery Steel be ID’d by Density
Cedar Crest Forge replied to Donal Harris's topic in Blacksmithing, General Discussion
I wonder if these could be pieces of drilling rod, also called sucker rod. Were there any more pieces, and were some of them threaded at the ends? Some also have markings in the steel. I just noticed that you are from Oklahoma. Lots of oil wells out there. -
Usually. I have some tricks to avoid the worst of that. He sounds like he should just find a teacher ( learn in someone else's shop), until he figures out what he needs or wants. It is easy to spend 1000$ in a belt sander setup, and those box store belt sanders just don't cut it. Actually, as a first electric tool, how about an angle grinder? Cheap, effective, versatile. Cuts, flattens. I've even used it to bevel the cutting edges of two handed Halberds. Fun times.
-
Interesting. So this is the reverse image of what a normal grinder would look like. Good point Frosty. Ideally any wheel bolts would be reverse threaded from a normal grinder, so they tighten rather than loosen, correct? As an aside, I am right handed, so I would probably keep hitting my hand on that square bar on the right side of the contact wheel, until I got used to it. Hmm..could your configuration be considered a left handed grinder?
-
Forge: Pipework for coal fired forge
Cedar Crest Forge replied to SteelyMike's topic in Solid Fuel Forges
To clarify, to get a pipe to act as a clinker breaker across such a large area, it would need to be very thick due to the forces, and the handle would aso have to be well built, to stand a chance of working. Then you would need to build up the areas around it with heavy steel. So, the constuction would be on a different level than what you have now. And this is only a blue sky idea, open for debate. I've built a few coal sword forges, hence my interest in this. I only used them for the final hardening though, not to shape the blade. As an aside, I have since moved on, and now use a propane sword forge. An easier design would be to have a solid clinker breaker, and build up your air flow design underneath it. I was just building off of your design though, and taking it for a test spin, no pun intended.
