
stressless
-
Posts
23 -
Joined
-
Last visited
-
kaowool inside covered in IFB. don't let kaowool deteriorate and don't breath kaowool. The mortar should hold everything together if you do it right. "KT Refractories offers a complete range of insulating firebrick (IFB) that offer excellent performance and value for a wide variety of industries and applications. Different grades of insulating firebrick are manufactured according to international standards, and are suitable to operate in various temperatures and atmospheres up to 3000ºF. Excellent Features of Insulating Firebrick are listed at the lower right side of this page." Quoted text from website avaliable upon request. if you want the link message me and i'll give it to you. but it is a soft firebrick that is made with ceramic fibers. it feels like caulk when you hold it. and probably would almost draw like it as well. Also I have them cut down to 1/4" and am not using the whole brick. I coat the kaowool in mortar and place the brick on it and add more for joints. has lasted me over a year now. the bottom is just normal clay type IFB 3000° rated 1.25" thick on the same mortar over kaowool. try and get just one soft IFB from someone and try it for the door. It does work rly well surprisingly so.
-
I know this is a older post but I thought I would mention that there is firebrick and there is firebrick. if you get the WHITE low density ones (extremely light to the feel) they have over a 99% IR refraction rate. They just don't suck up heat in my experience. IDK if it is a good brick for the bottom of forges but for doors and walls and ceiling used in combination with 3000° mortar for fireplaces and all that over kaowool I get almost no warpage. (burner heat transference only) The reason I am saying not to use on the bottom is because IDK if the FLUX will eat it or not and it is pretty fragile stuff. you can easily cut it with a wood hand saw to the thickness and shape you desire in seconds. If you drop it it can crumble or shatter very easily. Here each 4.25"x8.25" @ 4.25"thick brick is about $8USD but the refraction of the heat and IR being what it is has allowed my forge to get to extreme heats. So you may want to keep this in mind as well as you don't decarbonize your steel. for my doors I welded on some angle steel and placed smaller pieces on sides to hold up the bigger piece and also to narrow the hole from the sides and I have different side pieces for different holes but plan a better version on my next try.

-
and when I say rounded I don't mean a 45° I mean more on just a few degree rounding so that after I use it it still has shoulders.
-
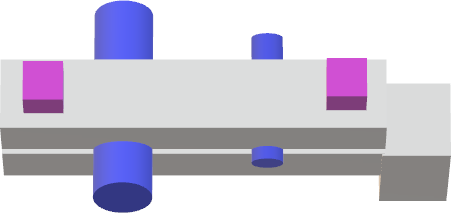
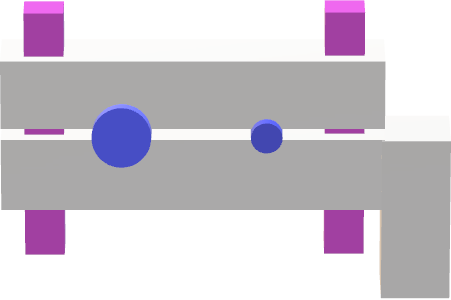
that tool is for last phase forming mostly to fix mistakes AFTER I do the work by hand. just to true up the shape. I will be also using it to clean up the reins on my new tongs that I forged out. atm I don't have a project requiring a tenon but I will make a few as blanks I guess just for future use and practice. should mention that the swage tool above will be rounded on the connecting surfaces fore and rear as it is probably going to be made out of 2.5" round stock. and the squares probably will end up rounds but for the pic I didn't want it to be confused. I have a swage block with several holes just for this reason that I will start the tenons on. I will also preheat the tools to hopefully help prevent cold shuts. as for stress concentrators that is why the swage tool will have rounded fore and aft entrances. but windows paint doesn't have a good way to show this.
-
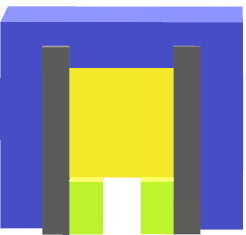
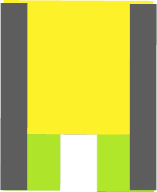
tendon swag tool for my hardy hole. Blue signifies blank space pink alignment square rods was also thinking to remove a bit of stock between top and bottom and put smallish springs over the square rods. will probably make it longer than the picture shows to compensate for lack of hammer control so the alignment squares don't do damage and the squares would be flush when done.
-
last wasn't a question it's what I did for the magnet. as for the tenon I am having trouble as there is so many pics not sure what i am looking for. If i'm not mistaken it's basically a integrated rivet for 90° joint? as for the upsetting I am doing it not to integrate it but for practice. (waste not want not)
-
done have but now I am working on vertical quench tank and the hardening procedure. I started all my latest projects with upsetting the metal first as I am working towards damascus (prob in a year from now) did leaves but not others I will have to try them to see how I do. in hardy to you mean making a hardy tool? i.e. cutoff tool? done this already with W1 not sure what it is. example so I can research this? I am actually in the process of making a full set of new tongs instead of buying them out of 836 blanks. your right on it loves to twist and also bend up on the reins. My issue I have been having it is so cold so having to preheat the anvil takes quite some time so my work doesn't lose it's heat so fast. (big chunk of mild steel 6"x4"x2"thick) metal rod with a spear cap on it formed over a smallish square magnet.
-
thanks now I have a better idea of what to look for and also to turn off the lights. You know that is a wonderful idea and I will have to try this. do you soak it a bit before you quench? what color do you normally see.
-
I have a 1500°C/2732°F laser for testing temps. so that actually helps a ton. Thanks as for the magnets? neodymium are stronger magnets so can attract a weak force. would you recommend them or just the generic ones like to get for picking up stuff in automotive types. the telescopic once that you see for like $5usd at home depot/harbor freight. is there anything that will help me see the decalescence point when heating steel and correct me if I am wrong but I believe that is when it starts to turn into austinite?
-
Also I hear about the decalescence point. I know it varies pre steel and starts to happen between orange and yellow. Anyone know the about temperature it would be at the decalescence point for say 1084? Yes you did and thanks for that. but I was wondering the actual temp (within say 1084 as a baseline) just to verify as I am a very detailed person and unless I know actual numbers it doesn't sink in well. Do you have a type of magnet you like over others? I have some cheap ones on a telescopic rod for say automotive and I also have neodymium magnets. not sure it matters or not. As for the decalescence point I have not witnessed this before. I read that it looks like shadows dancing across the steel but again my eyes are not great. So a approximate temp of when it starts and stops would help me know what to look for and at what time with more accuracy. In say 1084 steel. is there a green screen face mask or other eye cover that would help me see it?
-
850 Celsius = 1562 Fahrenheit 1100 Celsius = 2012 Fahrenheit 1300 Celsius = 2372 Fahrenheit I agree that range just doesn't add up right. and 1300°F is below the curie point of any steel. isn't the steel default curie temp 1414 F
-
which is this one right? Intro to Heat Treating which is this one right? Intro to Heat Treating I do know the it should be 75°F 50°F & 25°F above the curie temp. I just don't know what the curie temp(critical or magnetic limit) is. I know that it can vary batch by batch of even same steel but I havn't found a range to start working off of. I only have my forge atm to heat it but will eventually get a oven for this.
-
Those temps are from a bladesmith I was able to talk with in my state as he was running a event on bladesmithing and are specific to bladesmithing at the sizes I am working at according to him. He is a registered ABS bladesmith. and runs Fisks knives. However if this is wrong what is a approx temp you would suggest for normalizing cycles? I also could have misheard him and it is 1300°C and not 1300°F hammer control. nothing else. @ $0.20USD lbs and it is more for the other person at my forge and for me to get my rhythm back as I didn't swing a hammer in a very long time. Plus idk if the steel is actualy mild. I will probably find out by the end of the week after I quench it. all I know is it was bulk steel so is PROBABLY mild steel
-
lol lol I always get ' & " backwards. in my head because ' is smaller than ". Smaller = inches in my head but it isn't in this case. eventually I'll remember it.. I will be normalizing the metal @ 1300°F than again at 1100°F and lastly at 800°F-850°F to refine the grain. Than I will be using canola oil for quenching. with the oil @ 120°F file check for hardness and immediately tempering. I will be tempering for 1/hr two times @ 400°F If above doesn't work than 2/hr @ 425°F That sound right? Just so anyone that reads this knows. to get the ° symbol you hold the ALT key and on number pad type 0176 than release the alt key
-
A blksmth I friended on instagram just got back to me and for beginners he stated get shape to 60-80% where spine is 1/4' and blade edge is 1/8'. thoughts?