Onobeka
-
Posts
6 -
Joined
-
Last visited
-
New forge from Romania - burner issues, lots of pics
Onobeka replied to Onobeka's topic in Gas Forges
I already cut the nipples 1cm and now I can already see that as you’ve rightfully said it’s rich. Just 1cm and the flame turned yellowish and the chocking effect is back. Next week I will try a cross piece instead of the T to have the two inlets. This part is not easy found at home depot, so weekend is not a succesful shopping time. I already have the 1” to 3/4 T piece but I need to redo the gas coupling to the MIG nozzle. Maybe I will just do that. The last time I went shopping I did not find right brass parts for that, so I went with the 1” plug drilled for the 1/2” brass nipple. -
New forge from Romania - burner issues, lots of pics
Onobeka replied to Onobeka's topic in Gas Forges
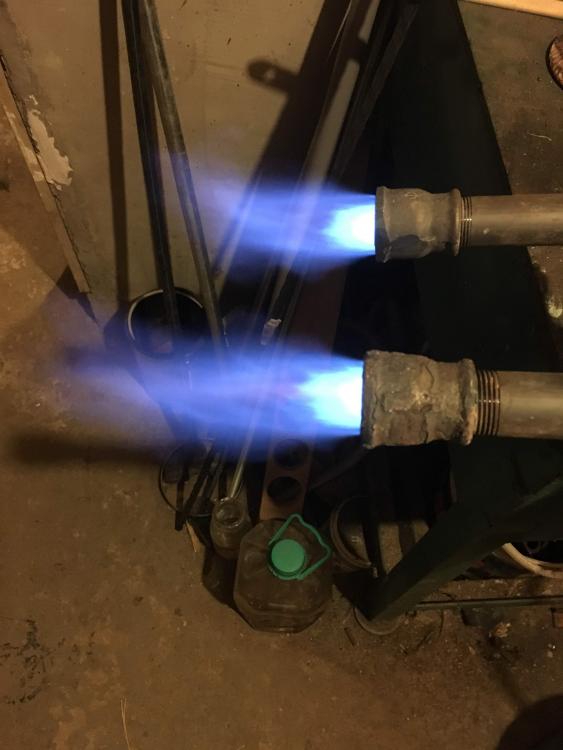
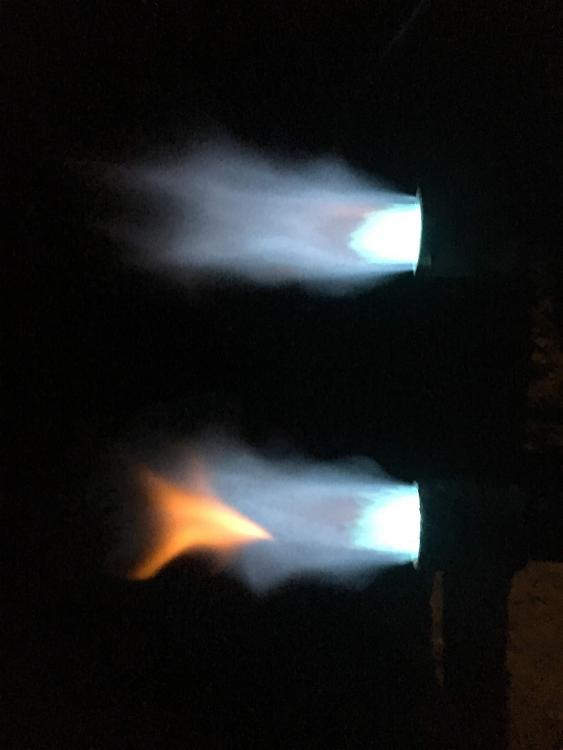
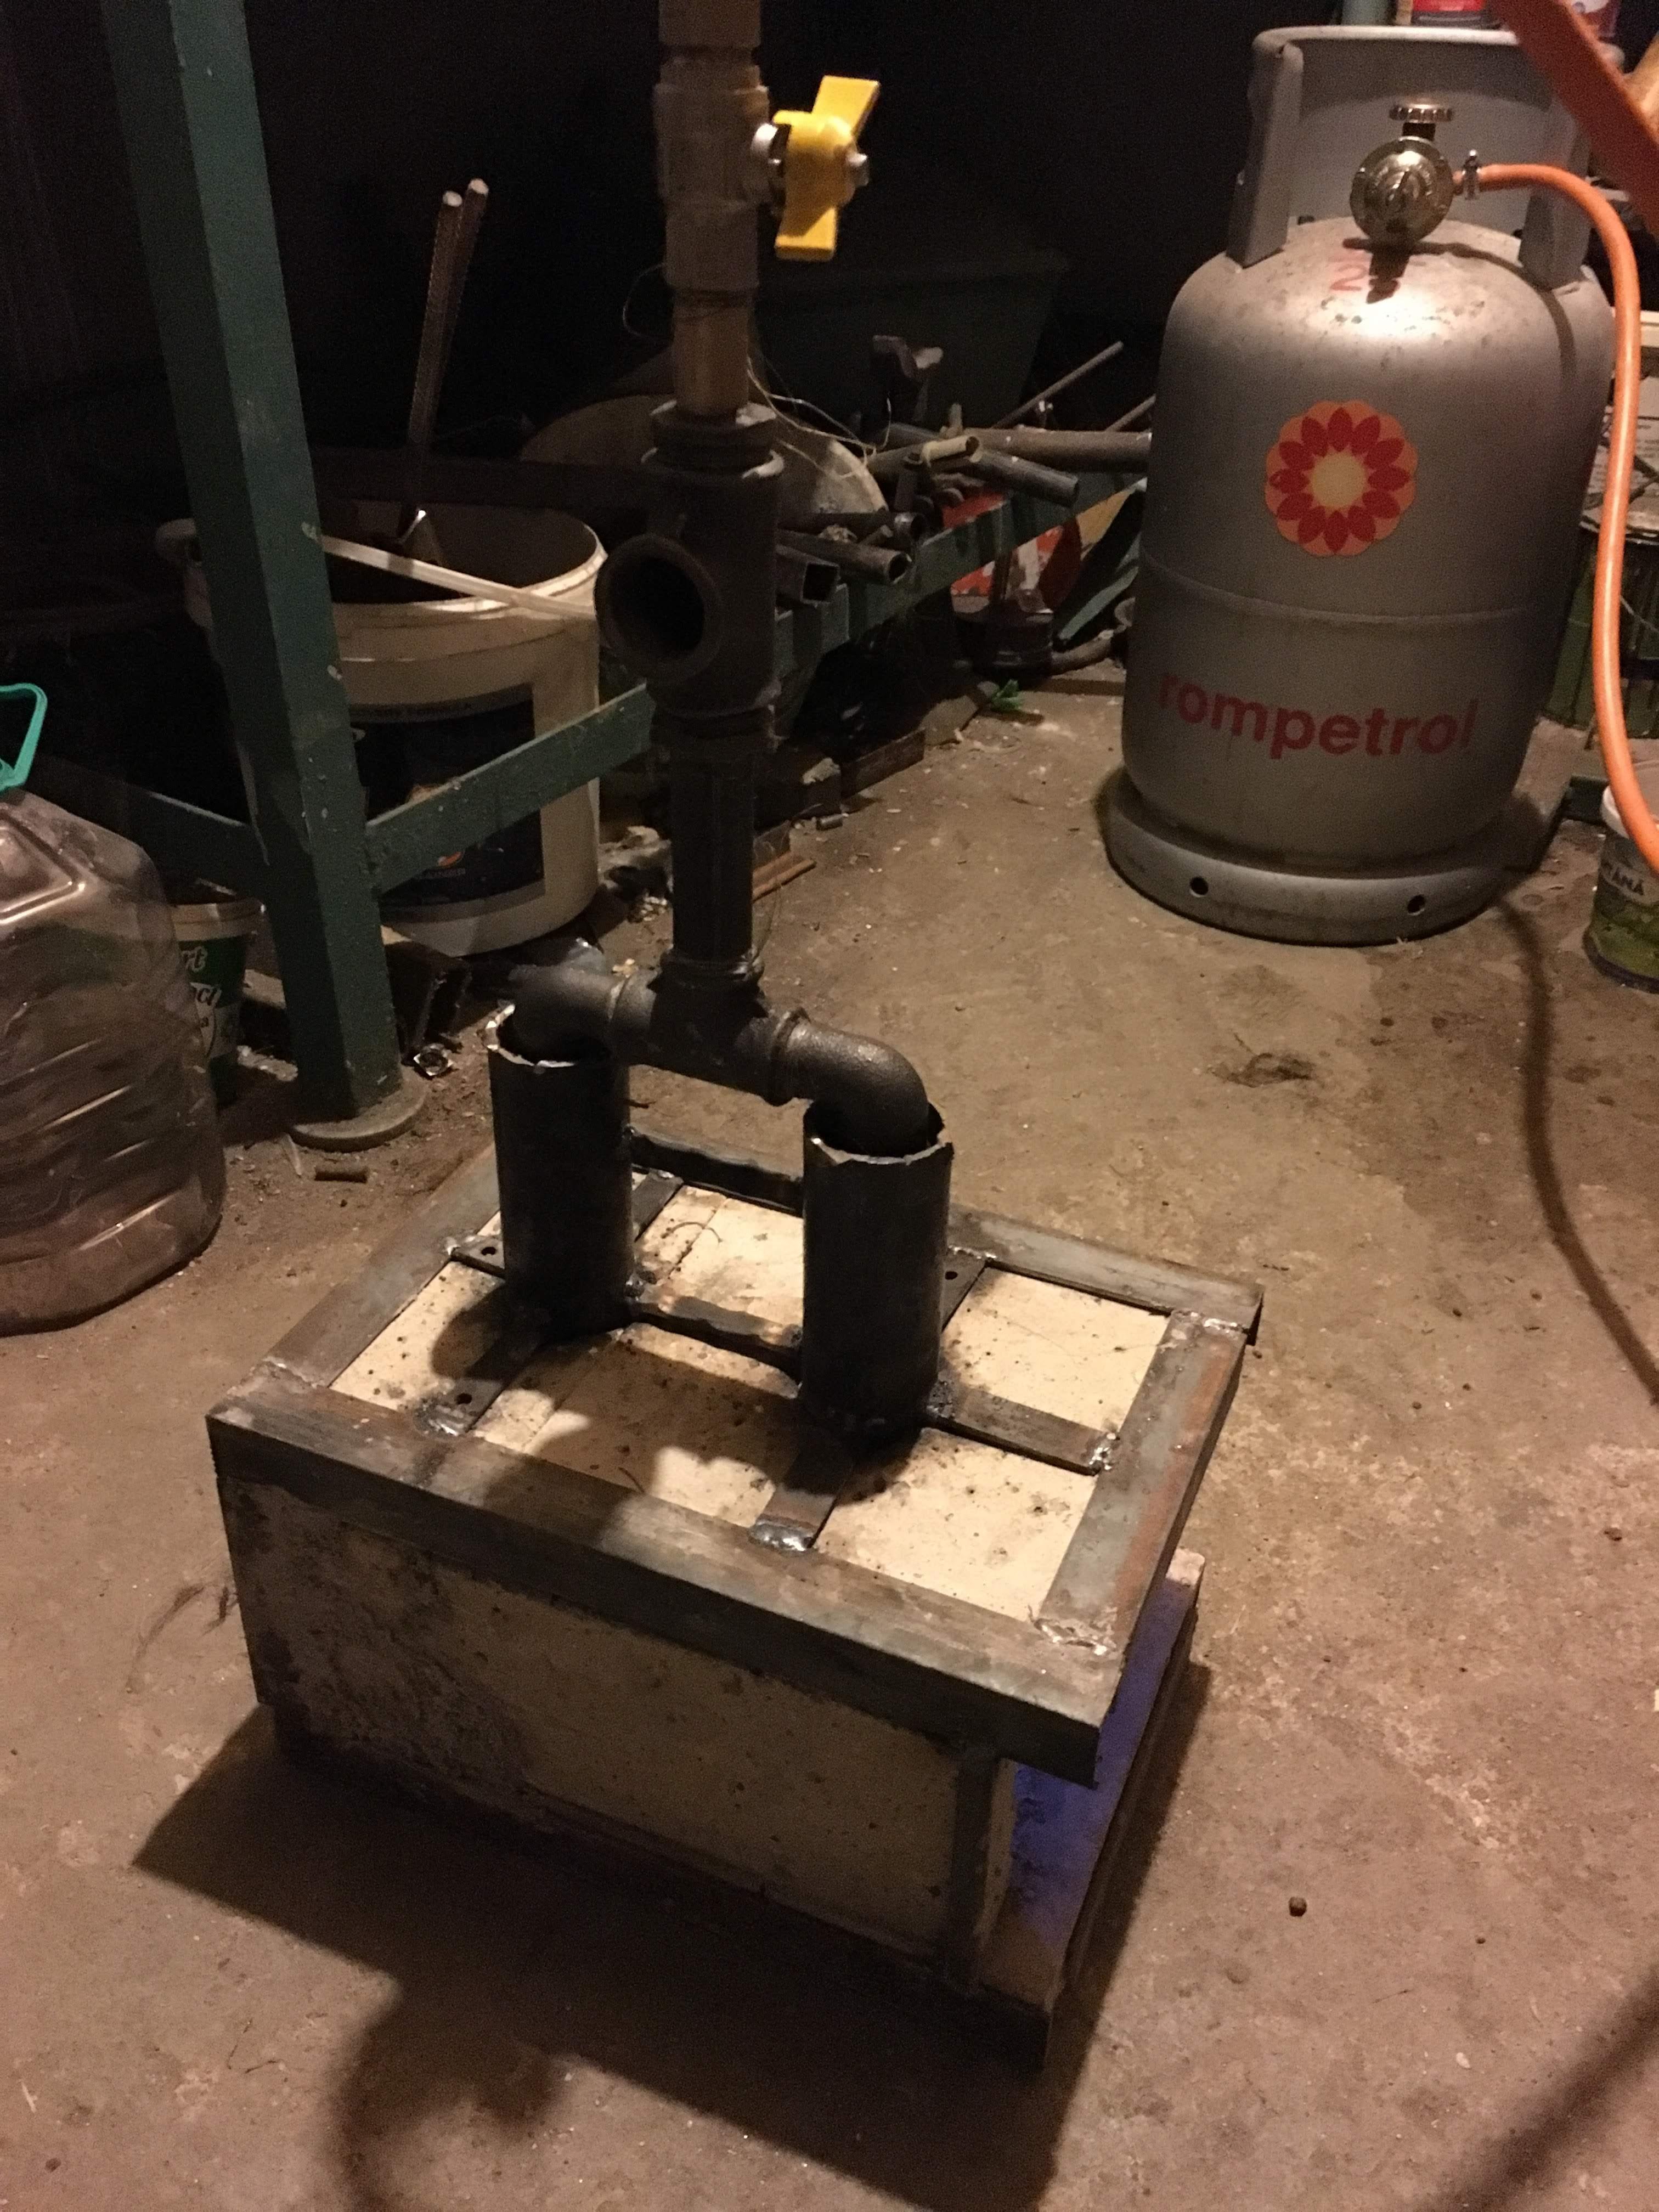
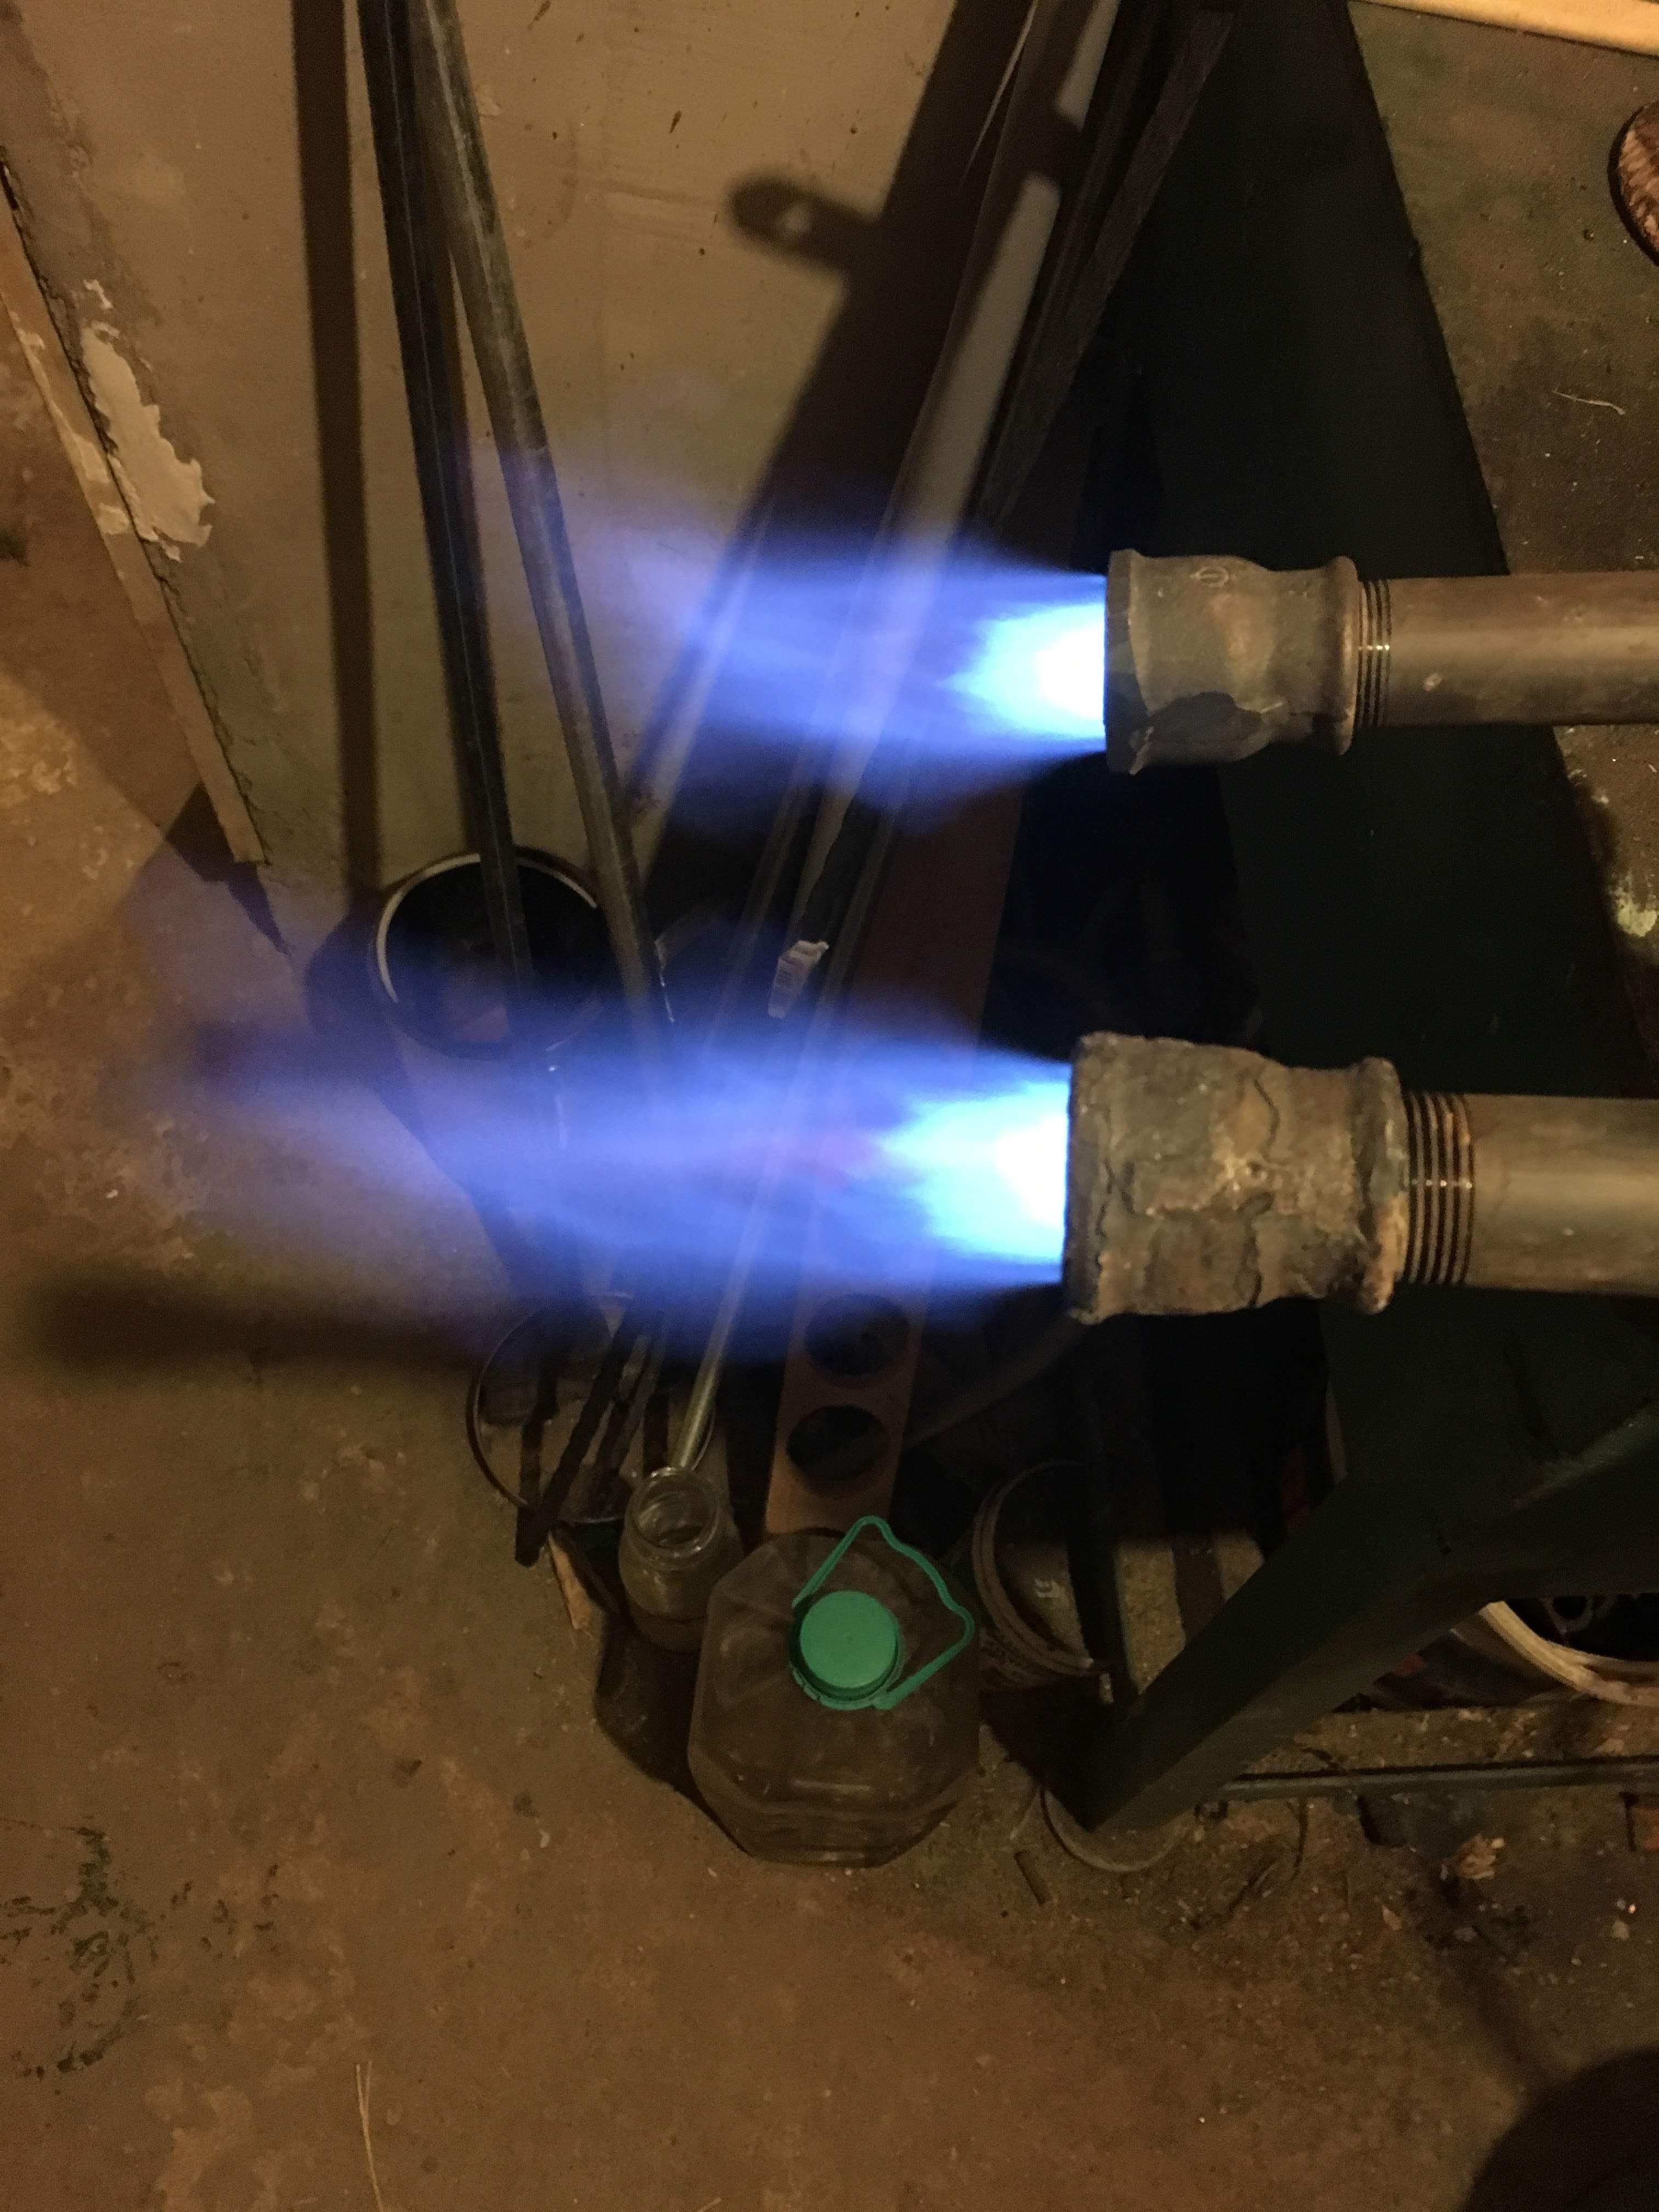
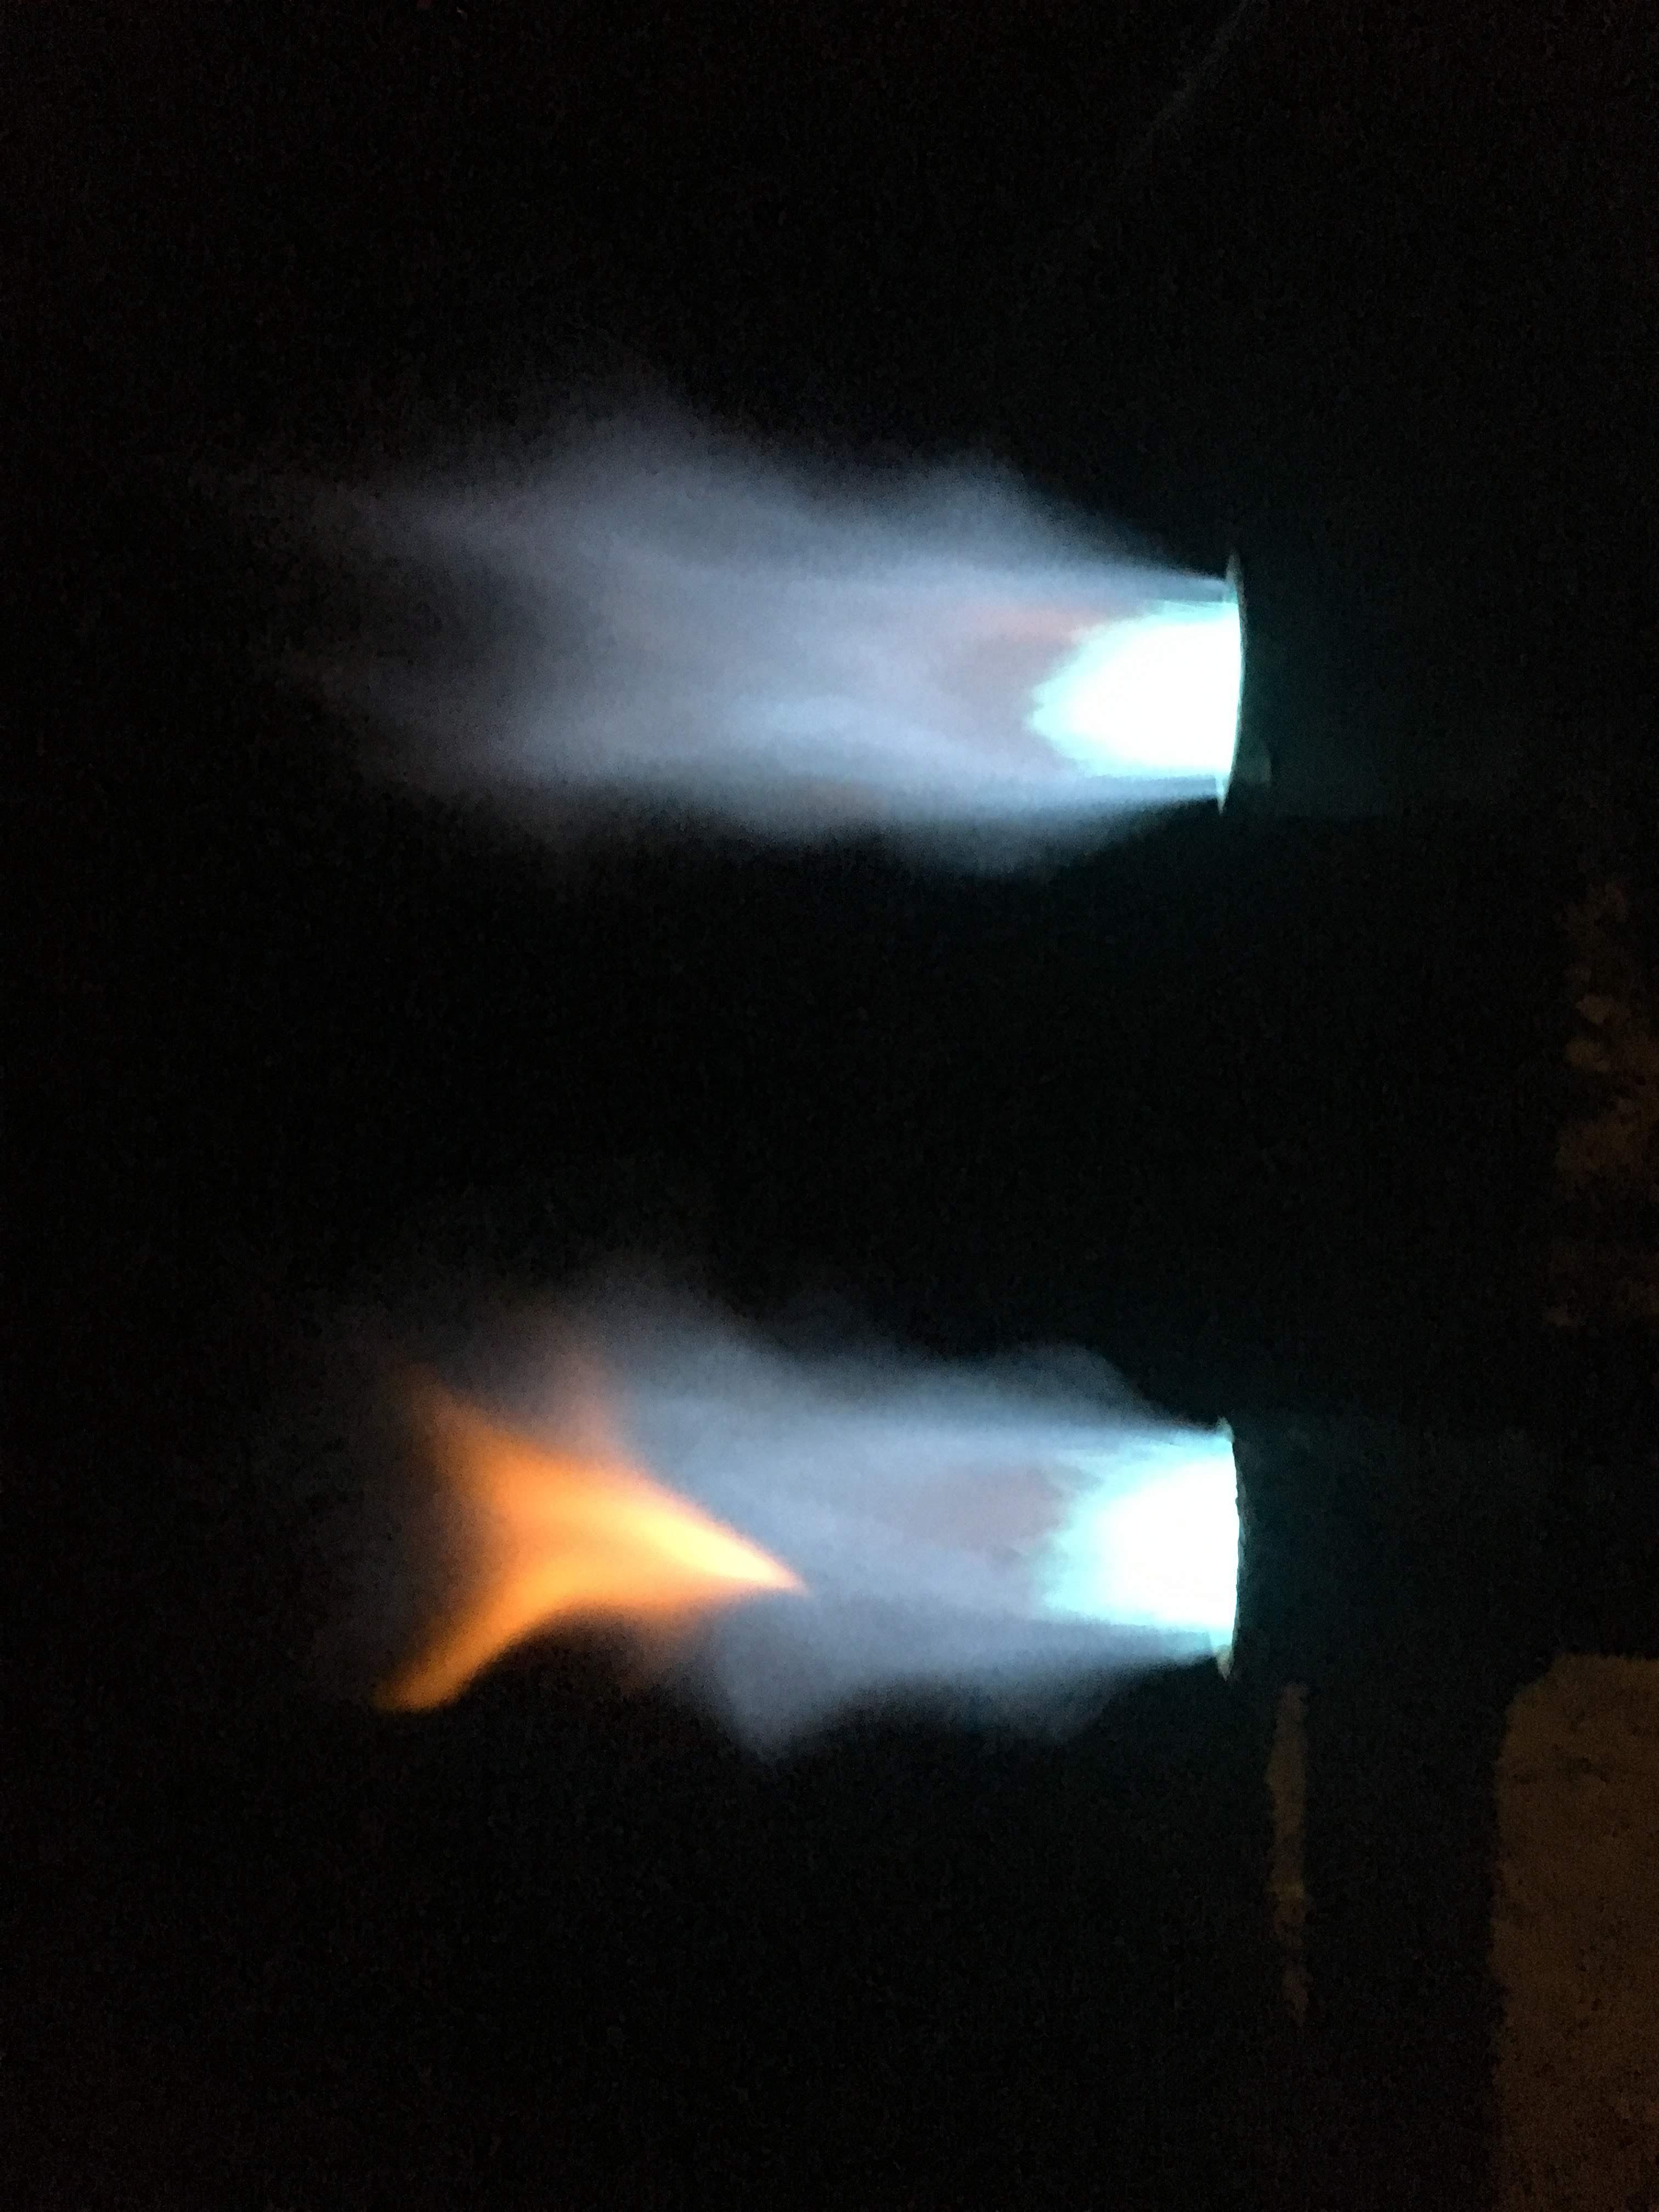
John in Oly, WA - thank you very much for your answer! I can indeed easily fix the flares going in to far, I will cut and rethread the nipples. One end of the burner is already burned out in the first softbrick forge, I was careless with that one. The baffle is also a good idea, seems that I need something like that because now the dragon breath is just too much as you may see in the movies below. Yes, it ran outside very well, just in the forge it had issues. Update, this evening I changed the MIG tip from the 0.023" to 0.03", very similar to this one: Now, it seems it runs more stable. Actually I did not had any flame interruptions compared to before. I made some videos, hope that you guys can see them, otherwise I will upload in youtube. I apologize for me moving around while recording, I was alert in stopping the gas in case the chock would take place again. I messed with a grinding disc, chocking the intake to simulate a flap. Outside the forge: https://photos.app.goo.gl/Lk3ffVxukFVqEBgQA https://photos.app.goo.gl/3ppdUZEcf3xnGZnK6 https://photos.app.goo.gl/jzSQH7sAmYCi5wy97 Inside the forge, it's a cold start but I did not record the ingnition. https://photos.app.goo.gl/oudXofGrhqNch1A28 The piece of stock is randomly inserted, not in forging position. Now that it seems it's running stable (I do need to test for a longer period outside my workshop) I will create a door with sliding half bricks to shut the main opening. It seems to me it's running pretty neutral. It also looks to me that the burner closest to the entrace may be just a bit too close, I am wasting too much energy outside and it also it's a big inconvenient to work this way, I would need really long tongs. It's an easy fix though, I can add another brick or half of it. I checked the outside of the bricks, they were pretty hot at the end of the last movie. I took that into account and I can reduce the work area easily by adding bricks inside when I do not really need that space, however for larger Items I can live with a bit of wasted energy. I will appreciate any suggestions and I will also answer questions if you have any. -
New forge from Romania - burner issues, lots of pics
Onobeka replied to Onobeka's topic in Gas Forges
Thank you Thomas. Indeed it makes sense. I've mentioned it just in case it brings some insight to my main question: why do the flames go out after a while of nice running? Obviously I cannot operate the forge this way, it's very dangerous. With the softbrick forge and single burner I could mind my business and leave it running, it ran smoothly. I am thinking it has a certain relation to temperature build up in the forge and going up the burner causing bad combustion, backpressure or exhaust ingestion. If I have time I will build another NA burner this weekend, but before I would like to understand and try to improve the current system, just because it's so simple and convenient to pull out just one burner, no screws in place, one gas connection line. These are all advantages but they do not mean much next to the disadvantage of not running properly. I know, stubborn ... :). -
New forge from Romania - burner issues, lots of pics
Onobeka replied to Onobeka's topic in Gas Forges
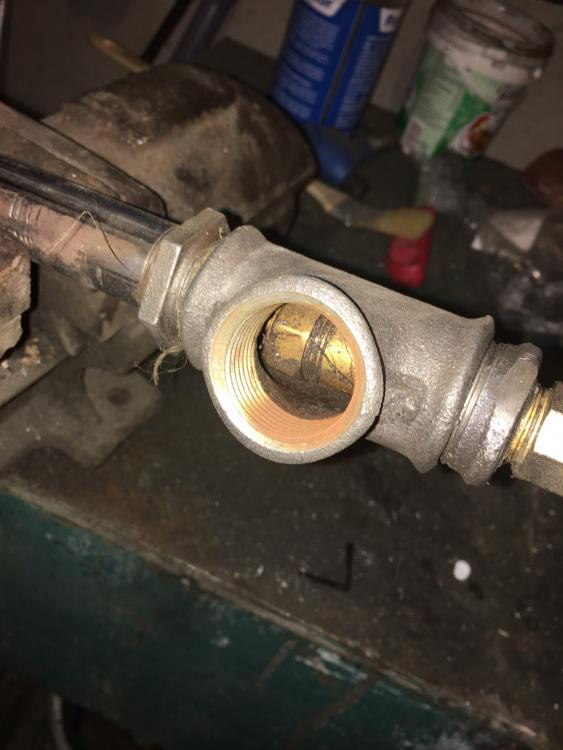
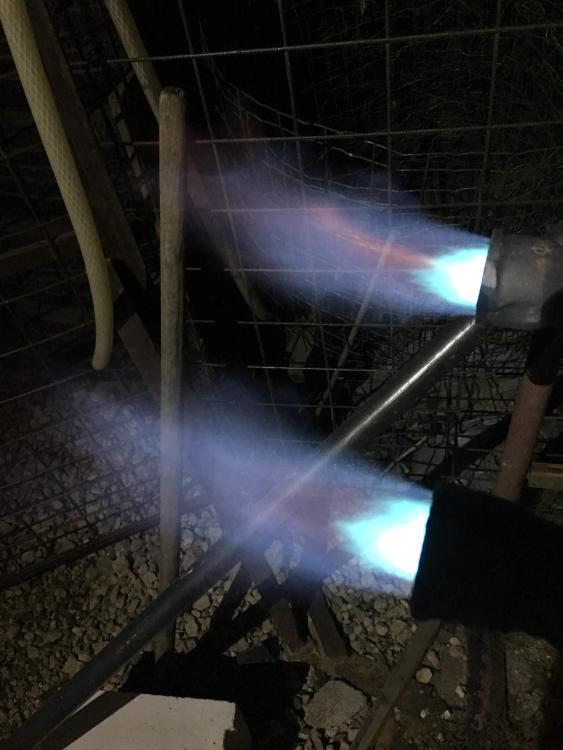
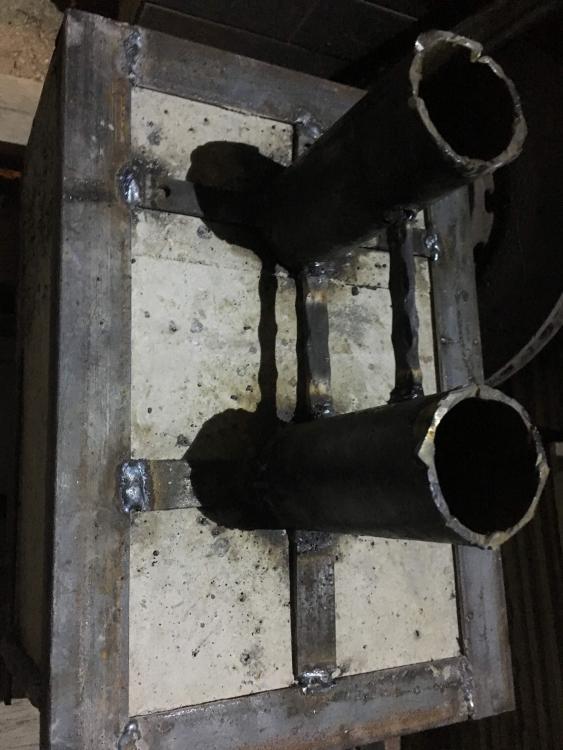
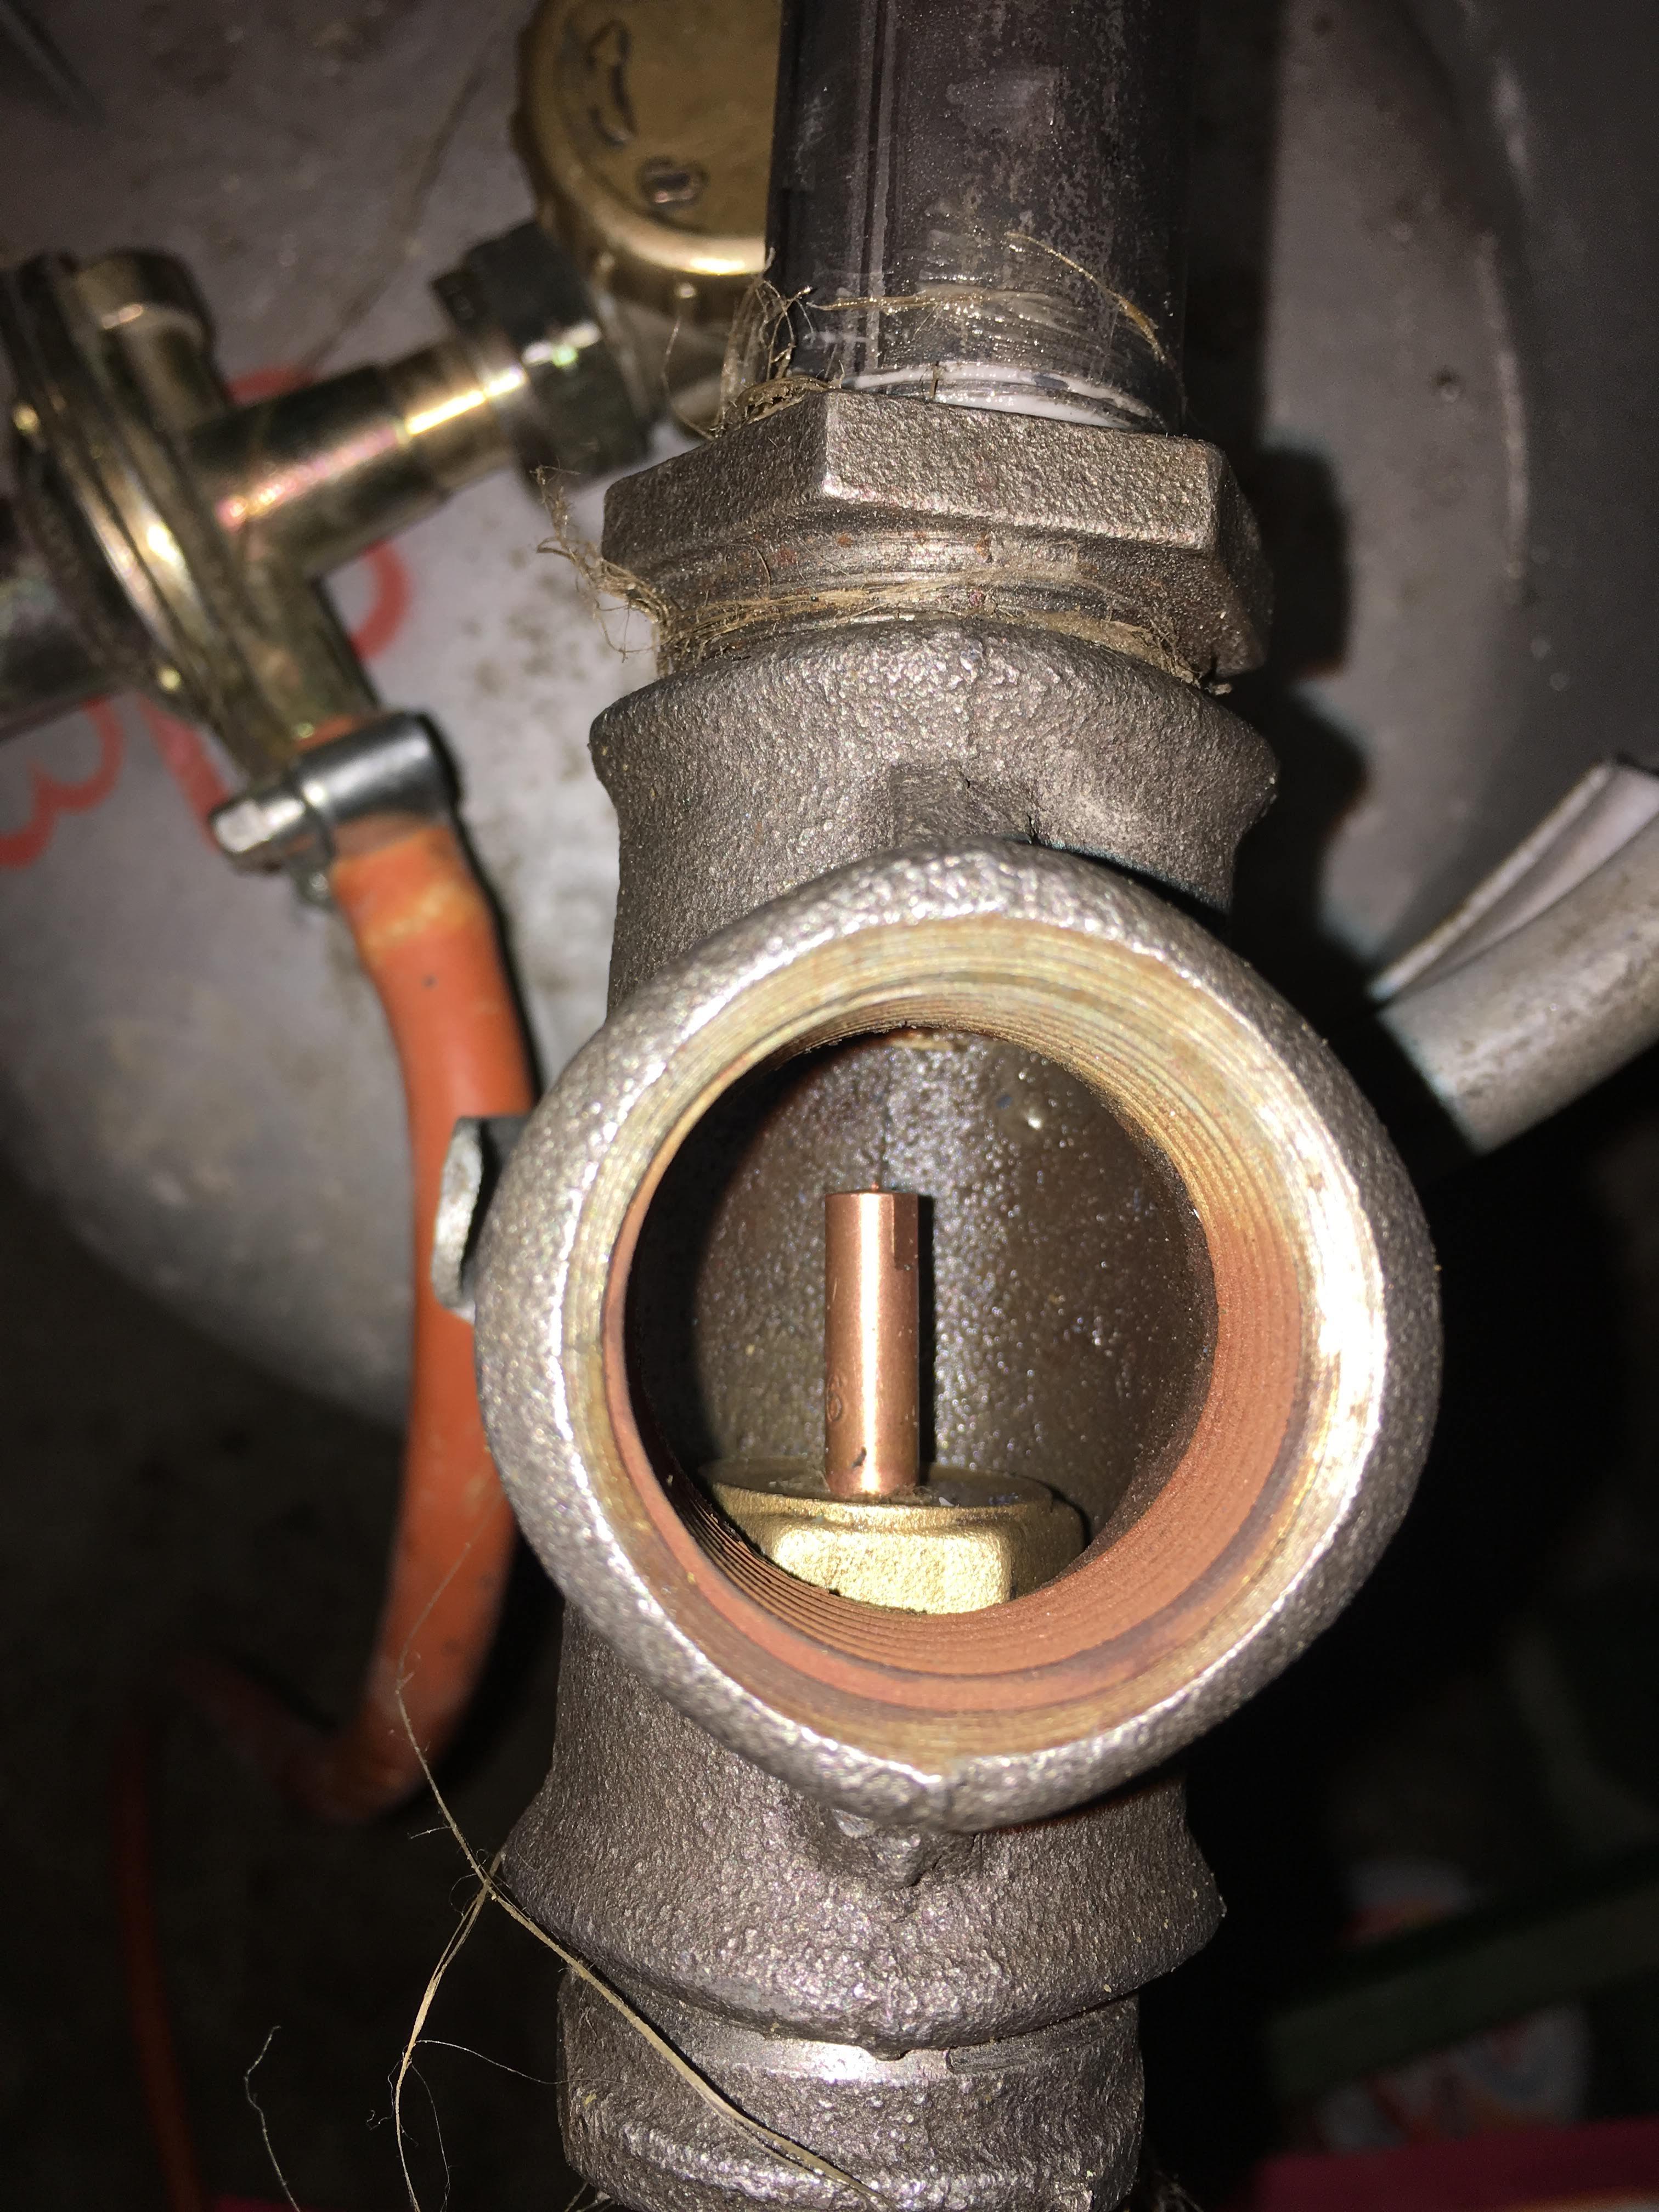
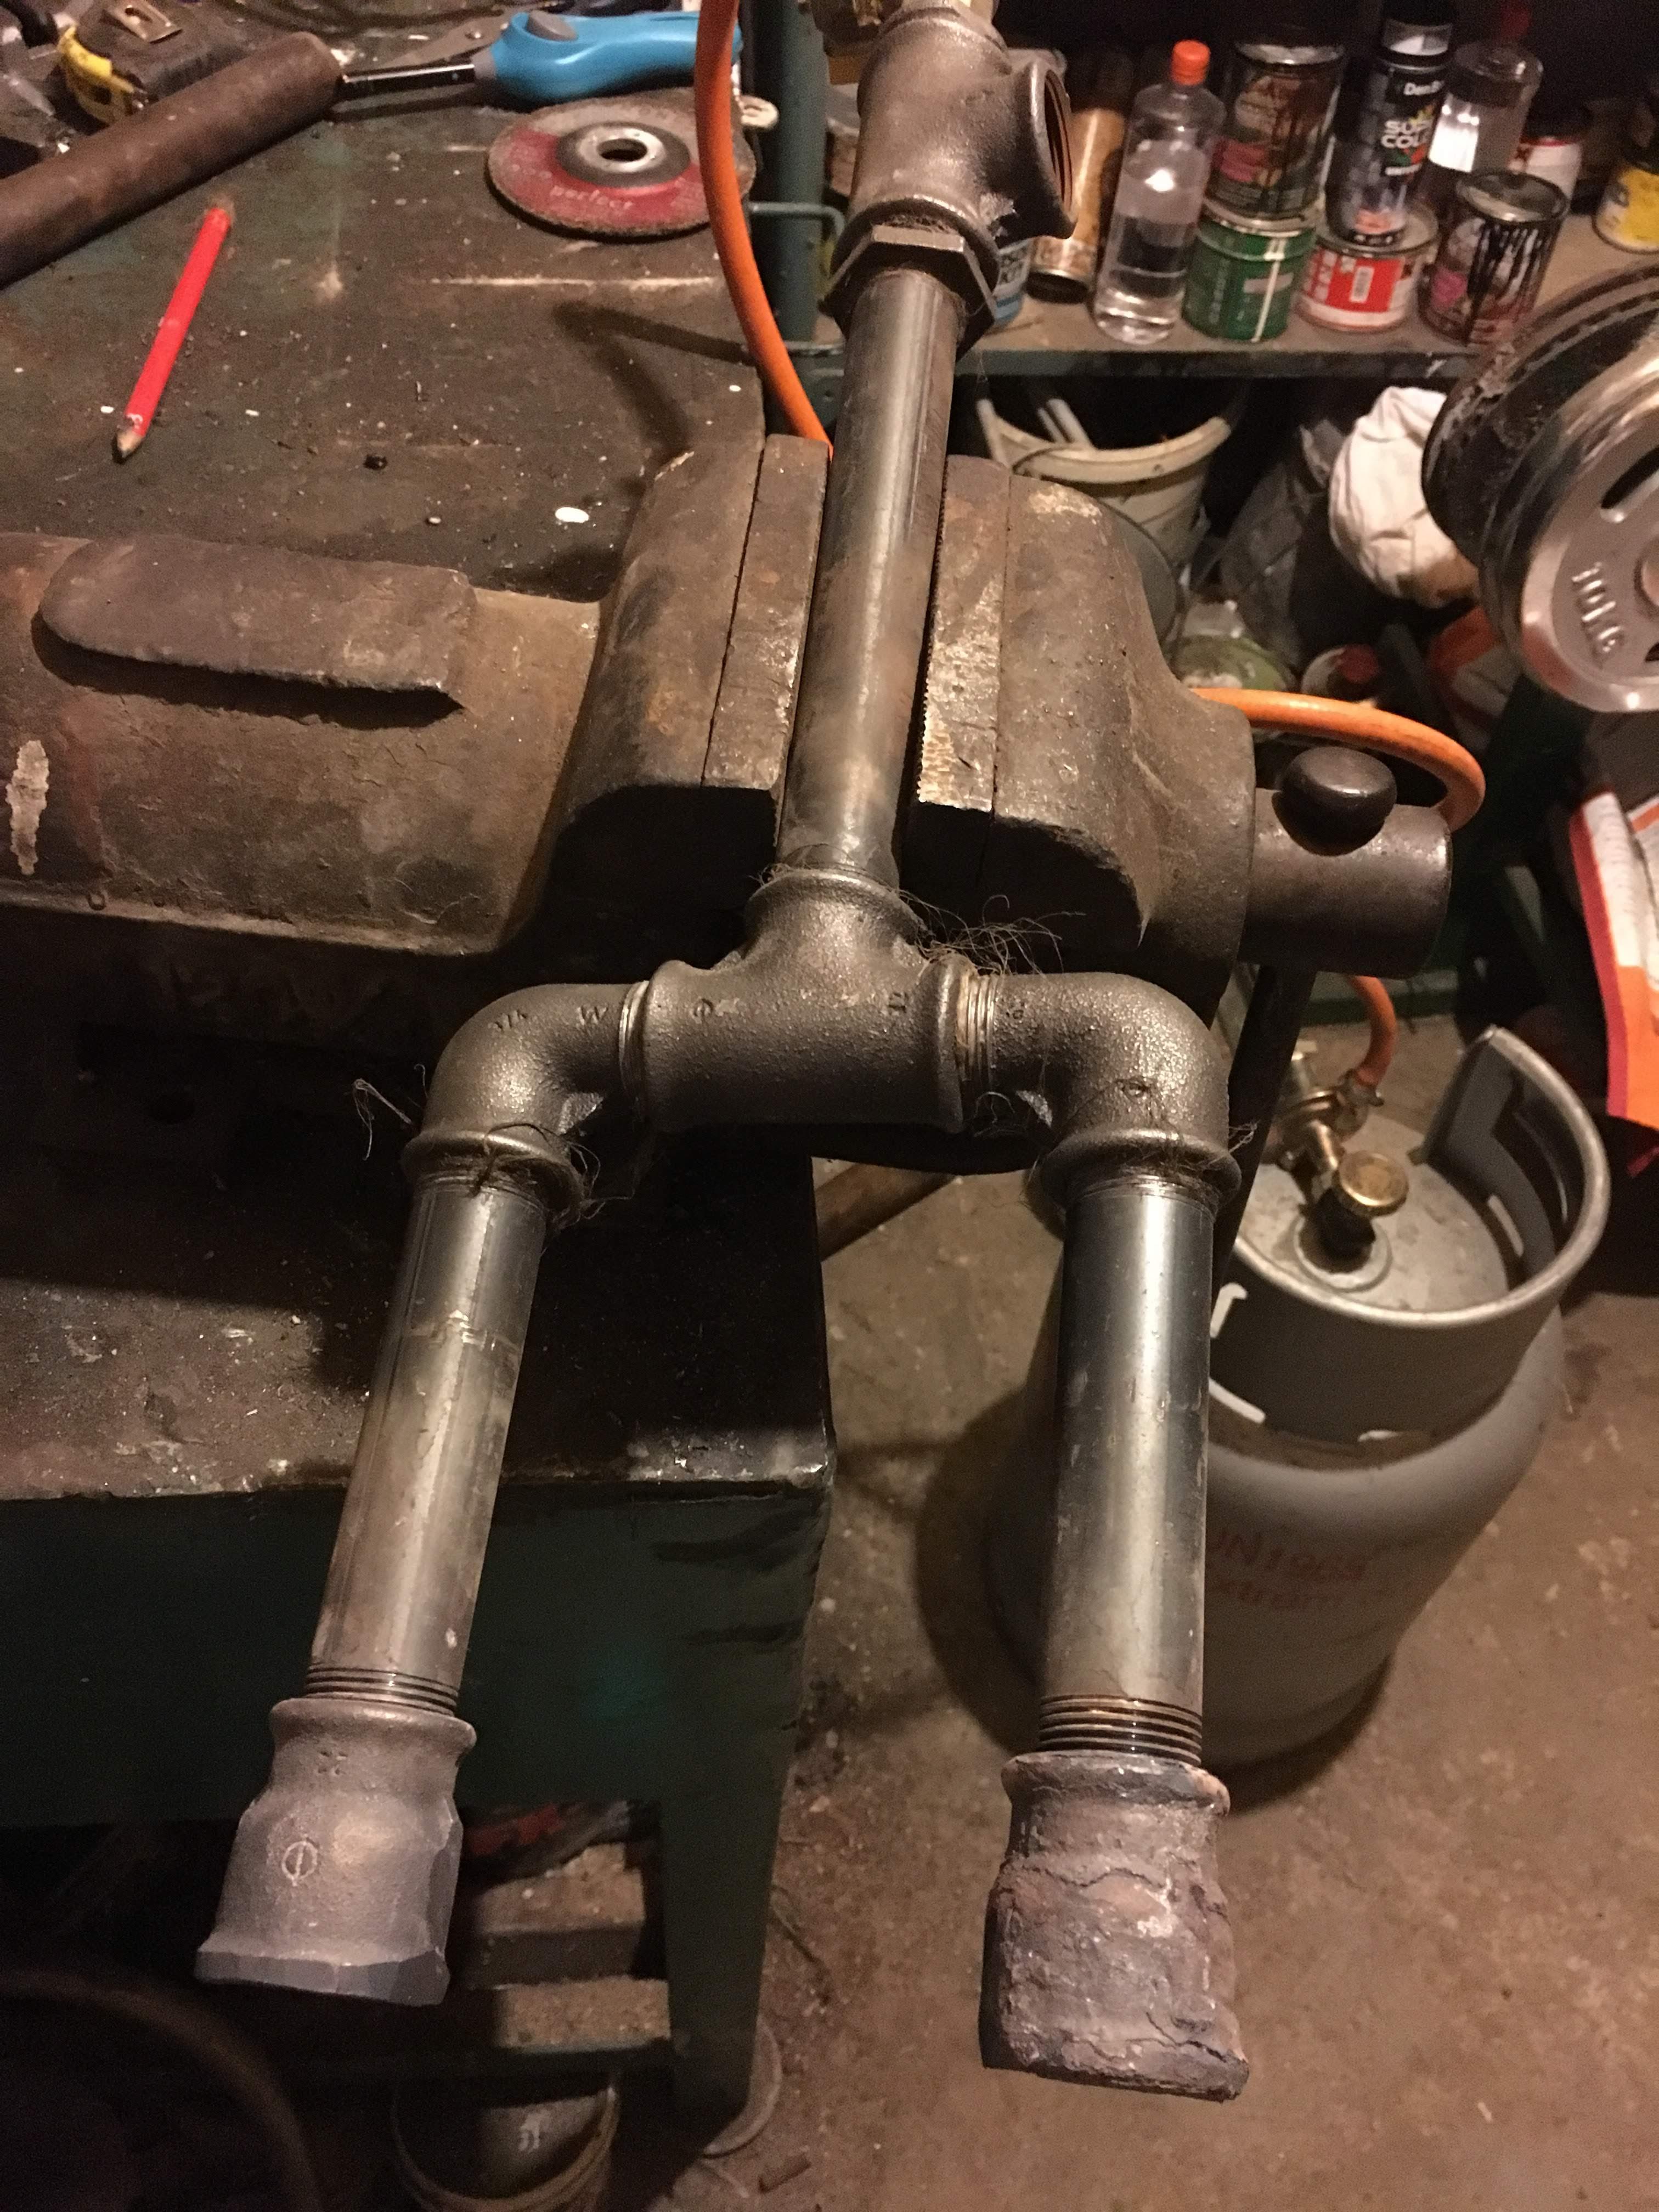
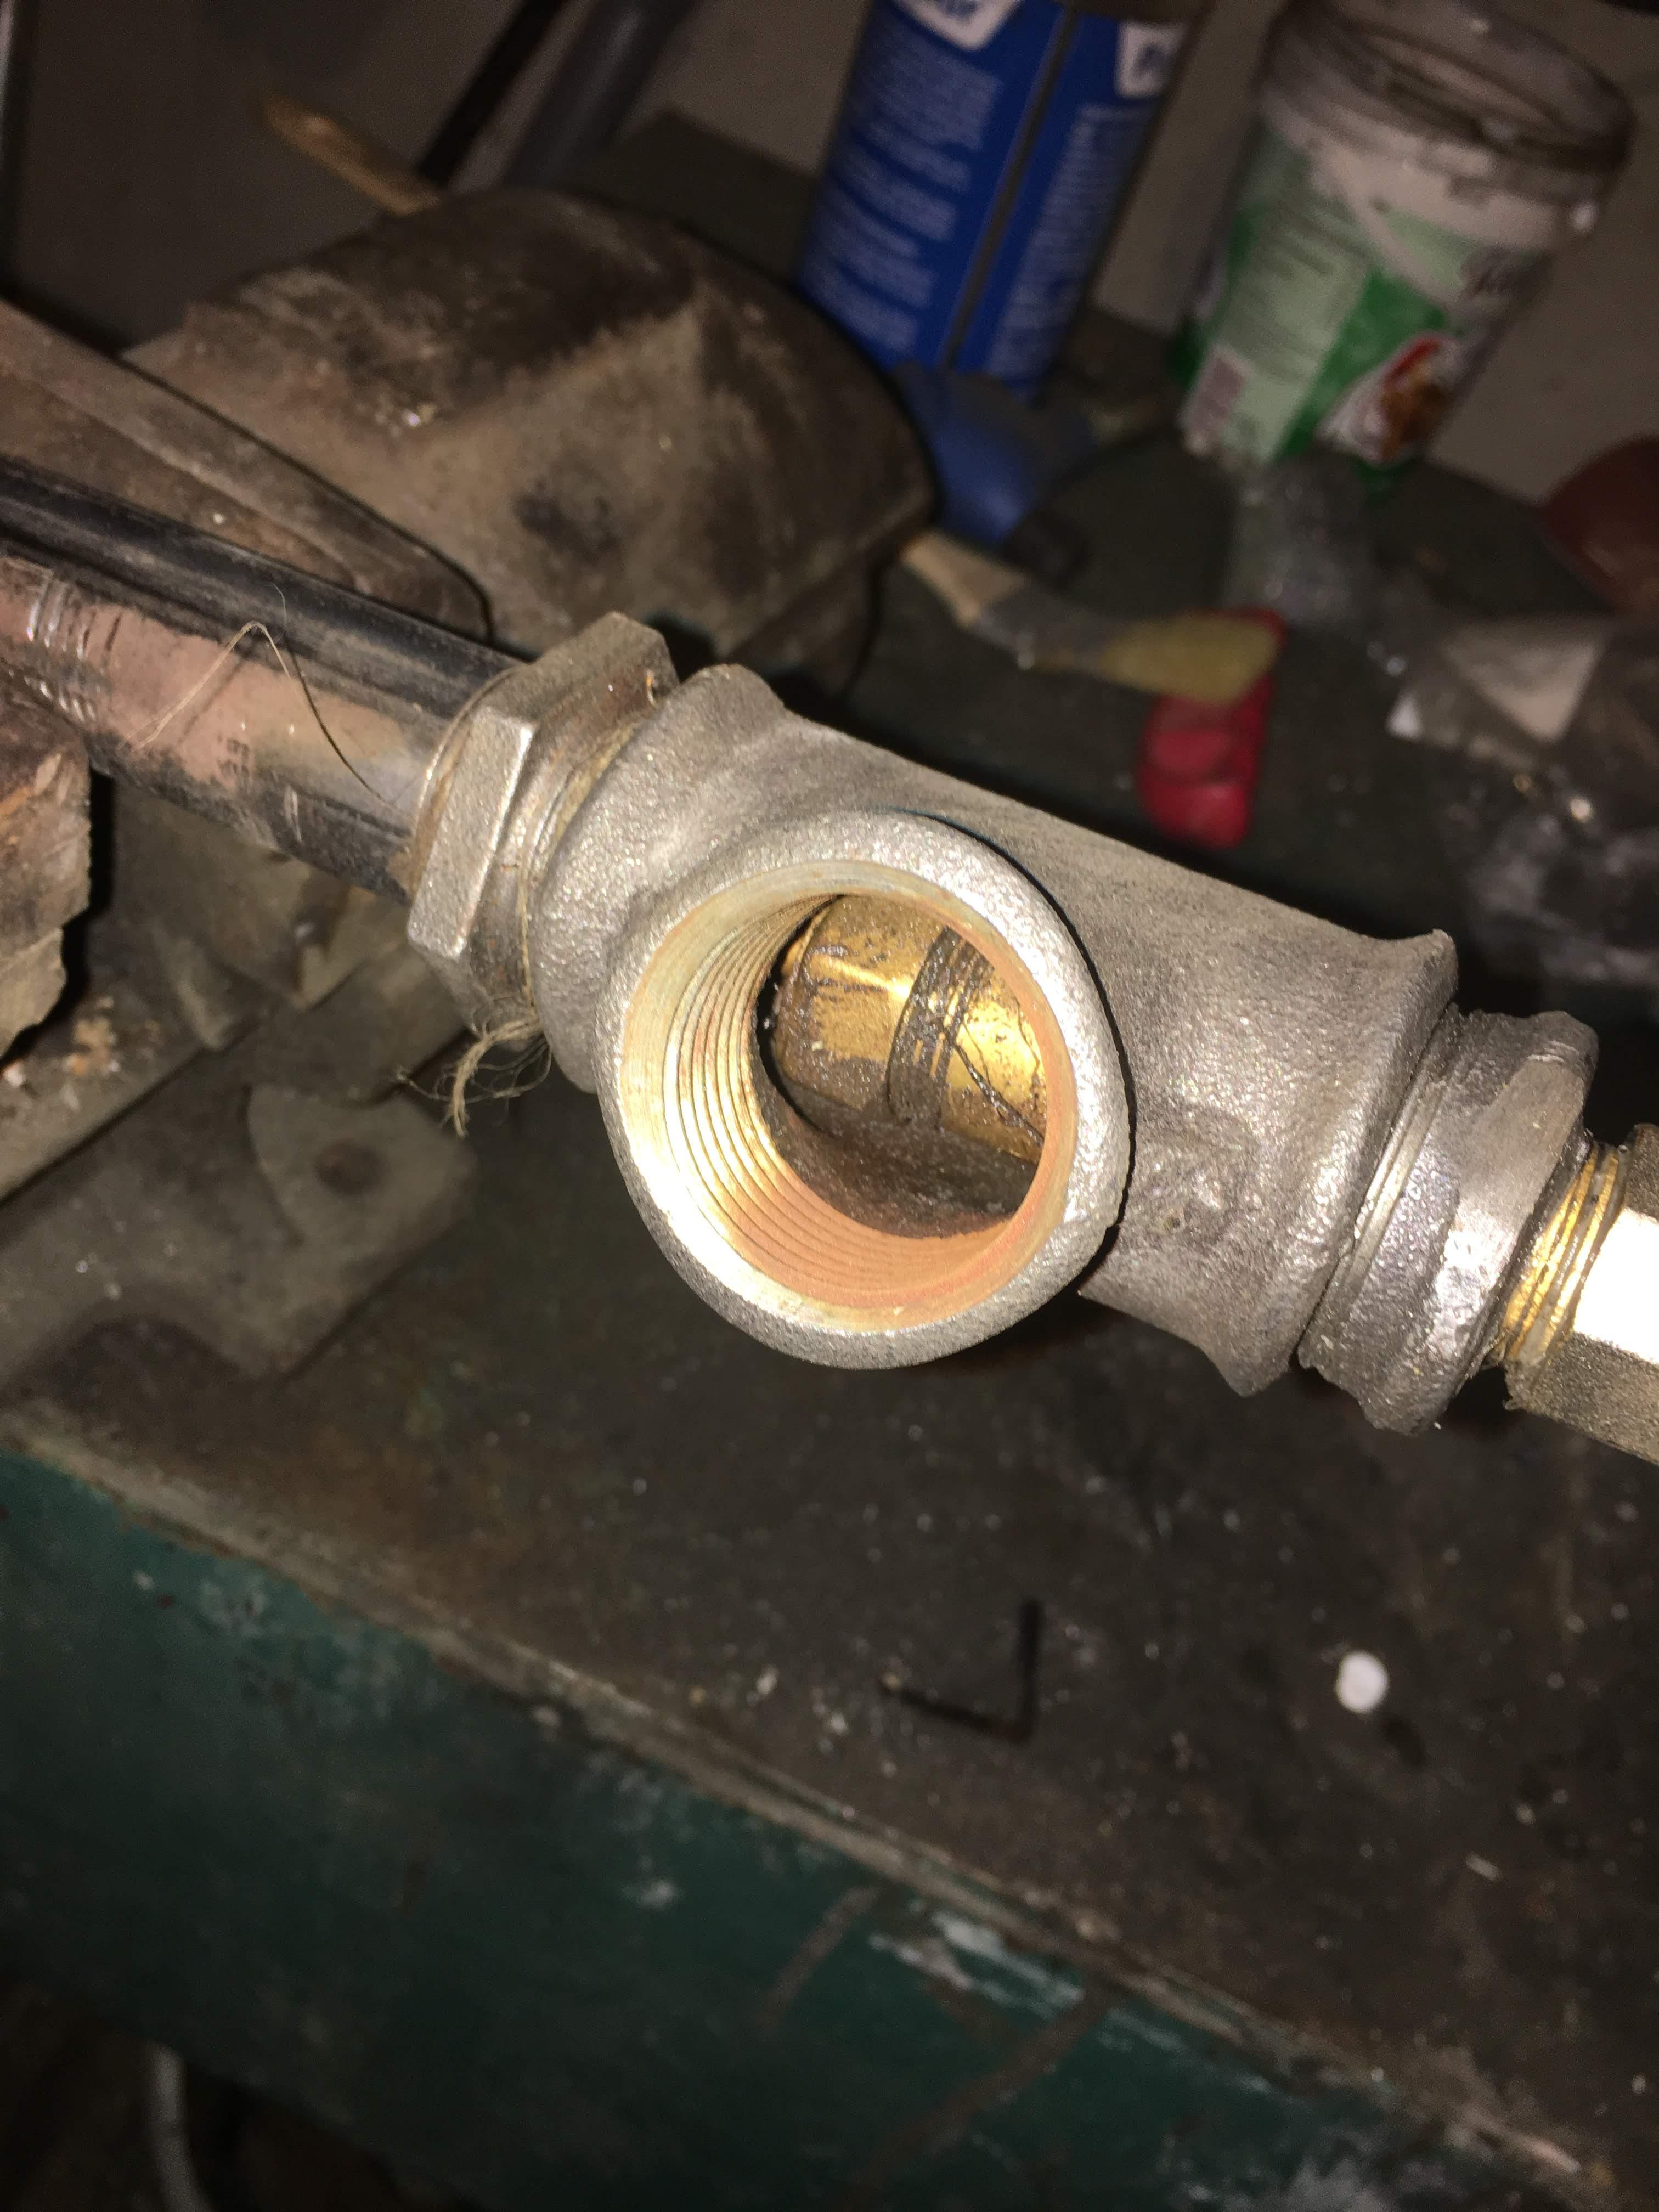
Thank you very much for the answers. I tried something yesterday evening, before you answered. I shortened the main nipple to the T splitter and pulled back the MIG nozzle back in the intake. All other parameters stayed the same, same tank, same pressure, same temperature. Outside the forge I noticed no issues, seemingly the flames are shorter but no issues on a long burn. In the forge I noticed a BIG difference, the flames look better at least to my inexperienced eye. It runs longer, I got a piece of stock at glowing red temperature in 3 mins, but ... later on the flame chocked and I think I had burning inside the pipes. When I stopped the gas, a short burst in the intake took place. I have no clue at this moment what could be the cause of the flames stopping after a while. Could it be exhaust going in the intake? My forge has a fully closed back. I'm also thinking that there is not enough pressure. I actually checked the MIG tip yesterday and it's not a 0.8mm, rather a 0.6mm (0.023"). I could also trim it further to allow for more air intake, as Frosty - explained in his instruction. Frosty, while I understand the remark about the elbows, T and additional nipples adding to an already busy setup, I fail to understand why you've said that the "gas connections are a mess". Can you please explain? Some more pictures, the MIG tip is not really straight ...


-
New forge from Romania - burner issues, lots of pics
Onobeka replied to Onobeka's topic in Gas Forges
I know I should not reply to myself, but after reading Frosty's T Burner Illustrated Directions I have a hunch that the MIG welding tip may be too deep in the 3/4" tube. I indented it to be that way initially because I was afraid that gas may be slipping out through the air inlet. I could replace the current T piece with an X piece, while using everything else as is. That would probably put the MIG tip at a similar distance similar to what Frosty recommended while using the T piece with two inlets. I might just try that to see how much it will make a difference. -
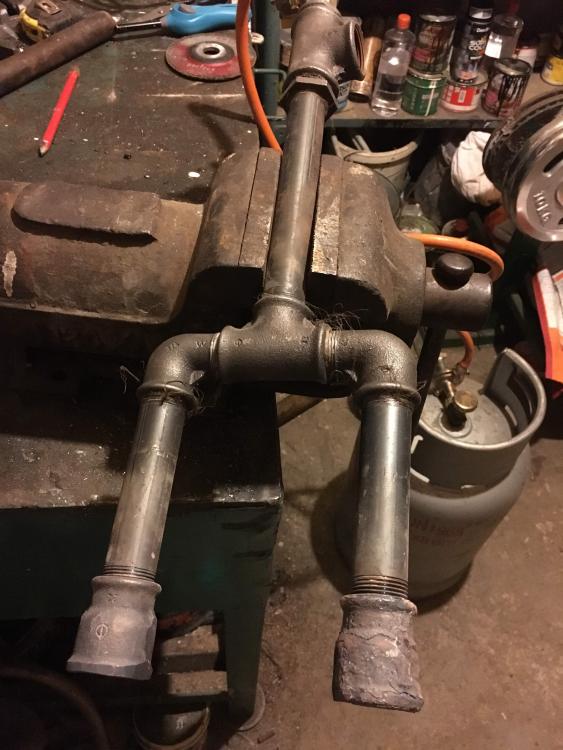
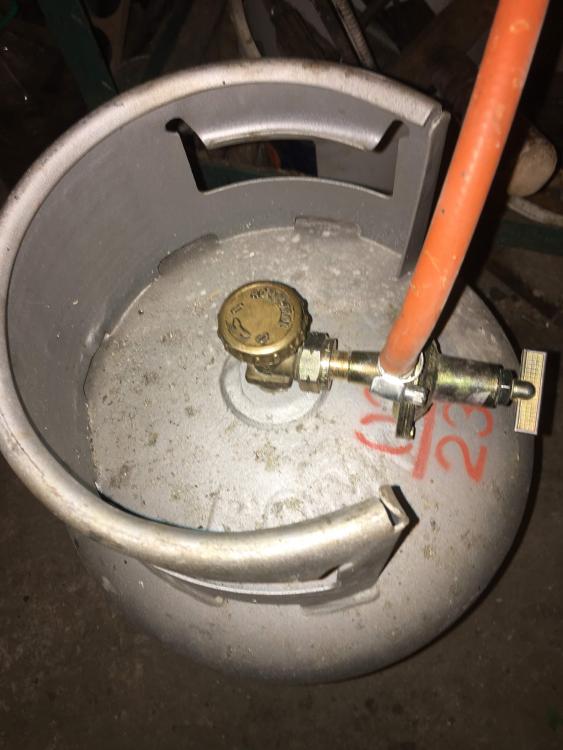
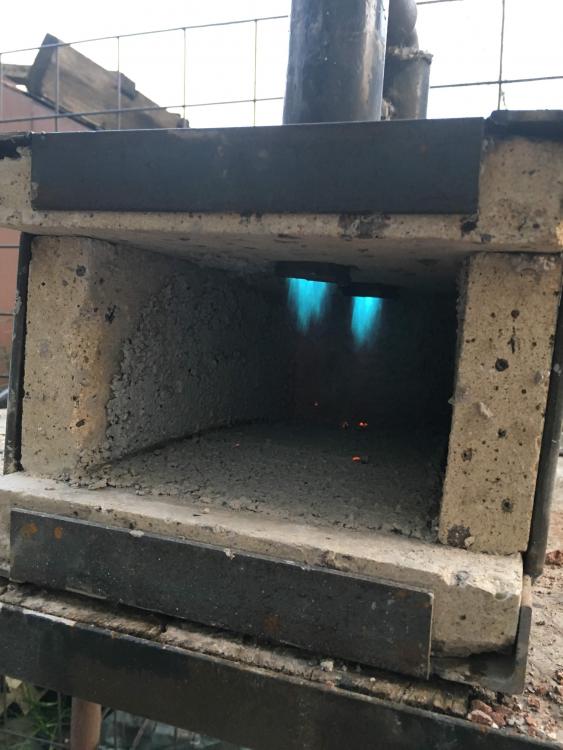
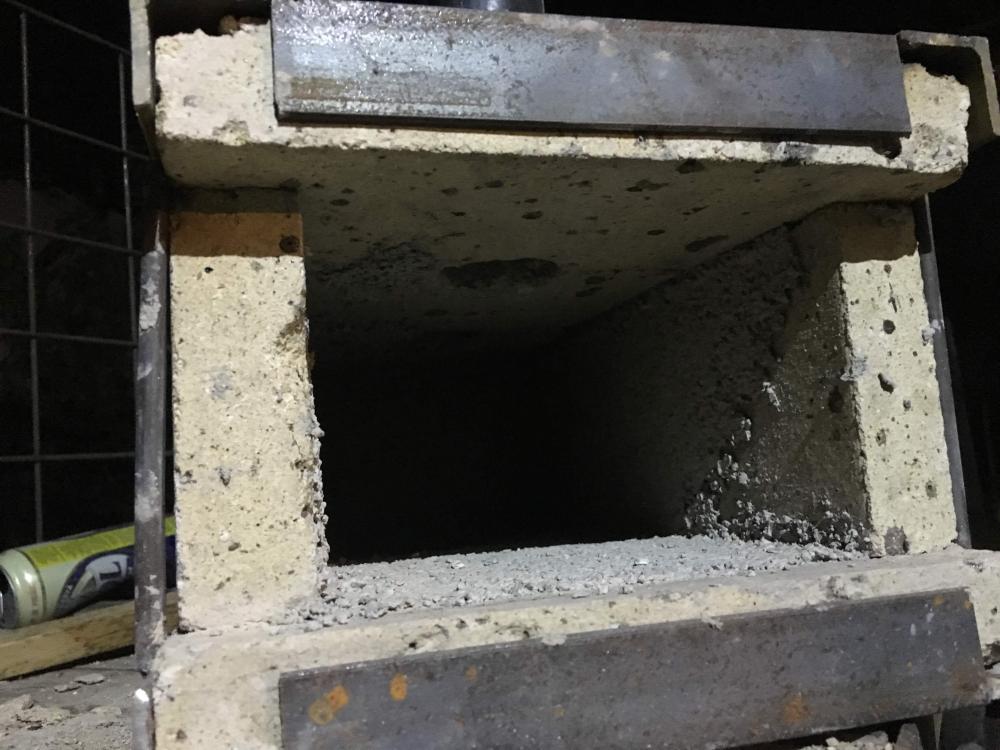
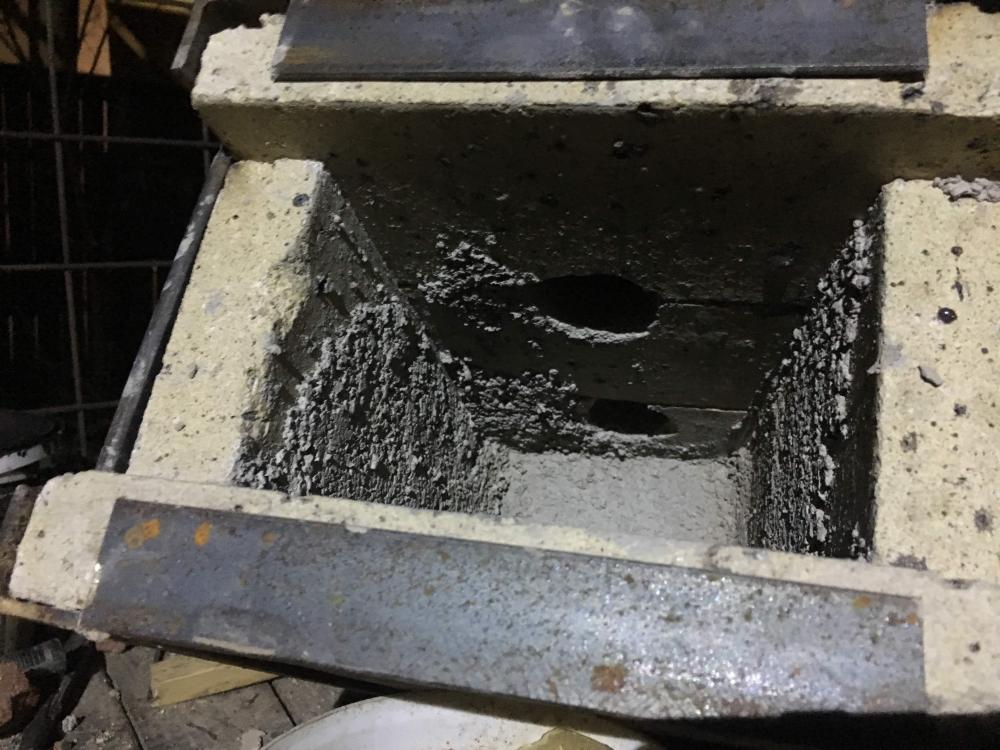
Dear, This is my first post. I have been reading lately on this forum and learning many new things, but as it typically happens, first you build then you try to solve issues. So, this build I am posting is done before most of my reading. This is my second forge, first one was a soft firebrick one made from a block of autoclaved cellular concrete. It was OK, but with every forge the inner chamber got smaller and smaller due to the concrete erosion. So, I've built one from hard firebrick (refractory), the material used for stoves. Dimensions of a brick are: 250x124x30 mm, so it's close to 1.25" thick, similar to what I've seen some other forge builds. I glued the pieces and spaces in between with refractory cement, rated to 1200C. Now, the burner. I've built it as an atmospheric one with a MIG welding tip, 0.8mm, that's 0.03". Pipe is 3/4" with a flare at the end of 1", larger would have been better. This burner ran on propane in my soft firebrick forge without issues, maybe a bit of dragon breath. I use a propane/butane tank. In my country these are sold at gas stations for cooking ovens, it's the only type I can find without going really into professional shops for welding. So far so good, I've made a few knives, pair of tongues, other decoration items from wrought iron and high carbon steel. I got them to non magnetic, quenched, had success. But, with the new forge I thought of going for a double burner. Before completely building a new one I thought of trying to split the existing one in two, still having just one injector. On the tank I use an adjustable pressure regulator from 1-7 bar, same as in my old forge. I've tested the new setup outside of the forge and it runs well, stable but I believe there's not enough pressure. There is no backfiring to the air inlet. My tank is now probably only 30% full, so pressure is not optimal ... maybe. Once I put the burner in the forge it runs well for the first 3-5 mins and then it starts choking. I'm thinking it could be exhaust running in the inlet. The two pipes that I put the burner in have no screws yet, rather I let the burner hang in there. Protrusion of the flares in the forge is about 10mm. The pipes are really tight to the flares but definitely not sealed. I took pictures and I hope you guys can help me. I could build two separated burners. I tries to search if somebody else had this crazy idea and I'm thinking it could be it's so bad nobody took pictures of it. I'm thinking that also forced air could be a solution, like stacking a hair drier like blower in the inlet. The welding and pipe cuts are unfinished work, once I have it running properly I will dress it up. Please excuse the mess. I'm looking for advice on the burner, starting with fixing the current solution if it's not totally idiotic to building two separated ones. Thank you in advance!