Donal Harris
-
Posts
970 -
Joined
-
Last visited
Content Type
Profiles
Forums
Articles
Gallery
Downloads
Events
Everything posted by Donal Harris
-

I believe I will try to make a steel faced WI hammer
Donal Harris replied to Donal Harris's topic in Hand Hammers
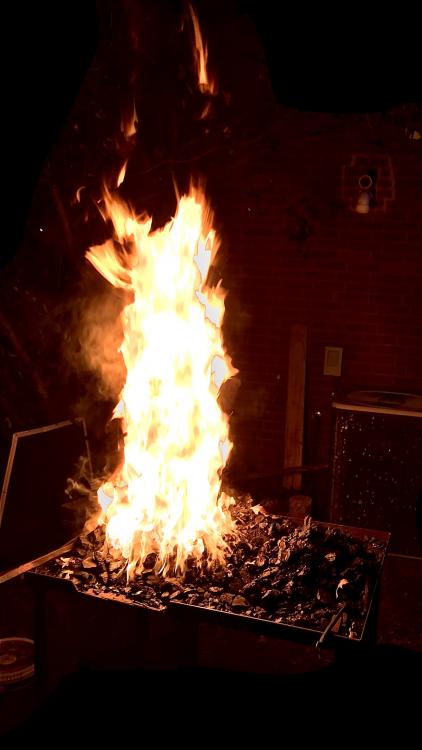
This is where I have taken it so far. I need to work it some more to remove all the sloppy hammer marks and true it up. The flat bar is 3/8” x 1.5 inch I am trying to draw out wider and flatter without increasing the length. Not such a success so far. I will need to practice with JLP’s video’s on directional movement to practice with again. It is tending to split, but that is likely poor heat control. Eventually it and another piece riveted to it will form a busIness card holder. The second picture is after I cut the end off the hammer blank to remove the tack welds. It appears mostly solid with only a couple of places with a small bit of slag. With the face welded on I don’t think they should hurt it much. The bottom picture is a standard store bought hammer I am going to copy. I figure I may can cut the blank in half and add an inch of 5150 to each end of one face and the same to the other face and make a flat face and a rounding face. Or diagonal peen if I am feeling up to it. Likely not. The copy will get a 1” 5160 face and a 5160 insert in the middle of the peen. I may or may not try to fuller the sides to make it look more like the one JLP did. Question: the hole for the handle. Punch and drift that after or before forge welding the faces on?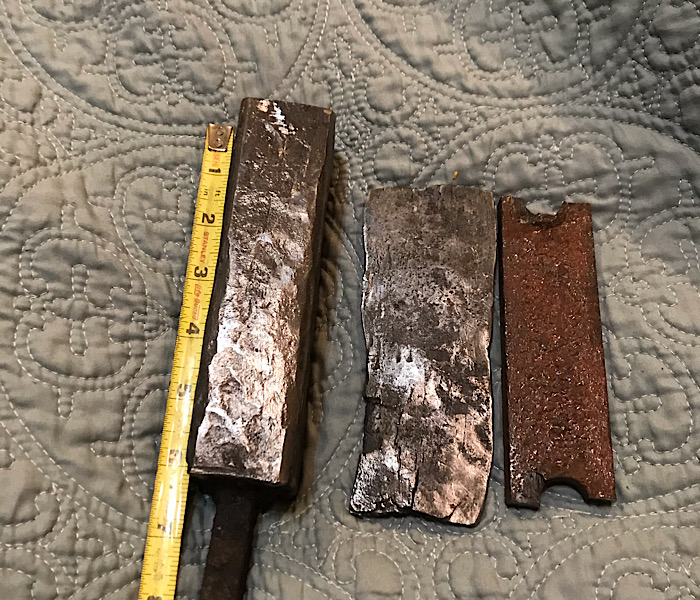
-
How about this one. My daughter took the picture. It is sort of fuzzy. Does Piglet count? Do heffalumps and woozles like pork?
-
I believe I will try to make a steel faced WI hammer
Donal Harris replied to Donal Harris's topic in Hand Hammers
I’ve been working slowly. I now have the blank at 8” long x 1 3/4” wide and 1 1/2” thick My plan now, after I forge weld the last bit of flattened wrought iron to the blank is to use a fuller some what like the Black Bear Forge guy did to make two hammers from one blank. I hope to be able to fuller it in the middle so the hammers are diagonal peens first I have to fabricate the fullers. I am thinking angle iron with bits of other steel welded inside the V’s to add mass to them? Would a better method to make the fullers be better? Should I fuller the blank with the blank at an angle? Should I just fuller them as cross peen and twist the peen into position using a vise and a bending tool? Would de-lamination be a problem with either method or less with one than the other?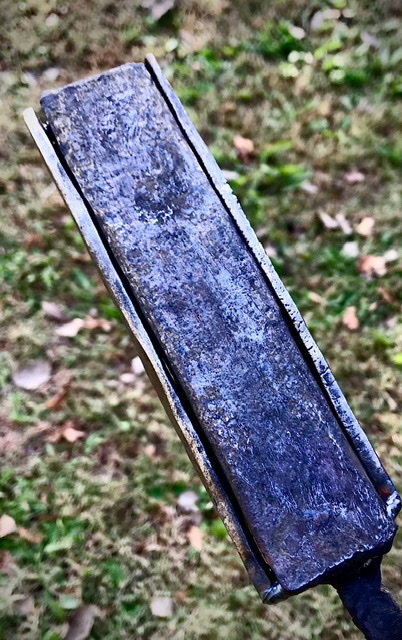
-
I agree. Silicone layer with anvil tightly secured to the base. Magnet under the heel and side of cutting step if the anvil has one if needed. Just the silicone and clamping the anvil to the base tightly will eliminate almost all the ring on most anvils. Currently mine has chain wraps. They get in the way and the sound dampening was no better than it was on my prior mount which was just a layer of silicone with bars over the feet and attached to base. Some day I will remove the chains and go back to that.
-
Pros and Cons for 1095? vs 5160? Cores in San Mai
Donal Harris replied to Donal Harris's topic in Knife Making
Thanks to both of you. it only just now occurs to me you may have covered this in your book, Steve. I will pull them out again. When I bought them I didn’t think I would ever be trying this and would have just skimmed over it if it were there. -
Threads finally stripped on old Iron City vice. How to repair?
Donal Harris replied to fishnaked's topic in Vises
That certainly seems to easier than what this guy did in this video. You wouldn’t need access to a lathe or other machining tools. -
I have tried searching but no luck. I know from my search that when using wrought iron or mild steel on the outside carbon will migrate from the high carbon core to the areas of lower carbon. 1095 seemed to be the most commonly used core, but other than the high carbon content and the material being readily available at a very low cost in the form of old files, I couldn’t find much to inform me why it might be preferred over something like 5160. l have many old files to play around with as well as several leaf springs from some sort of large Ford truck and a small pile of leaf springs from small utility trailers (small as in like what you would use to haul a golf cart). I also have 4 or 5 used coil springs from some unknown vehicle types. I know from past reading it is best to use known steels, and used springs could have stress fracture, but I have them and am not selling knives. Something which behaves like 1095 or 5160 for my purposes now is just as good as known 1095 or 5160. Does 1095 tend to crack or warp during heat treatment more or less than 5160? Is one easier to forge weld to WI more than the other. Is there a table which shows which cores are best suited for use with WI or other different types of steel? Thank you, Don
-
Mortise and Tenon Construction
Donal Harris replied to Owen Hinsman's topic in Blacksmithing, General Discussion
Thanks, Thomas. That is such an obvious thing now that you’ve said it, but is not something that would have ever thought of. I’ve had an unused set of 1/2” metric sockets in my garage for almost twenty years now. Finally I have a purpose for them. -
Threads finally stripped on old Iron City vice. How to repair?
Donal Harris replied to fishnaked's topic in Vises
I have often wondered if you could weld a coil spring inside. I’ve read that at one time threads were not cut. They were made by welding or brazing a coil spring to serve as threads. Mainly I just posted to make this thread (NPI ) easier for me to find later. I know threads in the first vises were not cut, but have no real idea how they got the coils attached and functioning. -
Making my own flux
Donal Harris replied to Benona blacksmith's topic in Fluxes used in blacksmithing
What about diatomaceous earth? -
Why not rent something?
-
I believe I will try to make a steel faced WI hammer
Donal Harris replied to Donal Harris's topic in Hand Hammers
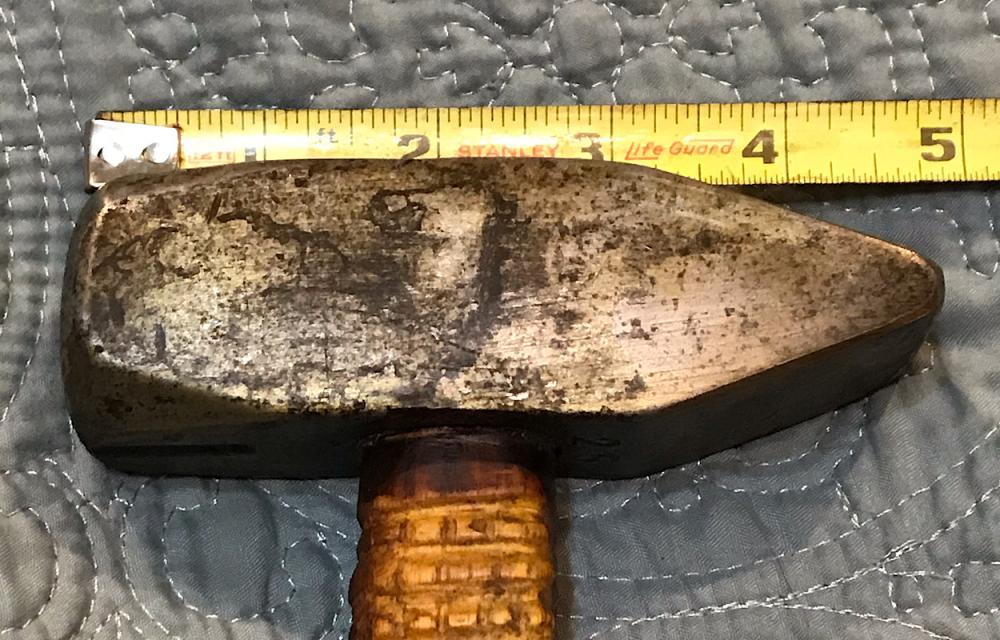
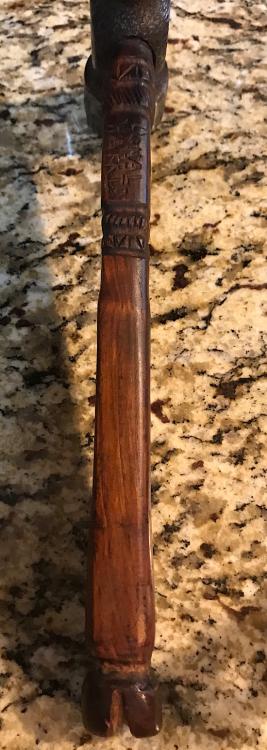
This is the profile I prefer. I just wish it were a little thicker. I didn’t make the head. It is just an old and rusty, garage sale find. The handle is bois d’arc. No stain applied. It just darkens naturally from the BLO, bee’s wax, and grime as you use it. The odd knob on the end was once different, but I split it in half when knocking it on concrete to set the head. I smoothed it up and it looked like a phallus (If I can say that. Please edit if I cannot.). So I worked it some more to try as best as I could to make it not. That was the last time I set a head with concrete. I use a rubber mallet now.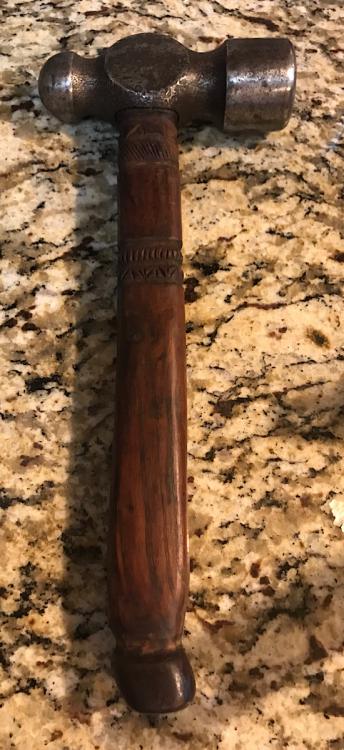
-
I expected this grate to last longer than one session
Donal Harris replied to Donal Harris's topic in Solid Fuel Forges
At one point the club coal was from Texas, but that was a long time ago before I became a member. I believe most Texas coal is lignite, but I could be wrong. Steel was actually once made in Texas. The Lone Star Steel company was/is located in NE Texas near Longview where I once lived for many years. I am down to about half a barrel now. With cooler weather here, I should be out there more now. Hopefully they are still on the same pile, but I expect not. It may be the same clinker producing stuff you guys are getting now. -
I believe I will try to make a steel faced WI hammer
Donal Harris replied to Donal Harris's topic in Hand Hammers
Yes. I got a bit carried away with the rasps. The handle is a bit thin at the butt end though, so I won’t be upset when it breaks. I am still looking for a shape I like. I have tried a few different shapes. The first was sort of a backward D shape, kind of like a guitar neck. It made it easy to tell where the face was without looking. It was Ok, but not great. When this one breaks, I will probably go with something like a U. The one part of the handles I expect to stick with is the type of wood. Bois d’arc is great. A bit heavy, but not excessively so. Rather tough. I haven’t broken one yet. I’ve broken two oak handles, but that may have been because they were made from pallet would. That wood is taken to a very high heat to kill any bugs. It could have made it brittle. Even more so than the physical qualities of bois d’arc, the color is what I really like. At first it is bright yellow, but with use and exposure to light, it turns a very nice golden brown. The handle in this wrought iron hammer will be totally impractical: flame maple. Probably one of the worst choices possible for a hammer handle. Looks great on a Les Paul, tomahawk, or rifle, but is likely going to break if heavily used. -
I expected this grate to last longer than one session
Donal Harris replied to Donal Harris's topic in Solid Fuel Forges
I usually run my forge for an hour at a time. Clinker is usually not a problem unless I go longer than that. I assume because of the coal the Saltfork Crafters makes available for members to purchase. I believe it comes from a mine near Vinita. It is of pretty good quality. It is only on a weekend when I might run the forge for 3 hours or longer that I have to remove clinker that it is a problem. With a grate like my brake drum forge had it was manageable. Removing the clinker requires I break up the fire, but that is a minor thing. It isn’t so minor with just pieces of scrap placed over the tuyere. The grate in my old pot was removable, but I could still scrape the clinker out with my poker. With just random scrap bits I cannot. All I can do is just poke holes through it. I could fix it by welding the bars to the inside of the tuyere or add a clinker breaker. Both would require a trip to my Dad’s. When I eventually do that I will go with a clinker breaker. If they weren’t the ideal solution, you wouldn’t see them in every old original pot. -
I expected this grate to last longer than one session
Donal Harris replied to Donal Harris's topic in Solid Fuel Forges
That is probably why what just the odd scrap bits I normally use seem to las longer. That one covered the entire bottom. The scrap bits are just large enough to sit over the tuyere. At present I am using three small pieces of 3/8” round bar I had used as a drift. They actually seem to function better as a grate than they did as drifts. The holes I was drifting grew progressively larger the more each piece was used. Drifting out the holes seemed to disrupt the 3/8” drifts and they would get thicker with each use. I know how to put a traditional clinker breaker in the pot, but my Dad’s shop where I fabricated the pot is a little over an hour away. It was running a little late on a Sunday and I decided to skip it. -
Leaf springs from a truck. Unknown vintage. Needed a nice chunk of spring steel for a hammer I am making. I figure this will do better than the other leaf springs I have which come from smallish utility trailers. They are no more than 1/4 “ thick. Paid the mechanic $10 and he helped me carry it to my truck. Much more than scrap price, but he is a good guy. Donal
-
I believe I will try to make a steel faced WI hammer
Donal Harris replied to Donal Harris's topic in Hand Hammers
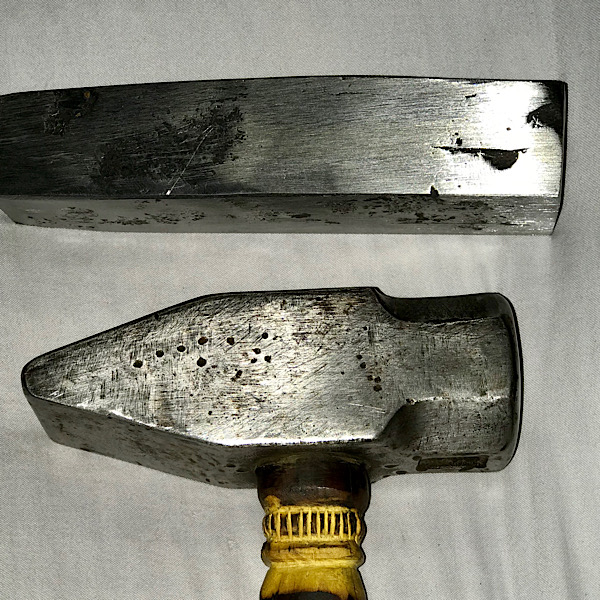
This is where I’ve landed so far. I forge welded another thin drip to the side. The top pick has my favorite. Stamped 2.5 lb, but feels lighter. It is 5” from face to peen. Sort of square. Bottom of head to top is 1.5”. Peen starts at 3” from face. Face is 1.5”x1.5”. Center of the handle is at 2.125” from face. Hole for handle from top side is 2 1/8” parallel to the direction of the face and 7/8” side to side. WI blank is 1 3/8” top and bottom of the front of the face. The sides are both 1 3/16”. The peen end is 1 1/16“ on both top and bottom. The sides are 1 1/16 “ The WI block is exactly 6” long now. On to scales in the AP lab, the block weighs 2.5 lbs. I like the length of the store bought hammer. I am not totally pleased with its weight. I plan to forge weld another thin piece to either the top or the side to both add weight and get it to square. I will lose quite a bit of mass disrupting the bar down 2” if I can actually get it to move that far. My spring steel for the faces are about 1/2” thick. That should leave me with a hammer which is just shy of 3 lb and about 5” face to face. I am not sure yet if I want an angled peen or one side flatish and the other shaped to be a rounding face Beyond the obvious, I am a newb, anyone see any concerns or have any advice? The bottom photo is my second favorite hammer at 3.5 lb it is both two heavy and too light. 3.75 lb or even 4 lb might have been better. It is store bought. To make it I would need to enlarge the blank. Thanks, Don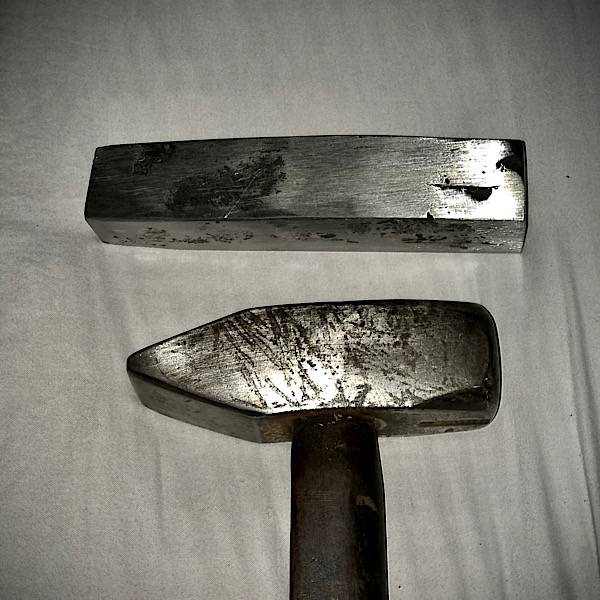
-
I expected this grate to last longer than one session
Donal Harris replied to Donal Harris's topic in Solid Fuel Forges
My very first grate was made from sucker rod. 3/4” I believe. It lasted a year and a half, but I wasn’t forge welding much if any. Just leaves and s hooks. I have sucker rod. I may try it again. Or just continue on with the scrap. -
I expected this grate to last longer than one session
Donal Harris replied to Donal Harris's topic in Solid Fuel Forges
Probably. It was a shade too large. I had intended for it to sit flush on the bottom. Instead it was about 3/4 above. -
Half inch, mild steel, square bar. I don’t have a before pic, but imagine the bars in a old west jail cell. I had two bars forming the side and 5 more bars laid on top of those running perpendicular to the sides. I arc welded the pieces together. Prior to this I had used just two random junk pieces across the opening. Or sometimes pieces cut from a cheap charcoal grill. I could get several fires out of each of those before they became unusable. This one had its center burned completely away in just a couple hours. I had been running the fire at a welding heat for much of that time. Was that the likely cause of the failure?
-
I believe I will try to make a steel faced WI hammer
Donal Harris replied to Donal Harris's topic in Hand Hammers
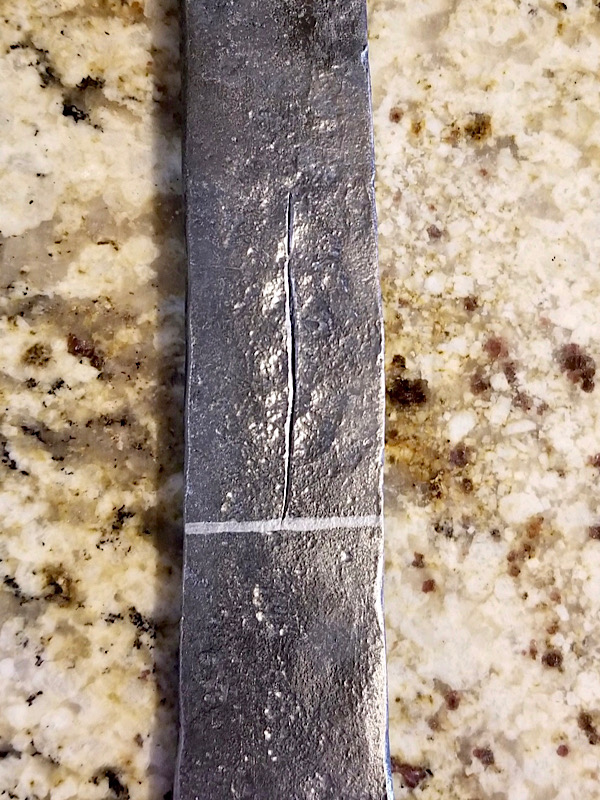
Total mistake. As I was cutting I noticed the slit was not full thickness, but I kept cutting. Then after folding I could not get the two halves of the bar to stick. Will try again today using flux and a totally new fire. But in the spirit of finding victories where you can, I managed to do all of this without injuring myself. So there’s that... -
I believe I will try to make a steel faced WI hammer
Donal Harris replied to Donal Harris's topic in Hand Hammers
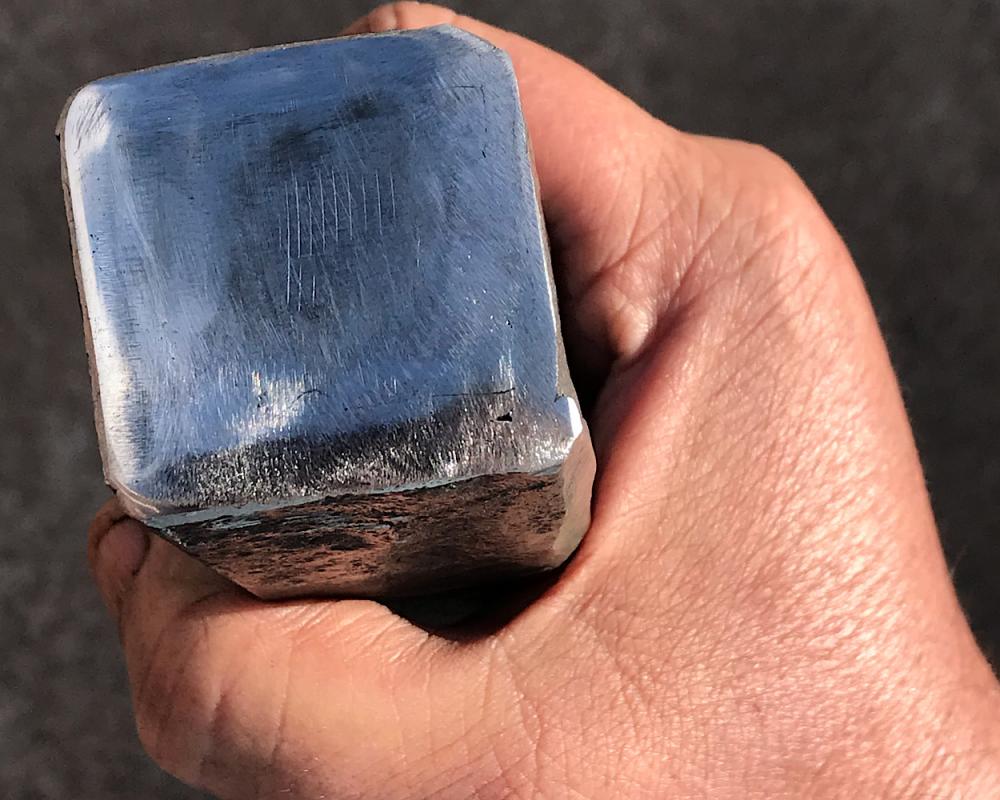
Decided I wanted the block to be a little wider, so I took one of the to square and then folded it back over itself and tried to weld it. Both ends stuck together reasonably well. About a two inch long section in the middle did not. I tried reheating it till it was just below burning three or four times and still couldn’t to get it to close up. Each time the piece would get longer and thinner. I am going to split that section open to remove the slag I can see inside the slit and then fold it back over and forge weld it again. By the time anyone responds, I will have already done this, but I would like to know what if anything people here may think of my plan? What I think is the poorly welded spot is running from front to back and would be on the outside and not likely to cause a problem. That and the fact I will lose so much mass to slag trying to forge well the faces on, doing this is probably just waste of time and material and off no practical benefit to me except for the additional practice with forge welding it will afford me. Thanks, Don
-
I believe I will try to make a steel faced WI hammer
Donal Harris replied to Donal Harris's topic in Hand Hammers
I knew that about closed sections, but not the tapering. Dad stopped branding his cattle when I was about 10 or 11. He has no cattle at all now. I went out again this evening. One of the neighbors was having a party, so I didn’t stay out long. I worked just long enough to get another piece drawn out a few more inches and ready to weld on to the block. My wife is still fairly mad because I didn’t go get a couple stitches. Yes, I should have. It is going to take much longer to heal since I didn’t. The scar I will have doesn’t bother me much. What I worry about is possible infection. The area around the cut was a little inflamed when I came back in the house, but other than that it seems fine. It is weeping a little, but that isn’t necessarily bad.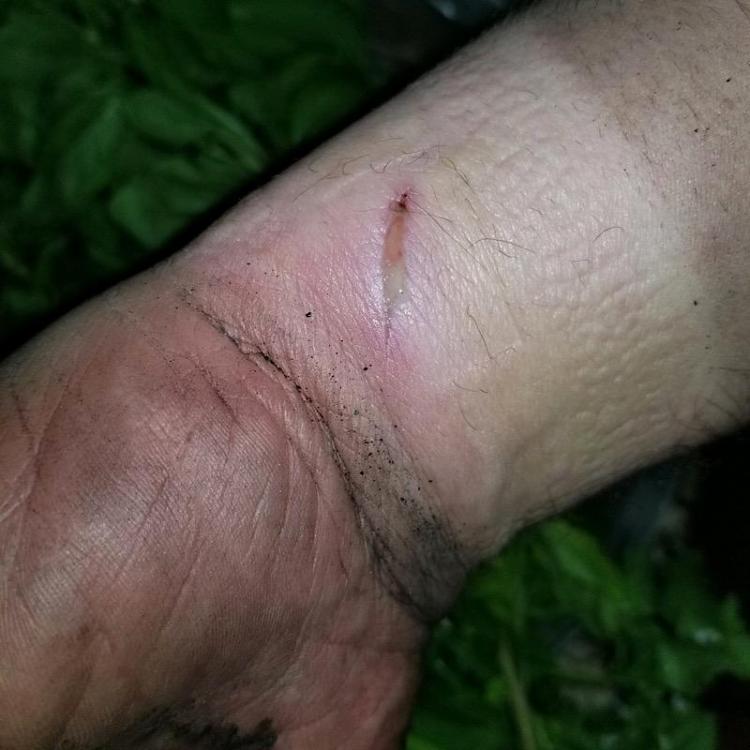
-
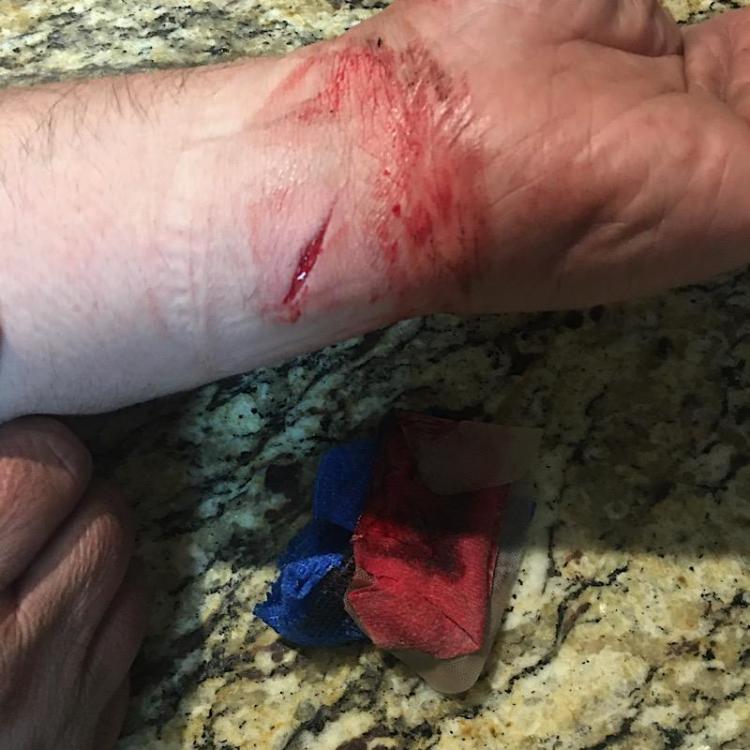
I believe I will try to make a steel faced WI hammer
Donal Harris replied to Donal Harris's topic in Hand Hammers
I shoulda left well enough alone, but went out anyway. The cut popped open and began bleeding. I felt the cuff of my shirt was wet, but assumed it was just sweat. When I finished and removed my glove I could see it was blood. I went in the house to redress it. Some fat was proud of the skin, I trimmed it back. It is hard to tell from the photo, but it is at my wrist.