Dece
-
Posts
21 -
Joined
-
Last visited
Content Type
Profiles
Forums
Articles
Gallery
Downloads
Events
Everything posted by Dece
-
A good idea and I actually have the walls built and sitting in the garage. The shop is small enough(10x21') that putting up one of the walls(each is a 10' wall panel) affects the airflow enough I'm not comfortable running the forge. I would probably build temporary half walls for the 10x10' half that doesn't have the forge if it wasn't storing several 4' long, 3' diameter, white oak logs(seasoned on the tree, mostly just keeping them up off the ground and out of most of the rain). I tried canvas walls there and putting it up and down to move around those logs was enough of a pain. I really do appreciate the suggestion Glenn and I think I might finish the foundations for some of the walls this weekend instead of forging some more gifts so that when the time comes I don't have to worry about the weight I will be hanging off those walls in the form of tool and stock racks and can put that up from the get go.
-
Unrealistically, those gone by this year to return for one last day. Realistically 6' of Class A DuraVent so I can get a chimney put in so I can put walls on the shop.
-

What did you do in the shop today?
Dece replied to Mark Ling's topic in Blacksmithing, General Discussion
If that was to me, they in fact do operate as bottle openers. I leave the stem heavy, and generally oval for leverage across the cap. The one of the right doesn't work as well as the other three but I tested each out after they cooled. -
What did you do in the shop today?
Dece replied to Mark Ling's topic in Blacksmithing, General Discussion
Wasn't today, but Saturday. 4 keychains as a thank you to some tree removal folks, and also finished a few candle stick holders for holding memorial candles which I forgot to take a picture of before mailing them and some hand dipped candles off..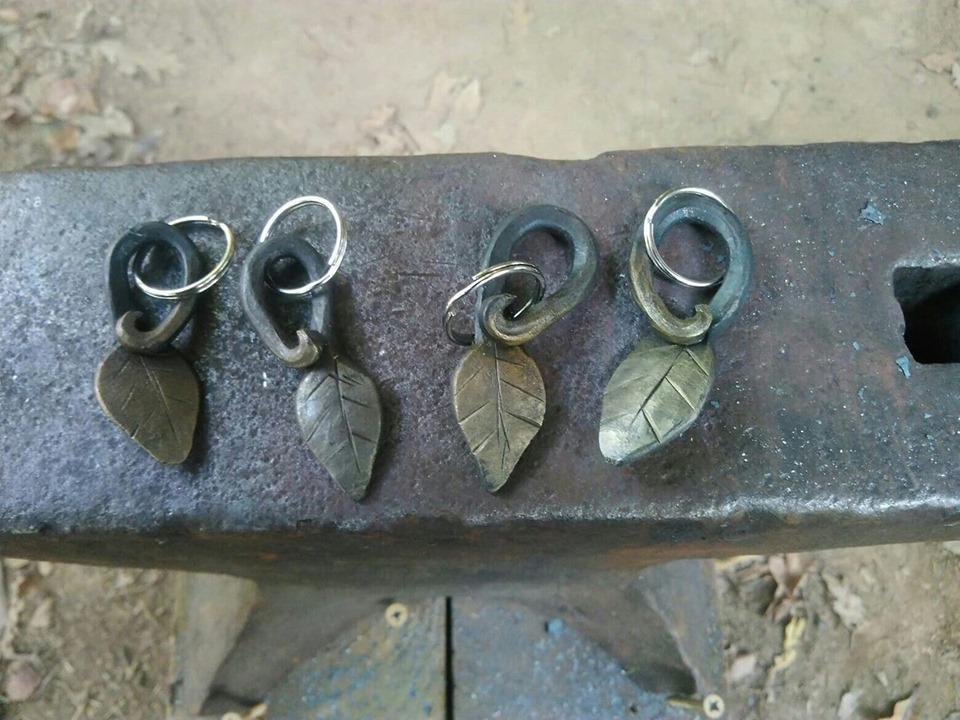
-
If you need ALOT(or do like I did and get a bunch of people together to chip in) some salvage companies will sell you a pallet of them. We paid 1.192$ for 3.100#(minimum order) and that included the freight shipping from Washington state to me on the east coast. Just had to have a business address for delivery and a forklift(110$ rental) to unload it. That was a couple years ago but if you want I can try to locate the contact info and PM you it. As it is I ended up getting just shy of thousand spikes for just over 300$.
-
Looking for some advice on flatware.
Dece replied to Dece's topic in Blacksmithing, General Discussion
Thomas: I'll look around for a copy once I finish going through Gerard's Herbal(Inter library loan on some of these get kind of limited), although just found a used copy of Cathedral, forge and waterwheel and picked it up, its next on my reading list. I just volunteer when I have the time but on some of the events where I am there at a mealtime it would be nice to sit out with the meal. The timeframe is 1590s-1650s in Virginia/North Carolina, so any resources like iron would actually have been exported and finished goods imported. The blacksmith mostly did repairs or anything that was not really practical to ship, hence the comment on charcoal being used as opposed to coal. The location has its own smithy, and it is a bellows, but air is bottom blast after the rebuild, although the location closer to me that I have also done some volunteering at(a bit narrower timeframe of 1611-1622) is a bellows sideblast forge, and the carpenter/blacksmith/surgeon there is the one that has gave me a fair bit of advice on getting started in smithing several years ago, just getting time to head out there when its open has been difficult this past month. I was mostly hoping to be able to make something close enough due to costs, but will give some more thought and take your advice on doing it right the first time into consideration. Was hoping to be able to make something that looked like it'd belong in timeframe with what I had on hand. -
Looking for some advice on flatware.
Dece replied to Dece's topic in Blacksmithing, General Discussion
Thanks for the info on fruit blades, did not think of the acids in the foods. Mostly I was worried about visible damage from use to the flatware or the wooden plate/bowl I have/am making(initial bowl I was trying to finish up and in my haste put a gouge straight through it trying to take off too much in one go and having to remake it). Appreciate the information. Does not need to be completely accurate, as mostly it is so that while volunteering, if a visitor sees it, it does not look too out of time. I.E. need to look like it could belong. Heck the anvil in the smithy there is ~250#(roughly, its had a few big chunks taken out of it over the years) Fisher and use coal instead of charcoal in the forge, and of course the nice 50# swage block isn't something they'd have back then either, but on a limited time helps with demonstrating and bridging from then to now. I see where I could have included more information and been clearer and will try to do better next time. -
I have tried searching the forums for the last few hours(with google and site:iforgeiron.com) but have not been able to find answer to the question of using mild steel for a set of flatware, using a food grade oil or wax finish(most of that time got lost in reading distractions in the bladesmithing forum). I am aware this would not be ideal, and that is most likely a large understatement, but it is what I currently have on hand and with my day job it is difficult to get to the local steel supply(Monday-Friday 9a-4p hours, I actually have to normally take a day off to make a run). The most the knife would be cutting would mostly be cheese, fruit, and maybe vegetables. And I will admit, I have never tried to really make anything bladed, at least on purpose, and figured this would be a good learning experience. I am looking to make some flatware for use in my kit for when I help out at a local historical park, period being 17th century. Eventually I would be replacing them with something more appropriate. And if anyone has any advice in addition to the question I would appreciate it as well since I am a bit out of my element. Apologies if I should have posted in a more specialized forum, if corrected I will try to post more correctly next time.
-
What did you do in the shop today?
Dece replied to Mark Ling's topic in Blacksmithing, General Discussion
First day at the forge in a bit over a month. Hadn't felt like doing anything since making some flowers for a friend's funeral but finally forced myself to do something. Made a new set of hold fasts, one for each anvil, and drive hooks to hang them up on. Not much done but at least it is something to get going again, and the first items I have been pleased with in a long time, although they could be a bit more uniform. Luckily they work great compared to the old ones I made when I started. -
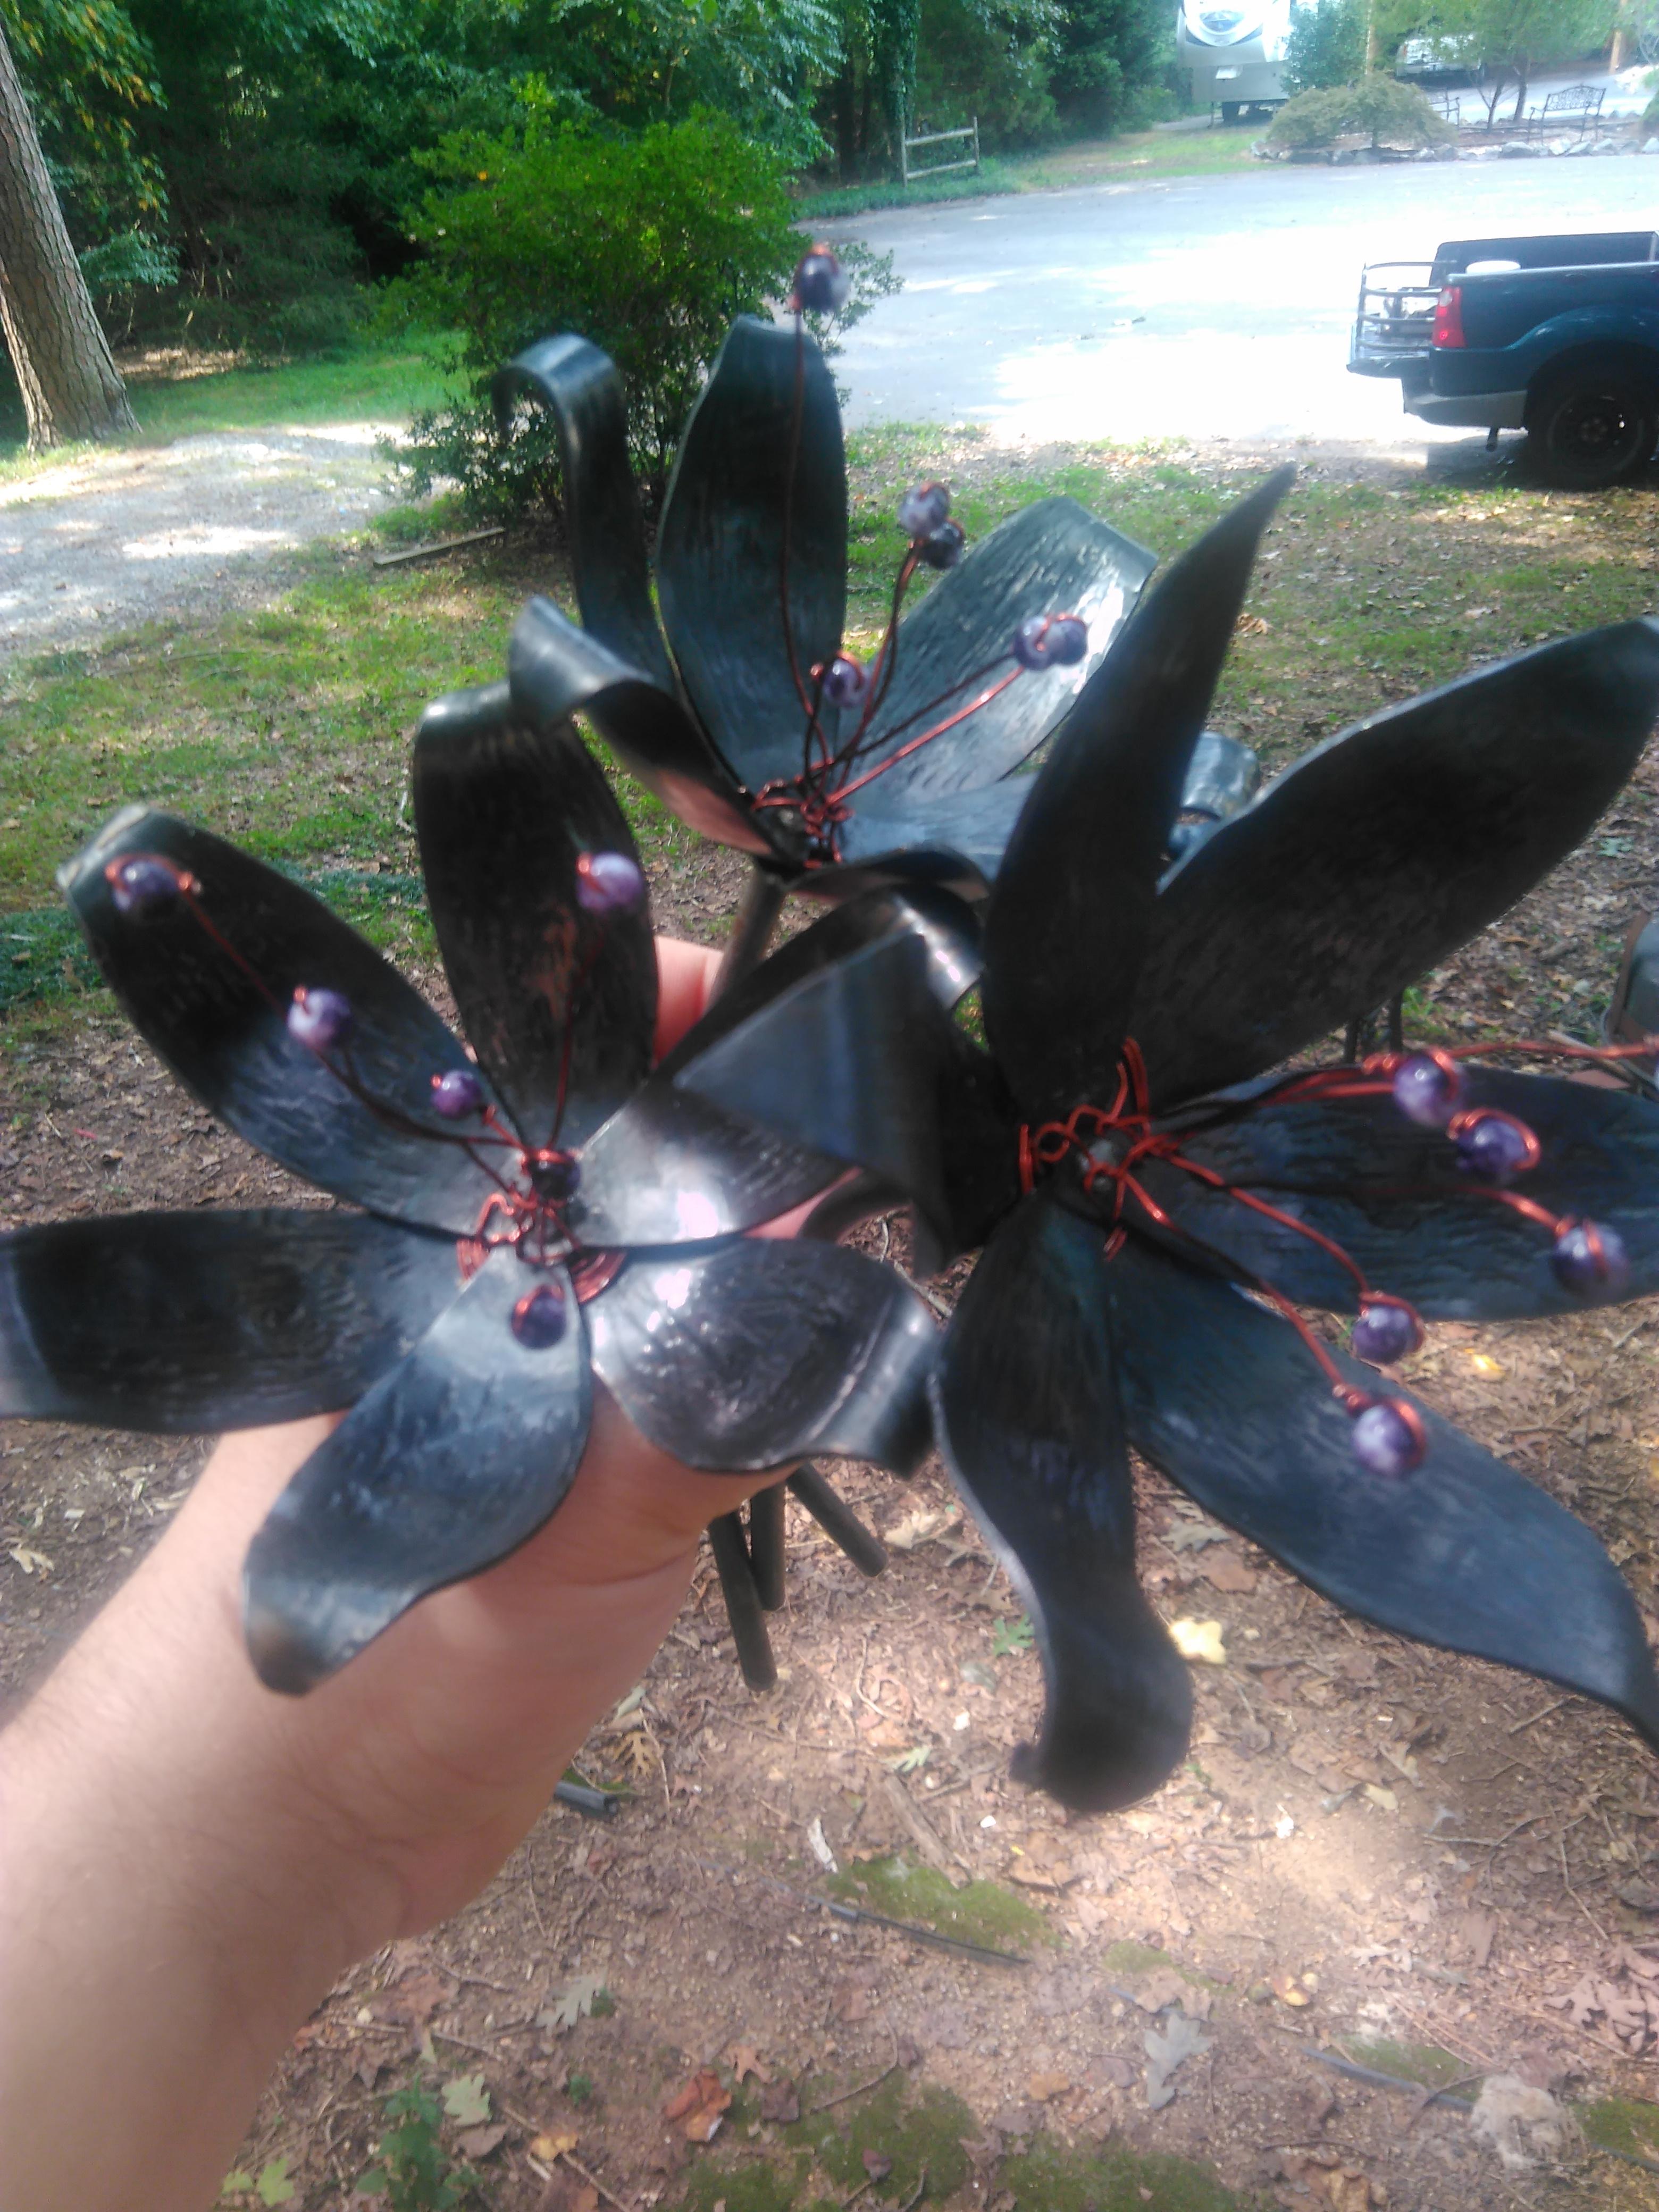
Have not posted in a long while and frankly not been able to do much forging as of late(ended up being able to get a lot of equipment, and as such needed to build a place to house it, and thanks to the weather took a few months) but made the time to make these steel lilies for a friend's funeral. Ended up having to shim the petals with copper wire due to not being able to get the stem riveted on tight. Not sure where I messed up on that but first time trying to make flowers to begin with. Still, learned a lot doing them.

-
Anvil ID appreciated if possible.
Dece replied to Dece's topic in Anvils, Swage Blocks, and Mandrels
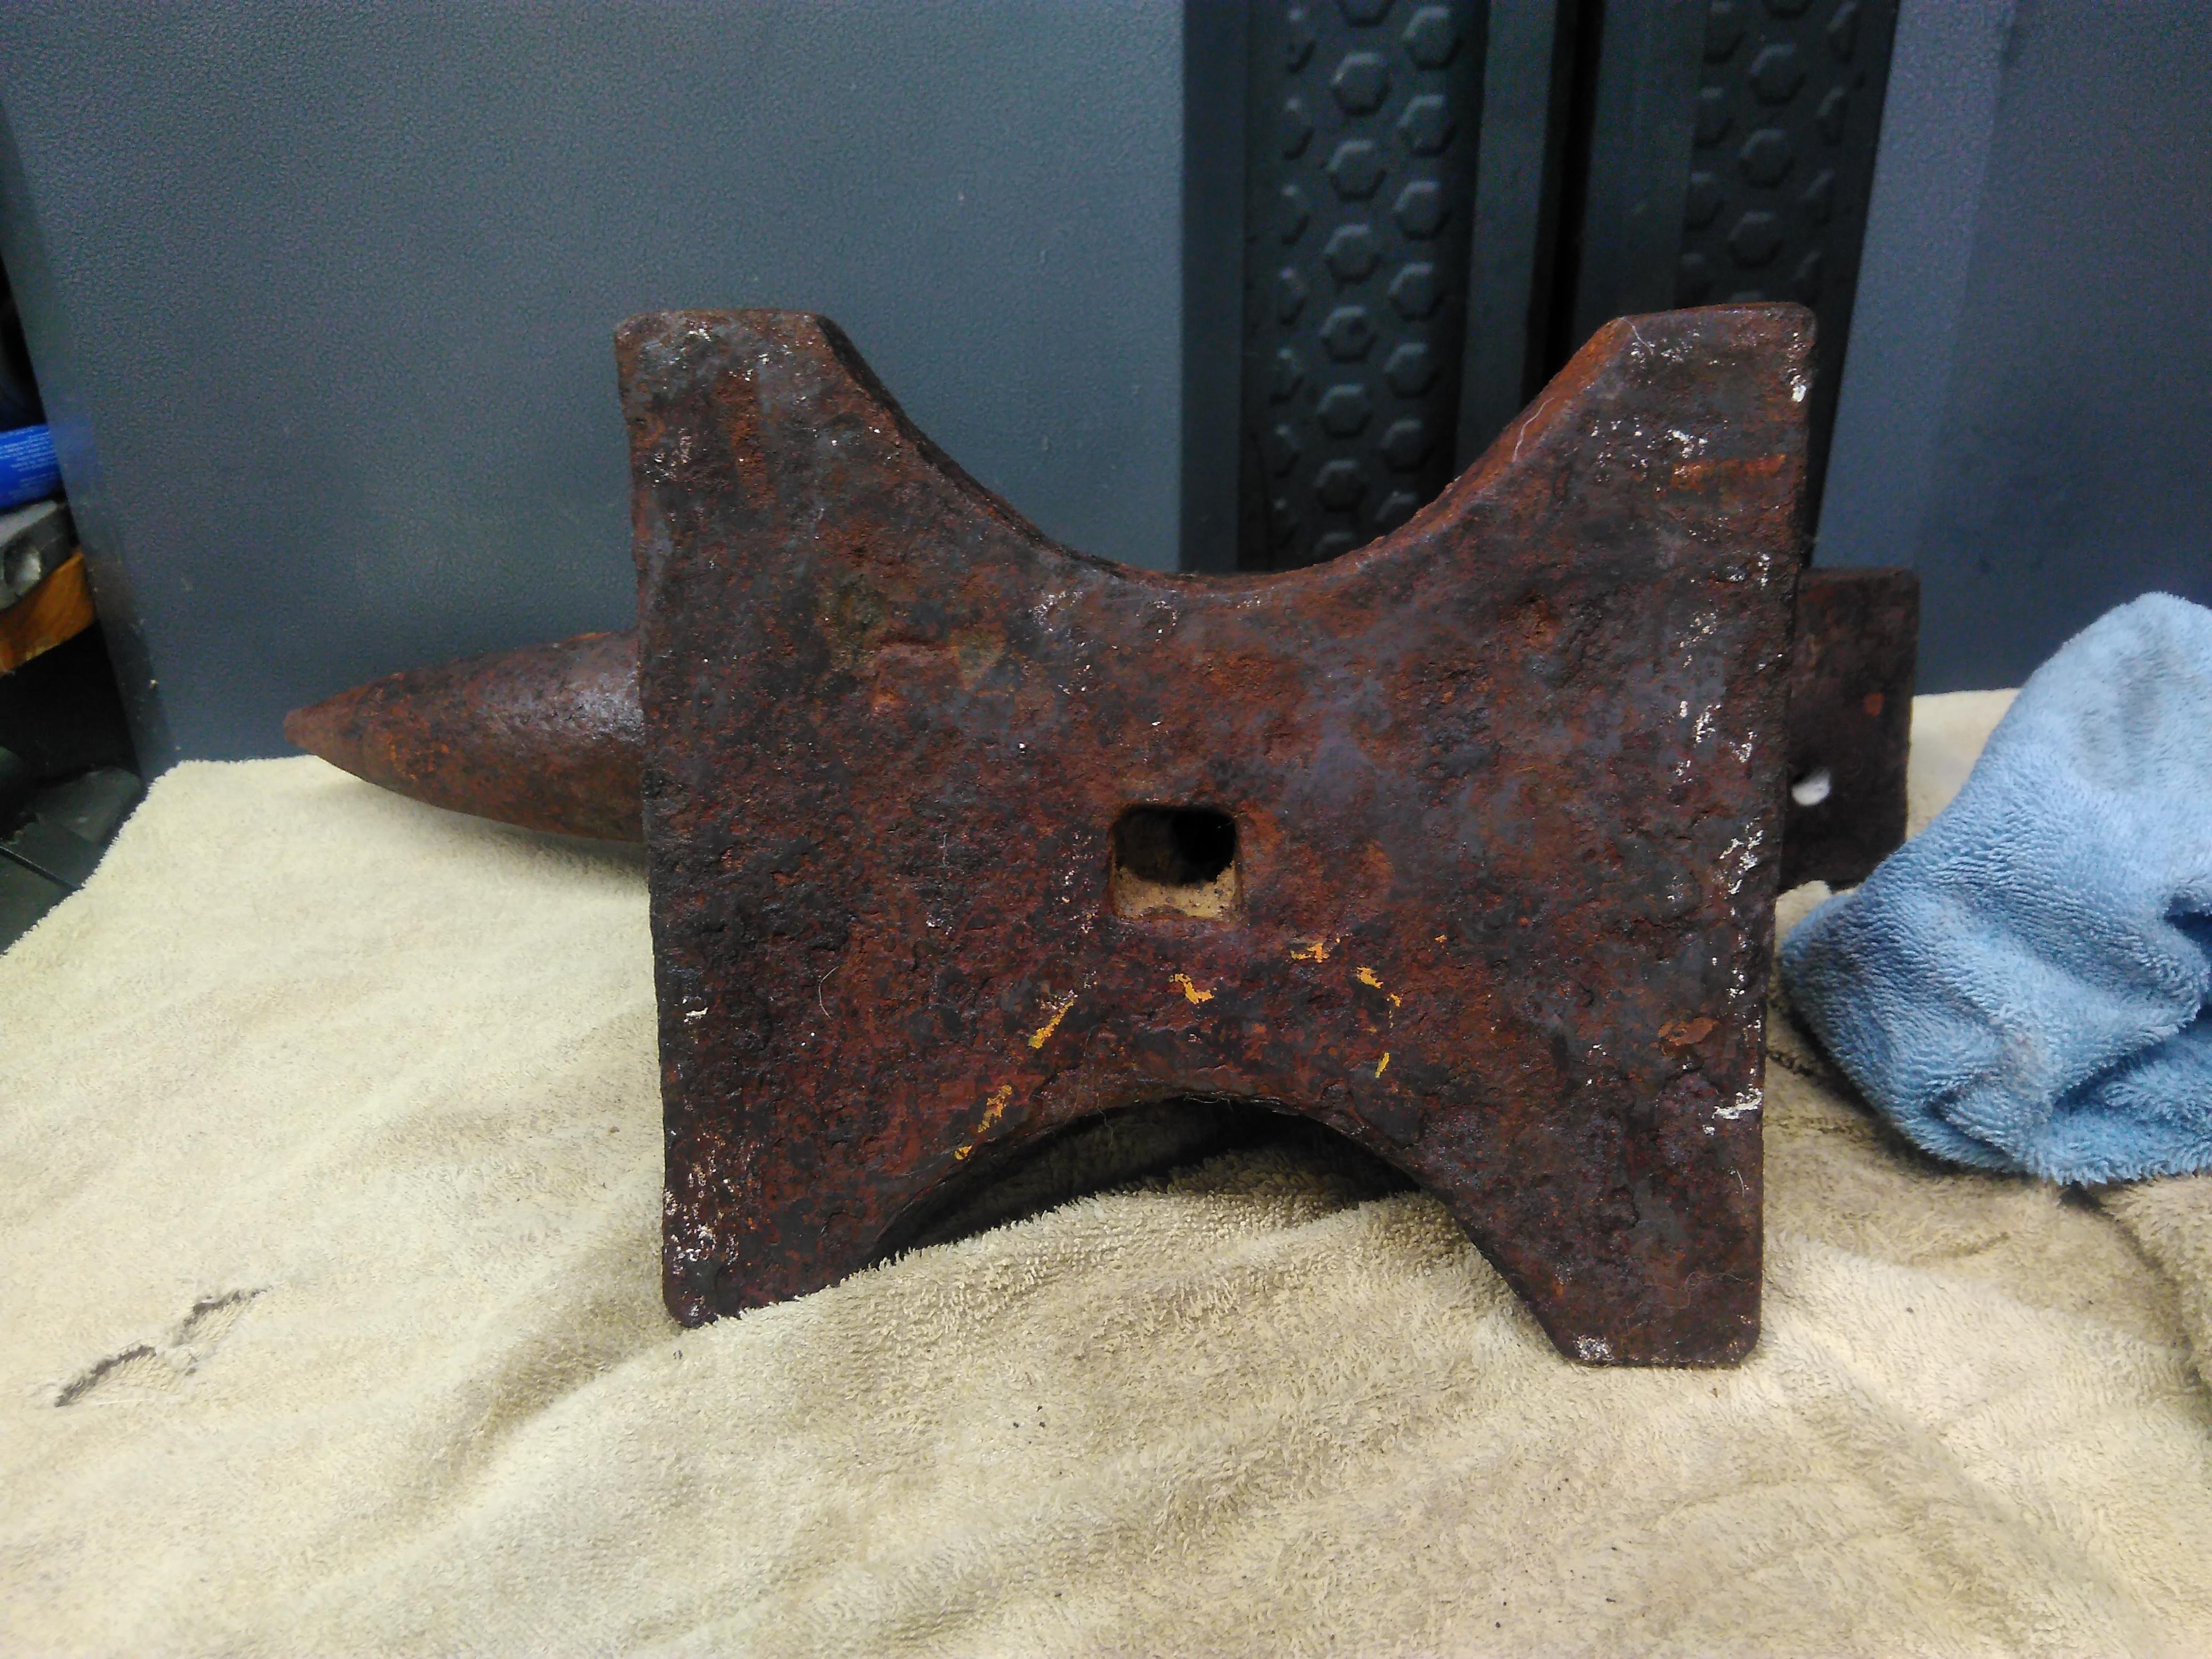
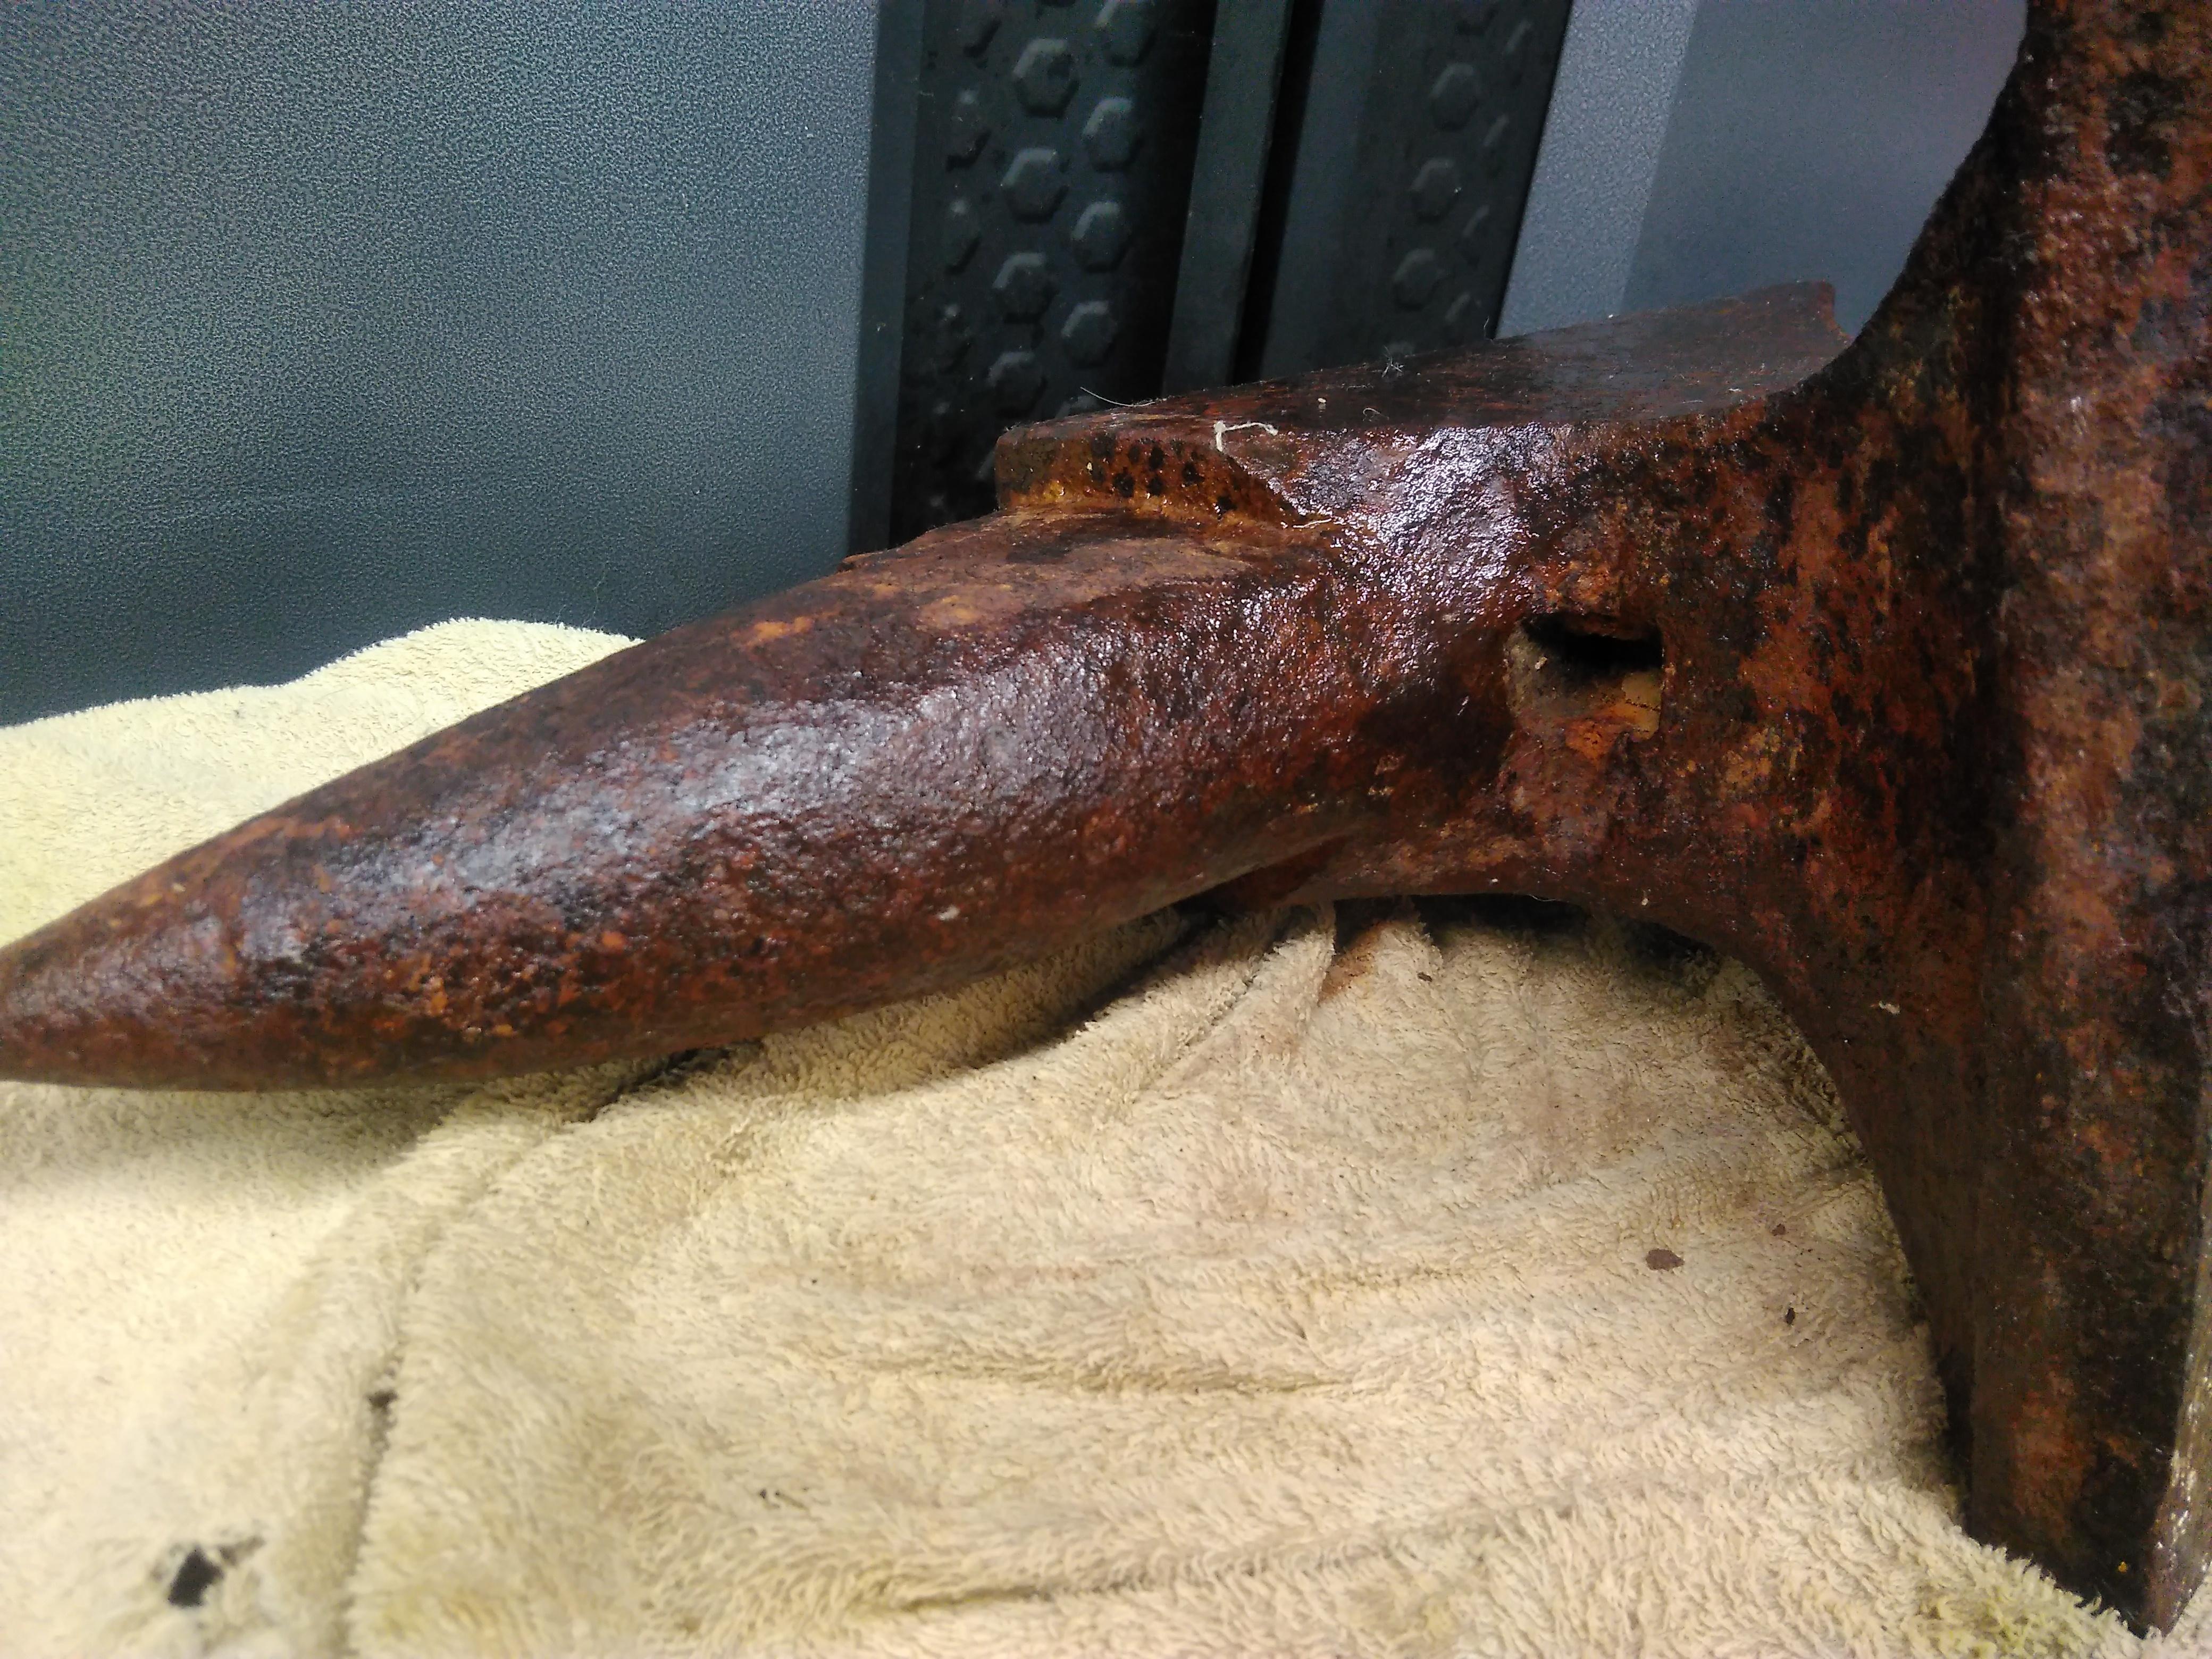
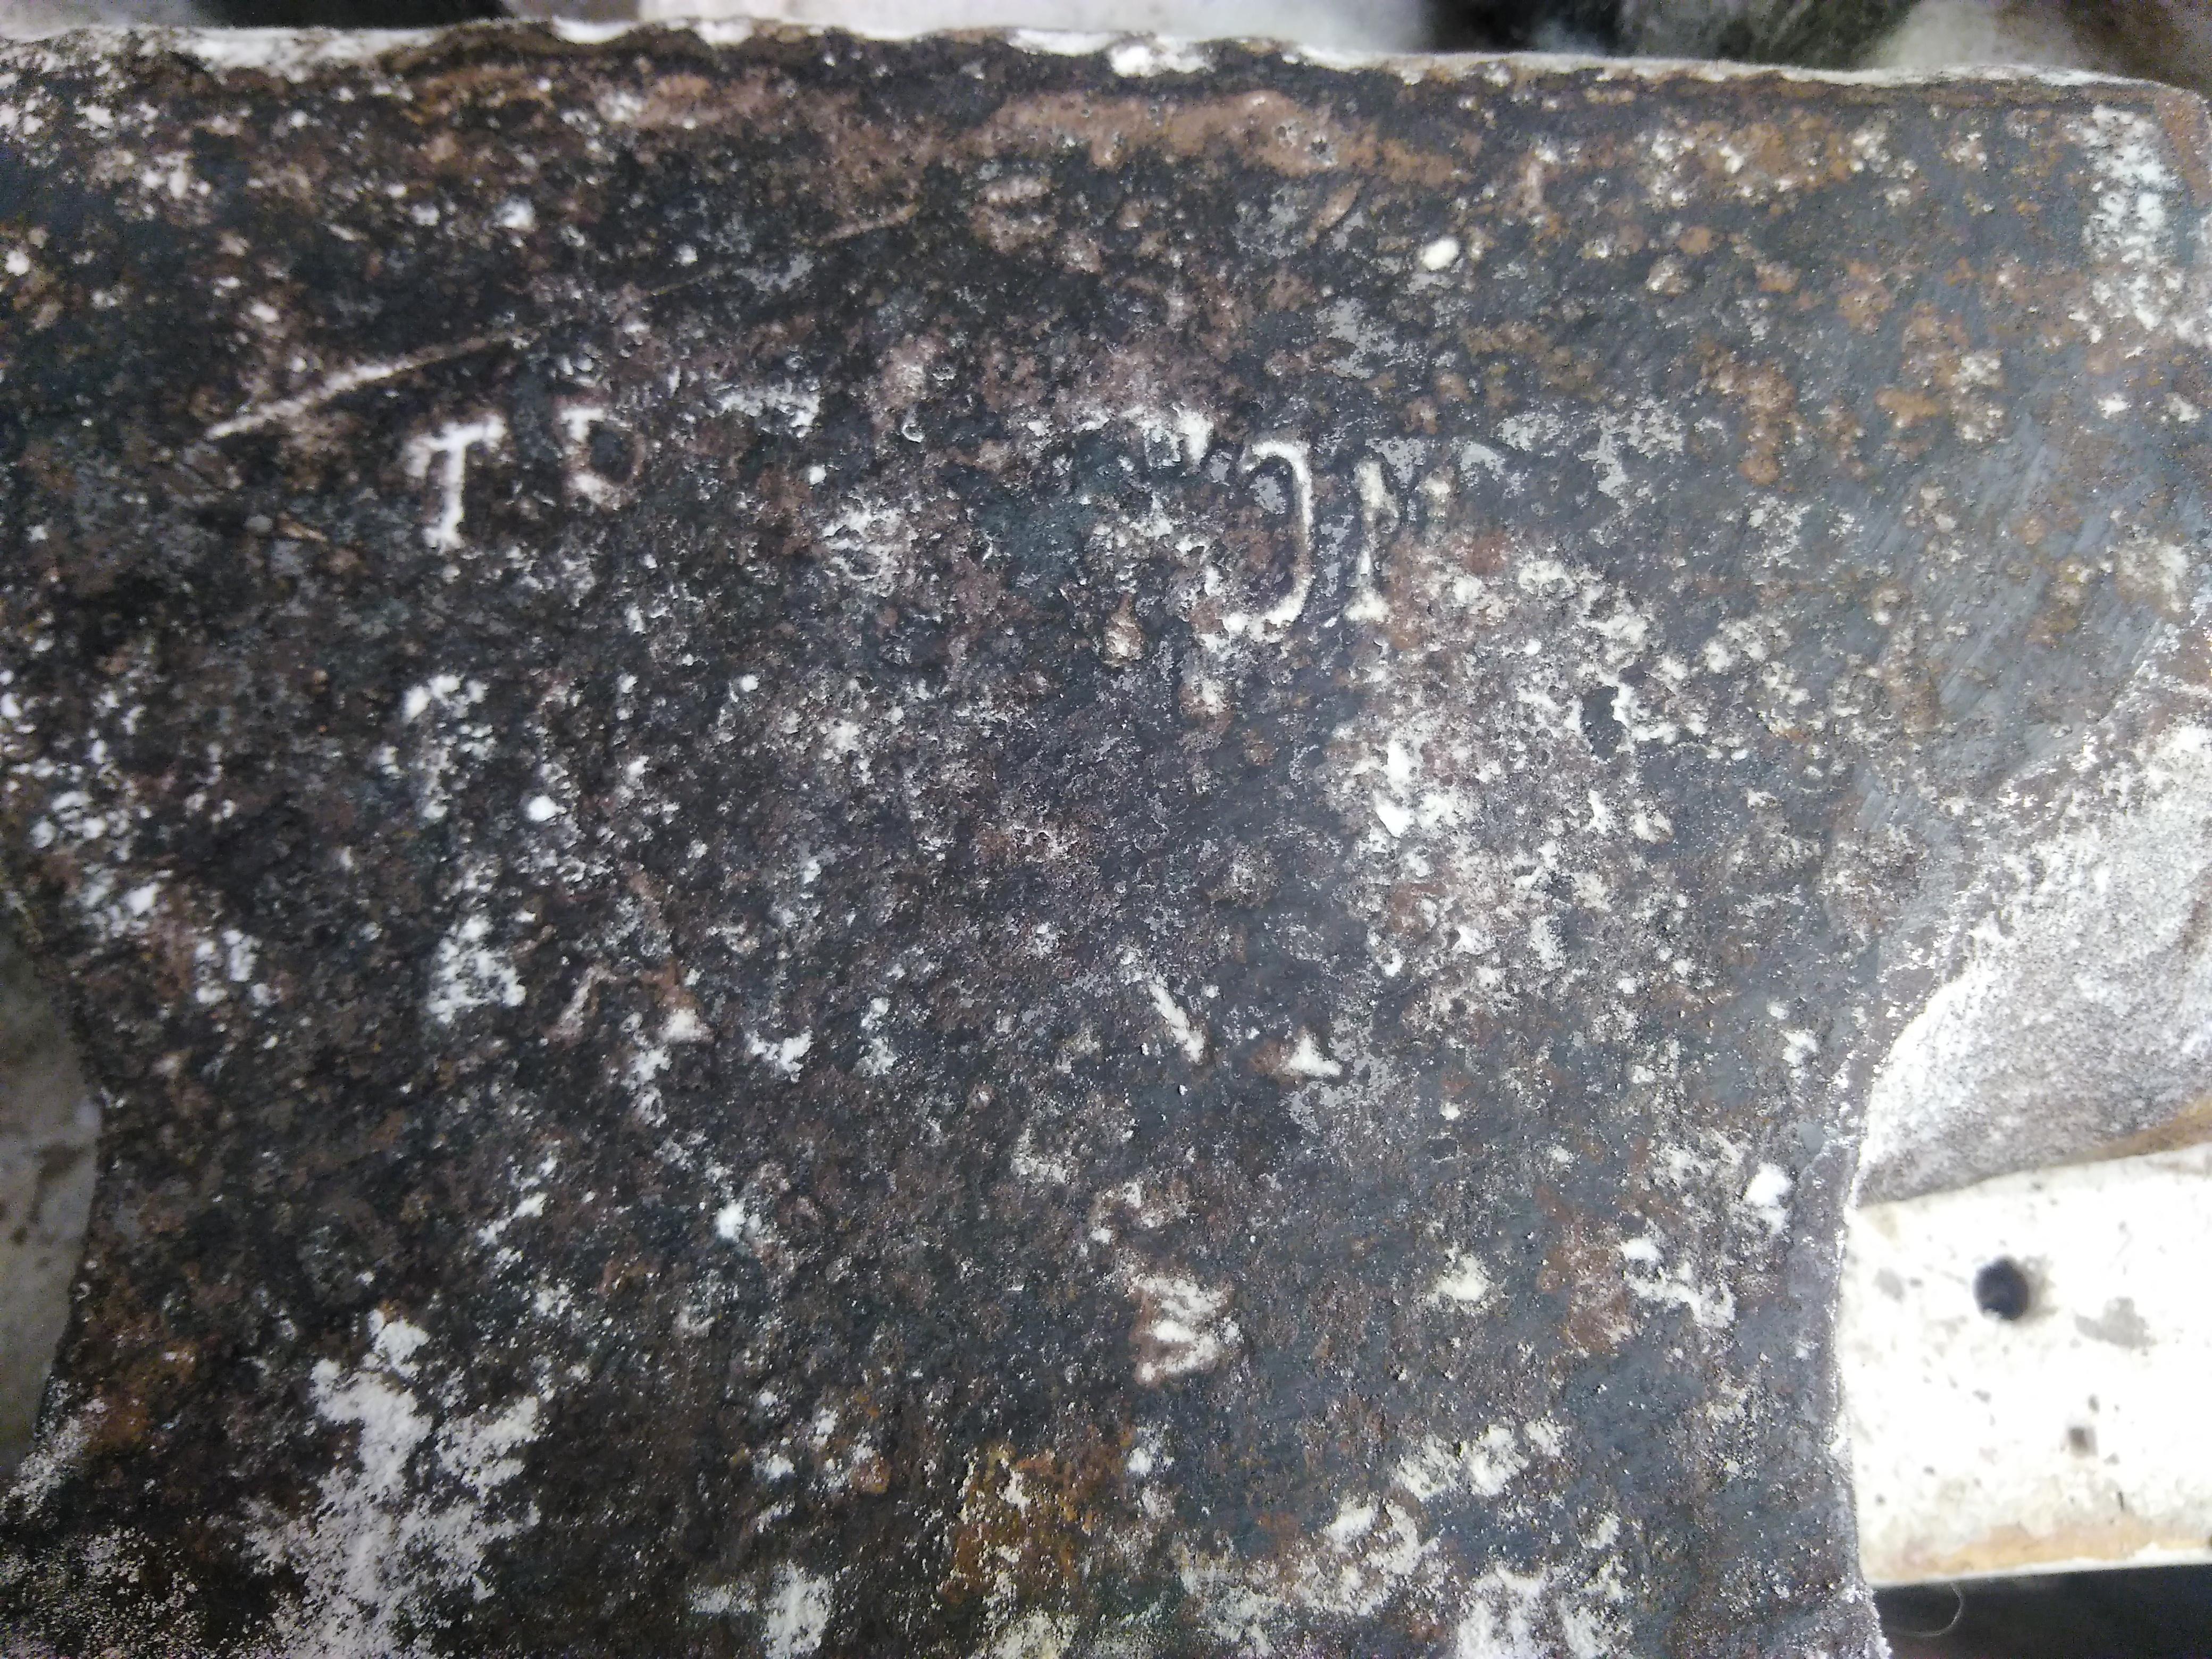
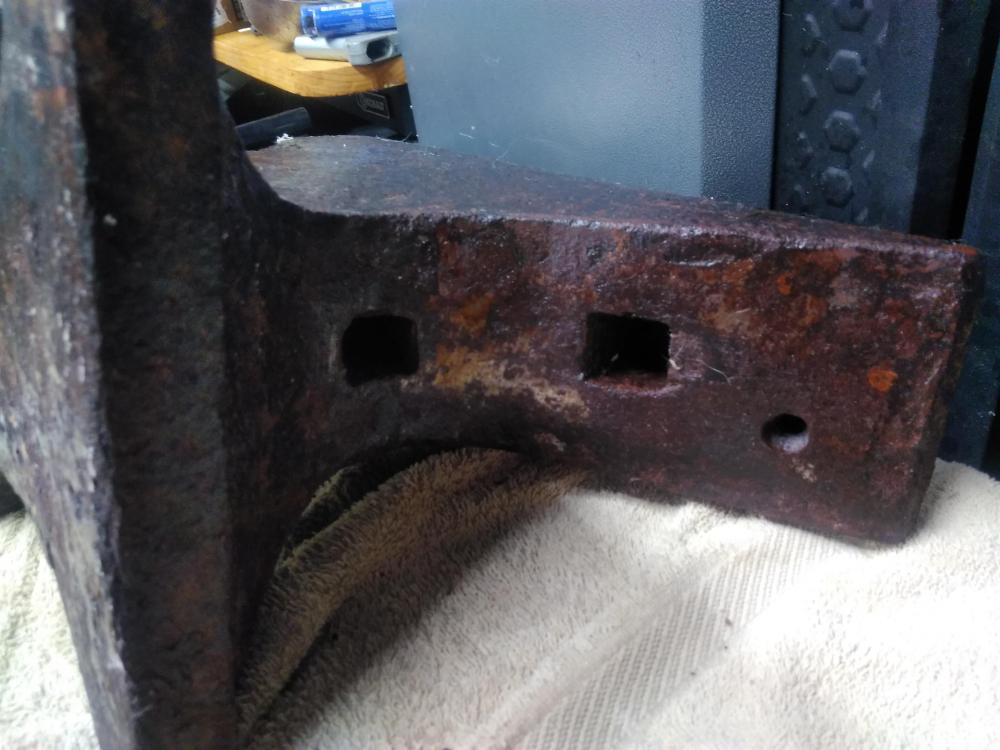
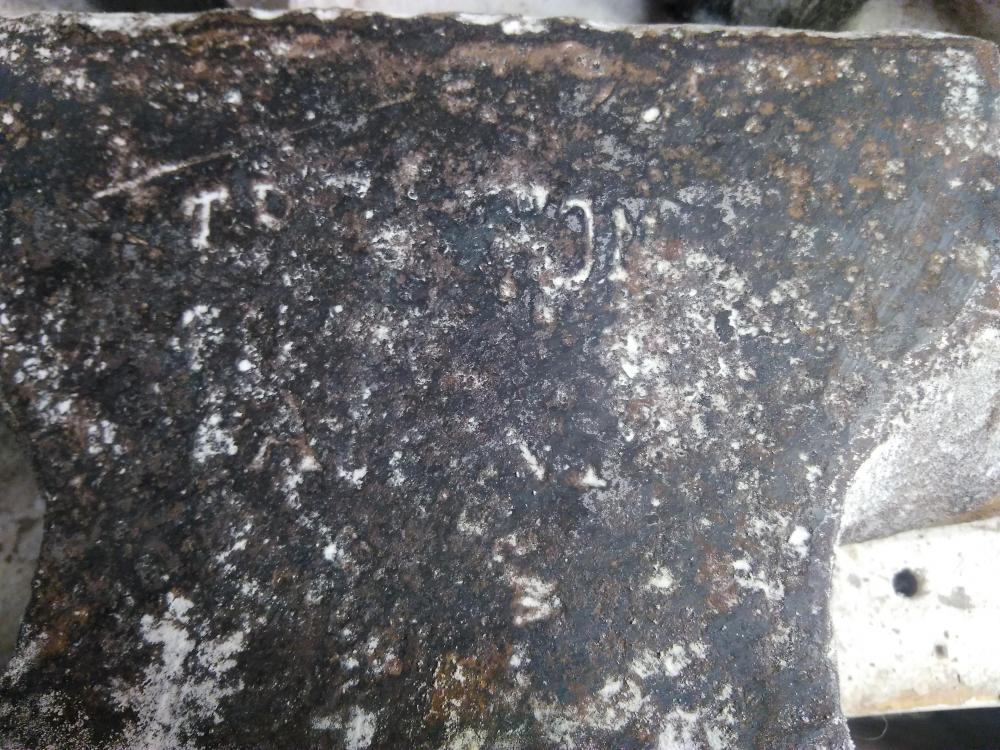
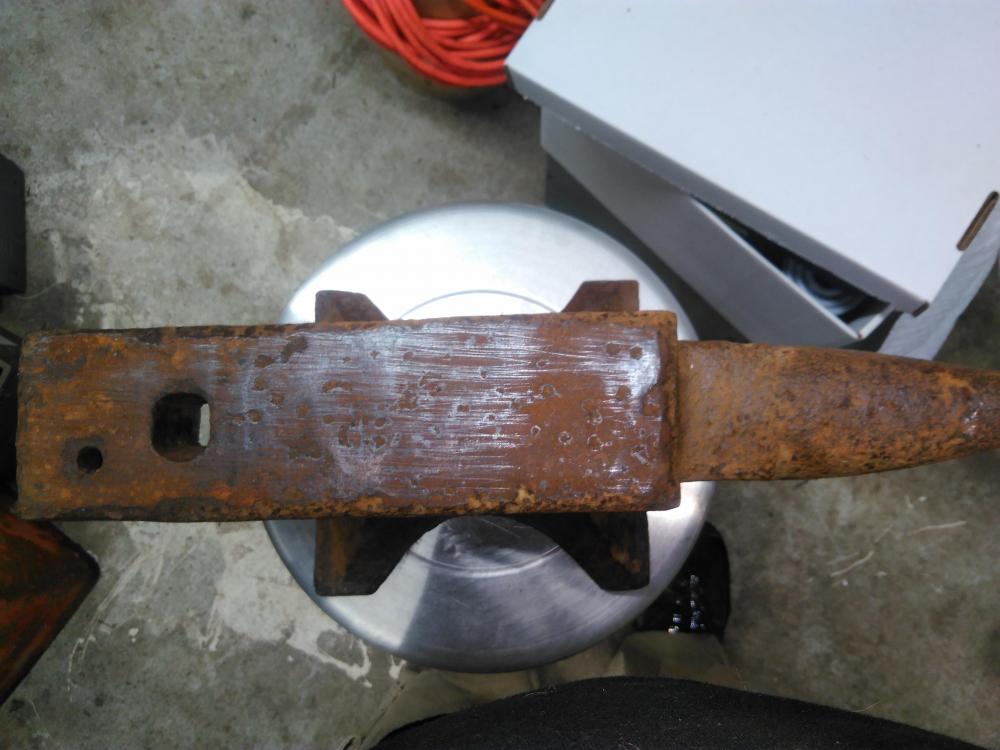
Thanks for all the help with the ID on this anvil. Right now only things I can see stamped on the anvil is the first T and the O N of the logo on one side and a 3 stamped on the other side about same height as the logo. This weekend Ill be getting a wire wheel that fits the angle grinder and trying to clean up enough to see any other marks. Really am amazed and grateful of the help and support of folks on this forum in the couple threads I've posted and questions I have asked. -
Anvil ID appreciated if possible.
Dece replied to Dece's topic in Anvils, Swage Blocks, and Mandrels
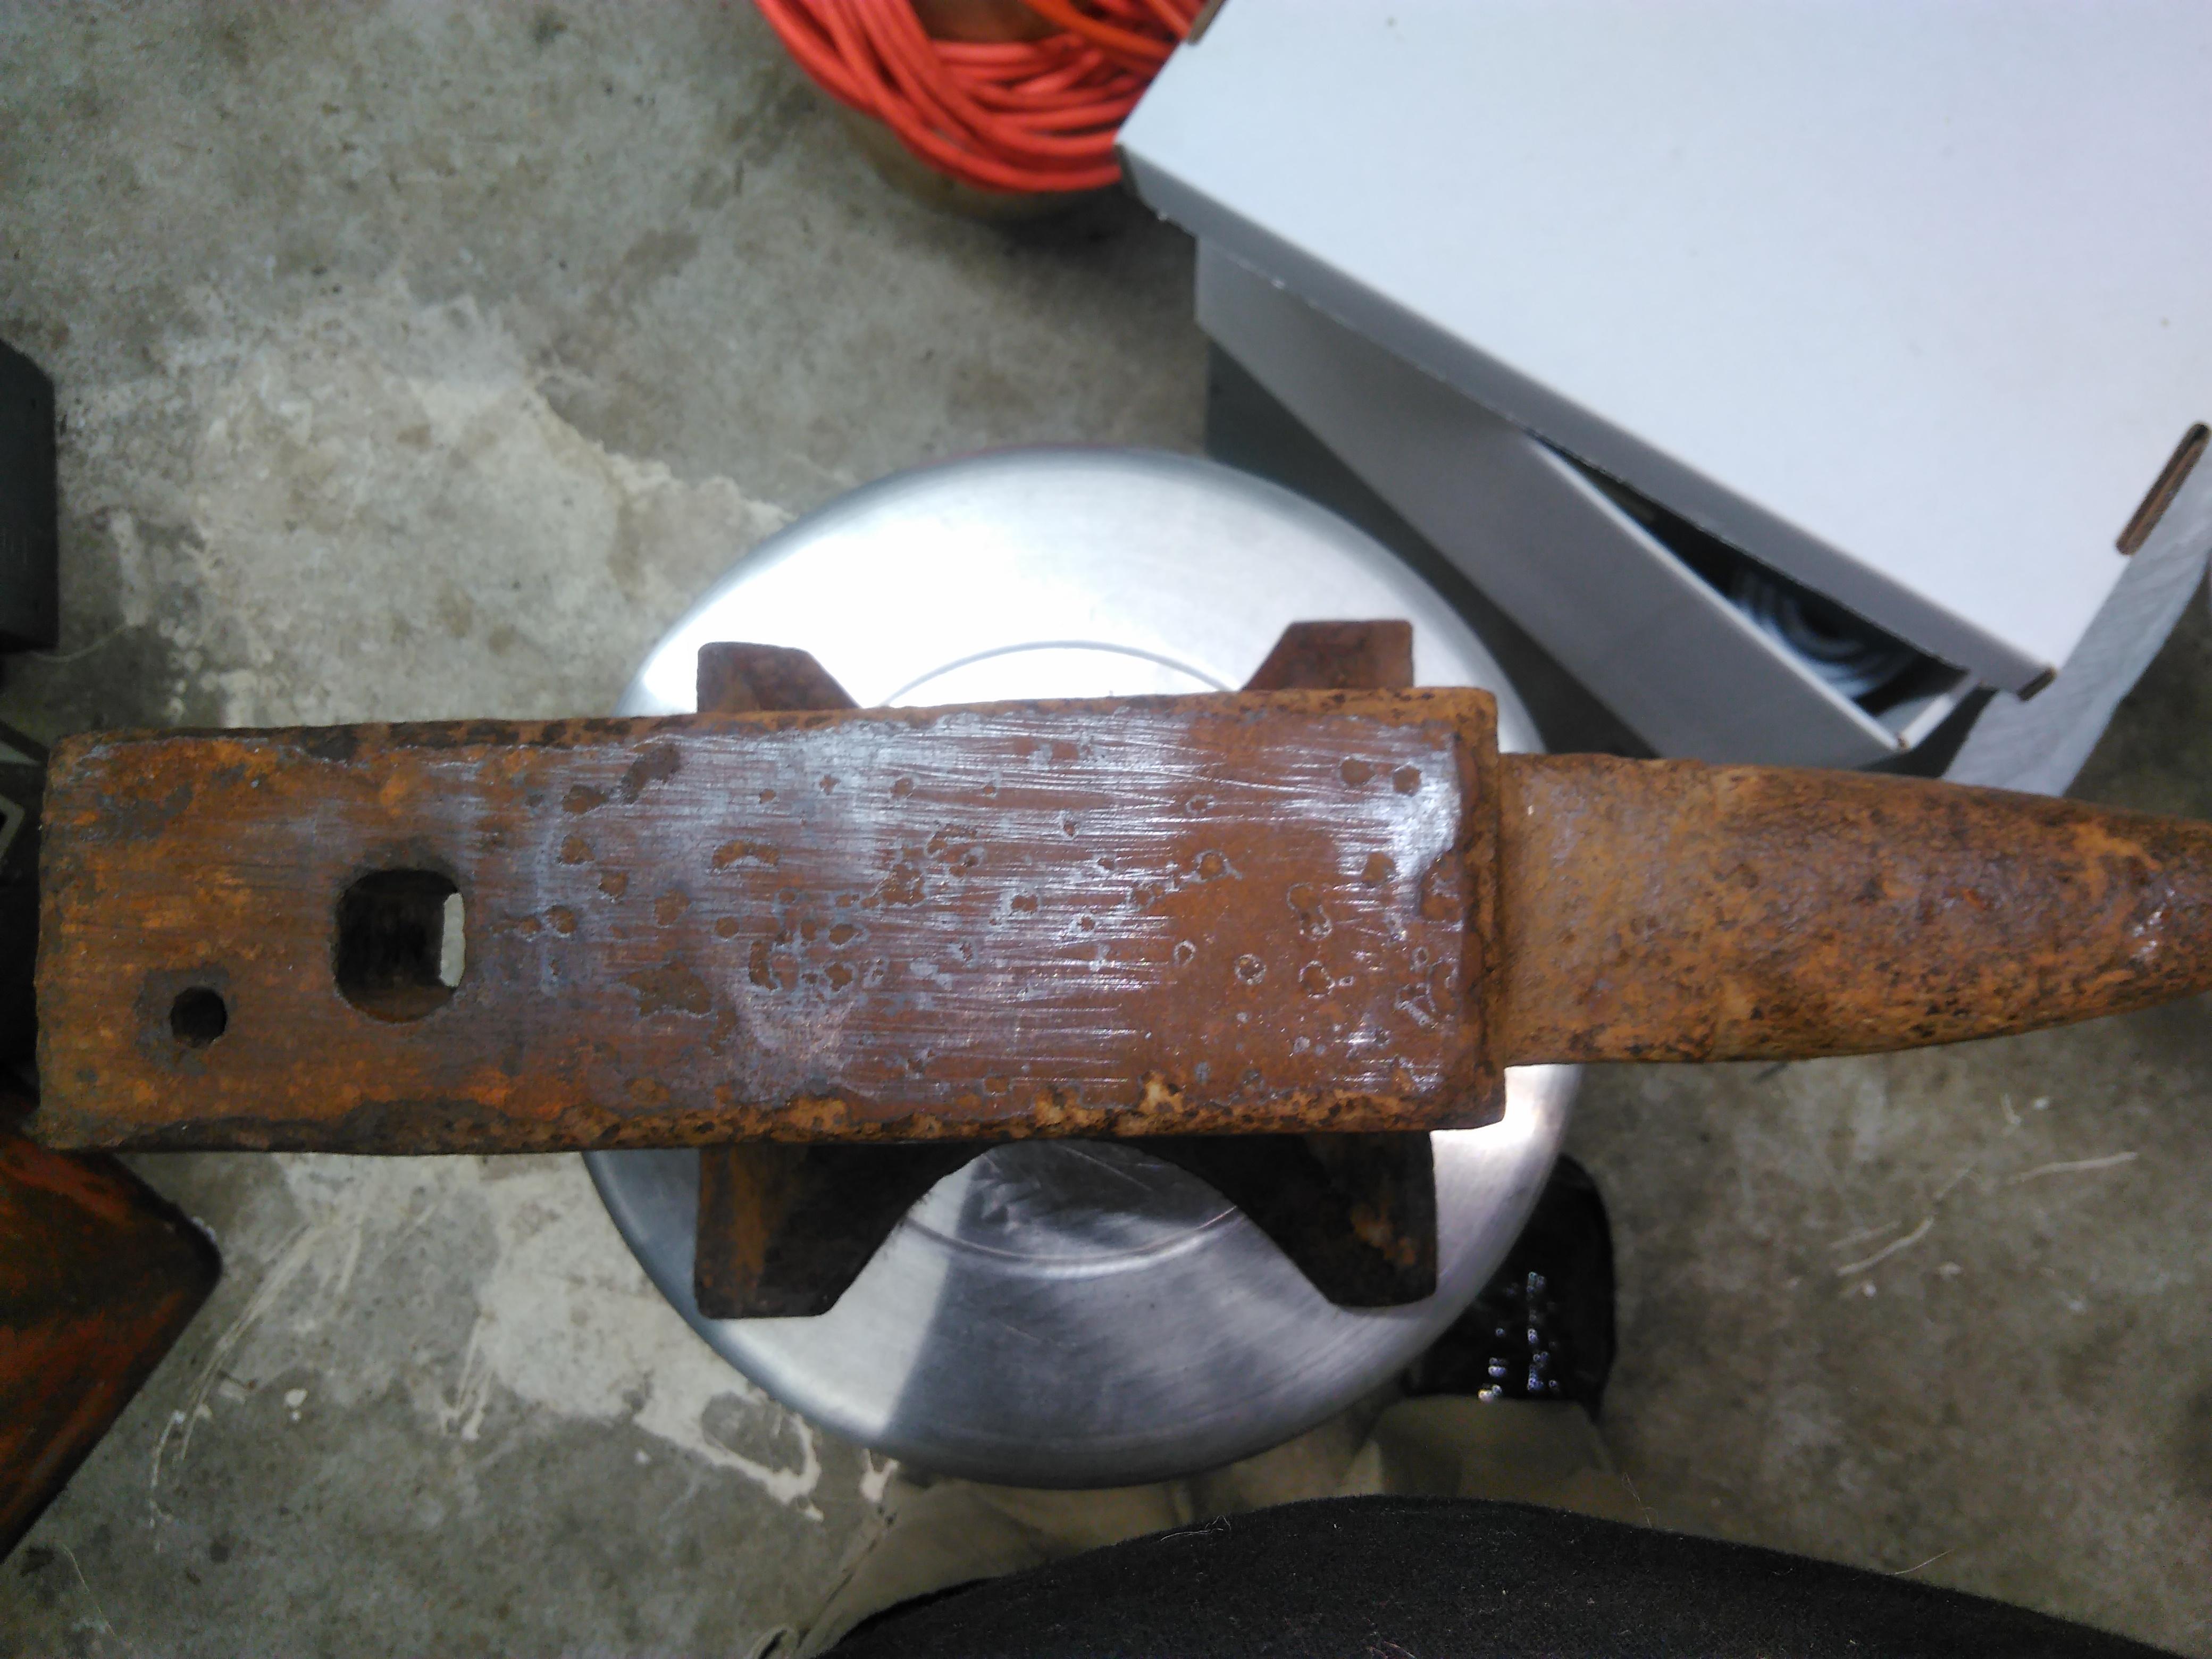
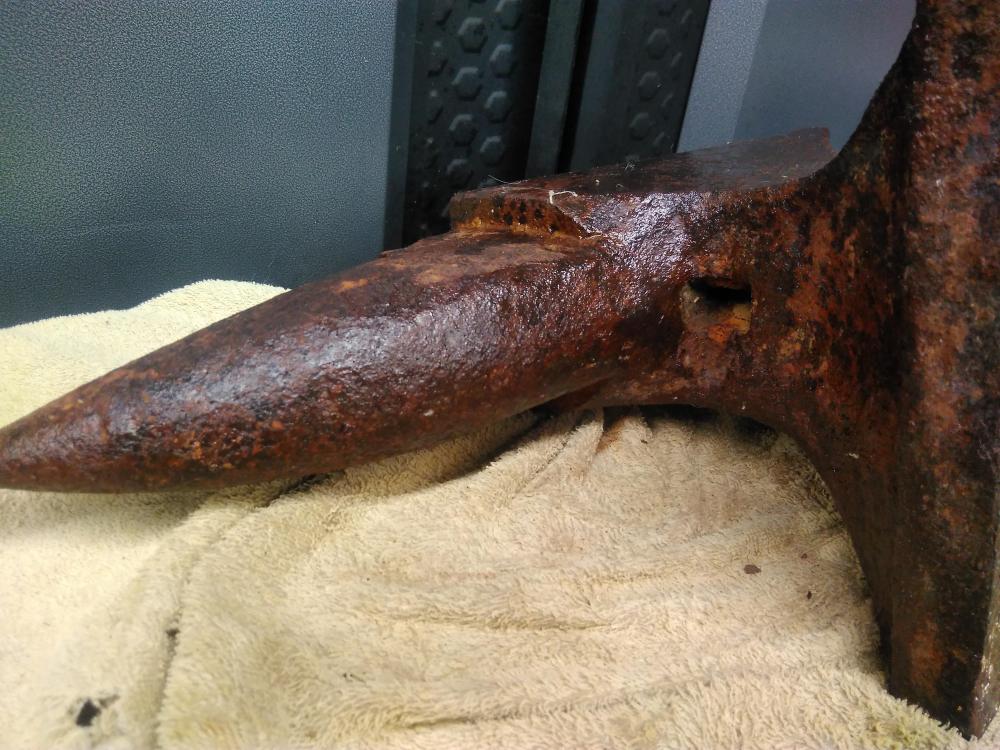
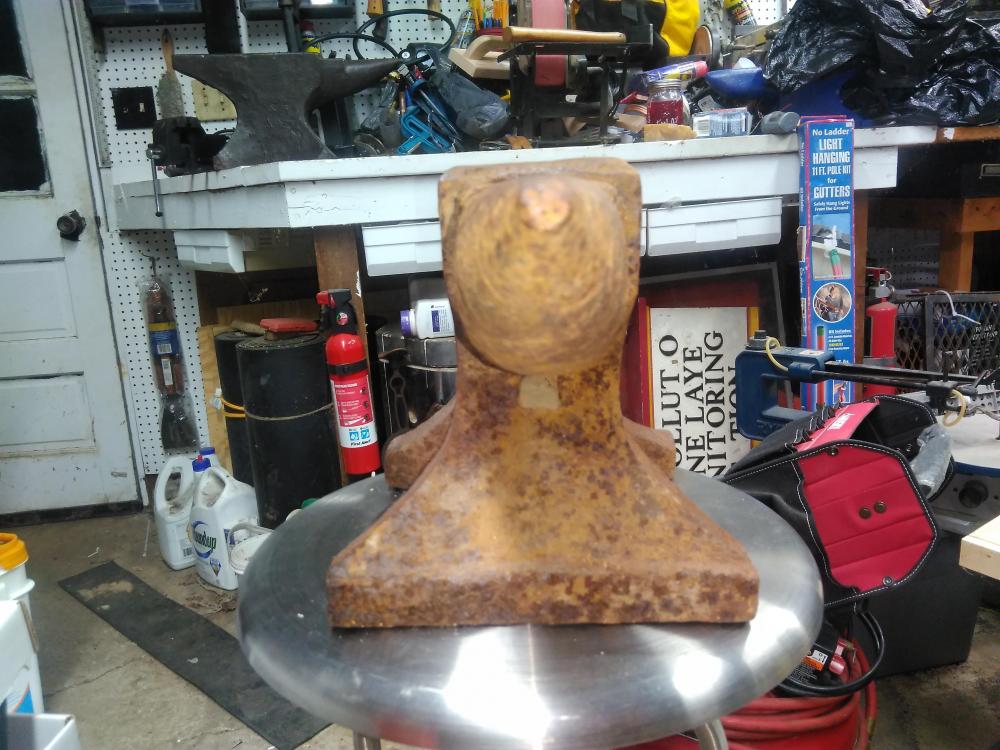
Ok, cleaned it up a bit more. Sadly only wire wheel I have is for cleaning up the cannons and not something I can really attach to the angle grinder, will have to pickup one after work tomorrow. Here are 3 shots of the underside.
-
Anvil ID appreciated if possible.
Dece replied to Dece's topic in Anvils, Swage Blocks, and Mandrels
It has a roughly 1 inch square hole in the center of the underside of the base -
Anvil ID appreciated if possible.
Dece replied to Dece's topic in Anvils, Swage Blocks, and Mandrels
Thank you very much. I wish I had taken some pictures when I first got it before getting it cleaned up to the state those pictures are. Could not tell how bad the pitting or chipping on it was. Is there a difference between a Trenton and German Trenton? Doesn't matter too much if once I can get the time to finally clean it up and on a stand it'll most likely be the more portable of the two(minus my railroad track and 50lb square block of steel anvils) and more used. -
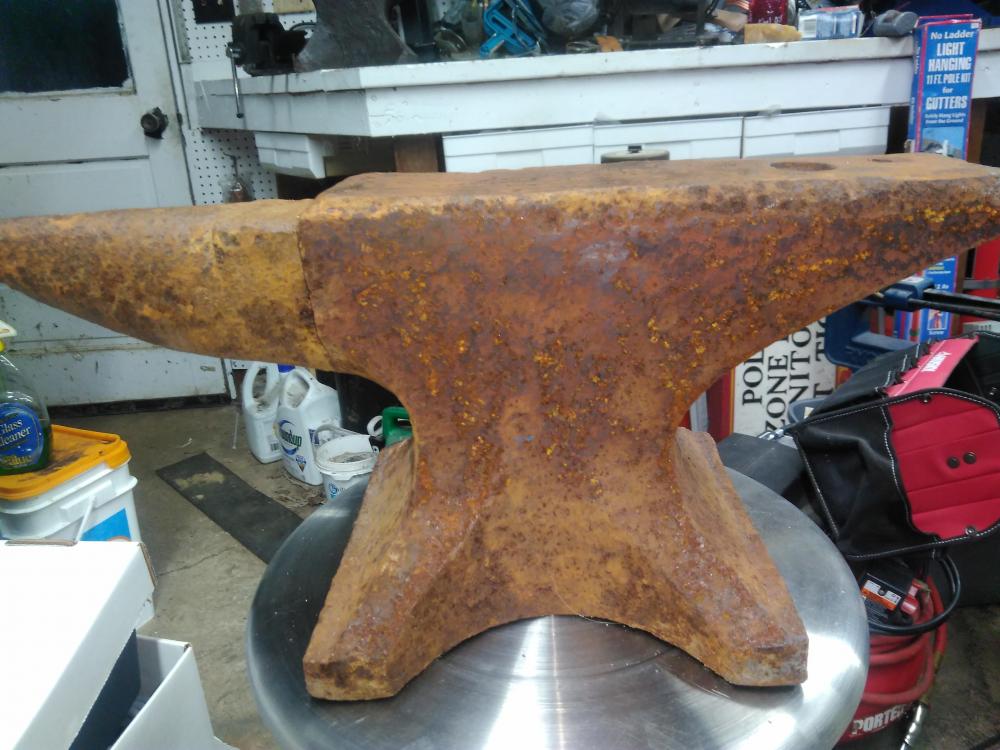
Picked this up awhile ago from an antique place. Not the best condition and was covered in a lot more rust and dirt then shown here(used hand sanding to get a lot of it off and feel a bit of an idiot for doing so now), got a ringing off of it with a hammer but I could not tell how pitted it was when buying, and was not allowed to "damage the patina", but after haggling a bit price was only about double what I could get for it in scrap price at the time(about 0.90/lb) and figured it was worth the risk. I was wondering if anyone has an idea what type of anvil it is. And if it looks to be in decent usable condition to be cleaned up and used. I got some more of the rust off and tried bringing out some of what markings I could find on the second picture (same face as the first picture). Sorry if the pictures are too large in file size, not that savvy in getting them smaller and this was the size the phone took. Thank you for any time given in search for the maker and advice. If there is anywhere else I can look for identifying marks I can take more pictures and clean it up so more, just a bit late and after going through the show me your anvil thread I got a bug to get out of bed and take some pictures and do a little bit of looking.


-
This would be Yukon, who seems to insist that my new anvil stand (or anvil on the stand, I am not sure how far he is trying to go) is his new toy and has taken to trying to climb on top of it.

-
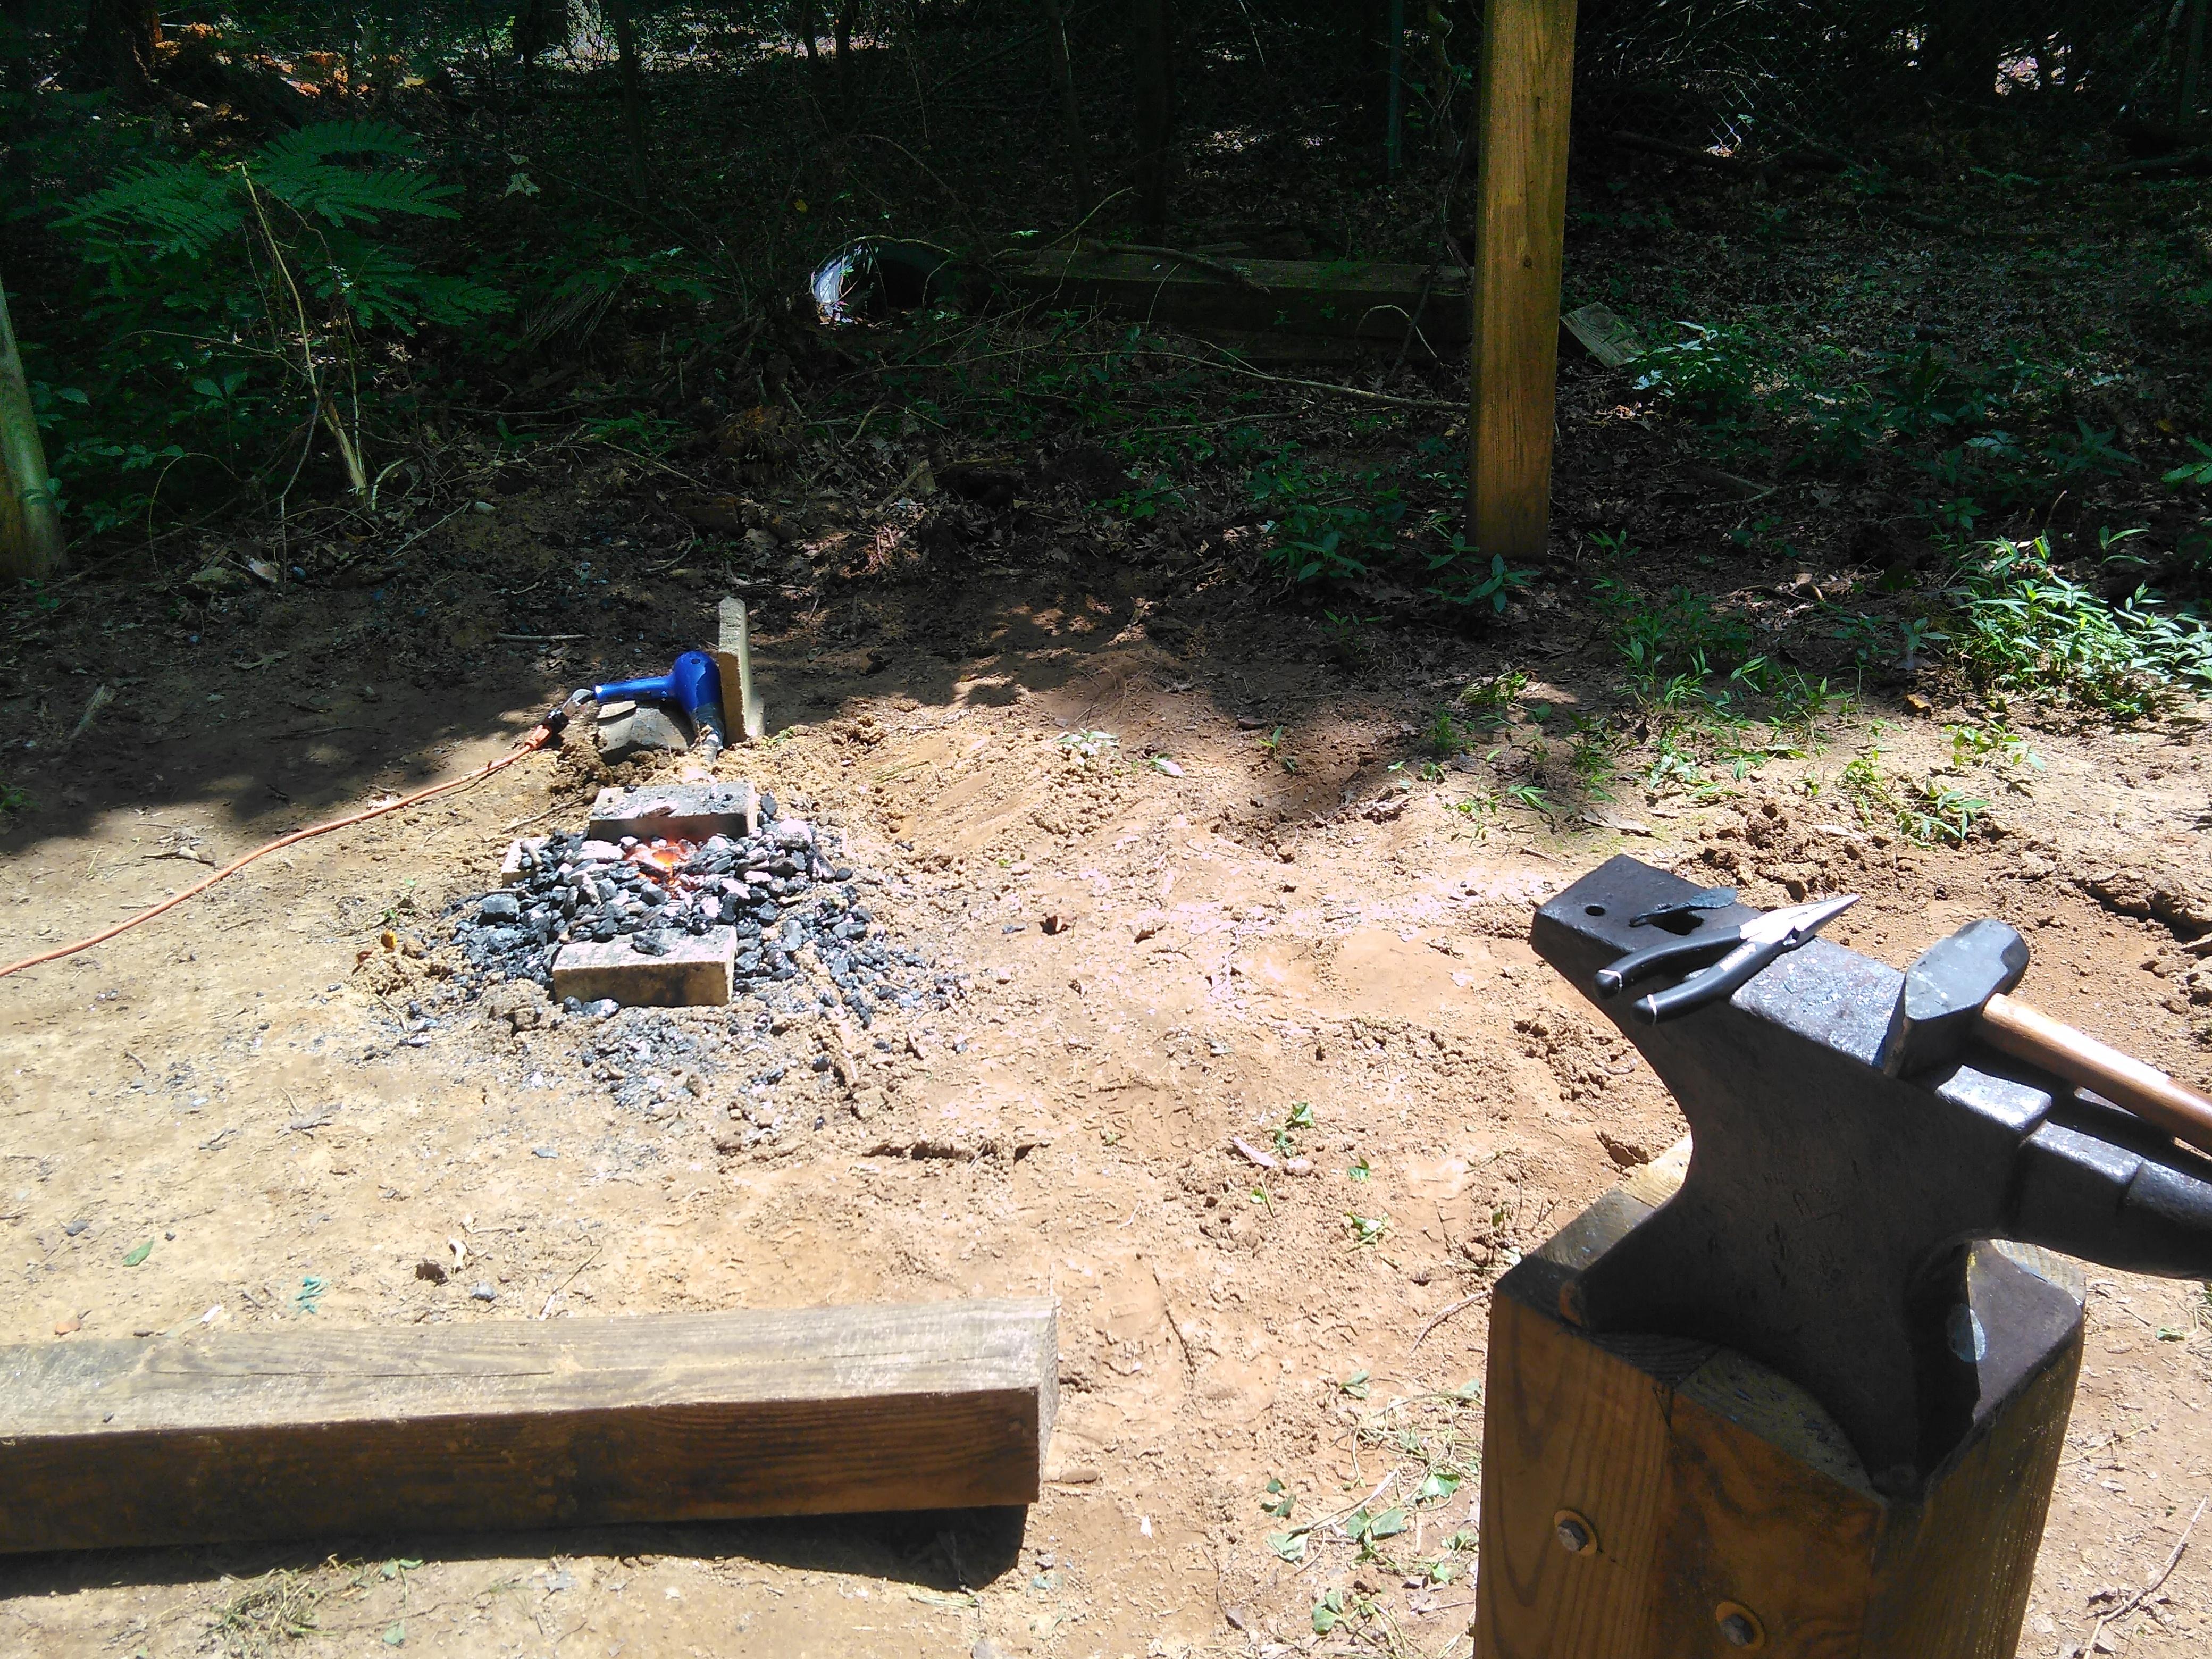
I started with doing just that, then went to sitting on a piece of plywood on the ground, but I have screws in both knees and some pins in my spine, does not handle sitting on the timber that well, and sitting on the ground made it a lot more difficult to reach everything. I now use the timber to help support the end of the stock to keep it horizontal as needed, rushed to do this and did not even out the ground that well. Plan for this is the upright 6x6s in the back will be the supports for the bottom of a lean to, and I will level out and tamp down the ground, putting in a brick forge as well as having room for the anvil to stay under it with an oilskin or waxed canvas cover over the anvil and stand.
-
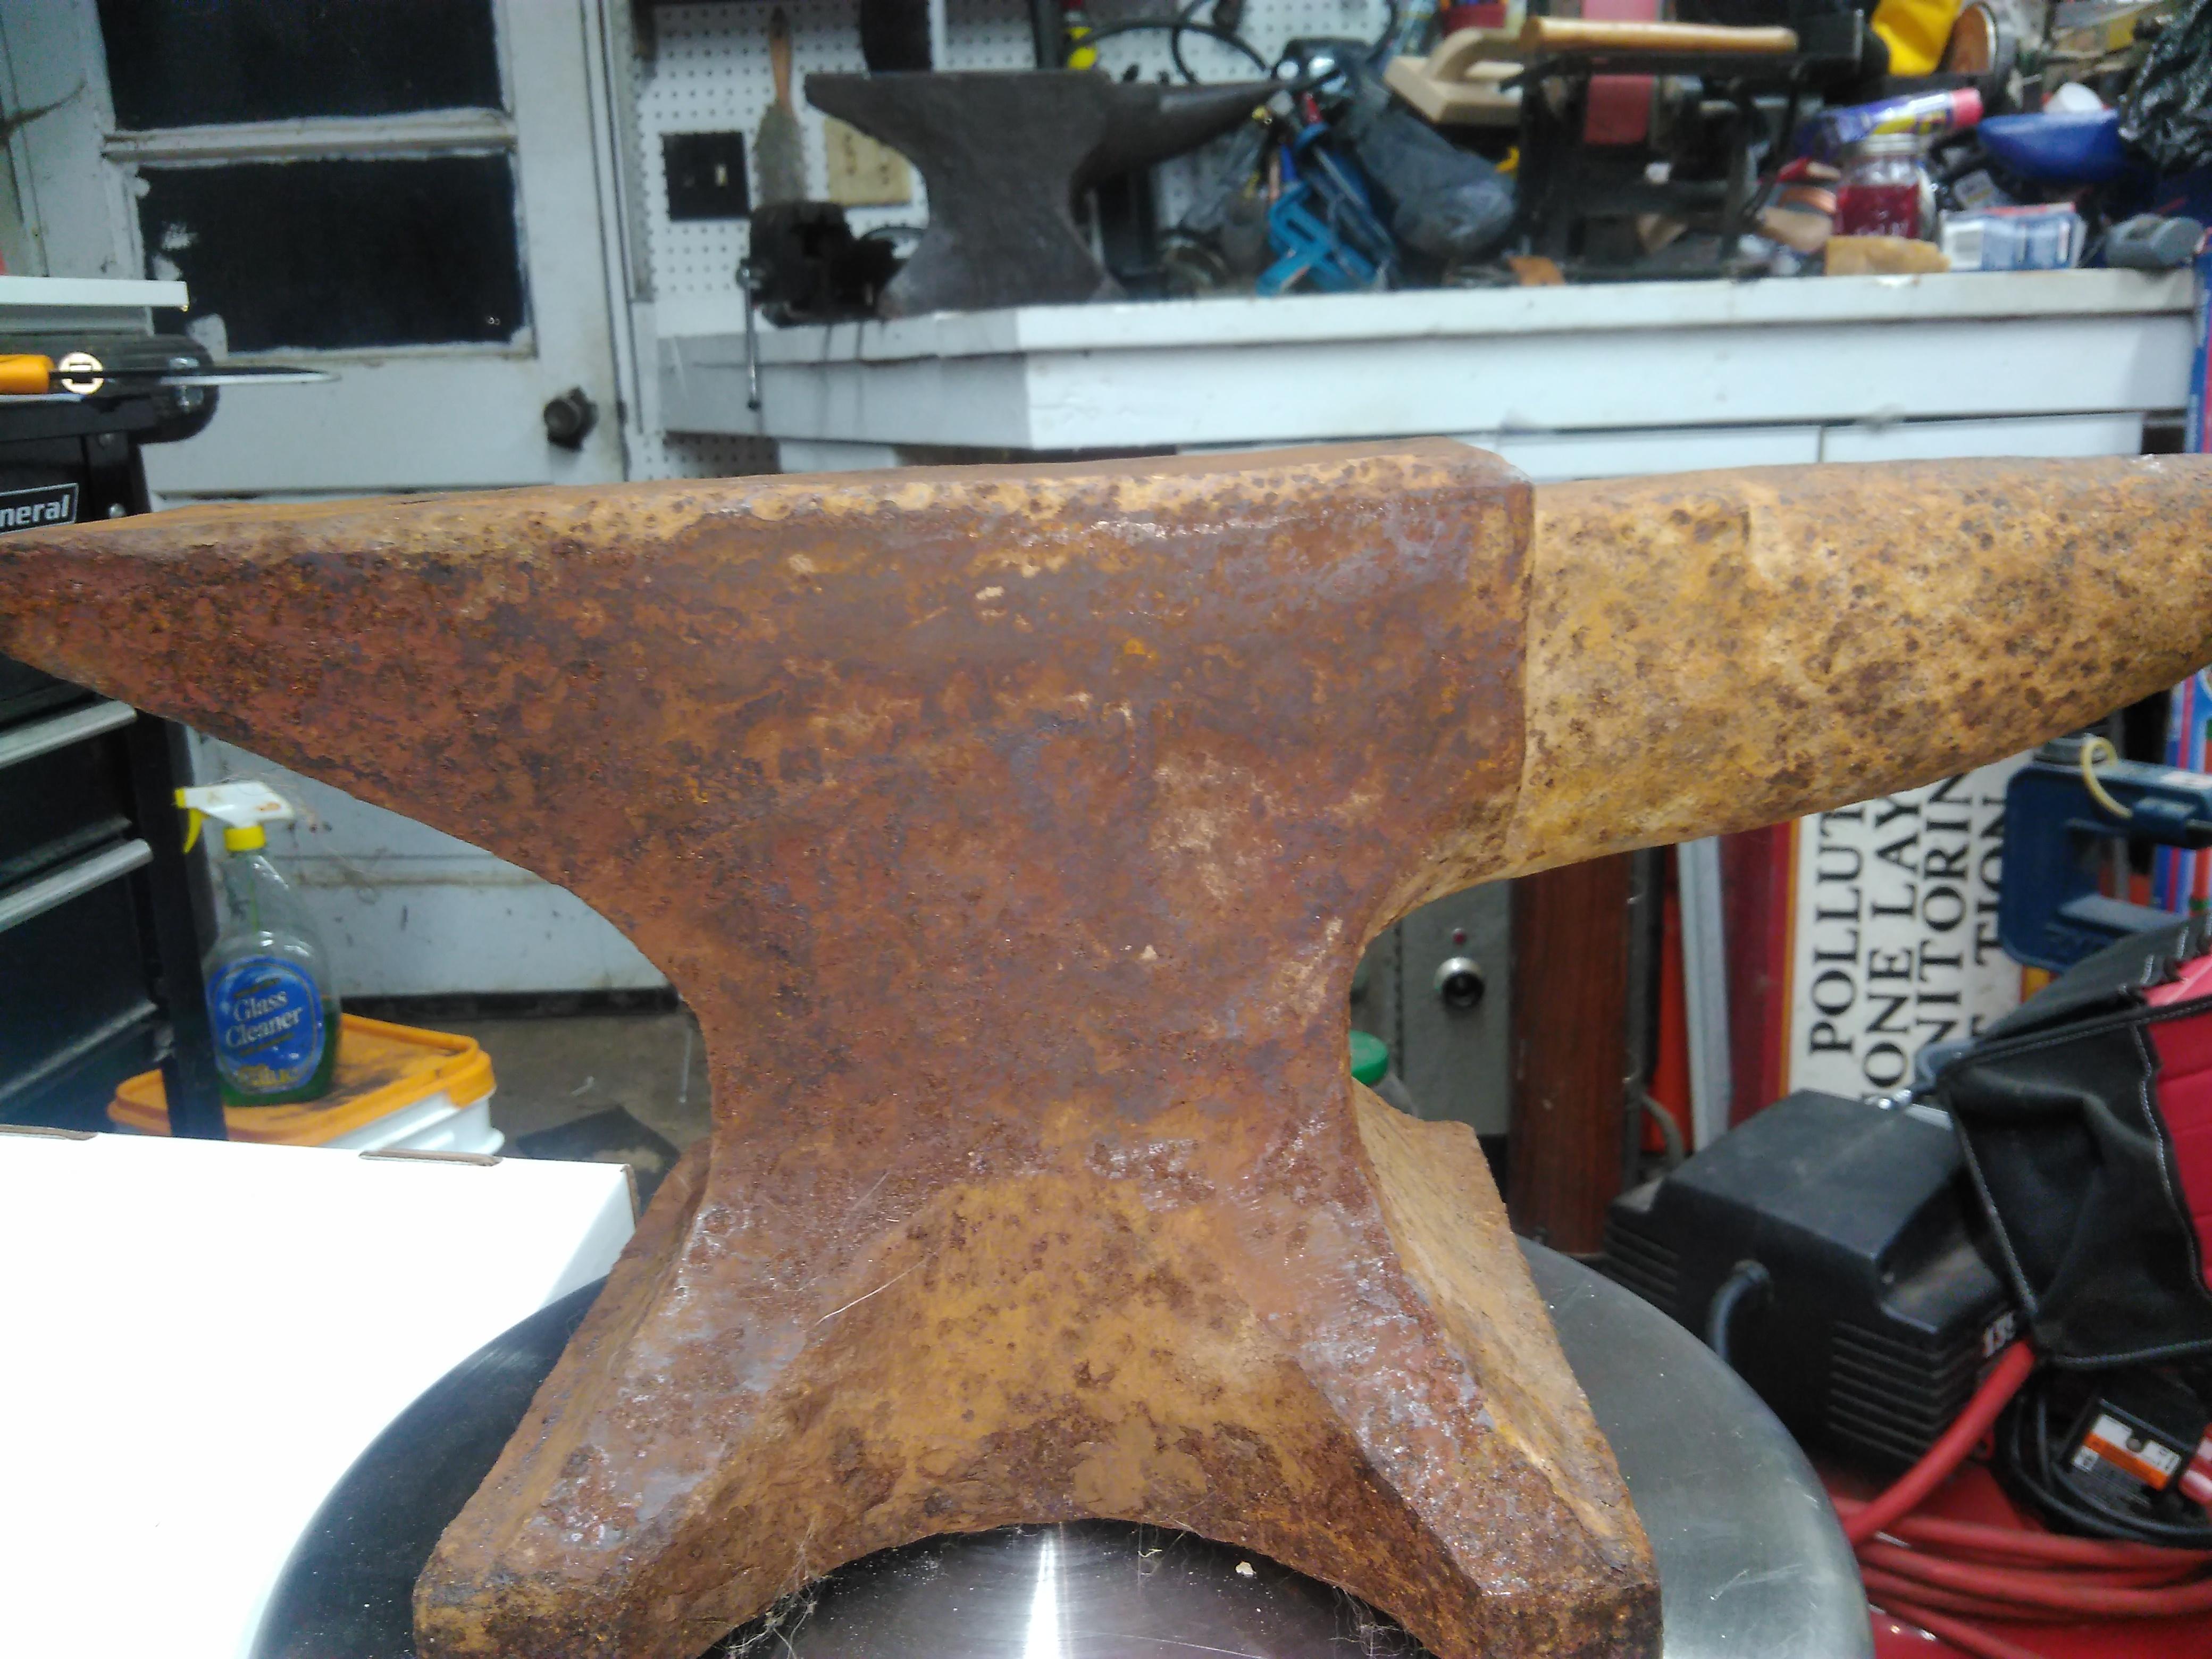
It is. Had someone pick it up for me yesterday along with a forge(need to repair the blower on) and a vice I need to repair the spring on. Spent this morning building that stand its on, just got to strap it down but until I get a cover just letting it walk on the stand so I can move it into the shed thats off to the side more easily. I made some more hooks for practice and started trying to make leafs(the first of which you can see on the anvil in the picture, did not leave enough material at the end).
-
As I said, Id get pictures when it was light, although I had to wait for it not to be raining and off work as well it seems. Although in the meantime got a used anvil.

-
Once its light out I will take a picture of some of the hooks that I have not punched yet(I broke the punch I made out of a piece of 5/8 round I had laying about, something else I need to learn is how to properly make those), others and the nails are already in the walls, as well as the ground forge, pictures of it lit will have to wait for friday at the earliest as I do not get home till after dark most days. As well as hopefully a fairly well worn anvil I found cheap that I will be picking up this weekend. I figure the horn will be useful for forming the curve of hooks a lot easier then what I was doing if nothing else, and I paid less then the scrap price for the metal so the way I see it even if it is completely unusable, I will be able to get my money back out of it. I am wondering where RR spikes are easily gotten, although I am just now wondering this and have not done much research on it. The spikes that are on the spur on my land had long been prized out and just the odd bracket and the rails were left, partially I would imagine from the trees having grown enclosing some of the rails making them impossible to remove whole.
-
I've been trying to get into smithing for awhile now and was finally able to scrape enough cash for whats needed for a ground forge(a few firebrick, black iron pipe, cheap hairdryer, and the handyman's secret weapon), cut a piece of old railroad track out of my property for an anvil and started trying to make wall hooks, nails, and the like. Simple items, stuff I could use. I am hoping to be able to get going and better at shaping items, although what I have been able to make is functional for myself at the moment. I have been lurking for quite awhile here trying to glean what information I can, and one of the local blacksmiths has been a large help with advice. Sadly joining the local blacksmithing guild is not something I can really do at this time due to needing to take what work I can to make ends meet means all of their meetings and workshops I am unable to attend, nor is the cost something I can afford and mostly working on the cheap, which oddly is one reason I wanted to learn what skill I can for this. The aforementioned hooks even after including cost of all the waste(the odds and ends hopefully turned into usable metals or a future project) I made learning and the fuel were cheaper cash wise then buying the number I needed for my shop and home. Instead of spending my more finite resource of money, I am willing to spend time to offset. My interest in the skill is for the most part practical, maybe if I feel I have gotten good enough, stuff to make to barter with some of the other local farmers for goods or sell at the stall at market for a spot of extra income. That said, I would love to eventually be able to make cruicible steel and make some damask-like steel implements out of, something of a goal to work towards in the years to come. I was able to pickup an old brake drum from my mechanic as well as some springs which hopefully I can turn into a small forge for tinkering with. I look forward to being less of a lurker around these parts.