
Jymm Hoffman
-
Posts
312 -
Joined
-
Last visited
Content Type
Profiles
Forums
Articles
Gallery
Downloads
Events
Posts posted by Jymm Hoffman
-
-
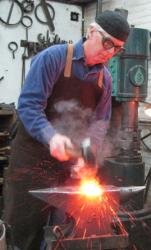
Thanks Glenn.
I started having anvils made to my patterns in 2002. After consulting several metallurgists (one of whom is a hobby smith,) machinists and die makers, I chose H13 for my anvils. I use the Colonial pattern for historic demonstrations. If you are not familiar with me, I am a full time smith specializing in historic ironwork. The 2 Continental pattern anvils I use on a daily basis in my shop, 1 small and 1 large. If you need to move your anvils frequently, or on a limited budget, I recommend one of the smaller anvils. You might be surprised how much you can do on a smaller anvil. While I do not own the foundry, I have been working with the same foundry since about 2007, in eastern Ohio. They have a great reputation for producing high quality castings. The heat treat facility is also near the foundry and also have a great reputation and history, and a recent change in machine shops to one near me in western Pa, producing a really nice ground finish on the face. Many historic sites are using the Colonial pattern as well as private individuals from re-enactors to those looking for high quality anvil with a clean flat surface. The Continental pattern is my design (sort of,) based on using other anvils for many years. There are also many of the Continentals in use in private shops from Quebec to California, and many places in between.
I do have a YouTube channel with a few videos you might enjoy.
More information about my anvils, contact me PM Link removed
Here's a video using my small anvil:
-
PS. The anvil that was in the original question to be indentified is owned and used by The Old Fort Niagara Association. They set up a shed to demonstrate Blacksmithing near the site where the Frech and later British each had a shop. They chose my double horn due to a reference of the French having a double horned anvil. While this one is not patterned after a period piece (and they know that,) they thought it could be close based on early images.
On 7/26/2018 at 9:22 AM, stevomiller said:Jymm, have you ever considered a version with the South German transition betwixt the horn and face/body?
Love the patterns you’ve done thus far!
Steve
Not at this time.
-
Yes, this is one of mine. The logo is actually my initials and I use it as my mark as well. I like the just add hammer saying. The pattern has been altered a couple of times. Here's the new version, so I am uncertain of the numbers, but this particular pattern with this mark is a limited edition. The new variation is available with or without the shelf/extension. The first change to the pattern was to recess the logo.

-
I have not had that problem with a 2" to 3/4" reducer. I have seen forges not work as well with the 1 1/2" to 3/4". They are harder to find so some guys just try the 1 1/2". Whom ever wrote the pamphlet I have did not sign it for liability reasons. I found if you build the burners exactly to his design, they work fine. Typically forging at 10 to 15 pounds, welding at 20.
-
Here's a couple of photos of my carts I built for teaching a special class for at risk kids. We could handle 6 kids at a time, 3 carts two forges each. Originally I set them up to work on opposite corners as I had a vise mounted on one corner. I use these in my shop as well, without the vises mounted to the carts and working from the same side of the cart. Roll them out when necessary, put against the wall when not in use.
2 of the carts get used a benches, normally removing the forge. A bit more involved. I will send you my forge building article.


-
I have to honestly I don't know cuase I never tried one. I think it would be weak due to the rpms. Try for at least 3450, it does make a difference, not only with the CFM, but also the pressure. My first gas forge I did not have the rpms and could not get up to welding temp. When I got a motor that was 3450 (fan belt to a blower,) that did it. That was also a much larger blocked up system, when propane was under $.80 per gallon. -
I am a full time smith and a requirement for me is to be able to forge weld, all the time any time, outside of a few minute warm up.
The answer for the blower depends on the type of burner tips you build or use, the size of the interior, the type of refractory and how thick.
I have been using the blowers Blacksmith Depot sells for many years. With a new burner design, I have had to go to a smaller blower that I got from Grainger.
I can send you a copy of an article I did about my forges.
-
Besides what John and Glenn said, of which I agree: I would suggest no more than 4 to 6 inches of tuyere , unless you plan to build really huge fires. What I don't see is the size flue you plan to use. Big fire needs bigger flue....
When I was burning coal, I had switched to a side blast system. I used much smaller pipe. As long as you keep water in it, (had to use antifreeze when I was not full time, and lived in Western New York,) it can be much smaller. I ran 1 1/2" over 1 1/4" pipe, and welded a 1/4" rod as filler. I also used a side draft chimney with it as I really hate hoods.
Now for the hearth area, I simply laid in loose brick to form something of a fire pot area. I let it fill with gaps with ash and had the option of changing the size of the fire. I could expand or constrict at my pleasure, or even put another layer in to make it deeper. I preferred this method oppose to simply relying on the coal and as to form a bed type pot/fire area. Once I settled into my preferred size (about 2 bricks worth of area) I rarely changed it. -
I used to only put the ram refractory in the bottom and coat the blanket with 3,000 degree mortar, thinned down. It was cheaper than the ITC stuff. However, it eventually cracks and flakes off, pulling blanket with it. When I switched to using Dixie Refractory products, I also got a salesman that stops by my shop on occasion. He suggested trying using the ram to cover the entire inside. I really like it.
The advantage of using a ram refractory such as Thermogen 60 (listed in the above article, I now use instead of Plastek 85 due to pricing,) is you can easily put it in cold, molding like clay to any size or shape. Tricky part is putting it on the ceiling. With a couple of hooks in the top, or even without, and using some sheet metal clamping it in place, you can fire it up and set it. I have taken flat bar and made simple "C" type holders for the firing process. One thing I have learned is to not make it too thick on the top as it does slow down the warm up time. I use no more than 1" on the top, 1/2" to 3/4" works well. I make the bottoms about 1" thick. While straight fiber blanket may initially be faster, the combination of radiant heat and reflective heat can work in your favor. If you use straight blanket and put a large piece in, you can see the cold metal pull the heat out of the system of straight blanket. I don't have that problem with the combining of materials I use. Plus the longer my forges run, the better they perform.
I have the more complicated I make things, the more problems I have. So I keep coming back to the philosophy of keep it simple. -
You asked what we think. See if you can open this document.
-
If you are doing mostly knives, it is way too big and will use more fuel than you can imagine. As Thomas said, plan your useage. If you look back at some of myn older posts building blown forges, they are smaller than than your drawing. If you look at my website, you will see I build lots of stuff out of a smaller forge. Unless you plan on doing very long stuff, just built it 12 inches or less. I am using a newly designed blown system, outside dimensions is 10" by 10". inside dimensions are 6 1/4 wide", by 3 3/8" high, 10" long. I can make axes, all sorts of things, it uses less than 1/2 gallon propane per hour and the interior is a hard ramable (plastic) refractory covering the blanket that is between the shell and interior, it is impervious to flux enough that when doing a lot of welding, the flux puddles on the floor. It is also very resistant to me banging into it.


-
I have initials that are easily connected. I also wanted a mark that could be typical of 18th. century smith might use. So I made a punch and engraved my initials in reverse. I also had this applied to my Continental Pattern anvil pattern.


-
Looks nice. A question for you, do you put your horn opposite of your hammer hand? If you are right handed as I am and put the round horn on my left, then I recommend you change so the 2 legs are under your horn and the single leg under the other end. This allows you to stand closer to the anvil, a great advantage to this type of stand.
-
More common than many realize due to many factors. For one, we (blacksmith types,) normally look for larger post vices.
These were considered bench vices and can be seen in many sizes, especially in period trade catalogs. -
I prefer the 3 legs. It does enable you to stand closer to the anvil and stand upright, getting more power out of your hammer and better use of your body.
On the large anvil, the legs are permanently welded. I used silicone underneath. Welded corner braces (pockets,) nothing else bolting anvil down. It does not move. Base is 1 inch plate. I don't remember tubing size, it was given to me, but it is heavy wall.
The small one I use to travel with, the legs are bolted through smaller tubing. Legs are 2" heavy tubing. Base is 8 inch channel.
I have not experienced any increase in the ring from using tubing. I have a piece of old conveyor belting underneath the small anvil.
Both have holes in base so items can pass through to the floor. Comes in very handy when needed.
I set mine at knuckle height to an in higher.
I use both of these anvils and stands on a regular basis. Just depends on the work lined up.


-
I was in a shop with a bad chimney and really bad high sulphur coal. That night it felt like I had the flu, knocked me down, fever like symptom, but I don't think I was vomitting. I can smell bad coal from a long way off now. Another reason why I use propane now. I got tired of chasing after good coal.
-
I thought I had posted some photos of my shop previously, so I had to look through the entire thread. That turned out to be very interesting. I have been in some pretty small shops in the past, my first was referred to a forging closet.
When I found the current shop space in June if 1999, I was looking for 1/2 this size. Well, I have filled it and would like twice this size, but not twice the rent :)
So here are some photos: My interior floor space is 17' by 43'. I took 8' off the lenght of the work space to have storage and office area, so the working shop space is 17 by 35.


And also a video interview that gives you some idea of my normal working conditions: -
John,
look into touring the Cathedral of Learning, University of Pittsburgh, (downtown Pittsburgh) to see some Yellin's ironwork. Then check out the Hofbrauhaus in Southside Works. There is also a nice Irish Pub across the street. -
The heat treat facility that do my anvils is so good, I send stuff like that to them. It is not worth the by guess by golly. It took me about 6 or 8 tries to get 2 good hammer heads in H 13. It is very sensitive to getting the temperature right for the right time, etc.
I think you chose the right material for your dies. I have dies from different steels and a couple of the same pattern as the H 13. The H13 is holding up better than S7, or 4140, after several thousand parts. I had the heat treaters temper my dies to around 50 Rockwell C.
I make spring dies and other hand held tooling from 4140 and some times A 36 for a real quick short run. I don't bother heat treating the spring or hand held tools, just keep them cool when using. -
I don't heat treat my dies. Some are made from A36, some are made from 4140. Don't have problems with them, but do small runs. I have only done about 6,000 nails with 2 different headers and top tools, no significant wear on those. Other items are probably not much over 100 parts for some under 1,000 for others. Again no significant wear. I do make a point of keeping the die or tool cool, sometimes to the point of having a bucket of water next to the hammer that I drop the tool into between heats.
-
Hamit has worked with Tsur and Uri and very familiar with an anvil such as this that weighs around 275lbs. You will have to work through the site to of find a contact for Bob Alexander to see if any are available.
http://ozarkschool.com/
If they are not available, try Euroanvils. -
Start with this group, they have a weekend long event (called a hammer in,) near you in mid April: http://www.illinoisblacksmith.org/index.html
-
I used a template that Yahoo offers, as my site is through Yahoo. It took me a little bit of time to learn, but not hard to change and edit. www.hoffmansforge.com
-
A good resource I use from Crucible Steel: http://www.crucibleservice.com/eselector/general/generaltitle.html


Kanca vs Holland vs Hoffman
in Anvil Reviews by brand
Posted
The sound is distorted. I am using a GoPro with the cover on the back. Also, I have this anvil bolted down tightly on a piece of old conveyor belt.