J.P. Hall
-
Posts
58 -
Joined
-
Last visited
Content Type
Profiles
Forums
Articles
Gallery
Downloads
Events
Everything posted by J.P. Hall
-
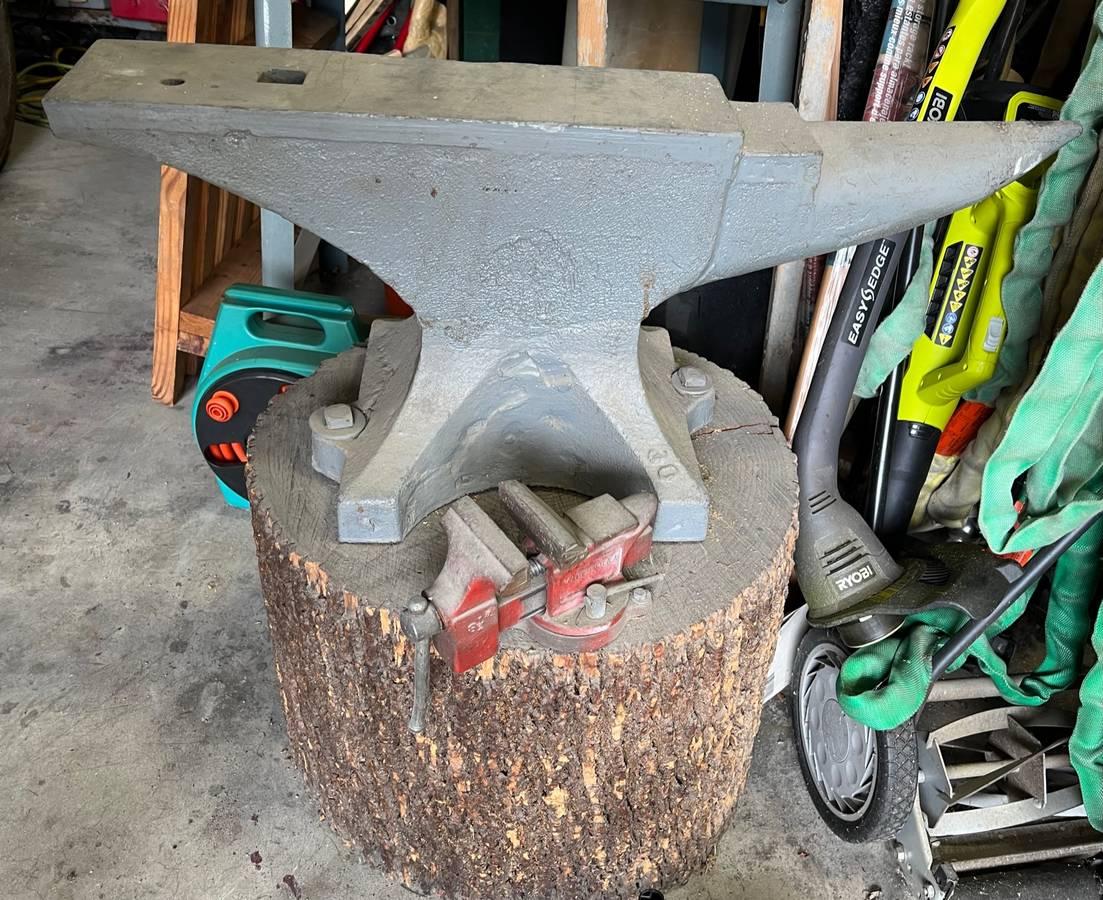
I was hoping they would, but they took it off the stump when I got there. I certainly think so. I've got to dress it up just a bit, maybe de-bark and char/oil the stump, and then make a sleeve for the hardy and then it'll be in regular service
-
I sure did. They had a bobcat to load it into a pickup (it was at a place that carves headstones-- I should have asked if they had any scrap I could use as a surface plate), and I used some strategic maneuvering and scooching to get it unloaded and in its new home
-
Well, to my surprise it was still there when I went to check it out. It bounced a ball pein just fine despite a coat of paint to absorb a bit of the impact. I love Fishers for their lack of ring, but I was very happy to find out that one of this size doesn't even have much of a "clang" when hitting the horn or tail like some of the lighter ones do.
-
I'm hoping to take a look at it this weekend. I may radius the chipped portion-- I've had a crisp-edged anvil for a while and would like to have a nice radius for drawing out, but I'll still hold off on it for a while to be sure. If the vise comes with it then it's an even better value.
-
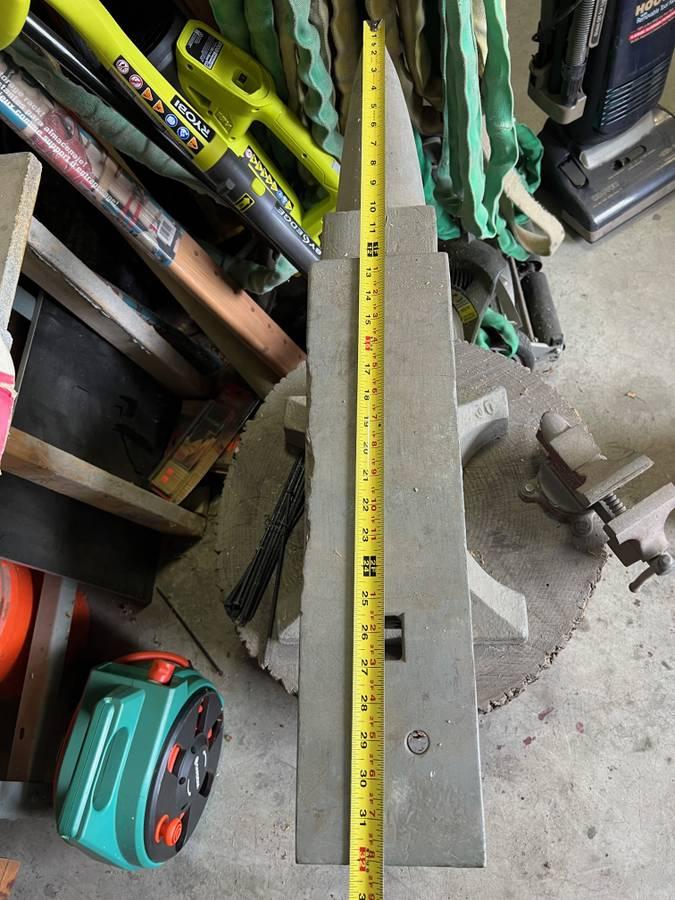
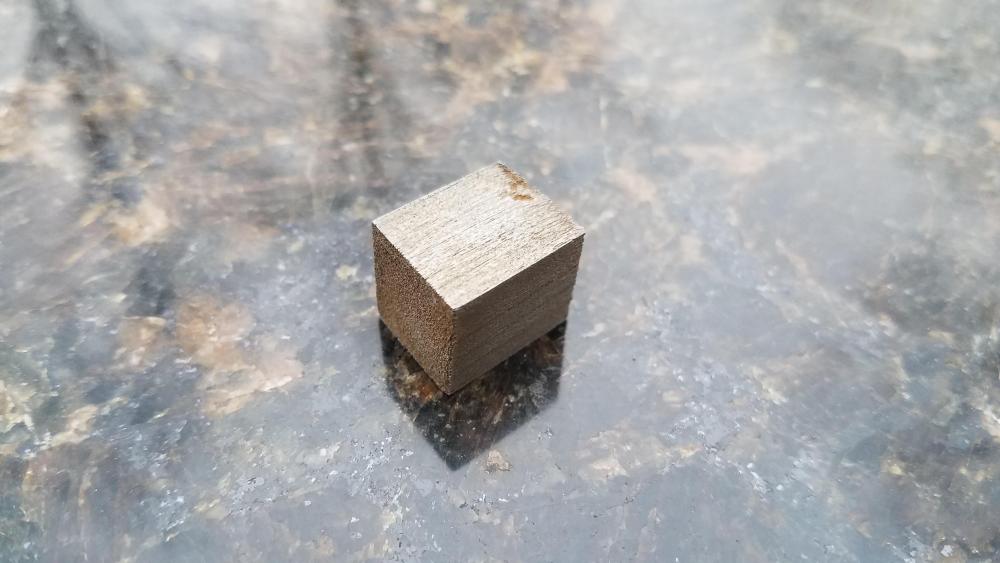
Here is a 300-pounder that I think may be 1950s due to "30" being the only visible markings. I think the seller is reasonable asking 3.25/lb even with the chipped edge, but I'd like to hear others' thoughts as well.


-
Fluidized Sand Bath for heat treatment
J.P. Hall replied to JHCC's topic in Heat Treating Knives, Blades etc
I've been toying with the idea of making one for quite a while. I've been using a PID-controlled gas forge for heat treating and its biggest limitation is evenness of heat. I was thinking of having a stand that could tilt it vertical to accept the tube. A dedicated setup would obviously be ideal, but I'd like it to be something that other people could build for a modular setup with their own forge. I'm imagining a coil of small diameter tube with small holes drilled in it sitting in the base of the main sand tube. A no-weld version would be great for both testing and maintenance, as well as minimal barrier to entry. The main issue would be passing a small tube into the larger one while maintaining a seal, not unlike a bulkhead or tank fitting for pipe. -
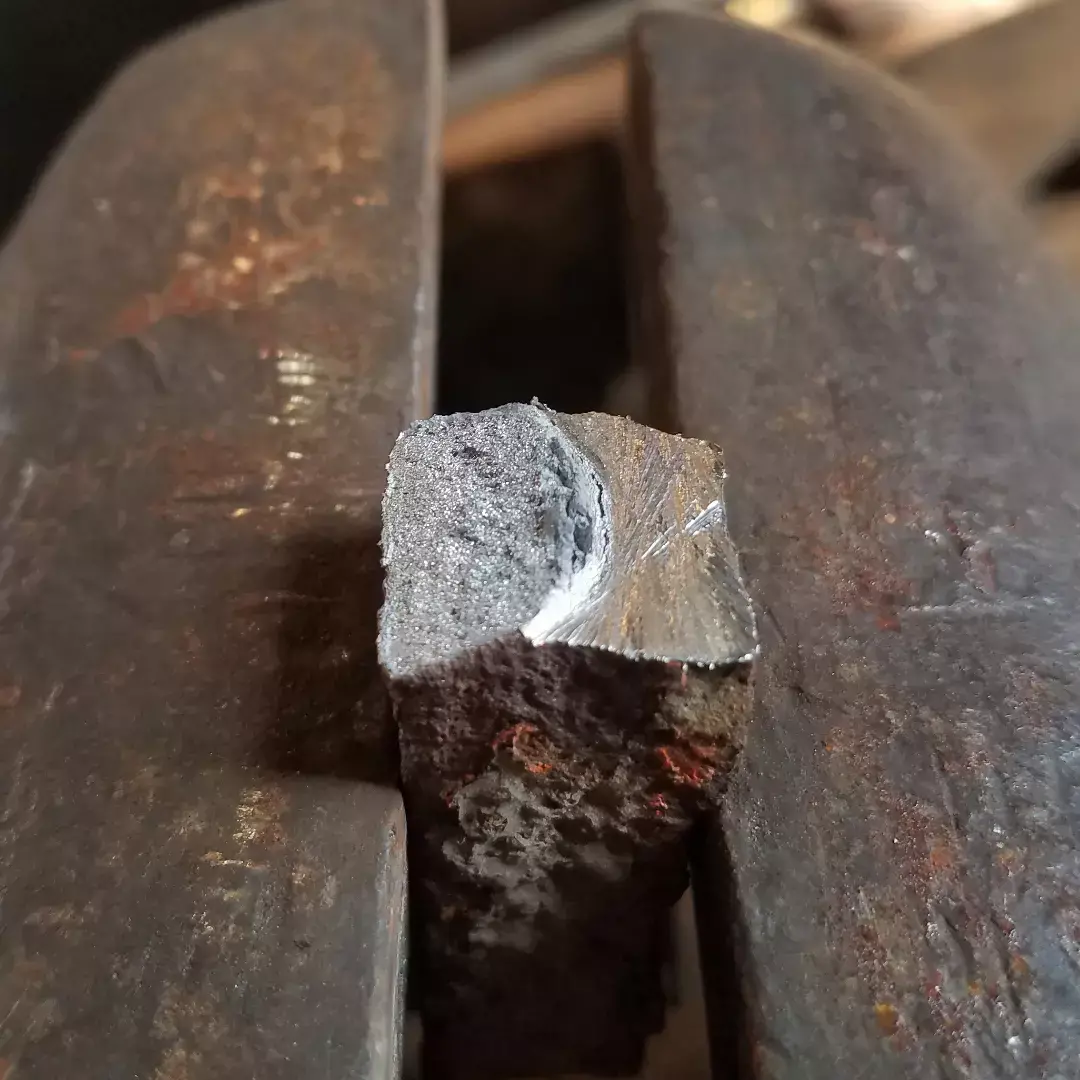
I was gifted a couple bars of wrought iron recently. I tried a break test and it looked clean enough that I was convinced they were actually mild steel. I would have taken then pieces anyway because I could have used the 3/4" square stock, but it felt unusually soft and it hot cut like butter. A spark test showed few sparks with little bursting compared to known mild steel (and high carbon as a sanity check), and a long etch in strong acid showed the telltale grain, albeit much finer than the few samples of wrought I've seen.

-
I'll second Daswulf's comment of having some sort of fuel containment. I prefer angle iron or firebrick for ease of adjustment. For bituminous and charcoal I use a barrier to contain the fire and conserve fuel; for anthracite (and if I used coke) I use it just to keep fuel on the table because the fire doesn't spread much from the air source.
-
Weatherproofing a wood stand?
J.P. Hall replied to J.P. Hall's topic in Stands for Anvils, Swage Blocks, etc
I like that idea quite a bit. I was thinking a generally thin oil like mineral or regular linseed would soak up better, but it would probably drop out almost as fast as it soaked in. I think I'll go with a thinned BLO like you suggested, and maybe something thicker to seal the top. I also really like the nuts idea. I could probably use them after just to keep it out of any puddles too (or pea gravel or whatever) not as absorbent as sand, but small enough to help settle and even out unevenness between the stump and stone, and not too compressible. -
Weatherproofing a wood stand?
J.P. Hall replied to J.P. Hall's topic in Stands for Anvils, Swage Blocks, etc
I'm not too concerned about the footing. It's on a flat stone about 6ft wide and 4-6" thick on top of compacted soil and pea gravel. My main worry is rainwater puddling on the stone and getting soaked through the base of the oak. -
Weatherproofing a wood stand?
J.P. Hall replied to J.P. Hall's topic in Stands for Anvils, Swage Blocks, etc
Something else I've seen is "shou sugi ban", scorching wood to prevent rotting and deter insects in Japanese timber framing and siding. I'm hoping that would help in addition to a sealant. I'll steer clear of anything too harsh because there's a fair amount of groundwater that flows through my area and I'd hate to leach into it. I looked into the wood glue sealant a bit more and it seems pretty effective. It might be easier to seal over the large pores than to saturate everything with oil It's sitting on a pretty hefty paving stone and I leave a tarp on the anvil so there isn't a ton at stake. The old stand made from 4x4s has held up decently over a year or two. -
I recently came into possession of a large section of oak trunk to use as an anvil stand. I'm not sure of the species but it's definitely not white oak, so it will most likely suck up water from my outdoor work area. What would be the best option to protect it from the elements? I'm debating between linseed oil, paint, and end grain sealer used for drying lumber (some people even seal end grain with wood glue). The diameter of the trunk is 27" at the narrowest, so I'll have fresh dry wood once I trim it down a bit. I'm thinking 16-18" square for my 130lb Fisher.
-
Great info. I have a natural coticule that I use for sharpening, if it breaks or becomes unusable for that then I may try using it for polishing.
-
Beautiful polish. I'm sure you can't get *exactly* the same effect with conventional abrasives, but do you think something more cost effective like EDM stones could give something similar (provided they come in high enough grits)? I'm also curious if this is purely polish or if you used any etching.
-
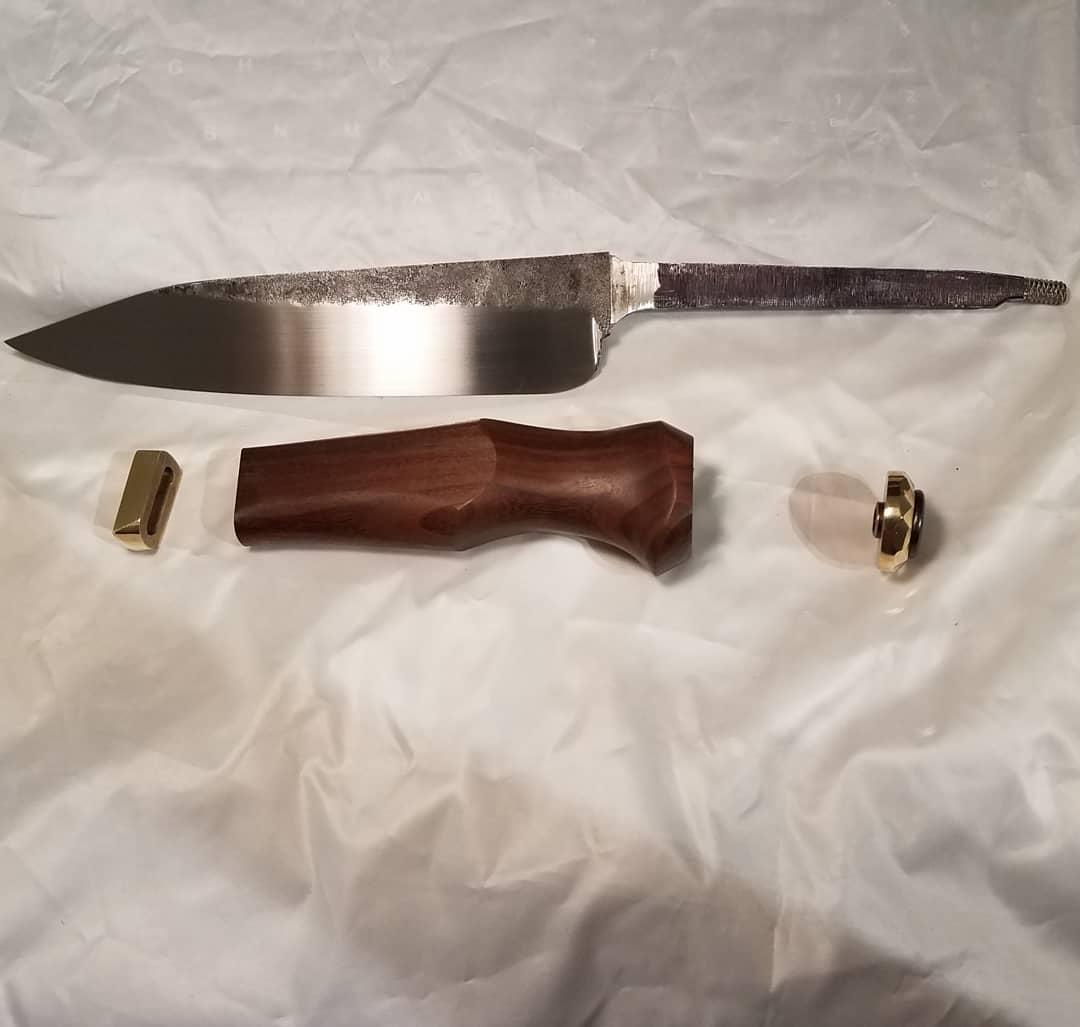
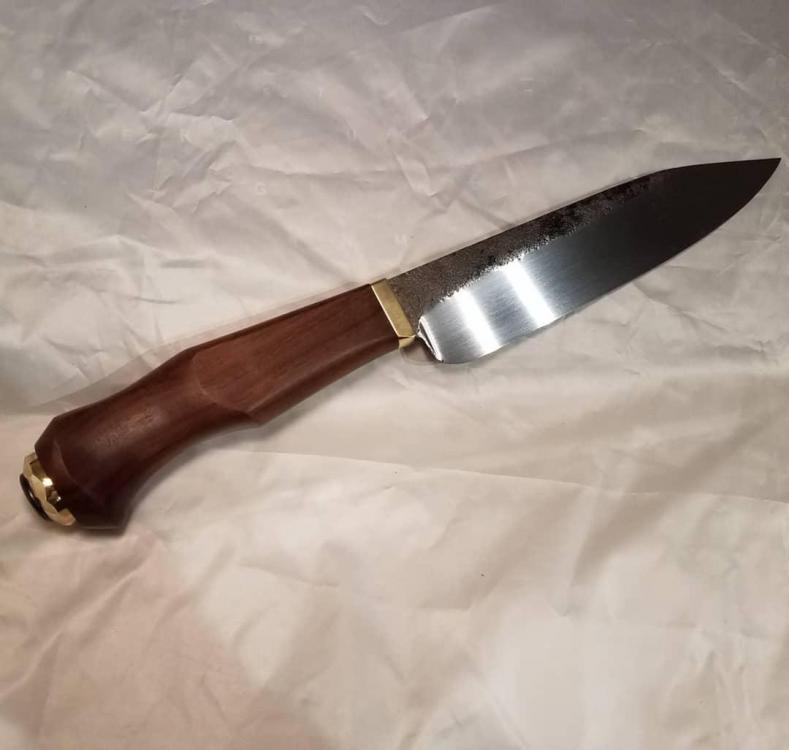
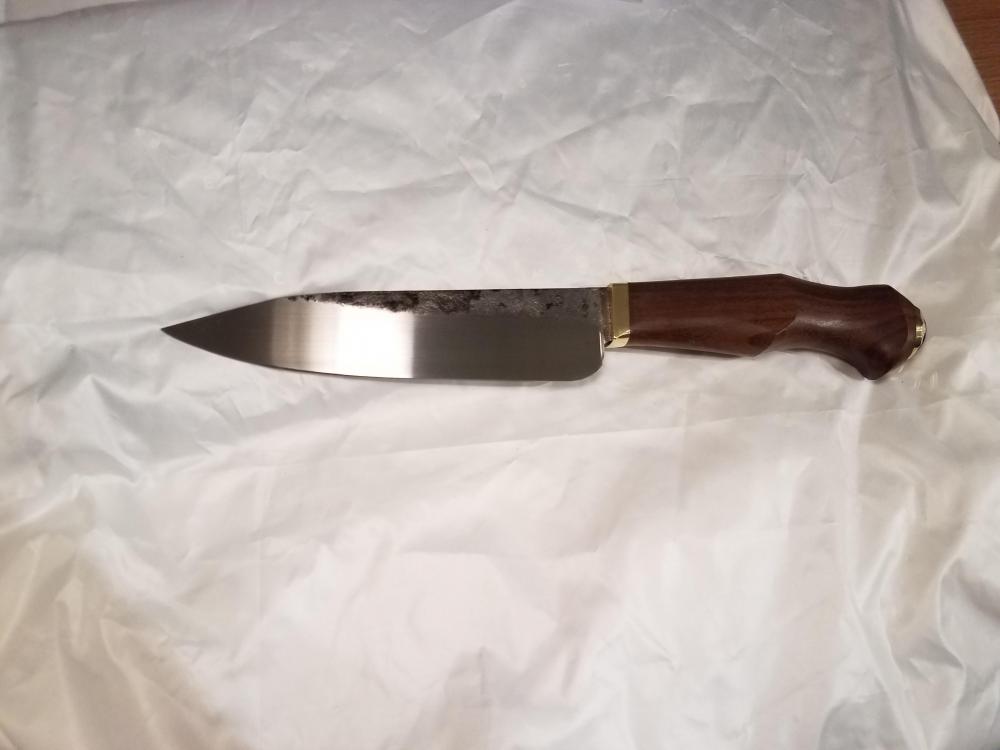
Camp knife -- 80CrV2, Ipe, and brass -- criticism welcome
J.P. Hall replied to J.P. Hall's topic in Knife Making
Thanks guys. Slag, the thickness was necessary because the hole on the female bolt doesn't extend close enough to the head. I'm going to find or make something that will give proper clearance. I have a hard time buffing wood with compound. I may be using too much, but it usually seems to smear some residue. I've tried using less, but it doesn't seem to be enough to really do anything. I'm fairly certain the wood is Ipe. It's a tropical hardwood used in similar applications as teak. Got it from the scrap bin at a local stair company. I did notice a small crack in the handle near the bolster, probably from the chop test. If the end cap isn't really cranked down, there is a small bit of vertical play at the bolster. It's also expanded slightly hirizontally just enough to feel relative to the bolster. There isn't a visible step at all but it irks me. I've since bedded the tang, and will most likely do a full-on epoxy job for the next one. excessive spacing removed -
A couple of firsts on this one: -80CrV2: hardened well in canola oil, though the reputation for a thick decarb layer is true. The edge is thickest at the heel and tip, but all sections shave after chopping through 8" of 1" pine and should be like new with some stropping. -Broaching: made one from a screwdriver and it worked really well for getting a precise fit. -Threaded tang: decided to give it a go for simplifying glue-up, but the fit was good enough that I left it without epoxy. There was a couple thousandths of movement between the bolster and handle, so I think I'll go back and bed the tang with epoxy to be safe. -Sculpted handle: I don't think I quite nailed it, but it's way better than I expected. Shaped entirely on the grinder up to 220, hand sanded at 400, and buffed with beeswax. I think the brass end cap is pretty tacky, but the female bolt(?) doesn't have a through-hole so I needed a spacer. I'll most likely replace it with some different hardware. The 600 grit satin finish looked really nice until I scratched it right up with the chopping test. The plunges also got pretty washed out, but overall this was a big improvement for me. I'm keeping it for myself for R&D purposes.

-
Stones in coal, lots of clinkers
J.P. Hall replied to J.P. Hall's topic in Solid Fuels: Coal, Coke, Charcoal, Wood, etc
Aging has its benefits. For example, I used to be terribly indecisive, but now I'm not so sure. -
Stones in coal, lots of clinkers
J.P. Hall replied to J.P. Hall's topic in Solid Fuels: Coal, Coke, Charcoal, Wood, etc
Great info, guys, thanks. I do like the suggestion of having children sort the coal , but I agree with George. Although, some people have asked to take clinkers home as souvenirs when I explain what they are and why I need to take some time to clean out the fire. Nobody's offered to take the pile of them sitting out back when I mention it though. I have debated talking to the museum about possibly switching to charcoal, but I would prefer a side blast instead of the bottom that we have. It would definitely cost more, but I wonder if there are any bulk charcoal suppliers. I'm not sure I'd have the time to make my own, either. -
Stones in coal, lots of clinkers
J.P. Hall replied to J.P. Hall's topic in Solid Fuels: Coal, Coke, Charcoal, Wood, etc
Thanks for the suggestions. I may try out separating the stones out with water. The reason I thought the stones contributed to the clinker was that there appeared to be some partially molten rocks that I pulled out with the clinker. I couldn't tell if it was just the surface, or if it had been melting substantially. I also couldn't tell what type of rocks they were. -
Hi all, I've been having some trouble lately with stones mixed in with coal. The museum I forge at gets bituminous "blacksmithing" coal from Cornwall Coal in Cornwall, NY. The coal itself isn't terrible, a good bit of ash, but not unusable. The problem is that there are a fair amount of stones mixed in. The large ones (1/4 fist size) aren't too difficult to pick out based on texture and density, but I'm sure there are smaller ones that blend right in. In a ~4 hour forging session this past weekend, there were well over a half dozen clinkers to dig out with most being at least fist sized. There was no flux or burned steel in the fire, and the cast iron firepot was cleaned out well before use. I rebuilt the fire two or three times, and often when I started with green coal there was a clinker by the time the whole fire coked over. More than once I noticed as many as one or two stones per scoop of coal. Does anyone else using this supplier have the same issue? Is there any better way of sorting the coal than picking through each scoopful? Are there any better suppliers in the Orange County NY/Hudson Valley area? The next closest supplier is Tri-County Coal about an hour away, which I haven't found much information about.
-
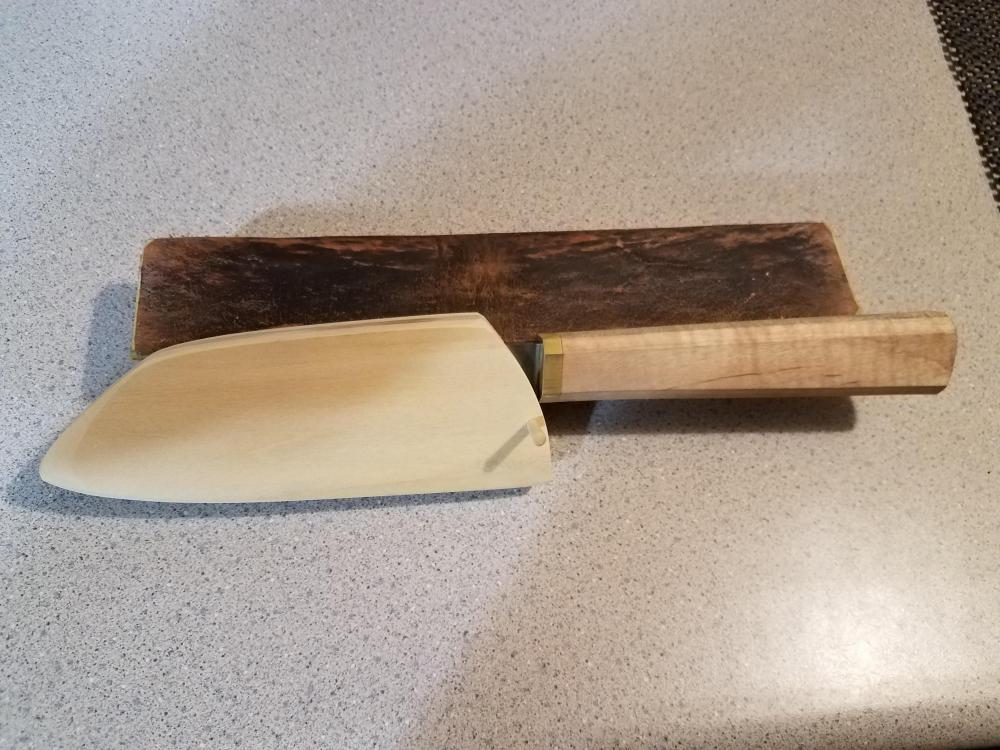
I'm imagining the "U" of the handle resting in the palm, with two fingers around the narrow portion -- think of making the Spiderman gesture -- leaving the thumb and index finger for making a pinch grip on the blade. I wonder if this would lend itself to long push or pull cuts for slicing large pieces of meat
-
I came across this post from Dan Prendergast about "glazing wheels": https://www.instagram.com/p/B0Bpd0ZHucl/ In his words, I tried researching the term, and I did find a greaseless finishing compound that is abrasive grain suspended in hide glue, to be used like buffing rouge. Does anybody have experience with this? I'd be interested in trying it out, I'd probably want some sort of guard around the wheel though.
-
First forged knife with auto-hamon, criticism welcome
J.P. Hall replied to J.P. Hall's topic in Knife Making
Thank you. I realized too late that I hadn't stamped it, but I suppose I could have etched the finished product. Oh well. -
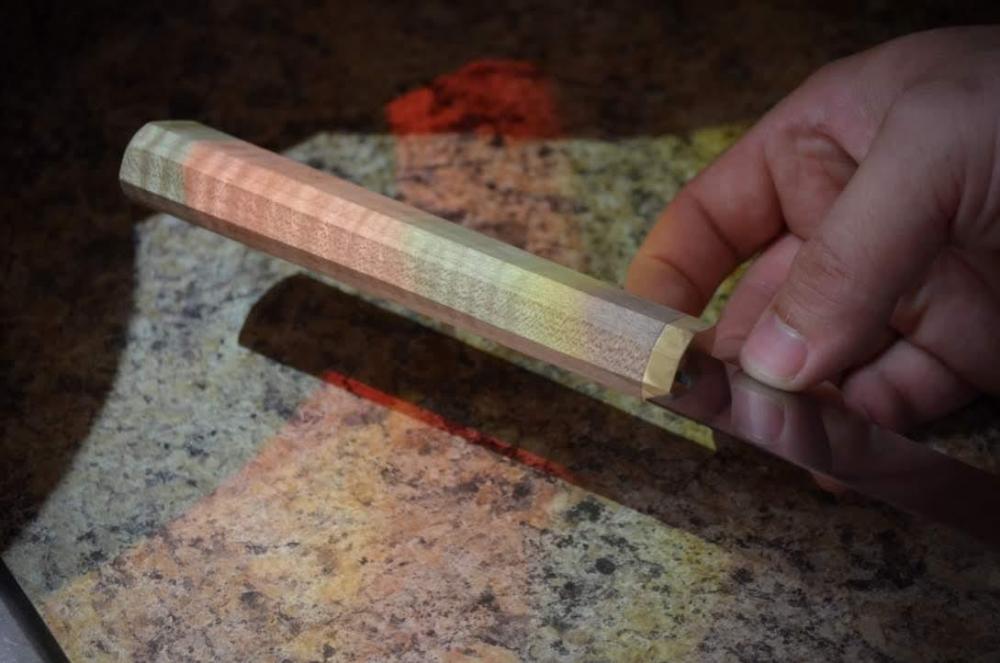
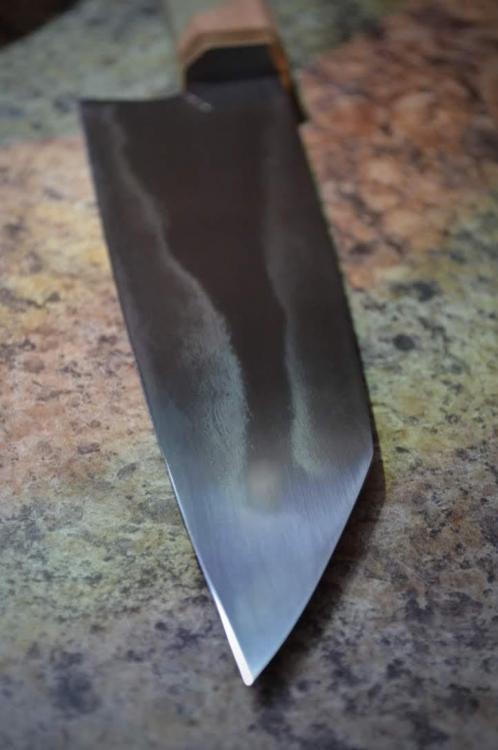
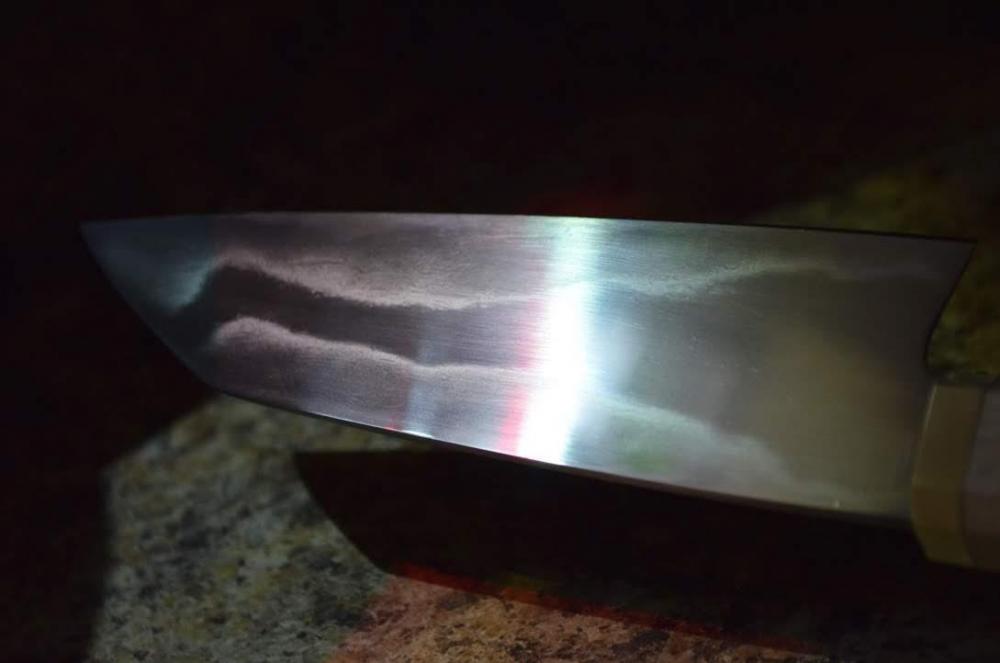
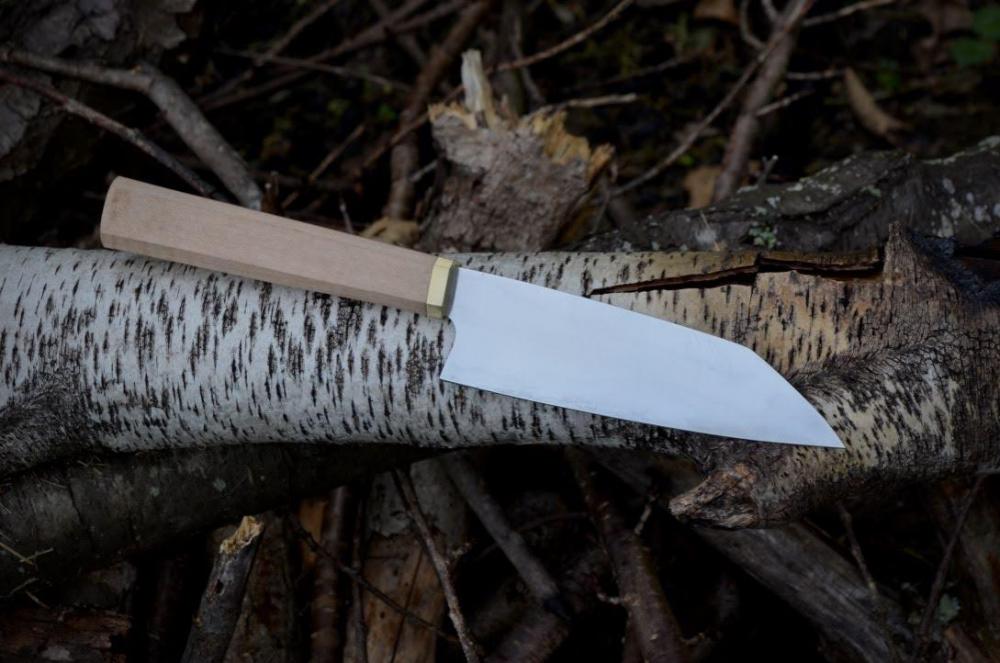
This is the first *forged* knife I've actually completed. I think it would be classified as a gyuto. 6" double bevel in 1084, brass, and maple. It took much longer than anticipated, mostly because I found an auto-hamon while finish grinding. I went back to the grinder a couple times to thin it out some more, and I experimented with a bunch of different abrasives, which I documented in another thread. Being 1084, the hamon itself is pretty plain but there's some interesting alloy banding (I think) that started to show. Not perfect and there are some blemishes that happened after finishing, but I'm satisfied with it how it cuts and it taught me a lot about grinding, finishing, and geometry. Somebody more artistically inclined than myself took some photos:

-
Heat treat info for Aogami 2 from Hitachi's site: Standard Heat Treatment temperature ( centigrade ) Annealing 750-780 Slow cooling Quenching 780- 830 Water cooling (Oil cooling) Tempering 160-230 Air-cooling Delivery hardness ( HBW ) 229 or under Hardening hardness ( HRC ) 60 over Aogami 1: Annealing 750-780 Slow cooling Quenching 780- 830 Water cooling (Oil cooling) Tempering 160-230 Air-cooling Delivery hardness ( HBW ) 229 or under Hardening hardness ( HRC ) 60 over Aogami Super: Annealing 750-780 Slow cooling Quenching 780- 830 Water cooling (Oil cooling) Tempering 160-230 Air-cooling Delivery hardness ( HBW ) 229 or under Hardening hardness ( HRC ) 60 over All identical heat treat schedules per the manufacturer. These do seem fairly loose. Having only a minimum hardened HRC, and as "low" as 60 given their reputation is interesting, although I'm used to Kevin Cashen's heat treat info for common steels on his site. I believe "slow cooling" is a fairly technical term. That said, I only have a gas forge available to heat treat so this is plenty of information for me, should I ever get some of this in my hands. I am curious of a few things: Is there a minimum forging temp? Is there an optimal normalizing temp that isn't the annealing or quenching temp? And is the listed quenching temp ideal for all three? The spec for carbon content is a .1% range for each, but it varies between varieties. Super is 1.4-1.5% and 1 is 1.25-1.35% Between this and alloying elements, I'd imagine that some of the temperatures would vary at least slightly. Although, they may operate under a totally different model. Since they cater heavily to domestic knifemakers and toolmakers, I wonder if they just manufacture to tight and consistent specs, and leave the heat treat to the customers. If most of these steel go to that sort of user, I can understand not needing heat treat info as detailed as what other industries would require.