LiveWire
-
Posts
12 -
Joined
-
Last visited
Content Type
Profiles
Forums
Articles
Gallery
Downloads
Events
Everything posted by LiveWire
-
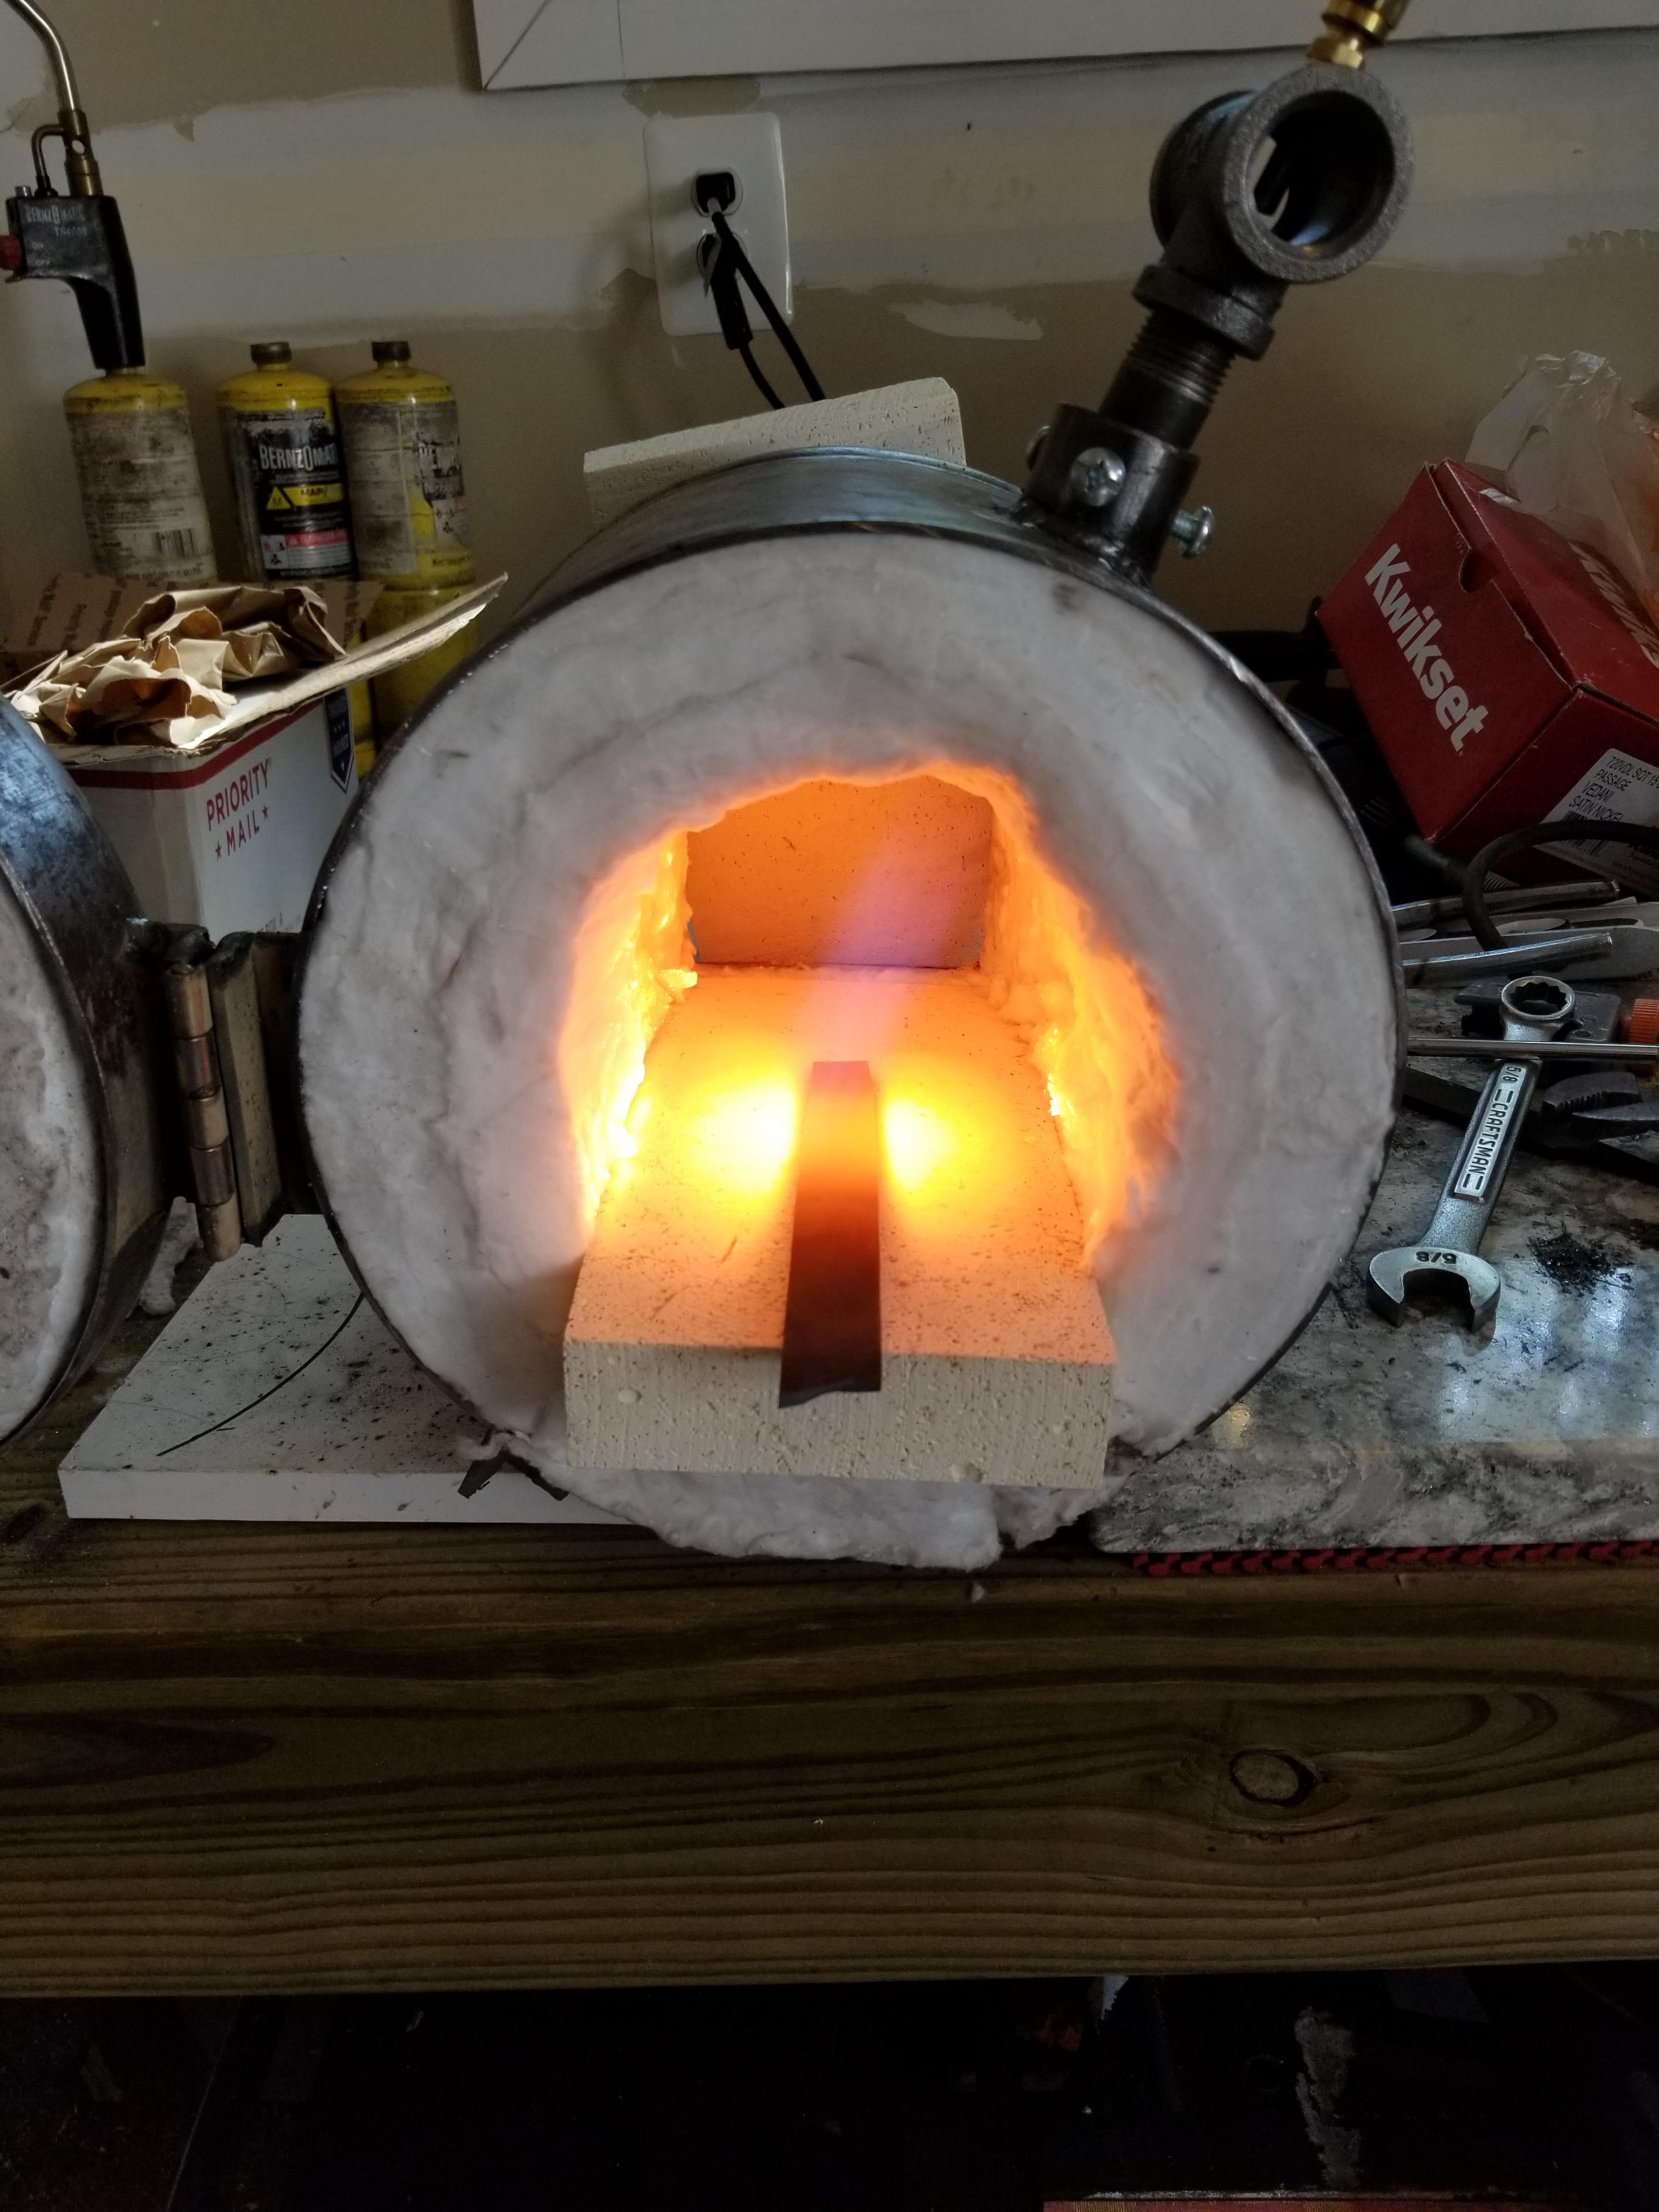
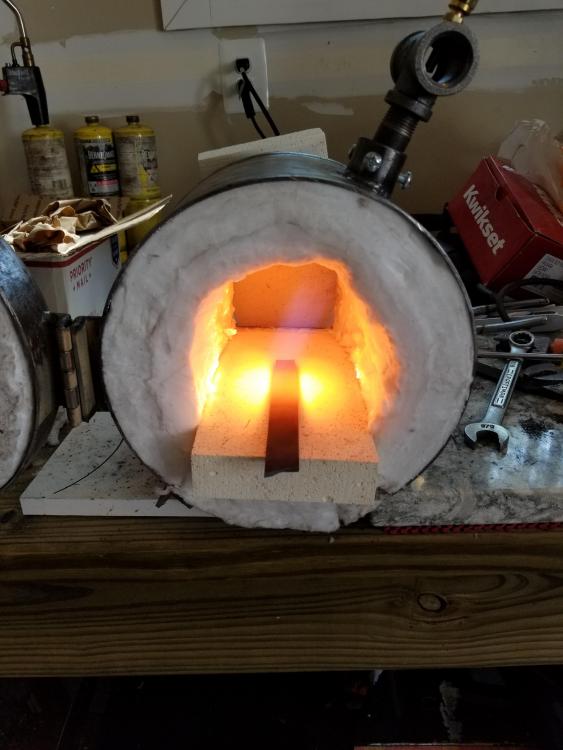
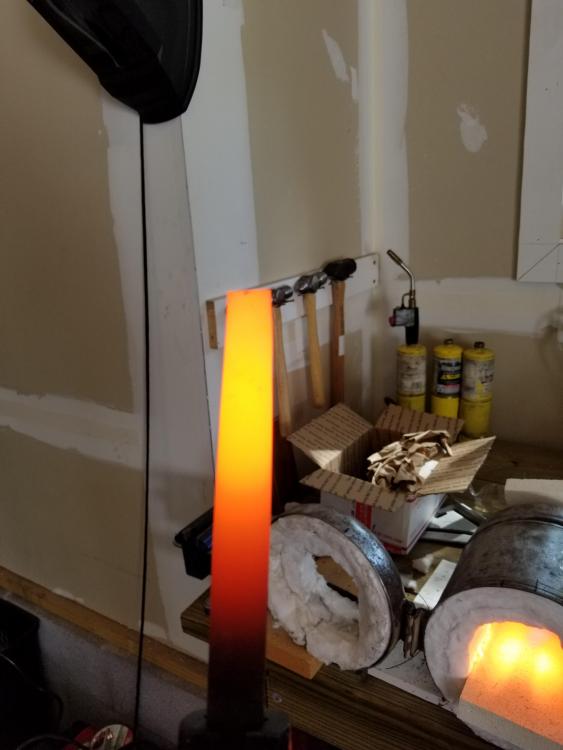
Yeah I think it's just too wet. Now that it's dryer it seems better. Takes a minute to get going but after a minute or so it's going better. The brick have me a good flat surface. I planned on covering the brick with the kast-o-lite and then a layer of plistix just like the kaowool. Just made a nice flat surface.
-
Need help first forge/burner build and trouble with burner
LiveWire replied to LiveWire's topic in Gas Forges
So I just got home from dinner with the Mrs' and it was significantly dryer from all my fiddling with it this afternoon. I fired it up and it' sputtering but working better. I think you guys may have solved my dilemma. Thats a great idea irondragon. Just may give that a try. Not gonna lie I was freaking out a bit. By the way... Frosty... your burner is fantastic. I made a 1/2" one and this thing is mean. I can only imagine what the 3/4 is like! Super excited to get started. Thanks a bunch guys. -
Need help first forge/burner build and trouble with burner
LiveWire replied to LiveWire's topic in Gas Forges
Ok. I was thinking it may be the moistire content in the air. Wool was still pretty damp. Applied the rigidizer 48hrs ago and this stuff takes forever to dry apparently. Im super anxious to start hammering so i thought id run the burner for a minute or two every hour to speed up the drying process today. I'll just let it sit and dry a couple more days. I see so often people are told not to modify the burners but frostys guide is for a 3/4. I made a 1/2". Thought maybe it was my design but I know it ran ok before? Thanks for the quick replies guys. Anxious newbie here. Can't wait to use this thing! -
Need help first forge/burner build and trouble with burner
LiveWire replied to LiveWire's topic in Gas Forges
Been messing with it for hours now. I can get it to keep a flame at next to no pressure just a candlelight intensity but as soon as I add gas it shuts off. I put a blowtorch in it to hold the flame cranked to 20psi and got it to keep but it's a tornado of fire and sounds irregular. First video is small flame and adding pressure it shuts off. Second video is 20psi to get it rolling then turned down to 10psi and it held but not nearly as nice as before. Do you think there's too much moisture in the air from the rigidizer? Air should be coming in from behind the mig tip right? 20170912_163216.mp4 20170912_163607.mp4 -
Need help first forge/burner build and trouble with burner
LiveWire replied to LiveWire's topic in Gas Forges
This was before rigidizer. Ran great. Now it won't even stay lit? VID_85950516_081248_775.mp4 -
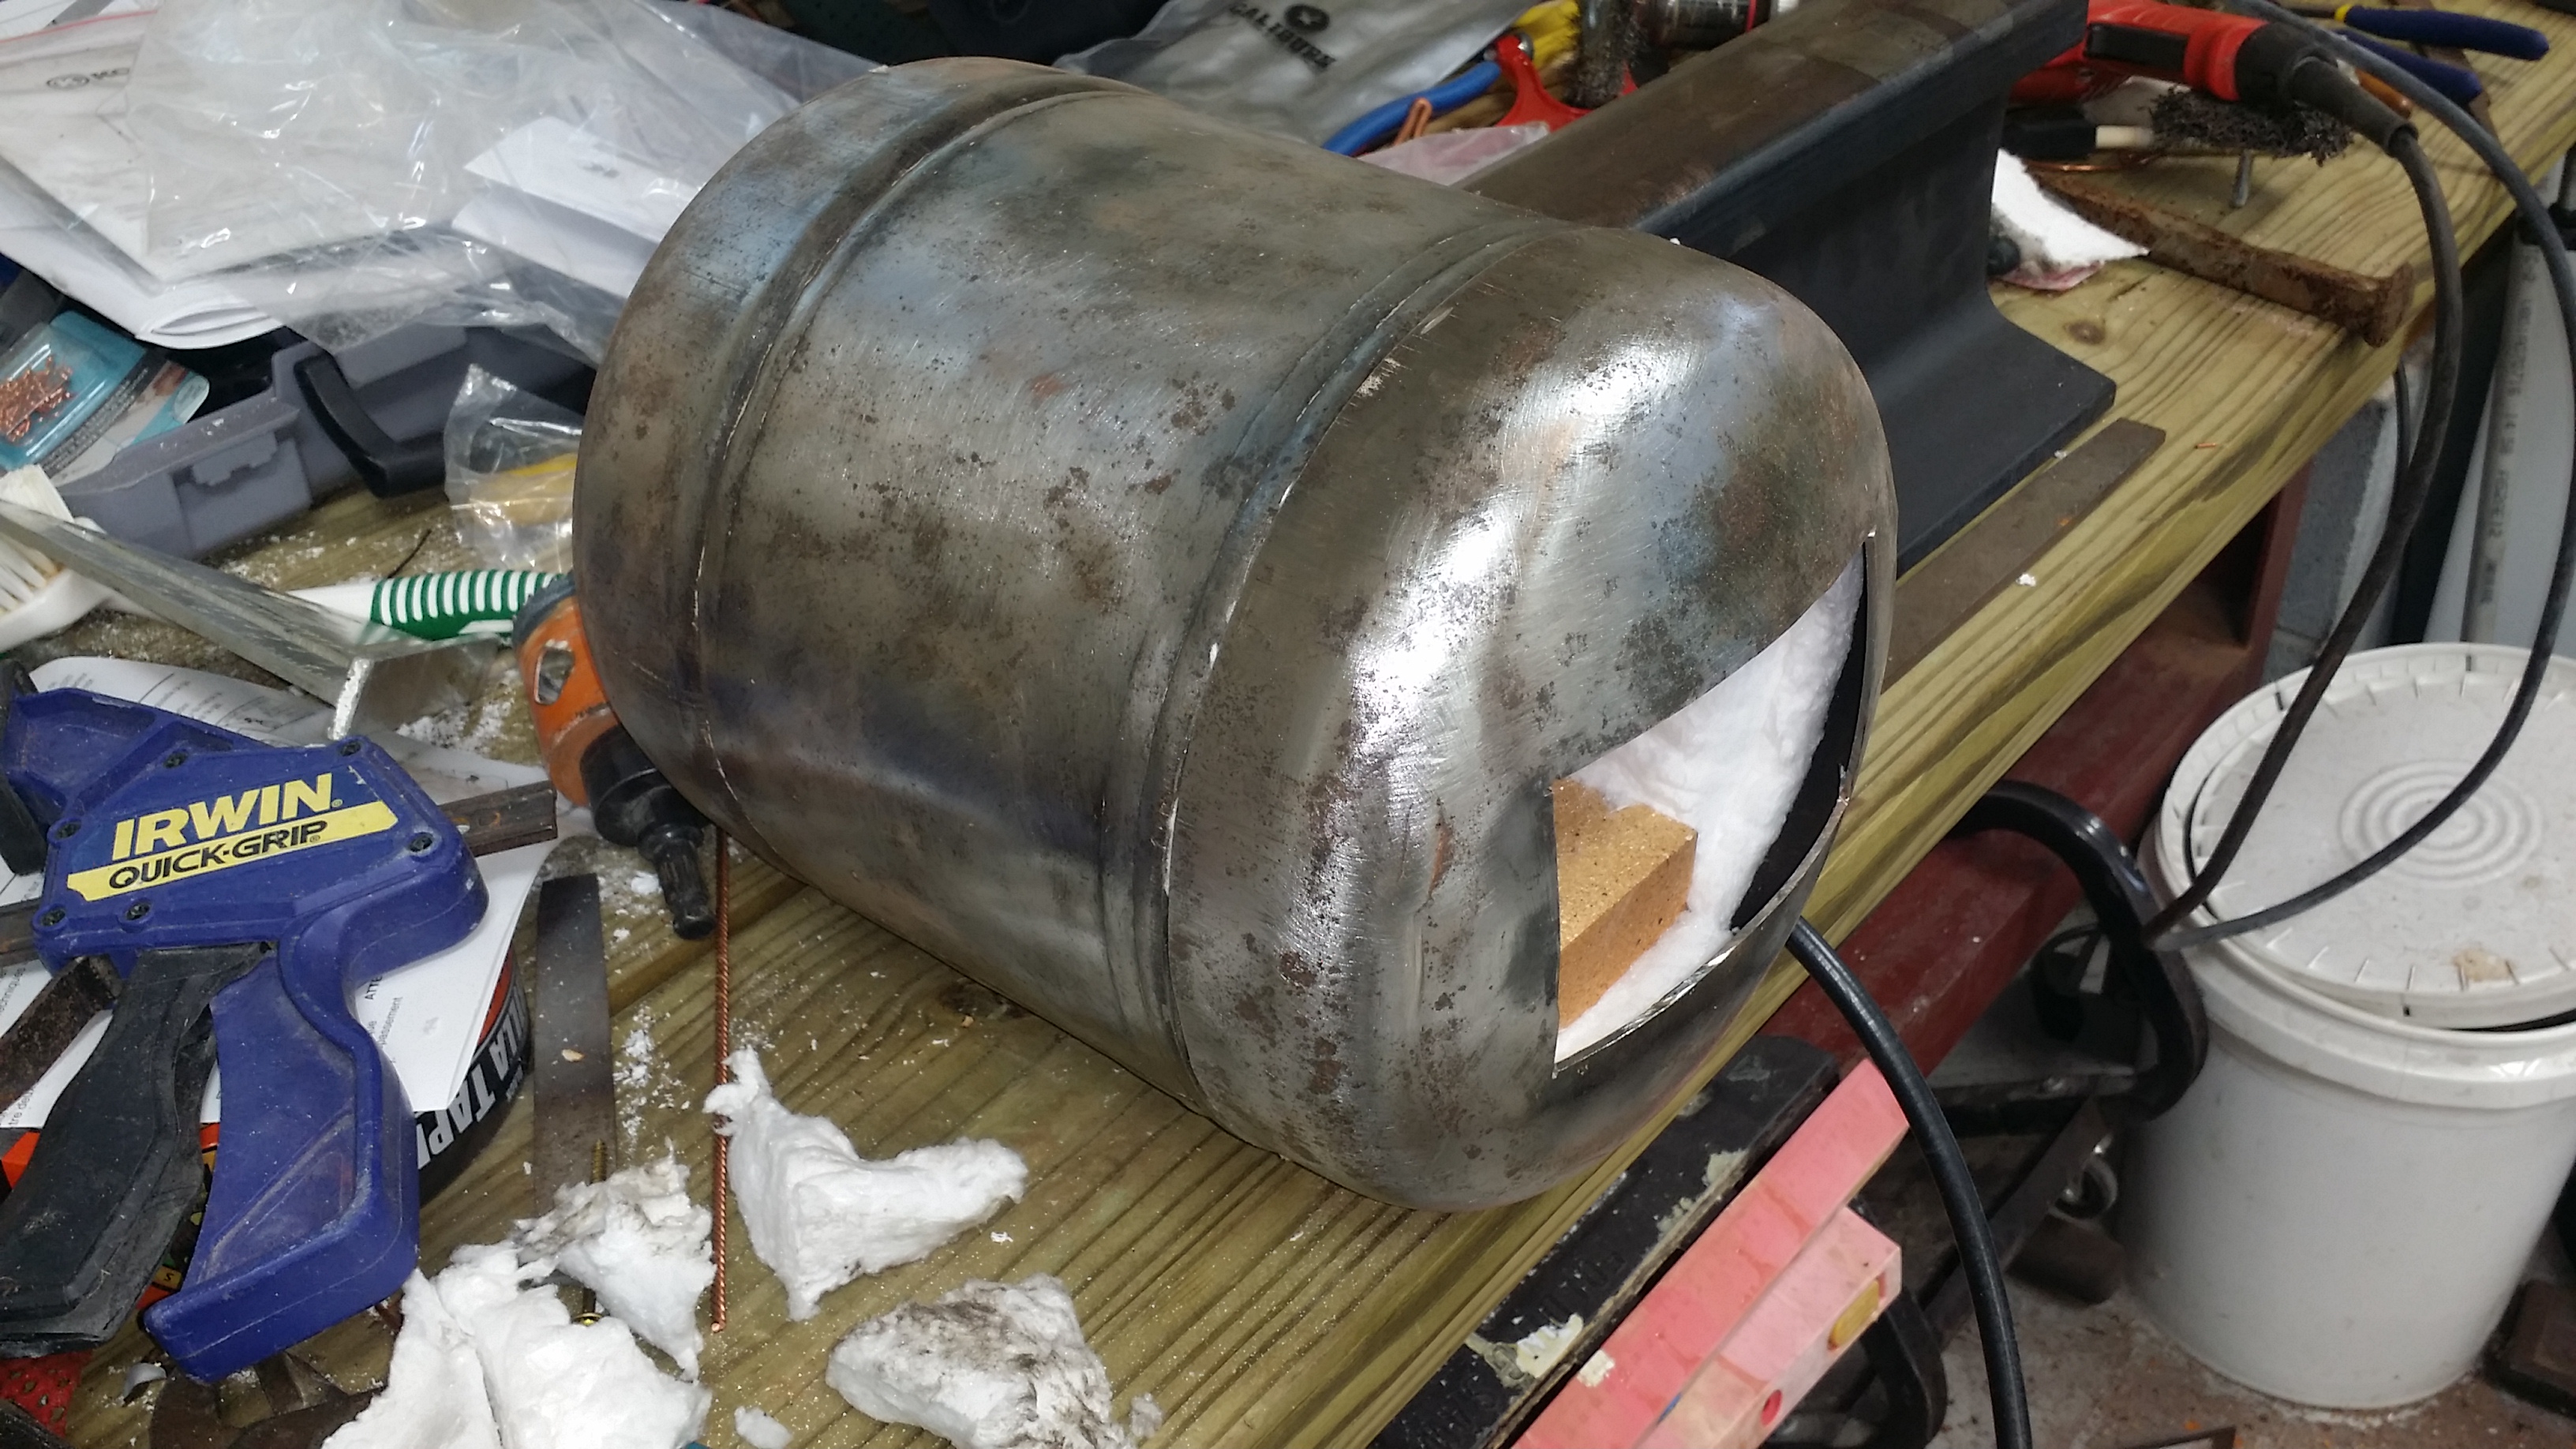
So I built my forge and I tested my Frosty burner out for a minute or two while I was just lined with kaowool and it ran beautifully. Consistent nice flame that heated my metal to temp in 2 minutes. Problem is I just got my rigidizer and the stuff to line the wool will hopefully be here soon. I pulled the burner off of the forge to rigidize the wool... put burner back in after it sat for 24 hours and went to fire it up to help try out and set the rigidizer. Now it won't stay running? Any ideas on what could cause that. I literally just loosened up the set screws and pulled the burner out. Didn't do anything else.
-
Tested my 1/2" frosty t today. I would say this seemed successful. Only ran it for 10min today for the test because I still haven't rigidized the wool and coated it yet. Waiting on supplies to arrive.

-
Curious as to how fragile is this stuff going to be as well. Especially with a thin coat. Much like a glaze I wonder how well itll hold up to pulling pieces in and out banging the edges or material dropping out of tongs etc. In theory it should be pretty hard but as we know sometimes the harder things are the easier they crack and chip.
-
Thanks Frosty, Yes... Master Electrician here. Maybe one day add Master smith to my list of accomplishments. Being new to the forum(about a week) I havent had time to read every post... yet. haha. So i wasnt sure if anyone else has attempted this process yet. I saw Maartens write up in one of the posts about the clay but figured he was just using what was available to him as an alternate to what we could get here. Mikey I think I will try seattle pottery supply. So in laymans terms it sounds like were basically "Glazing or Kiln washing" the rigidized kaowool? Mixing a small batch of VeergumT then adding it to a bucket zircomax or maybe adding the veergum to the zircomax then adding water. Should this be a trowel-able paste or more like a pourable self leveling texture that will "Glaze" the inside of the forge? Im not sure. Plus its a guessing game as to how much to buy of each medium? I am very interested in this process because it seems like the most effective final lining and thinnest thus keeping my forge area maximized for only a small blade forge from a 10lb propane tank. Unfortunately I am severely lacking in the knowledge on how to do this, I have no experience with this sort of thing. Mixtures and ratios are not my thing. Bending and moving metals I can do, I know enough about the chemistry and makeup certain metals and such for welding and forging by hands on experience and what ive been told, what ive tried and havent tried but this sort of chemistry and molecular binding agents and stuff I am a bit leery of. I dont want to waste too much money with trial and error on what was supposed to be my first crack at building a cheap effective and durable first forge. I firmly believe in do it once, do it right so Im willing to take your advice and give this a try. Sounds like you guys have really done your research and know your stuff. Like I said this is my first forge build. Got the tank for free so thats how I chose it. No other reason besides I wanted a small efficient forge. Read too many stories of guys building ridiculous huge forges wasting energy and fuel. I want something thats gonna be efficient and long lasting. Im hoping this being my first ever forge to be able to one day show my kids, "This was dads first forge and I still use it today" - 10+ years from now.
-
Sounds good. I am all about doing it right the first time but im having one problem... while all this is great knowledge on what I should use as the best setup where do you purchase the zircopax and the veegum T and how would I mix it? I feel like this is all way over my head... I want to start hitting things with a hammer but in the process I am finding that now I am trying to understand crystaline structure, binding agents, colloidial grade particles etc. I quickly looked at digital fires page and its tells me the same thing you said but im not finding a tutorial or guide on how to source/make this stuff. I dont mean to be a PITA but being this is the first time I have tried anything like this and I feel a bit lost. I do like knowing the science behind it as this definitely helps me understand what im doing but I guess I still need a bit of guidance on the best way/how to do it? Are there any threads of someone using this process yet?
-
This is why I asked. Thank you for the quick response Mikey! So correct me if im wrong, after re-reading the forges 101 would you recommenced not using the ITC-100 after rigidizing and instead use a zirconium silicate/veegum mixture for the outer surface and as you stated the Thermal ceramic brick in place of the cheap firebrick? Also on your recommendation im planning on installing a 1/2 "T" burner at about 2-3" from TDC (roughly 2 oclock) with 2 sets of set screws?
-
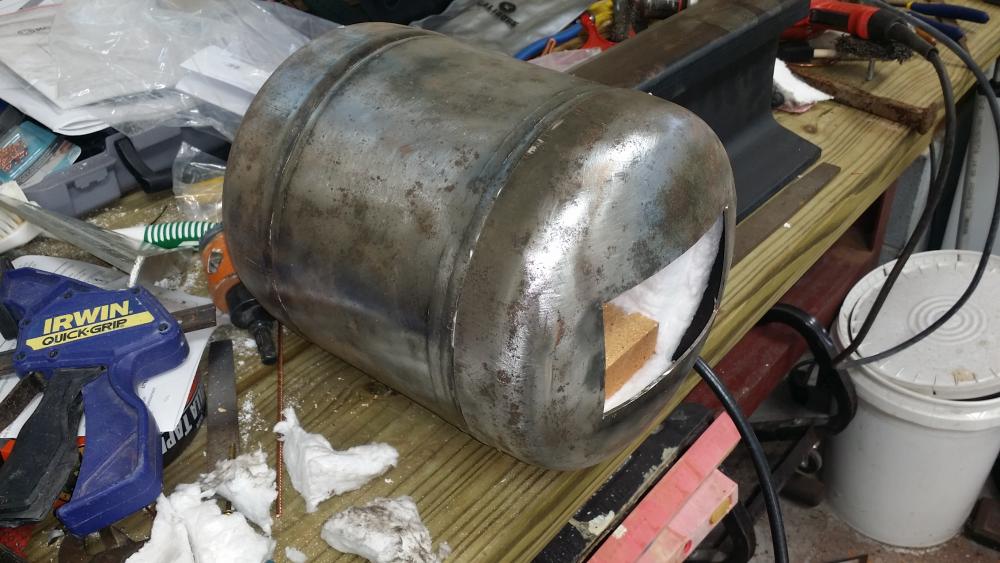
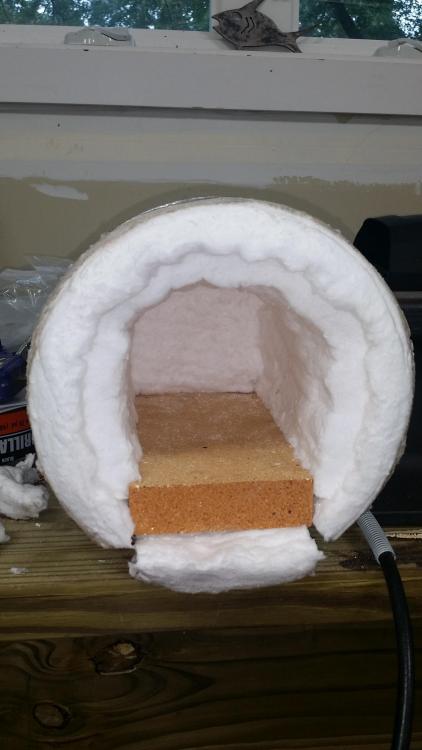
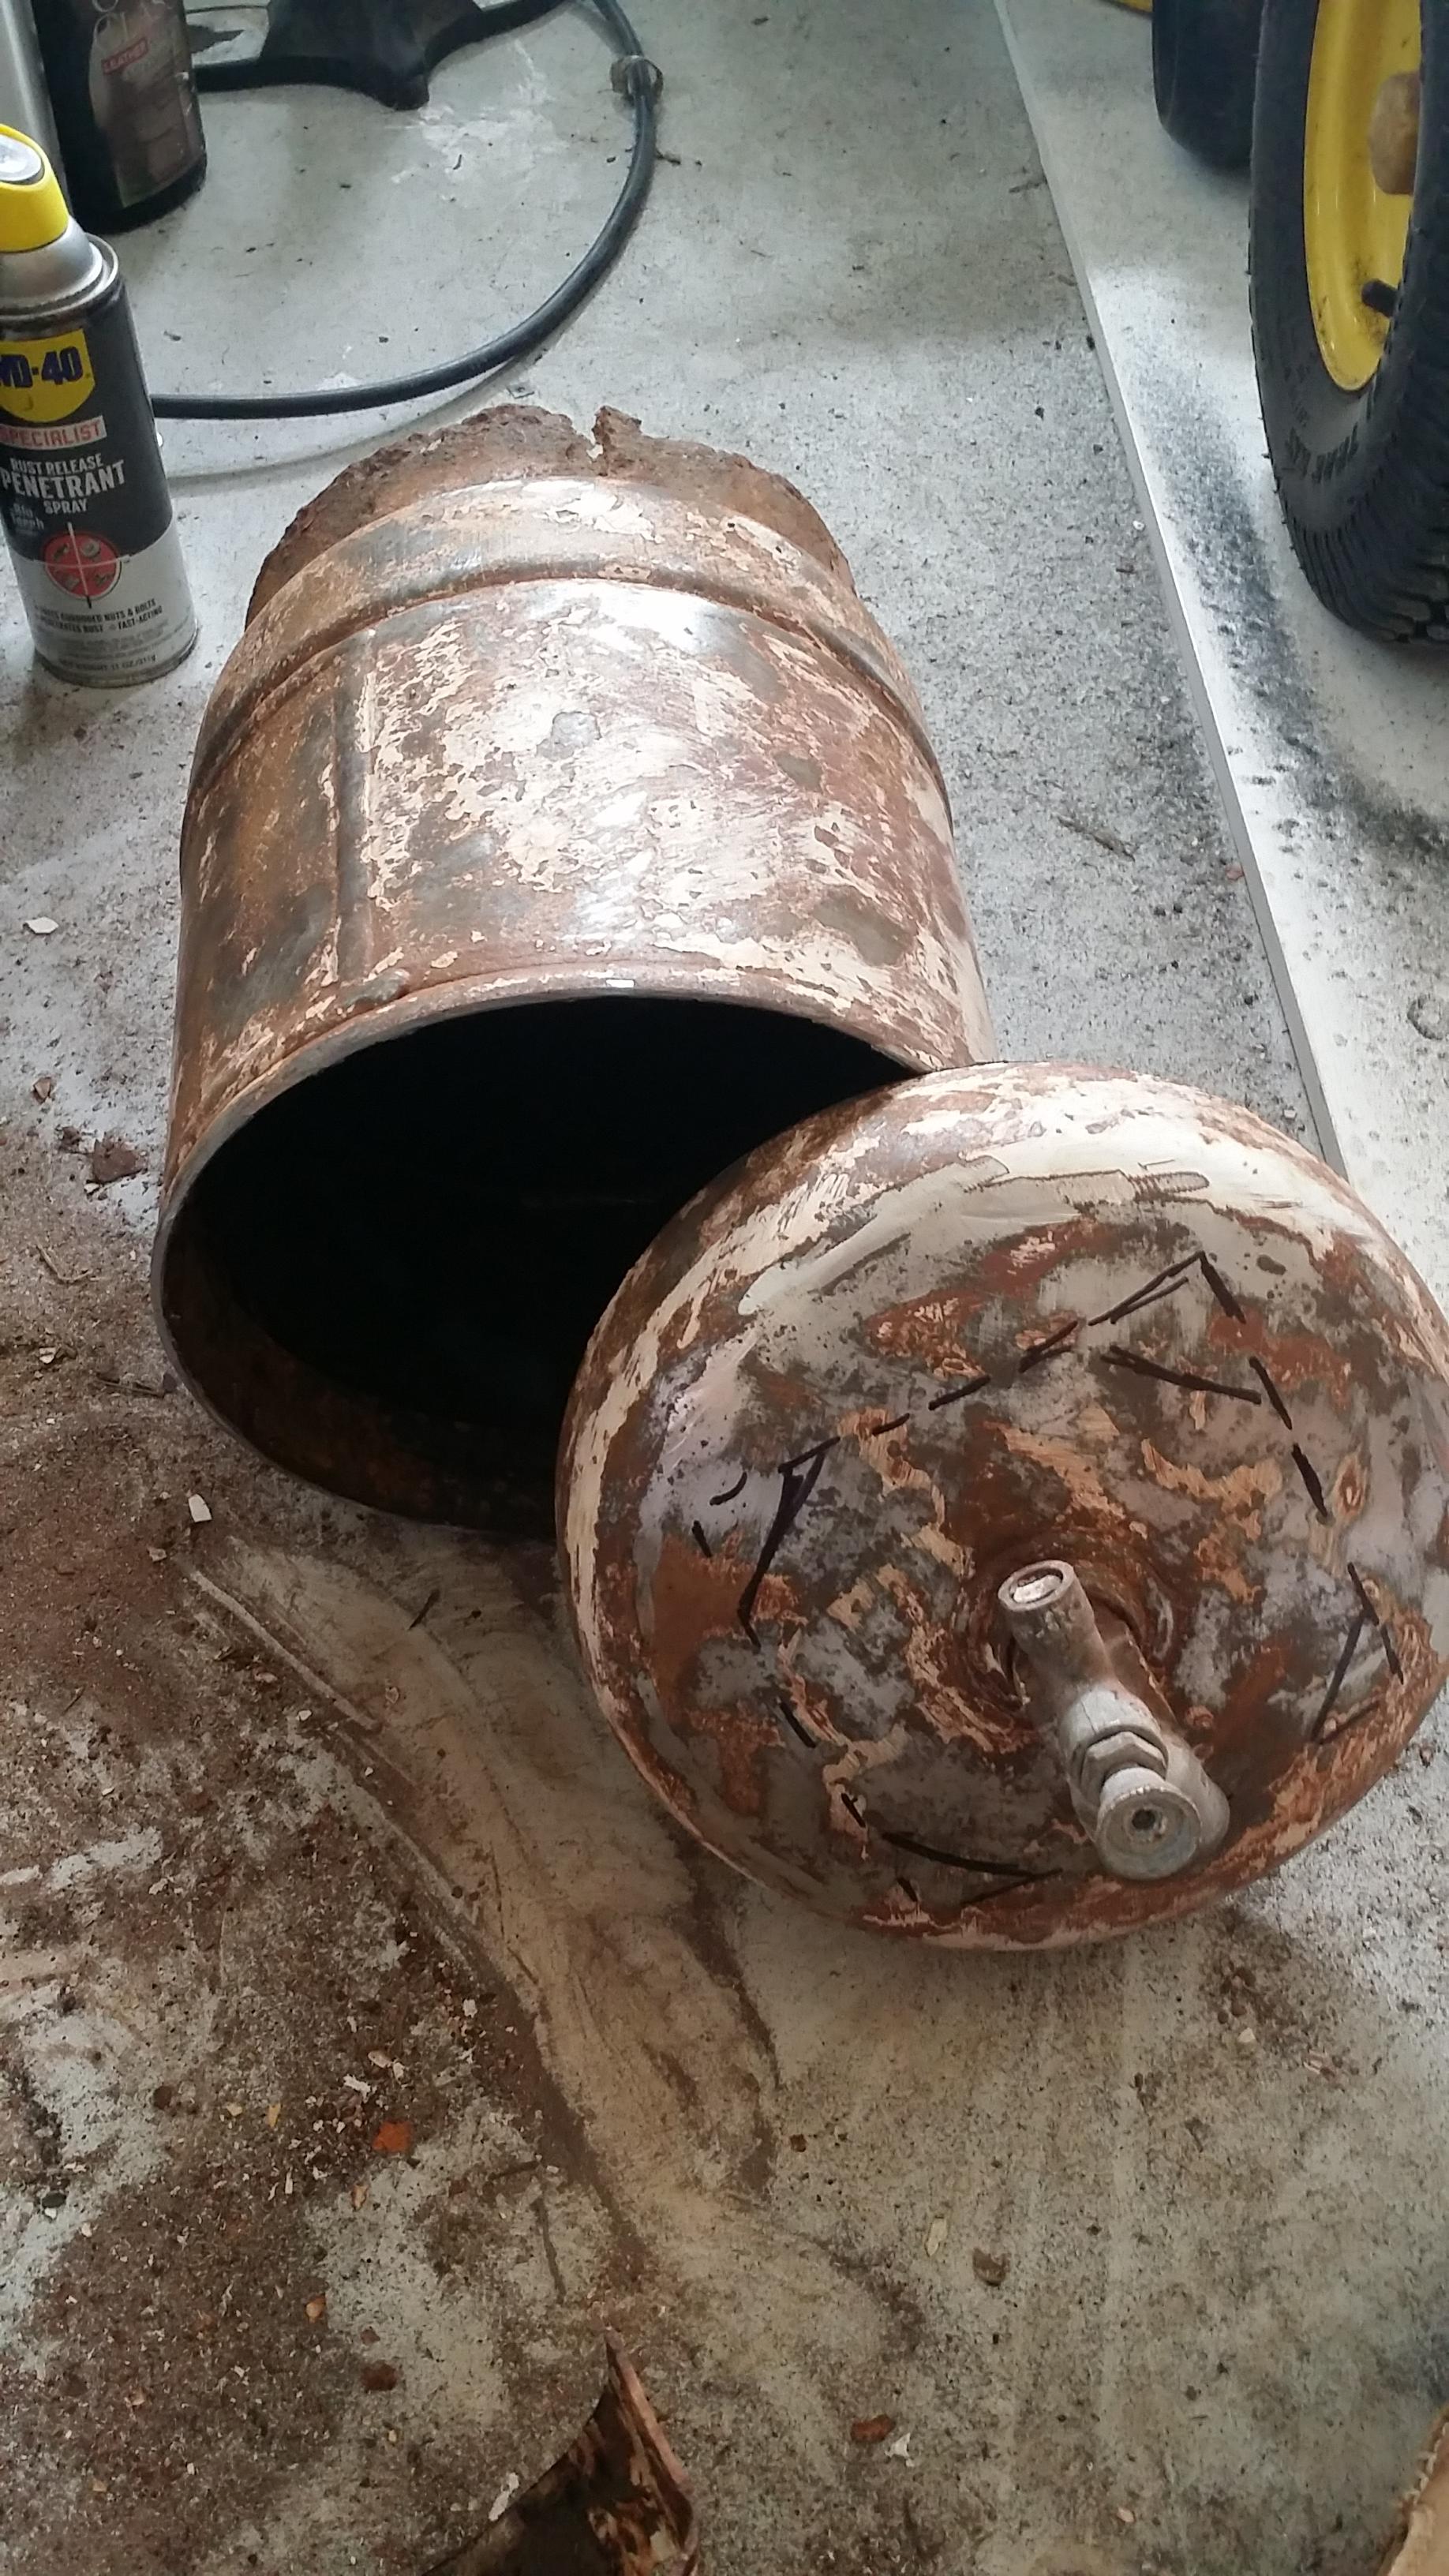
Hey guys new member here, first post. Just starting out in the trade and instead of buying a forge im one of those guys that likes to do things myself. Ive seen lots of articles and have been hovering on this forum for a while now and am pretty sure ive got it down but just looking for some advice before i finish the whole thing up. I have a small old steel 10lb propane tank that ill be using for my beginner forge. I have lined it with 2" of ceramic wool and am about to rigidize and htc the inside but before i did i figured id reach out for any advice. This will leave my inside dimensions about 4" tall by 8" deep. Im thinking this will be a good small efficient forge to begin the hobby with. My problem is with the burner size, ive seen some cubic inch to burner ratios but being such a small forge i dont want to over do it and melt my lining? What would you guys reccomend as a burner and any other advice would greatly be appreciated. Thanks! -Conor