Caleb Hale
-
Posts
24 -
Joined
-
Last visited
Content Type
Profiles
Forums
Articles
Gallery
Downloads
Events
Everything posted by Caleb Hale
-
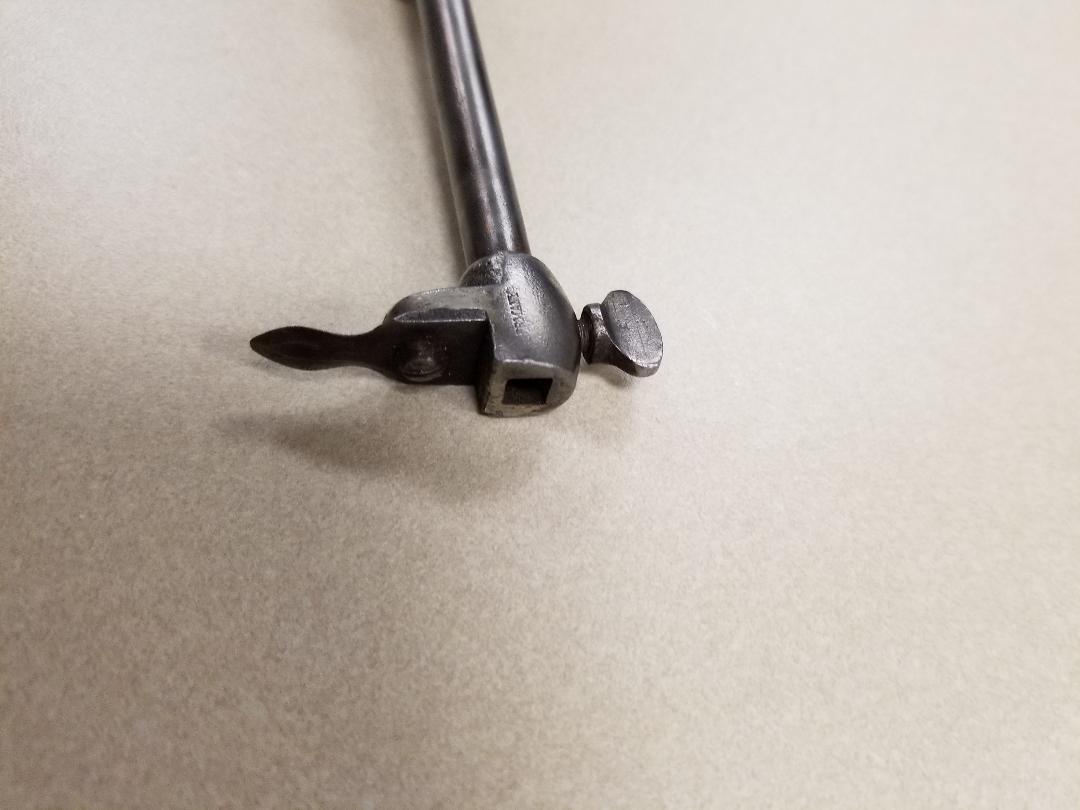
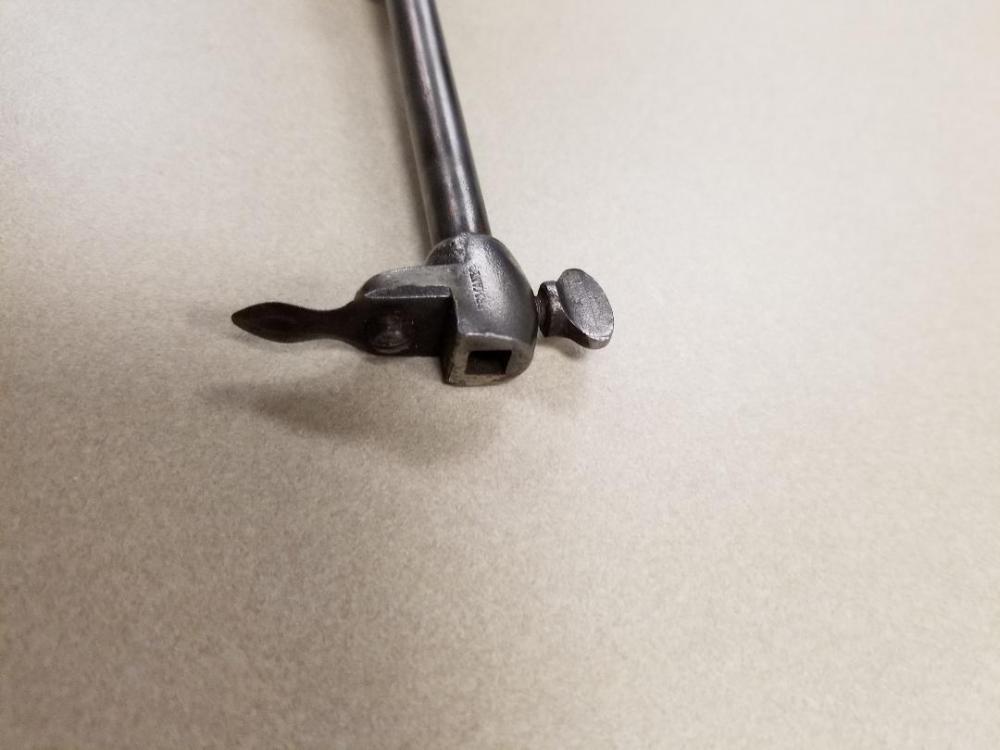
It looks like the stamp says "GERMANY".
-
Yeah it does resemble those slim molding paint scrapers. The hole in the top where something else connects is throwing me off though.
-
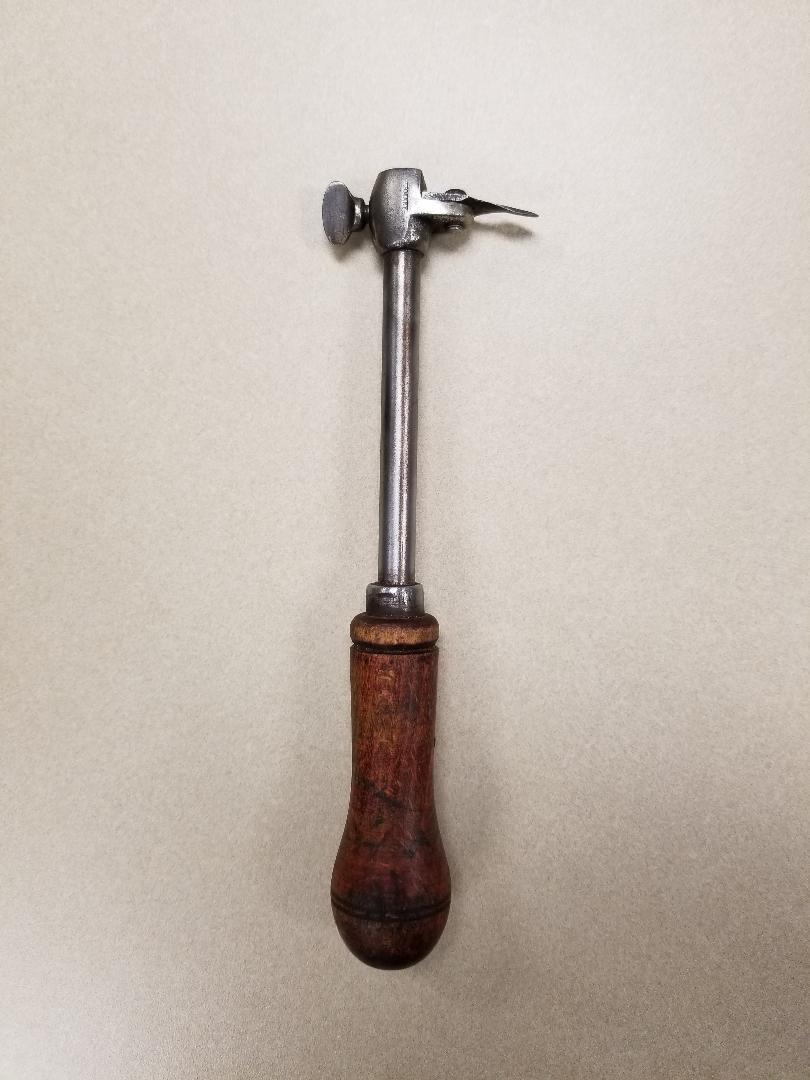
A guy at work brought this in and he has no clue what it is. I've never seen one, anybody here have an idea? That's a wingnut on the side that tightens down something else you slide into the hole on top. The pointy piece has beveled edge on both sides, and is a little twisted (not sure if that's on purpose or not). Overall it's pretty small, about 7-8 inches long.

-
No they haven't been tempered at all. The last two were straight stock removal. They got hot enough in a couple of spots to turn blue/purple before I'd dunk it, but nothing near forging temp. Unfortunately I just have a cheapish belt sander, so no speed control. But dragging the tip across and off the edge of the platen with some pressure...I was consciously trying to do that to get the bevel to follow the curve of the blade. Started realizing toward the end of this last one that it wasn't really needed. I'll try it as you've described next time with stopping the tip in the middle. Thanks for the tips! (<- haha pun!)
-
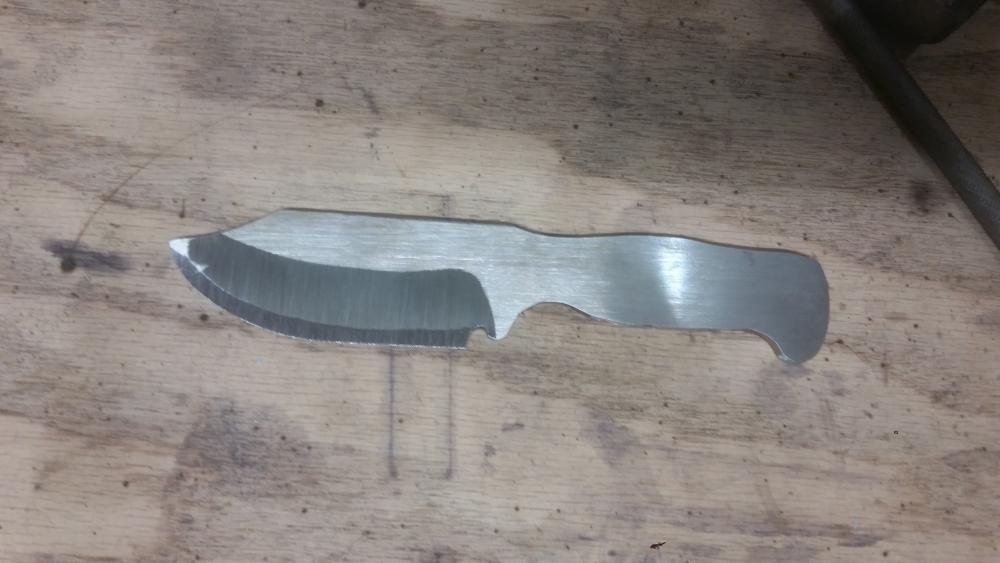
So I'm getting better at grinding in my bevels. I still need to work on getting them parallel to the spine, probably just need to be a little smoother and consistent... ...but I keep breaking the tip off once the metal at the front starts to get thin. Three times in a row now Is that just a matter of dunking it more often to keep it cool or what? I'm using a jig to grind so I let it get pretty hot before I dunk. Thanks for lookin'!
-
What did you do in the shop today?
Caleb Hale replied to Mark Ling's topic in Blacksmithing, General Discussion
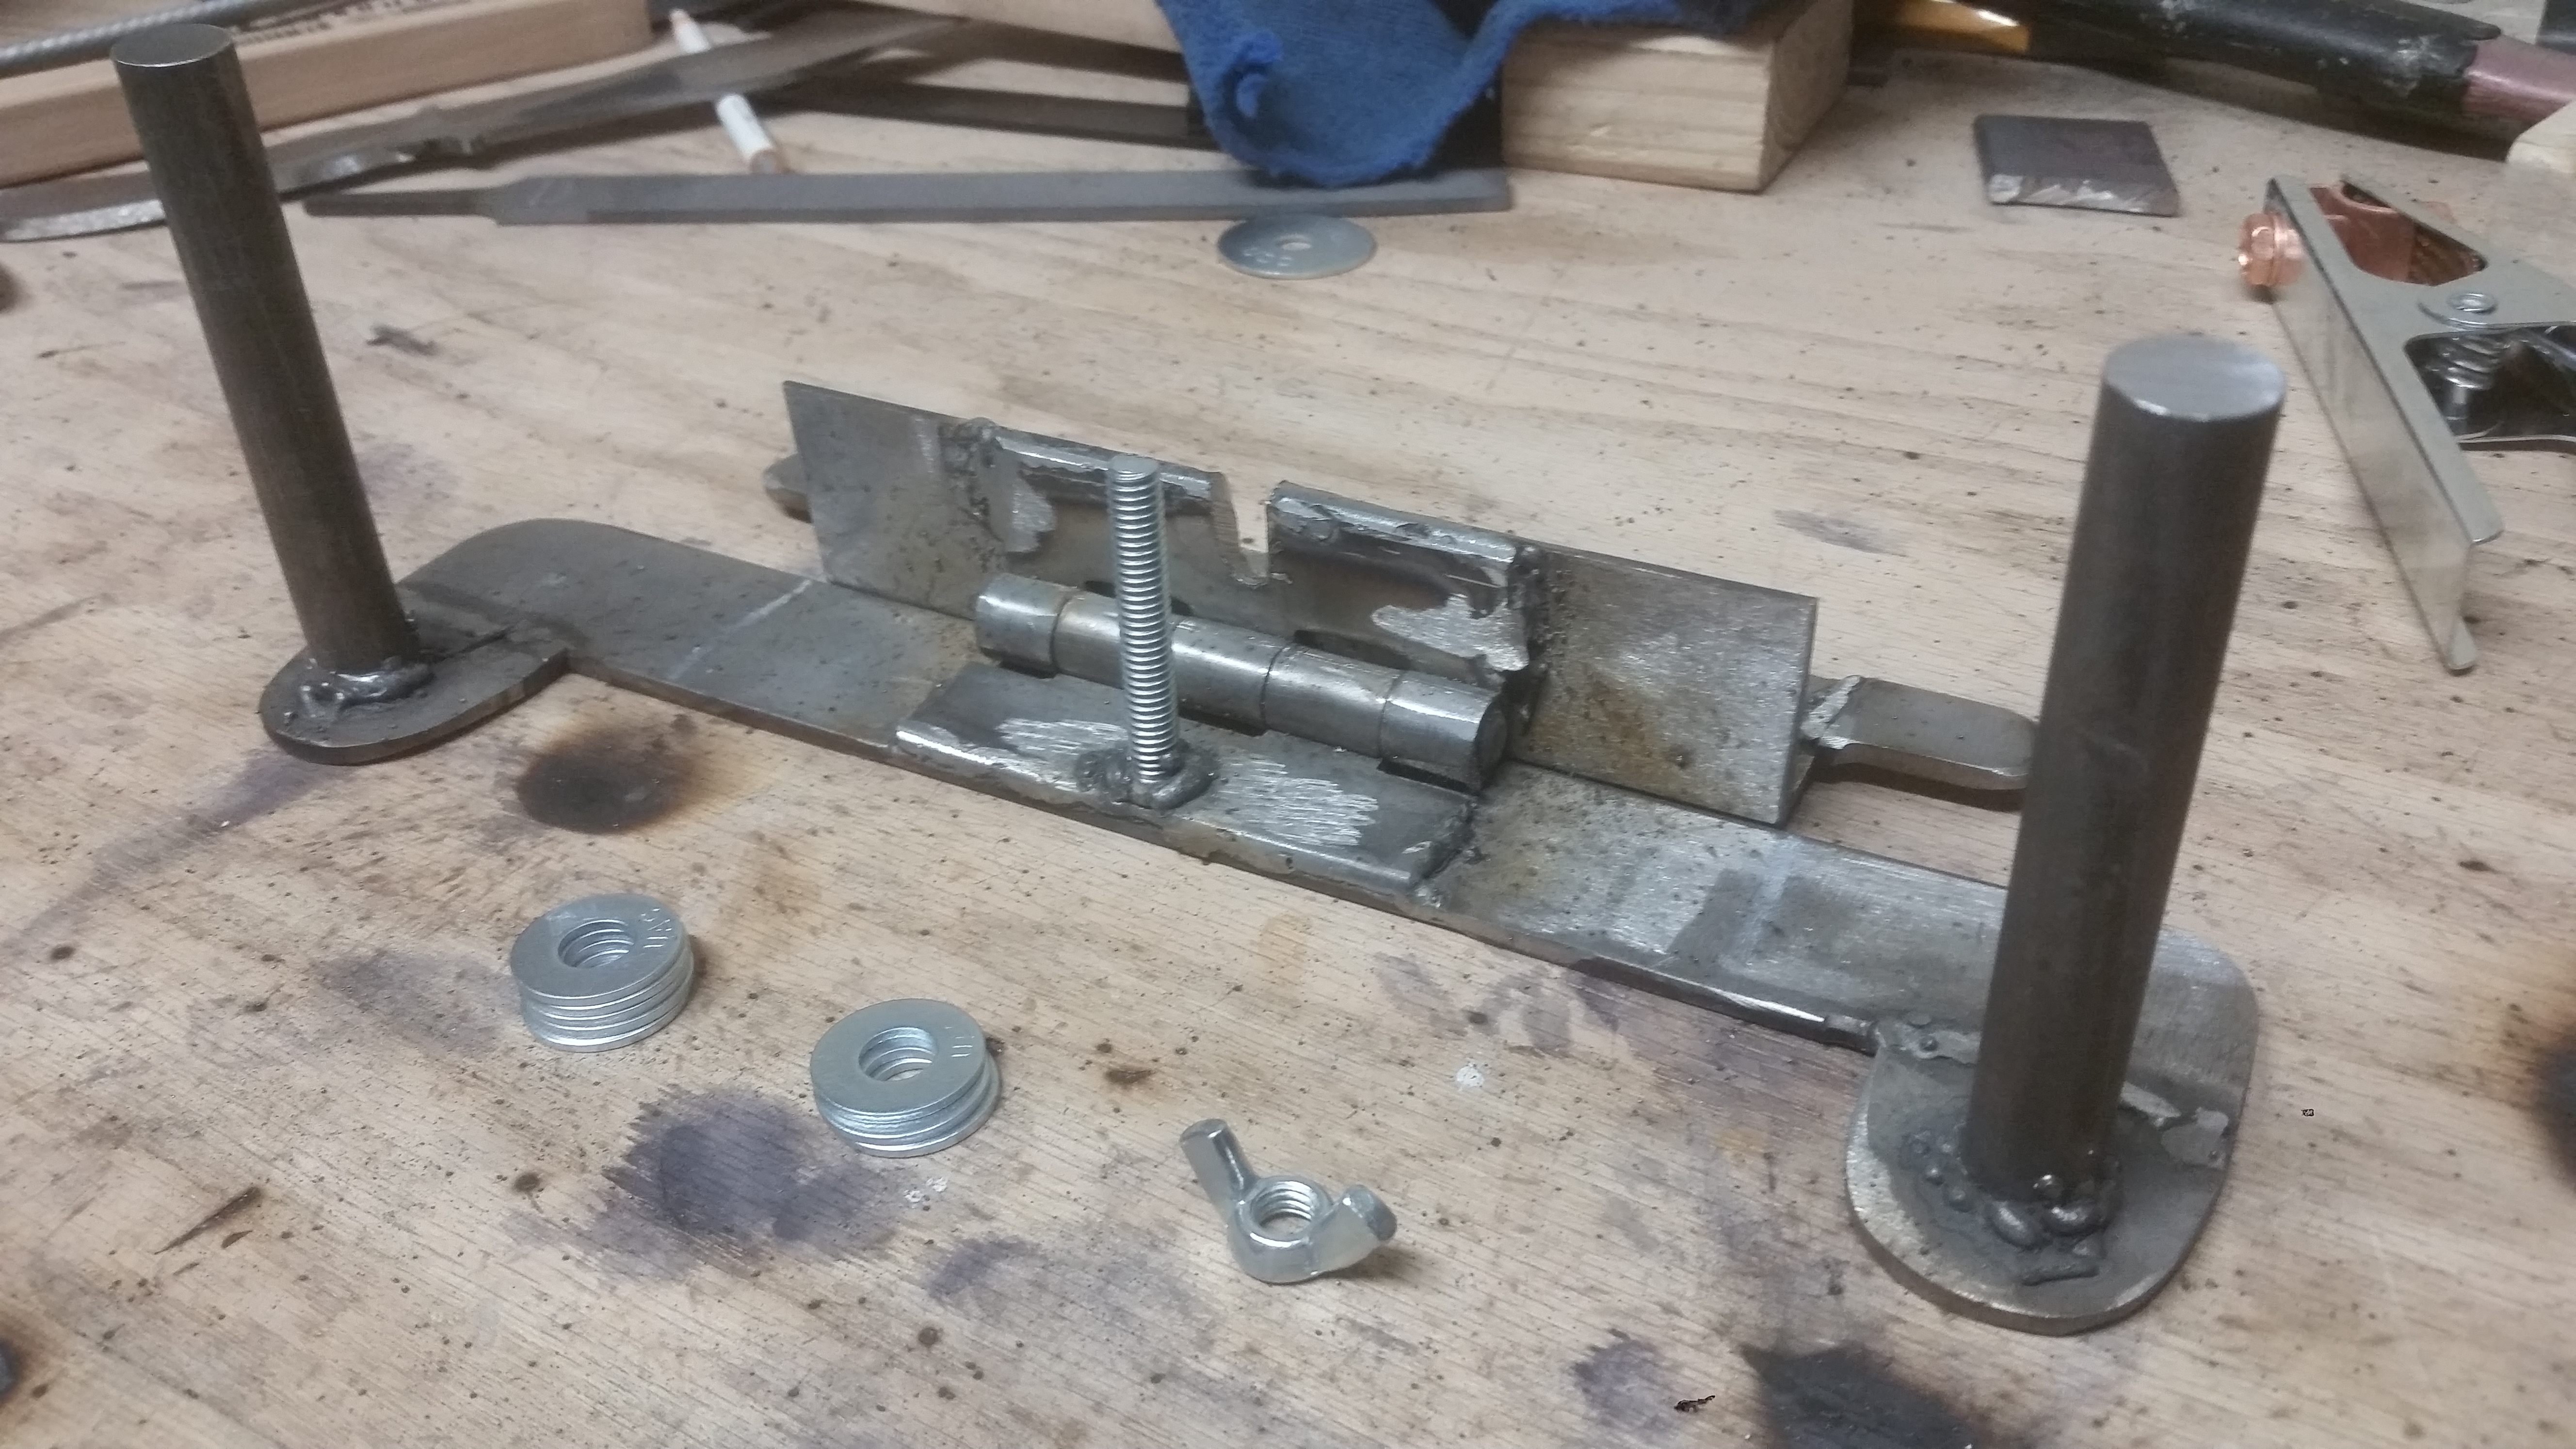
I gave up on freehand grinding after several failed attempts and made myself a knife grinding jig: Now I just need to make another knife to test it. This was also the first time I've welded anything. Kinda fun...looking forward to practicing more of that.
-
Anvil stand construction
Caleb Hale replied to Caleb.B's topic in Anvils, Swage Blocks, and Mandrels
Mine is made from 12 pressure treated 4x4's connected together with 3/8" all-thread rod. It was pretty easy to do...total cost is around $30. -
I was a bit shocked when I saw how much a damascus billet goes for, but you can buy Chad Nichols' billets online here: http://www.texasknife.com/vcom/index.php?cPath=1022
-
Thanks man! Yeah I think I was scared to hit it real hard the first few times...wasn't moving much metal. That first tong took like 4 hours or so, second one probably only about 2 hours. I'd say a tank last me 5-6 hours using a dual burner setup. Thank a lot man I appreciate it!
-
I'm with you on the 2x72 grinder. I can't wait, but I have to because I haven't learned how to weld yet. As soon as I get some welding skills the grinder will be my first big project I have planned. My little 4x36 is ok but I go through belts really fast and it heats my work (and fingers) up pretty quickly as well. I've checked out the HABA website in the past but not lately...I'll go check it out again and sign up. That is a BC Rich. Right next to my Randall half stack (big Pantera fan) that plays metal while I work on metal!
-
Thanks for the info, and the vivid descriptions! Apologies for not searching beforehand. I'm rather attached to my fingers and skin (pun intended) so I'll have to start getting used to going gloveless as much as possible.
-
So yeah, this is the show that pushed me over the edge to try blacksmithing. I had always been interested but I thought it required a huge forge and all kinds of crazy expensive tools, but once I started seeing the other people's home setups I figured I could do that too. Anyway, I was rewatching a few episodes recently since I've started smithing on my own, and I'm picking up and noticing a lot of things that I wouldn't have even known about before. But one question I still have is why do blacksmiths not like wearing gloves when working? Am I missing something important by not having the steel touch my skin or is it all just preference? If I don't wear gloves all of my fingertips would be burned and my knuckles would look like hamburger from the belt grinder.
-
What did you do in the shop today?
Caleb Hale replied to Mark Ling's topic in Blacksmithing, General Discussion
I made my first knife-shaped object today. I only say that because it's just some unhardenable mild steel. It will be pretty useless and was mainly just for practice. I found out my bevel grinding skills are...hmm...severely lacking. Left-handed grinding I did ok... ...but right-handed grinding was a disaster (I had a low spot in the blade and couldn't get it out, just kept looking worse and worse) It all come out pretty centered though It's fairly comfortable in the hand And it cuts very well. -
I came out Saturday afternoon. The only person I met was a guy named James who owns Texas Farrier Supply out of Fort Worth...he was setup right in the front where most of the anvils were. It was just pure luck that when I bought my anvil/forge online he emailed me back that he would be at that show and if I wanted to meet and pick it up in person to not have to worry about shipping costs. I did see some really nice hammers there. I actually went with the intention of buying one, but my jaw dropped a bit when I saw the prices. Then James recommended I start out with a cheap hammer anyway to see how heavy I like it before I spent a lot of money...that was probably good advice.
-
Awesome thanks for the offer! I was actually out near Bryan a couple of weeks ago at a demo at Steephollow Forgeworks where I picked up my forge and anvil. It's only about an hour drive for me.
-
Thanks JHCC that's some good info on dressing the edges. I think I'll go the route of hand filing a radius as the need arises, like what Daswulf suggested.
-
Can't take any new ones right now, but in the last photo you can see the edge of my anvil pretty well. It's got a pretty sharp right angle to it all the way around like that. I've seen some posts about "dressing" an anvil, but grinding down the edge to a radius makes me nervous.
-
Bolster plate, thanks! I need to make some modifications to my bolster plate for the next time I pin some tongs. Agreed! It would have been a lot easier if I didn't have to make a matching pair. I struggled with making any radius at all because my anvil is new. Should I think about dressing the edges myself or just let it wear down on it's own? I wanted to round the entire reins but I was worried about drawing the material out too thin, so I just did the handles. Thanks for the kind words everyone!
-
Thank you sir! I punched and drifted the holes. Ruined my punch by not quenching it often enough and dulled the point severely.
-
Preface: Sorry to those who object to the idea of tongs being someone's first project. I didn't start reading here until I had already planned and started this adventure So I've been at this whole blacksmithing thing for about 3 weeks now, I'm definitely hooked. I just had to steal the propane tank from my barbecue pit to finish heating the pin for these tongs, so yeah. I started off pretty slow because well, my arm was just a limp noodle after a few hits...I'm much better now. This is actually my second attempt at tongs, the first ones I abandoned very early on, after my first day of forging, when I realized I didn't have enough metal in the boss. These are made out of whatever the low grade steel bars are they sell at the big name hardware stores - 1" x 1/4" x 3' flat bar (I read that it's A36 steel from an unofficial source). The pivot pin is the same steel - 1/4" round bar. I used 2 whole cans of propane while forging them / learning to forge...that was a bit of a shocker how fast it goes, but I know I'm wasting quite a bit right now. All good. Anyway I'm pretty proud of how they turned out, and they seem like they will do the job intended. The real test will be when I actually hammer on hot metal while gripping it with them I suppose. They've got good motion to them and are comfortable when I'm gripping the intended steel. Most importantly it was a completely awesome experience and I can't wait to make more stuff. Picture time... Everything is pretty much in-line and on-center. Overall 25" length. I rounded the handles as much as I could by hand. Front profile view...sorry so dark. LED lighting for my workspace is on the to-do list. Rear profile This is the first side of the pin I hammered on. It started to fall off to one side as I was hammering...I recovered a little bit. The pivot hole is actually centered in the boss. I punched as big a hole as I could in a piece of 3/16" flat bar and set it under the boss with the pin in it for my first few strikes (not sure what the technical name for something like that is, swage block?). It kinda worked, not as well as planned (needed to double the thickness of my swage block or whatever it's called) but I do have 1-2mm of pretty thick overlap all around the pivot hole on the other side. Notice the hole actually is centered from this side... This is the knife stock they will be holding for me. They have a nice, firm grip on the material. They feel springy in my hand when I grip tight. Banged it around on the anvil a few times...didn't budge. All comments and criticism welcome! And thanks for reading this far!
-
Great point, I'll move the fire extinguisher to a more logical location! I must have gotten confused by looking at the welders that are MIG and flux core capable...just assumed it was basically the same thing. I really didn't want to have to deal with any bottles of gas which is why I went purely with the flux core machine. I was probably a bit too hasty in the welder purchase, but I'm sure it'll get some use. No worries about being pedantic, I appreciate it. I like to get the details correct myself!
-
Yeah I thought about trying to sell/trade or maybe even use the parts from this one to build one that better suits my needs. I always have a box fan blowing air out of the garage while I'm forging, been wondering if that was enough ventilation. I'll have to get a CO meter to put out in my garage. The welder is mainly for welding handles on the bar stock I'm working with so I don't have to fiddle with tongs the whole time, as well as making hardy tools (welding the shank to the tool). Also I'll need it to weld up stacks of steel for damascus billets eventually. I'm not trying to build any metal structures any time soon. I wanted to go with a 220v stick welder, but I don't have any outlets in my house that provide enough amps, so I just went with the cheapest 110v they had. In my mind it's just temporary until I can get something with more capabilities...and have a proper outlet installed. Thanks!
-
Done...I'm in northwest Houston, TX but it doesn't want to update this post. I'll have to look into possibly modifying my forge, thanks! Yeah, computers and heat don't mix. It's really just an mp3 player so not too worried about destroying it. Thanks!
-
Hey everyone! I've just picked up the hobby and started acquiring tools a couple of weeks ago. My focus will be knife-making. Here's what I'm currently working with: Workbench - 6' x 2' - designed and built this myself out of 2x4s with a 3/4" Red Oak plywood top...thing is sturdy as a boulder. Future plans include adding some shelves and storage areas, possibly drawers. Anvil - 100# from Texas Farrier Supply I built the stand out of pressure treated 4x4s with 3/8" all-thread rod to connect them all together. The anvil isn't fastened to the stand, just held in place by the two pieces of plywood on either side. The red magnet on the end of the horn there deadens all the ring. The garage door is always open when I have the forge going for ventilation. There's a sheet of plywood behind me when I work because the wife is scared of sparks flying everywhere. Forge - 2 burner propane farrier's forge. I should have done more research before I bought it. The side entry is problematic for the metal stock I'm working with and generally I'm only able to utilize 1 of the burners. My belt sander is there on the right as well. I just bought a cheap one to get me by until I decide this is really for me, and then purchase something more substantial or possibly build my own 2x72 grinder. Welder - I've never welded before. I've had this machine for about a week now, but haven't tried it yet. It's been taunting me every day...maybe tonight I'll give it a shot. It's a flux core only MIG welder. And of course, an easily accessible fire extinguisher. You can also see a blurry bit of my first forging project on the workbench. Tongs! My drill press is on a truck to be delivered any day now, then I'll have all the basics I need. Let me know if anyone sees any safety hazards or something stupid I've done in the pics please! Thanks all!