
Bob JS
-
Posts
196 -
Joined
-
Last visited
Content Type
Profiles
Forums
Articles
Gallery
Downloads
Events
Everything posted by Bob JS
-
Would look good at the front of a wine shop or a restaurant to promote whatever special wine they are stocking. Im sure you already tested and thought about this in your design but It did remind me of a 5 guitar stand I own, which works great untill you take more than one guitar off the wrong end and it falls over I do have a preference towards textured metal, I also think the next one would benefit from having more bottles. Just seems like a lot of iron and space for just 3. Well done, I like the wraps and twists.
-
Thanks Wayne, I will check to see if my local Boots has it next time I go in to town. I bought 1.2kg with postage it cost me
-
Ive made folded tin containers air tight using silicone sealant, run a fillet round all the seams with a finger. Or you could use fibreglass. Unless it was leaking badly I would probably use clay - quick easy and harmless.
-
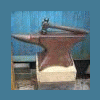
I wonder if the anvil has become very rusted and pitted at some point, and what you are seeing is the surface after it has been wire brushed? That or maybe it has been used for lots of sheet metal work and is coved in small dimples and dents? I have worked on an anvil that was used to make a lot of flowers, and when I looked carefully it had many dimples from ball peins.
-
Thanks everyone for all the good advice and support. I had another go yesterday, I used a big rusty wrought nail. I wasnt really making anything but wanted to test out a new punch and try welding again. The phone rang just after the weld, so I had to shut everything down to deal with that -result was a cold lump of iron covered in scale and crusty flux. Gave it a quick going over with a file to examine the weld - I was very pleased to see solid iron emerge through the slag. Ok, nothing pretty but makes a very serviceable keyring. I got the borax from ebay - one of those natural 100% borax products, probably with an eco friendly price mark up. Frothed up but seemed to melt ok. The process Im using is: Prep surfaces, heat to light red, wire brush the scale off and apply flux while iron is still red, bung it in the fire, crank up the air untill I see white light then shut it down to tick over, I then waited untill I could smell the flux, watched for and counted a couple of sparks, bring it out knock it on the anvil then give it a couple of positive but light blows then lots of small taps (like planishing) with a 1lb hammer. (this is based on reading through lots of 'how to forge weld' material, they all seem slightly different) Am I on the right tracks with this process? How could I improve? Thanks again. Bob
-
Selling/ shipping heavy stuff
Bob JS replied to Ferrous Beuler's topic in Anvils, Swage Blocks, and Mandrels
I would just sell it under the condition that the buyer aranges all transport, let them worry about all that stuff (they will probably aready have it figured out in their mind by the time they make you an offer anyway) -
Well the postman finally delivered the box of borax I ordered, so I thought i'd give forge welding a try. First I tried to weld some rebar. I thought I had a weld first time but it was too good to be true and came apart when I tested it. Looking back I forgot to rotate the work in the fire and I dont think I got both parts hot enough. Had more sucess with some 3/16 mild and made an eye on the end of a rod. There was pause in welding here as I forged a rudimentary bick to refine the eye (too small for my blunt anvil horn). The ring did not go as smoothly and I had to weld it in three sections, unfortunately burning it up a little. Had a lot of fun, and learned a lot. ps. Ive got the Lorelei Sims book which details forge welding with coal by forming crusts and caves etc - does anyone have any additional advice on forgewelding, particularly with pure coke?? Thanks
-
Lets have a look then. Photos please.
-
Which could possibly be replaced by angle iron and tapping holes (or even nuts and bolts if you dont even have taps and dies) Where there is a will there is a way - its not always about having enough money to buy the perfect tools.
-
how about a stepped shank - small bottom half and bigger top half. You would then need to make a steel plate (like a square washer) that fits the smaller shank diameter and provides a nice big shoulder so as not to damage the anvil. (if difference in shank width is small and hardy is well chamfered it might jam) You would have to check this idea out with a more experienced smith first. Heres a quick sketch.
-
I have seen some very easy to make hot cut hardys - a piece of angle iron with a filed or ground edge and a shank (or diagonal bar) fixed to the bottom (weld/tennon/thread etc) I am planning on making one tomorrow - so will be keeping an eye on this thread with interest
-
If you bought a new anvil you would need to grind some of the crisp edges off anyway - I wouldnt want to start grinding on something new or expensive untill I am certain I know what I want in an anvil. Best thing to do is go and view the anvil first, then you can run your hands over it and look for usefull features, such bits of OK edge, big chips you can grind out to make larger radii, a slight dish in the face is usefull for gentle curves and straightening stock. One way of looking at it is the more 'interesting features' an old anvil has the fewer additional tools, swage blocks etc you will need as a beginner. - at least thats my theory.
-
Now those are safety boots!
-
Hammers in the UK - supplier?
Bob JS replied to LLoegrfach's topic in Blacksmithing, General Discussion
There always seems to be some ball peins floating around at the boot sales in my area - usually only -
Finally a little success
Bob JS replied to Steve McCarthy's topic in Blacksmithing, General Discussion
I like the way you have decided to texture the cross, but kept the twisted area clean with the chisel cuts making a nice boundry. I would be really proud of that. Next project: make something big enough to justify using that grumman as a slack tub. :) -
good functional ironwork, cant fault that. Actually a bolt/latch is on my list of projects (since someone decided to 'liberate' some of my scrap.) What technique did you use for the bent pieces? I have read up on 3 different techniques for forming these - and comments or advice based on your experience? Thanks Bob
-
thats very cool. I want one! I imagine a really easy way to adjust for different a thickness of material would be to have packing pieces under the anvil? Thanks for sharing.
-
Here are a couple of photos to support what I was saying last night. At least then if im talking rubbish you might understand why and forgive me :)
-
Also, what makes you think it is an old file?? I had another look at the the photos - there are what looks like two dimples one above the other but slightly offset. Similar dimples occur on both my vices in various places, which would suggest it is an original part. Also on my vices there are some marks that look like the surface of a file, but must be marks made by the jaws of another vice or grips etc during manufacture.
-
hi grimcat, nice vice. I may be stating the obvious here but the spring is held in place by the mounting bracket - I notice this isnt fitted with the wedge in the photos so everything is loose, which could be why it isn't working. Also I am wondering, how free the pivot at the bottom is? The springs are only there to open the jaws and dont need to be that strong. On my big vice it is very easy to close the jaws by hand - however on my smaller one the spring is stronger but still easy. Sorry if Im stating the obvious - Im half expecting you to tell me you took the wedge out so that you can replace the bad spring. Bob
-
Simple is good! I had this idea that I would have a pipe sticking into the fire - but it looks like a 'hole in the wall' is all thats required. Right, Im off to go and dig up some clay. Ps. Thanks Charlotte, I think I missed your post earlier. Bob
-
This might be of interest to you. Its from a UK series I saw earlier in the year - they want to make enough energy from the sun to manufacture petrol from scratch, but the clip shows what they can do to steel. (and a sausage) james may solar - Google Video does look like there is a lot of faff to get the thing set up. If the link doesnt work for any reason, just type 'james may solar' into google video. enjoy,
-
Thats great! I really like the RR spike people with their caps.
-
I gave mine a quick clean with a wire brush today, it didnt need it, but I found stamped on the box: Peter Wright, Patent Solid Box - Have enjoyed reading up on the history. It is also stamped with a large letter 'B' - any ideas??
-
Thanks John for that great info, Im going to bookmark it for future use. Only problem is I cant weld, yet - Its high on my list of skills to learn. The reason I thinking about a side blast is mainly because I intend to put the forge inside my existing BBQ - which is enclosed on 3 sides with a roof and a chimney. It will be sitting on a table of 6'' concrete, so I simply wont have room for a bottom blast with ash dump - without making the forge very high, and getting the wrong type of nipples hot. I think Mlmartin's suggestion is probably what I going to settle on. Bob