Xavier F-C
-
Posts
47 -
Joined
-
Last visited
Content Type
Profiles
Forums
Articles
Gallery
Downloads
Events
Everything posted by Xavier F-C
-
Scrap steel identification
Xavier F-C replied to Xavier F-C's topic in Tools, ID, and pictorial reference
That seems to be a good guess to me. I tried to find some pictures but I did not find any. Maybe they are rare things. -
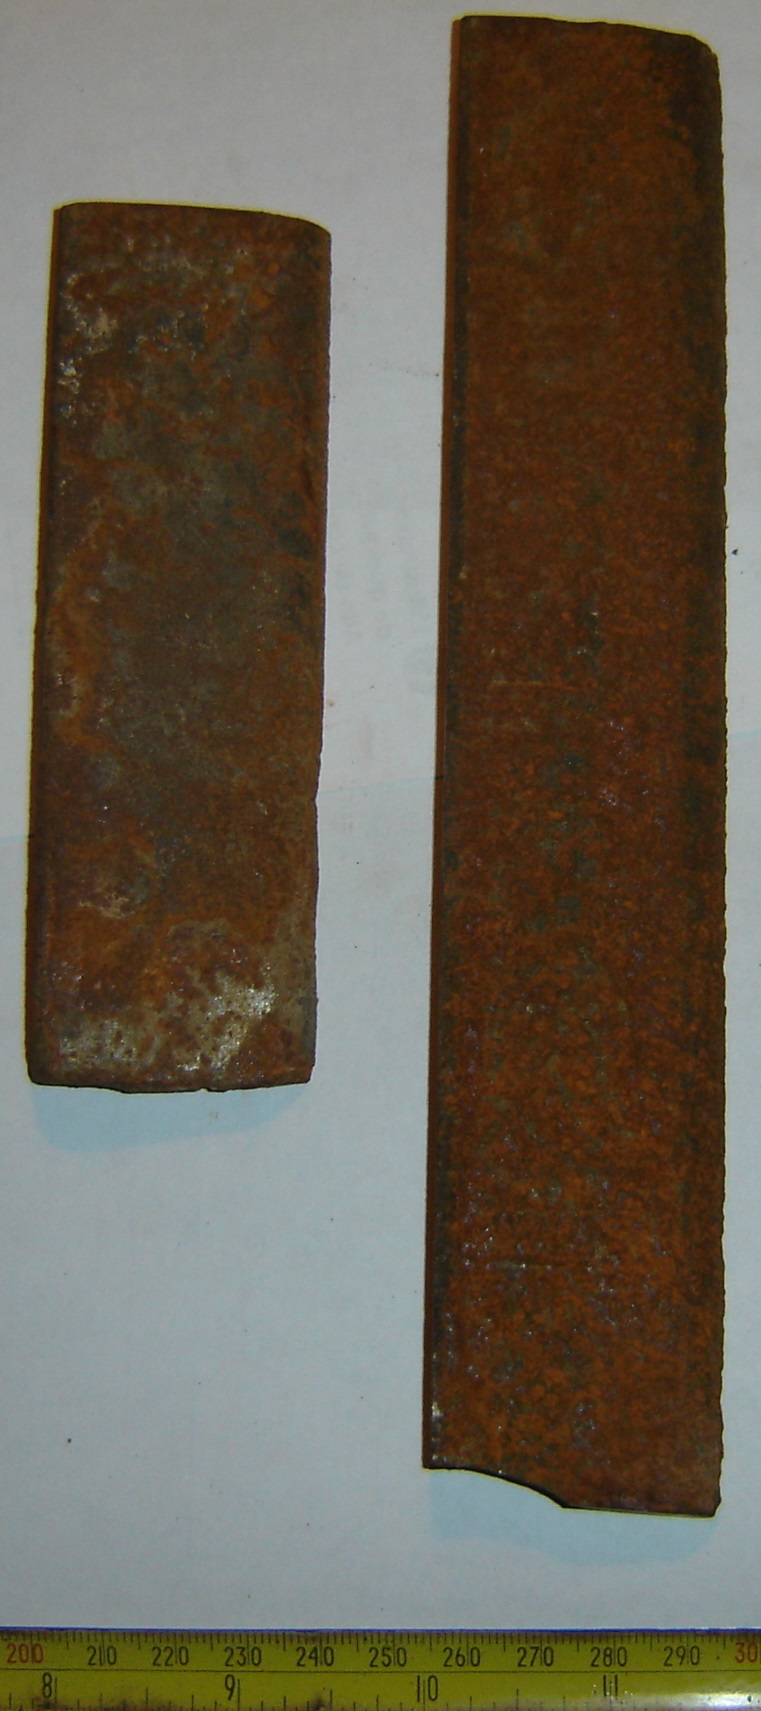
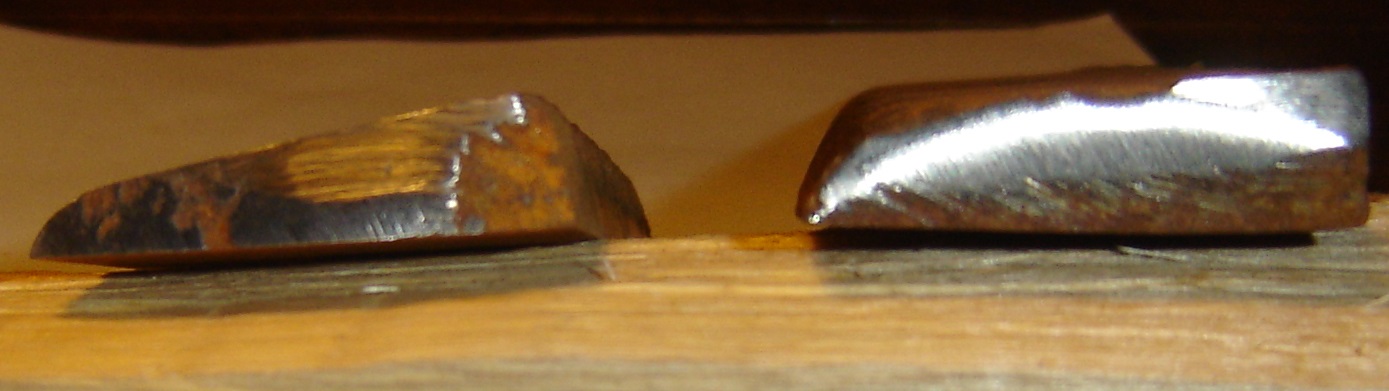
Recently, I picked up two similar blade-like objects at different locations, along the road: I spark tested these and one looks like a simple high carbon steel and the other looks like an alloy because the spark shower was much shorter and less bright. What was the scrap original purpose? Thanks in advance for satisfying my curiosity.


-
Frosty, thanks! I certainly agree with you.
-
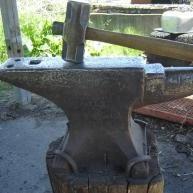
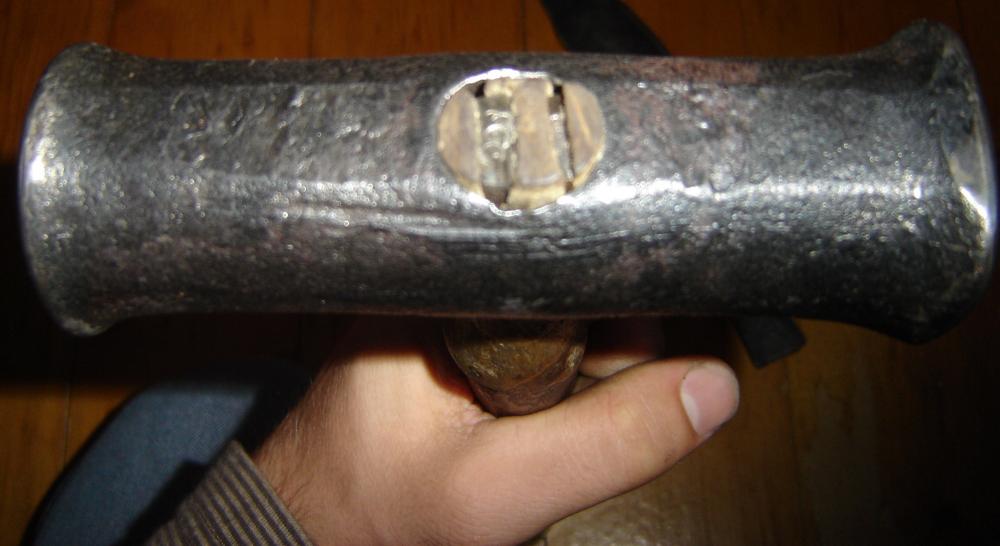
Hammerfall, thanks! I have been using this hammer for a while now and I like it; it is my second most used hammer out of the five I own.
-
Making a striking anvil from a plow?
Xavier F-C replied to Xavier F-C's topic in Anvils, Swage Blocks, and Mandrels
If I do the project (I am pretty sure I will), I'll have an idea of the type of steel when I make the cut. I don't know exactly, but I think this plow is at least 15 years old. -
Making a striking anvil from a plow?
Xavier F-C replied to Xavier F-C's topic in Anvils, Swage Blocks, and Mandrels
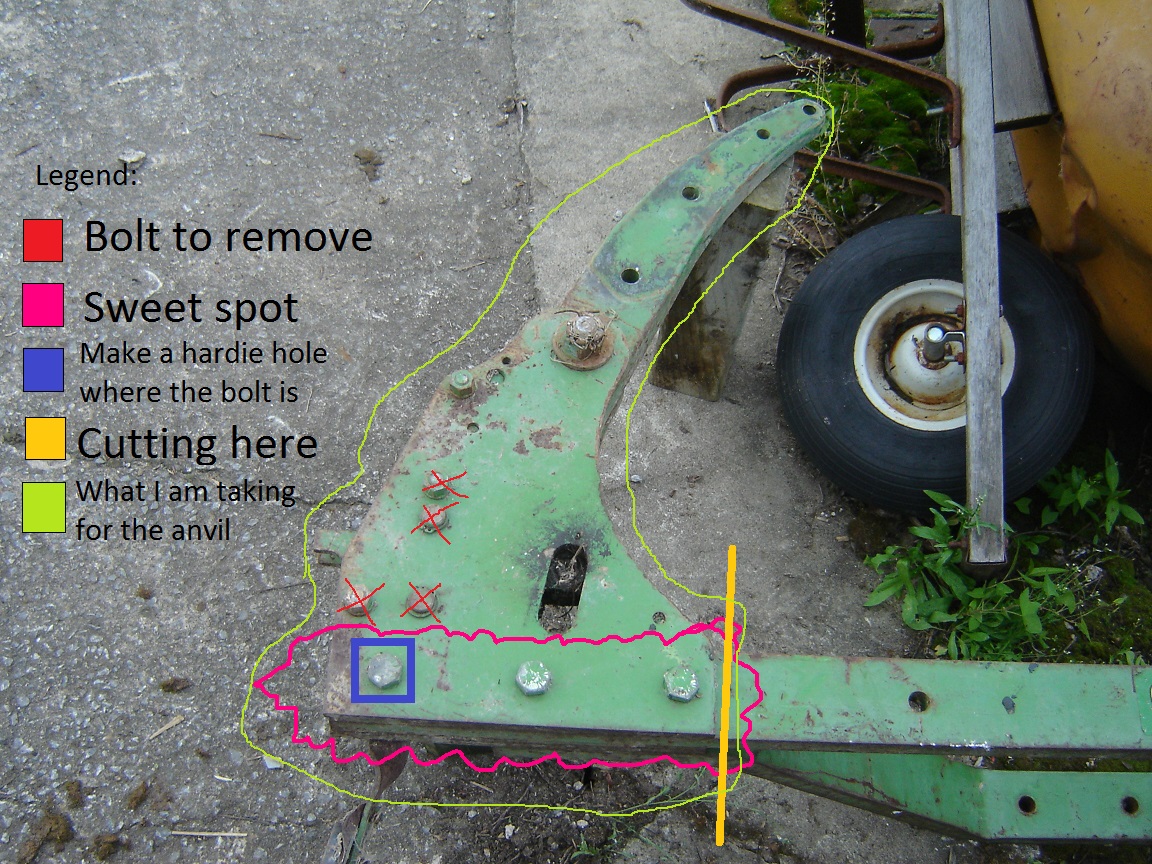
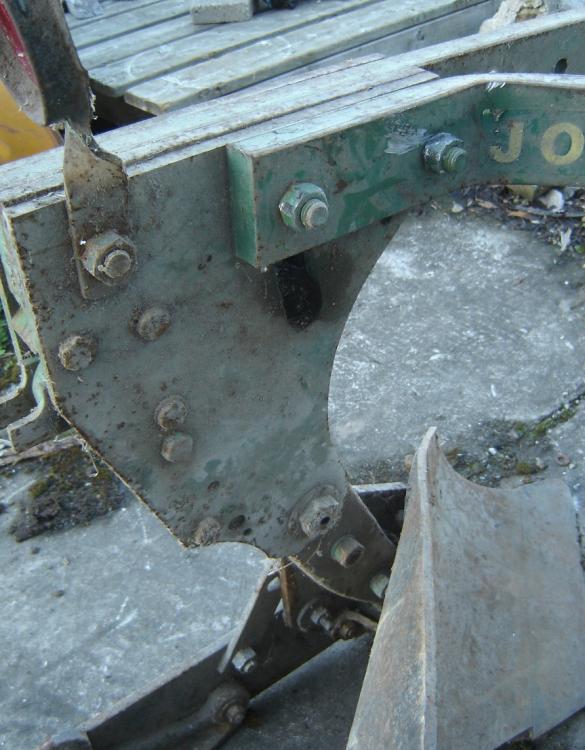
I have progressed and have separated two large pieces. Here is my plan for the anvil itself: I now think making the anvil looks totally feasible. The center, the zone between the sweet spot and the huge bolt, is hollow. I think I can remove the heads of the bolts without much drawback. The long arm could very easily be fixed to a wooden support. I just need a good idea for the support of the piece. Maybe just putting a good log with brackets will do the trick. Thoughts?

-
Making a striking anvil from a plow?
Xavier F-C replied to Xavier F-C's topic in Anvils, Swage Blocks, and Mandrels
EJRailRoadTrack, I planned to use a striking anvil mainly for making hardy tools, but also for drifting(like large hand hammers) and other work where a lower anvil is helpful. I have not considered the selling/trading option. I'm not sure about its value. I currently live on a farm with my parents and we no longer have a truck. The long thick plates(about 1 inch) could be useful for me, like making swages. From my perspective, selling/trading does not look so appealing. -
Making a striking anvil from a plow?
Xavier F-C posted a topic in Anvils, Swage Blocks, and Mandrels
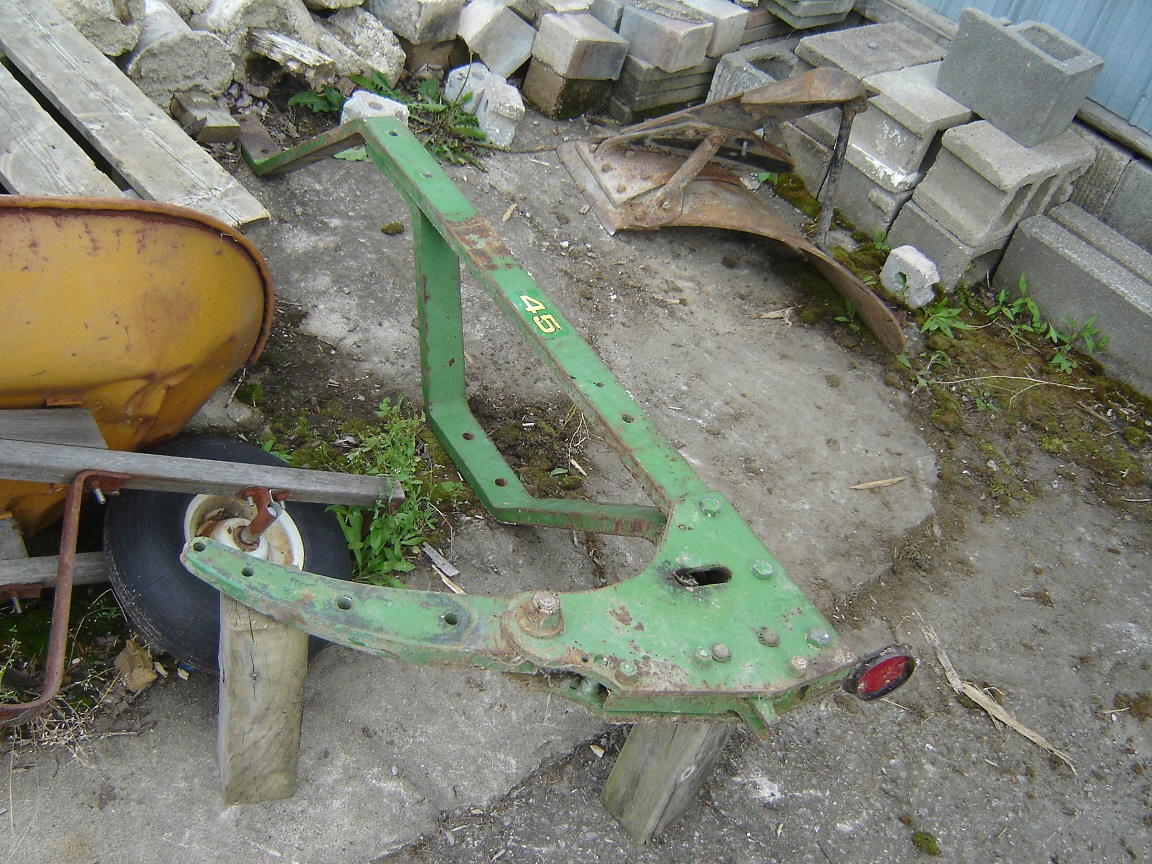
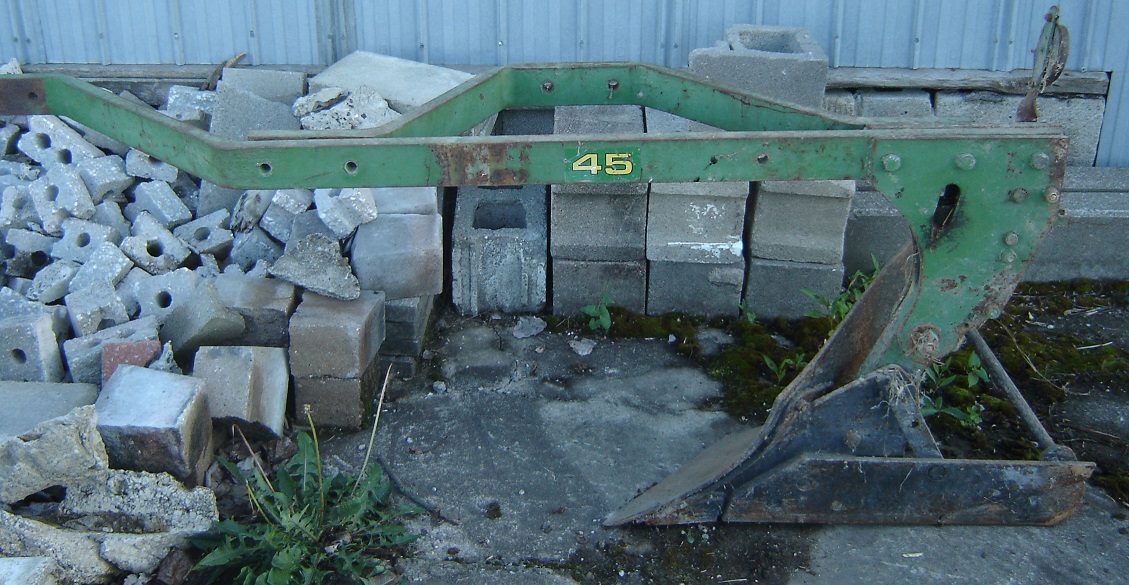
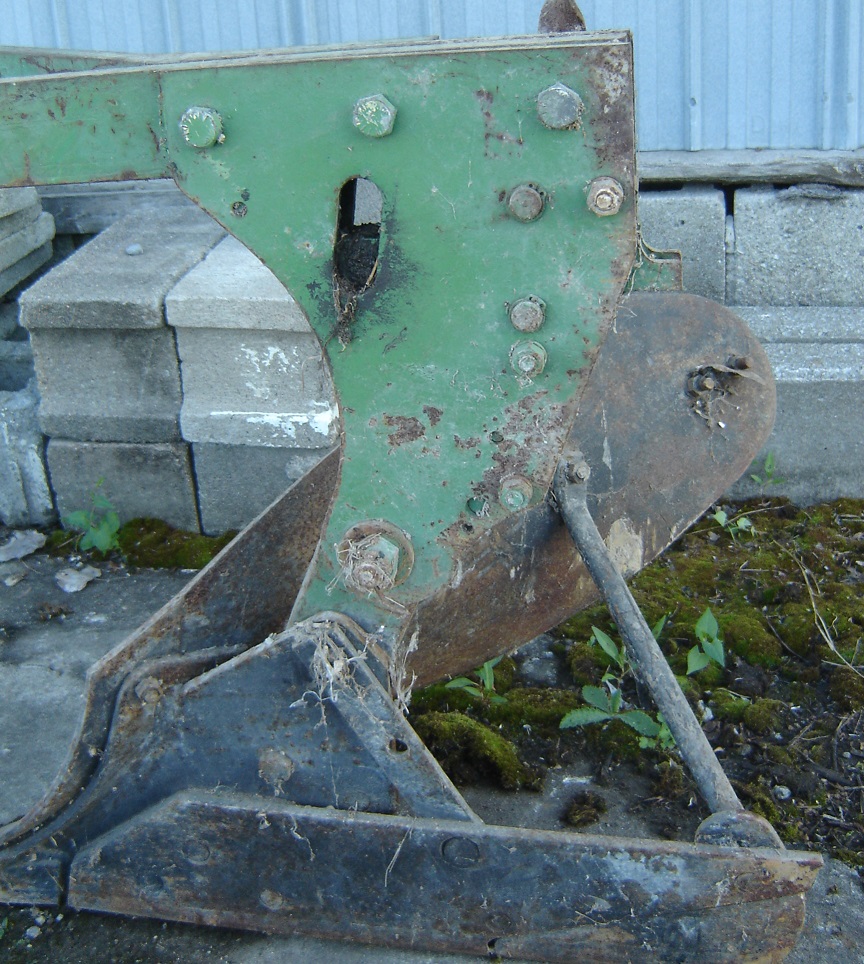
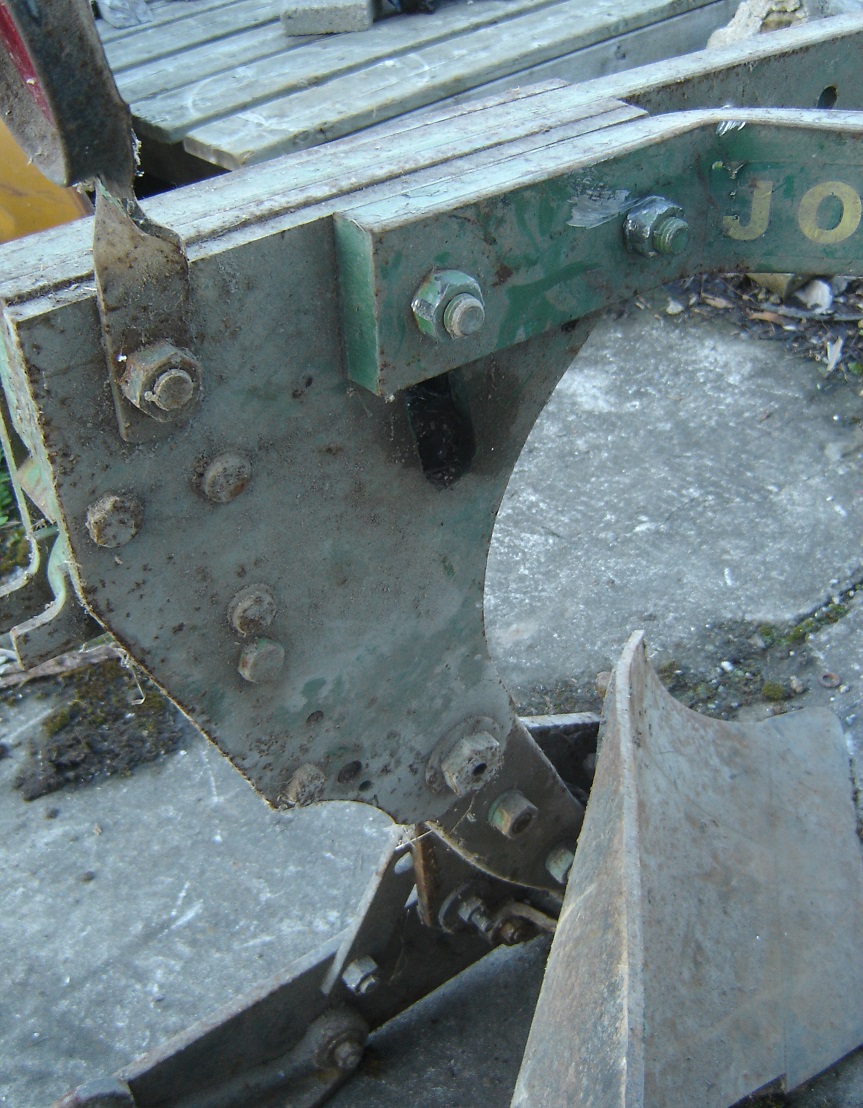
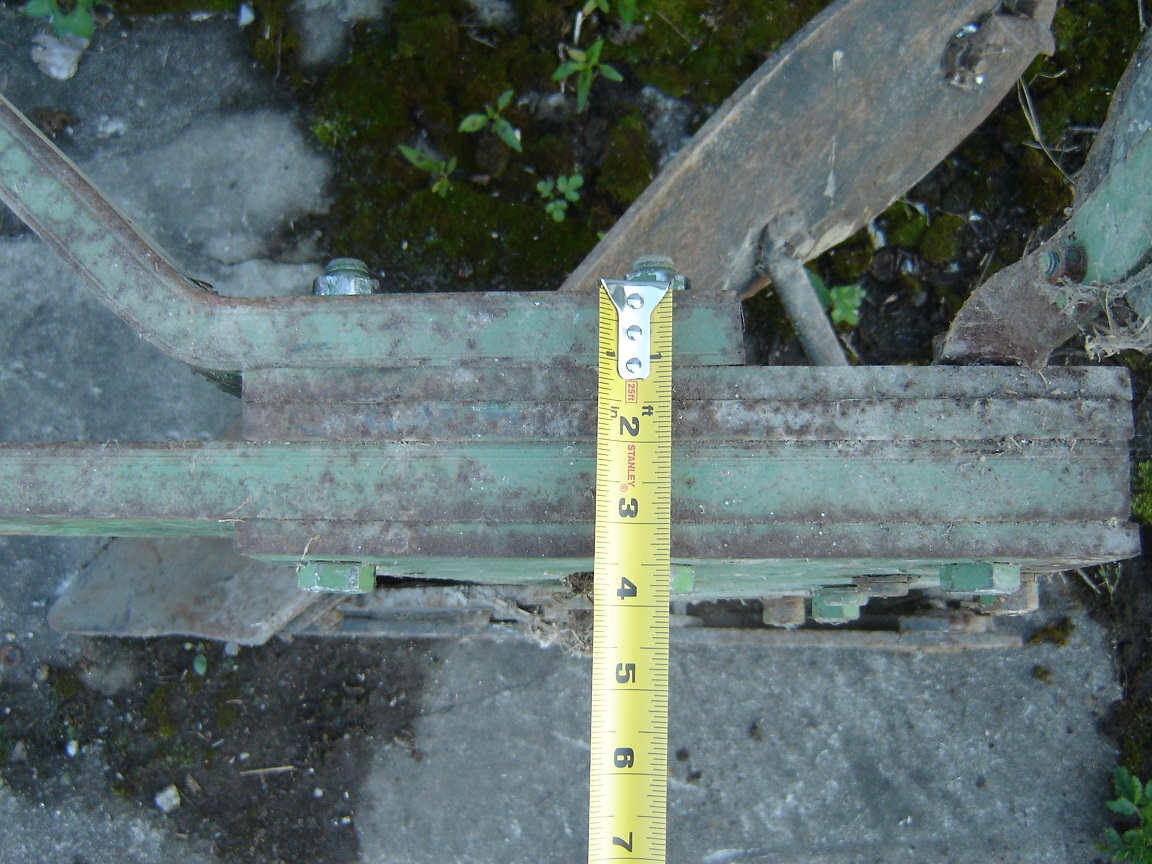
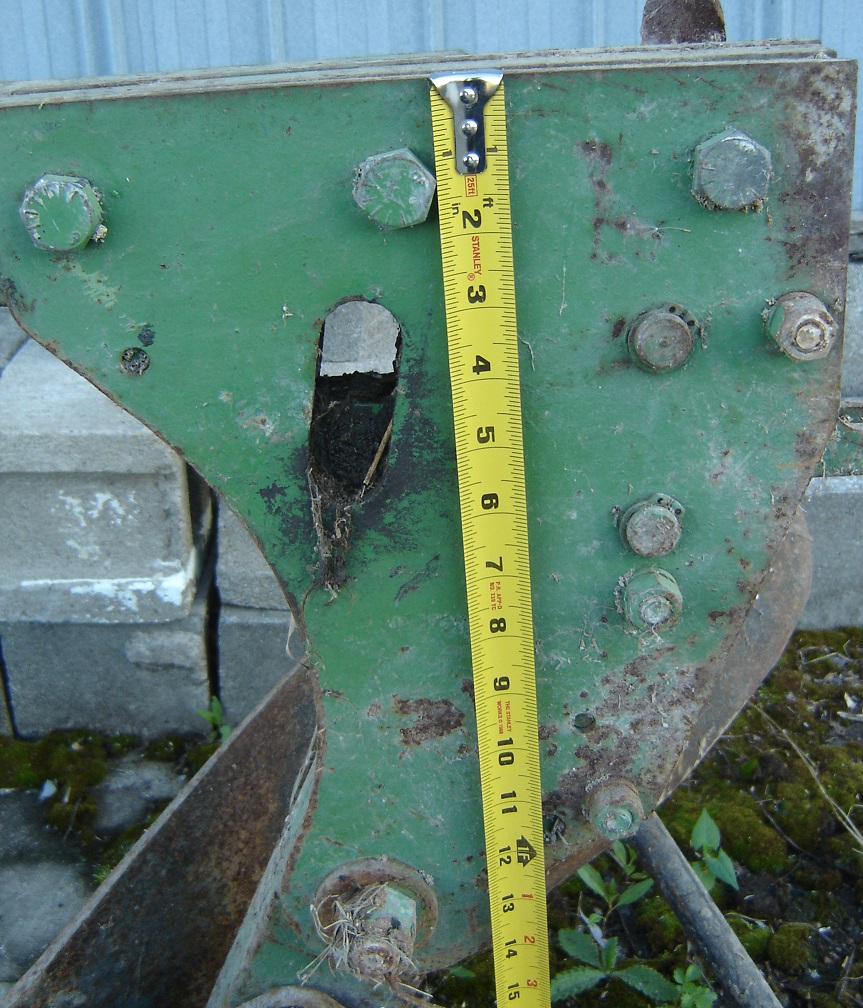
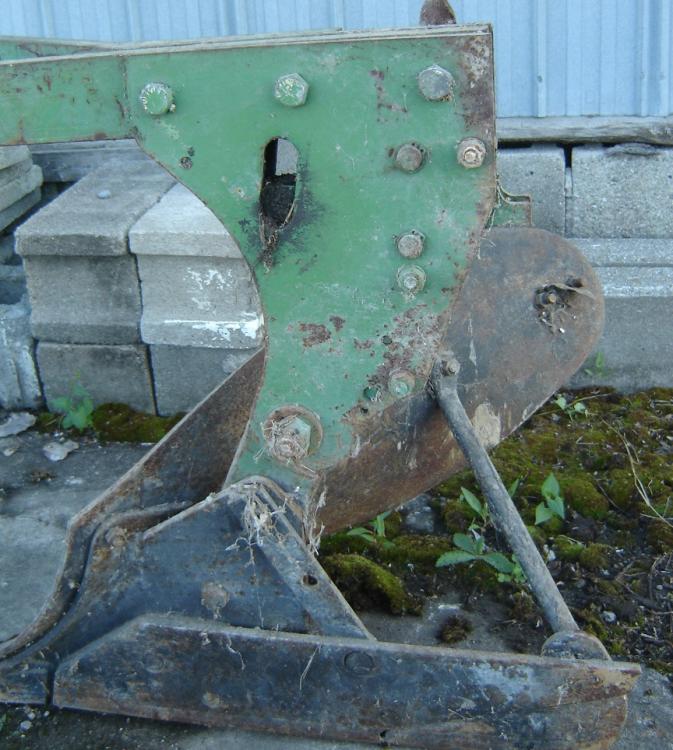
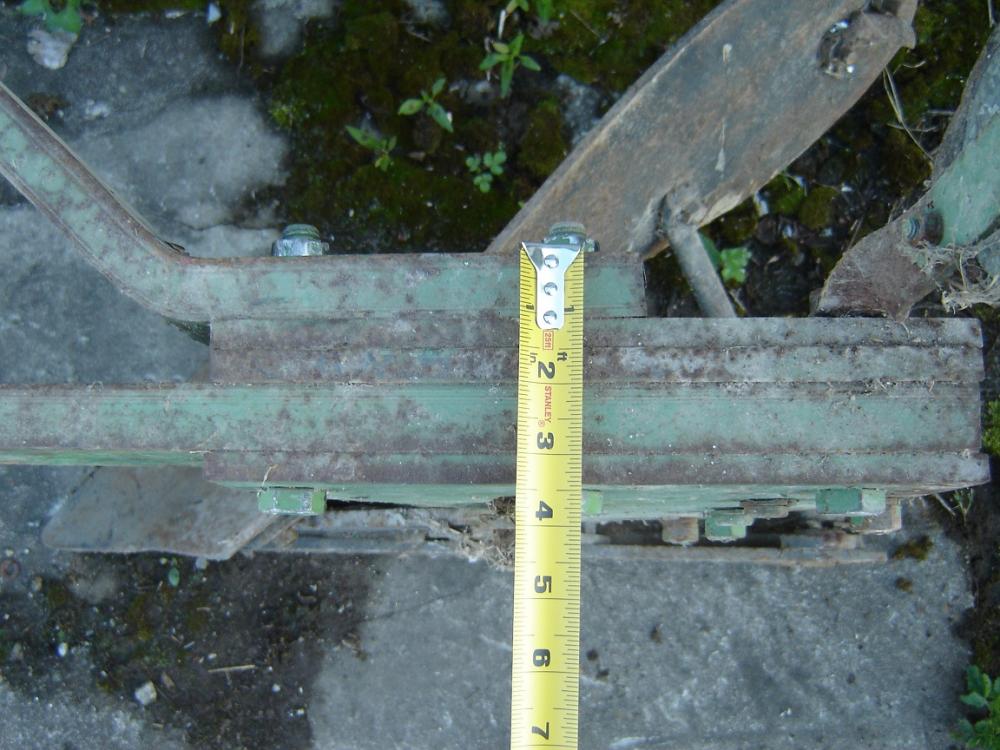
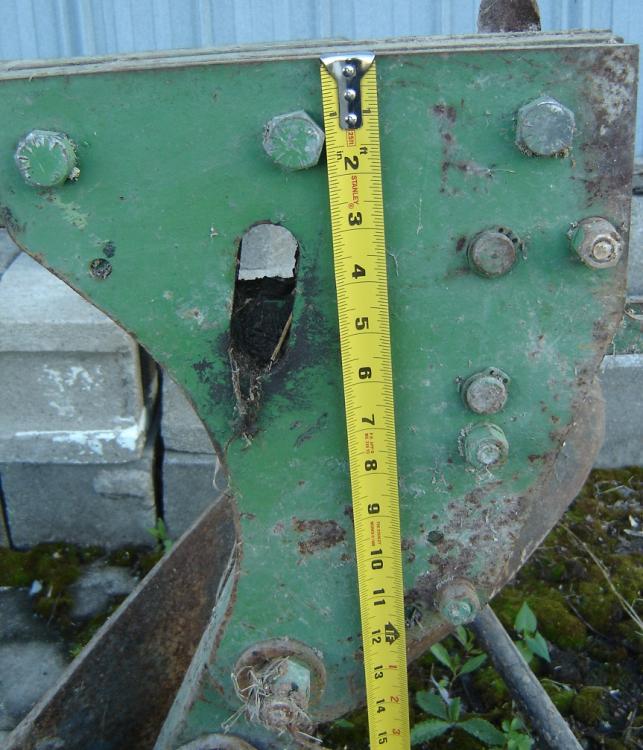
I have a very heavy plow that I would like to convert into a striking anvil. What I would like: - A hardie hole with the same dimensions as my anvil's. (around 1 inch) - Convert the existing rectangle hole for drifting. - Make a wooden stand for it. - Have one face without all the bolts in the way. What I have: - Some drills. - A grinder. - Files. - Wrenches.(Some of the bolts are really hard; I broke one wrench! I can show you the pictures if you ask for it.) - A lot of scrap wood and some small logs. What I don't have: - A welder. - A HUGE forge.(I could heat a small part of a maximum of 2 inch thickness.) - A metal stand for the anvil. My main issue is the supporting stand; it needs to have some empty space below the hardie hole and the rectangle hole. I can only make it out of wood, so the design has to be good. The other main problem I will have is about the bolts; If I cut them to make a flat face, the plates might fall apart. Where should I place the hardie hole? What kind of wood stand should I be designing? The overall look of the plow. Definitively weights more than 100 lbs. (Was not that hard to slide it on concrete though.) The part that interests me. The other side. To give you an idea of the dimensions. The thickness. I'm open to suggestions, picture request and warnings! Thanks in advance.
-
I have followed the few tricks you guys gave me and I'm having a much better time heating my stock. I actually made very few changes to my forge. Boedie32, I have watched your short video and it looks hot to me! I am pretty sure those sparks meant that the temperature was high enough for forge welding. I believe those sparks indicate temperatures too hot for steel with a higher carbon content.
-
Hypothetical variation of London pattern anvil
Xavier F-C replied to Xavier F-C's topic in Anvils, Swage Blocks, and Mandrels
Thanks for the input! The idea of a surface designed for tooling plates looks fun, but I certainly don't know how it could be done in a simple and effective way. (The tooling plate would need to be quite secure and easy to make.) ThomasPowers, I am not sure if I saw this kind of anvil but is it anvil with a |__| concavity in the face? -
Hypothetical variation of London pattern anvil
Xavier F-C replied to Xavier F-C's topic in Anvils, Swage Blocks, and Mandrels
ThomasPowers, thanks for the response! A concave swage inaugurated into the table looks very useful. For instance, it could be a 90 degree angle that could help shape V-bit tongs. -
Hypothetical variation of London pattern anvil
Xavier F-C replied to Xavier F-C's topic in Anvils, Swage Blocks, and Mandrels
Frosty, Thanks for the reply! My fuller certainly takes up space where the horn/face of the anvil could be longer. -
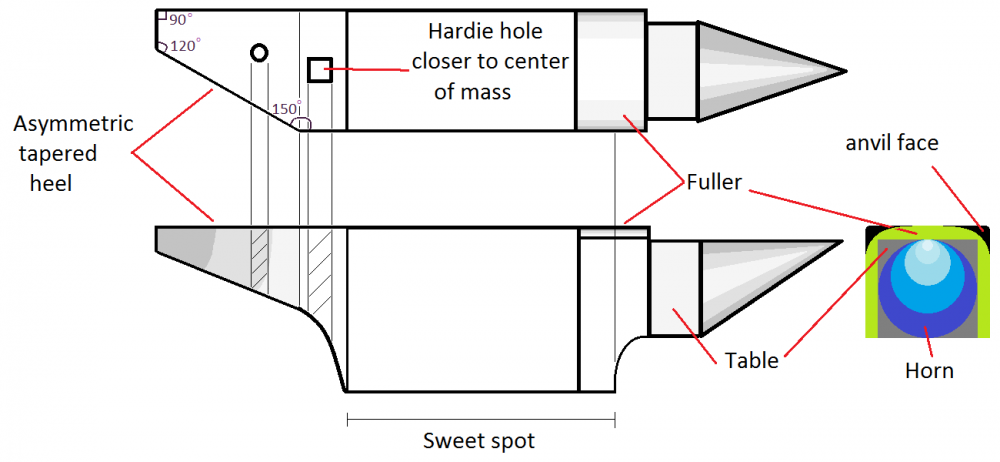
I wanted to share what I thought would be an interesting change to a London pattern anvil for general forging. -The heel is asymmetric; this would allow it to be used like a normal tapered heel with the advantage of having one 90 degree corner of the square heel. It also features some obtuse angles and a hardy hole closer to the center of mass. -The section between the face and the table is a fuller; it could be useful for bending and drawing. When I made this picture, I had no specific measurements in mind. It is just there to give you an idea of what I what thinking. Does this anvil basically exist? Are the modifications actually bad? Or is it in fact a good idea?
-
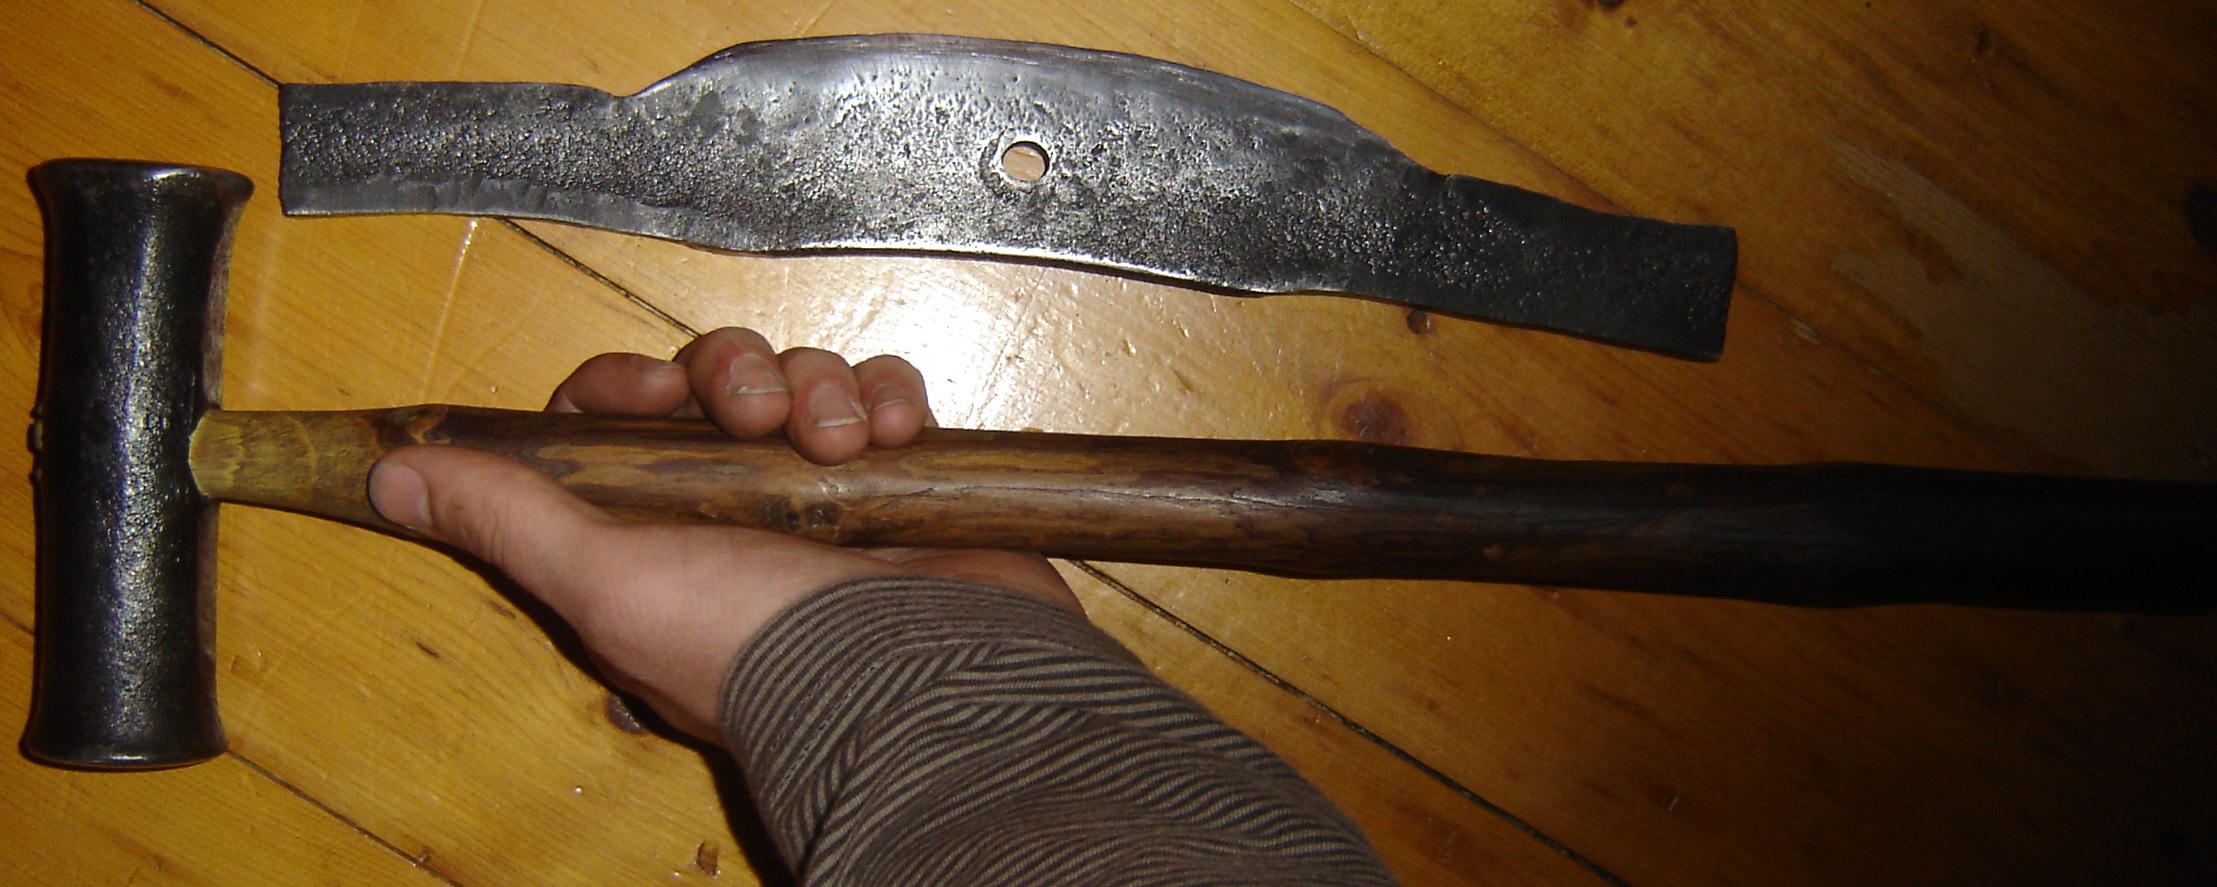
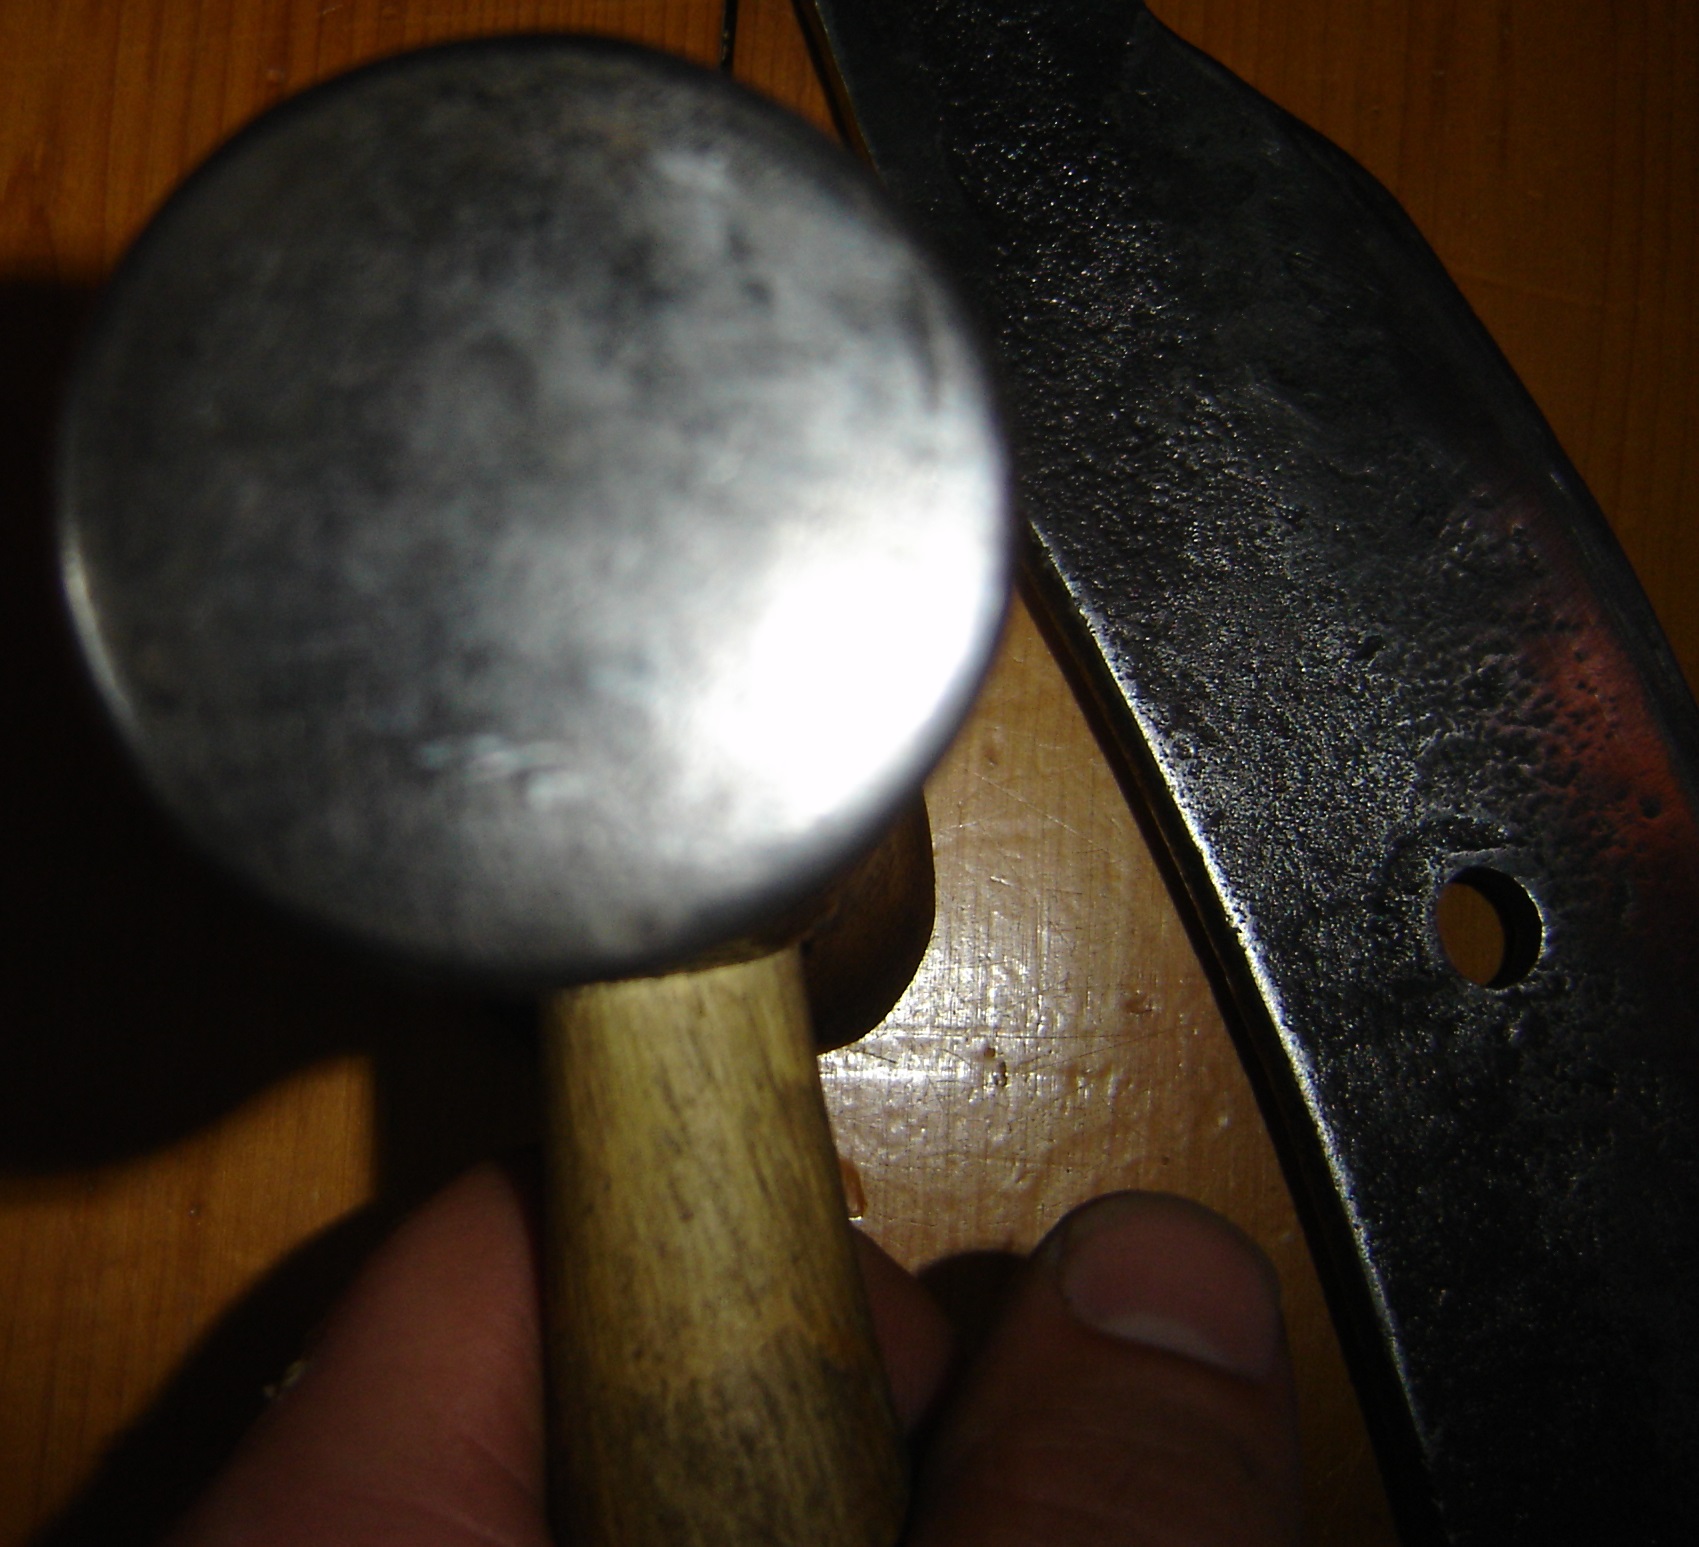
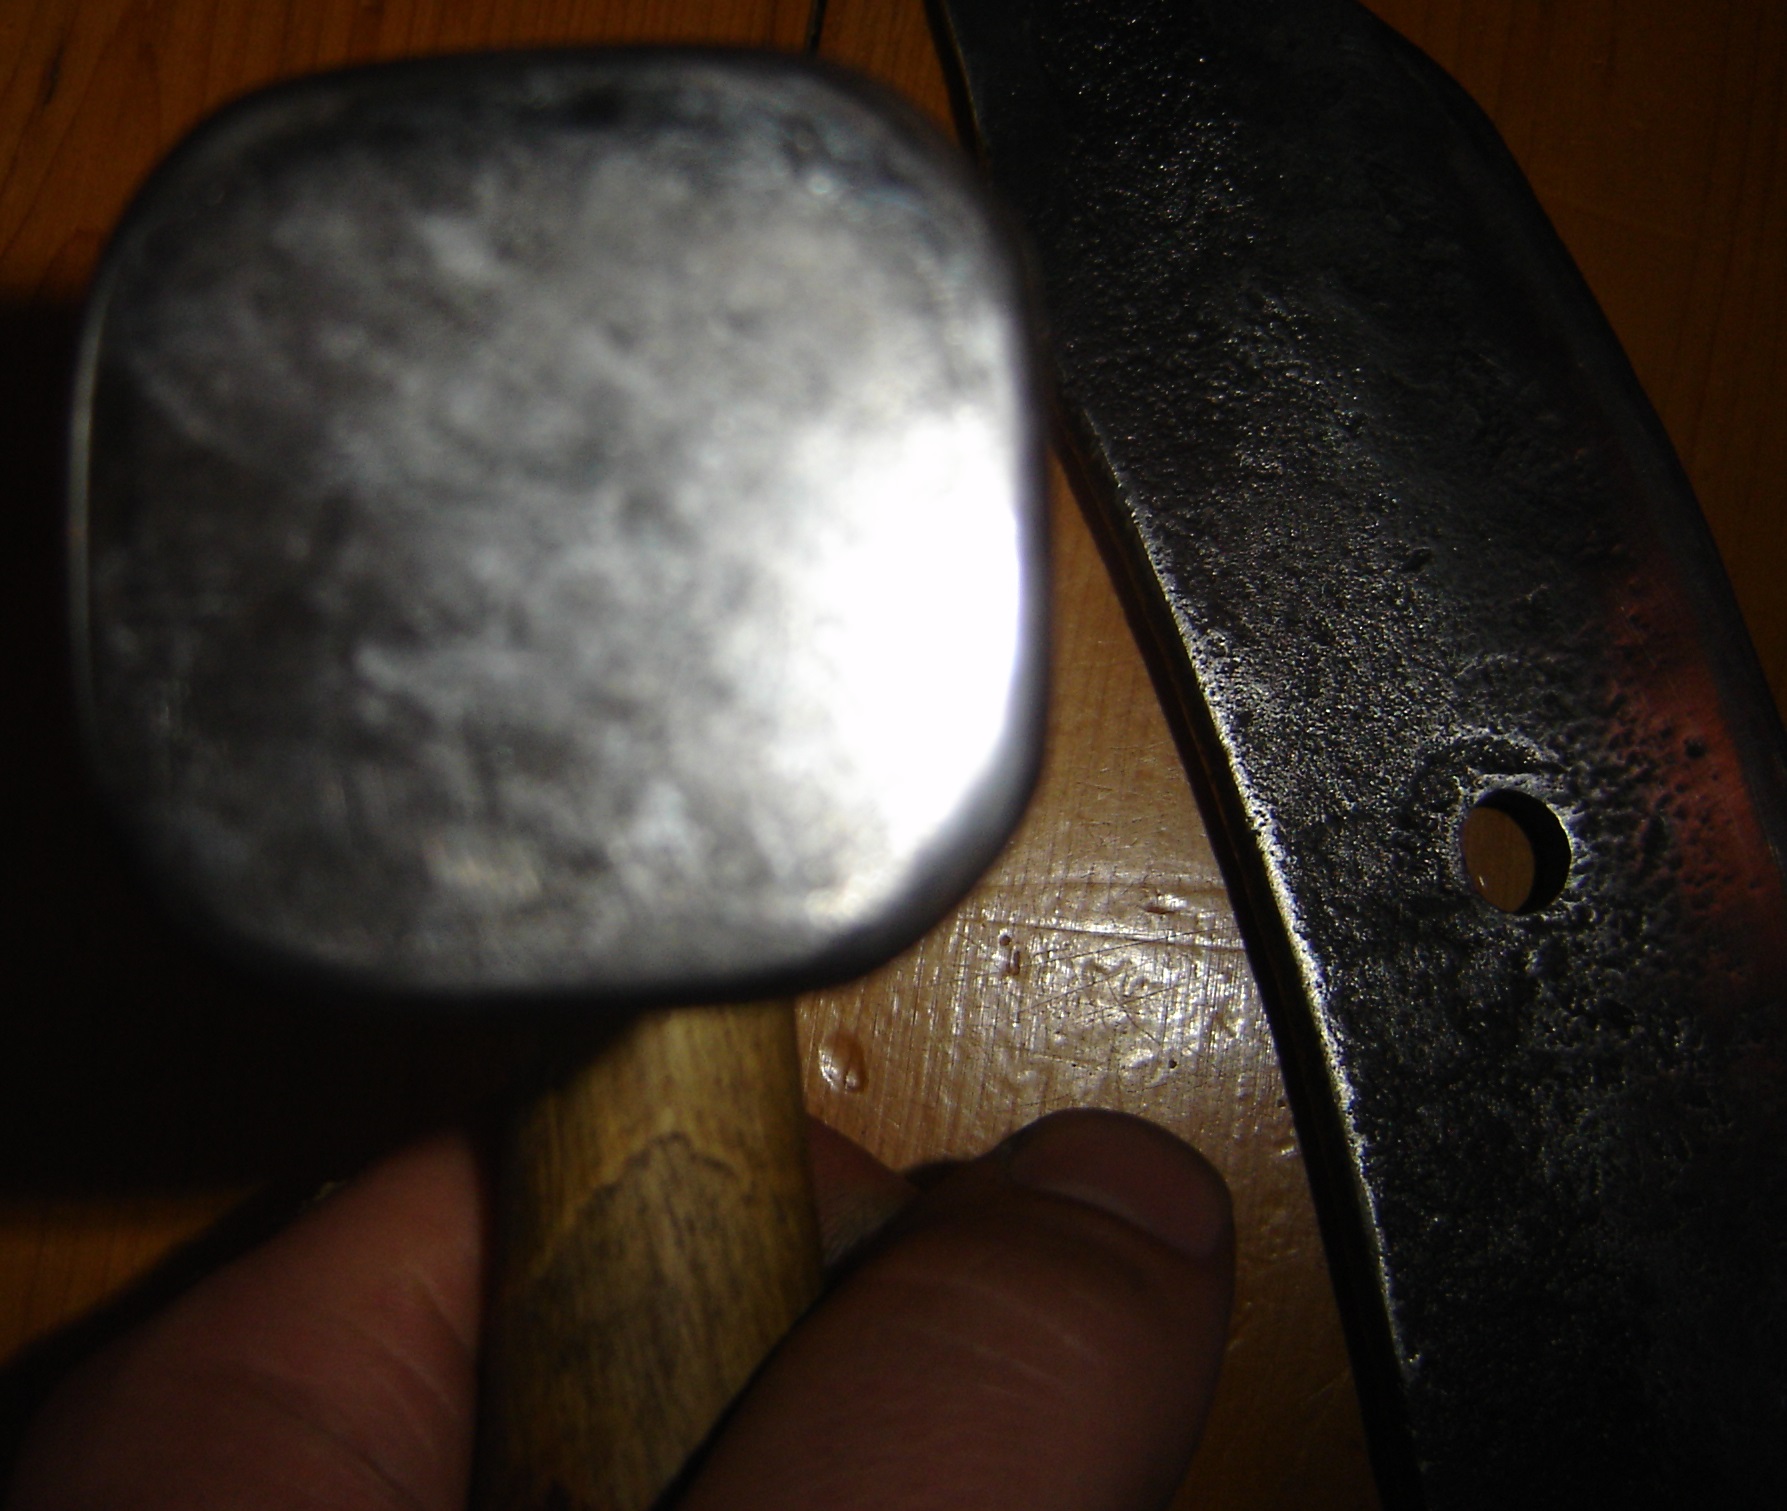
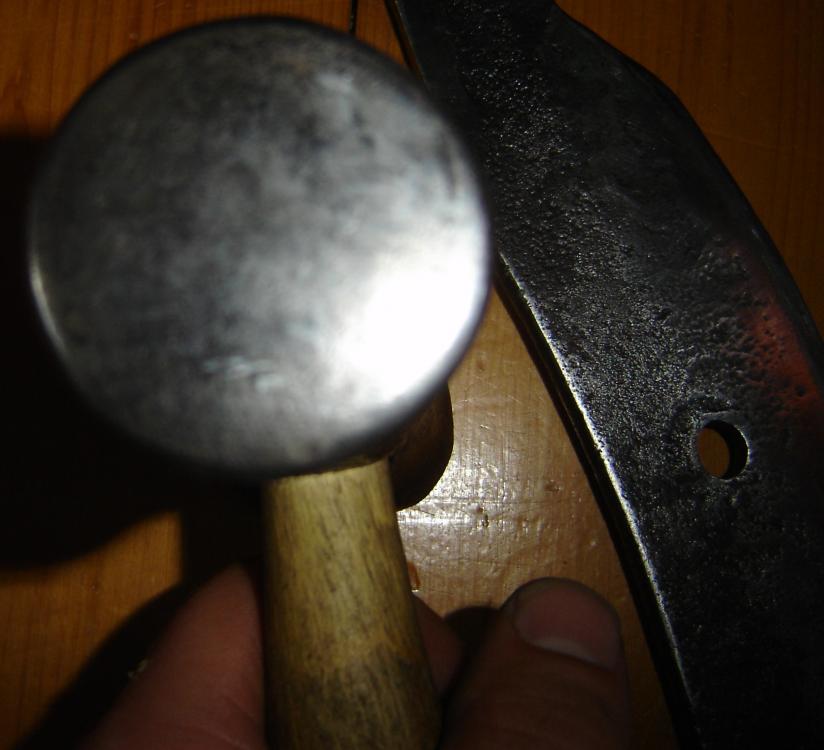
Here is my second hammer I made from a shaft, similar to a rounding hammer but simpler. I tried it and really appreciated the long knotted handle; I think it is good since the hammer is rather light. The head's mass is just above 1 kilo and the hammer weights 2,6 pounds. I hardened both faces and now a file can barely scratch it. The handle is made from a branch of ash and very long: almost 45 cm. It is charred unevenly and coated with boiled linseed oil. You can see above the draw knife I forged from a leaf spring using only this hammer. It looks crude but it is the first blade I made. Simply two metal wedges. The round face is only slightly convex; the radius is like that of a soccer ball. The flat face is pretty flat and crowned. If you have questions or suggestions, let me know!


-
Spark test on a car coil spring
Xavier F-C replied to Xavier F-C's topic in Blacksmithing, General Discussion
Thanks for the info guys! I will eventually post what the heat treat does, especially if something unusual happens. -
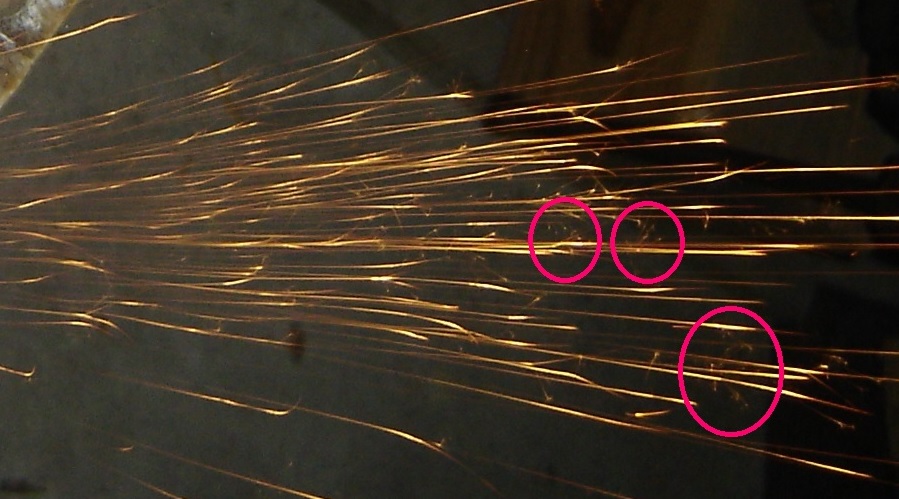
I recently acquired 2 car coil spring weighting about 5 kg each with a "Kia Sedona" chalk mark. When I did the spark test, the sparks were much shorter with a "tiny explosion", unlike the plain carbon steel I have used. I wondered why the sparks looked that way. I am just curious about the mystery steel. The circles are just highlighting the "tiny explosion" I mentioned.
-
Free scrap discovery and identification
Xavier F-C replied to Xavier F-C's topic in Tools, ID, and pictorial reference
I quenched the rod in water and it hardened, without any cracks. My test file could not bite it. I tempered it to a bronze-purple color and the test file could bite it, but just a little. I have not done any other test. -
Free scrap discovery and identification
Xavier F-C replied to Xavier F-C's topic in Tools, ID, and pictorial reference
Gergely, Thanks for the answer and I will try to test the steel behavior with various hardening test. -
Free scrap discovery and identification
Xavier F-C replied to Xavier F-C's topic in Tools, ID, and pictorial reference
Gergely, The metal rod is clearly magnetic, just like normal carbon steel. The sparks are short and slightly reddish. From this picture and the info I gathered, what steel is this likely to be?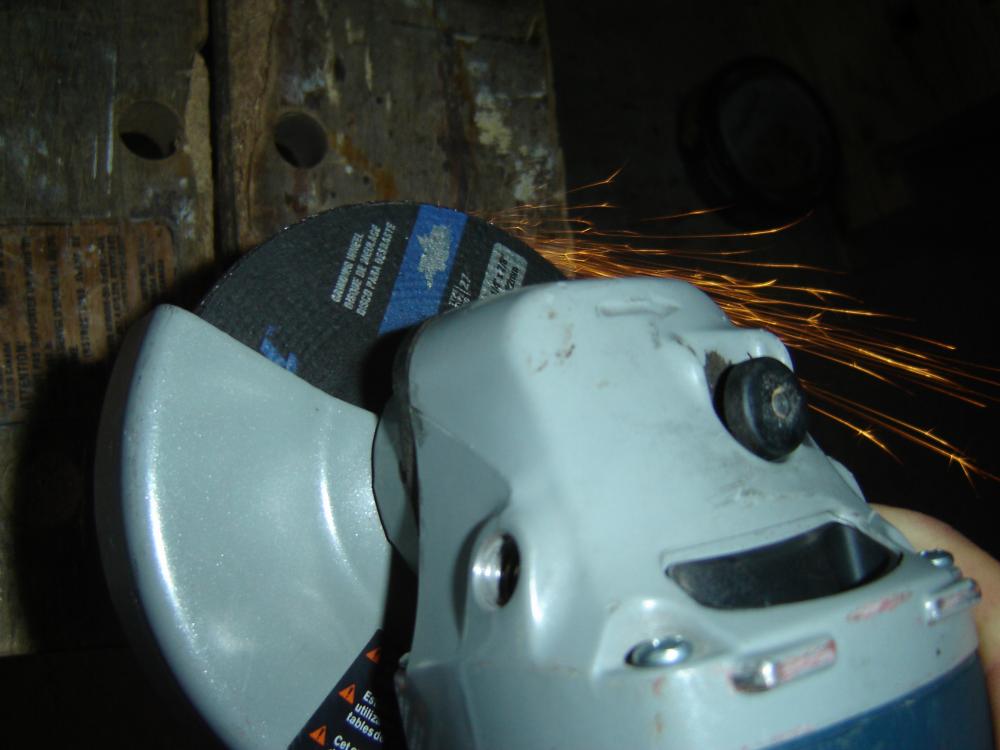
-
Free scrap discovery and identification
Xavier F-C replied to Xavier F-C's topic in Tools, ID, and pictorial reference
ThomasPowers, That would make sense because the tool is clearly asymmetrical, with one end more slender than the other. -
Free scrap discovery and identification
Xavier F-C replied to Xavier F-C's topic in Tools, ID, and pictorial reference
Exo313, That seems reasonable considering I live near the St. Lawrence River. How was the tool used? JHCC, The temptation was too strong. -
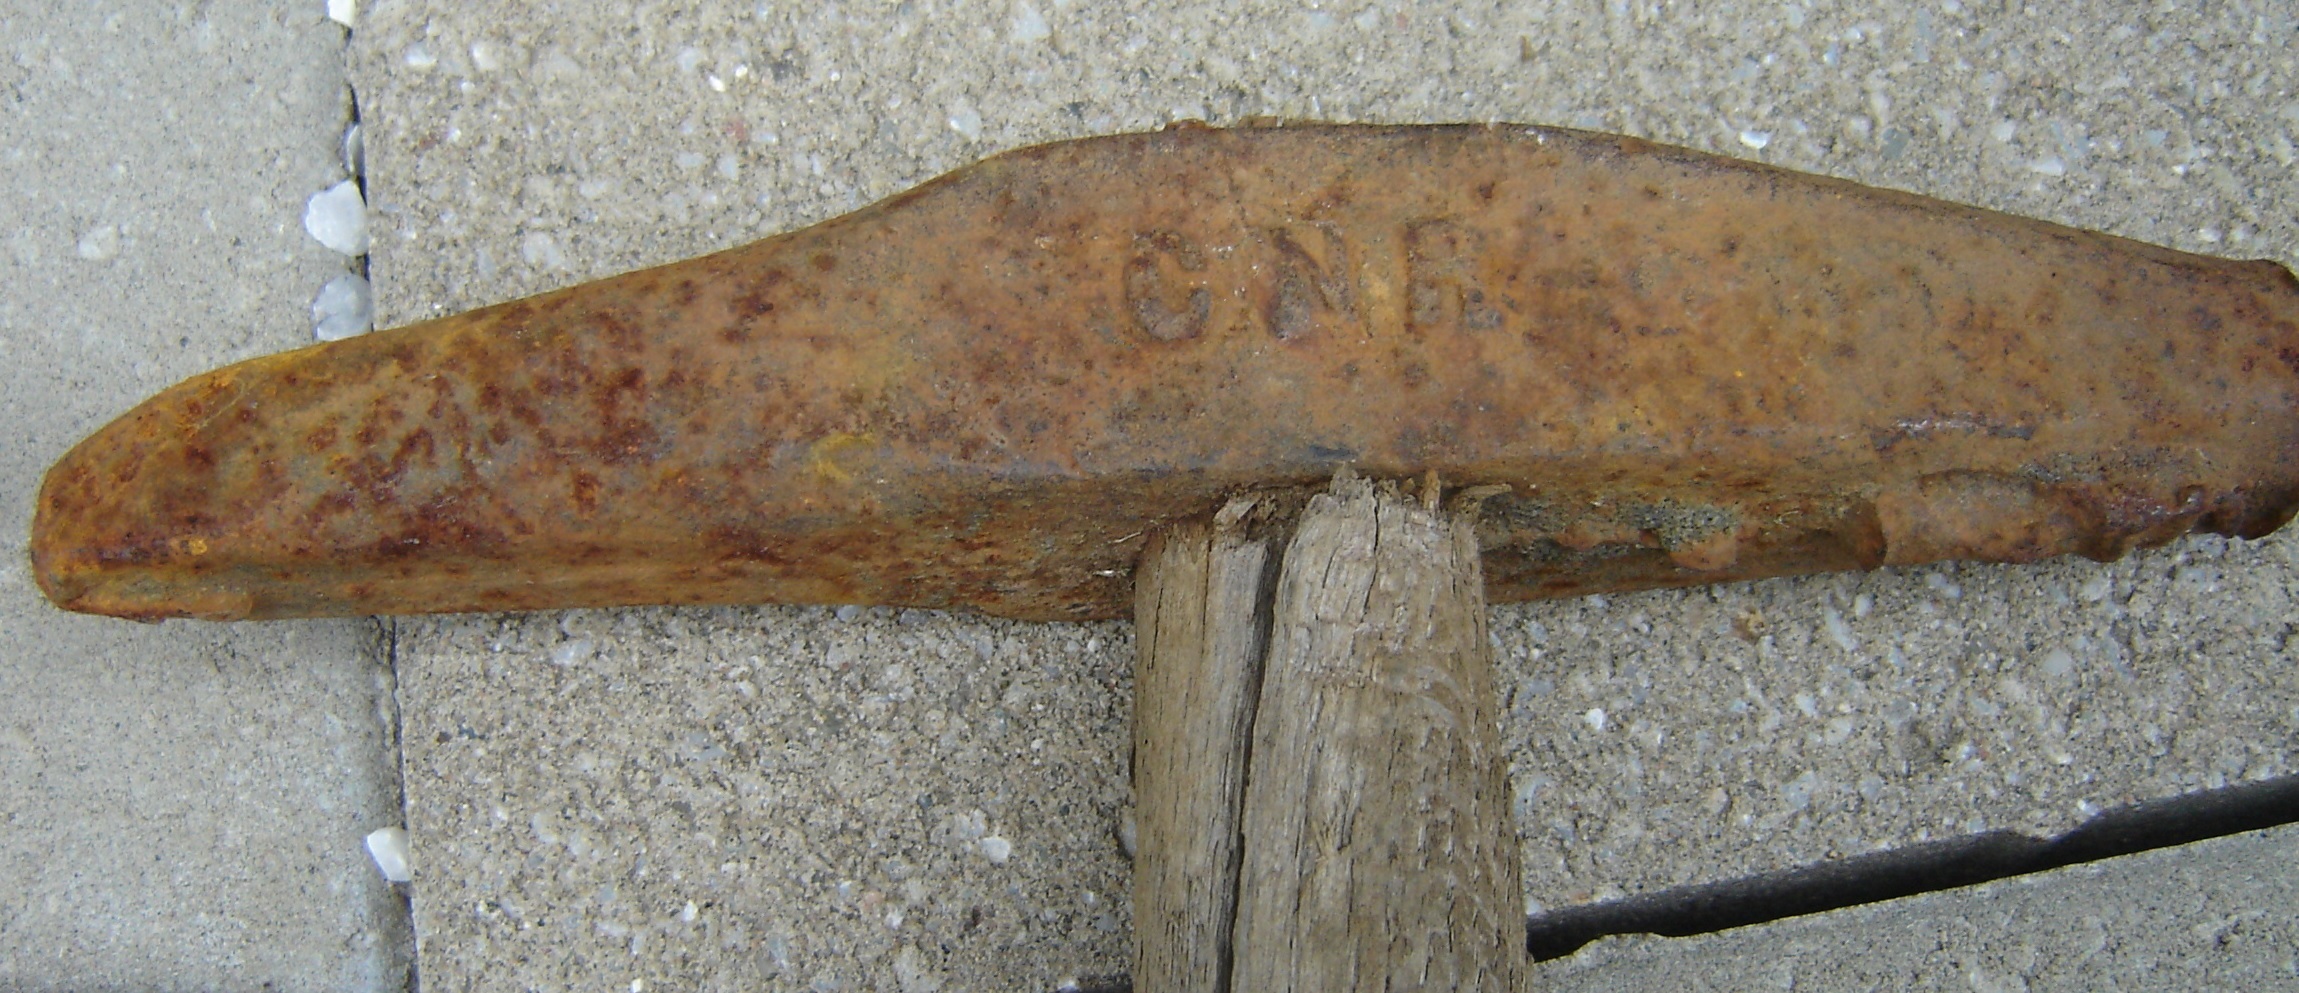
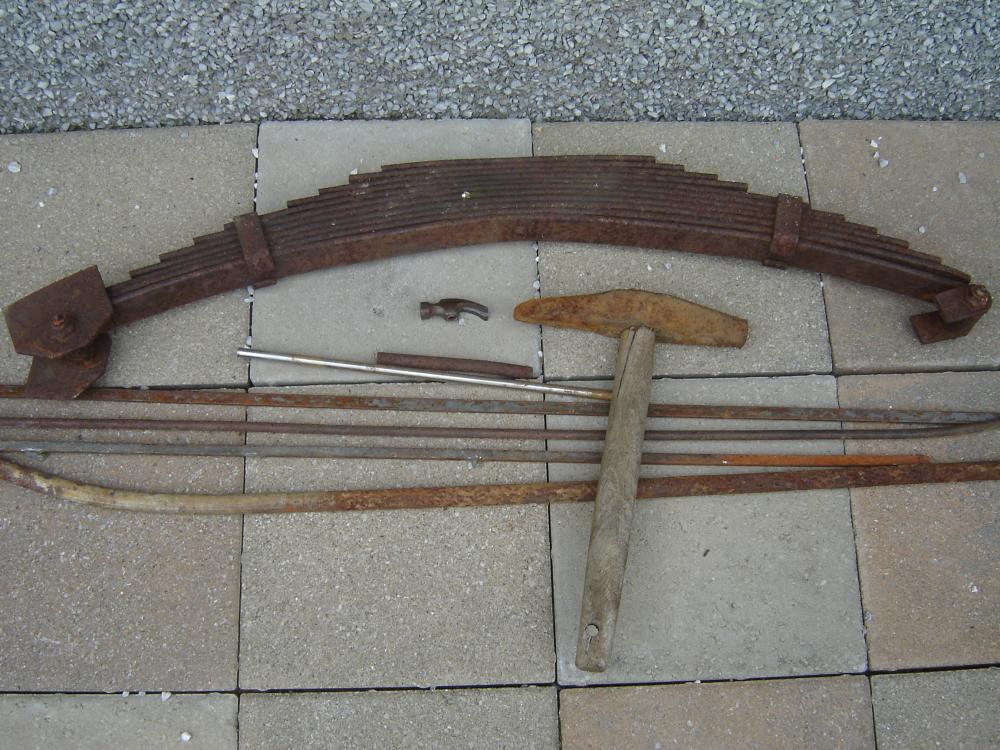
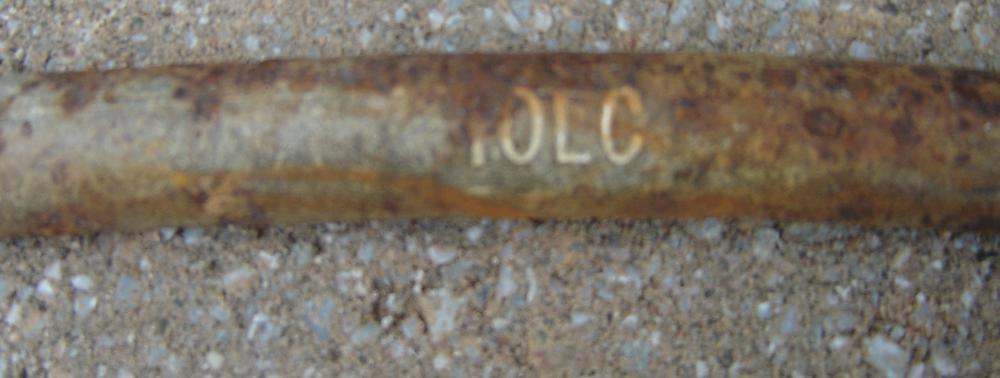
Today was my lucky day! I visited a small scrap yard while collecting a few trinkets and the owner gave them to me for free! Anyway, here is all that I took: The shiny rod is threaded and is not simple carbon steel, according to the spark test I made. (Much fewer sparks than simple carbon steel.) Stainless steel? What kind of steel is the leaf spring most likely to be? It looks like medium carbon steel (could be between medium and high carbon steel) from the sparks. I can see the letters "CNR". Do you know what it means? What is a pickaxe? I can see "10LC". Is it the name of the steel or is it something else? It sparks a lot with the grinder so it seems to be high carbon steel. If you think you know something, I'll be glad to hear it!

-
Will W. , Before I used the pyramid kiln, I cooked split wood in a closed container to make charcoal. Sometimes, there were some charcoal lumps that were almost completely charred but they were not easy to break. (This charcoal had a blackish look, not the silvery look.) I have to admit that it was probably the method that i used that made some of the charcoal hard to break.
-
WNC Goater, The idea of cooking some wood in a few containers above the fire is an interesting idea as it will be using some of the wasted heat. It will provide some good quality charcoal, but will require more preparation. JHCC, I have calculated the ratio of weight of charcoal/raw wood. The ratio is 9,29 %. mass of raw wood: (77,5 ± 2,8) kg mass of charcoal: (7,2 ± 0,4) kg The best ratio is 10,2 %. The worst ratio is 8,47 %. I could get a more accurate ratio when the charcoal will be cold. (It was divided among 2 trash can, doubling the incertitude.) Unfortunately, I have no idea how to measure the average humidity of the wood and it was not perfectly dry for sure.
-
JHCC, Since I have some extra wood, I will be using all the wood that is not green, but not perfectly dry as it was collected recently from dead trees. (The trees have been dead for at least 1 year ago and it is somewhat humid around the St. Lawrence River.)