WillS
-
Posts
16 -
Joined
-
Last visited
Content Type
Profiles
Forums
Articles
Gallery
Downloads
Events
Everything posted by WillS
-
Chris, you are an absolute hero. Those threads and the image in particular are exactly what I was looking for, thank you very much! Funnily enough, I've just bought a set of original Alldays bellows as I found some online for £20! The bellows themselves are no use and needed ripping apart, but the frame is intact and ready for a new set. I'll use the stuff you've provided to build the replacement set.
-
I'm not confused. I was recommended to look for a patent, I did and (as I said) "still no luck" because it's not available. There's no confusion, I've just not found the answer to my original question.
-
...the one that I replied to? About the patent?
-
Cheers guys. I think maybe I didn't explain myself properly. I've made lots of bellows, and use pear-shaped double lung bellows that I made myself for most of my forging. What I'm trying to find is not "how to make bellows" but how specifically the Alldays & Onions ones are made.
-
I hadn't, but I have now! Still no luck sadly.
-
Hey folks. I've been looking around everywhere (including the files and threads on this site) and can't find what I'm after, so I'm hoping somebody can help. I'm trying to find some blueprints, diagrams or really any info on building a set of piston double-acting (not double-lung) forge bellows - the Alldays & Onions type for example. They're round, drum-shaped bellows and they work differently to the pear-shaped double-lung bellows. The air is forced through the opening on both the up AND the down stroke of the handle. What I need to know are things like valve and opening locations, as well as constructing the framework itself. If anybody can help out, that would be great!
-
Hey folks. I've recently started forging in a beautiful old farm forge, and amongst the random wonderful gems left in the building are a couple of sets of bellows. One is up on the wall and is a huge pear shaped set of Alldays & Onions, which I've not even looked at yet, but there's also a large set of double acting drum bellows, which look like Alldays but have the makers plate on top saying "T Reynolds & Sons, Bristol". Firstly, does anybody know anything about the maker? Google has failed me... Secondly, they're not working and I'd love to restore them. They blow air on the first stroke, but the top chamber doesn't lift and there's no air on the down stroke. The leather is old and needs some careful attention and has some holes, but is there a procedure to follow or things to check for? I really don't want to pull them apart unless I absolutely have to!
-
Help needed with Type 16 arrowheads
WillS replied to WillS's topic in Spears, Arrows, Pole arms, Mace/hammer etc.
Ah, we'll have to agree to disagree there somewhat - two of the best arrowsmiths (master arrowsmiths, in fact) Mark Stretton and Hector Cole use a spring swage for Tudor points! Regarding the Type 16 - I'm sure it CAN be done by splitting and folding, but I'm really hoping to learn how to do it with a weld. That was the point of my original post - knowing that they were welded, and knowing that my personal favourite versions of them are also welded is why I'm more interested in understanding HOW they're welded, as compared to finding an alternative method. Hope that doesn't sound ungrateful - the advice you've given thus far is fascinating and greatly appreciated - perhaps I should have been cleared originally. I still have no clue how these barbed sections are welded on, as none of the examples I have seem to make sense in a practical viewpoint. I know they are welded, I know WHERE they are welded, but no manner of thinking is giving me the answer HOW they're welded. Unless of course the socket section is stood upright on the anvil, point skyward, and the barb section is hammered down onto it. That's the only way I can currently see it being done to produce the exact same result I can see in the heads I own. However, that of course returns me to the problem of holding both barb and socket section in the fire at the same time, bringing them to welding heat simultaneously without melting the tiny barb section... And so on. I don't seem to have progressed at all with this haha! By the way, this is a perfect example of a good Tudor point. How this could be done without a swage I don't know
-
Help needed with Type 16 arrowheads
WillS replied to WillS's topic in Spears, Arrows, Pole arms, Mace/hammer etc.
Not sure I quite understand, but both sides look identical... The two photos are taken from front on, and side on, not front and back. -
Help needed with Type 16 arrowheads
WillS replied to WillS's topic in Spears, Arrows, Pole arms, Mace/hammer etc.
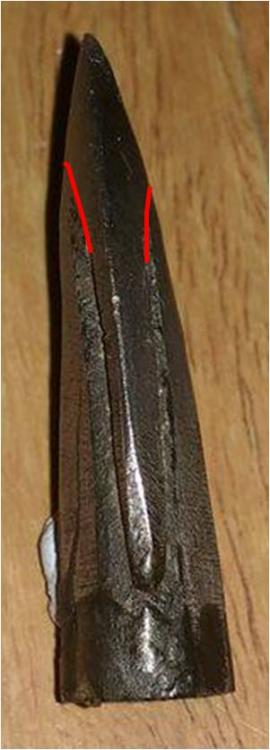
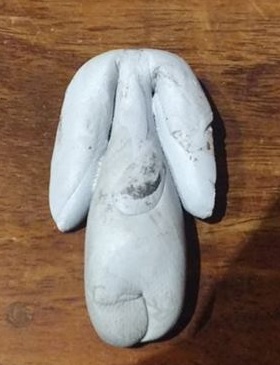
That's true. I do have lots of modern versions of them, made in mild steel however. I think part of the problem is that I'm looking at these heads and I can see the weld join, but it doesn't make any sense as to how it's been done. I've attached two photos of different angles of the same arrowhead. The red lines are where I can see the weld line - it doesn't look like a flat piece laid into the socket, as it's a flattened diamond section. The edges are of course ground that way, but right in the middle, where the barb section meets the socket piece, it's still a diamond section. Folding a flattened diamond section "on the flat" as described by Frosty wouldn't work I don't think, as it would do all sorts of weird things in the area where it's folded. I hope that makes sense?! Also, in trying Frosty's method of folding the barbs back using some clay, the shape ends up very different to what I'm seeing on these heads. Because of the shape, the area where the two barbs fade into the main head end up much higher, very close to the tip. I've attached a photo of my attempt in clay, and as you can see the shape at the tip is completely different to the head in the photos, and no amount of grinding would solve that! Where the split is folded back, the tip squares off, and there's not enough material to shape into the finished head.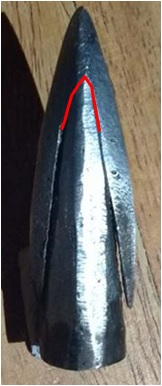
-
Help needed with Type 16 arrowheads
WillS replied to WillS's topic in Spears, Arrows, Pole arms, Mace/hammer etc.
Excellent, thank you very much Frosty! I'll have a go at bending the barbs back the way you suggest. I do eventually want to learn to weld them on, as that's the historical method. For what it's worth, normal Tudor points are made slightly differently to the ones I do - in fact I'm willing to bet nobody has ever made a copy of the head I'm copying for my Tudor points! Usually people have conical swages, and with those the process is a while lot easier, and quicker. -
Help needed with Type 16 arrowheads
WillS replied to WillS's topic in Spears, Arrows, Pole arms, Mace/hammer etc.
Cheers Steve! I do have some experience - I've forged plenty of heads at this point, and a few other things. I think welding is the only "core" skill I've not attempted, purely because I've just not needed to try it yet. -
Help needed with Type 16 arrowheads
WillS replied to WillS's topic in Spears, Arrows, Pole arms, Mace/hammer etc.
Frosty, Awesome response, that's what I was after! Some of it (ok, most of it!) went over my head due to lack of experience, but your second method made sense. I can't quite imagine what shape the barb section needs to be, as once you fold it to form the angle of a V shape, it all starts to squash and swell in odd places. I'm not sure if you'd need to then grind the barb section to make it defined, or shape the split in the bodkin to match or something. I assume you need a close fit for things to weld properly? And then you've got the issue of working out the cross section of the barb piece, which of course gets all strange looking in the fold area... My brain can't cope with it! Maybe actually doing it will clear up many of the issues. The Tudor points are a piece of cake, once you accept the fact that you're gonna be constantly reheating and swaging, instead of (as I tried originally) to get much of the shape in one or two goes. I think mine take about 6 heats to get them properly formed in the swage. -
Help needed with Type 16 arrowheads
WillS replied to WillS's topic in Spears, Arrows, Pole arms, Mace/hammer etc.
Not sure what you mean. The heads on the left are replicas of MOL 02250 from the museum of London, and they're Tudor bodkins from the 16th century. The heads on the right are Type 10s from around the 14th/15th century. None of which helps in trying to forge a Type 16... -
Help needed with Type 16 arrowheads
WillS replied to WillS's topic in Spears, Arrows, Pole arms, Mace/hammer etc.
Hi Lou! Thanks for the quick response. As frustrating as it is (cos I've never even attempted a weld!) I do know that they were forge welded! I've got lots of them from various smiths and you can see the join in a fair few. It's also the universally understood method of production for these heads. They weren't overly common, certainly not a standard military head (despite what some will say!) so the extended construction time isn't too much a problem. My main issue really is HOW they were fire welded. I'm starting to think that perhaps the socket and bodkin section ended with a split, which the barbed section was slotted into, and then fire welded. This would keep everything together nicely, instead of trying to manipulate small loose parts. Here's a pic of a few early efforts at Tudors and Type 10s. Each attempt gets tidier of course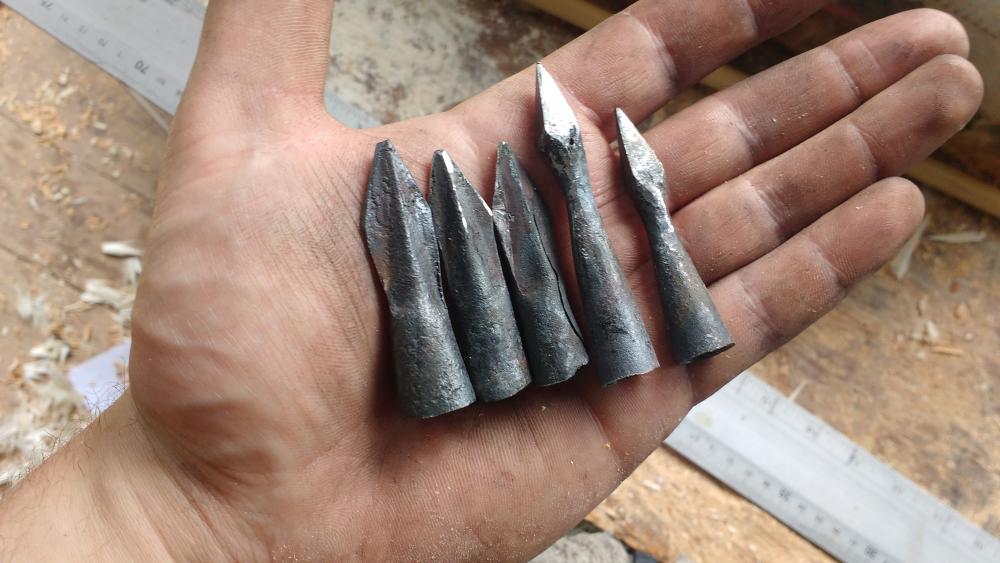
-
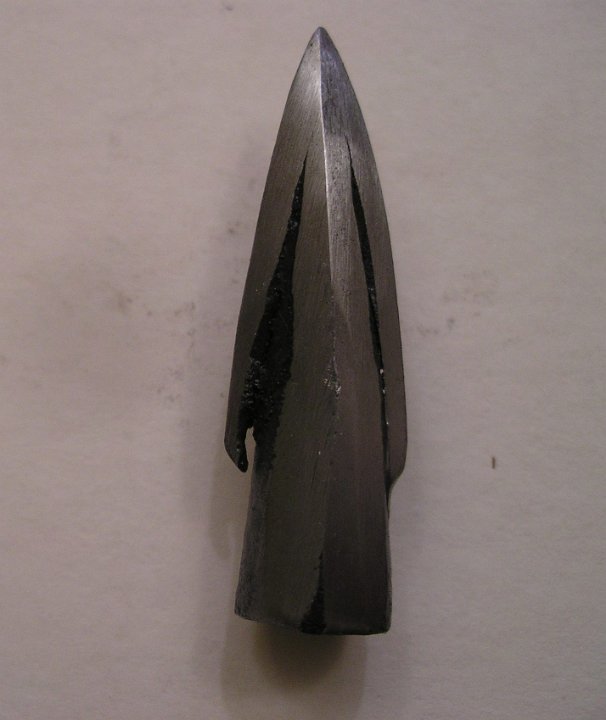
Hey folks, I've been making arrowheads for a short while now, and I've got my bodkins and Tudor heads sorted out, but I'm totally lost when it comes to type 16 heads, as pictured here. I know they're forge welded, with the socket and part of the point forged as normal, and the barb and point section welded on, but I have no idea how you'd approach it. I can't figure out the shapes each part would need to be in order to weld them properly, and I can't work out how you'd get such small pieces to just the right temperature to weld when one is tiny in comparison to the other. By the time you've taken something as small as the barb section out of the fire, placed it on an anvil, positioned the socket over it just right, grabbed the hammer and got ready, all the heat in the tiny part would have vanished! Any thoughts, tips, advice etc would be awesome!