

rookieironman
-
Posts
17 -
Joined
-
Last visited
Content Type
Profiles
Forums
Articles
Gallery
Downloads
Events
Posts posted by rookieironman
-
-
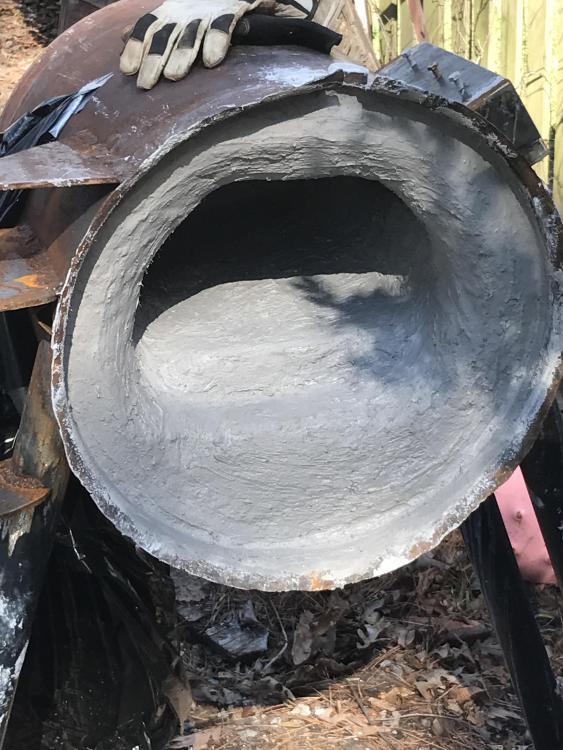
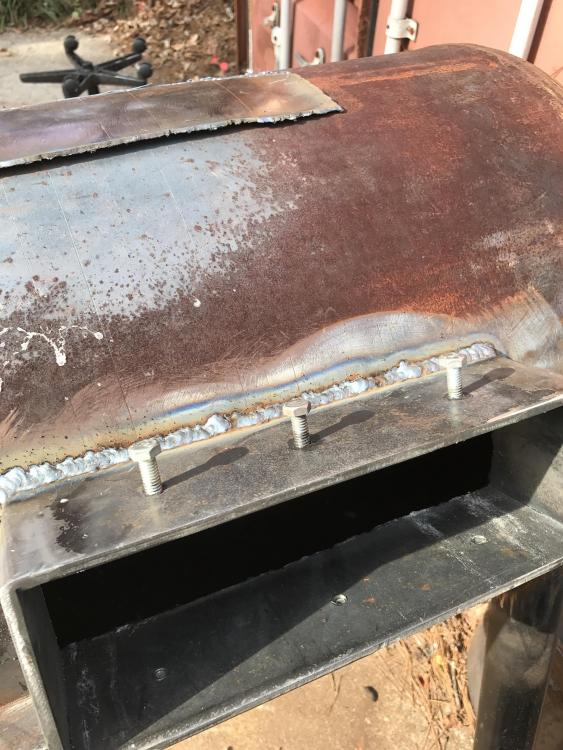
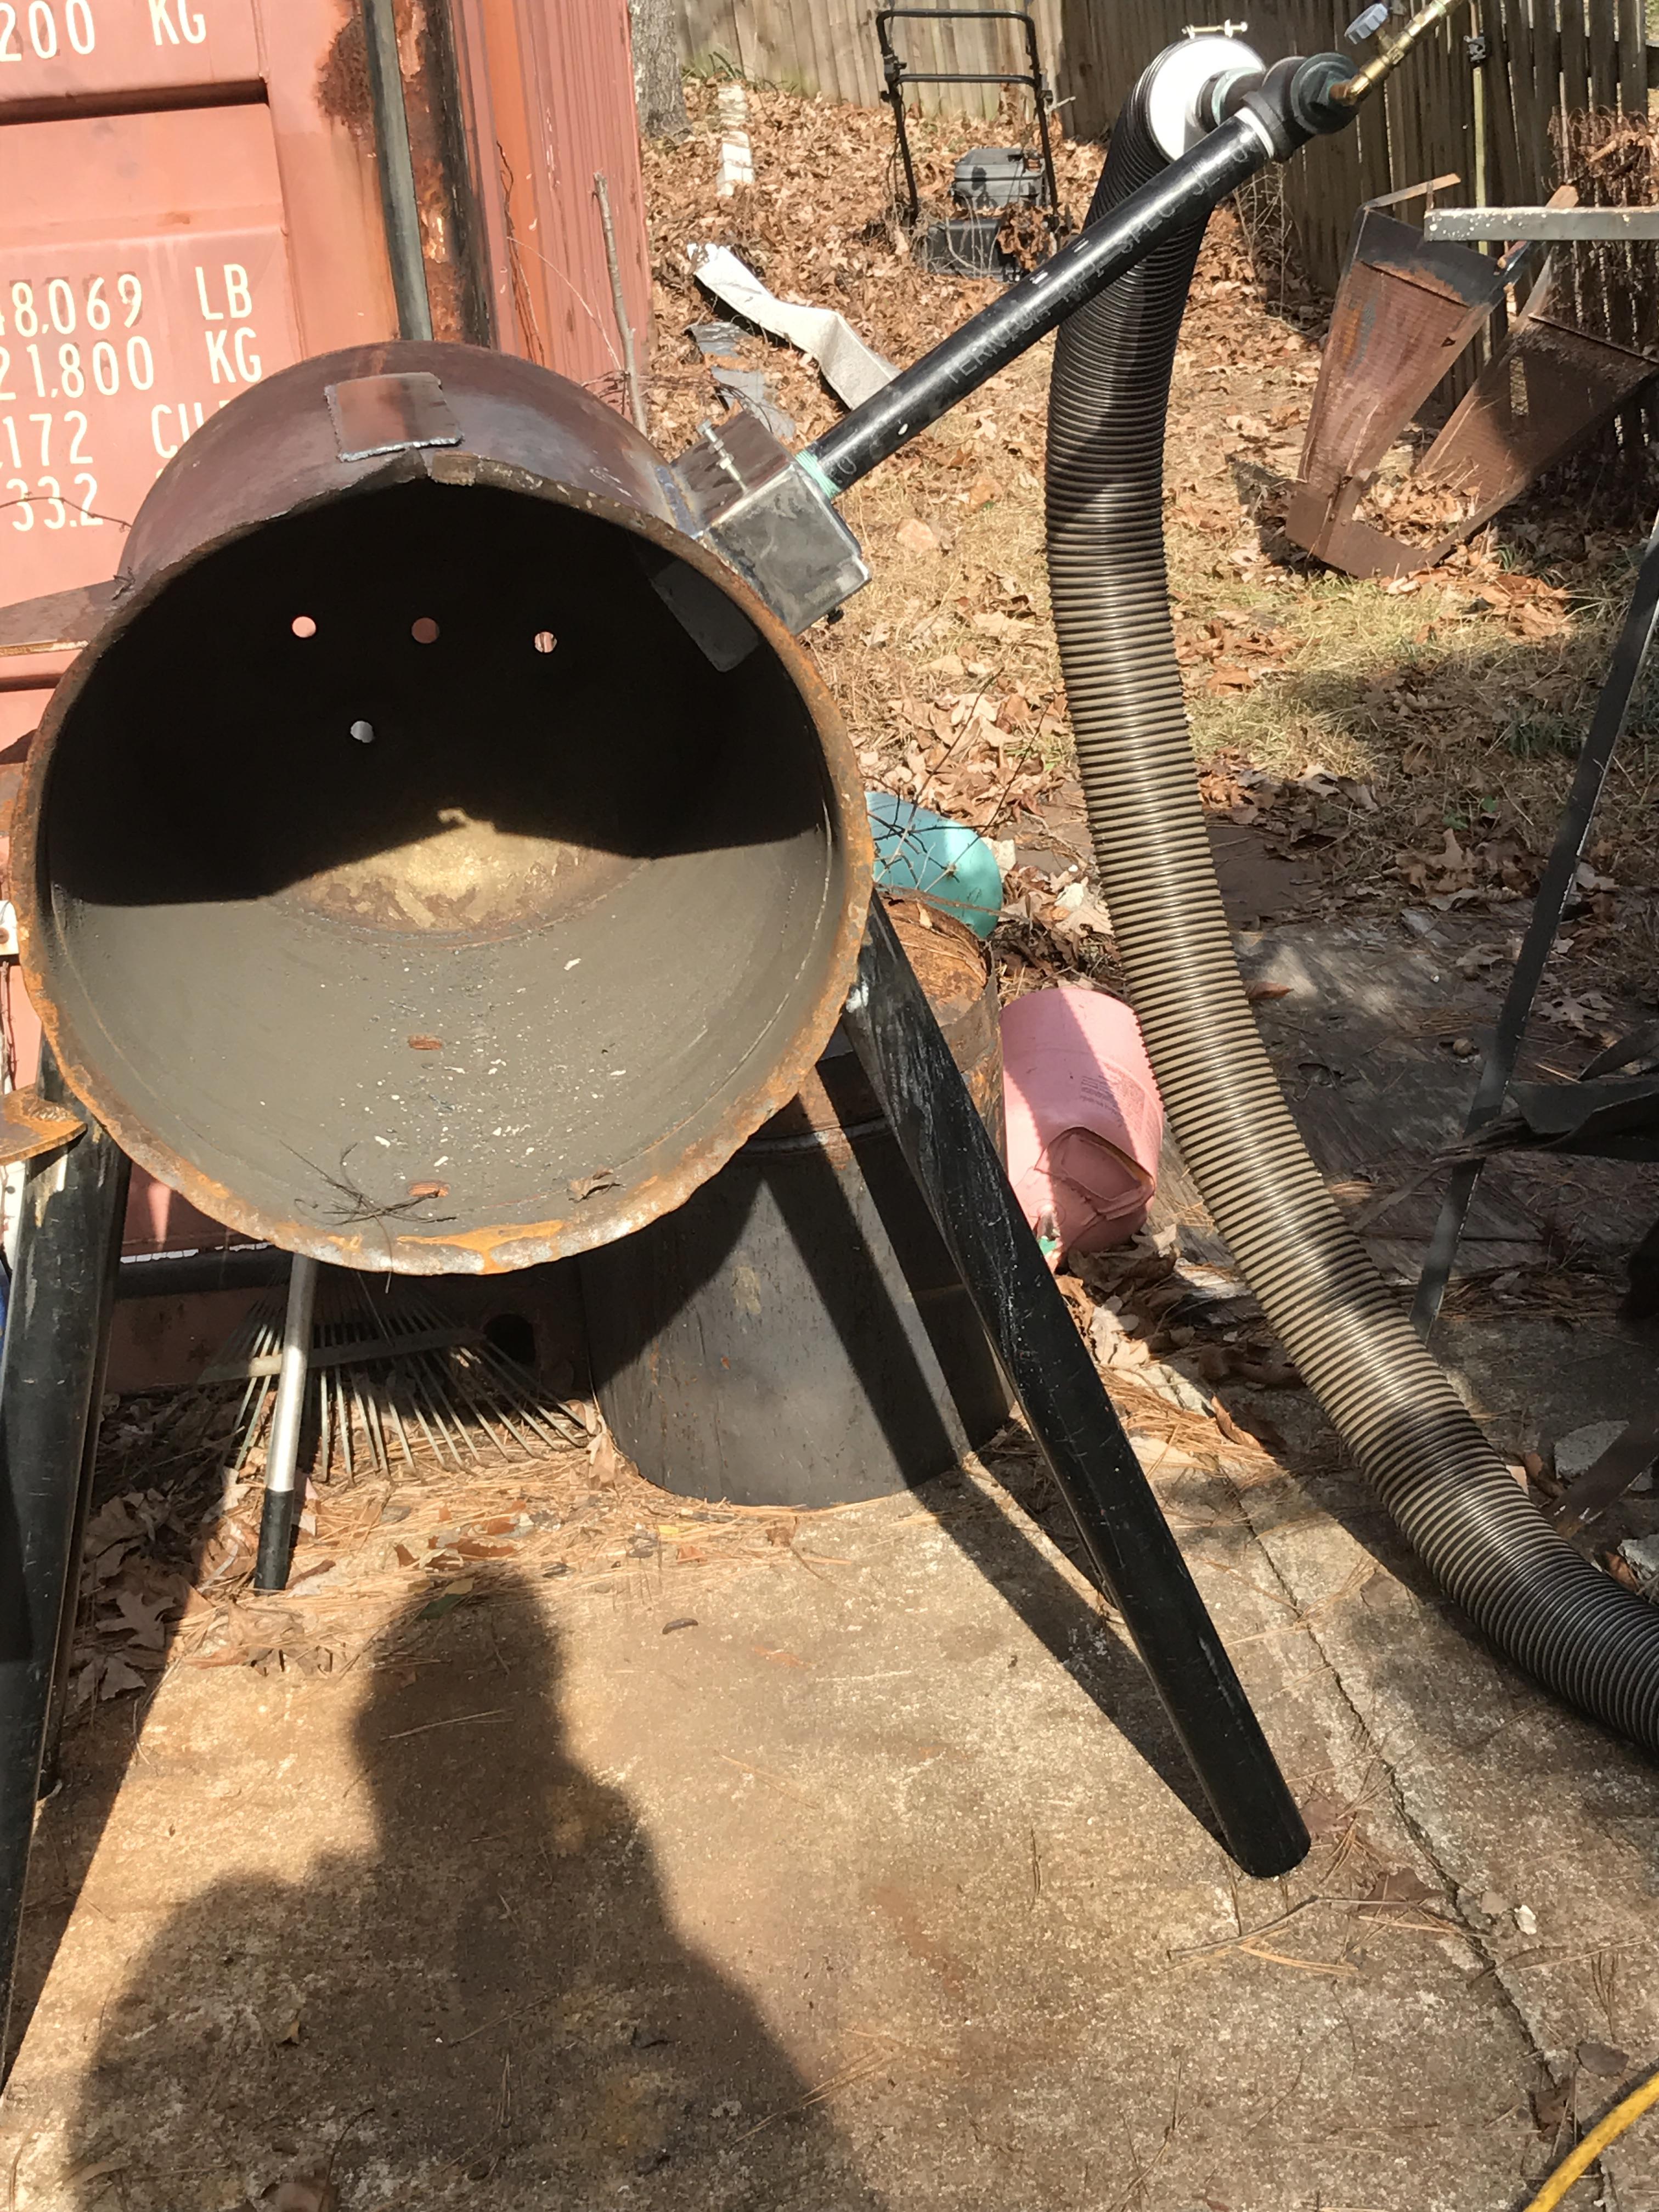
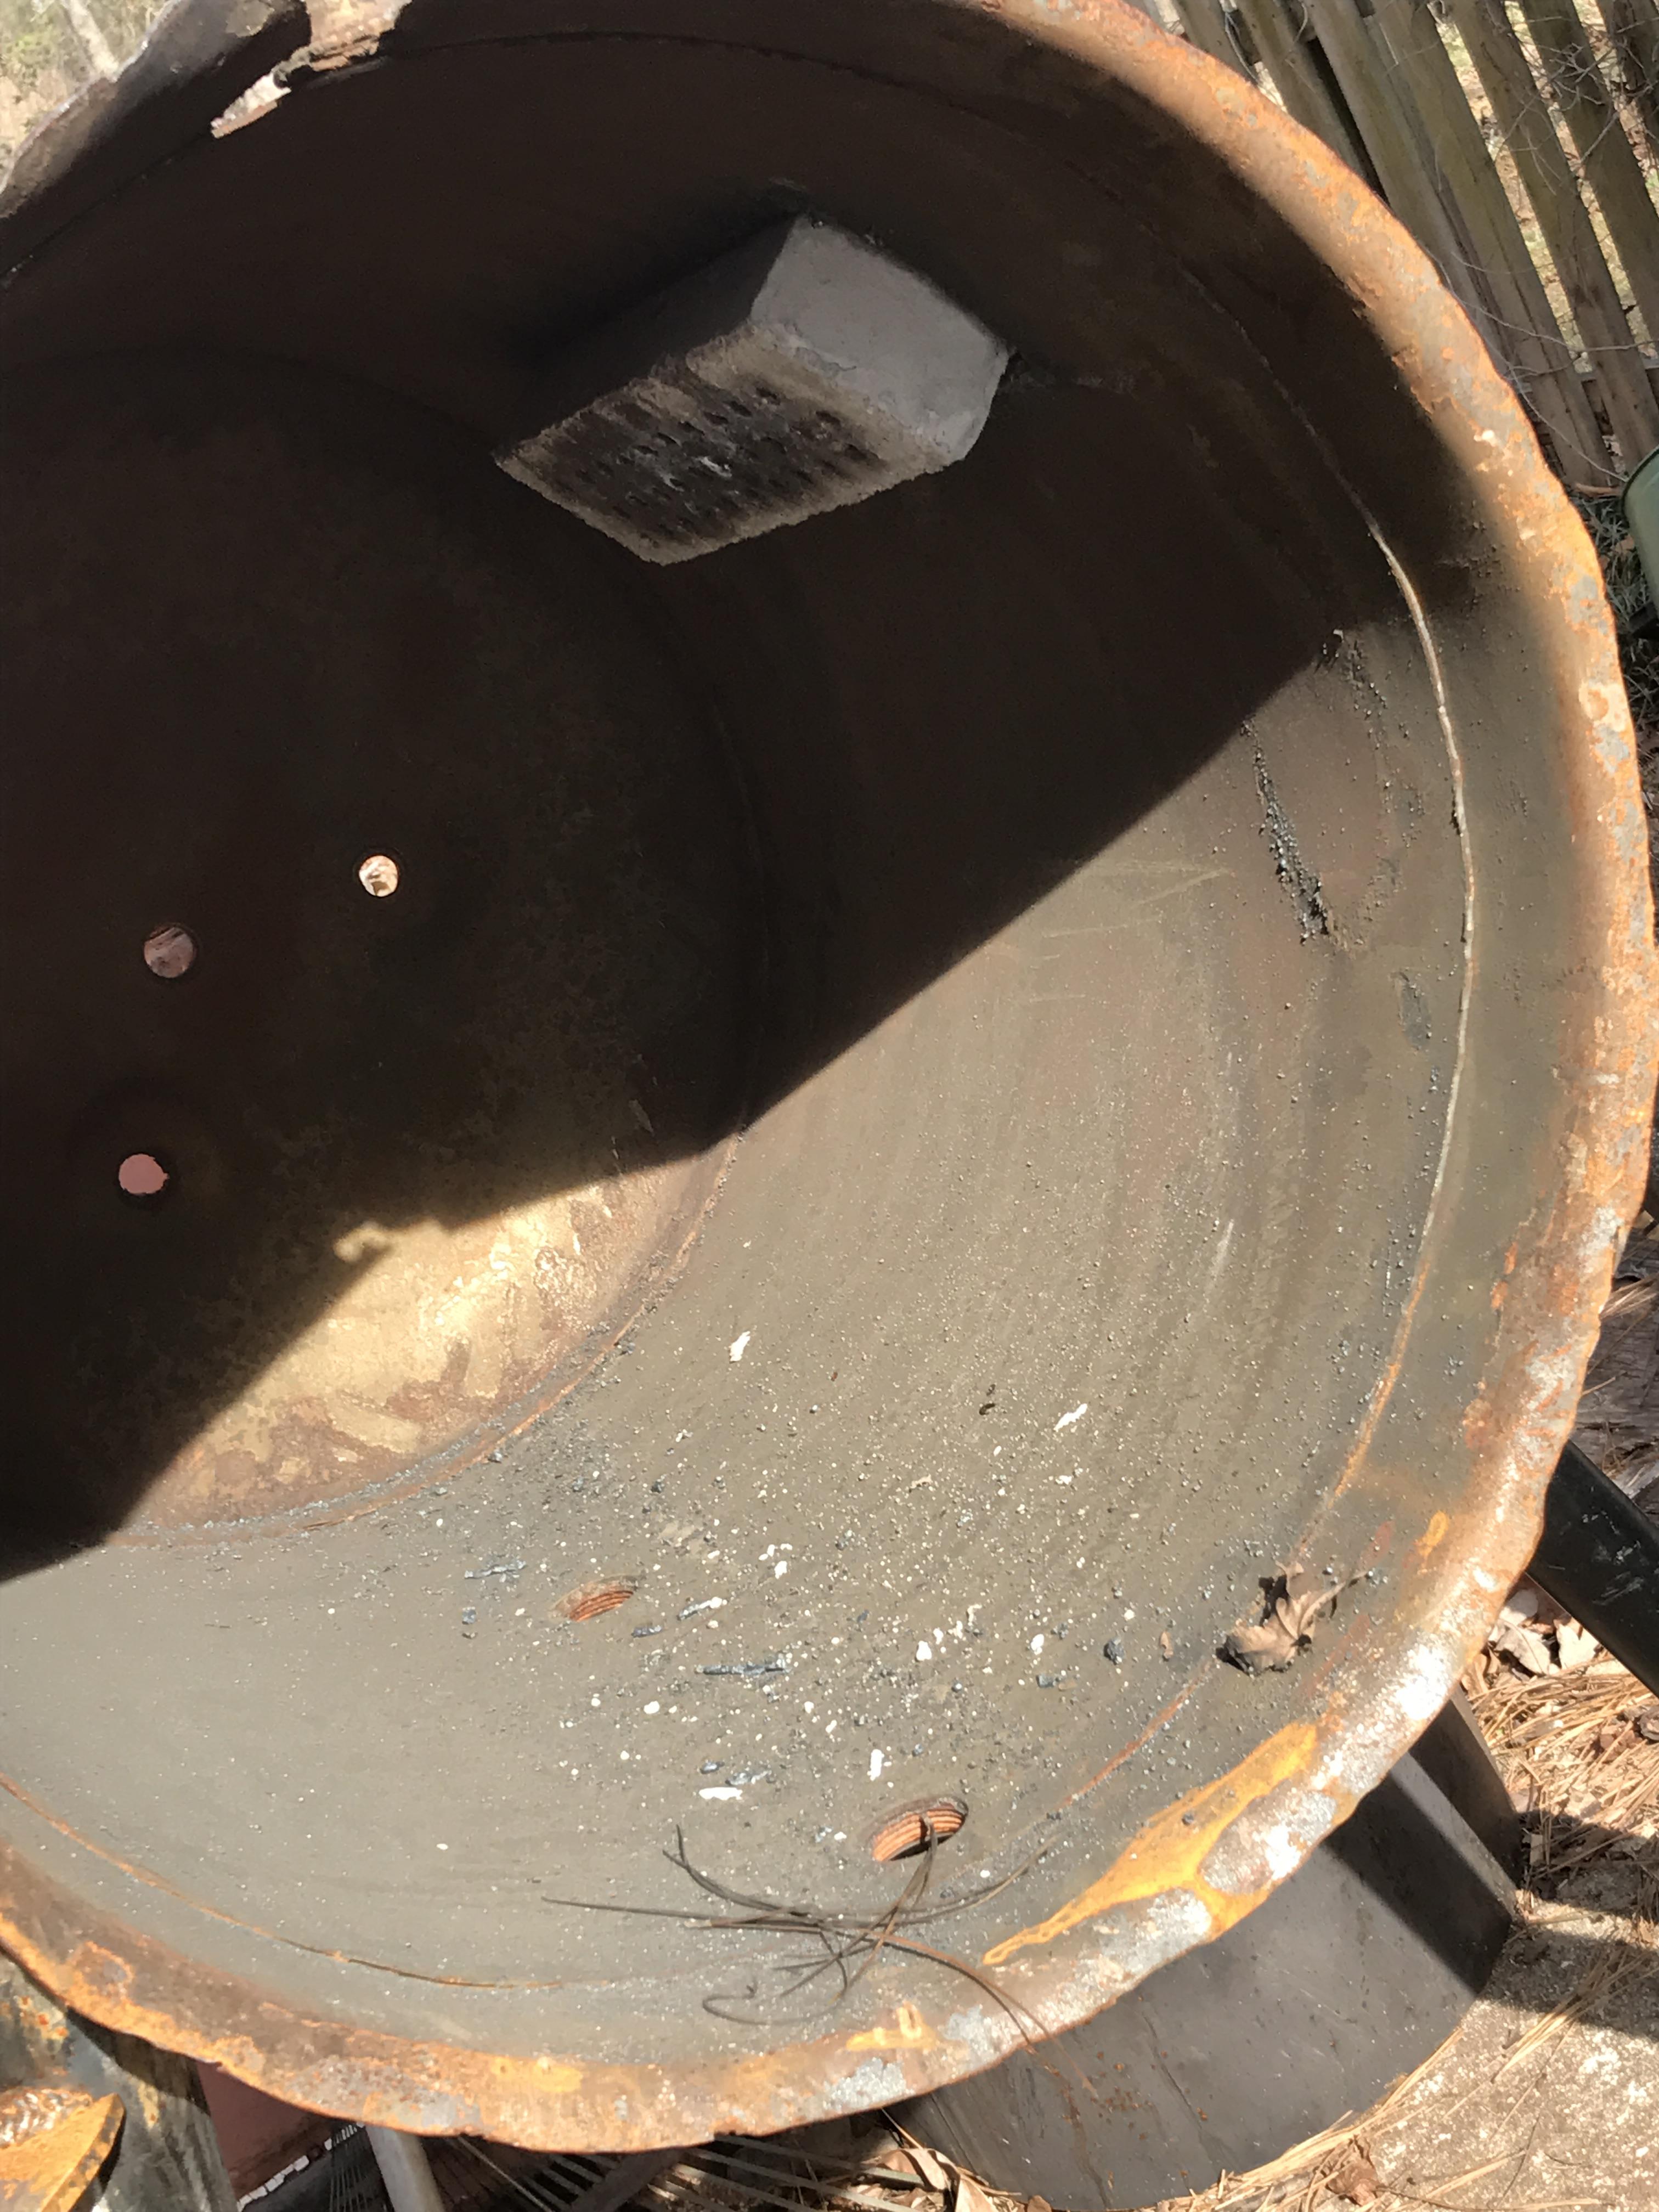
Refractory lining in. Castable first, then coated with greenpatch421. Will be ordering the macote wash from Wayne soon.
I heated too fast and got some steam spalling. Have repaired and am letting things dry for awhile before I fire it up again.

-
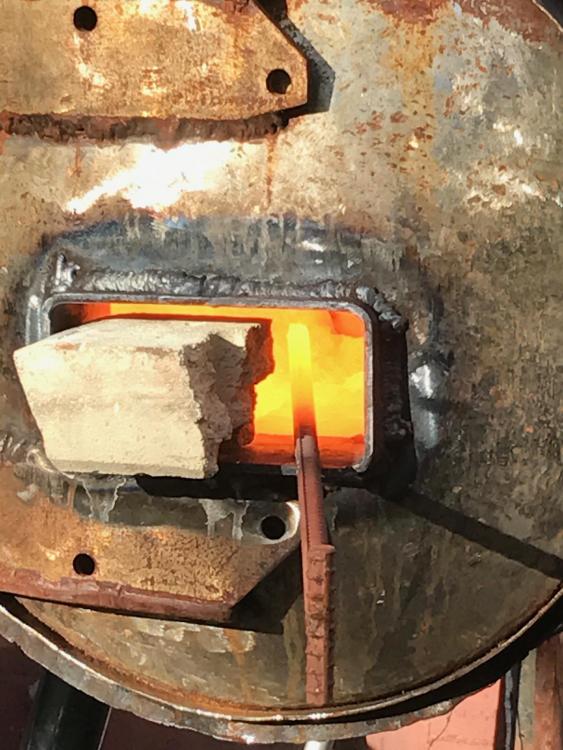
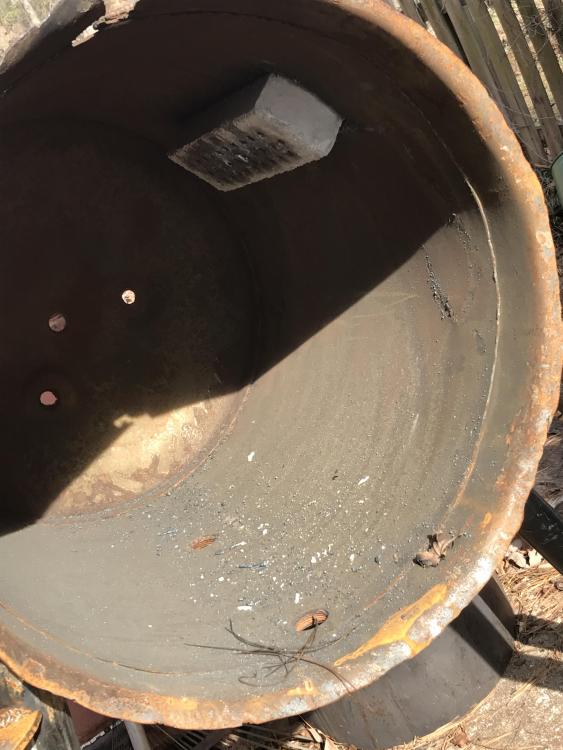
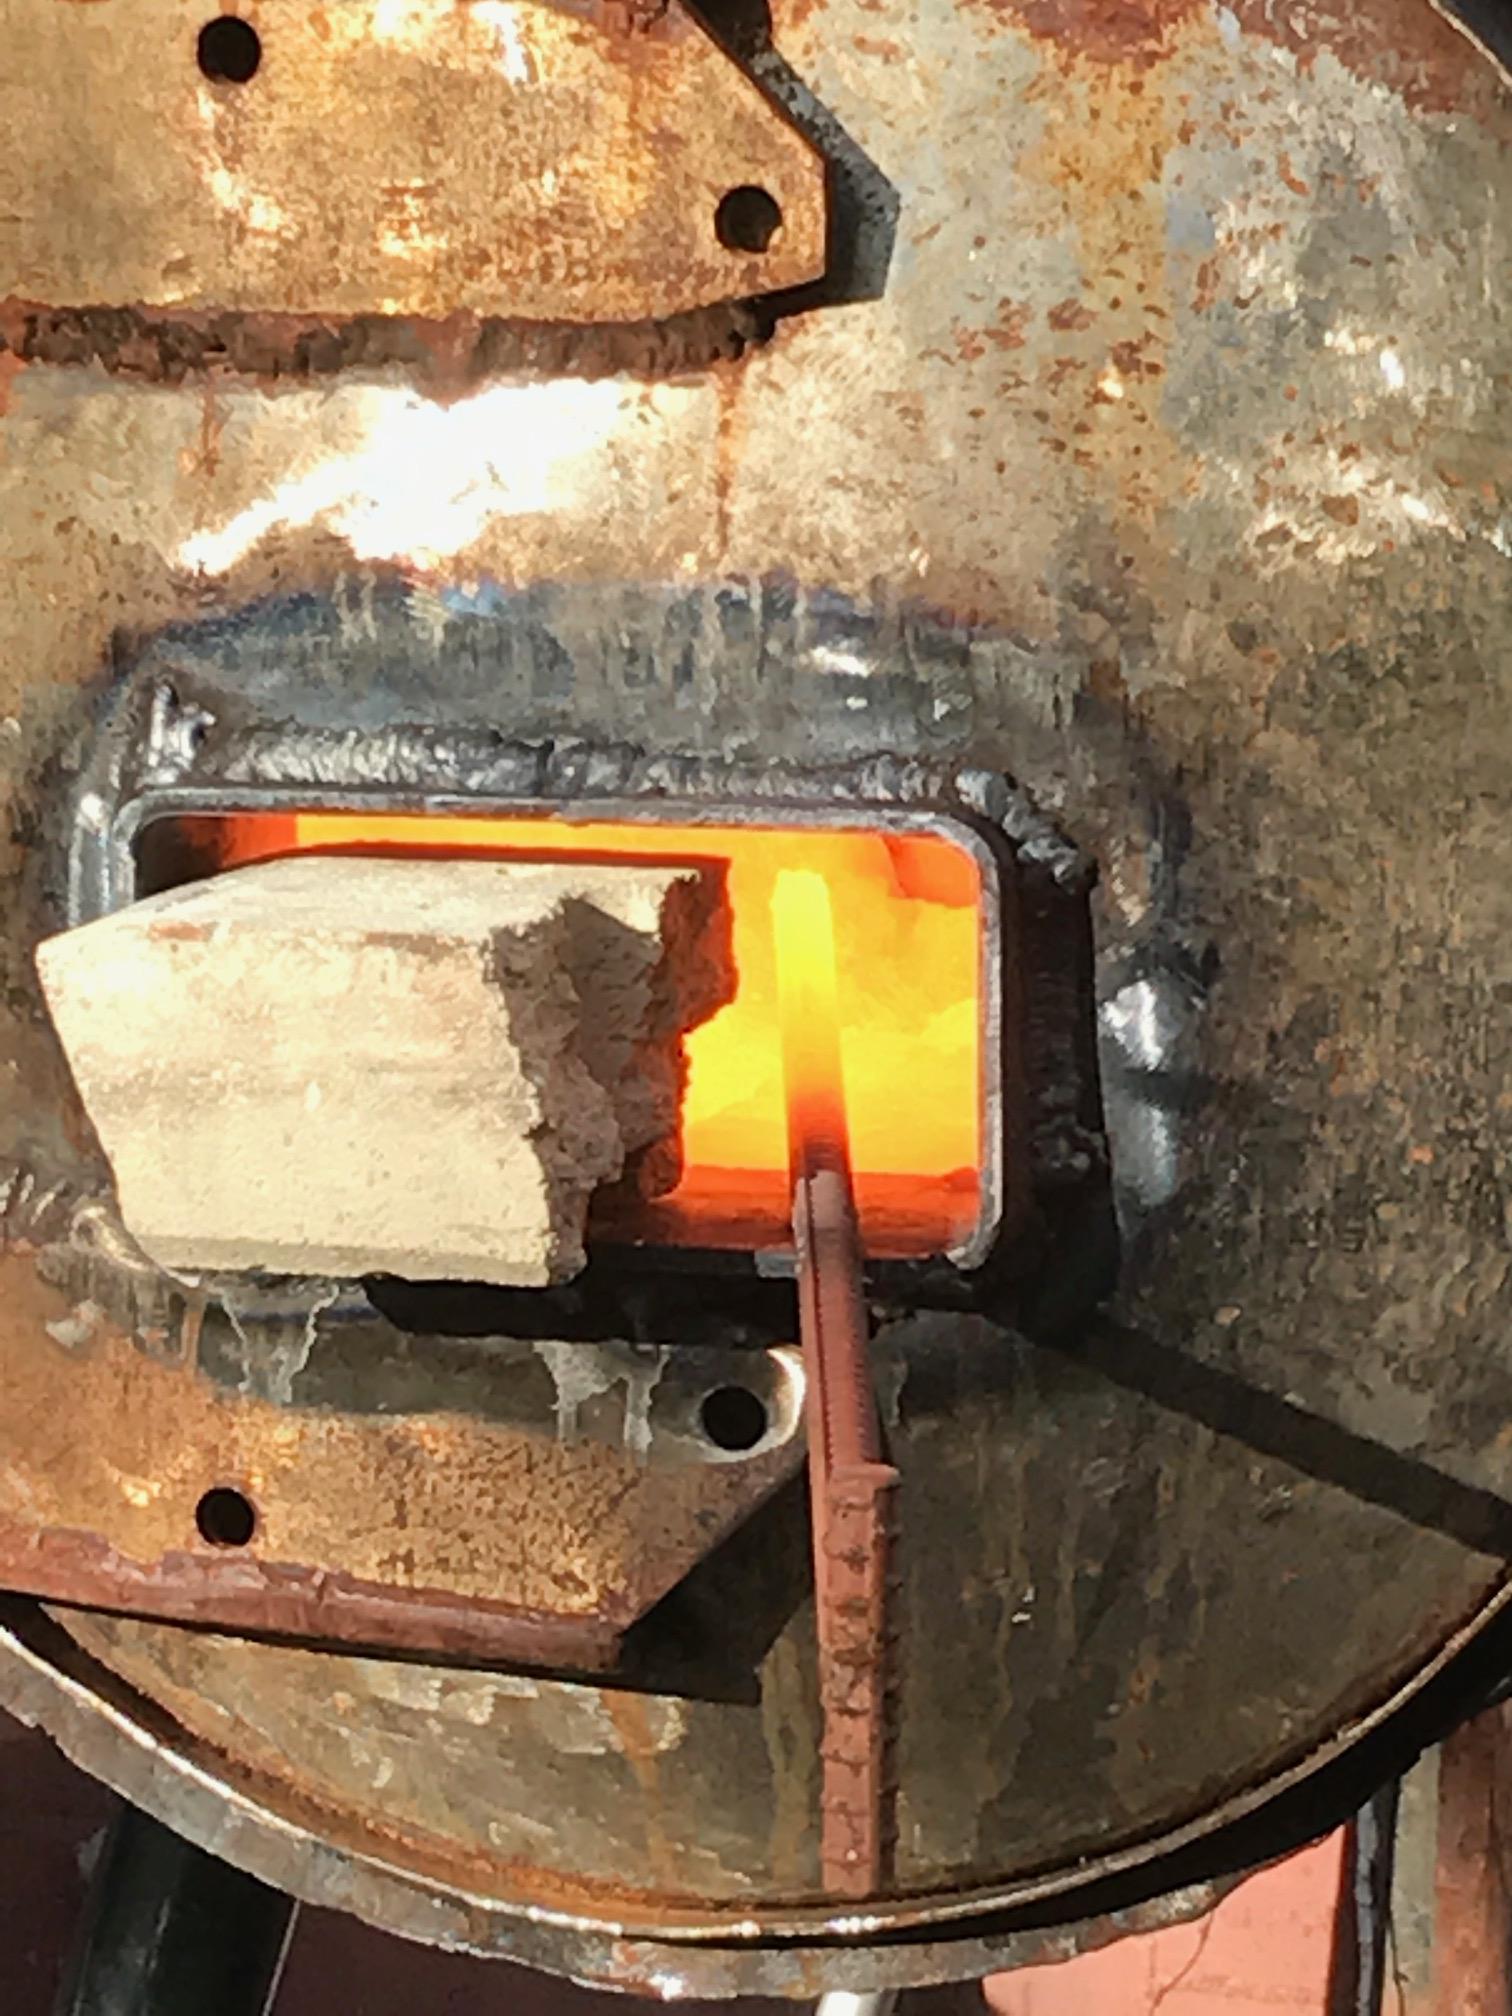
Lined it with the cerachem. I found an online source for Sodium meta silicate powder. Five pounds for $30 so I used a solution of that to assist with the installation. It went well. Test fired it. After running for an hour at a low level I cranked it up to about half way (air gate valve) and stuck a piece of half inch re-bar in it. The picture is of the re-bar three minutes after I put it in the forge. Running at 2 PSI through an eighth inch orifice. I shut down after running for three hours. I figure that was a sufficient burn in. Tomorrow I line with refractory.
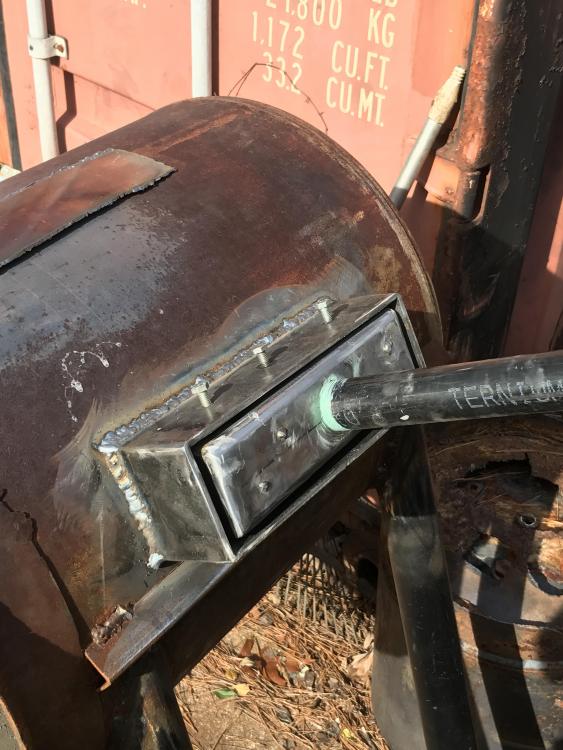
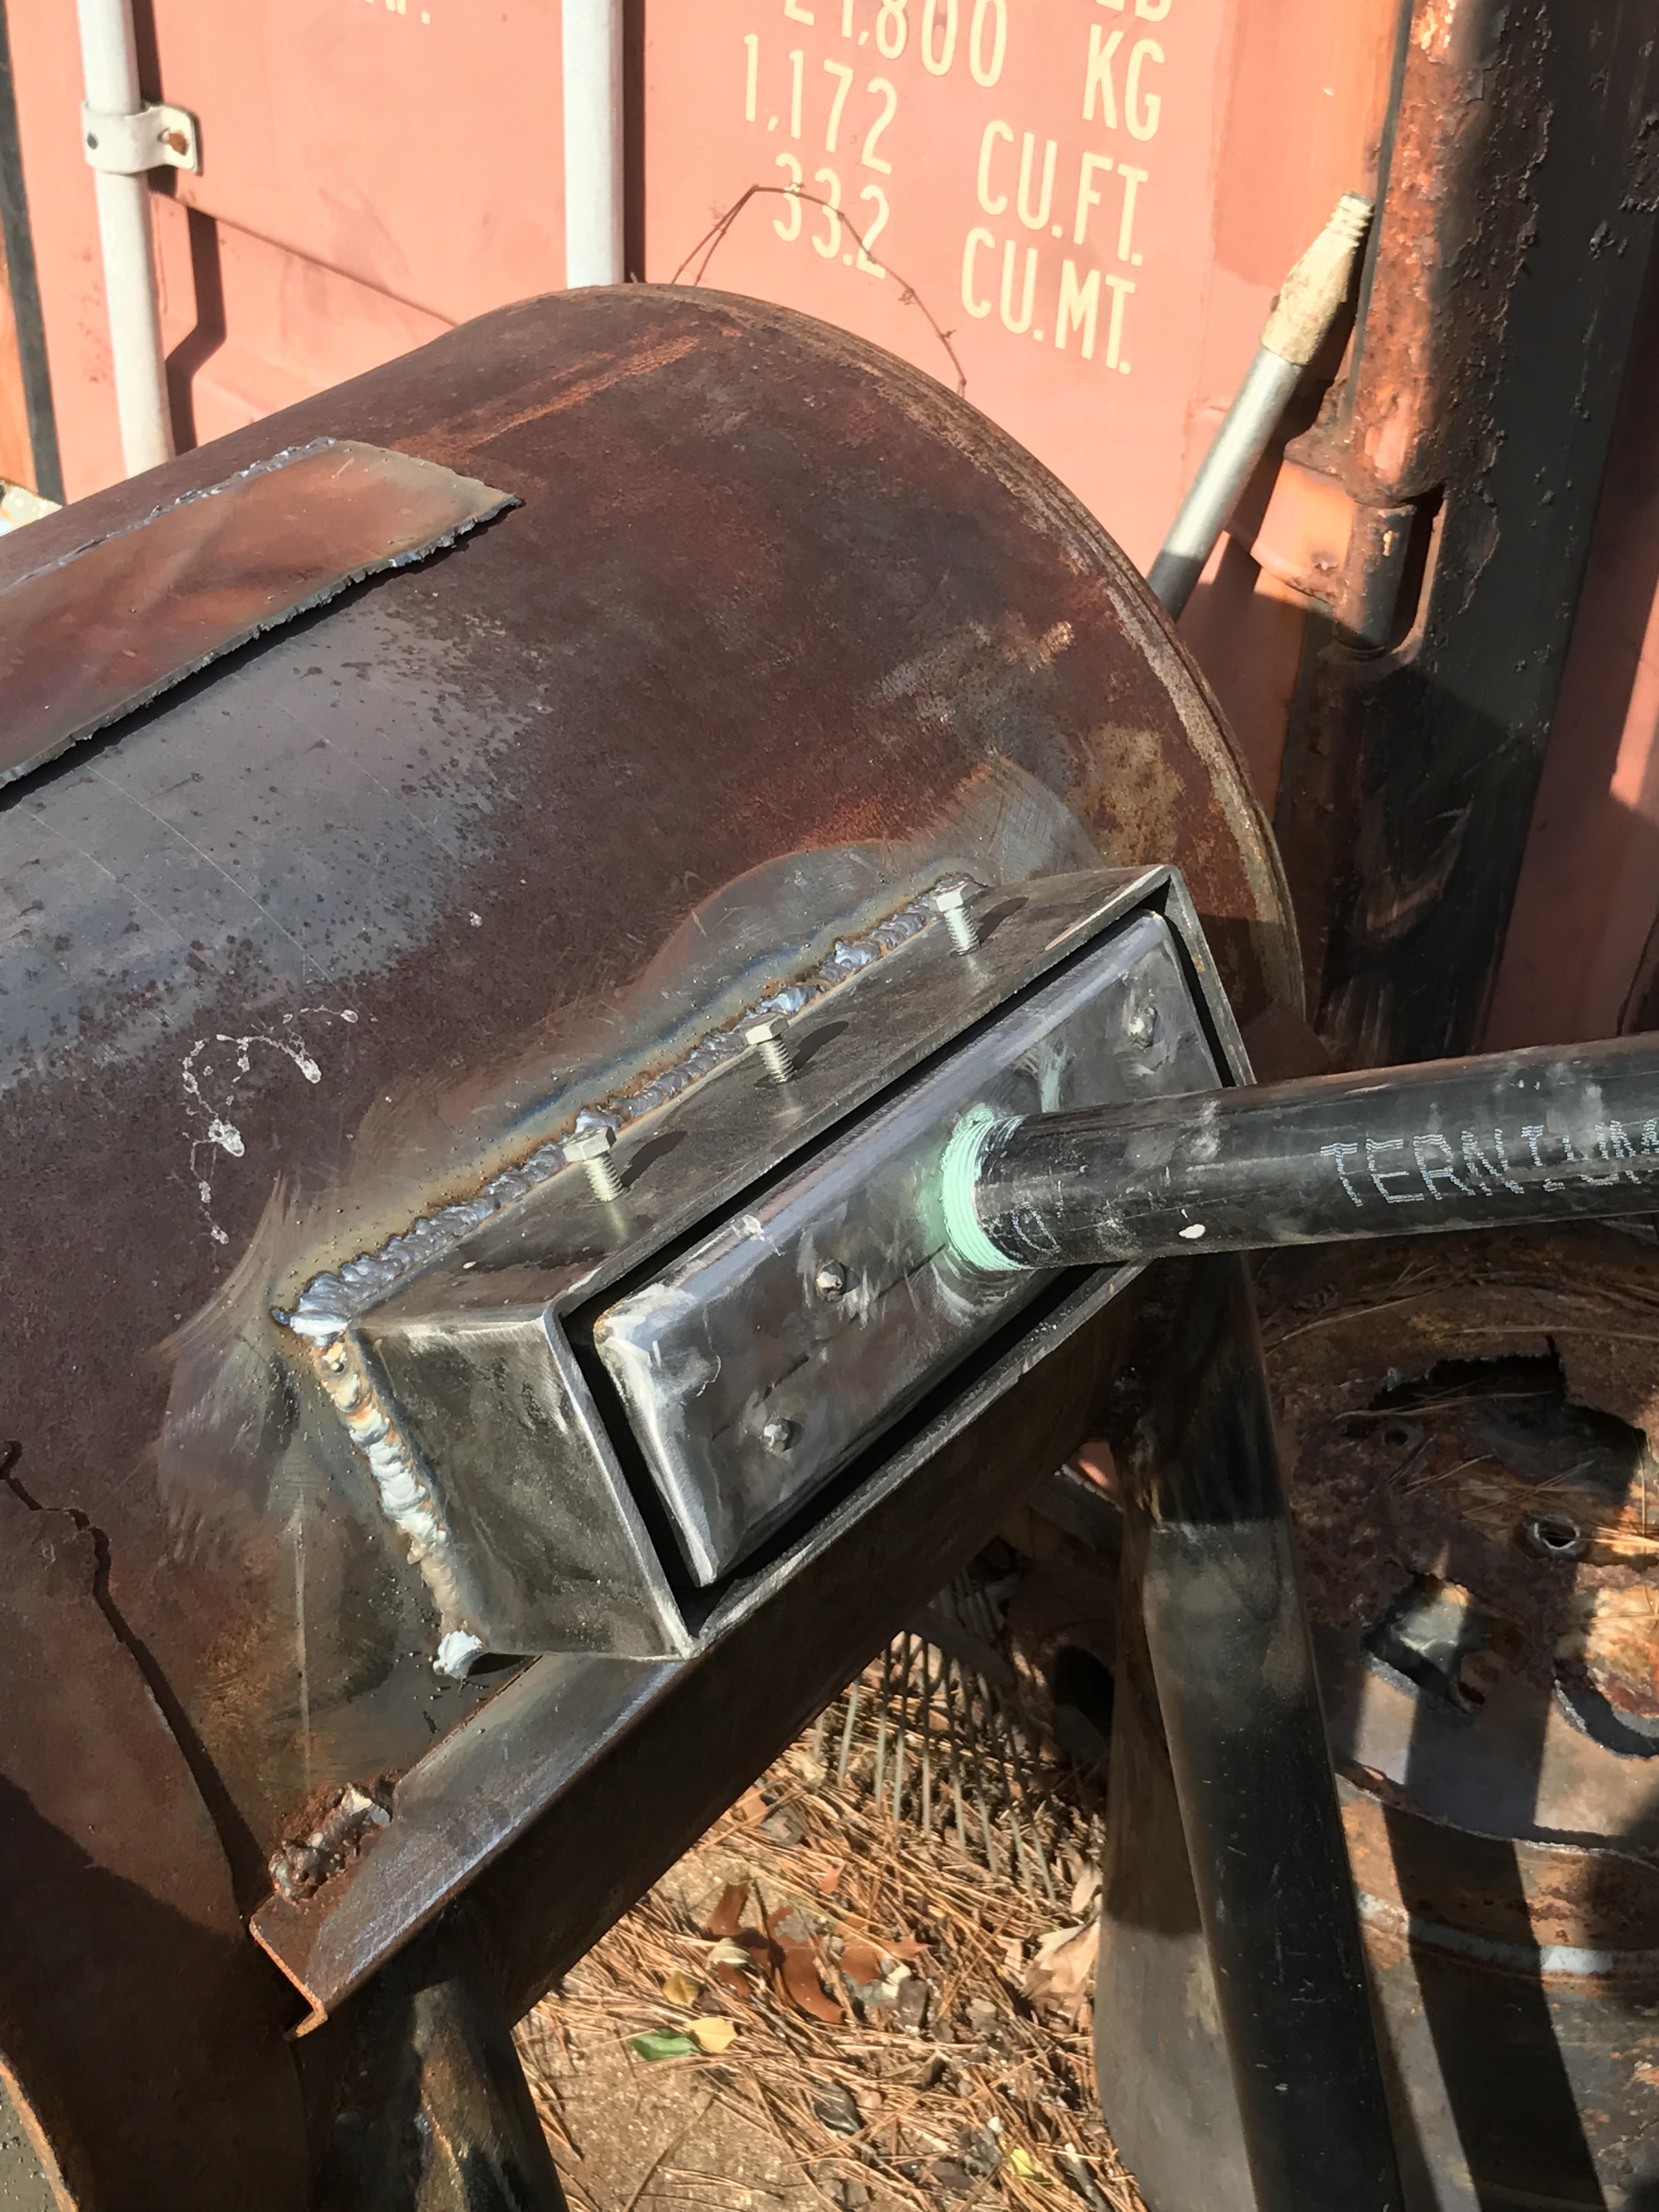
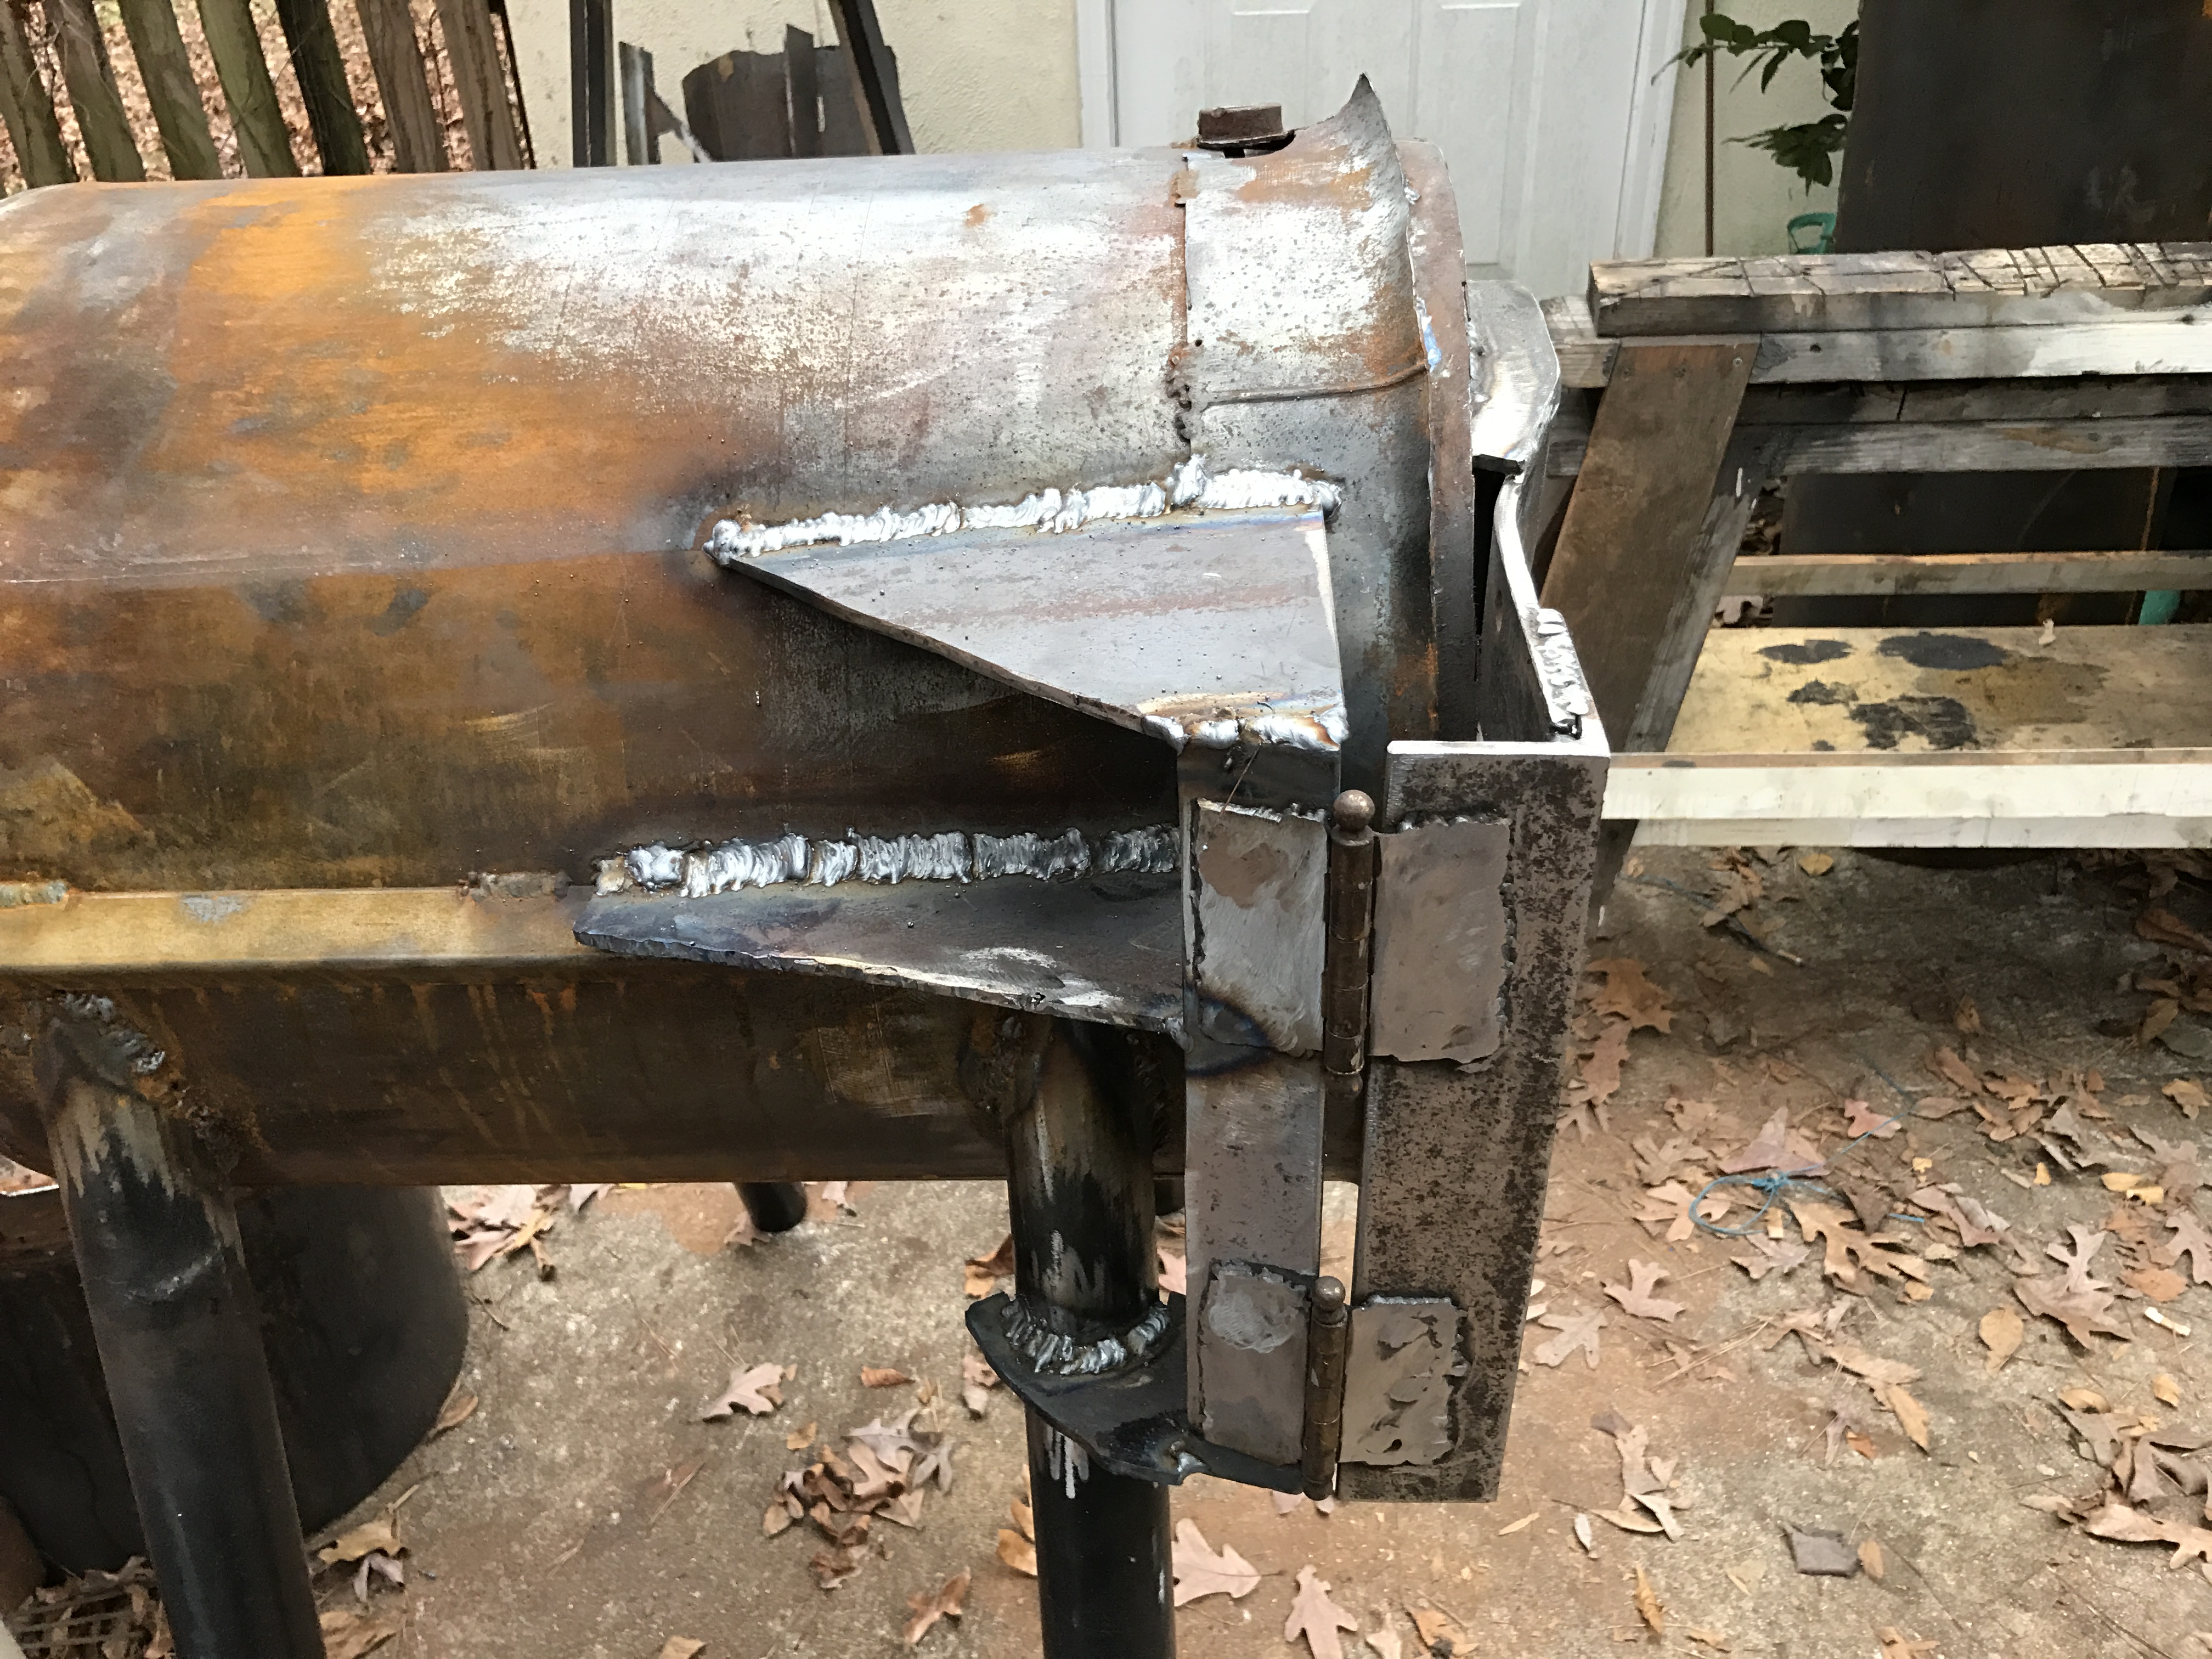
Thanks to Wayne Coe for the comment about the threaded section possibly interfering with the baffle..thanks to him I took a look and adjusted the feed pipe. It was touching the baffle and preventing lower level flames from forming properly... I fixed it and it is completely adjustable now..
-
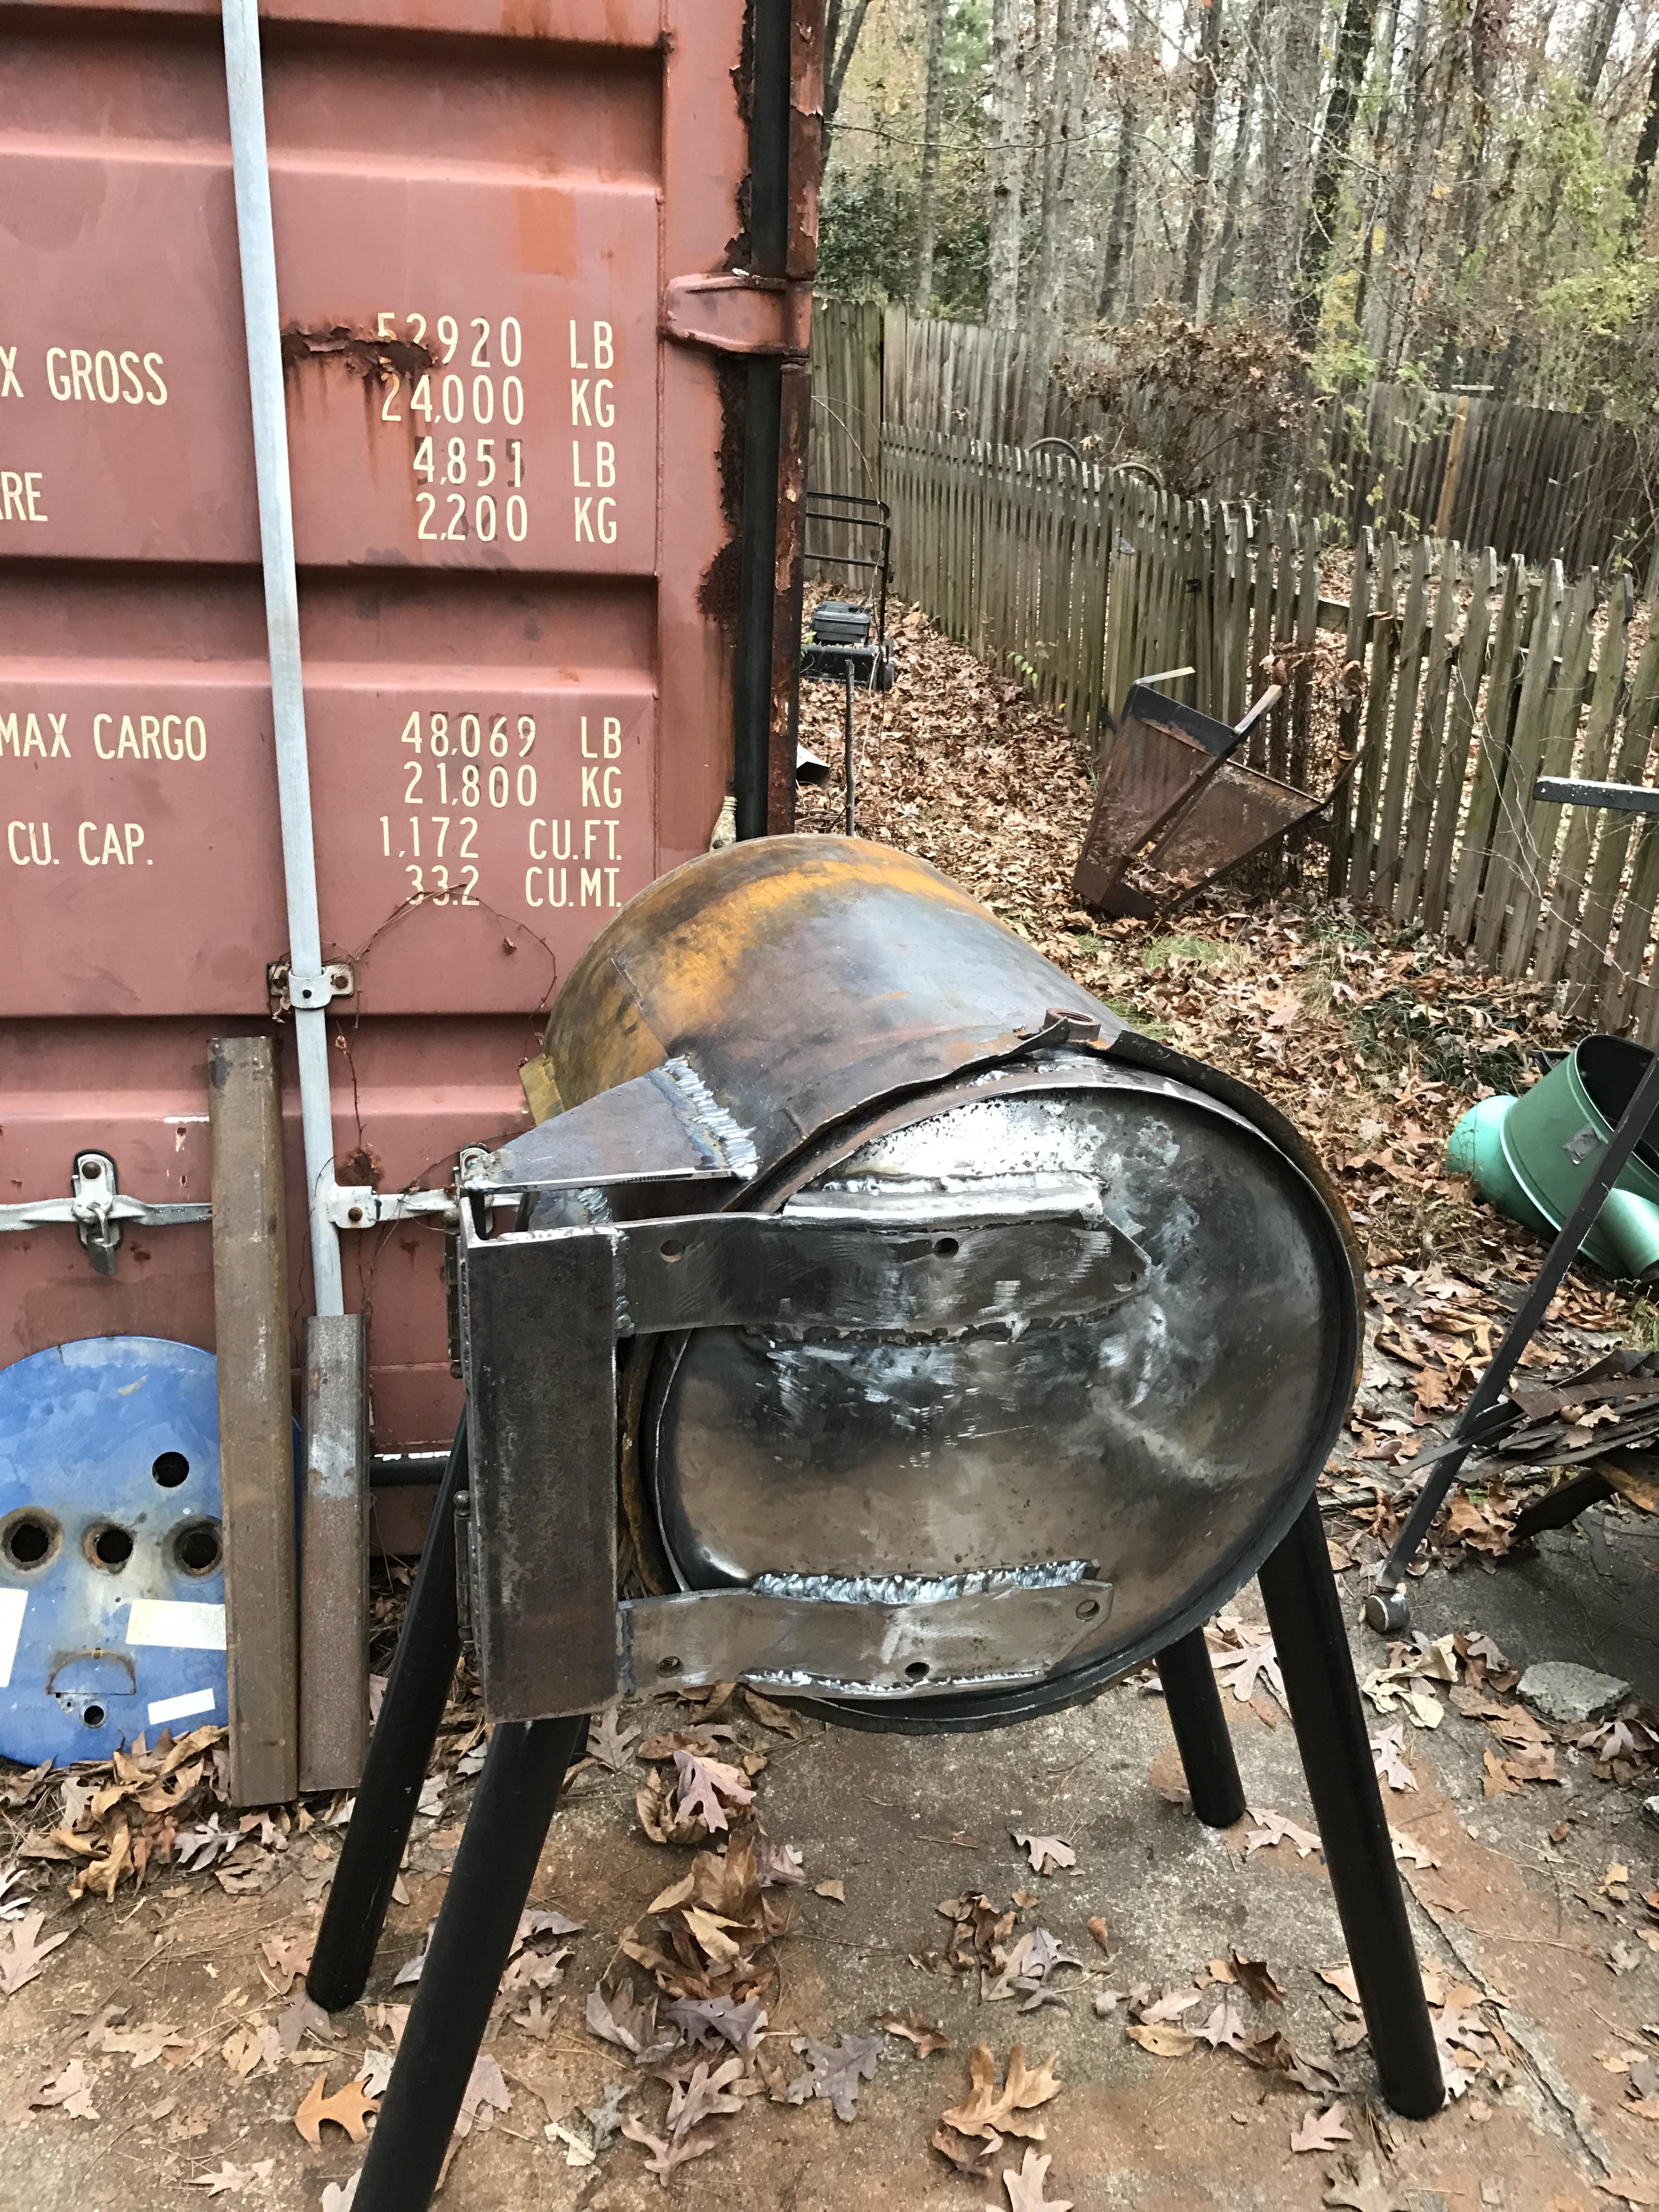
Burner mounted and test run. Air adjustment is a bit touchy. I'll be scouting for for a 1 1/4 inch gate valve to allow a bit finer adjustments. I currently have a blast gate over the blower intake but that is a bit crude. I was able to easily produce reducing, neutral and oxidizing flame fronts, though because of the air adjustment, the oxidizing flame was a bit unstable. Had to shut it off after 3 minutes as

the structure started glowing a bit. Lol.
Burner body had no leaks and stayed cool to the touch. So far so good.
 On January 9, 2017 at 8:17 PM, WayneCoeArtistBlacksmith.c said:
That sounds good about the leaks. When I first started considering building Ribbon Burners I used 1/4" round to make the holes. I oiled them first and then was able to wiggle them out. That casting came apart because I did not use a strong enough castable. After that John supplied me with a ready built burner so I don't know how the 1/4" holes would have worked out.
Let me know if I can help you.
Wayne
Your comment made me look at it a little closer. The end of the pipe WAS touching the baffle. I think it affected the lower settings. I shortened the threaded section and added holes around the edge to make the tube part of the baffle system. After that modification I was able to get flames about half an inch long. Prior to that, at lower pressures the ports furthest out would not fire properly. Thanks for the thought Wayne. Checking the baffle clearance definitely helped.
-
Wall thickness is 5/16. So a bit more threads than it appears. Test fire showed no leaks or issues at join.
-
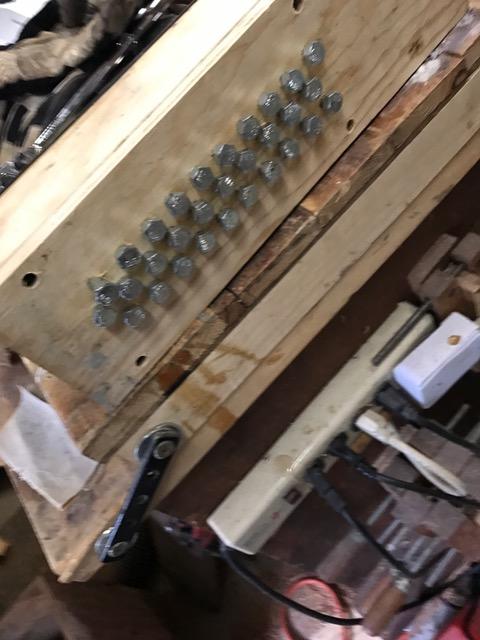
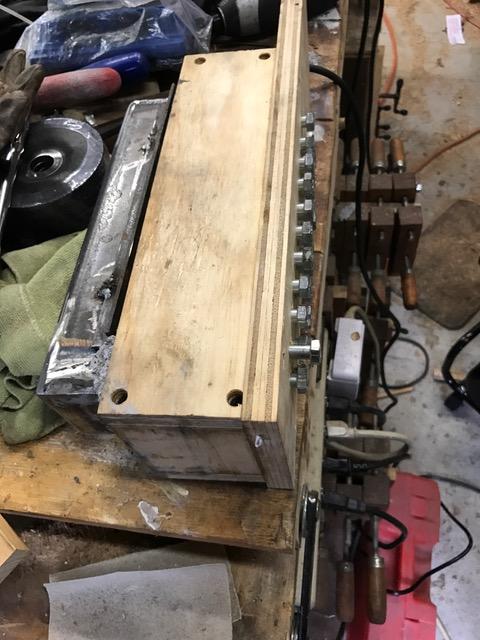
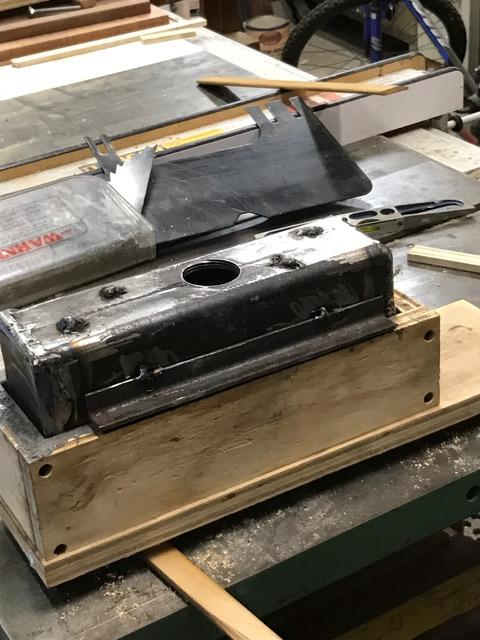
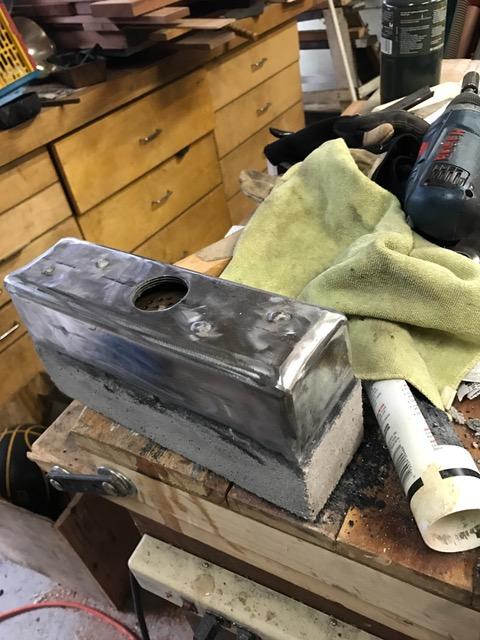
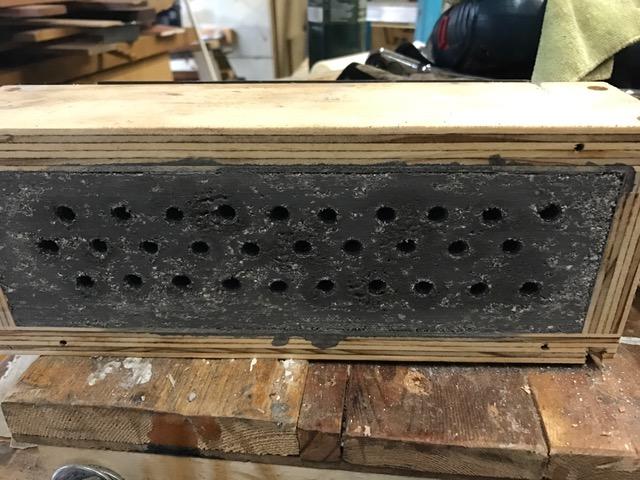
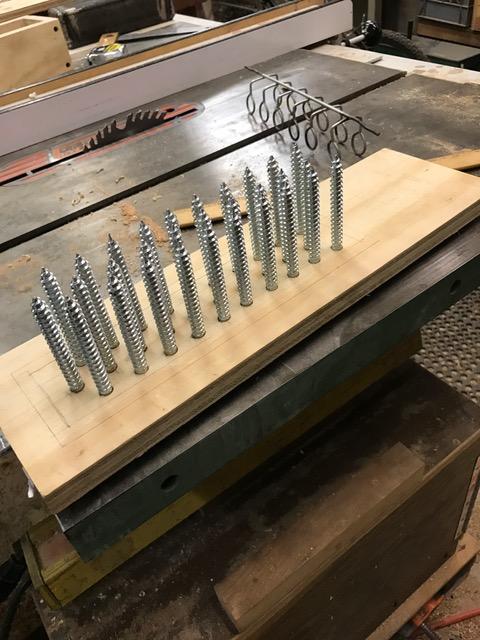
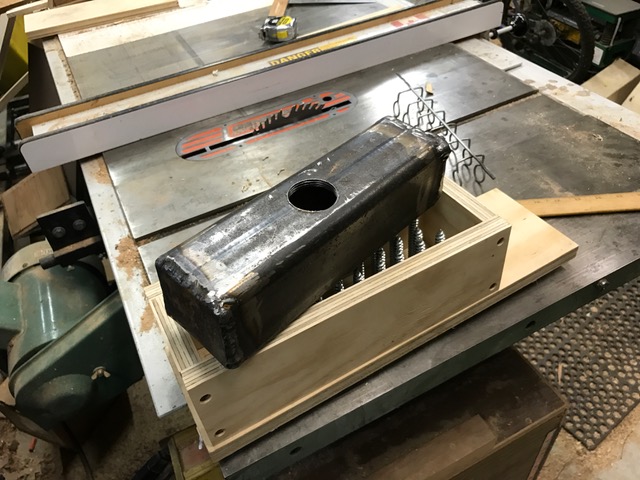
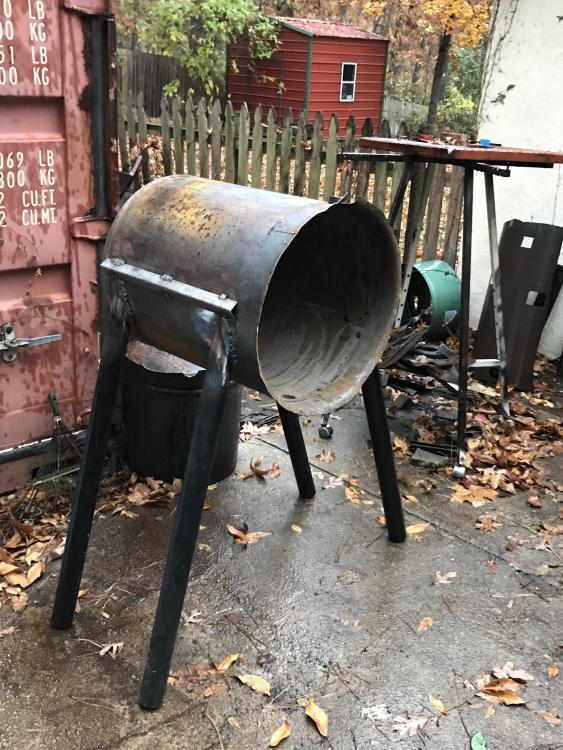
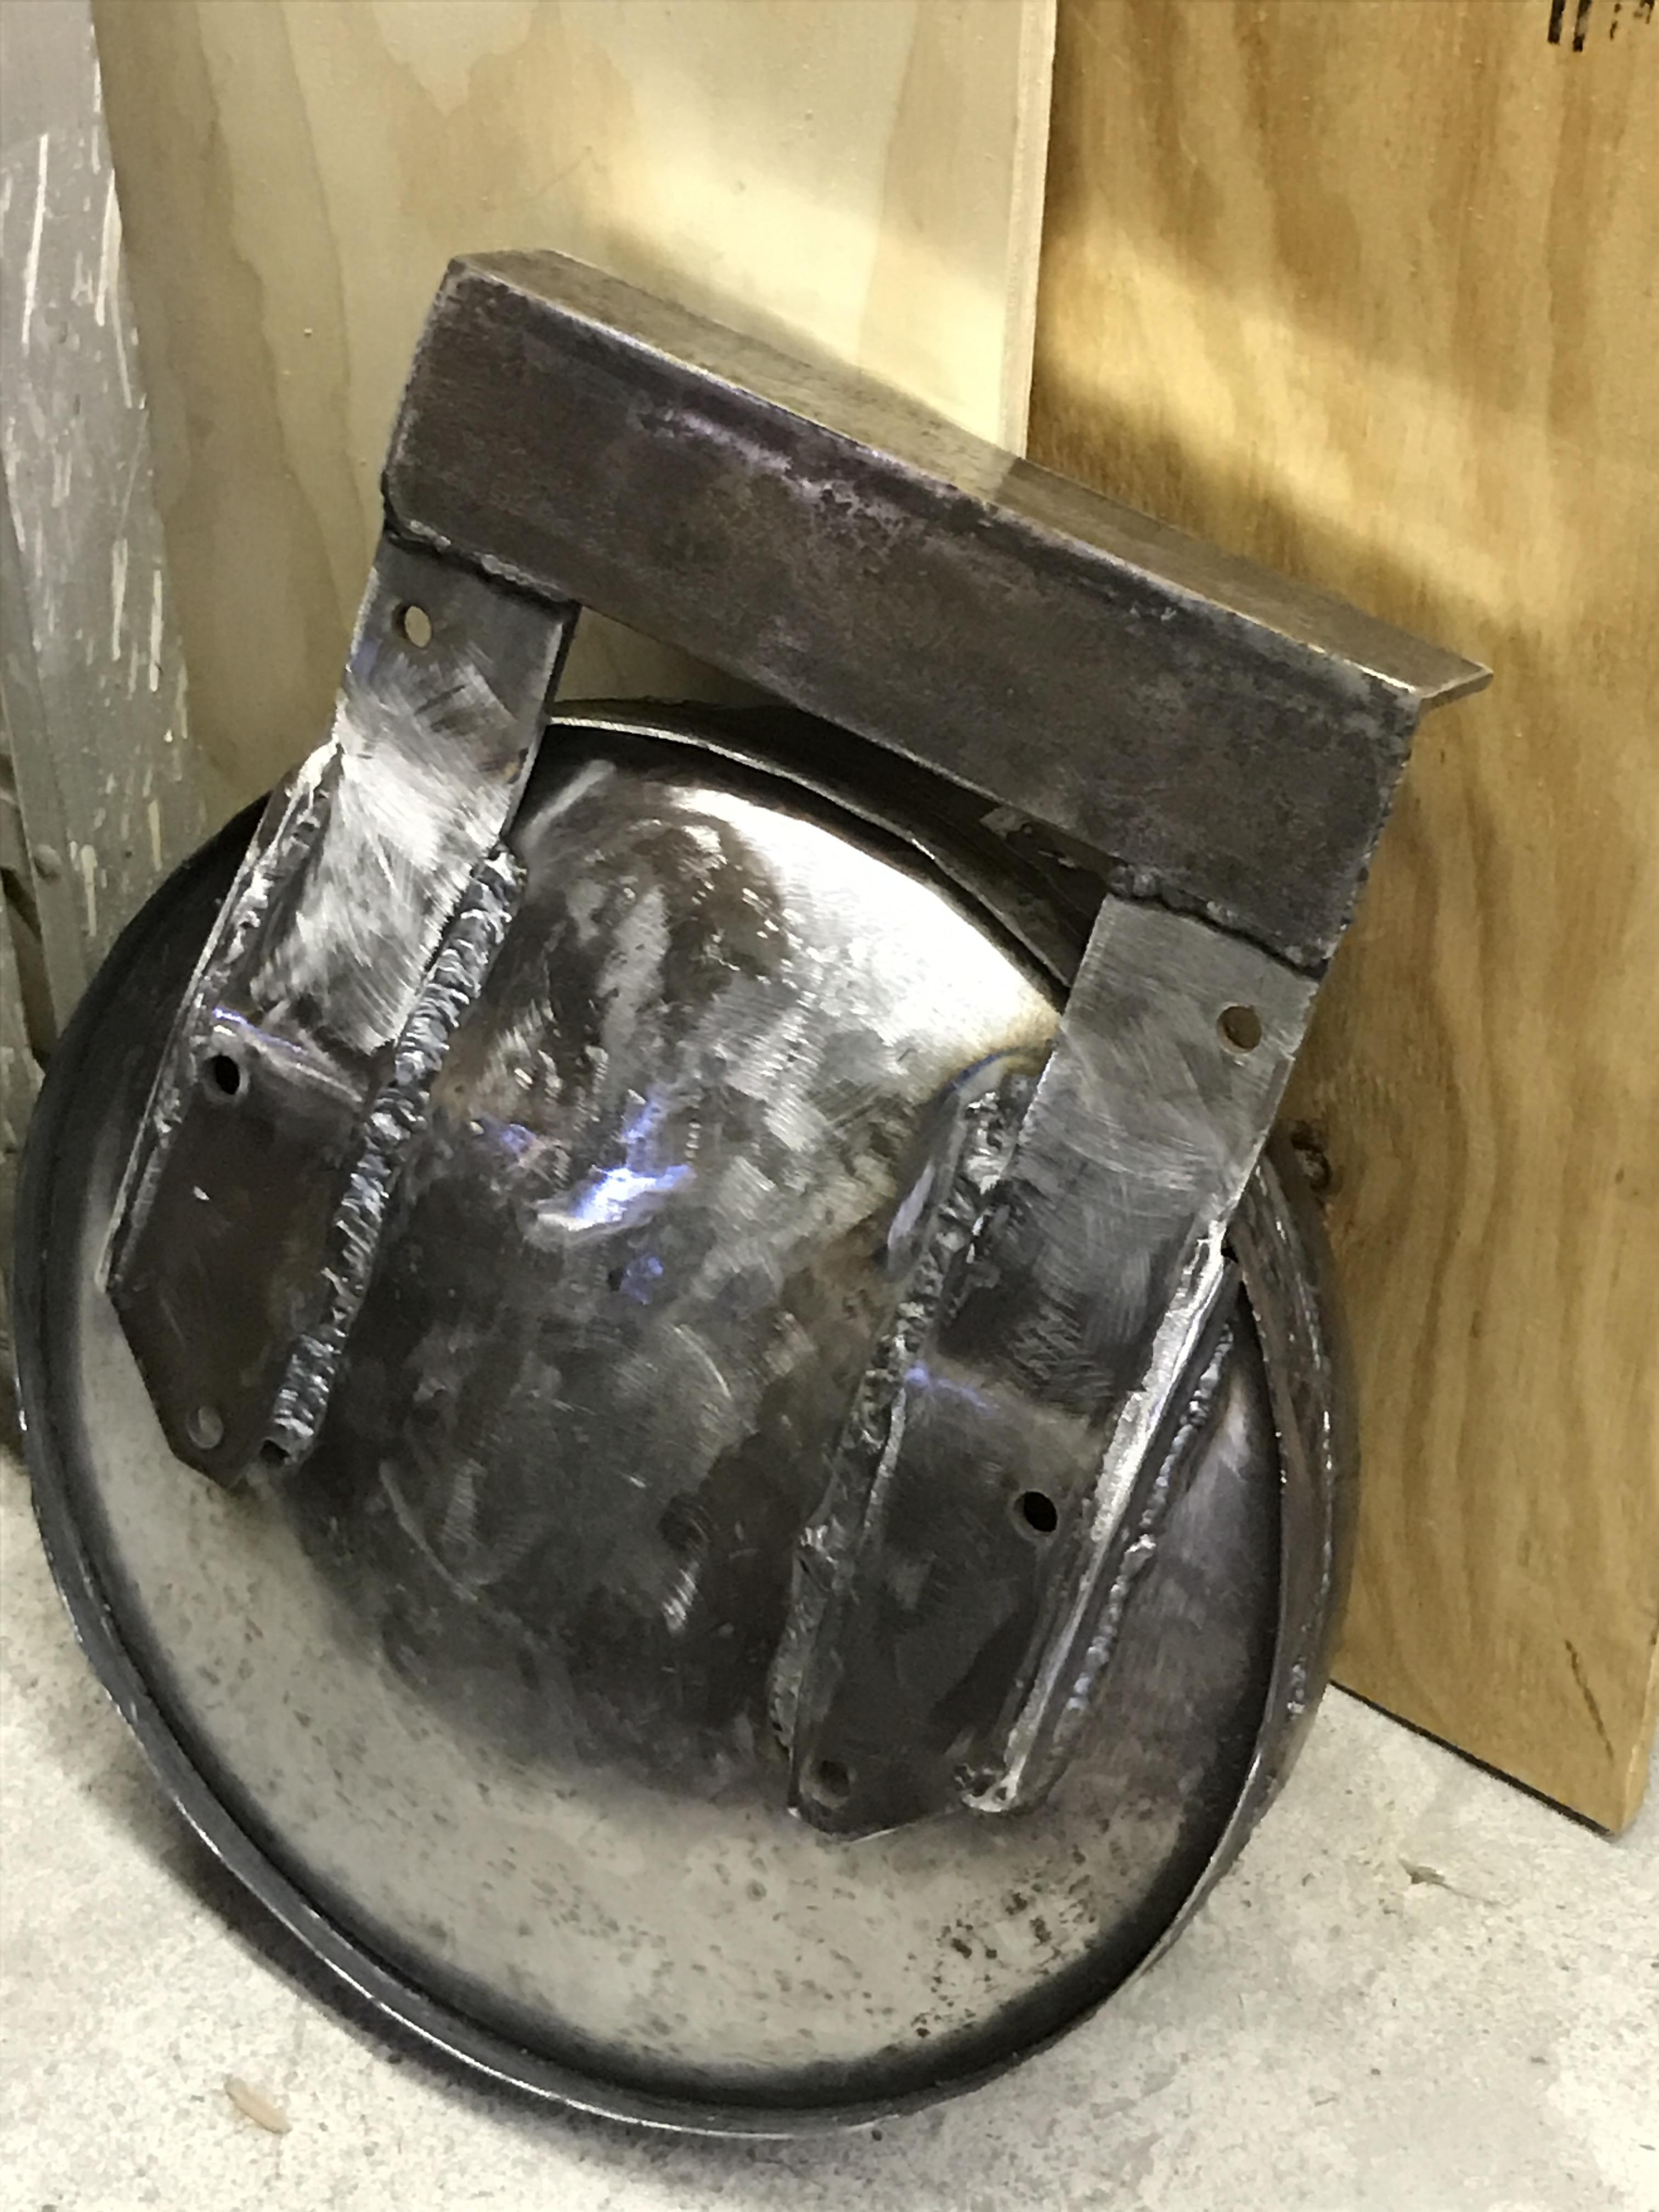
Finished the burner. Following John Emmerling's path with a couple of exceptions. Instead of using crayons, I used lag bolts that I was able to remove after the refractory had set. I didn't like the idea of drilling out the crayons. Also I thought the spiral left by the lag thread might aid in mixing. Additionally I chose to thread the fuel pipe in to the burner instead of welding it on just because I had the appropriate sized pipe tap available. The excess plywood at the end of the burner form was so I could mount my orbital sander to the form tto vibrate the concrete and get rid of any air bubble easily (that worked great), I am now working on the plumbing for the air and gas. I will have pics of my test fire soon. In the mean time here are pics of the burner. They are out of order but I'm pretty sure y'all can figure it out...


-
7 hours ago, Buzzkill said:
"My understanding was that there was less fuel wasted with forced air. No?"
I'm not sure how that would be possible. Did anyone explain the mechanism by which this would happen? You indicated before that you had done stoichiometric calculations. Does the fuel/oxygen ratio change if the air is forced in with a blower compared to being induced by the fuel stream? FWIW I have used both in a much smaller forge using a single 3/4 inch burner. Tuning the flame to the desired type of atmosphere was quicker/easier for me with a blown burner, but if there was a difference in fuel consumption I couldn't detect it. In either case the goal is to have the correct amount of fuel and air entering the combustion chamber in order to maximize the heat output. Do the molecules in the reaction behave differently in one scenario versus the other?
The stoichiometric requirements are more readily met with an excess of air as the ratio is nearly 30 :1 air. If you don't have enough air to burn the gas then the gas does not burn. The velocities of the gas required in a Venturi burner require high pressure and usually depend on the excess gas burning in the chamber not the flame wall.
-
54 minutes ago, Buzzkill said:
No, you don't need a layer of refractory against the shell; just in the forge chamber itself.
To follow up on what Thomas was saying, there is a common misconception that blown burners use less propane to produce the same heat. This is not true. Blown burners normally operate at less pressure than naturally aspirated burners, but the volume of propane used is identical (or very close to it). There are some potential efficiency differences between a ribbon burner and a single larger burner port regarding flame front speeds, exhaust, and the time the heat spends in the forge before exiting, but Frosty or Mike can tell you more about those. Regardless, you will use about the same amount of propane or natural gas to heat that forge whether you are going to use blown burners or naturally aspirated burners even though the pressures involved may be significantly different. At full volume that forge is going to require a lot of fuel, especially if you plan to reach forge welding temperatures.
Oh, and thanks for the pics. We love pictures.
My understanding was that there was less fuel wasted with forced air. No?
-
On 12/14/2016 at 10:43 AM, Buzzkill said:
Sounds like you have it figured out. I have a couple questions though. Would you be so kind as to post some pictures, either WIP or when you get finished? I'd like to see what you end up with here. I'm also curious about what you intend to create with that forge. Again, we love pics so don't be shy about sharing the forge and/or what comes out of it.
BTW, I don't think anyone was saying it wouldn't/couldn't work. I believe the comments were directed more at fuel consumption and the long term costs of it. If you have way more forge than you need you effectively waste fuel which costs you a lot of money over the life of the forge. In that vein I guess I do have one more question. How are you going to feed this beast? I hope you have a couple 100 pound or larger propane tanks you can link together, or that you can use the natural gas from your house. I can tell you that one or two BBQ size propane tanks will not be sufficient for that. One or two small tanks like that will freeze up in a short period of use.
One way you can kind of have your cake and eat it too is to create baffles out of refractory material that you can slide into place to decrease the volume of your forge when/if you desire, but remove them when you need the full volume. Of course your burner(s) placement will affect where these barriers can be placed inside the forge.
Thanks. Movable baffles are part of the plan. It is my understanding that forced air burners use far less fuel than Venturi burners and are more forgiving in terms of design. The preference in the community, from what I see, is for Venturi burners.
And indeed most comments I have received on another site regarding this plan assume massive fuel consumption based on Venturi burner fuel rates.
I have 16 gauge Kanthol wire I intend to use to hold the blanket in position.
Question: should I use a layer of refractory against the tank wall before I put down the blanket? I am going to coat the blanket with refractory also.


-
On December 13, 2016 at 11:54 PM, ede said:
Rookieironman,
I did the calculation here: http://www.online-calculators.co.uk/volumetric/cylindervolume.php
for burner volume and think Frosty is correct at around 3,700 cu/in.
24" long at 20" diameter, subtract 6" to arrive at 14" diameter.
And subtract six for a length of 18"
According to pine ridge a burner with approx 30 sq inches of burner should work for my 1.6 cubic feet of heated space. 3 x 10 burner should suffice.
I happened upon a dust collector/ blower for 75$ that provides 660 scfm and a static pressure of 25. So I won't have to make my own blower anymore.
Help is appreciated. Advice to scrap all my work thus far because it will never work and should go out and buy something is accepted in the spirit with which it is offered.
Computational fluid dynamics investigation of the flows ( including anticipated losses due to boundary effects and friction) involved indicate a high probability of success. Thanks for suggesting that.
-
Actually 2700 Cubic inches. And I'm not aware of commercial size furnaces that small. But thank you for your concern. I will run right out and try and find a 'used gas fired pottery kiln' and compare that expense with the $10 total I have spent thus far. I suspect the difference will certainly allow me to purchase a fair amount of propane.
On 11/25/2016 at 4:33 PM, Mikey98118 said:That is an excellent, but more expensive choice of ceramic fiber, the density is sufficient for low cost rigidizer to be used to look the fibers in position; thus three layers is fine.
Would you suggest an inital layer perlite/sodium silicate in addition to the three layers of cerachem?
On 11/26/2016 at 4:01 PM, Frosty said:That comes close to 3,700 cu/in not counting openings. That's large enough you'd probably be better off just buying a used gas fired pottery kiln and tweaking the liner for what you intend to use it for.
Were it my project and I HAD to build it I'd go with a multi port gun burner. If you are shooting for welding heat you're looking at TEN 3/4" burner outlets. I'd manifold them and run it on a suitable blower and natural gas if I could get a large enough line. Propane is fine but you're looking at a commercial size furnace and it will use a LOT of fuel, I'd happily trade a few BTUs per cubic foot for the significantly lower price per cu/ft.
Frosty The Lucky.
Actually 2700 Cubic inches. And I'm not aware of commercial size furnaces that small. But thank you for your concern. I will run right out and try and find a 'used gas fired pottery kiln' and compare that expense with the $10 total I have spent thus far. I suspect the difference will certainly allow me to purchase a fair amount of propane.
-
Cerachem 8 pound density rated to 2700 Degrees. I have 50 sq ft
-
I am making a gas forge. I am using a water heater tank. The dimensions (outer) of the tank are 24 inches long by 20 in diameter. I have enough cerachem to line it to a three inch thickness. I am going to make a forced air ribbon burner for it. I am going to build the blower so that it will provide a static pressure of at least 25 inH20. That should be plenty from the stoichiometric calcs. I have a refractory coating to coat the cerachem and a couple of firebricks (good to 3000 F) for the deck. My main question at this point is what do I need to do to install the cerachem? Will it stay in place once I coat it with the refractory and then coat it with ITC100?
-
Funny my first reply was not posted.
I'll try again,
I am mechanical engineer who has studied and published on the engineering properties of wood. I understand very well the consequences of the various mounting schemes I have seen for anvils on wood. I understand the mechanical properties of wood thoroughly. Perhaps a more direct way of asking my question is this: do you want an anvil mount that absorbs the kinetic energy of the hammer strike or do you want one that stores the energy momentarily and then returns it as noise and motion?
rookieironman
-
I note that Nimba states a Rockwell hardness for their anvils but neglect to say what the scale is they are using. I have asked them three times by email what scale and they have never answered. I'm pretty sure I'm not going to buy from them even though I like the shape... if they can't answer a simple question and use hand waving meaningless terms like Rockwell hardness with no scale mentioned, it seems more like a marketing excercise than a real anvil company.
-
So, I am preparing to begin hitting metal. I am starting to target and acquire tools. I have noticed that anvils are often mounted on the end grain of stacked planks. This seems to me to encourage bouncing. The mechanical properties of wood in this direction are spring like. My thought was that mounting securely to a packed sand filled container would remove this bounce and probably decrease the ring. Has anyone explored this?
-
Funny, I am going through similar changes but I am going to get a new anvil. I really like the style of the Nimba. And I like the Peddinghaus being drop forged,And I think the Rat Hole anvils are beautiful, BUT unfortunately the decision is being forced by my location... I'm only 1.5 hours away from Big Blue Hammer... no shipping charges!


Why I stopped listening to experts
in Blacksmithing, General Discussion
Posted
Awhile back I thought I'd start hammering. Now that was more years ago than I'd care to divulge, but over the years I've acquired some knowledge about hammering metal. And I've learned a few things about places where experts hold forth.
I've learned that the quickest to comment with an opinion often writes so much that there is obviously very little time spent at the anvil. Unless you call a keyboard your anvil.
I have learned that engineering facts about heat transfer, thermodynamics, and material dynamics are areas of knowledge generally misunderstood by those who hold forth as experts on those subjects in these threads.
I've learned to hold my counsel as I have been vigorously told that the facts I learned acquiring my degrees in engineering and years of work in the steel industry were wrong and misguided and foolhardy. And after all that I was graciously told it would never work the way I thought it would...by experts who don't understand that, although they claim to have experience, that doesn't mean that experience has done them any good. Sitting in front of a keyboard spewing misinformation with an authority based on little besides self aggrandizement is apparently what is now considered "expert" . I have stopped listening to "experts". Except, of course, when I feel like a laugh and want to read something truly ridiculous.
"Inelastic rebound" indeed ha ha ha ha ha.