Elciteeve
-
Posts
19 -
Joined
-
Last visited
-
I think Charles might be on to something. Seems like I have the entire community advising me away from my plan so I'm inclined to consider a different approach. Any thoughts on pining down the swage block concept? Seems like if the intent is to flip it over for convenience, the pinning and un pinning should be quick and simple.
-
I know it wont be like a proper forge welded anvil, but I'm hoping this will be decent enough.
-
I have a large piece of square bar which I currently use as my anvil. I'm looking to get to the next level. I want to start making top tools and the like. Thus, I'm making my next anvil a bit larger and a bit more anvil-ish.
-
Yeah I don't do this sort of thing often enough to know the correct temps off the top of my head, but I worked in fab shops and machine shops long enough to know I need to have it sorted out before I start Most guys I know just do basically what you described with a large rosebud on the plate for an hour or so and get to work. I plan to take IR readings and anneal the thing post welding and do one last round of machining when it's welded up before I do the heat treating.
-
Yes, I fully intend to pre / post heat treat etc. I have a large stack of fire brick which I plan to make a temporary kiln / forge out of just for the heat treating. It will be temporary as I will be using kao wool (sp?) and bent sheet metal to encase the thing in, but it will not be welded together as a forge that large won't really be practical for me long term. I'm hoping 3 venturi burners will heat the thing sufficiently. If not, I'll just have to make more burners.
-
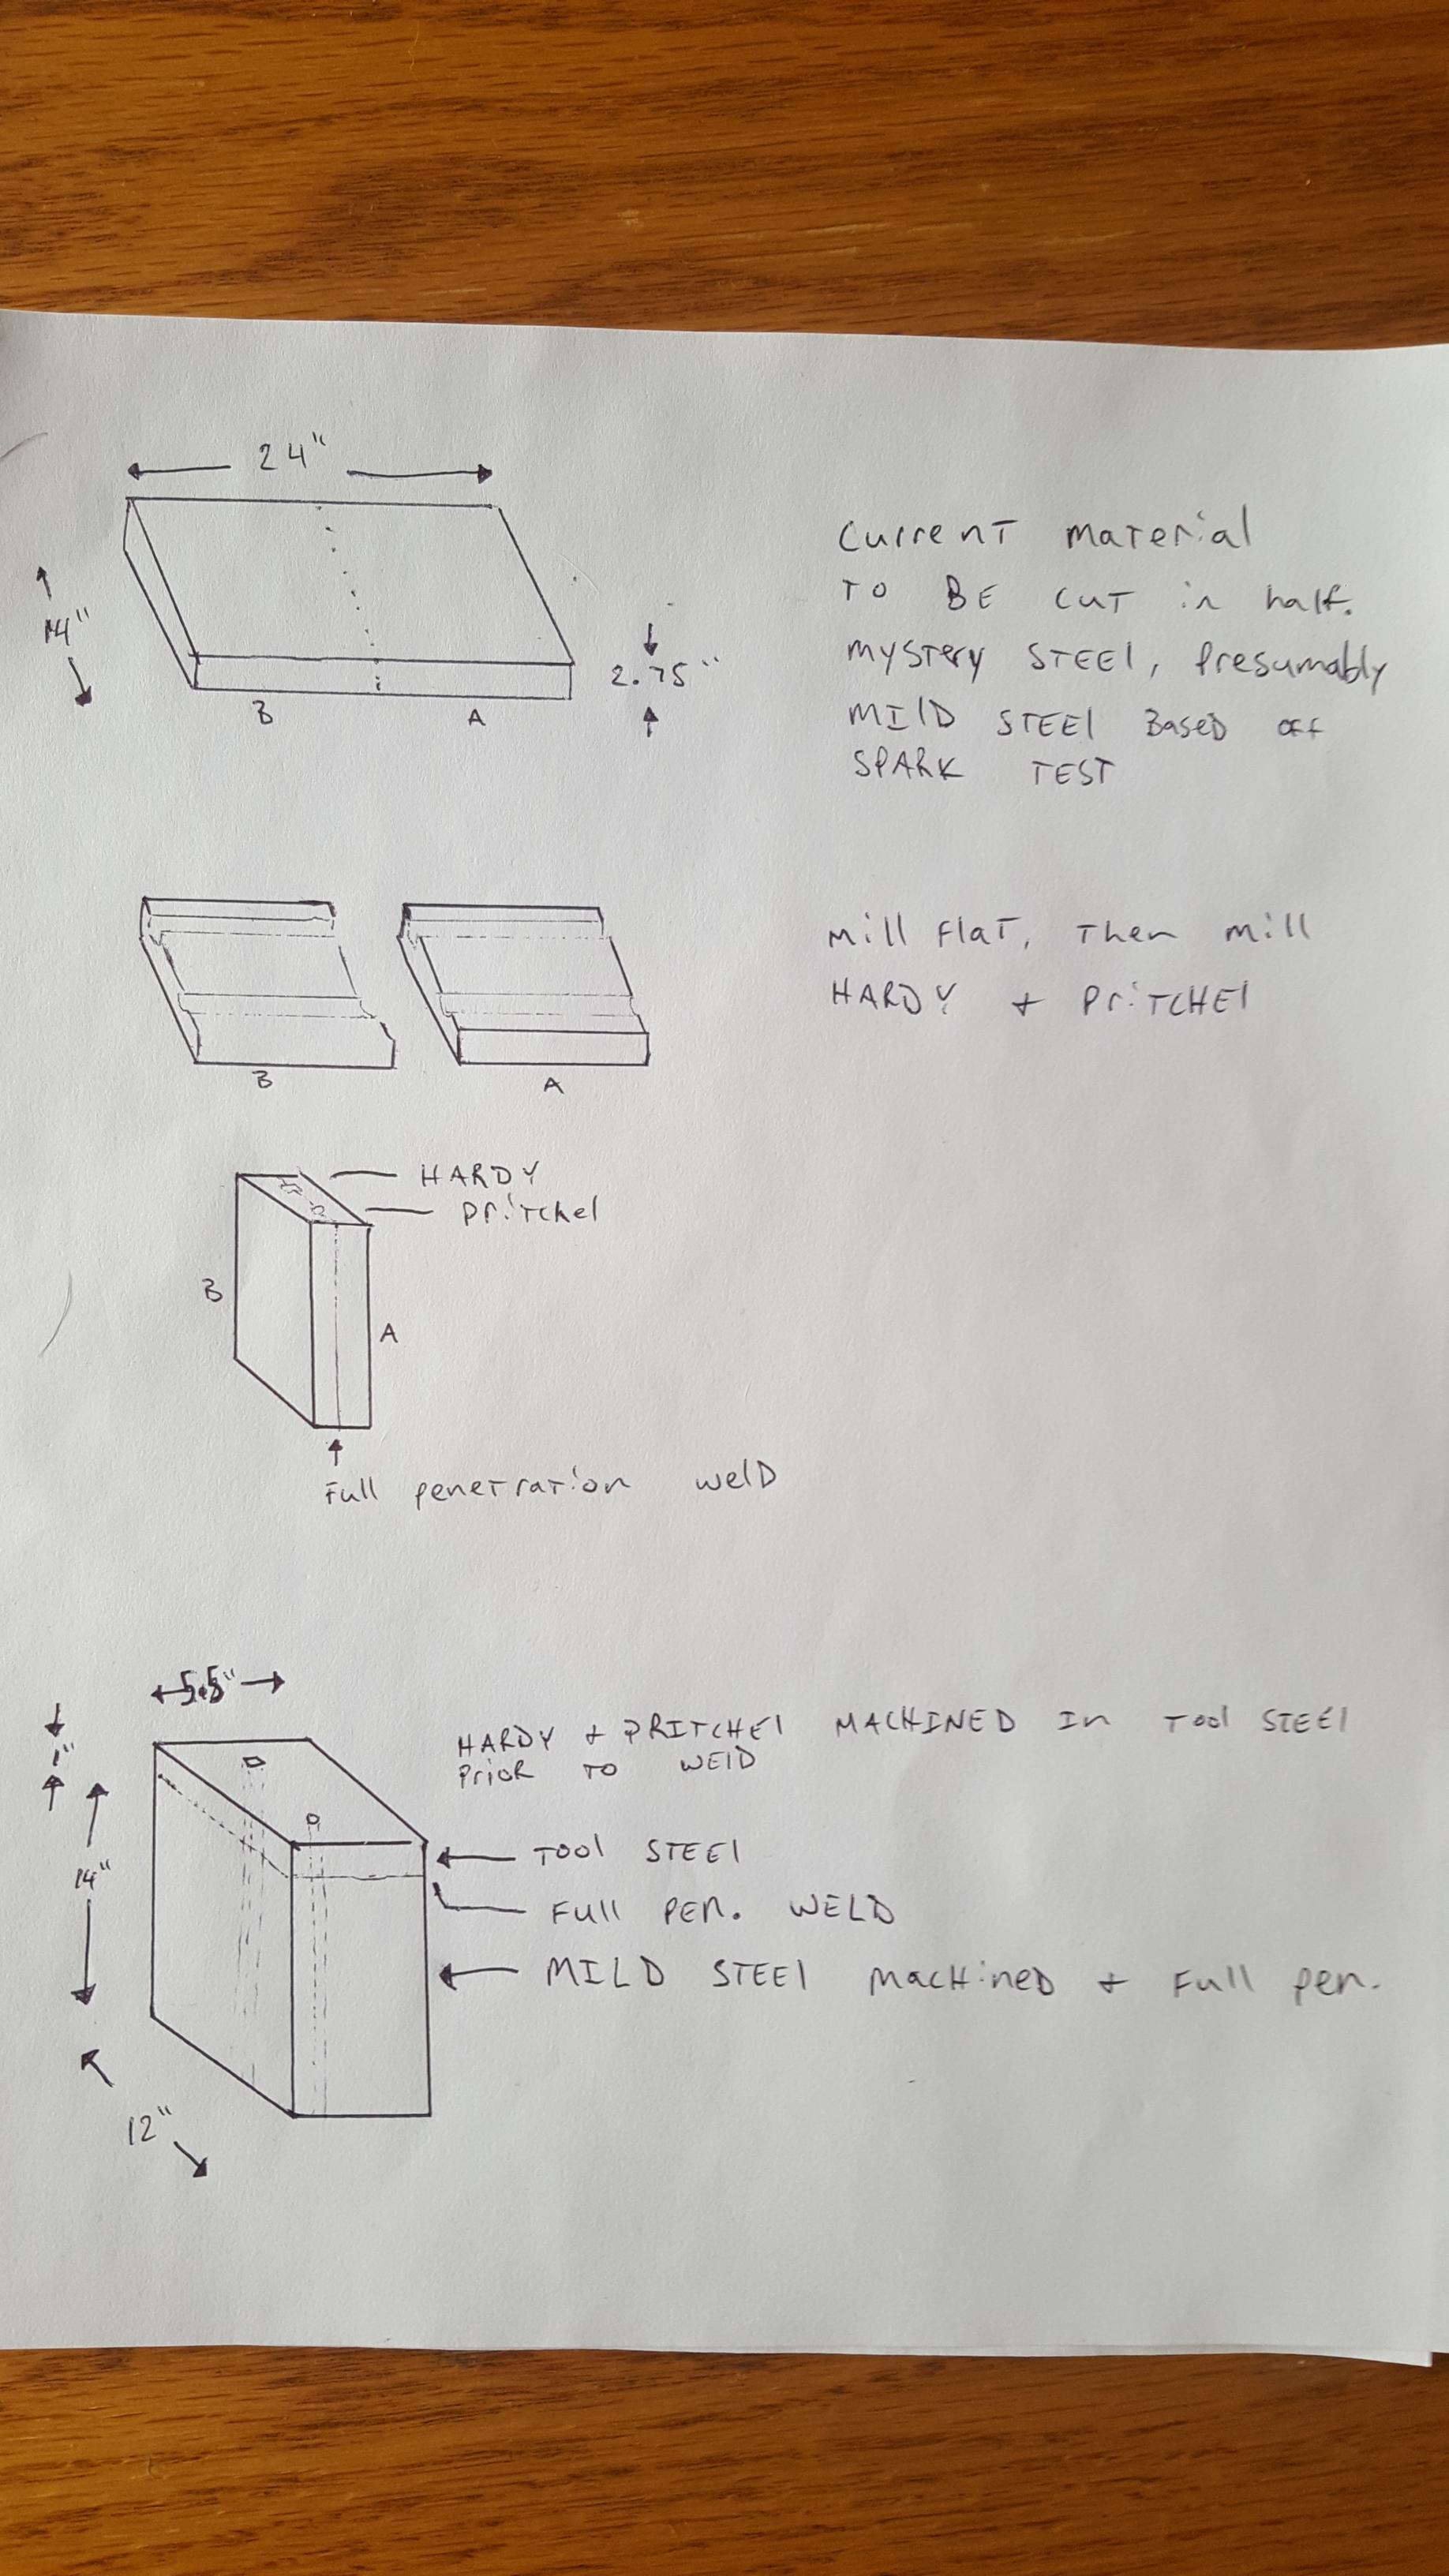
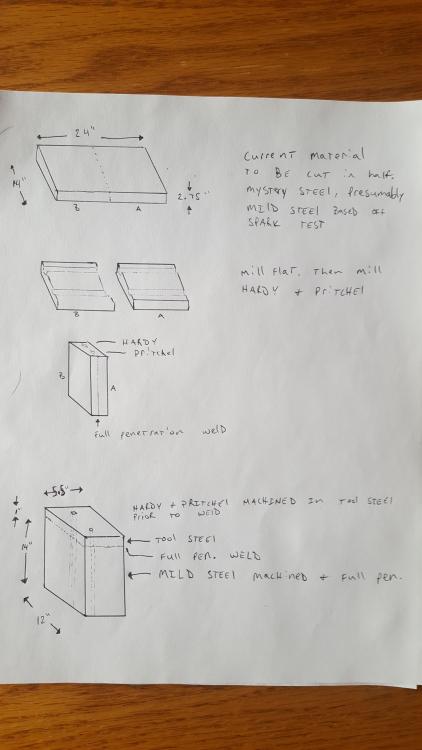
Good morning all! I have acquired a piece of 2.75” x 14” x 24” mystery steel which I would like to use as an anvil. My current plan is to cut this in half, machine out a hardy hole and pritchel, then weld it back together in a 5.5” x 12” x 14” configuration. Once that is done I am going to weld on a top plate of tool steel (any input on what might be best for that, greatly appreciated. I’m finding S7 and the like to be too expensive for my pay rate) I understand the top plate has to be a full pen weld, but does the base component also need to be full pen? That would be practically impossible for my abilities. Unless maybe I forge welded it , but xxxxxxx what an undertaking that would be… I’d have to build a new forge to accommodate that size material, ha! I’m hoping if I chamfer the edges one or more inches, or xxxx even just mitering the edge at a full 45 would be doable. Would that be enough? Or is this plan doomed before it even starts, maybe I’m better off just using the plate as is accepting a smaller face? Thanks for any advice!
-
Great info. Thanks again for all the input. I will be attempting this on saturday so if all goes well i will post results this weekend!
-
Sorry things moved faster than I thought they would. I didn't realise how involved this project would be (just the handle that is) I'm building this bench .The leg vise is all I've ever thought to call it, although yeah on a smithing forum... that gets ambiguous. You can get an idea for the wheel I'm trying to make. I'm building everything from the ground up. Cutting down the trees, paying someone to mill the tree into lumber, dimensioning the lumber myself, making a leg vise from raw components basically (I have to buy some things, but I'll make as much myself as possible.) the vise style I'm copying is this. I will be making my own holdfasts as well (one down two to go!) and also a few other fun projects.
-
I should also mention this is for a woodworking Vise. The 6 to 8 in size ship's wheel style Vise handle is pretty common in my experience so I'm wondering why the 2-foot handle seems necessary.
-
Well, like I said it's going to be sort of like a ships wheel. There will be a handle that runs through this wheel I'm making, which will be straight, and could be about 2' long I just love the look of the ship wheel vise handles, but as I said before I can't afford one so I'm going to try to make one. The wheel will be solidly attached to the vise screw while the cheater bar if you will, will slide through the wheel so it can add leverage, or move out of the way. Wasn't planning on having it be much more than decoration, but I could just as easily make it functional... again thanks for the insight. I'm curious as to why not rounded for the handle?
-
Wow awesome insight. Thanks very much for the advise! And thanks again to everyone else who has provided input also. I see what you mean with starting with 1x2, that makes a lot of sense. Would this same logic apply to the "Wrap a piece of bar around a pipe" method also? The reason for the sizing is, as I stated (sort of) I'm making a vise handle that will look sort of like a ships wheel. The bigger the size the more comfortable it will be to use, and the more force I can apply to clamp the work piece in place. I wanted it round because round is more comfortable than ... not round. Yes the size will be roughly 8" in diameter. (the jaws of the leg vise this is for will be 8" wide so the vise handle can't be larger than 8" or it could interfere with the work piece.) I'm not here to prove anything, although I would love to pull this off, I don't get a lot of time at the forge and I'd prefer to avoid failures so if there's a better / easier way I'm all for it.
-
Gotcha. My fuel cost is hard to calculate... relatively low. My time is pretty value-less (in terms of dollars) on stuff like this since it's what is fun to me. If it takes me 4 hours to make this thing I will have spent less than $20.00 in materials + fuel which again, since it's entertainment for me. I feel like that's a bargain. Also I'm poor, so even if it takes me 4 hours to do something, I've still saved money because I'm not paying $300.00 for Benchcrafted's stupid (read: completely awesome and I wish I could afford it, but can't) vise. Even if theirs does look prettier. Mine will be mine, which is cool to me.
-
All I have currently is a 200lb anvil with a good horn on it. I priced out the cost of the round bar, and at about $5.00 for 2 feet of 1" or about $10.00 for 1 foot of 2" I'm not super worried about the price. It sounds like bending the smaller bar will be far easier and quicker though. I haven't priced out a piece of pipe, although I'm pretty sure I could just borrow some 8" round bar from work to use as a template. I just need to find someone to weld it. Thanks for the input!
-
Well my skill at welding is poor, which is why I liked the idea of splitting a 2" round bar, like was done in the video. (each half of the circle would be about 12", so a 12" bar split in half I think would make about an 8" circle, could be +- 3/4 ") I could use whatever material - I have access to a wide array of mild steel, tool steel, stainless, high carbon, low carbon etc. at a relatively low cost. I just want the finished product to be round bar. Which Is why I was originally thinking A36 round bar to start with. That's kinda what I was wondering, until I saw this video, then I thought maybe splitting a piece of bar stock might be the hot ticket.
-
Sorry, I should have clarified a bit more. I wanted to follow the process in the video - like how the flat bar was split in the middle, this would leave me with ~ 1" round bar (or half round ish bar that I would round into nice round bar) and It's going to look like a ships wheel - but it will only be 8" in diameter. So the total length of the stock would be about 12 - 14". The forge I use is a pretty decent two burner forge, I think it could heat the 2" bar ok (I can achieve weld temps with it using 1" stock pretty easily)