Lou L
-
Posts
1,180 -
Joined
-
Last visited
Content Type
Profiles
Forums
Articles
Gallery
Downloads
Events
Everything posted by Lou L
-

Can sombody tell me more about my hay budden?
Lou L replied to Billober's topic in Anvils, Swage Blocks, and Mandrels
I’m in CT as well. Your anvil should fetch about $4 per pound here. Because people romanticize Hay Budden so much (and because of the anvils nice condition) you could start at $6 per pound asking price. -
I saw the pic. Looks great and can’t wait!
-
What did you do in the shop today?
Lou L replied to Mark Ling's topic in Blacksmithing, General Discussion
Wow, you move fast JHCC! I’m still stuck where you last saw my forge. Thankfully, I have spots opening up in my life that will allow for a little bit of shop time. Perhaps we will both have gas forges going soon. Can’t wait to see your first burn. Remember that it may require adjustments once done. You may have to back the mig tip away from the mixing tube (or file it back) to get the right burn. -
Glad I was finally able to get the goods to you. Sorry it took so long but I promise life has been a rush. I decided to take the late hours and get back to IFI. Feels like home. I posted my notes for you just a few minutes ago in the gas forge section. The only thing I didn’t add to them was Frosty’s account for measuring quantities in the pouring of a ribbon burner. Here it is: ”Current ribbon burner form gets 3 lbs of kastolite and 8.25 ounces of water” Frosty found that measuring pure volume was not enough and he ended up having to mix another batch. Figure out your volume and add a bit more to account for settling. His measurement should get you darn close or right on though. Have fun! Lou
-
After countless hours combing the gas forge section of the forum I came to realize that much of the information required to build a basic forge was difficult to access. It was spread out across a number of threads and much of it was “old information” as new ideas could be found in other places. For that reason, I decided to document my own journey and share my notes that I took as I found information. This is what I gleaned from much reading. I know that JHCC wanted these notes so I thought I’d share them with my own experiences. Here goes: Materials for Gas Forge Mikey’s summary of the whole thing: https://www.iforgeiron.com/topic/47439-forges-101/?page=27 Ceramic wool: This is easy. It is available online and from current members here. I found a warehouse for Harbison Walker International a half hour from me and was able to get a large amount at a good price. Go with 1” material at 8# density. It is best to use two layers rather than one 2” layer. Measure the circumference of your forge substracting ½ “ from the diameter (half the thickness of your wool) and cut ever so slightly large. This will create a fit that is tight enough to keep the wool rigid in place. Before adding the second layer I rigidized the first layer and burned off the water with my burner. The color of the dye faded to white as the wool heated up. When it was basically gone I stopped the burner. It took about five minutes, maybe a bit more. The second layer is added using the same math measuring from the new, smaller diameter created by the wool. Ridigizer: I bought fumed silica on Amazon and made my own using Jasen’s recipe. "...used a cup of fumed silica in a pint of water. Idk if it's proper amount but it worked very well on my forge." Add a drop of food coloring so you can see the rigidizer and ensure coverage. Per Frosty: It’s is critical that you butter the wool by spritzing it with water prior to applying the rigidizer. Do this for both layers. The rigidizer should run between layers and bond them together somewhat after the second firing. Buttering: This has been identified as a critical step in all processes of forge lining. It is Frosty’s mantra. “The ONLY thing I have to add to Mike's above post is about buttering. If you don't wet the surface before spraying the rigidizer it will dry on contacting the dry material. Capillary action can ONLY happen if it's wet enough to flow.” “Interestingly enough the colloidal silica rigidizer is denser than water so as it flows through capillarity it will push the water ahead of it by displacement. It doesn't do this forever but it does allow the rigidizer to penetrate farther.” “Buttering a hard surface is even more important as the rigidizer, mortar, etc. will NOT penetrate a hard surface it flash dries on the surface unless it's way too wet a mix. You want the rigidizer to penetrate the surface so it bonds properly.” “Buttering is an IMPORTANT part of the process of getting stuff like a hard refractory flame face to bond solidly to a refractory blanket insulating liner. Getting the blanket to bond to the shell. and getting the kiln wash to bond to the flame face.” “Heck, anybody out there throw pottery? What do you do when you stick the handle on a coffee mug? You wet the joint surface right? It's not quite as important on freshly thrown pottery as it is on masonry but it ensures a good bond none the less” Link to Frosty’s forge lining directions: https://www.iforgeiron.com/topic/51493-blown-propane-forge-question/?tab=comments#comment-546241 Kast-O-Lite 30 curing instructions: Mixing instructions. 1 pound of kastolite gets 2.75 ounces of water. This comes from Frosty’s NARB thread. I found that measurement to be about right on my first try. I found some detailed information from Harbison Walker that suggested 3oz would work. I started with 2.75 by adding it very slowly and mixing a lot. I mixed it for five minutes or more and finally added a bit more water to get close to 3oz. If you go over it will make the refractory too thin and weak when hardened. Be patient and it will suddenly switch from being too dry to being wet. Cure it in 100% humidity. I did this by putting a damp rag on it and putting it in a garbage bag for a day or two. It should then be heated starting at 200 degrees for a couple hours to get remaining water out and then gradually increase the heat. The final cure is done with incremental application of the burner. Some have used the burner to cook off the water carefully and skipped the oven. Addendum: The only thing I didn’t add to them was Frosty’s account for measuring quantities in the pouring of a ribbon burner. Here it is: ”Current ribbon burner form gets 3 lbs of kastolite and 8.25 ounces of water” Frosty found that measuring pure volume was not enough and he ended up having to mix another batch. Figure out your volume and add a bit more to account for settling. His measurement should get you darn close or right on though. JHCC observes elsewhere: "I’d found in another thread the useful detail that since one cubic foot of mixed Kastolite weighs 90 lbs, that’s 19.2 cubic inches per lb. My [own] mold measures 7-3/4” x 3” x 2”, which is 46-1/2 cubic inches. That gave me a starting point of 2 lbs, 6-3/4 oz of dry Kastolite plus between 6-2/3 oz and 7-1/4 oz of water. It’s been very dry, so I ended up using very slightly more water (about 8 oz total) to get what felt like the right consistency." Matrikote- How To Apply “It isn't intended as a refractory liner, it's a kiln wash. A product designed to be the final barrier between the fire and what's in it and the liner. Thick is counter productive, think of it as paint or like an undercoat, it's there to protect and radiate heat back into the forge more efficiently. MIx it to a consistency between thick latex paint and country gravy. Spritz the liner with water then paint it on.” -Frosty This is a step overlooked by everyone I have seen on YouTube and most other sites except here. It reduced the time to heat up stock by 20-30% according to anecdotal evidence from members on this forum. Themal ceramic K26 brick. Per Mikey “The 1" thick version of these bricks make the perfect transition layer to place between a high alumina kiln shelf and a pillowing layer of ceramic fiber insulation, to protect it from being overheated by the shelf temperatures.” Mikey uses K26 brick to create better forge floors. He also offers a more complex method using high alumina kiln shelf and refractory. It is beyond me: “Those wanting the most efficient floor possible will use small amounts of high alumina refractories in layers, starting with 3000 or 3200, then 2800, 2600, and finally 2300 refractory over ceramic fabric or board insulation. This scheme also allows the floor to be shaped, rather than flat.” https://www.iforgeiron.com/topic/47439-forges-101/?page=2 Wayne suggests using scrap ceramic wool and shaping it to create a “half oval (per Mikey) and then layering last-o-lite and kiln wash to avoid a flat floor and allow flame to flow. This seems superior to a flat kiln shelf. I found that this is too much for the average person (I’m below average and it’s way too much for me). I am settling on the strength of the kast-o-lite applied to a rounded floor. I also picked up a gallon of moldable refractory from Harbison Walker that is rated for 2300 degrees and hardens like kast-o-lite. It can be applied like joint compound and I may use it for the forge walls instead of casting the whole interior. I did make a shell out of metal flashing that will serve as my inside mold for casting the walls of the forge. The large opening for the ribbon burner makes casting the interior problematic. The mold is complex. This is why I may use the moldable refractory. However, the K26 bricks appear to be the best thing on the market for covering the forge openings. They are relatively cheap and seem useful to have around. Alternatives to buying matrikote or plistix for lining the forge: There is an active group experimenting with all sorts of cryptic, alchemical concoctions. These are not for average (or below average) folk. Frosty does offer up one that seems doable: Buttering surfaces during forge construction: by Frosty “I mixed 2pts. Zircopax to 1pt. Cast-O-Lite 30. I added enough water to make a consistency about like latex paint and painted it on with a brush. Making it that thin means you have to mix it almost constantly or the zircopax settles out. I believe this is his version of a final layer for lining his forges. I do not have Zircopax and the additional cost of the bag of Zircopax is more than the small amount of Matrikote that I need. I would like to hear from Frosty on this...I may have it wrong. Propane regulator: It must be adjustable minimally from 0-20 psi. A shielded hose is ideal if you will not be using copper tube to the burner. It is possible to use a long schedule 40 nipple on the end of your burner and orient it away from the forge opening to get the hose away from the heat. Burner components: There is so much information on the forums and it is specific to the type of burner you are making. I made a ribbon burner and found all the parts I needed online at supplyhouse. I’m certain this is incomplete and welcome questions, comments, and challenges. I’m just hoping to consolidate the most basic information for people trying to get started. Lou For the first of the many inevitable addenda: I forgot to mention release agent when casting kast-o-lite. It will stick to anything! Readers who don’t diligently examine all the threads may follow the older advice for using spray Pledge or another waxy furniture polish. Don’t do it! Use either cooking spray or crisco. I used crisco because I felt I had more control applying it without making a mess...plus I had an old tub of it that wasn’t good for much else. Apply release agent to everything that will be contacting the wet refractory but should not be permanently attached to it. Gas Forge Refractories and Supplies
-
It was a nice iPad typo! I intended to type “should”...the stupid iPad assumed I meant otherwise and added it without my noticing.
-
Just a box of dirt, or a simple side blast forge
Lou L replied to Charles R. Stevens's topic in JABOD - Just A Box Of Dirt
No galvanized pipe. If you can use vinegar or stronger acid to remove the zinc first then you can use it. -
Is the 2x72 belt grinder worth the upfront cost?
Lou L replied to Seabass's topic in Grinders, Sanders, etc
This question (well, a similar one) has come up recently. I’ll link to that thread because my response to the options available to you is too long to redo and I like to work smarter, not harder! https://www.iforgeiron.com/topic/59937-belt-grinder/ A grinder is certainly useful for a number of tasks but it isn’t necessary by any stretch. Files, a rasp, a disk grinder and clean forging are all replacements. Clean forging is a bit idealistic People will come here to ask you, “What type of work do you intend to do and what is your budget?” These are the two biggest factors in your decision making. If you can afford a 2x72 no problem then don’t bother typing a lengthy response, just read up on the types and options, pick one, and buy it. They are great tools to own. Otherwise, look at the other options I suggest in the linked thread. Concerning belts, I wouldn’t buy a huge amount of one type of belt. There are plenty of websites on which you can shop for belts of all types. You will want various grits and backings for different jobs. Some low grit belts with a heavy backing are great for roughing out shapes. Higher grit belts with various degrees of flexibility are great for finishing work. Buying a load of one type of belt will be inconvenient. Even if the deal you linked has a mix of belts (I admit I didn’t check) it is unlikely to have what you need. If it is a variety pack and you have the cash then it may work out as a good way to try out a variety of belts so you can educate yourself on their uses. Hmmm...I just realized that my entire response could be summed up as “it depends”. I feel stupid now -
You shouldn’t tell your art teacher that all art is derivative!
-
I can’t tell the make based on those pictures. The smoothly rounded feet aren’t familiar to me but I’m certain someone here has more insight on it. My first thought is that it is a modern Russian, Chinese or otherwise less traditional country of origin. The maker’s mark would be on the other side. Either way, those dimensions tell me it’s a 300 pound anvil or close. But, once again, there are people on here who would be much more accurate in that estimation as well. In the end, you need to see it and test the rebound by dropping a large ball bearing on it. It should rebound 7.5 inches or more being dropped from ten inches. More is much better. It should also have a clear ring with no buzzing. Good luck!
-
I’m curious about what the assignment was. As a teacher I am curious to understand you teacher’s input.
-
Joe's collection wouldn’t be on the website. It is packed into storage containers for the most part. I haven’t seen it yet but I have the invitation.
-
Look great!
-
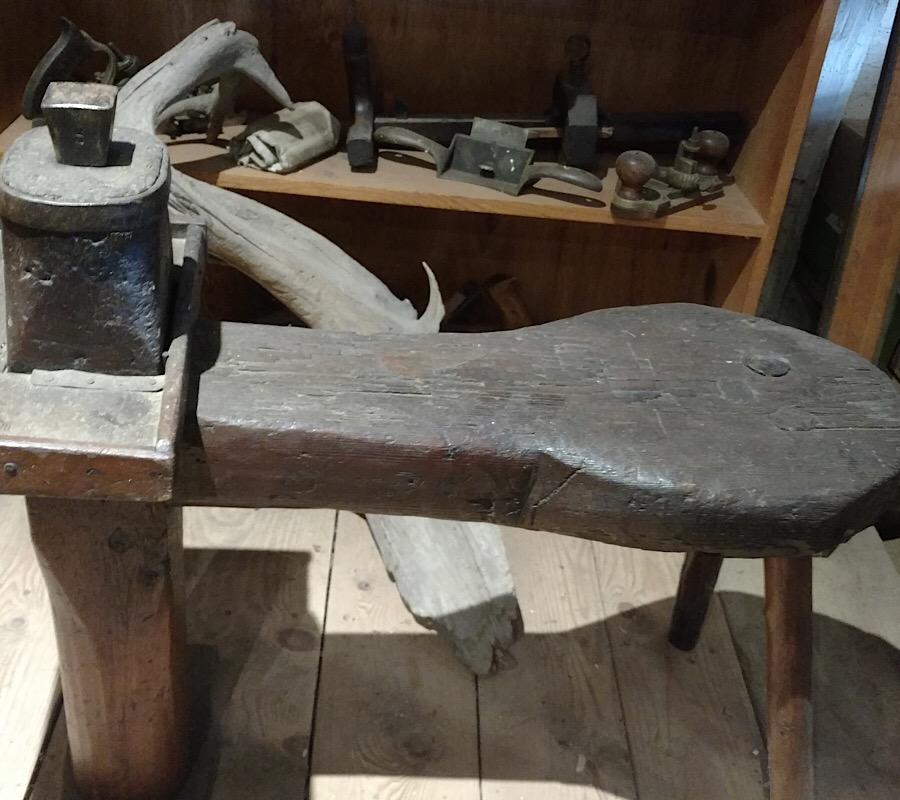
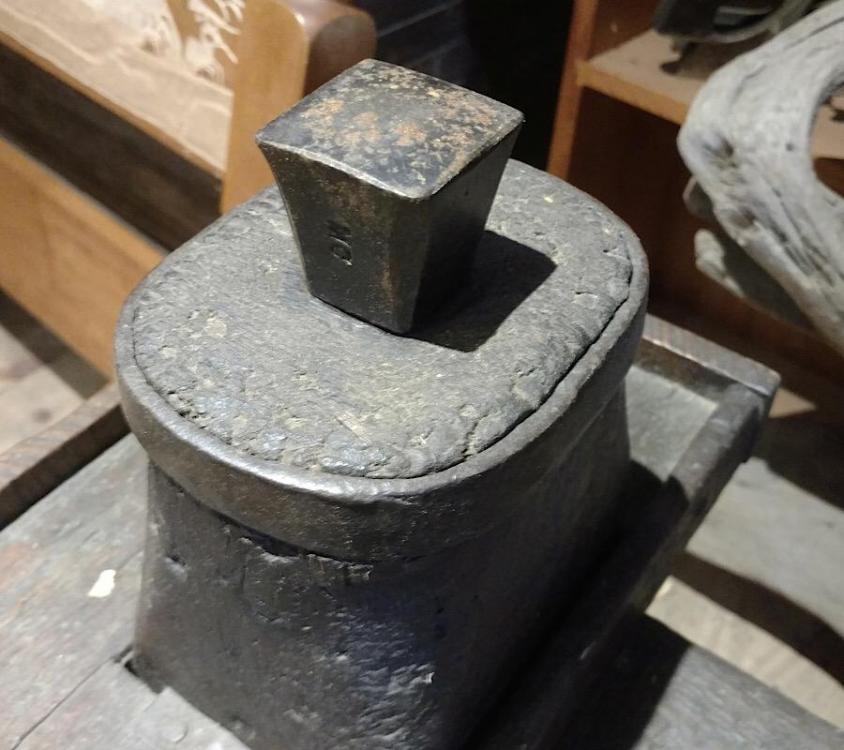
So, recently I’ve made a connection with a local guild of tool collectors. One of their members is a curator/officer of the Simsbury Historical Society near me. He has an enormous tool collection that started when he was 10 years old (and is willing to part with some of his blacksmithing collection!). His personal collection has fully outfitted a blacksmithing display at the society but they are intent upon creating a working blacksmithing shop out of an old barn they may be acquiring. He is offering me and anyone I know the opportunity to help design and plan the shop and displays as well as to use the shop and sell goods out of it (sharing profits with the society). They are looking at spending 60K on this building project....this town has serious money. Aside from this cool connection I’ve made I wanted to share something from Joe’s collection I saw today. It is apparently a blacksmith apprentices work station for making nails. The hardy stump originally had a nail header on it. He got it with a small stake anvil instead. I think it’s a pretty cool piece of blacksmithing history. Just thought some might appreciate this, Lou

-
1500 year old sword found at the bottom of a lake in Sweden
Lou L replied to caotropheus's topic in Historical Blades
I can’t help but imagine the events that lead up to that sword sitting at the bottom of the lake. Great story and I, too, can’t wait to hear more. Sadly, this sort of study is usually painfully slow. -
Beautiful fit on the bolster/handle transition. Gorgeous knife all around. What a nice sentiment too.
-
I appreciate your attention to detail. It belies your age. In my opinion, that is a really nice first try for a free hand grind on a wheel. It’s a skill many don’t even bother trying to learn. You can touch that line up with a hand file to get it straight OR just try a few light passes on the wheel again. Keep your hands in a comfortable but sturdy position on the knife, keep your elbows locked in by your side to limit arm movement, and keep your feet shoulder width apart and square to the grinder. Apply the knife gently to the belt so you can feel the bevel “fit” into place and then use your legs to slowly shift your body ever so slightly to make the blade move across the belt. I found that, when I used my arms, it always went crooked on me. So let your whole body be “locked” onto the knife and shift slowly side ways. Also, make sure you aren’t using too aggressive of a grit. It is nearly impossible to get a straight line with 36 grit. 80 is tough. If you already heat treated then watch the temperature of the blade. Dunk it in water each pass. If not, then be sure not to grind the knife edge too thin before heat treat. The only way to get those lines straight is to do it a bunch of times. Each knife you make will get better and better so just enjoy the process. Lou
-
Seriously good point, Das. Mike, grab all you can and make quench tanks out of them. Sell them at your next conference at the tailgate area and make some money for more gear!
-
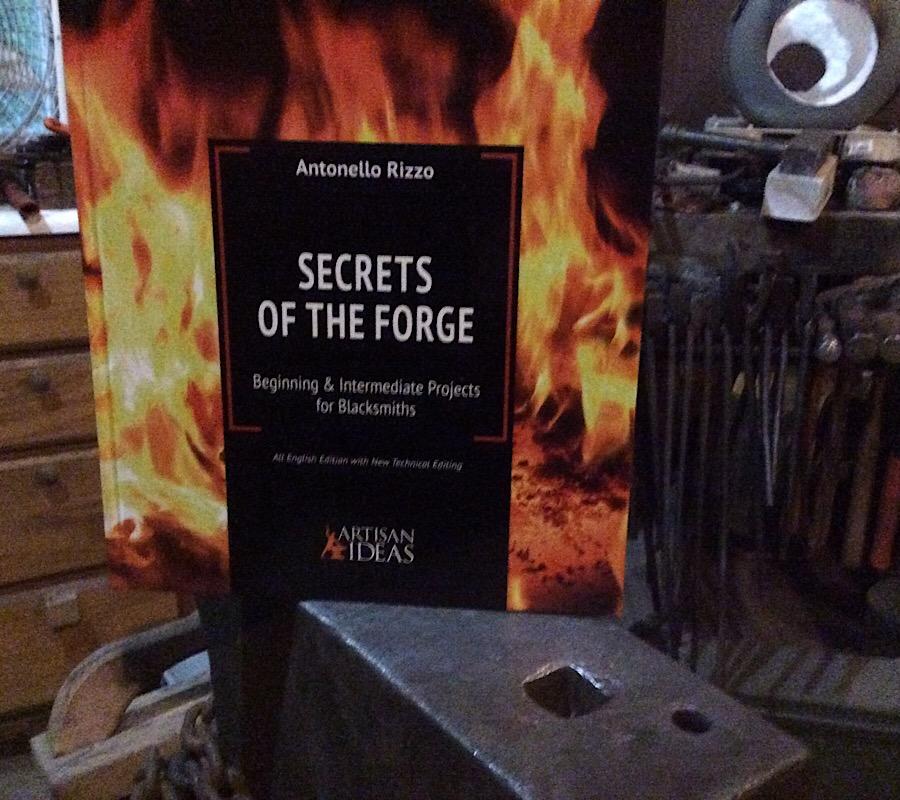
Bought this on the suggestion of John at Blackbear Forge. I was intrigued and I’m glad I got it. Very detailed information, great projects requiring diverse skills, and loads of clarifying pictures. I’m quite certain that an individual who could not read could still use this reference.

-
For what it’s worth, the Mythbusters used clay to put dimples on the exterior or a car and found it increased gas mileage. In a pickup truck it was found that the turbulence created by the open bed with the tailgate door closed actually increases gas mileage as well. A friend of mine is an engineer and, as a student at UCONN he was a co-writer with his preofessor on a study in which they studied the vector dynamics of air flowing over small gaps (valleys of different dimensions and shapes) in a steel plate. They found similar results. Depending on air speed and the shape of the impression it is common enough for the air to create a cushion that creates a zone of even pressure at the mouth of the gap. Just go ahead and use the flex duct as is
-
A Holland Anvil swage block just popped up on Craigslist in Hartford, CT for $275. Gotta tell you, it’s a sharp looking swage block!
-
Personally, I’d use it as is and stretch it only as needed in order to keep the shortest length possible. In my experience, those things go foul when stretched out and then cut. Also, the ridges are unavoidable even when it is full you extended and, in reality, if the negligible effect of resistance affects your blower enough to affect your fire then your problem is a weak blower.
-
I’m far from a hammer expert but the first one looks like a stone hammer. I can’t see the very end of the second hammer, but, if it has a radiused end, it can be repurposed into a cross peen hammer. You will have to learn how to dress your hammers...google “dress hammer iforgeiron” and you should find info on that. The chisels are always useful. Those are cold chisels as they sit. To use them for hot work you will have to grind/reshape the edges to have a steeper bevel. Once again, use the Google to learn what a hot work chisel should look like. Use the largest chisels for the hot work. Keep the smaller ones to make drifts and specialty tools later. The chisel with the long flat end should never be used on hot work. It is for engraving (a whole other can of worms). Fullers are rounded on the end and can be shaped any number of ways to make different impressions in hot steel. That punch is is almost ready to go. Just clean up the edges so they are sharper.
-
Either way, whether it was milled or ground to that finish, you certainly have some sharp corners on that thing. They are cold shuts waiting to happen. I’m torn on whether or not you should use the anvil for a while before doing any modifications (the usual good choice) or go ahead and put a little radius in at least one edge. Congrats on your first anvil. I know it feels good.
-
I actually get excited to see your new posts. You never disappoint.