Lou L
-
Posts
1,180 -
Joined
-
Last visited
Content Type
Profiles
Forums
Articles
Gallery
Downloads
Events
Everything posted by Lou L
-
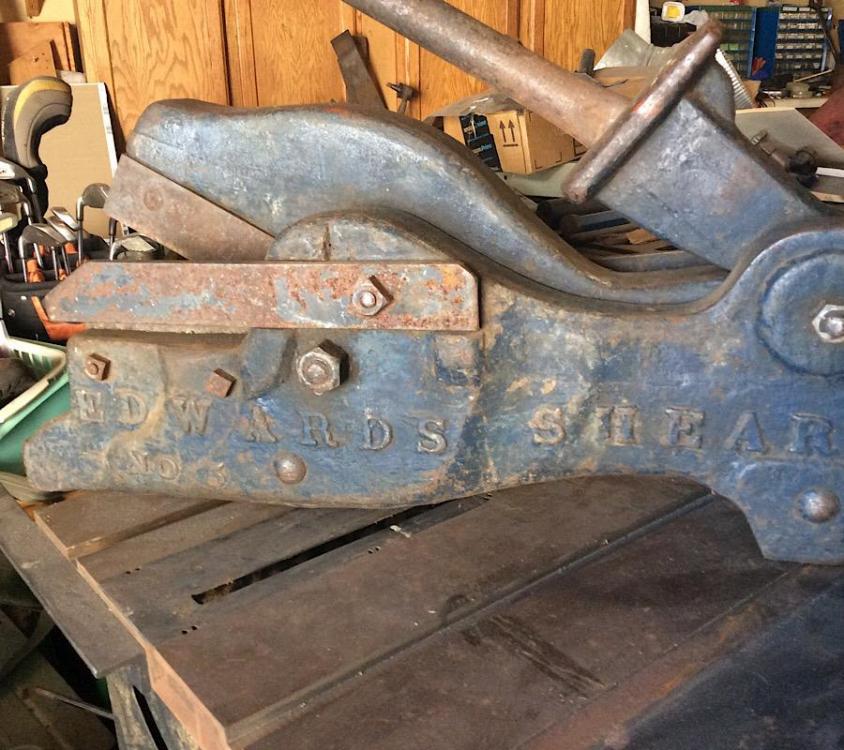
Picked this up at the tailgating area.at the NEB Spring meet two weeks ago. I have been looking at buying a new, modern shear but nothing they make now can hold a candle to this beast. It has been requested that I paint a googly eye and add a fang encrusted maw to personalize it. This will be the first time I paint an old tool.
-
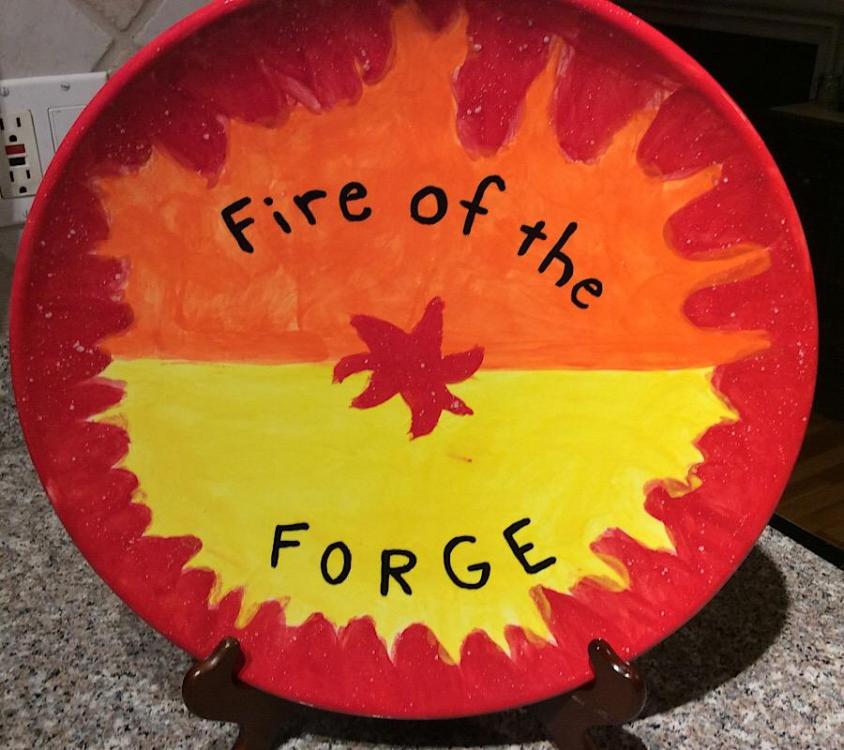
Got a Father’s Day gift from my six year old son I had to share. He has already made his first forge weld (it took a few tries because he misses more than hits) and he loves having a Blacksmith for a dad. He designed and painted this on his own at one of those personalized pottery places and now I have to find a way to keep it safely in the shop:
-

What did you do in the shop today?
Lou L replied to Mark Ling's topic in Blacksmithing, General Discussion
@Les L This is the best I can do for a full picture. I usually just put a rope twist in the shaft to match the vine theme at the business end. Then I tap the edges of the parent bar to make it just a little bit less sterile. Finally, I put a pretty abrupt diamond taper at the ground end.
-
What did you do in the shop today?
Lou L replied to Mark Ling's topic in Blacksmithing, General Discussion
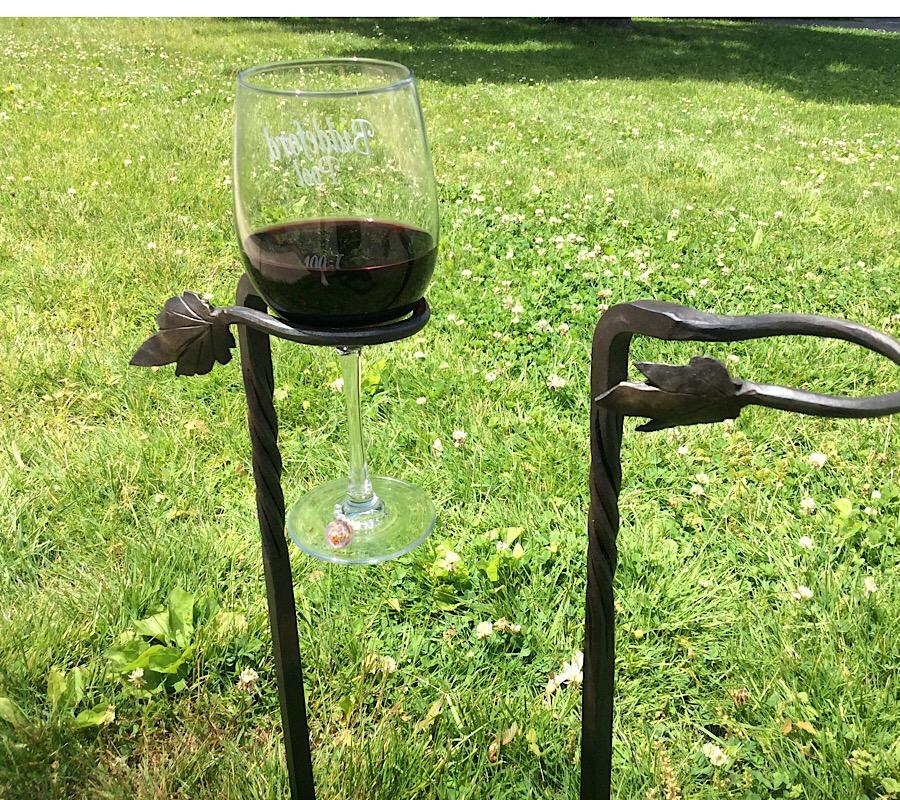
Been busy with life as usual, but school let out for me on Wednesday so I had a day and a half to make gifts for my kids’ teachers. These are the wine glass holders I made last year. This time I had a go with something like a grape leaf. I checked for pictures online and found a number of shapes for real grape leaves, so my interpretation must be close to one of them. I think Daswulf wanted to see a picture of these in use last year. I can finally oblige. I had to make six in order to get four....lost two leaves right near the finish line. I relearned to avoid cold shuts at that junction!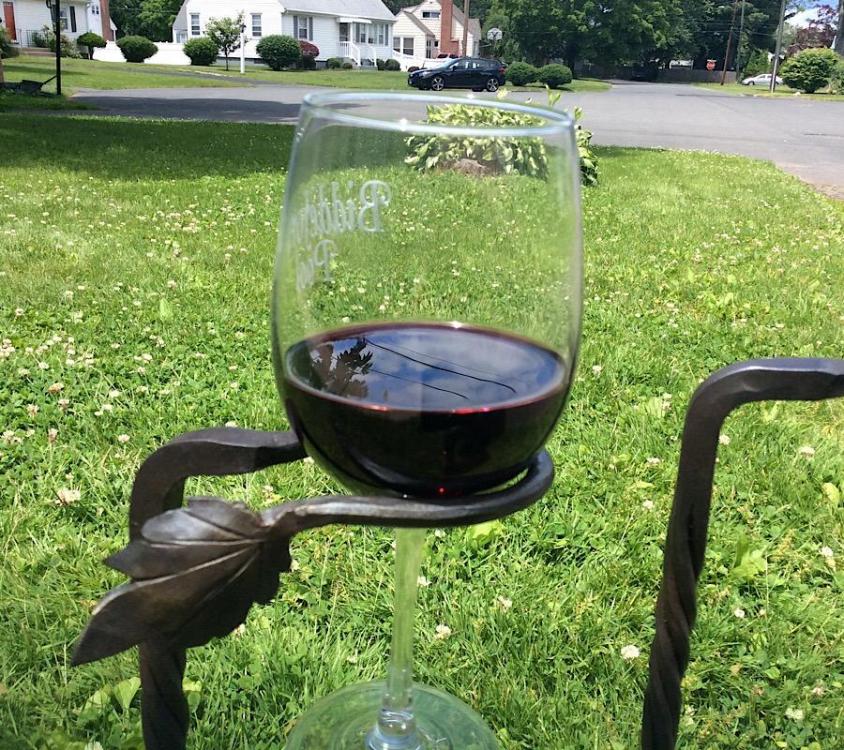
-
Welcome aboard , Les. It sounds like you have done your reading and are well on your way. It will be a cool feeling the first time you get to light up your grandfather’s forge for sure! If you have the time you should start planning out some first projects with drawings. The visualizing is a great start. Managing to get the steel to do what you want it to is another thing entirely:) Lou
-
Agreed with all of the above. As you learn the nuances of the anvil’s edges you will find a use for them. Down the road you can make a hardy tool with clean edges of different radii for cleaner work if you have no clean edges of the anvil. Welding it without serious knowledge and skill will minimally soften the top and could cause cracking and delamination of your working surface. It’s a nice anvil Lou
-
Lol. I promise to not change variables until the current test is complete. I certainly could test with higher psi and see how much it takes to run smoothly. At some point, though, I will be pushing as much heat out of the forge as I am keeping in. Once I get a number on the right psi I want to change another variable on oredrr to see what allows me to run more efficiently. My goal is to learn what makes these burners tick as much as it is to make this one work.
-
The forge is 5.75 inches in diameter. All told, including the 3x3 column at the back entrance, the forge is about 290 cubic inches. I was concerned that back pressure might become an issue. Ive considered more variables I could test in order to deal with the pressure. Changing the length of the mixing tube is one option. Changing the mig tip is another. I figure that, once I play with the ports on the burner block, I will test each of those as well. Any other ideas?
-
It’s better than most new drills. That is a serious score.
-
This was great to see! I just saw a guy post an Instructable wherein he made this same design using just Rutland furnace cement and labeled it something like “The Ultimate Forge Build”. I followed him to his YouTube video and tried to give him the basics...but mostly told him he should come here to learn from the real pros. Still, his bad information is now widely available, detailed, and comes across like the gospel. Your approach was thoughtful and your questions were perfect. You were made for IFI! You are nearly curmudgeon proof. Cant wait to see it up and running. Lou
-
This entire conversation has made me hungry and inspired me to go out to my neighbor’s new restaurant as I haven’t been there yet. He told me that he put khao soi on the menu. Khao soi (Thai coconut soup) with a heap of chili seeds in oil is my jam!
-
Vincent, thanks for that research help. I believe it supports an explanation for everything we have been working out in this thread. You have a good no weld option that someone on here has already used. Search online for a “T-type threaded conduit body 3/4”. That’s what I’m thinking of using for my next burner. Back to my testing. All, strange results! I blocked off one jet on the burner and more than doubled my run time of 4:20 at 5 psi to 9:35 at 5 psi before blowout. I then blocked a second hole and ran it again. This time it blew out at 7:20 at 5 psi. When it cools I’m going to try it with three holes blocked just to look for a pattern. After that I guess I will run the same series at 7.5 psi. So far I see no logic.
-
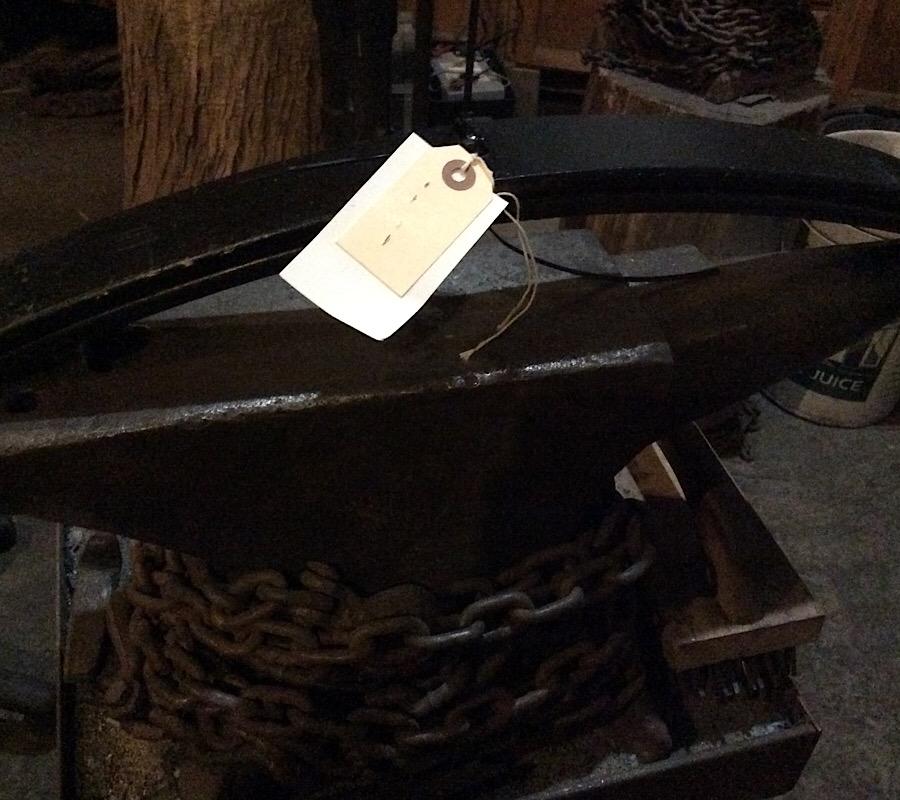
My neighbor is a Thai owner/chef who moved from his 20 year and going restaurant in South Pasadena to try to bring his style to the East. Our neighborhood cookouts improved dramatically since this past summer. Back to my purpose.... my mechanic has been cleaning his shop (two 30 yard dumpsters so far) because he is selling his shop to another family of mechanics. He stopped by my house to deliver me some new old stock leaf springs! Somehow the photo is dark but you can see them still with the tag still on them.

-
I love the Attwood duo of hammer and anvil. You were fated to have that anvil find you. I love the anvil.
-
Yup, I followed the plan as closely as possible. I have 19 holes made with crayons. I’m thinking that the severity of my problem may be related to the forge design itself as well. Where I cast the back wall of the forge it bumps out into the chamber just enough to create a shelf that overlaps the edge of the burner. It may created a little hot pocket of air that increases back pressure. By blocking off the jet that is closest to that side, I’m hoping to reduce the effect. I’ll find out today. I hope that makes sense.
-
This seriously worth the experimentation. I only had the time to run one test today and, at 5 psi, it backfired at 4:20. I’ve decided to not bother with testing at higher pressures and, instead, to block off ports incrementally to see if I can increase that time. Currently the blue flames appear to start inside the ports. I’m going to see if I can’t increase the airflow until they stand just proud of the holes. I’m thinking this will be a good place to start.
-
Sections of the block do get red hot relatively soon into a burn. I’ll try to get footage of that as I’m doing some of the testing today. I’m thinking about running it at 5,7, and then 10 psi and timing it for blowout. Depending on how that goes I’ll think about blocking one of the ports on the burner block and running the same tests again.
-
The knife is, as always, a work of art. The story is the blade version of the ugly duckling. It was beautiful the entire time....it is perceptions that change.
-
I’ll eliminate all but one variable and run tests. I get it completely, Frosty. I have a mind for science! Dan, the smoke/steam is (I believe) from the moldable refractory I used to build out the pocket for the burner. It could be a cause of a problem, but I don’t believe so. I’ll consider it a constant in my tests for now and follow Frosty’s advice by timing at different psi settings. To be honest, I’m glad to be working through this problem. If it went smoothly I wouldn’t have learned nearly as much and, by virtue of my posting here, others wouldn’t benefit. I’m looking forward to the feedback from my next steps. Edited to add: Frosty, as an aside, I changed the pressure because I was trying to induce the desired blowout just to get footage of it for your viewing pleasure. I’m not even certain if my particular blowout issue is a common “type” of blowout. Still, your advice to eliminate variables is well taken. You have my sincere thanks, Lou
-
Okay, here is a video of my issue. I did file ever so little off the mig tip. I heated up the forge and it ran for nearly ten minutes at 7 psi but then it had a blowout. I set up the camera and started it up at about five psi. It ran about a m8 Ute but no blowout. I raised it up to 7-8 psi and it ran about minute with no issue. I then gradually lowered the pressure and it finally blew at about 5-6 psi. I think it has more to do with the burner getting hot enough until it burns back into the plenum. My propane tank is quite low atm, I’m not certain if that can be a factor.
-
Agreed, a little photo walkthrough on this style of guard construction would be really informative. It might transfer over into other uses as well. I love the knife, Theo. I like brute de forge of knives like this.
-
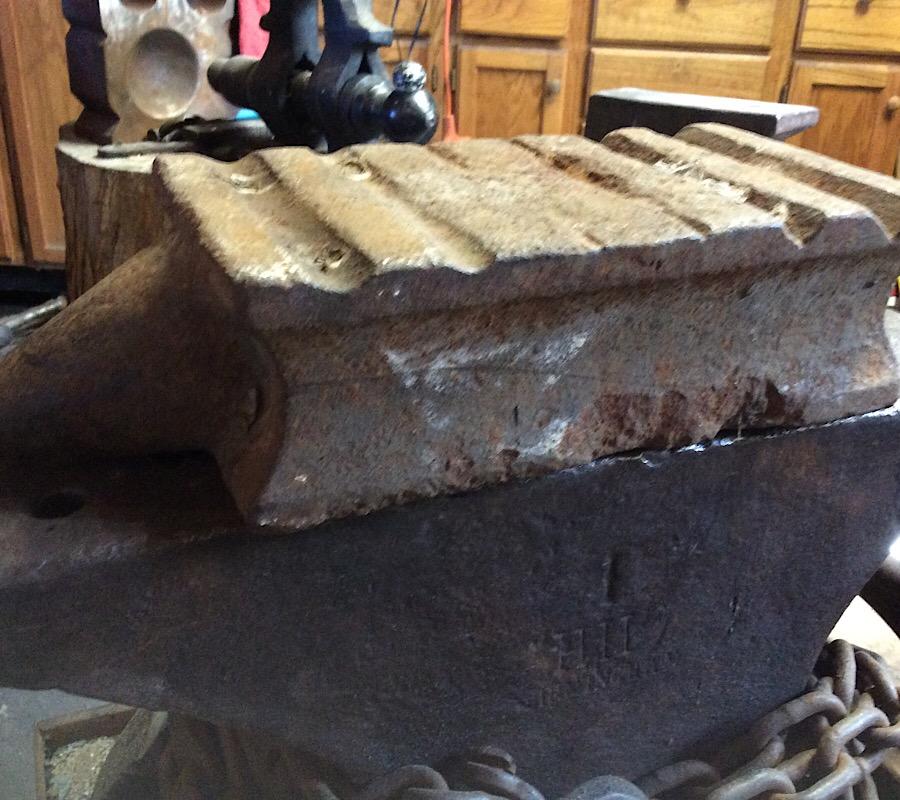
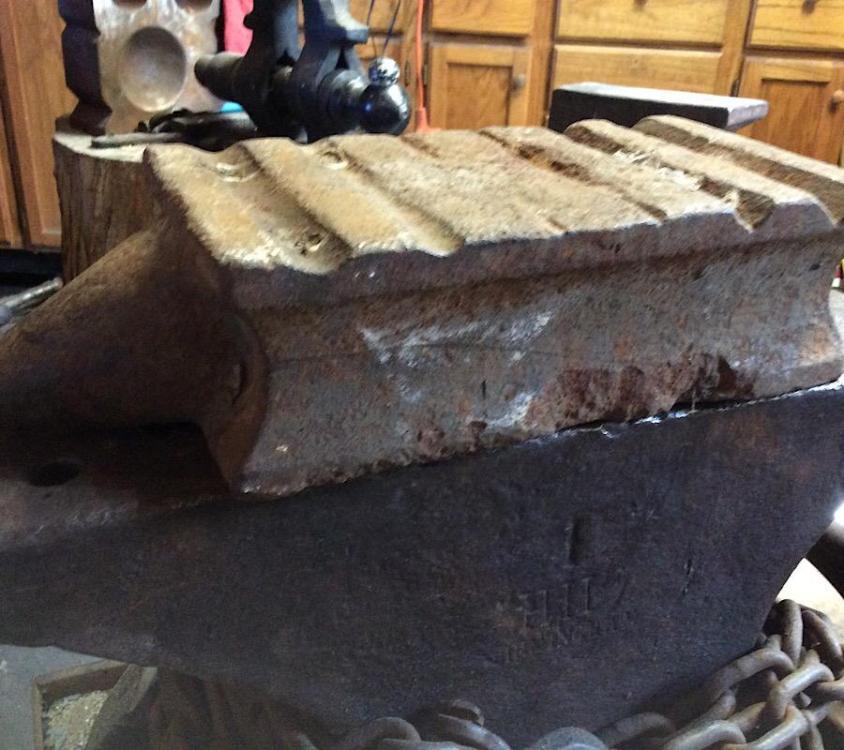
A guy on a town sell and swap page was selling this as an anvil. It is beat up and I have little need for it but it was a curiosity I had to have it. It was cheap anyway. It appears to be a small swage block with a small bick. It is 11.5 inches tip to tail. The guy told me his grandfather used it as an anvil. You can see where his missed hits took chunks off of the corners and he deformed some of the swages. Too bad he didn’t know. Either way, anyone have any ideas what it is and where it comes from?

-
Are you thinking to yours or, “Why didn’t I do this a while ago?”
-
Thanks for the ideas. I fully intend on trying to get a video of the blowout. Burning back into the plenum sounds like a possible explanation and would make sense out of the fact that it works fine once the pressure is up. The video was at 9-10 psi. I will try to see if it doesn’t blow out when the intakes are partially covered. If it makes it worse then Jennifer must be correct and I should file the mig tip shorter. This would fit into Frosty’s tuning guidelines. I already tried putting the burner in different positions and, within the somewhat limited range of motion, seem to have had little change. Either way, covering the intake is an easy test and modifying mig tips is nearly as simple to do. Both are not permanent changes I will try first. Thanks again! Lou
-
Fortunate for you someone was so knowledgeable! Most of us are doomed to ignorance about the provenance of our vises.