
Al Stephens
-
Posts
382 -
Joined
-
Last visited
Content Type
Profiles
Forums
Articles
Gallery
Downloads
Events
Everything posted by Al Stephens
-
Minimum Work Triangle Footprint
Al Stephens replied to Ridgewayforge's topic in Building, Designing a Shop
Small spaces are fine. I have found that no matter what I work on my " work triangle " is small. In any shop I have ever set up I've figured a 1/4 turn to the the anvil from the forge, a 1/4 turn to the the vise. I might suggest you move your vise and bench to the window side, this would give you better light for bench work. In a small work shop like this, if you ever add artificial lights, put them on the edges of the work space and not in the center. From personal experience, I found I was always working in shadow of 1 light in center of shop. Lot's of nice things have come from small spaces. Good Luck. Al -
I'ld give $65 for it if it was close. I've rebuilt several old bellows like this. Rebuilding one is a good experience, and repaired it would be a great addition to a portable demo. setup. Also repaired it would be a wonder exhibit in a hands on museum, where youngsters could see how things were done pre keyboard. Al
-
What did you do in the shop today?
Al Stephens replied to Mark Ling's topic in Blacksmithing, General Discussion
Jennifer, excellent example that everything hand forged does not have to look like it was burned up and beat to death. Al -
Come on everybody! Several things came to mind when I saw this. Poor boys got poor ways. Necessity is the mother of invention. I can still make this work. Make a silk purse out of a sow's ear. Or one I've used, "Baby, It 's old and broke and needs a good home". Lets celebrate the ingenuity of keeping it somewhat useable. I would have flattened the broken edge and added a big spike to it myself. Al
-
For me it is wonderful, inspiring work, whenever it was done, or reproduced. There is much that I can learn from it. Al
-
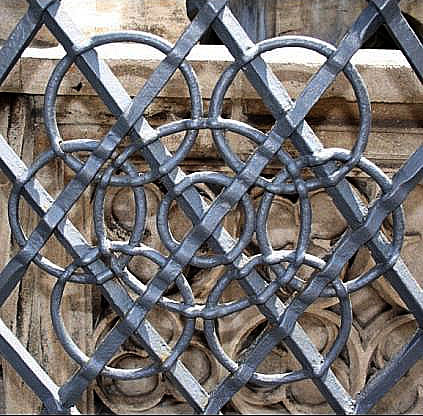
Using Thomas's lead and time on my hands . I have found more info on the "Beautiful Fountain", and the iron work surrounding it. http://www.beautifuliron.com/beautiful_fountain.htm For anyone that ever thinks " What should I try today." to themselves, check it out. Plenty of ideas here. You can also fine other pictures by searching for schöner brunet nürnberg.
-
Thomas, thank you very much. There was another picture sent with the posted one that was indeed taken at schöner brunet nürnberg. I have not found another picture of the post, probably because it appears to be below the "line of site" of anyone not interested. There's a lot of interesting elements there that are worth studying, and trying. I will continue to research. Thank You again. Al
-
Hey Everybody, This picture was sent to me yesterday, maybe second or third hand. I and others are thinking about doing this as a project , but some more information would be helpful. I believe the picture was taken in Nuremberg, Germany. Don't know where, or have any idea what it is in, or overall dimensions . Hopefully someone will recognize it, and can help me narrow it down. Any information would be helpful. Thank You Al
-
What did you do in the shop today?
Al Stephens replied to Mark Ling's topic in Blacksmithing, General Discussion
Hans, try letting your air hammer bit/chisel air harden. I had a similar experience yrs ago. I just let the second try cool slow, and just on a whim sharpened the end and tried it. Still use it today with only touching up edge as needed. I realize different steels are used, but might be worth a try. Al -
Very nice work Andy, I would use the term "inspiring" to describe your work. Thank you for the pictures. Al
-
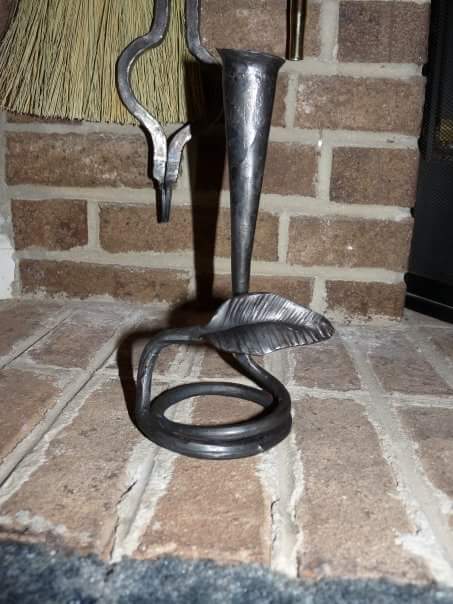
The Athens Forge, a member of the AFC, will meet Sat. June 23 at 10AM. Our demonstrator will be Raymond Head of Wetumka, AL. Raymond is past Pres. of the AFC, the AFC Conference Chairman, an accomplished smith , and builder of tire hammers. He will be forging a tulip candleholder from a single piece of 5 1/2" long x 1" dia. stock.( you might want to bring ear plugs.) There will be an Iron In The Hat drawing at lunchtime. Visitors are always welcome. For more information, and directions to Athens Forge, visit the website at athensforge.com or Athens Forge on FB.
-
control excessive distortion of large hole during forging
Al Stephens replied to RogueRugger's topic in Problem Solving
If you still have, or can get them, you might try tacking the slug back into the hole. Then dishing the piece, then removing the slug. The mass of the slug will help with the hole distorting. Al -
What did you do in the shop today?
Al Stephens replied to Mark Ling's topic in Blacksmithing, General Discussion
Hans, I have enjoyed your casting projects please continue and keep us informed. Al -
Iyuv, don't worry about how long it takes you to do anything. Speed, consistency, accuracy, only comes one way, practice, practice, practice, then patiently practice some more. 2 1/2 hours, any time someone ask me how long it takes to make a simple J hook, my standard answer is 30 years and 10 minutes. Al
-
muting concussion of anvil in concrete shop
Al Stephens replied to redfoxx's topic in Anvils, Swage Blocks, and Mandrels
Building your box high enough so the anvil feet can be covered with sand/scale also helps to quiet it down. Al -
Show me your sales or demo booth
Al Stephens replied to Glenn's topic in The Business Side of Blacksmithing
Right off the bat. I will say I've not worked at lot of retail craft shows, of any kind, and the one's I did , I never felt went particularly well. However I have worked wholesale shows for about 20 tears. Following are a few of my observations about them. If you have a 10' wide booth, a prospective buyer is past you in 3 steps. That's how long you have to catch their eye. Most peoples "scan" area is about 3' off the floor, or ground, to about 6" high. Eye catching color, or shapes help. Even the shadow cast by things will catch peoples eye. Chose colors that will contrast your work well. Allow enough area around an object so customers can focus on that object without being distracted. I always liked an area that I could invite customers into, then they are in "your house". You can have a conversation with them, find out what they are looking for, and point them to things they might have missed in their "scan". The better the light, the better customers can see. Keep your space clean and clutter free. You want customers to see your work, not the boxes you brought it in. Good luck to all, Al -
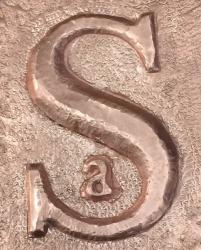
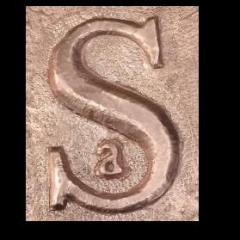
"I want to start blacksmithing"
Al Stephens replied to Marc1's topic in Blacksmithing, General Discussion
Hello All. There have been many good thoughts in this thread. Don't know if I can add anything to it, but here goes. I've been on this blacksmith journey for more than 30 years. The first thing I was ever taught was a taper. Then I was shown how to bend around the horn of the anvil. I took a s hook home that day, which I still have. My last project was recreating a 15-16 century grill from a picture I found. 30 years ago I would have looked at the project as impossible for me. However when I broke it all down, What I did the most on it was draw tapers, and bend. I've had the great pleasure to meet and work with many different people on my journey, which work in all areas. Without exception, they have all stressed learning the basic forging technics, and then expanding from there. Following their example, the first thing I ever start some one who "wants to start blacksmithing" is to show them a taper. I can then show them examples of tapers on blades, and grills. Later Al -
Aus, thanks for the pics. Reminds me of a steam association I was a of member of in PA. Al
-
Hans, if you get here I can put you up for a couple of days. If not check the Athens Forge website after a couple of days, will try to have some step by step pics posted. Al
-
The Athens Forge, a member of the Alabama Forge Council will meet Sat. May 26 at 10AM. Steve Williamson from Columbia, TN will be demonstrating box joint pliers. If you've never seen this done, it is an interesting and not often seen way of forging tong and plier joints. Visitors are always welcome, for more information, and directions to Athens Forge, visit the website at athensforge.com or Athens Forge on FB.
-
What did you do in the shop today?
Al Stephens replied to Mark Ling's topic in Blacksmithing, General Discussion
Sfeile, very nice piece, clean, smooth, easy on the eye, everything fits and works. Al -
Charles Lewton-Brain also has a book titled "Foldforming" Al
-
What did you do in the shop today?
Al Stephens replied to Mark Ling's topic in Blacksmithing, General Discussion
I want to thank everyone for their kind words. This project was very satisfying for me on several levels. One, it was outside of the scope of most of my work, but when you brake it down it was tapers, 1/2 face blows, bending, fullering, and collaring. Two, I was informed the afternoon before it was finished that I will need another shoulder surgery, the 3erd in less than 4 years, to be done next week. I will be "down" for a minimum of 8 weeks, and the wife is planning on putting the force field of doom around the shop. Best to All. Al -
What did you do in the shop today?
Al Stephens replied to Mark Ling's topic in Blacksmithing, General Discussion
Thank You everyone. The first quatrefoil took about 18 hrs to work thru over several days. I made a custom jig to form the c scrolls around, but wound up resizing them around a 1&3/4" pipe. Had to take the second one apart and completely rework it after a friend spotted that I had rolled the scrolls the wrong direction. ( knew something was off, but couldn't figure out what). The last two went faster. It was a exercise in consistency and patience. But my wife tells me I should work on one of those on a constant basis. There are 72 tapers in the piece. I also made some jaws for the vise, to hold during the collaring. Although I lost track of the time I believe I have about 55 hours in it. Al -
What did you do in the shop today?
Al Stephens replied to Mark Ling's topic in Blacksmithing, General Discussion
Thank you, it was one of those, "I'm gonna try that" moments". Al