

mutant
-
Posts
114 -
Joined
-
Last visited
Content Type
Profiles
Forums
Articles
Gallery
Downloads
Events
Everything posted by mutant
-

Minimum Work Triangle Footprint
mutant replied to Ridgewayforge's topic in Building, Designing a Shop
My workshop is tiny- a mere 33 square feet. Not perfect but it works for me. Don't over think it, just do it. -
Thers is nothing wrong with melting cans. It all depends on what you want to do with them. I think it’s awesome to use trash that’s blowing around, melt it, and make art. I do lost foam. I even use them to make belt buckles. If you want to machine it or make parts for a steam engine, then yea, use higher quality AI. As to why your crucible failed? Could of just been a defect or maybe how you tempered it. The guys over at AlloyAvenue will have better insight. -m
-
Check out alloyave.com The guys there will steer you in the right direction. You you're planning on doing just a couple of melts, a metal crucible is fine. Casting a simple billet is pretty straight forward but you might want to add gates and a sprue - both help with metal flow and shrinkage. -m
-
Looks like someone use to much force on it.
-
What did you do in the shop today?
mutant replied to Mark Ling's topic in Blacksmithing, General Discussion
I have the same rivet forge. Since I use mine in a small closed space, I built an enclosure and a hood for it and use a brake drum as my fire pot. I cut a large circular piece of heavy sheetmetal and made a shelf that sits on top of the brake drum. This keeps the coal level with the top of the brake drum and makes it easy to rake - if that makes sense. -
Hope you unlock the bipod for it.
-
I have the same building code - 50sqf without permit. I’ve posted this before - I sectioned off part of a wooden shed I built (and need) for storage and made a tiny smithy at a whopping 33sqf of space. I also made it mostly sound proof since my free time is mainly at night. I wanted to see how much I was going to blacksmith before building a new shed. If you want to see how I did it and the safety precautions I took, look up eviltwinx on YouTube. I have a series called Building a Tiny and Soundproof Smithy. Don’t over think it. Just do it. -m
-
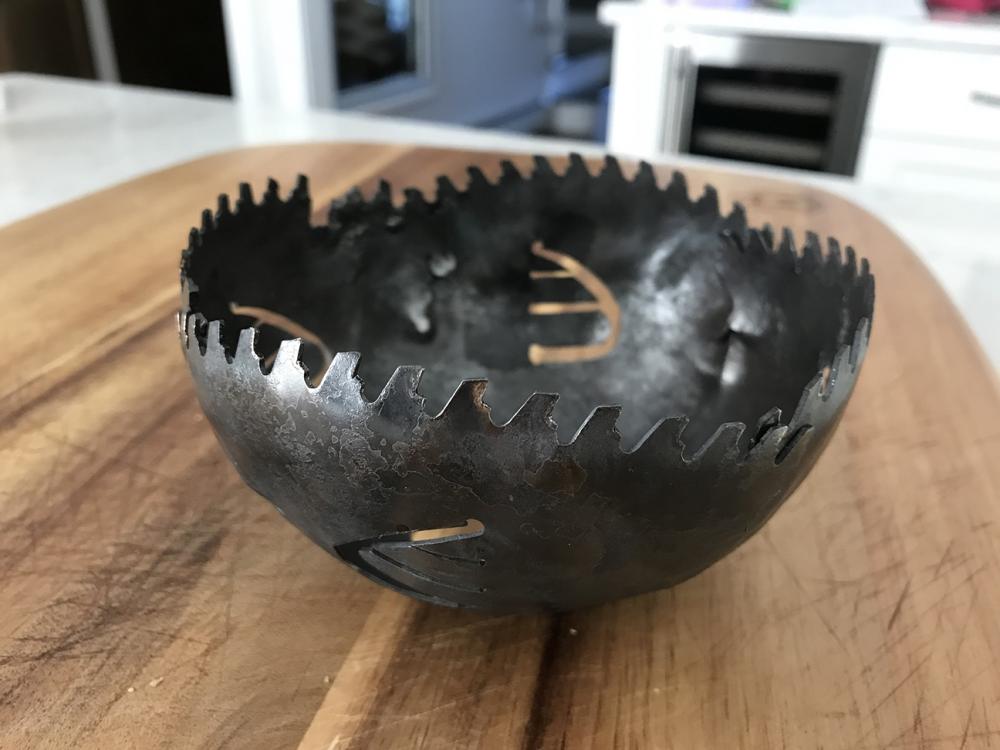
Hey ausfire - the blade has a hole in the center to mount on the saw itself. It helps keep the bowl steady.
-
Thanks for the suggestions! After I make a few of these, I would like to tackle a larger blade. I’m a big fan of recycling items and retaining some characteristic of its original form. -m
-
It's not that impressive but I thought it was pretty cool, especially for a beginner project. It was the first time I used a swage block as well. I found an awesome guy who's been smithing as a hobby for 30+ years and he has an open forge every Sunday. I've been trying to make it out to his shop as much as I can. -m
-
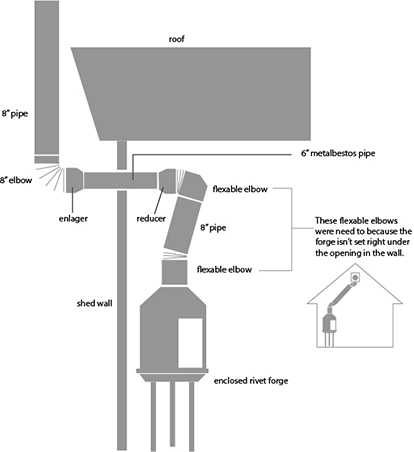
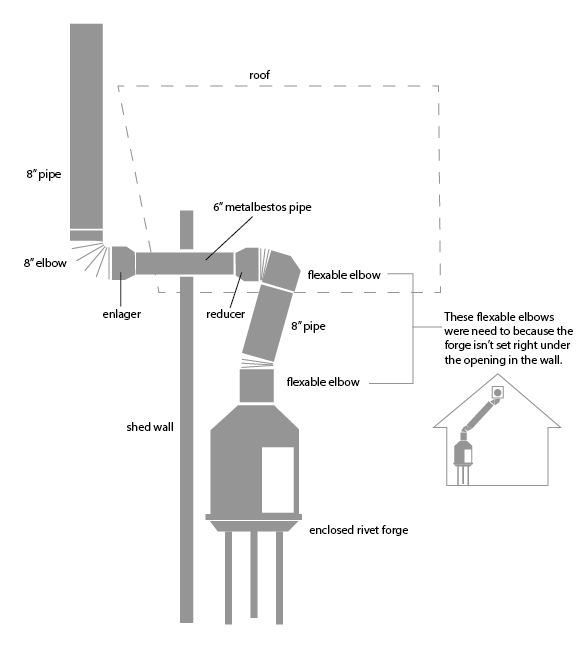
My set up starts with an 8" pipe with a slight bend, goes to a 90 degree and reduces down to a 6" pipe. (It's a 3-foot length of double wall metalbestos which passes through my shed wall.) It expands to an 8" 90-degree elbow and extends up to a 4-foot pipe which is 3 feet over the peak of the shed. Crazy right! But it works because I built an enclosure around my tiny rivet forge and made a small opening. Less cool ambient air mixes with the hot air for the coals and I get a fantastic draft.
-
What is a good size for a small hobby shop?
mutant replied to Glenn's topic in Building, Designing a Shop
Well, I'm just starting and still on my first shop which is a whopping 33 square feet. I sectioned off part of a 8x16 shed and made it as sound proof as i could since most of my forging time is late at night. My coal forge, anvil and post vise all fit within this space. -
Stuck in the city. Now what?
mutant replied to MrDarkNebulah's topic in Blacksmithing, General Discussion
Congrats on getting in to Copper Union, I went to SVA. Not sure if there are any places in the city to do blacksmithing. You'll probably need to travel to Brooklyn or Jersey City. If you do happen to find something on Manhattan, let me know for sure. I still work there. -
I love youtube and watch all types of videos. Some to learn, some to see how other people are doing whatever I'm interested in. I don't care if someone doesn't practice PPE, or if it's their first time, has improper information, does whatever in a dangerous manner. I've done my research, asked questions, read books, and use a healthy dose of common sense. I enjoy learning from others success and mistakes. I view certain videos as entertainment and not a guide on how to. I have a youtube channel and I'm a newb to metal working such as welding, backyard foundry, blacksmithing, and general metal shaping. I don't teach, I show how a beginner tries. We all watch the experts and they make it seem so easy. Sometimes, just watching a beginner struggle, fail, learn, and hopefully succeed is the inspiration to try or not giving up. I guess it's why I love Chandler Dickinson. He doesn't teach, but shows how he does it. Sometimes he fails, but he keeps at it. He is the underdog that's making it and inspiring others to try. BTW- I do understand the severity of people giving dangerous information or participating in hazardous activities. I just don't promote watching those sites. There was a thread with a list of blacksmithing channels that I thought was super helpful. We should direct newcomers there.
-
I have a crazier setup. My forge goes from 8" pipe to 6" back to 8". The 6" is a metalbestos pipe which is a insulated double wall pipe. I used this because of a tight fit through my shed opening. Too make matters even crazier, I have two 90 degree bends and a slight bend from the forge. I have no issues with draft or smoke coming into my shed. If you close up your opening so a lot less ambient air mixes with the hot air- it'll draft. I have a video if you're interested.
-
I get a lot of comments saying that I should cut a hole in the floor and place my anvil stand through it and also several feet into the ground. That's probably the best solution but I didn't want to do that. Instead, I was able to get a few 18x18 pavers wedge between the floor joists and the ground. It did help. I also made a hollow anvil stand and it's filled with sand.
-
Looks like a great smithy! Enjoy your new setup and let me know how you do with the rapid tongs. I've been debating getting a set.
-
I covered my shed floors with sheets of 1/8 inch plate that I picked up at the scrap yard and most of my walls have old corrugated roofing tin on them. It was't all that expensive to do. I think I paid more for the rockwool insulation that I put in for sound and fire proofing.
-
Hi Chuck, I recently finished turning a small portion of my shed into a smithy. Most of my free time is at night so I needed to find a way to do it quietly and as safely as possible. I used rock wool for sound proofing and fire safety along with old corrugated metal sheets. I'm using coal which is much different in regards to oxygen depletion. You can check out my build series on YouTube. Look up exiltwinx. I'm not saying everything I did is to code and perfect, but I did take the time to problem solve a few issues that might relate to what you're planning on going through.
-
I love it. Can you improve it? Sure thing but don't let that stop you from using it as much as you can.
-
Thanks Frosty! Took me a while to complete but I've done a few projects in it at night and so far so good. They say necessity is the mother of all invention. I'm just throwing a little common sense in as well. I love being creative and luckily, it's what I do for a living.
-
Smelting aluminium with a blowtorch
mutant replied to T4G0R's topic in Smelting, Melting, Foundry, and Casting
That's not going to cut it. If you're just starting out, try using charcoal and a hairdryer. You can use a tin can or better yet, a stainless steel container as a crucible for your first few tries. You'll only get a couple of melts in before they fail but least you'll get some experience with little cost. Also, do as much research as you can. Use protective gear and common sense. It's a fun hobby but you need to be careful. -
I recently finished making the world's tiniest and quietest smithy in part of a my shed. The space is no bigger than 33 sq. feet. I used rockwool in the walls to reduce the noise as much as possible and for additional fireproofing. It's not 100% sound proof since my shed is built on floor joists off the ground, but I can forge at night without bothering the neighbors. I have a video series on my adventures on youtube. Look up How to Build A Small Blacksmith Shop by eviltwinx. Maybe you'll see something that you'll find helpful. Or maybe you'll laugh.
-
Wanting to get into casting/melting
mutant replied to Sabayn's topic in Smelting, Melting, Foundry, and Casting
I would start off small and easy since you can always upgrade. Make a simple charcoal furnace and use a hairdryer as the air source. I would also start with aluminum for various reasons. The main being it's lower melting temperature compared to bass or cast iron. Try melting the AI into ingots as a first few projects, an old muffin tray is great to use. After a few melts, try your hand at lost foam casting. I've done a few projects and it's a great hobby. Do your research, ask questions and use common sense. There is a pretty big risk factor with this hobby but it can be done relatively safely. Check out Alloy Ave. It's a website dedicated to the backyard metal caster. I also have a few casting videos up on youtube. https://www.youtube.com/watch?v=LK9rYpRQmiM -
That's part of "Among other reason" in what I wrote. You'll be surprised how much charcoal dust and forced air will sand blast away material.
