Gibson
-
Posts
13 -
Joined
-
Last visited
Content Type
Profiles
Forums
Articles
Gallery
Downloads
Events
Everything posted by Gibson
-

Show me your anvil stands
Gibson replied to pkrankow's topic in Stands for Anvils, Swage Blocks, etc
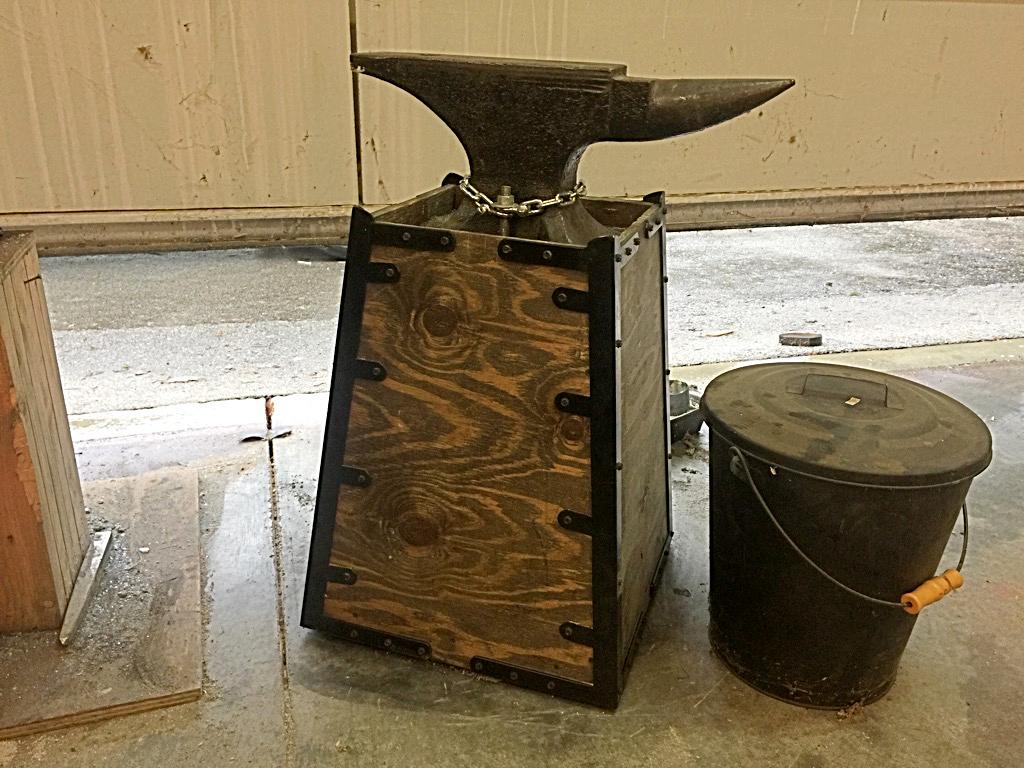
This is the sand filled stand I just made for my little 90lb soderfors paragon. The stand ended up weighing 300lb, not counting the anvil.
-
Truth. (Gorgeous grinds, btw!)
-
If it is a new batch - especially something you haven't worked with before - I would do a coupon like you describe just to make sure nothing is off from the mill. Sometimes orders get mixed up so that will help you see if maybe something is way off. After that to make sure there is nothing way off with your processes (in general), ideally you'd want to do everything to it you'd do in your normal workflow. The most straightforward test is to actually make a knife since that what you really want to test. Temperature is the bigger bad guy (vs time) with grain growth so if you really overheat it for just a short period, it can affect the grain. A cool experiment to help drive that home is to take an old file, snap it, and set it aside. Then bring it to a yellow heat and soak it for like a minute. Then quench as normal and snap that sample. The difference you'll see between the two samples is pretty amazing. I can't find the original article, but I've attached a picture of what it looks like (not my picture - I'm sure this has been posted here a hundred times). We did this experiment at a buddy's shop one time and only let it soak for a minute at yellow, then air cooled it and brought it back up to around 1500 and quenched and it ended up pretty coarse. In sort, any high heats you have while forging can come back to haunt you later. For the testing, it can also be very helpful to perform those same tests on a modestly priced commercial example of the same type you're making. You'll probably realize the bar isn't quite as high as you might be imagining EDIT: Realized that linking that image would violate some of the board rules. I'll try to find the photos I took of our experiment and post them here.
-
What Steve and Thomas said! If you are testing a new steel (or batch), supplier, or HT regimen it is a pretty good idea to do at least one test piece all the way to completion (within reason) and test to destruction as that will give you a MUCH better idea of where you stand. The crosssection you see when you snap a sample in the bend test will tell you for sure if you are getting huge grain growth. Also worth investing in an HRC file set. It won’t let you get an exact number, but they give you a range and actually give you a really good idea when you are comparing between two objects (like testing two different quenchants or between your knife and a commercial one or a sample of a known hardness) I really admire the testing techniques of Joe Calton and it includes a lot of what Steve covered, plus a lot of non destructive testing that can help you feel more confident sending something out. Probably the best advice related to making sure you have something good going out the door is to use high quality stock from a reputable supplier and be familiar with what state it is in from the mill. It will remove a lot of guesswork and doubt. Looking forward to seeing what you make!
-
Love the pattern. Really interesting composition! I’m also in the wet shaving community - I share the hesitation on the monkey tail. That will likely be an issue for grip due to size and geometry, but you never know unless you experiment! That Koa has a lot going on - I quite like it. Let us know how it shaves!
-
Gorgeous - can we get a detail shot of the pommel? From what I can see of that Celtic knot, I want to see more!
-
You may also consider before putting the refractory in splitting and hinging the box along the bottom (check out how Wayne does his propane tank forges). It is only a little extra work, and if you ever need to fit a large work piece in it lets you expand the forge at that seam.
-
Thanks for the project update Paragon! It is looking slick! I've actually been on the board for several years, I just seldom post I've updated my location - I've actually done that twice recently but for some reason, it doesn't seem to save. Hopefully this time it will take! Great project!
-
Hey Paragon, This is a great looking design! Any updates? I'm planning out a similar build for later this year and was wondering how this approach is working for you.
-
lyuv, that second attempt came out lovely. Out of curiosity, how thick was the cross section on that first attempt?
-
3D printed plastic burner experiments (photo heavy)
Gibson replied to Another FrankenBurner's topic in Gas Forges
Awesome setup Curtis! When you start looking to build your new printer give the Prusa i3 Bear variant (by pekcitron) a look. It is intended as an upgrade path for the Prusa i3 MK2/MK3 printers but can also be self sourced. It offers a lot of rigidity and is a great platform if you're wanting to push speeds without a loss of precision. Also sourcing it yourself you get the option to chose which multi material workflows you like the best. It is a really well documented platform with a lot of compatibility with the standard Prusa upgrades out there. -
3D printed plastic burner experiments (photo heavy)
Gibson replied to Another FrankenBurner's topic in Gas Forges
I'm really excited about this one! Curtis, you've probably already come across it but I thought I would mention it in case you haven't yet: you can do "Lost PLA" and burn it out but an even better option is wax 3D printing filament. MachinableWax makes one and there are several other brands as well. It is a bit tricky to print with from what I've seen, but the burnout is supposed to be a lot cleaner and easier (it is designed specifically for this purpose). -
3D printed plastic burner experiments (photo heavy)
Gibson replied to Another FrankenBurner's topic in Gas Forges
This might be the coolest thing I've seen today. Highly interested in the results! What printer are you using (also what layer height)?