Matthew D
-
Posts
68 -
Joined
-
Last visited
Content Type
Profiles
Forums
Articles
Gallery
Downloads
Events
Everything posted by Matthew D
-
PVF, Hey that is a great design! Retains enough of the RR spike, that you know what it was made from. Thanks for sharing. Matthew
-
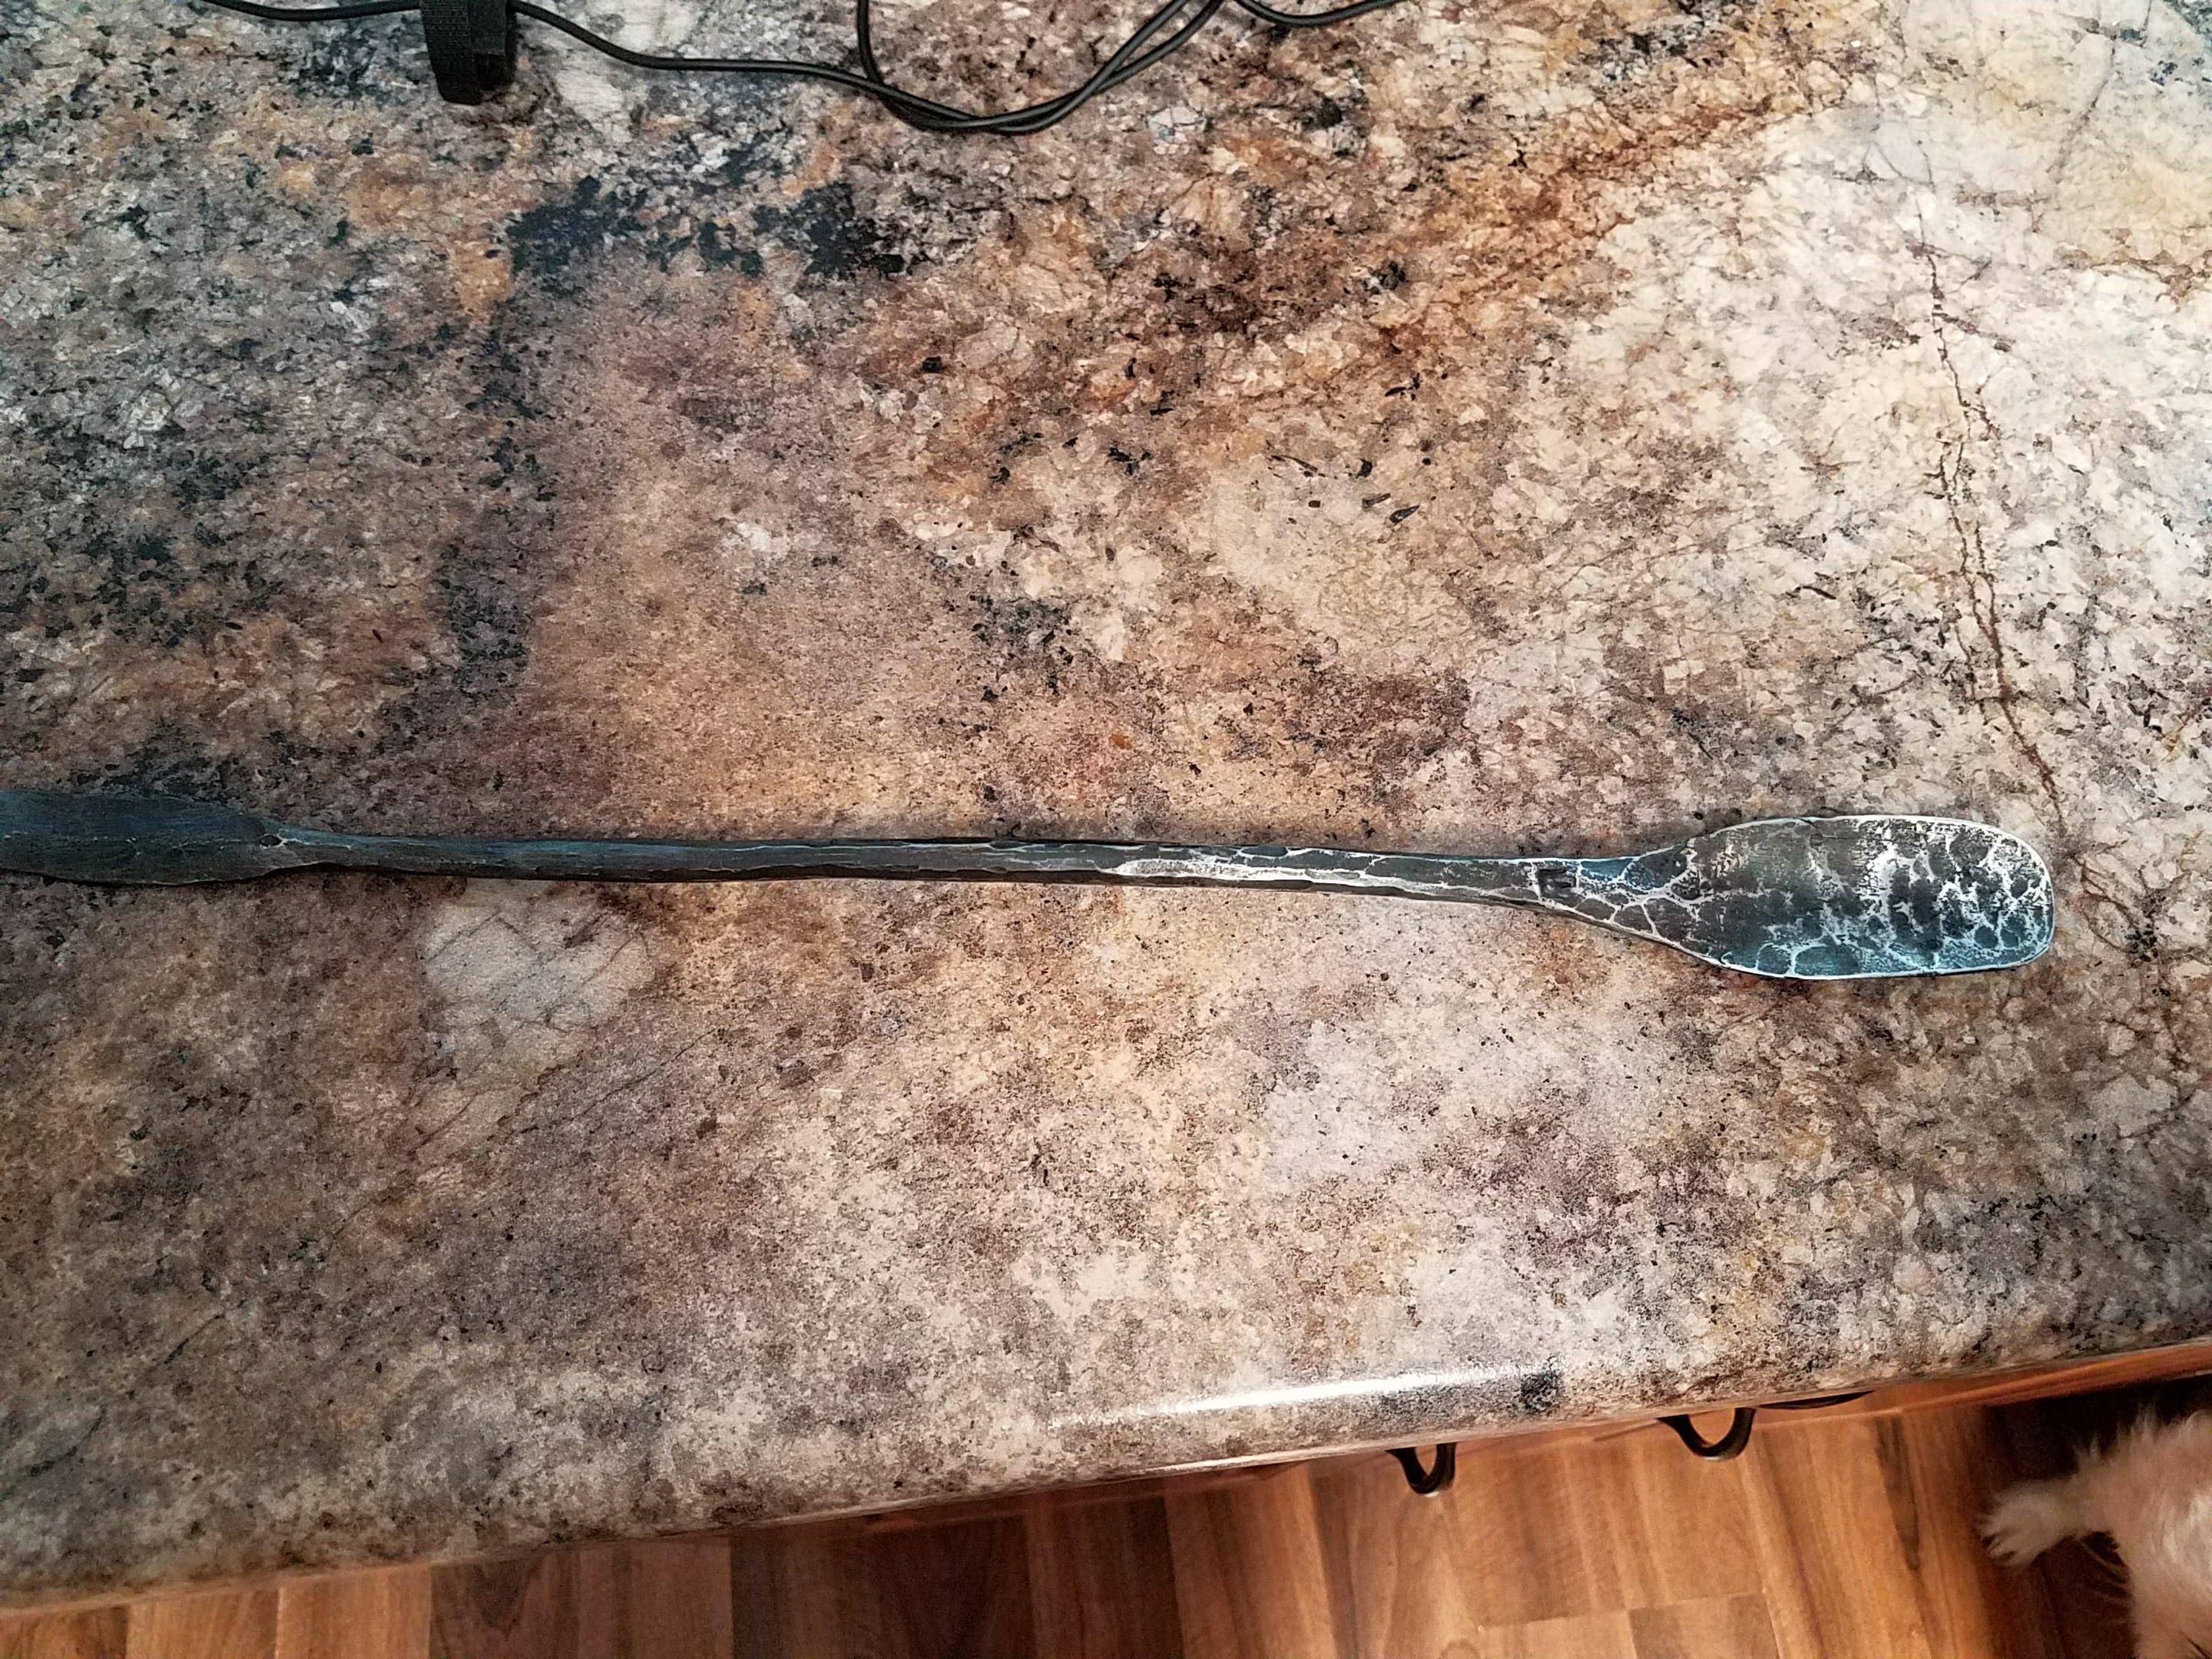
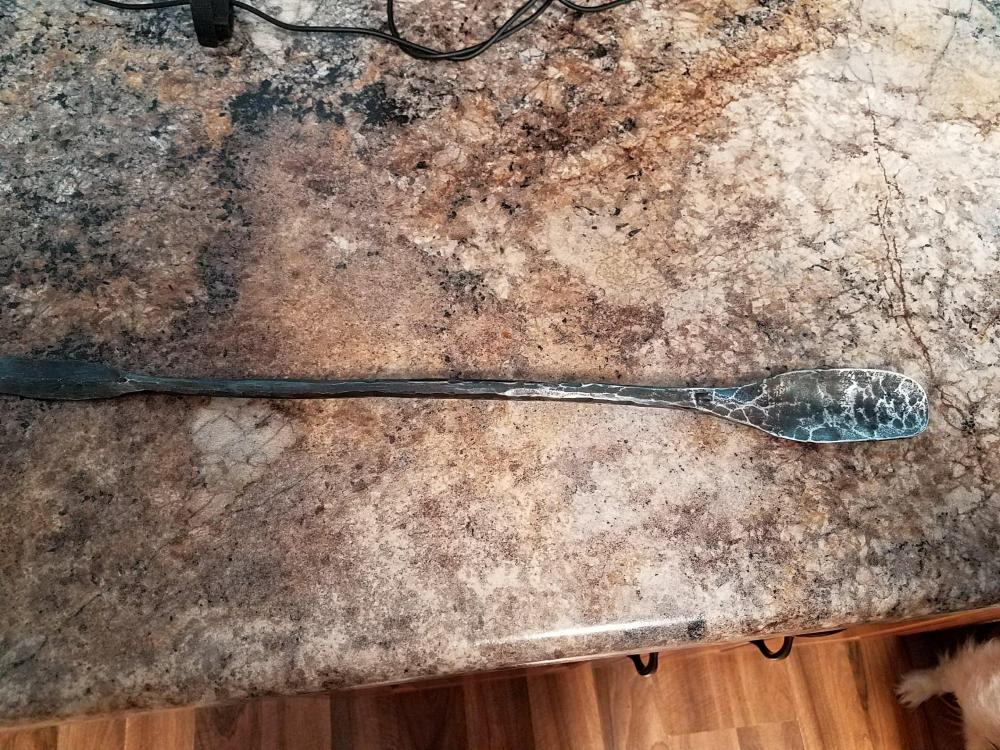
I finally got around to sharing this. Back in February I made a long handle shoehorn from a railroad spike for my brother. My son helped me make a video. Forging a shoehorn from a railroad spike.
-
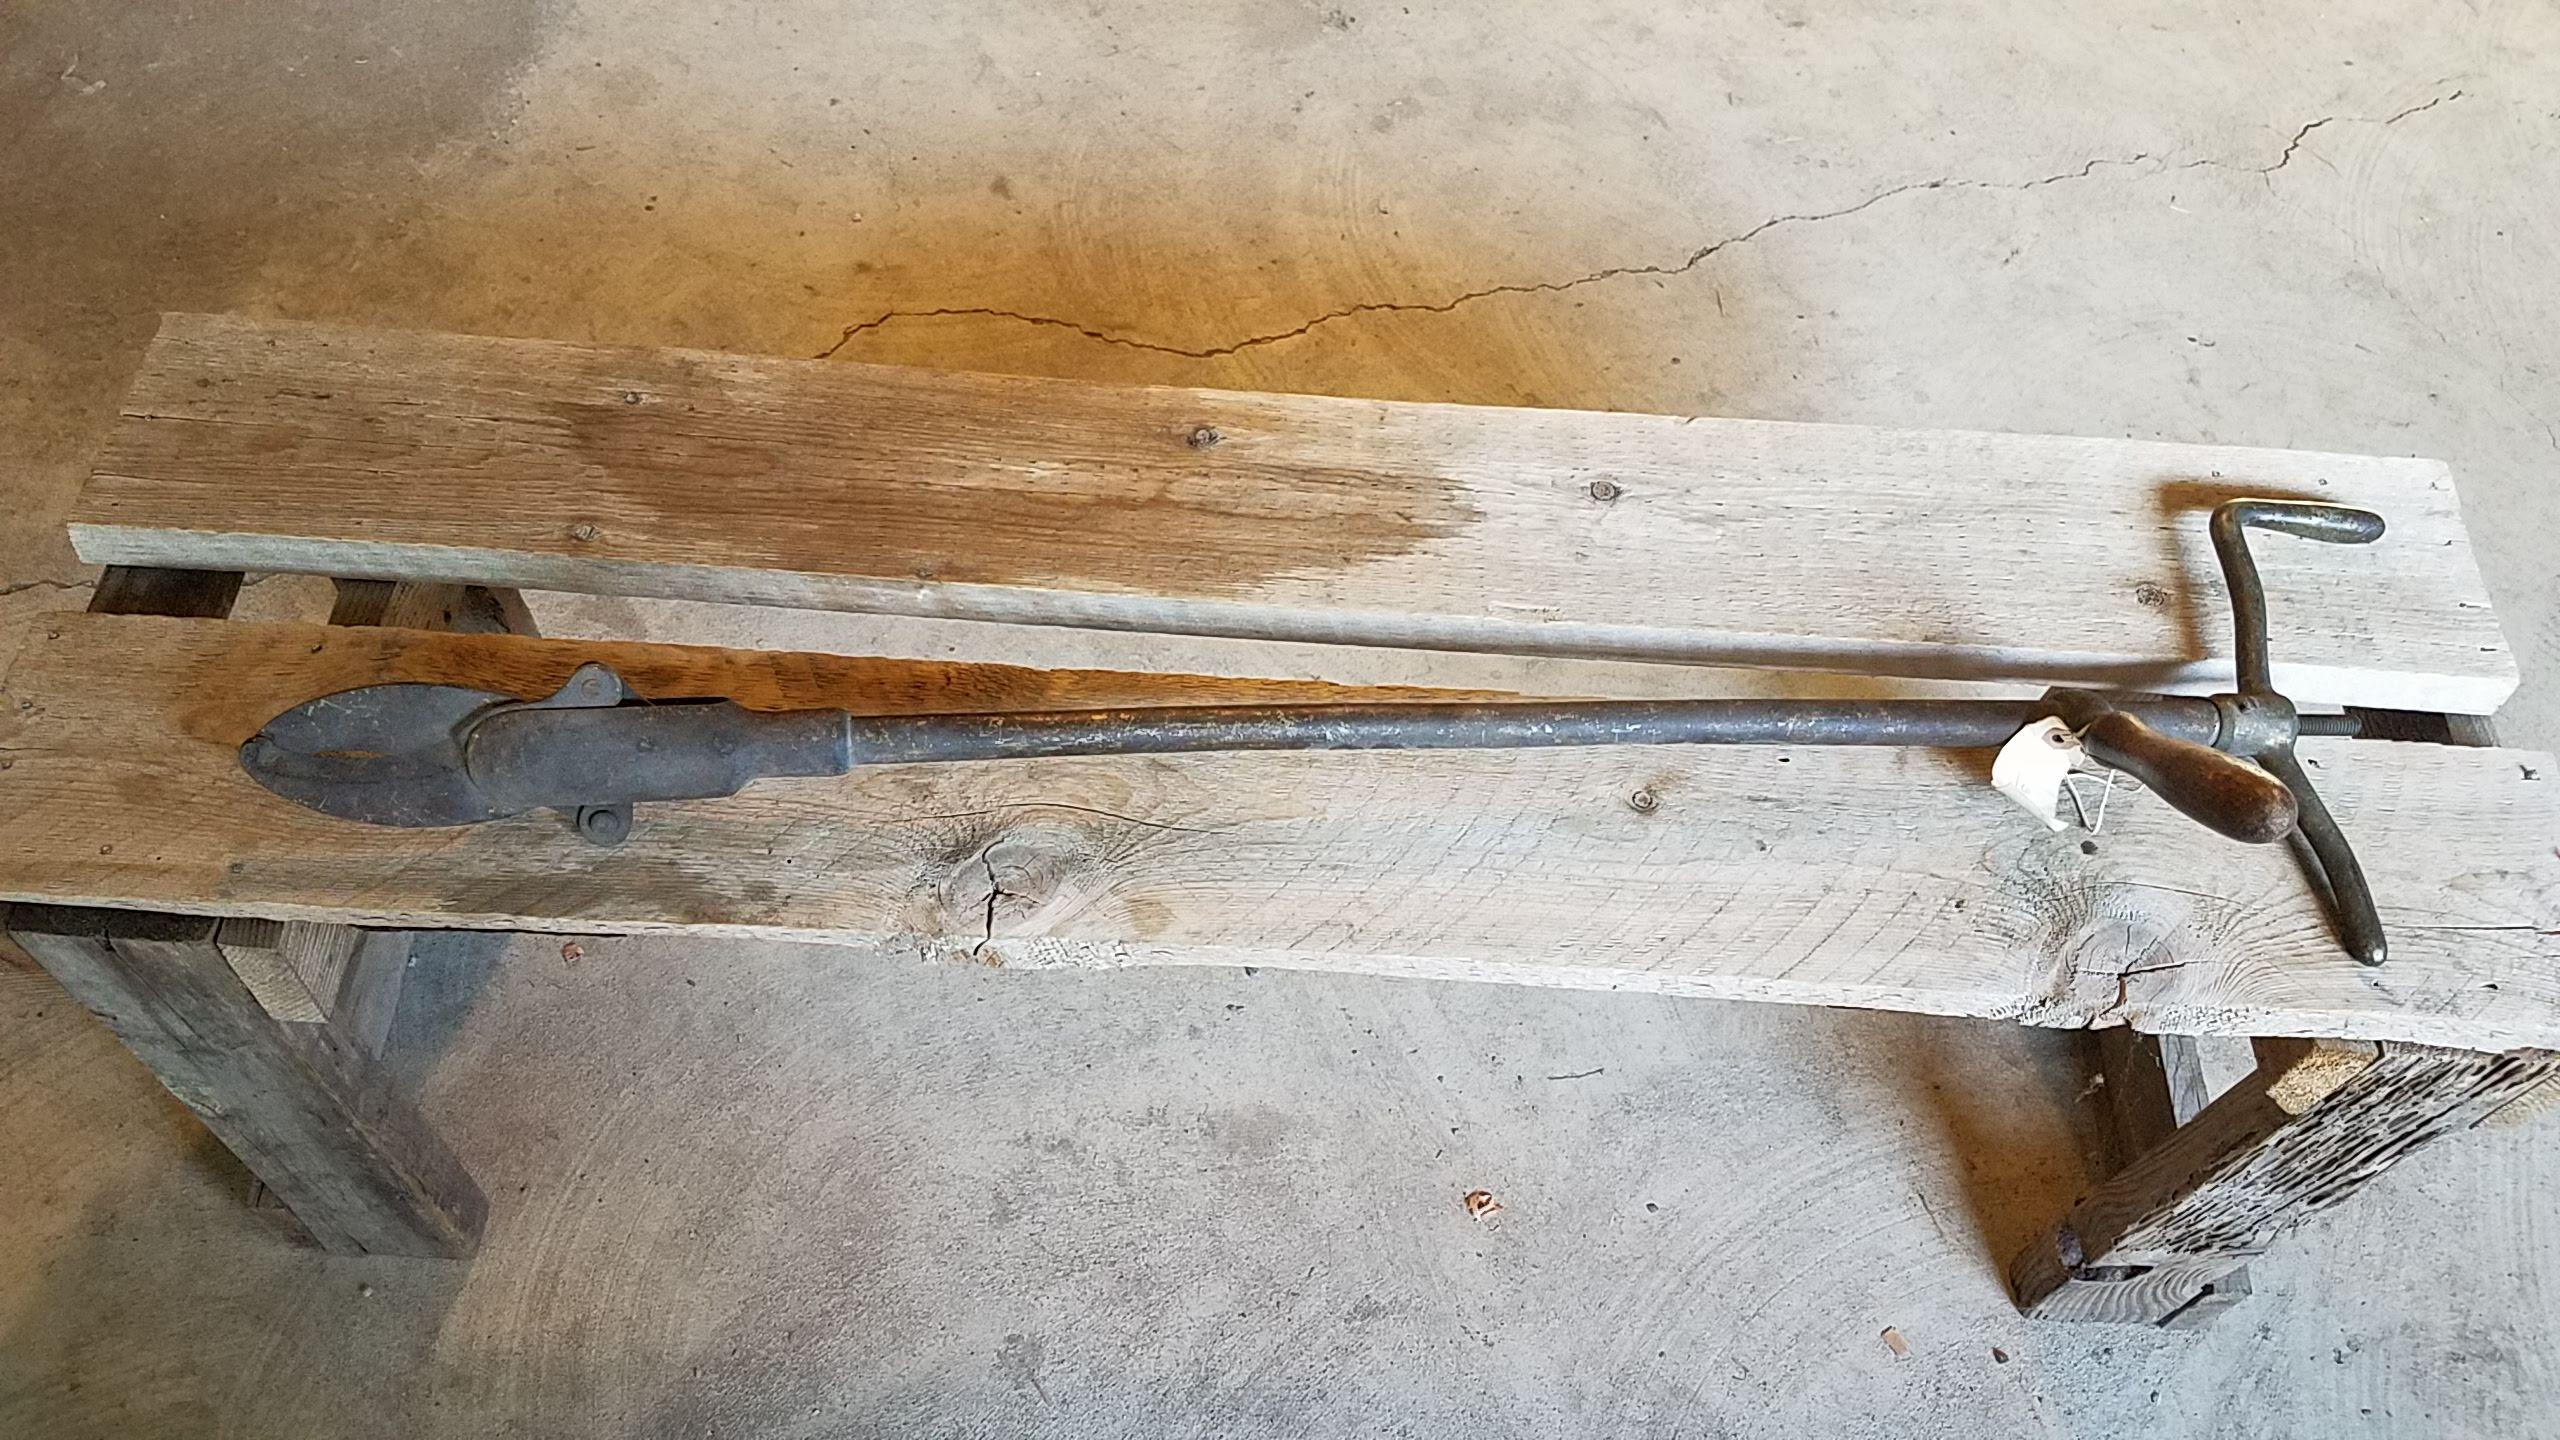
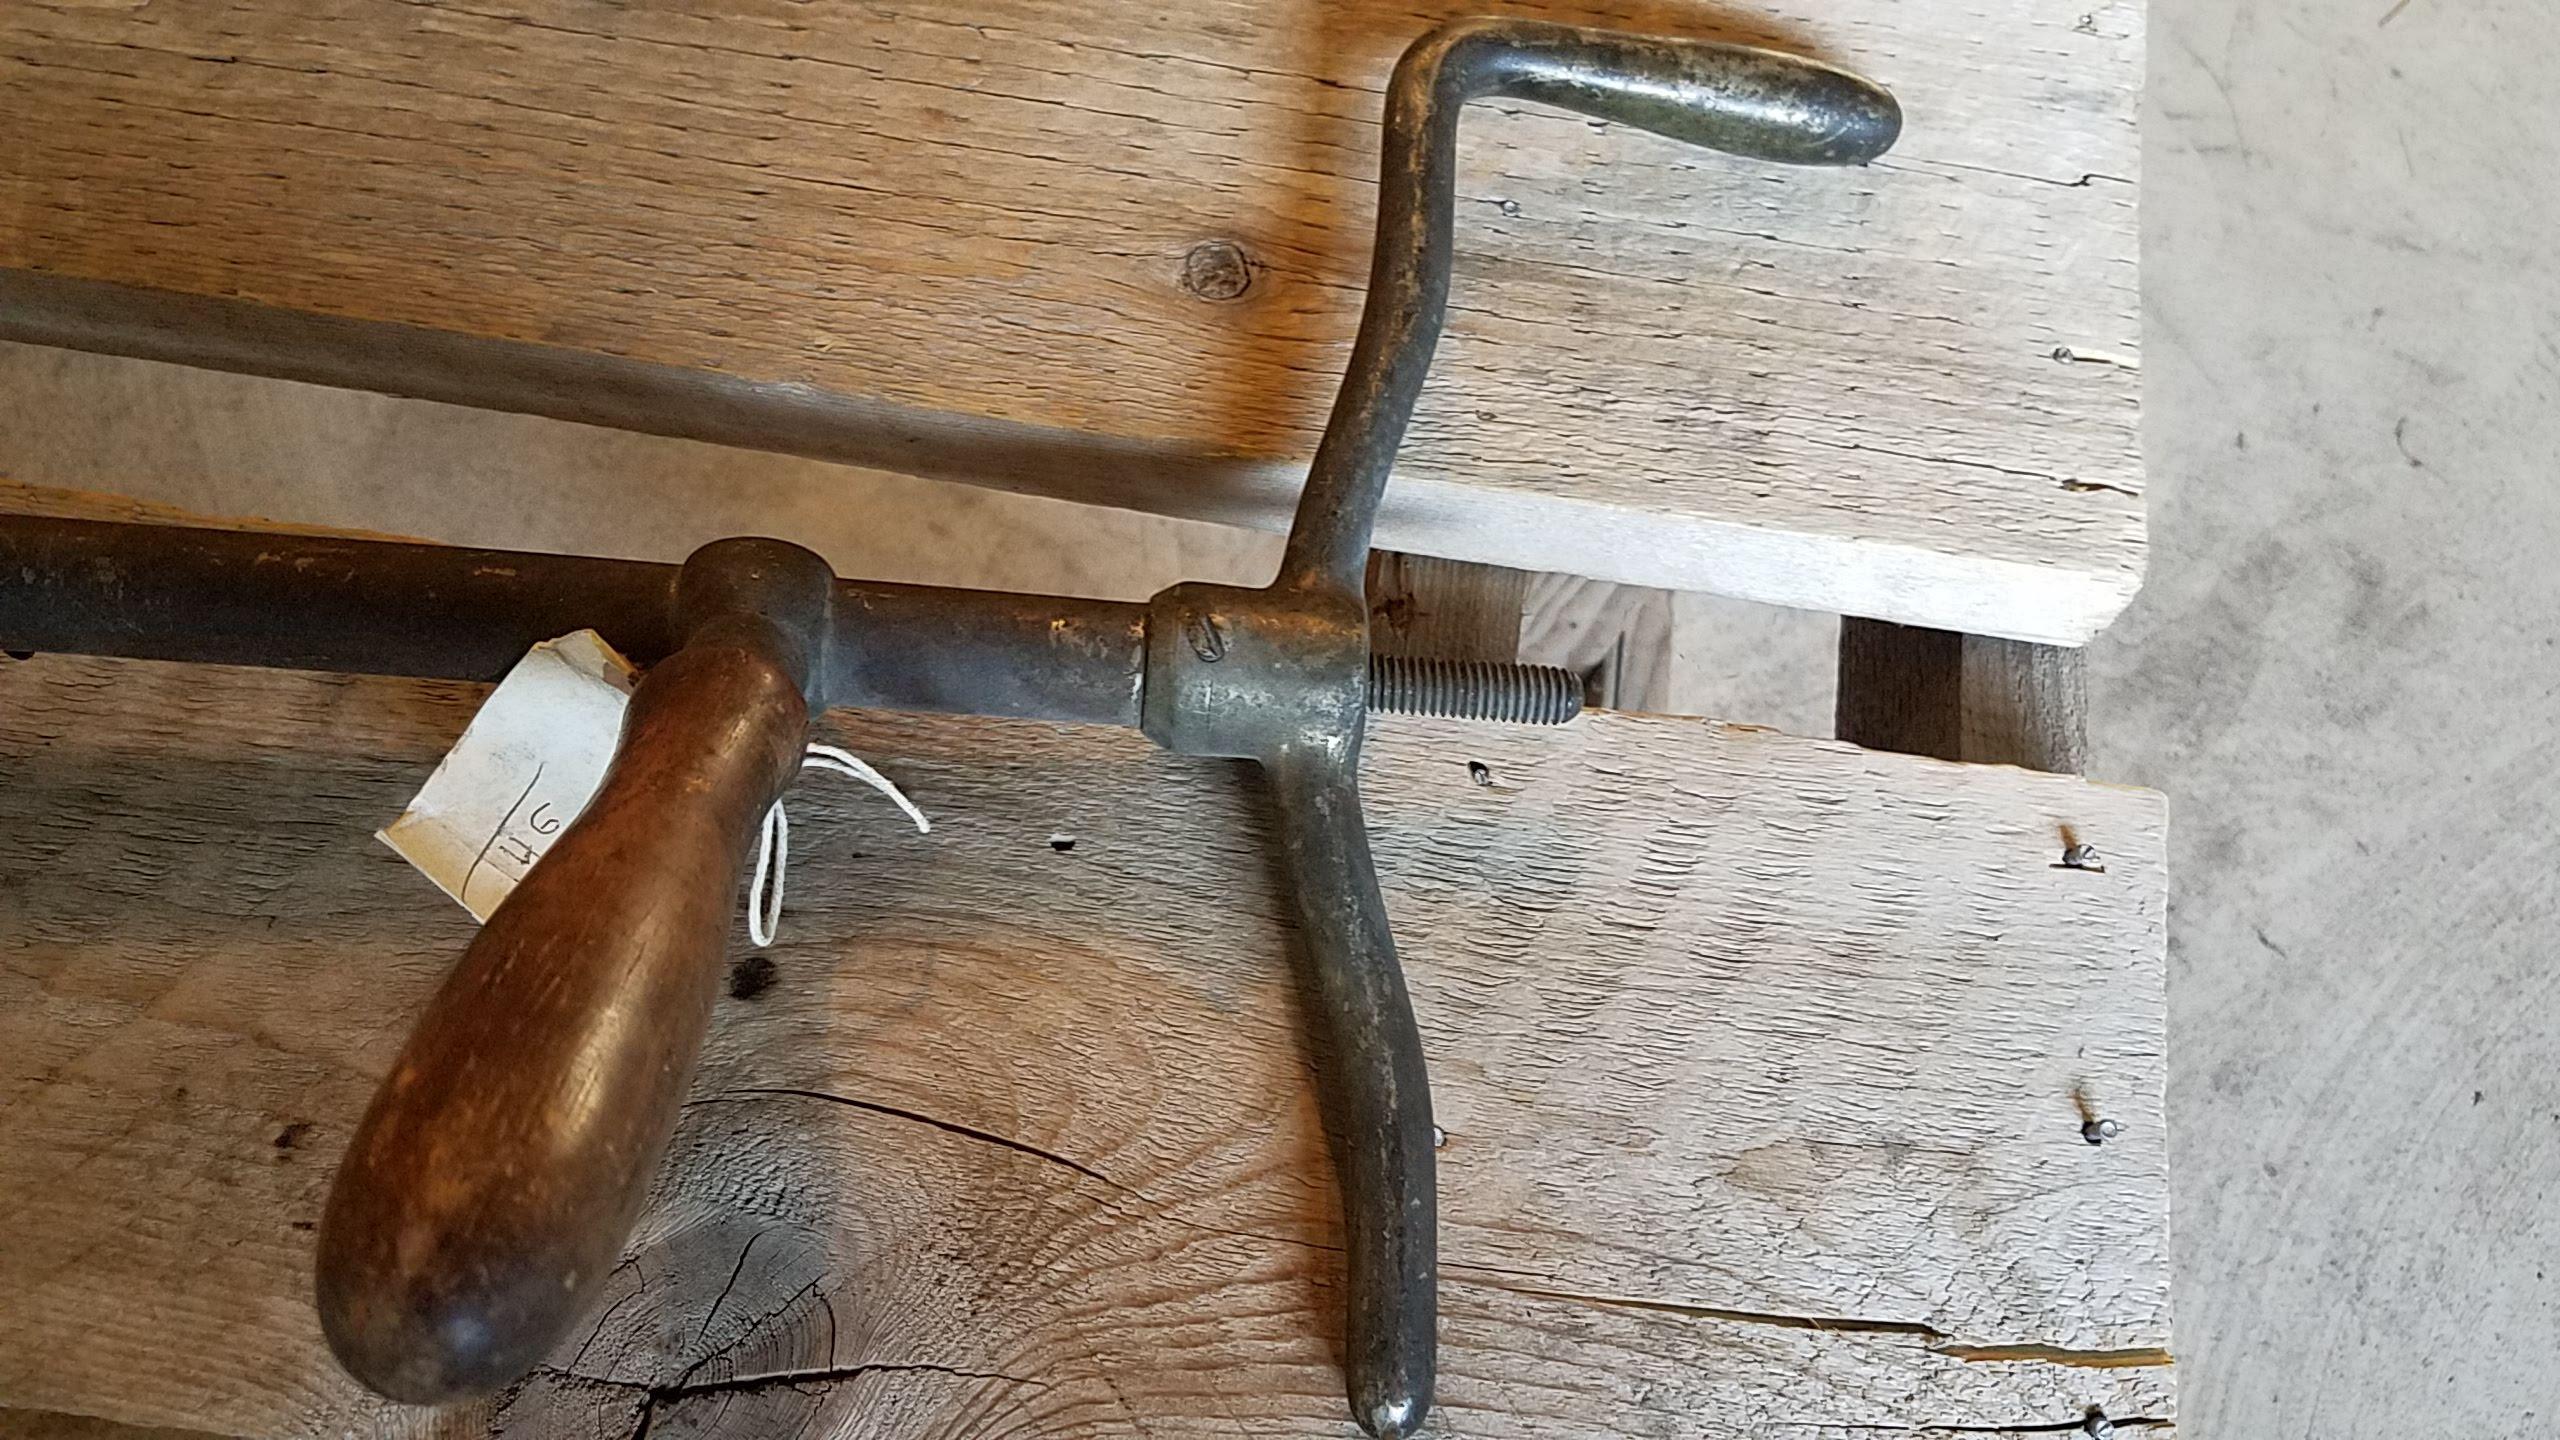
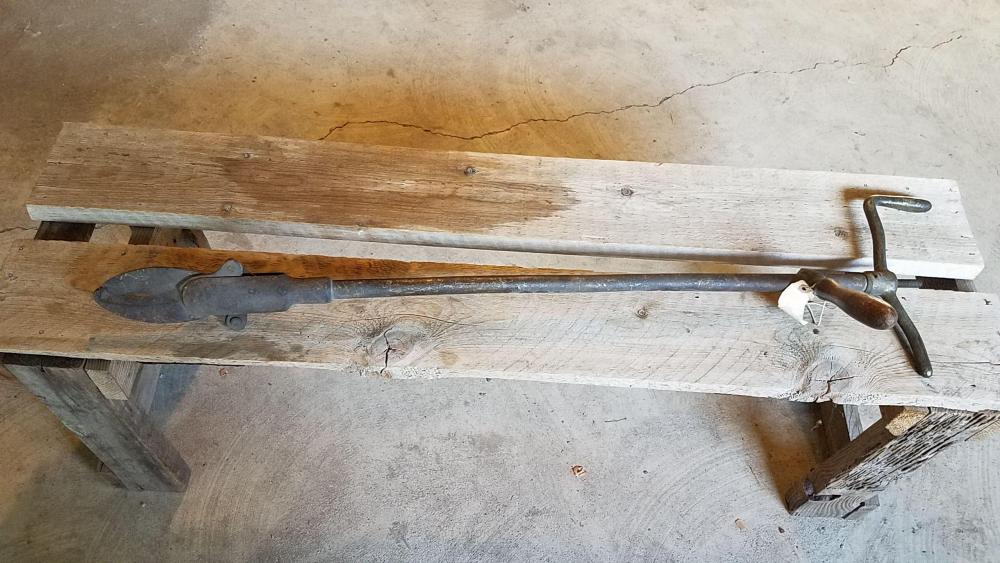
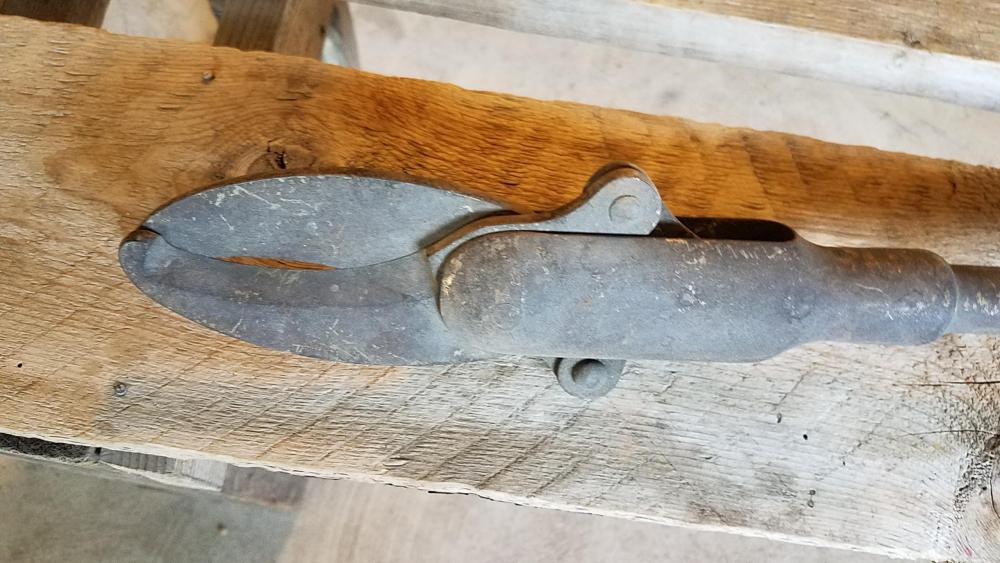
Okay, I finally found out what they are. They are cattle dehorning tools. Daswolf was closest when he mentioned cattle castration clippers. However, they were used for dehorning young heifers or steers. The long reach gave the rancher the ability to reach inside a cattle shoot and dehorn a restrained steer, bullock or heifer.
-
I have tried to find something like it on the net. Nothing so far. Just using my noggin, I can see that they were used to cut something that was difficult to reach. Perhaps something down a pipe? What about some sort of plumbing shears to cut a root grown into a sewer drain? Just guessing....
-
I volunteer once a week at a pioneer village. One of the curators asked me if I knew what this tool was. Nope. Any ideas? It is about 3 feet long. Has a shear head, like scissors, at one end that is operated by a bolt that extends though the hand to a handle you turn to actuate the shears.

-
Try a smaller piece of the same steel. Before you start hammering on it, heat it up (keeping the heat in the steel billet as even as possible) and let it cool down slowly. Do that a couple times and then heat it up and bury it in some ashes or other insulator and let it cool overnight. Essentially this process is going to relax the preset stress in the spring steel and anneal it. Then it will be ready for forging. Then work on it in the forge, a be careful how long you strike it. Keep it at a good malleable temperature. Start with a smaller piece and make something like a small dagger. See what results you get. Then move up to something two handed. You are going to make mistakes. BUT if you are a careful observer of what you personally do, you will learn NOT to do that again and learn to do the things that work. Watch some videos of blacksmiths from Africa and the Philippines making machetes and other tools. Essentially all they use is used leaf springs. But they do take time to heat them up and cool them down. Often they are cutting pieces from large springs. The process of heating the steel up a couple times before striking it relaxes the stress in the steel. Report back on what you learn.
-
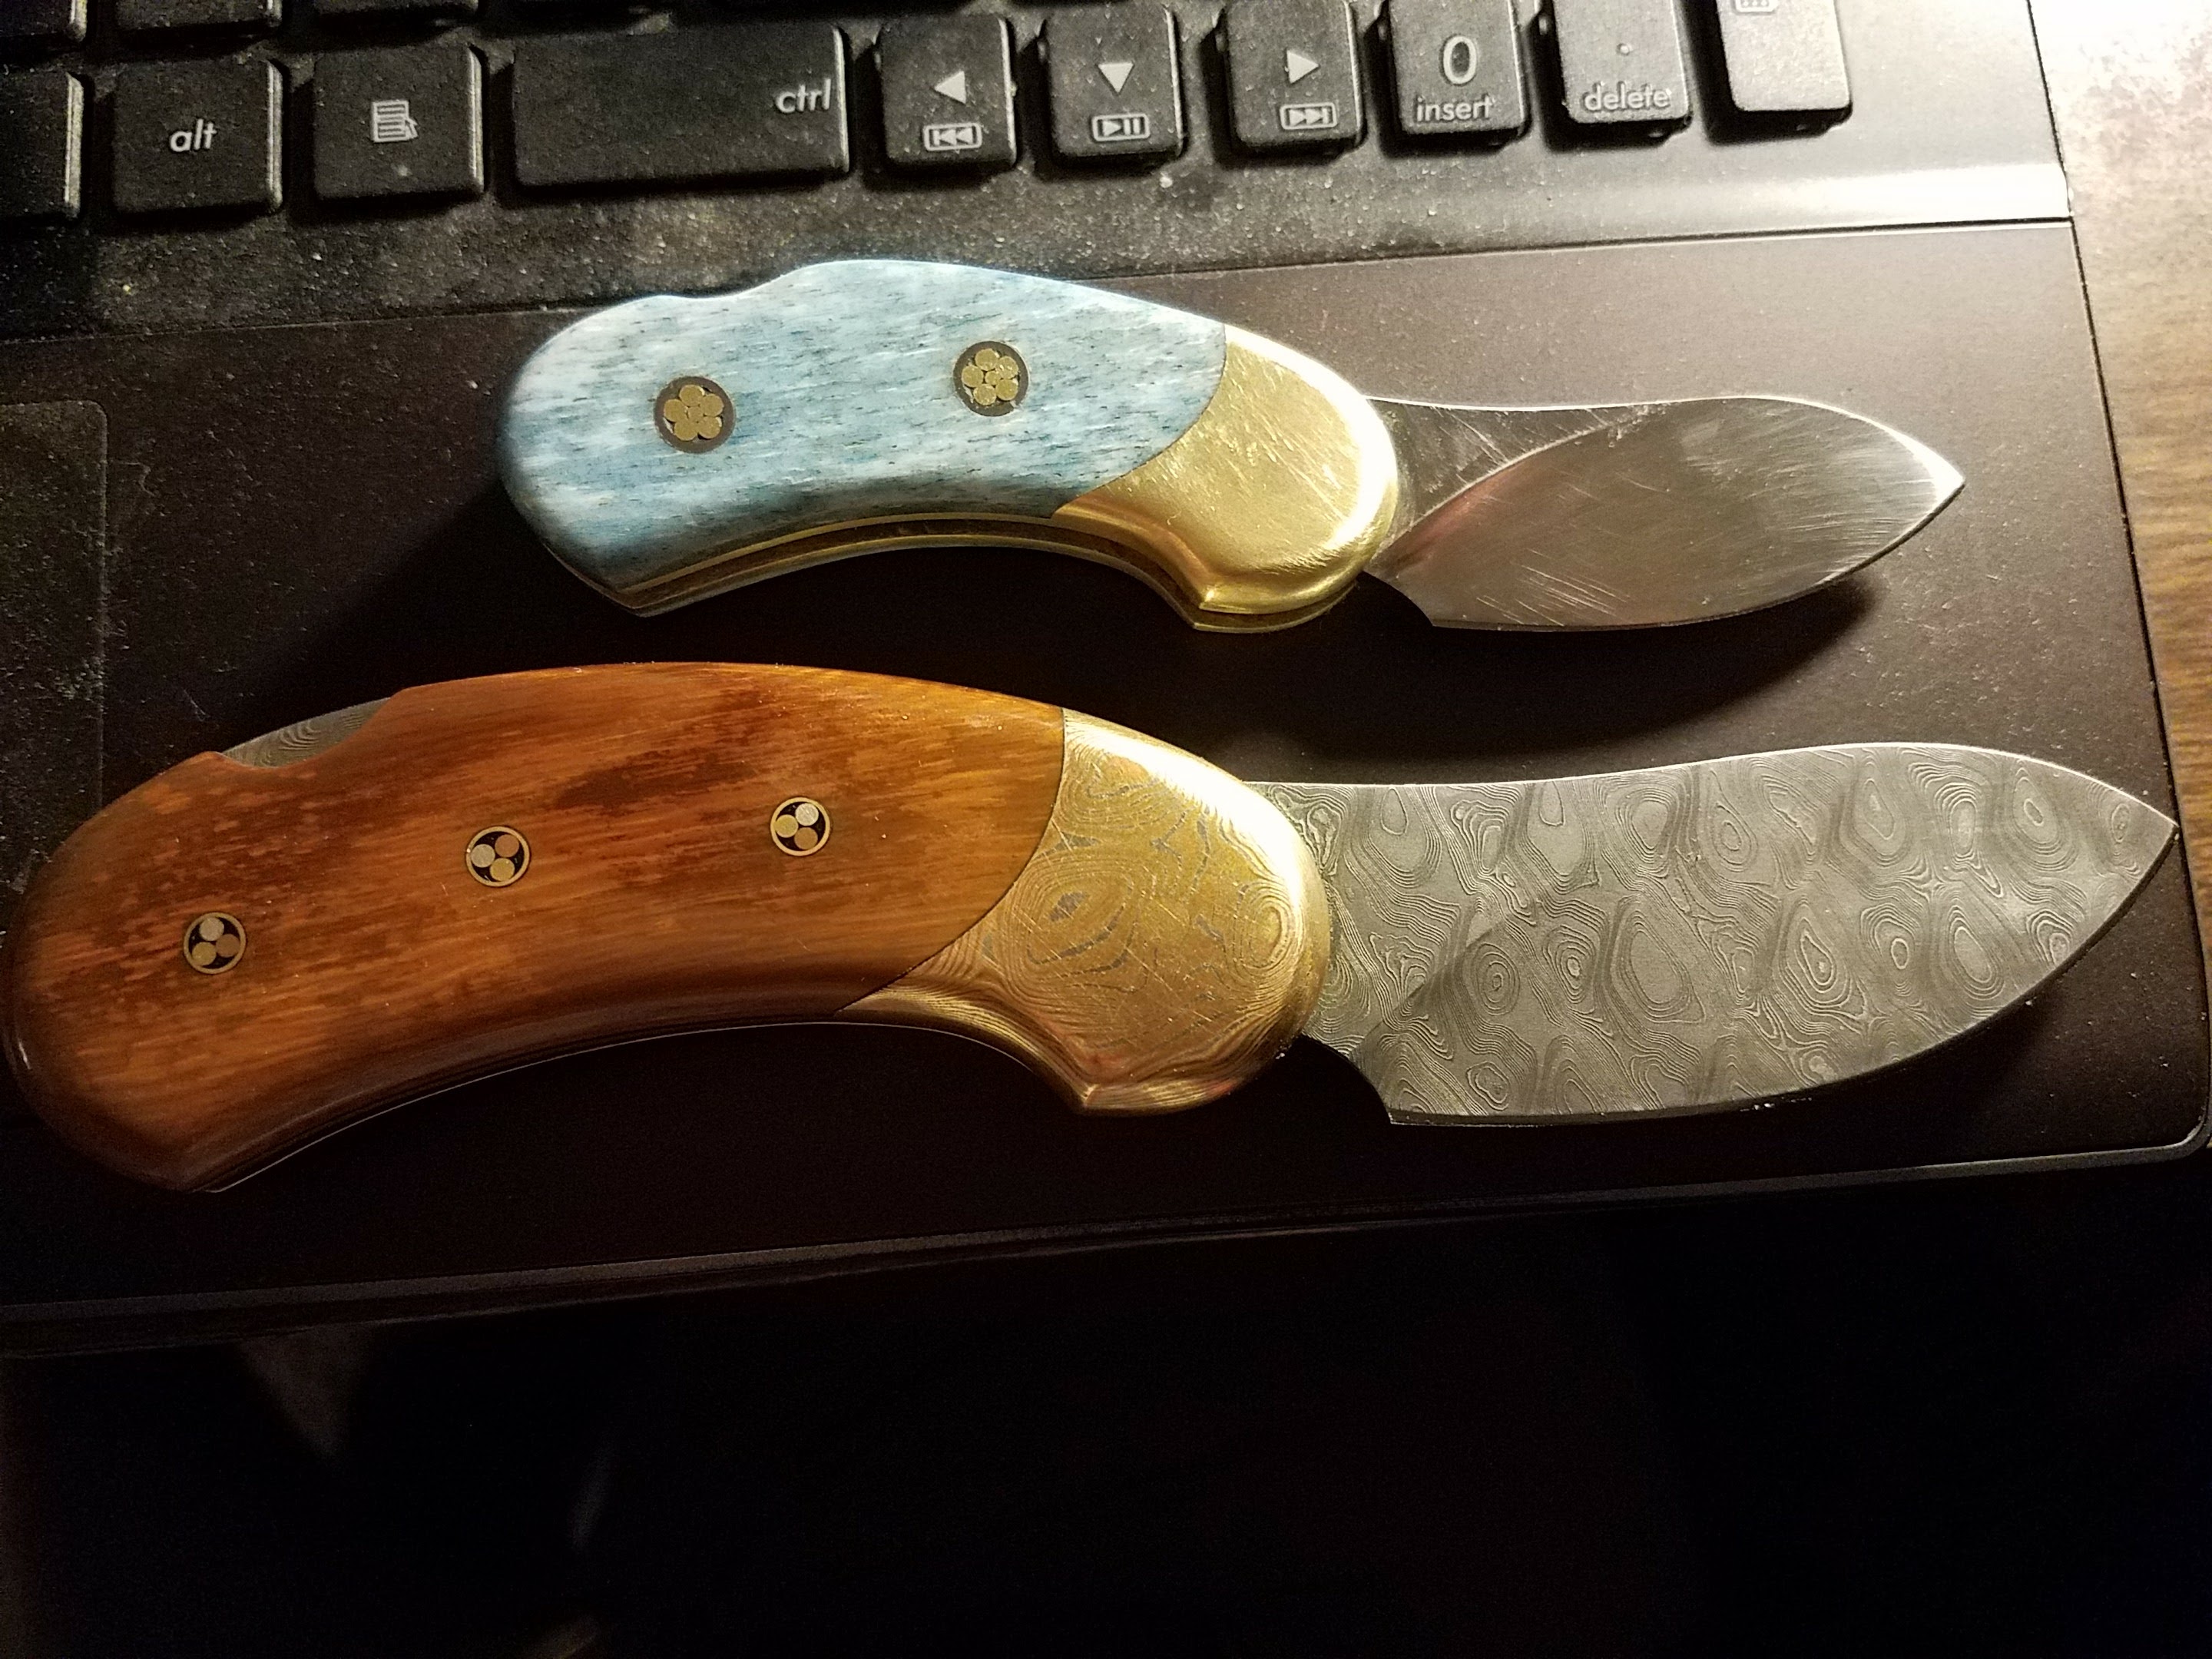
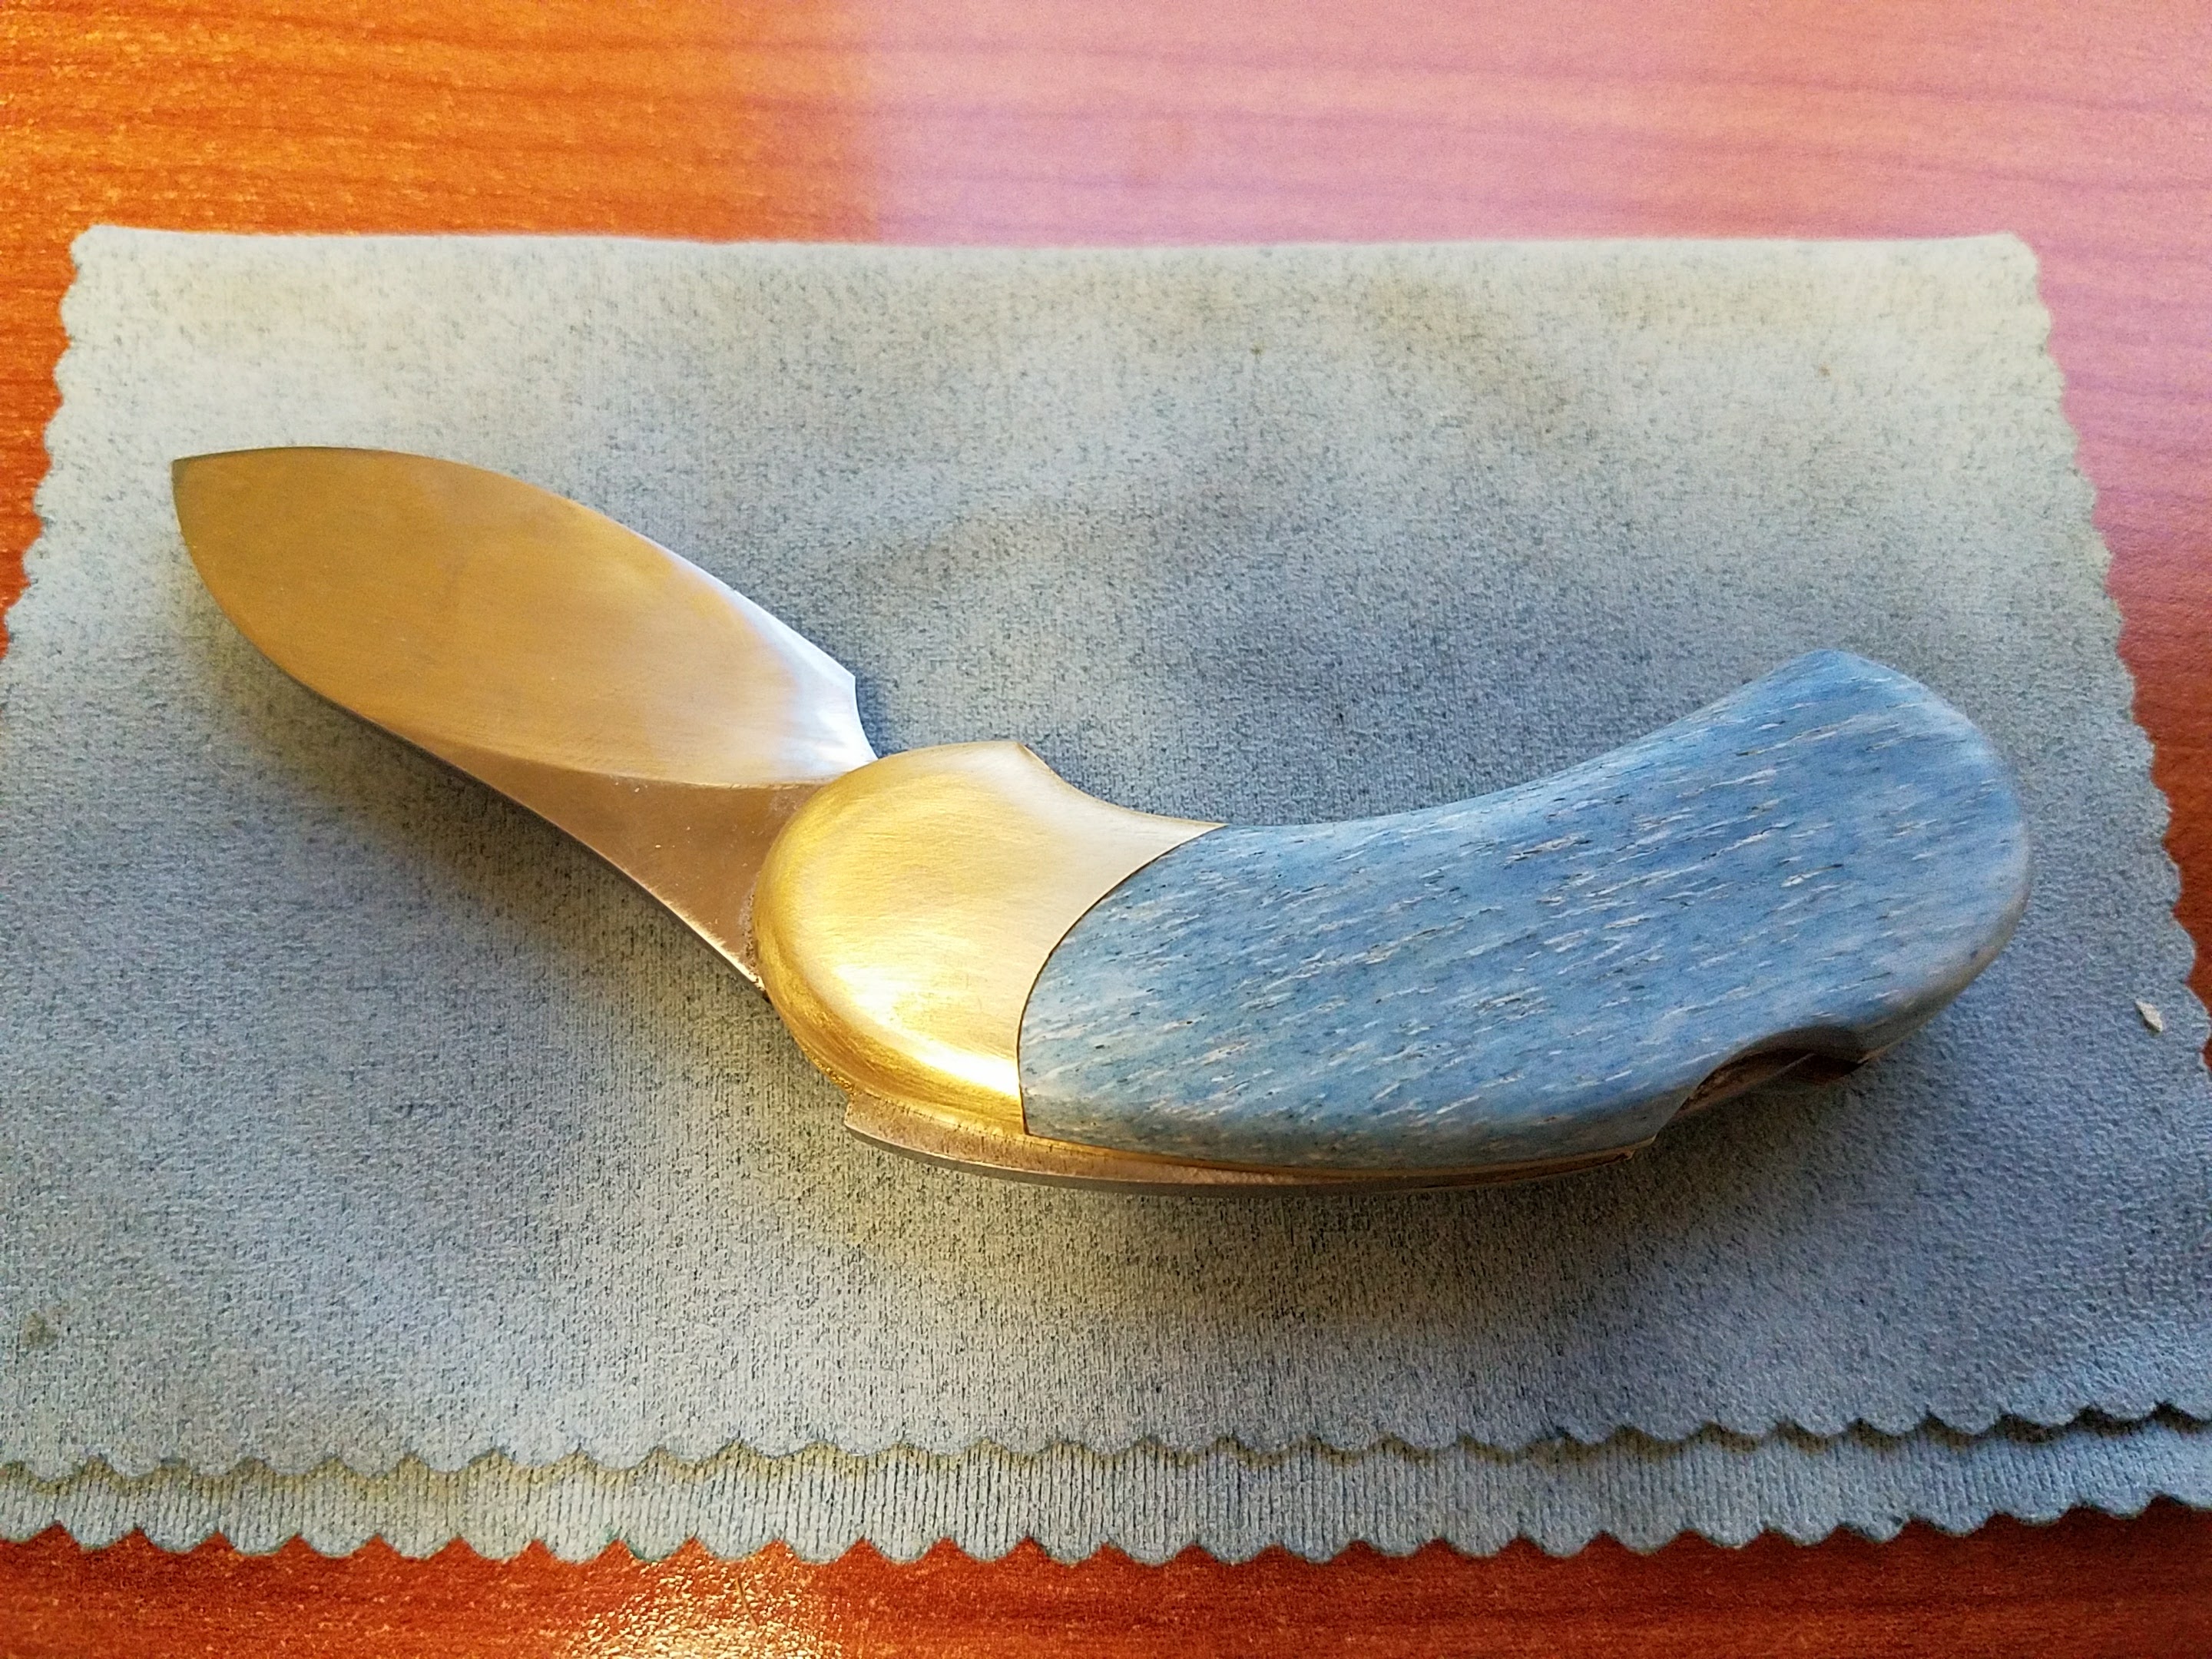
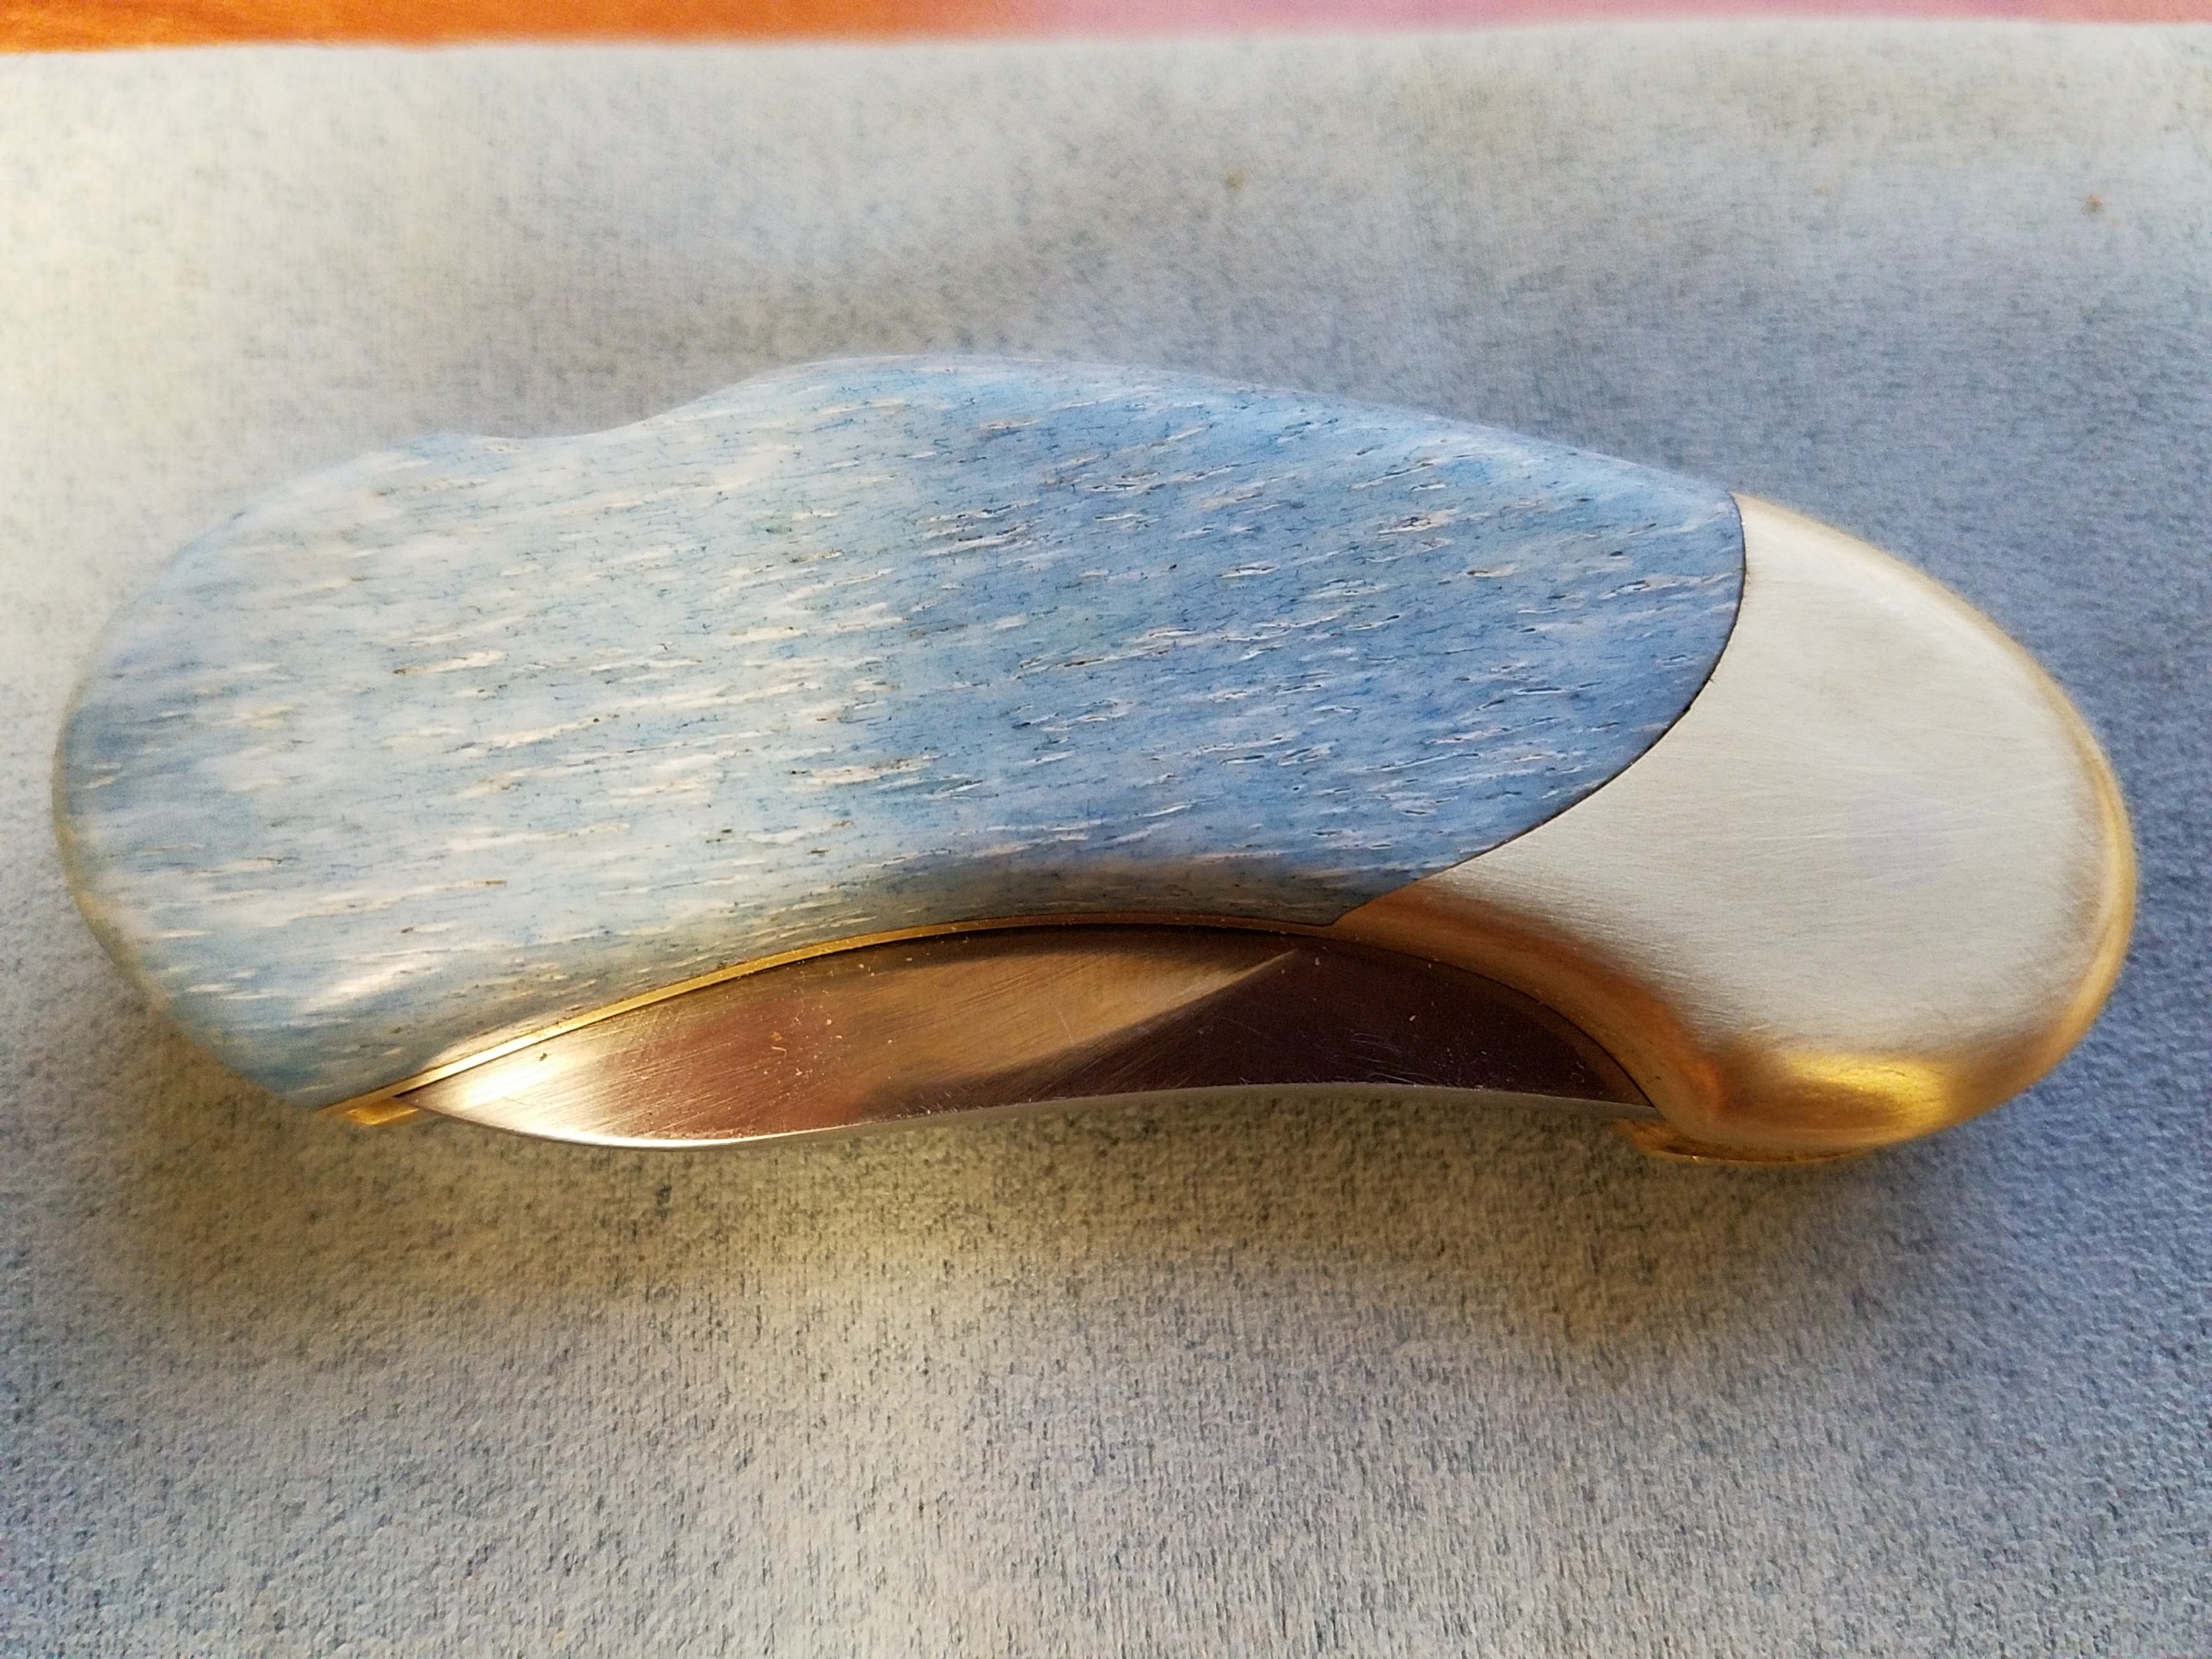
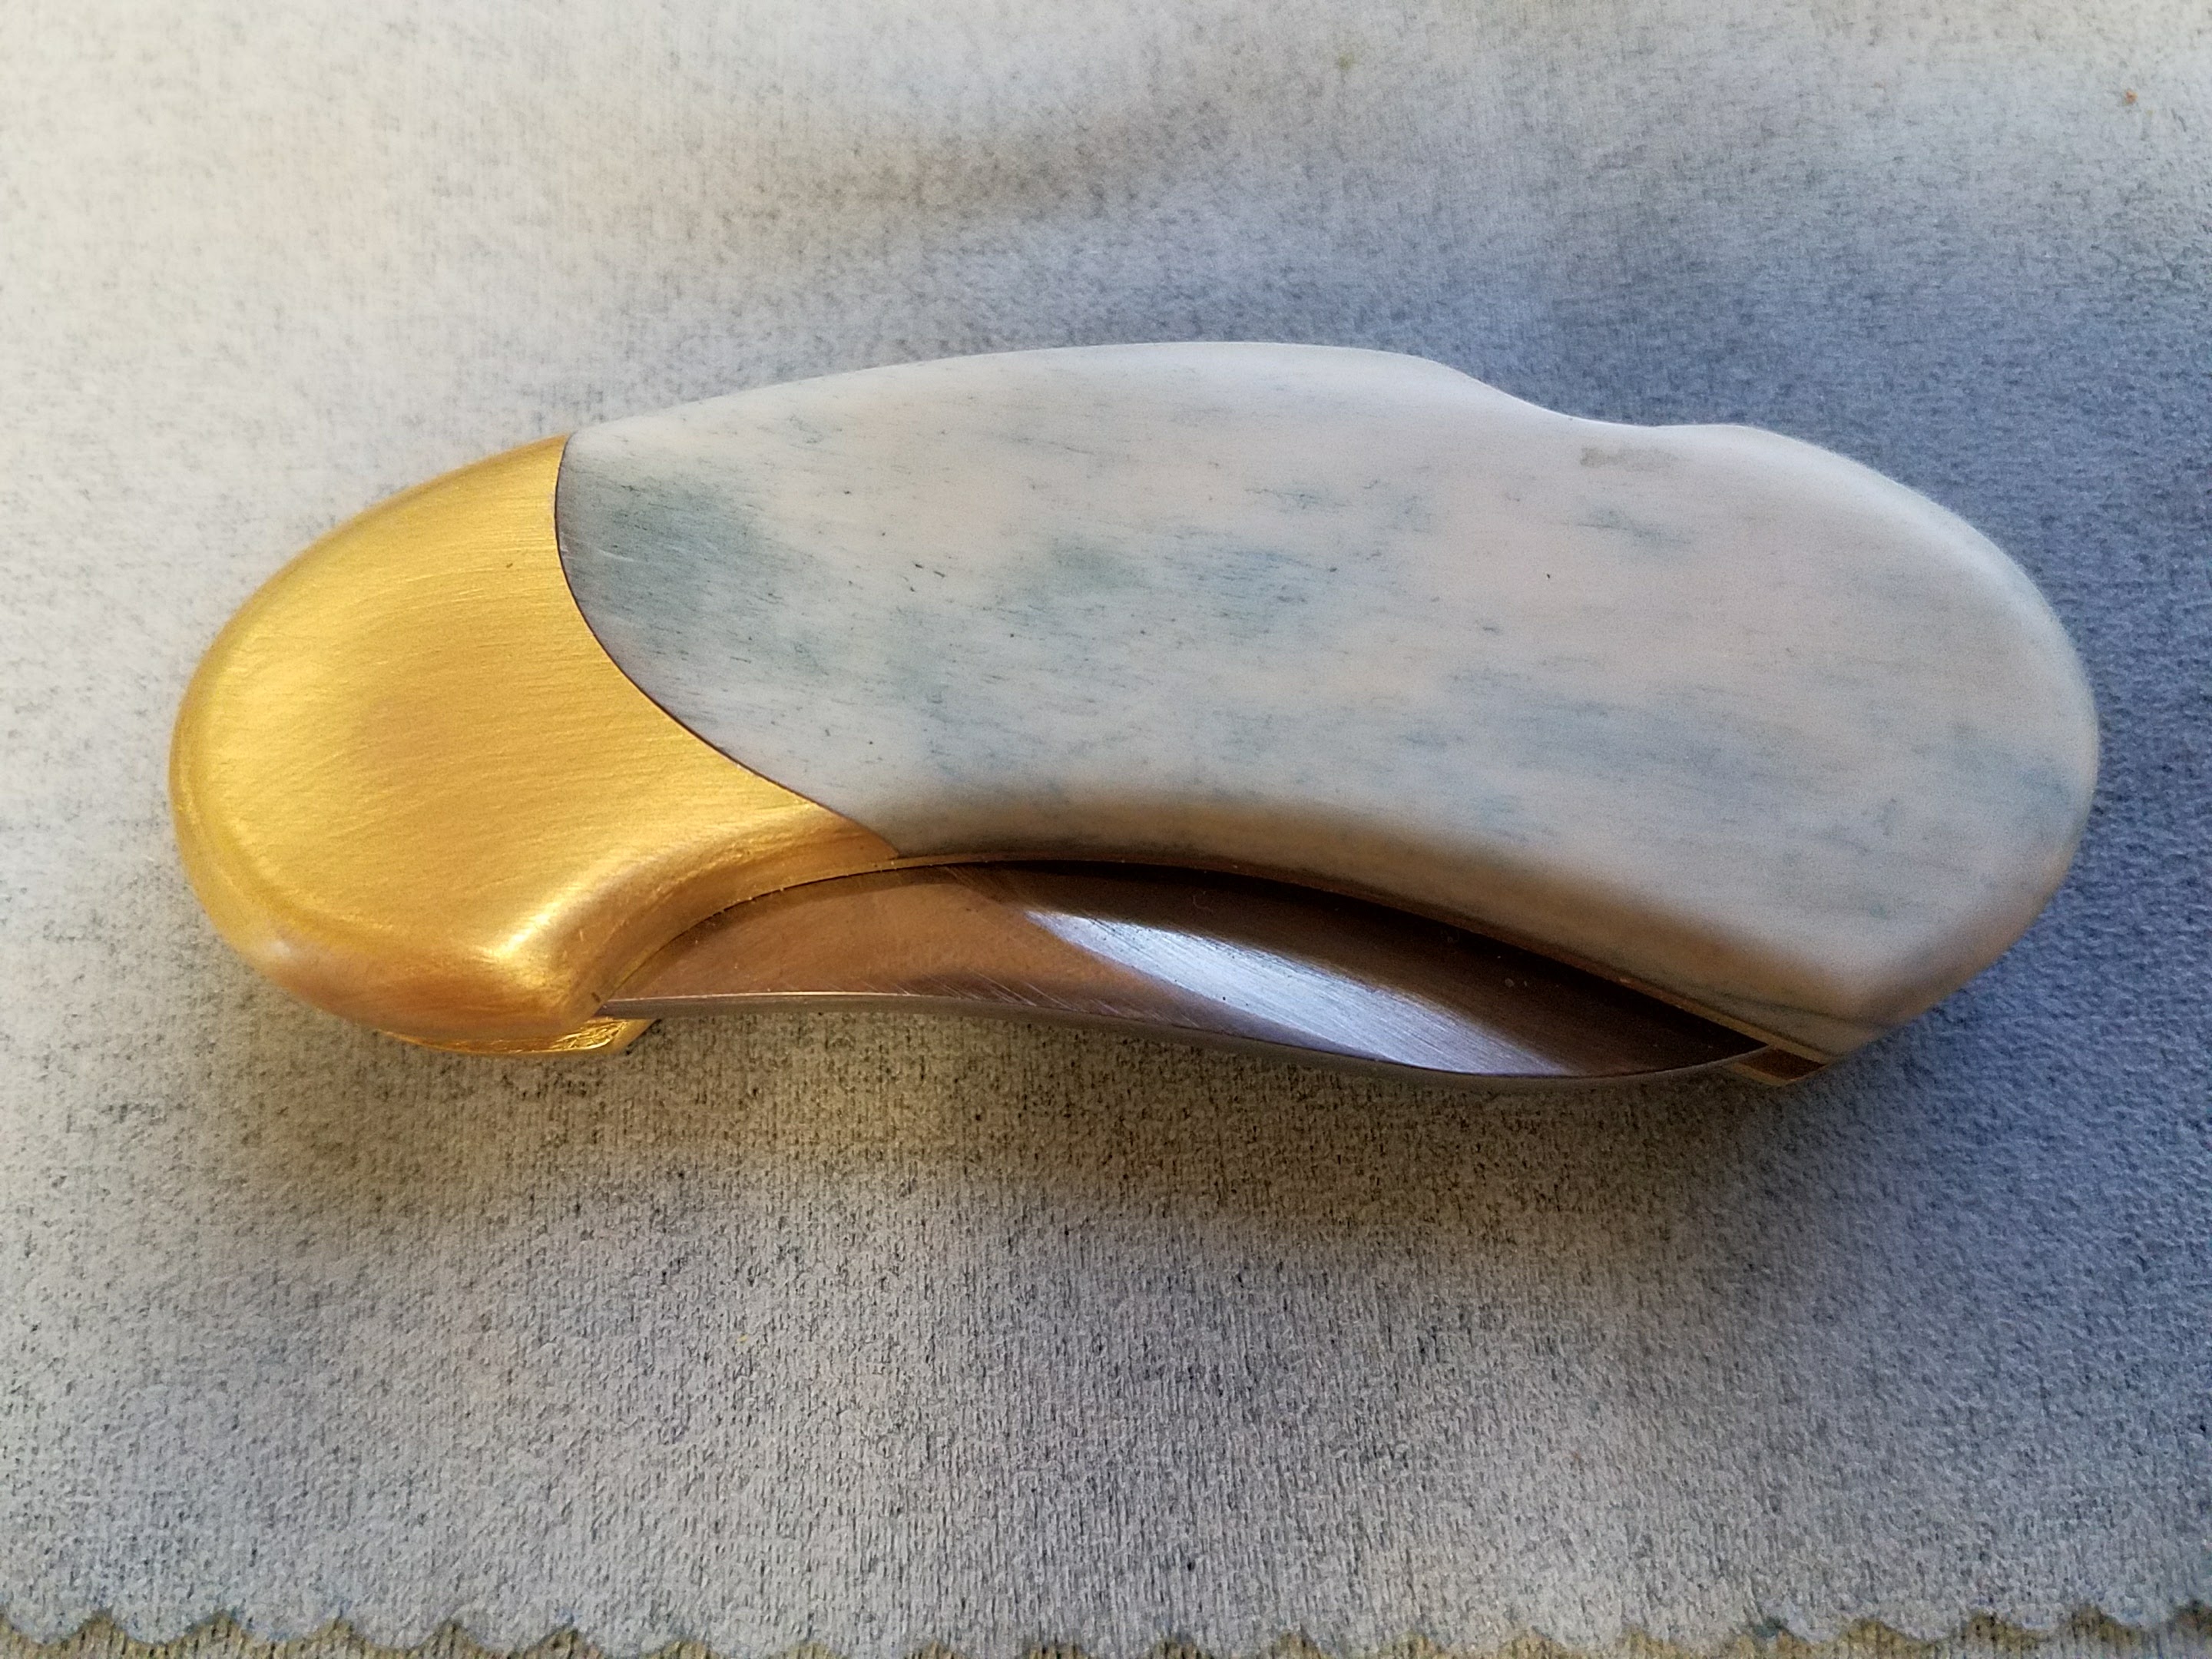
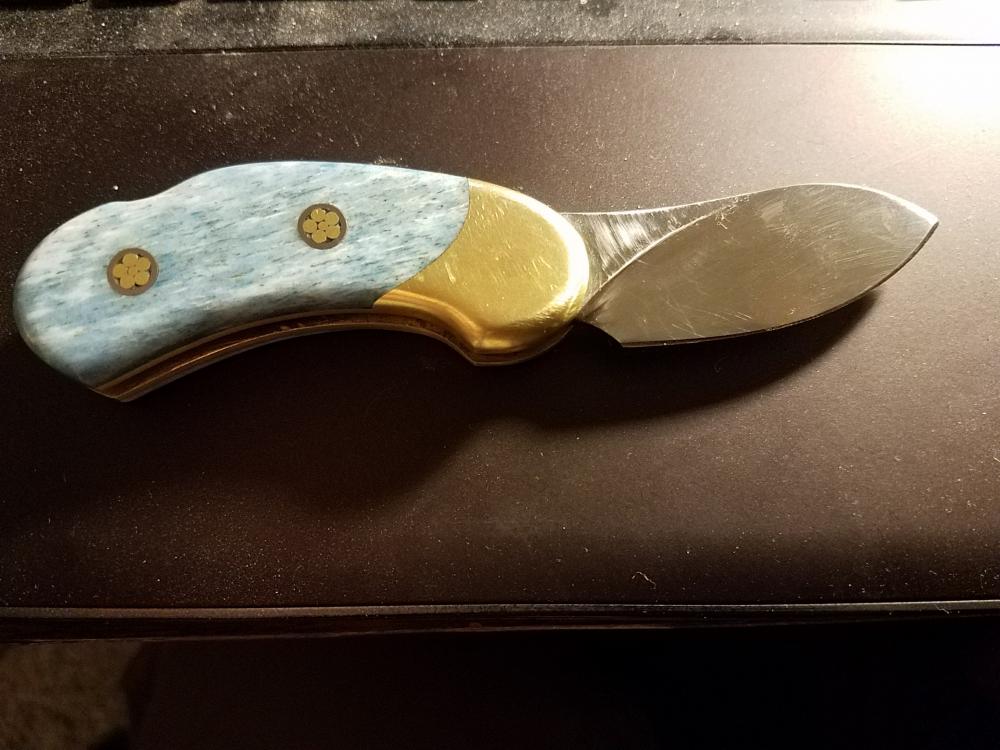
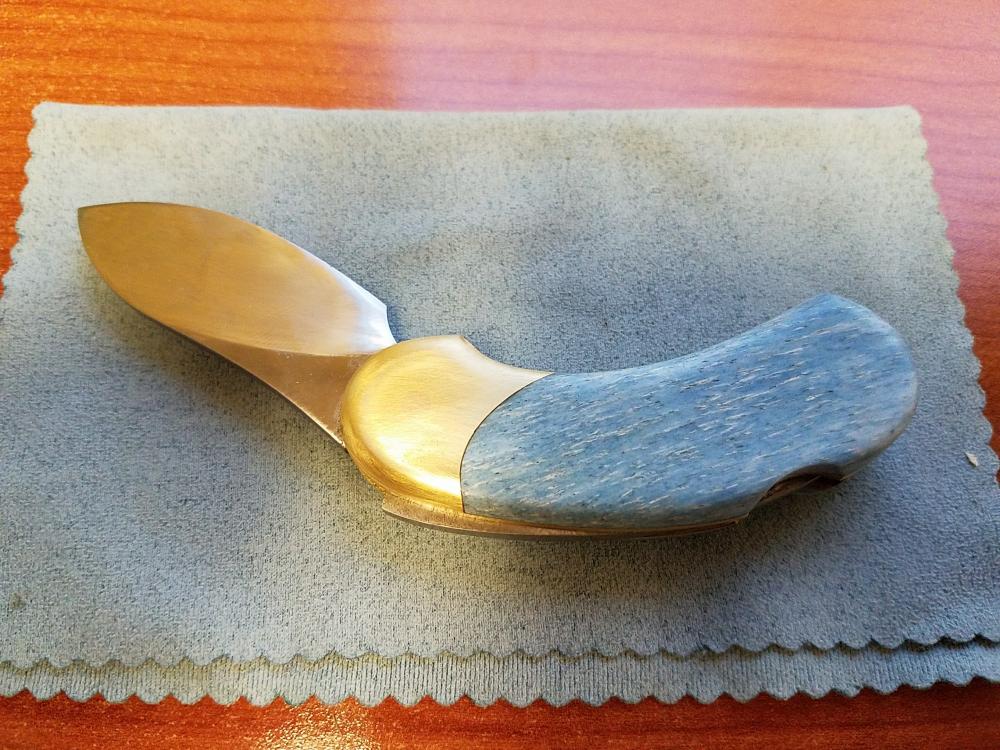
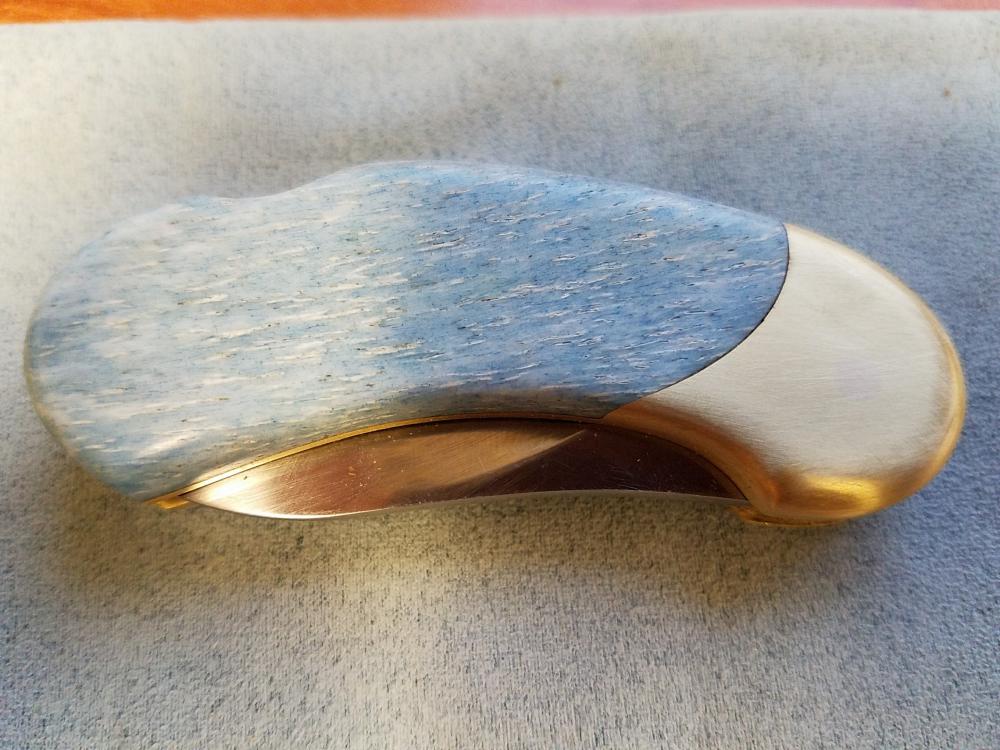
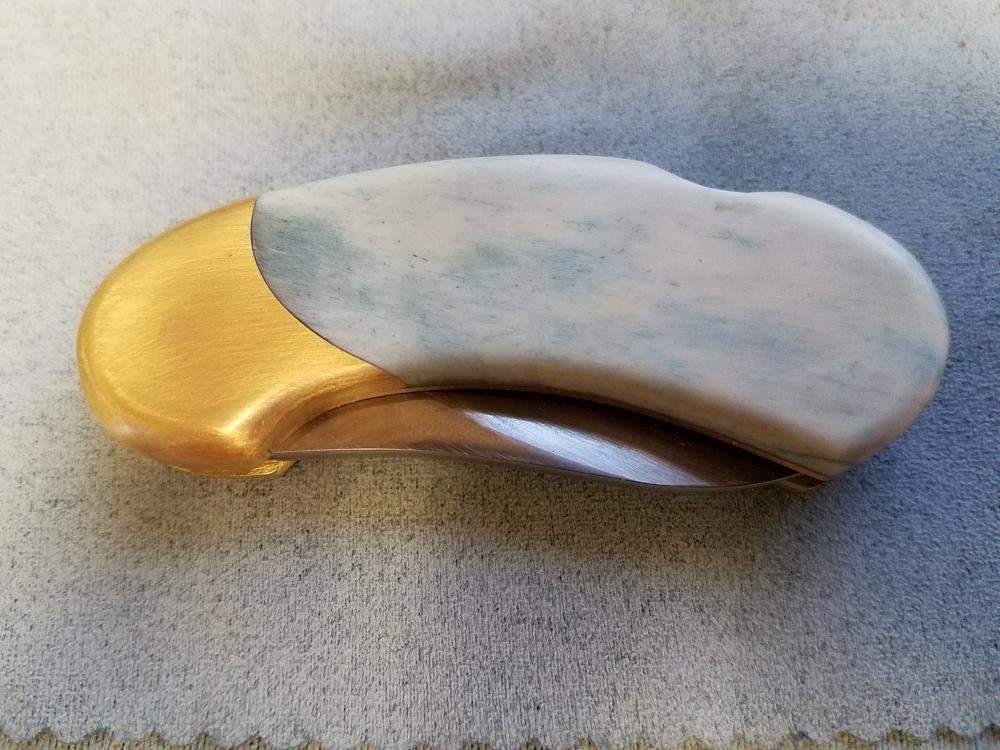
It's is a unique design. It's meant to be a little folding skinner. With a blade and handle similar to an old time sheep skinner. Somewhat like a canoe or butterbean design. Very handy little knife. Here is a photo of the finished knife with the mosaic pins. Just put them in this evening. For your viewing pleasure the second photo shows the large folder my brother made for me 12 years ago next to the little model.

-
This is my first locking folder. My brother helped me with all the steps. I am making three more just like it, but with different scales. Steel: 1/8 154-CM Brass liner and bolster Died bone scales I still need to put in the mosaic pins this week and will post a finished photo. Very smooth and locks perfectly. Blade pivots on a stainless bushing. OAL = 5.125 Blade 2.125

-
Concrete anvil stand
Matthew D replied to thecelticforge's topic in Stands for Anvils, Swage Blocks, etc
I worked with my father for years in construction. Here is what I know about concrete which will help you build a decent concrete anvil stand that would hold up. Concrete is strong under compression. When you reinforce concrete with rebar, the rebar adds tension strength. A good example is a concrete beam. The top of the beam is under compression and the bottom of the beam is under tension. The rebar adds strength to the part of the beam under tension. A concrete wall or foundation applies the same principles as the beam. Even a reinforced concrete slab can be thought of as a beam. The top or bottom of the slab (depending on what is going on with the soil or the load on the slab) is under compression or tension. Concrete takes time to cure and will take weeks and even months/years to cure completely. The amount of Portland cement is important. Concrete mixes have a ratio of square feet of aggregate to Portland cement. A 6 bag mix (cubic yard of aggregate and 6 cubic feet of cement) is stronger and harder than a 4 bag mix. A cubic yard has 27 cubic feet. One bag of cement (98 pounds) is one cubit foot. Premix from your local hardware store would be sufficient. See if they have extra strong mixes. Just calculate how much you need. You can find a concrete calculator for how many bags you need. An anvil stand made of an 18 inch square (or cylinder) and to the height you need and reinforced with 12 inch horizontal squares(or circles) of 1/2 #2 rebar every 6 inches starting with the first one 2 inches from the bottom and 2 inches from the top, tied to vertical 1/2 rebar at the corners would make a very sturdy stand. You could put some j-bolts that tied to and under the horizontal rebar to bolt your anvil down to. Make a simple concrete form from 1/2 plywood or what ever you have around. Use 2x4s on the corners and screw it all together. Allow the stand to cure for at least a week before using it. I have thought about making one. I think I will now. With the anvil bolted down well, it would add mass to your anvil. If you made it a cylinder you could tip it on one side and roll it around. If you made a steel frame from angle iron and incorporated that into the concrete mold, that would protect the corners from busting over time. So the tension/compression explanation and why I explained that. As you hammer on your anvil you are applying compression to the anvil which is transferred to your concrete stand. The concrete is very strong under compression, but since it is not going anywhere down the force is transferred outward as tension in the stand. Think of upsetting a rod of iron. The horizontal rebar every six inches will hold it all together. If you were concerned about it being stronger you could even add an "X" horizontal tying the opposite corners together. Add some additional j-bolts to the sides to bolt some hangers and tool holders to it. A cubic foot of concrete weighs about 150 pounds. An 18x18 stand would weigh about 350 pounds with the rebar in it. -
It doesn't look very useful to me. Why don't you just send it to me so you don't have to worry about what you'll do with it.
-
With 3/4 square stock you only need about 8-10 inches of material (4 inches for each side) to make a nice set of tongs since you will be drawing out the reins. You should be able to make a couple pairs with that material. I had a tong-making class with Mark Aspery not to long ago. We used 3/4 square stock to make tongs for the ABANA convention in Salk Lake City. We would mark off 4 inches on the bars and forge one half, cut it off and start another half. It was pretty simple to get 10- 12 inch reins from just 2 1/2 inches of 3/4 stock.
-
Although it may be a two bladed masonry/rock/brick hammer, it is may be a sheet metal hammer. By flipping the hammer over the tin seams and creases could be worked without turning the work piece.
-
The top hammer with the "pointy" end is a ship maul or hammer. They used those hammers to drive large nails in to hold the decking down and then turned it over and placed the pointy end on the nail head and used it to "set" the nail head into the deck a little. Most of you have used a nail set for finish nails. Well that is exactly what that hammer was used for. It was used for making and repairing wood decking on boats, barges, and docks. Over time the nail will work its way out a little and with two of those hammers a couple guys could reset the nails back into the decking so it was flush or a little below.
-
One of the best tong making tricks I learned was from Mark Aspery. When the tongs are put together, heat them up to a nice cherry red and clamp them to the material you want to hold and adjust them in the vice.
-
So far so good for your first pair. Looking forward to pics of the finished product. Feedback. Be careful about getting the boss so thin. It is easier to thin things out, not so easy to make them fatter.
-
Dennis, You can probably make some neat stuff from those wrist pins, however, you are going to find them a bear to forge. Alloy steal is made to be tough and resist the problems associated with being heated over and over. That type of steal just doesn't like to move very well under the influence of a hammer. Try a few and see what you think and report back. Then go find some mild bar stock and compare the difference. You can use natural gas, but the problem most of us face is it is under low pressure from your meter and doesn't have the volume or pressure you need to make a proper forge. Matthew
-
So, just an update on the usability of my viking style tongs. They work very well for holding flat stock. The trick is learning the proper technique. Let me explain what I learned (some of you probably knew all this though) 1. When holding flat stock on edge position the tongs over the top of the metal so it does not rebound up and escape the grip you have on it or come flying at you. 2. Use the tip of the tong as a stop against the anvil. This will allow you to work a certain part of the edge of the bar. 3. Use some tong rings to grip the work piece, sparing your arms from getting so tired. A proper tong ring makes these tongs into practical vises. 4. Everyone who uses them in your shop will want a pair... I'll take some time in the future to post some demo photos. Make a pair and post some photos.
-
Begginner needs some help.
Matthew D replied to Nitroheadache's topic in Blacksmithing, General Discussion
I found that old tie-rod ends work well for making a hardy tool. Cut off the ball-joint and you are left with a fat end that can be shaped into a variety of tools including a nice bottom fuller. Forge the threaded end to fit into your hardy. You can find plenty of large tie-rod ends at the local pic-a-part wrecking yard with all sort of sizes. Plus, it is dang good steel. Have fun! -
Traditional blackmsithing.
Matthew D replied to EJRailRoadTrack's topic in Blacksmithing, General Discussion
"Traditional" is just one of those words thrown in there which helps sell something. Simple marketing ploy to reel in the buyer. It only mean what it means to the buyer. If they believe they are getting something that was made using "traditional" methods then they are happy. -
My very first pair of tong I made were from 1/2 rebar. I made some very basic flat bit tongs and drilled the hole for the pin and used a 1/4 bolt and peened it over for a pin. Don't ever quench them in water though or they may break. I didn't forge the handles at all. I used them all the time and found them much better than my old pliers I had. Eventually I made more tongs out of better steel. But those are still kicking around and functional. I made a nice fire poker from rebar. I have some I will make some coat hangers from. I saw some nice tongs made from 3/4 rebar. If that's all you got, hammer away. Stick with something simple though, like flat bit tongs. Don't hammer the boss to thin and don't hammer the reins thin either.
-
my guess is it is a cast iron hammer made in a foreign country. I got a shingle hammer from a garage sale, which has a chipped edge. I was going to forge it into a tomahawk. It did the same thing as your hammer when I struck it the first time. I took it out and reground it so at least I had a little ax for splitting kindling.
-
Looking forward to seeing the repair done. I have used coal ash to slow cool things down with to anneal hc steel. It worked very well. I have also used glass insulation as well.
-
One of the most important things I learned from a tong making class is that after you forge each tong and each part matches, then rivet them together. You make a lot of adjustments after they are riveted by heating them back up and tweaking them to fit the steal it will hold. Also, heat them so they are red hot and straighten them in the vise to get them just right.
-
I watched a several videos on making tongs over and over, before I made my first tongs. After 8 pairs I was getting much better and made some good ones. I learned the most from the videos from Brian Brazeal. Also, I was fortunate enough to participate in a class at the Bonneville Forge Council with Mark Aspery for a Saturday. That day I learned some great techniques for making tongs. Keep at it and don't be satisfied with just one set. Make another set and then another.
-
Wedeking, The Gunther article is great. A couple years ago, I purchased a Trenton with very bad edges. Although it is not as bad as yours with the big chip. I wanted the edges repaired because I was interested in using techniques of forging half/on half/off as demonstrated by Brian Brazeal. I am not a professional welder by any means, but a competent welder. I followed the directions in the Gunther article and was very pleased with the repair. The edges are good again and the face still has all the rebound that it had before. I have struck the edge from time to time and it has held up just find. It could be a little softer than the rest of the face, but I am okay with that. The anvil works beautifully and I couldn't be more happy. I look forward to seeing your after repair photos. By the way, I did not see anything in the Gunther article that discussed having to harden the anvil after it was repaired.