Kozzy
-
Posts
1,203 -
Joined
-
Last visited
Content Type
Profiles
Forums
Articles
Gallery
Downloads
Events
Everything posted by Kozzy
-
Because it's 3 steps*, it's technically an item that falls under building codes. That specifies certain things like the size and grip nature of the handhold, the way the handrail portion must be terminated (this is a big one), and the side force the system must take. And baluster spacing of course. Top and bottom platform size also come into play and must be considered. Start with the code...and then if you think you can fudge because no one is looking, you can do so at the client's peril. People fudge all the time but I can't say whether it's appropriate in your case or not. Places like the Bay Area or NYC, you darn well better be perfect...Indiana..? 1" square might be a little light for the posts depending on a lot of other factors, especially how they are mounted to the steps. Thin wall is probably too light so you are looking at minimum 1/8" wall in my opinion but since it has to play with all the other parts, that's nothing but a very rough guess. * Code in most places is weird and kicks in a 3 steps where 2 steps isn't considered worth covering in most cases (but not all). Codes is not uniform over the whole USA though so you do need to check local variations. There is a VERY handy product that can be purchased online or even at your local home center called "code check" books. They are more like spiral bound references and cover the basic codes that are most consistently needed...with drawings and examples. There are code checks on plumbing, electrical, and general construction. Not expensive, VERY good to have around, and makes a great Christmas gift
-
I'm in a little different situation (fabrication) but some of this applies. We lean toward only selling through resellers so that sales are tax exempt and the other guy has to deal with it. We do some out of state sales in CA where if your runny nose drips on the state you are considered to have a nexus for taxes--and it's a royal pain because you have to keep track of things like the local RTA tax...and a block difference in location might mean a different sales tax rate. Some other states (TX for example) nail you a HUGE fee for out of state registration so you never want to risk being nailed as having a nexus there (and it's becoming fluffier--"regular sales" within an area can be enough to call it a nexus). If you have a regular guy who sells for you in a state that can also constitute a nexus so your brother in law selling your stuff in Michigan might be putting you in harms way for sales taxes. So..personally, I'd do in person sales (fair booth for instance) with tax included so that I didn't have to figure it with each sale. I'd do mail order/internet sales though a portal that figures tax for me (plausible excuse if a problem comes up). And I'd do bigger stuff through resellers for the most part--such as through a contractor if there was lots of fence, railing or something similar that would best fit under a contractor's license.
-
The C is definitely Columbian as Thomas Powers mentioned. Columbian is a fairly common brand but decent. Having it "branded" is a very slight plus as there are so many that have no brand so can't be identified. With rare exception, branding adds only a very small amount to the value...maybe a few bucks and it might be easier to sell to some people with brand identification (there are collectors). There are "columbian" advertisements online if you do a search and those sometimes help to pin things down. As to company history: "Columbian Hardware Co. acquired or succeeded Van Wagoner & Williams Hardware Co. about 1905. In 1921, they were Columbian Hardware Division of Consolidated Iron-Steel Manufacturing Co., and changed their name to Columbian Vise & Manufacturing Co. about 1927. Columbian was acquired by Warren Tool Corp. in 1965 or 1966, and Warren was sold to Wilton Corp. in 1994. The date that Columbian ceased operations is unknown. As of early 2019, Wilton's sign reading "Ohio Operations, Columbian Vise Plant" is still on the building." I mostly chimed in to clarify the measurement thing. Jaw width is the defining factor and that's usually what most of the pricing is based on. In my neck of the woods, 80% of these are 4-1/2" and typically go for less than $ 100 in good shape (at antique stores..less in other places). You'll see a few 5" or 5-1/2" once in a while and those get a little more. Above that is where things start getting interesting. 6" and up is where the prices start climbing steeply because they are less common. 7's are quite rare to find and the price usually reflects that. 8 are like hen's teeth to find. I think someone mentioned bigger once but that's so rare you might as well be looking for leprechauns. And...smaller can get interesting too. There are some smaller ones (3 usually..but I've heard tell of 2-1/2) which show up once in a while and those tend to be a little bit rarer. They don't usually bring a bunch of money for the rarity of being smaller but hold their own relative to the 4-5" assuming they are in good shape. It's sort of a "cute factor" thing with the small sizes. And a bench version without the leg. Everything looks about the same but no leg (and not cut off). Not a great value but still price like any old bench vise (not blacksmith's leg vise) of comparable size.
-
Just to stir the pot, I disagree with both to a partial extent Milk and that type of dairy stuff are high volume products where much more must be stored than is displayed. Because of that you typically need a walk in cooler and the logical spot for that is the back of the store..sometimes the sides toward the back. Displays are restocked from inside the walk in. Walk in's also typically need a much larger compressor than your typical display refrigerator/freezer cabinet so you have to locate them where that compressor can do it's thing without being an eyesore or in the way..again, the back of a store typically. One could theoretically put the walk in at the middle of the store..costco does this...but that actually hogs a ton of the much more valuable retail floor space than it does at the edge. Costco only gets away with it due to huge volumes moving through the spaces. So..though merchandising psychology does play some part, there are also physical considerations which supersede many of those aspects.
-

Calf leather for an apron ? or not strong enough
Kozzy replied to KingAether's topic in Everything Else
A lot of leather is barely so..split so thin it's like paper and then glued to a synthetic substrate to make it seem like it's still leather. That's what most of upholstery leather is these days as well as most clothing leathers. That backer would NOT be good for hot work as it tends to be synthetic and could melt dangerously. Can't say your coat is that but I wouldn't bother finding out. Find a fat giant who needs a leather coat that big and pass it along. Not sure what one can get in the UK but there is a leatherwork chain store in the USA which has branches all over as well as internet sales. They can have really good sales on hides to make your own goods. Not cheap but you could make something superior that'd last a lifetime. Or..the cheap china tool store as well as some others in the USA sell leather full aprons that are not bad at all. They aren't particularly expensive and are quire serviceable. Possibly the UK version of those stores also does. -
There are some other complicated behaviors to consider also. I'll use a friend who is a local barber as an example. For years her charge was $ 14 for a haircut. She decided it was time to raise rates a little so she jacked it up to $ 16. The thing is, at $ 14, a lot of people just gave her a $ 20 and told her to keep the change. At $ 16 they do the same..so she isn't making that much more overall...plus a few customers thought that price to be a bit steep so have wandered off to find other sources fo hair mowing. It's a total wash. So...one has to consider some side effects too. It's often hard to pin down that "sweet spot" where you profit the most but finding that point is the real goal.
-
Hay Budden near me. Your opinions?
Kozzy replied to Manno's topic in Anvils, Swage Blocks, and Mandrels
Obviously location location location. But just judging by my area, it'd be a pass. That per pound price is up there with something much more remarkable than a simple "good" HB. As others have repeated, stand is nothing here. Stand is almost always nothing except if it happens to be one of the rare cast stands actually made for the anvil originally..or a remarkably superior fabrication which can be adjusted to match your work height. I'd be patient and keep shopping. The right anvil will eventually come along at the right price and time...it just takes a while as well as diligently keeping up the search. -
I didn't want to get into a long tirade on the issue but when you have multiple self-tracking features in a belt string they can basically battle each other...the closer they are together, the more they influence each other and do battle. No, you do not want your tracking rolls to be crowned when close to a crowned drive roll. And in fact, that can cause belt dither as they battle. When far farm the drive, a bit of crown is ok but in most cases of belt grinders, crowns are waaaaay more severe than they really should be. The fact that it doesn't fail in some cases does not make it good practice. Part of my job involves designing and tracking high speed belt systems...
-
Um...your tracking wheel is crowned. That means when you adjust the skew, it tries to use the crown to re-center the belt to where the crown wants it rather than to where you adjusted it. That means you only get eventual tracking forces when you make large adjustments...and that in turn puts the belt into areas where things are far less stable. Imagine your car steering wheel not really turning the car until you hit the gravel shoulders....then suddenly grabbing. That should really be either a flat pulley or just barely crowned. Flat might be a little too "touchy" to adjustment..in that small tweaks cause lots of belt movement. Because of that, something called a "narrow bodied roll" is often preferred. A narrow bodied roll is a bit of a hybrid: The center 60% is flat and there is only a very slight taper or crown at the outer 20% of the face on each side. That way, the flat does it's job but it doesn't act quite as strongly if the belt happens to wander toward the sides..those sides exert a very slight re-centering force to the belting sort of like a mild shock absorber. As to correct tension...there is no single answer. You need enough to not slip but if you go too high, you can start causing the belt edges to have more effect on belt tracking. The center of any belt is the area you want to do most of the tracking with--centers of belts are pretty darned uniform. Variations in belting tend to be mostly at the outer edges so when those start seeing a lot of pressure due to high tension, they can throw things off a little.
-
Pricing my work makes me uneasy
Kozzy replied to jwilson645's topic in The Business Side of Blacksmithing
I have a couple of friends who own their CNC machine shops and have the same outlook. They could both be making a ton of good money on thousand+ part runs but it bores them so deeply that it makes them hate living by the end of the job. Hiring someone to handle it for you only works for a short while and that person also tends to go crazy. I had a CNC project myself recently where even with an 8 part fixture, I had to reload the machine every 5 minutes (only 4 parts finished each time). The run was 1200 pieces and I wanted to stick a fork in my brain from needing to tend the machine like I was chained to it. Weigh those kinds of jobs carefully. Your sanity depends on it. -
Assuming that southern Idaho is not much different than Lewiston in pricing (and S Idaho is a big area so I'm not sure): Paid $80 at an industrial auction for a reasonably good shape unbranded 4-1/2" plus there was a couple of other interesting minor things in the lot that were worth about $ 20. Paid $ 175 for a very good shape unbranded 6" at the local antique mall. I felt that was a little high but I was itching for it that day for some reason. I had to dicker a bit to come down from a higher asking price. And remember...completeness and wear level counts for a LOT in pricing these. Missing bits and worn screws should really drop the value for a savvy buyer. Leave those for the newbies who didn't think to do their research.
-
Pricing my work makes me uneasy
Kozzy replied to jwilson645's topic in The Business Side of Blacksmithing
Others have given lots of good advise on the subject..and probably made it even more scary. The reality is, sometimes you have to plonk down a number and live it it whether good or bad. There will be jobs you do really well on and jobs that you end up losing on. In the long run, you want more of the first than the second It's not much more complicated than that. And..when doing your estimates, it's the million little things that usually come back to bite you. Underestimating the labor for a hole by 20% when you have a hundred to do. Forgetting that the bit of grinding/sanding in finish work always takes longer than you think. Even screws add up. With my stuff, crating adds $ 200 to $ 500 a job so that's a HUGE money-suck not to forget. ALWAYS err toward more labor than you calculate. I often calculate what I think are "accurate" hours (doing fabrication) and multiply by 4. In practice, I've come out close to that 4 multiplier MANY more times than I've landed close to my "accurate" estimate. Better to sit in your Barcalounger sucking down coffee while watching Judge Judy than to be losing money on a job you cut to the bone due to either thinking you needed to just to play or via underestimating your worth. Let the hungry fools take the really bad and low/no profit stuff. There are plenty of those guys and you don't need to mess yourself in that swamp..even when starting out: That's a race to the bottom, not the top. -
Stand is fabricated in my eyes. Not a difficult fabrication but a bit fiddly to get a good match for weld-up. The lettering appears to be applied...possibly either plasma or water jet cut. Nice little trophy, in any case. But....unless you use it, it's an expensive cup holder.
-
Fixing up a post vise as a gift for my blacksmith FIL
Kozzy replied to Orglethopter's topic in Vises
There's a special little dance one learns to do when that cold water hits your dirty hands and you pushed the timing a bit further than you should have....Pretty similar to the dance we old geezers get as things change so that "now" means "NOW!" with regards to plumbing. -
When all else fails, I use small carbide endmills and manually eat out most of the offending bits. I happen to have a lot of worn 1/8" carbide endmills and just chuck em in the foredom, carefully picking around in the hole. Eventually you get to the point where what's left can be basically pried out of the hole. I don't think I've ever had the privilege of a part that would actually be mountable on the milling machine...everything seems to be too awkward for that. Not fun and definitely last ditch method. However with care, I've saved a lot of holes from needing to be enlarged.
-
Titanium dive knife sharpening
Kozzy replied to 7carson7's topic in Knife making Class General Class Discussion
Wow. The subject got me diving into a web search and this subject is definitely one where 5 different people will give you 10 different answers, claiming the other 9 (including their own) is completely wrong. I did found a few commonalities: If it's actually TI and not some fancy military grade version, it's going to tend to be soft and the edge will always be pretty mediocre. The most common method mentioned is the silicone carbide wet and dry paper on plate glass...grits to about 1200. Part if the trick is a very light hand when you are sharpening. Higher pressures tend to smear the edge and sort of "un-do" some of the work. But I've never done it...so I suggest you do that web search yourself also and see if you can spot any other "trends" in methodology. On items that are highly opinion oriented like sharpening methods, I find that rather than specific advice it's the informational trends that are usually more useful to follow. -
Fixing up a post vise as a gift for my blacksmith FIL
Kozzy replied to Orglethopter's topic in Vises
I would superficially clean it, lightly oil and gift it as it is. I'd personally like to do the "fixits" myself so that I know the vise's story well. Fully restored (or to 90%) wouldn't hurt my feelings either but I'm just one who likes to know my tools. If it pleases you to go that far, it's not a huge deal. Do not re-weld. Do remove bad MIG splatter but carefully. Lightly wire brush but leave the aggressive version to him if that's your chosen path. If things are binding, penetrating oil isn't going to hurt and gives your FIL a head start. Let him grease or oil the screw after he gets a look at the state of the threads and screwbox (even if you do a re-hab to a fairly full extent). It's a pretty good lookin' vise and I certainly wouldn't complain about getting it for Christmas. -
Well, forge yourself some clinker tongs. If you do a search, there are some really weird and possibly challenging variations that might be fun to make.
-
Maybe I'm missing your point but typically you'd have a coal shovel...that is a small shovel which is quite narrow; A coal bucket which could be any bucket but usually had a bit of a specific shape; Clinker tongs which come in a variety of shapes; possibly a fire rake. Those all come up if you do an image search on the items..especially adding :antique" or vintage" to see the older versions. For the most part, people had either leather gloves handy when monkeying with their coal heater (because it was so dirty a job anyway) or at least the old asbestos-core hot pad nearby to open and adjust things. One story that I've heard confirmed independently from several old timers was regarding tending the larger basement coal furnaces as a kid: They all said that after pulling the hot clinkers, that bucket was just too tempting to pass on so they tried taking a leak on the clinker to cool it off...always only once because the smell of it flashing off basically told everyone in the house what you tried. I've been too cheap to get the chimney kit yet but I was given a large coal stove in great condition which came out of a local grange hall. Probably 19-teens vintage. It's going in my shop when I decide to plonk the cash down on the extras...that stuff adds up fast.
-
Thanks, all. I do have both muriatic and FC in my arsenal but wasn't sure if there was another better option to get a really deep etch.
-
Later vises did generally come with replaceable jaws. That was standard on machine vises so they just carried it over to leg vises. They have benefits in that you can use a hard flat, a hard checkered to really grab (and mar your part in most cases) or a soft brass to protect part surfaces. I'd personally replace them by fixing/tapping the screw holes..but I can't really see just how bad things are in the photos so don't know what you have to work with. You could also do smooth holes and just have dummy locating pins on the back of the replaceable jaws--that'd be easy to do with screws in that you just tap the threads in the replaceable jaws themselves to hold the countersunk screws and let the rest of the screw poke into the old holes (unthreaded) in the vise body. A bit of screw location error provides some friction and they would need to be tapped into place to stay and could be tapped out pretty easily to change to soft jaws. Note that you'd have to make your own jaws if you did the above. It's not hard.
-
M&H Armitage Mouse Hole. Top plate issues
Kozzy replied to S. Louque's topic in Anvils, Swage Blocks, and Mandrels
One thing that hasn't been brought up yet is *why* you are itching to repair it. I know that seems like an odd question but a lot of people get a new anvil and the first thing they get the bug to do is a major repair...before they've even used it much. The "why" is actually only because it looks like it needs repairs (usually): It's not that it actually NEEDS repairs to be workable, it just LOOKS like it needs repairs based on comparing to a near-perfect anvil. In short, cosmetic perception taints the decision making process. This one isn't quite a basket case yet by the photos posted. Save the repairs for the true basket cases. Use this one like you stole it...and if it crumbles into a basket case, then think about that repair. The exception to this is when one has a couple of spare working anvils and the local club is going to do some fancy anvil repair workshops anyway---then it might be worth taking in one that isn't quite at that basket case level yet. -
Recommended portable stick welder
Kozzy replied to WillForge's topic in Welding/Fab General Discussion
Thanks for your take on it. This is one of those items (when referenced elsewhere) which seems to bring the trolls out of the woodwork for some reason: Mention 110 in a post and someone will read you the riot act about how it's not 110, it's 120. Mention 120 and the next person will go on a tirade about how it really isn't 120 at all so you shouldn't call it that. Similar with the 240v-ish version of things. The real question is whether there is a preferred reference to use..what do people who do this for a living usually call it in their references. So for my own sanity, I'm just going to stick with 120v and 240v for casual conversation and questions. I personally understand that it's really more complex (if one chooses to get into the voltage weeds) but if the trolls elsewhere want to get their panties in a bunch, that's their problem. I'm sick of playing the "yes but.." game when it was just a simple question and the minute details are not the point. A simple question like "Are you considering a 120V or 240V welder?" doesn't need a full-on voltage terminology lecture. Can you tell I got ripped by someone recently? -
I guess that lands in metal finishing though what I am looking for is not your typical finish. I grabbed up a few pieces of round bar while out picking a farmer's boneyard the other day--stuff that I am fairly sure is wrought (haven't cleaned it our done any cut tests yet). Wrought is fairly uncommon around here because we don't have a lot of stuff that is pre about 1890, and the vast majority is post 1910. But with searching, there is some in the boneyards of most of the really early farms. In any case, what I want to do is etch a piece to really show the grain--emphasize what wrought looks like. I will also be doing a cut and bend piece to show what that looks like. This is for the museum display in our forging area, the intent being to try and show people including the local farmers with boneyards what to keep an eye out for and NOT simply haul off with the rest of their scrap. The nature of the weather here is similar to the desert in that we don't get a lot of corrosion that would cause the grain structure to show and if the piece is buried, it tends to be protected by our soils rather than corroding: Wrought isn't easy to spot among the 10,000 tons of plain old steel scrap. So, is there a recommended etchant or process to bring out the grain better than another? Something that would tend to make it really kick visually? Some way to make the grain/ fibrous nature really stand out? Thanks
-
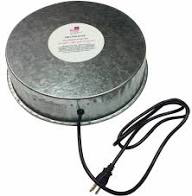
There are good stock tank heaters for this. The right one sits on the bottom, never gets so hot that it would melt even a plastic tank, and has an internal thermostat so doesn't even turn on unless freezing temperatures are met. IIRC, my stock tank heaters ran about 24 bucks USD. In a roughly 20 gallon tank, there is no freeze at all until it's been below zero F for a few days and then only minimal top freezing around the edges. Wattage is remarkably low to accomplish this so it doesn't make you go broke on electric bills. Image is the 500 watt version which is for a much bigger tank and is listed at $ 33 USD. IIRC, mine are 250 watts. For smaller tanks...say about a 5 gallon bucket size, they make a water heater for chickens--it's a galvanized platform with a built in heater which the chicken water...or a sslack tank...can sit on. I've never had the chicken water freeze on me but can't say how a more open tank would react. These are a bit more expensive, about 125 watts.