
JHCC
-
Posts
19,284 -
Joined
-
Last visited
Content Type
Profiles
Forums
Articles
Gallery
Downloads
Events
Everything posted by JHCC
-

Rusty hammer build along
JHCC replied to Jason Fry's topic in Power Hammers, Treadle Hammers, Olivers
I don't know -- a second guide might not be such a bad idea, both for precision and the overall strength of the system. -
Hang onto the I-beam; there's a lot of stuff you can make from it. For example, an anvil stand.

-
Do these numbers signify the type of steel used?
JHCC replied to HammerMonkey's topic in Blacksmithing, General Discussion
The older I get, the simpler I become. -
Rusty hammer build along
JHCC replied to Jason Fry's topic in Power Hammers, Treadle Hammers, Olivers
I've never built one of these, but it makes sense that you'd want the guides as close to the work as possible. -
There's some good discussion of this in the Solid Fuel Forges section. Don't get hung up on CFM ratings; a hairdryer should be adequate. I use a stripped-down vacuum cleaner with the hose fitted to the exhaust port; it's much too powerful on its own, but I've got it on a variable transformer to bring the speed down. A forge of this size isn't going to need anything really powerful.
-
Yeah, paracord/550 is designed to support a human's bodyweight, but not by one strand!
-
Thermal Cycling/Normalizing Questions
JHCC replied to Jacob Palmer's topic in Heat Treating Knives, Blades etc
The bladesmiths and metallurgists can correct me if I'm wrong on this, but I think one of the ideas behind the triple normalization is to do it at a slightly lower temperature each time. As I understand it, this makes new grains forming at the boundaries between the old grains, which results in a finer grain structure; heating to a higher temperature creates a new, coarser grain structure, so having your second or third normalization at a higher temperature undoes the good work of the earlier cycle(s). Is that correct? -
That looks very nice. Good move to put a little flare on the legs, for greater stability.
-
Don't ask how we know these things
JHCC replied to Glenn's topic in Blacksmithing, General Discussion
I used to have a T-shirt with a hot-cut-shaped burn in the center of the chest, from when a red-hot one flipped out of a set of poorly fitted tongs. THAT's how we know these things. -
I have no idea whether or not your pricing is realistic, but I must admire your organization.
-
If a little chilling to the nether regions.
-
New side blast with water tuyere & bosh (pic heavy)
JHCC replied to JHCC's topic in Solid Fuel Forges
No, I am going with the remake-the-fire-bowl-with-moistened-ash-and-cinders-every-day method (English-style), at least for now. I am using the old sand and clay fill from my JABOD (broken up: it’s not a solid adobe mass anymore), and I understand that it will get even easier as the ash builds up from several fires. So far at least, I like the flexibility and the fact that the clinker comes free so easily from the loose fill. -
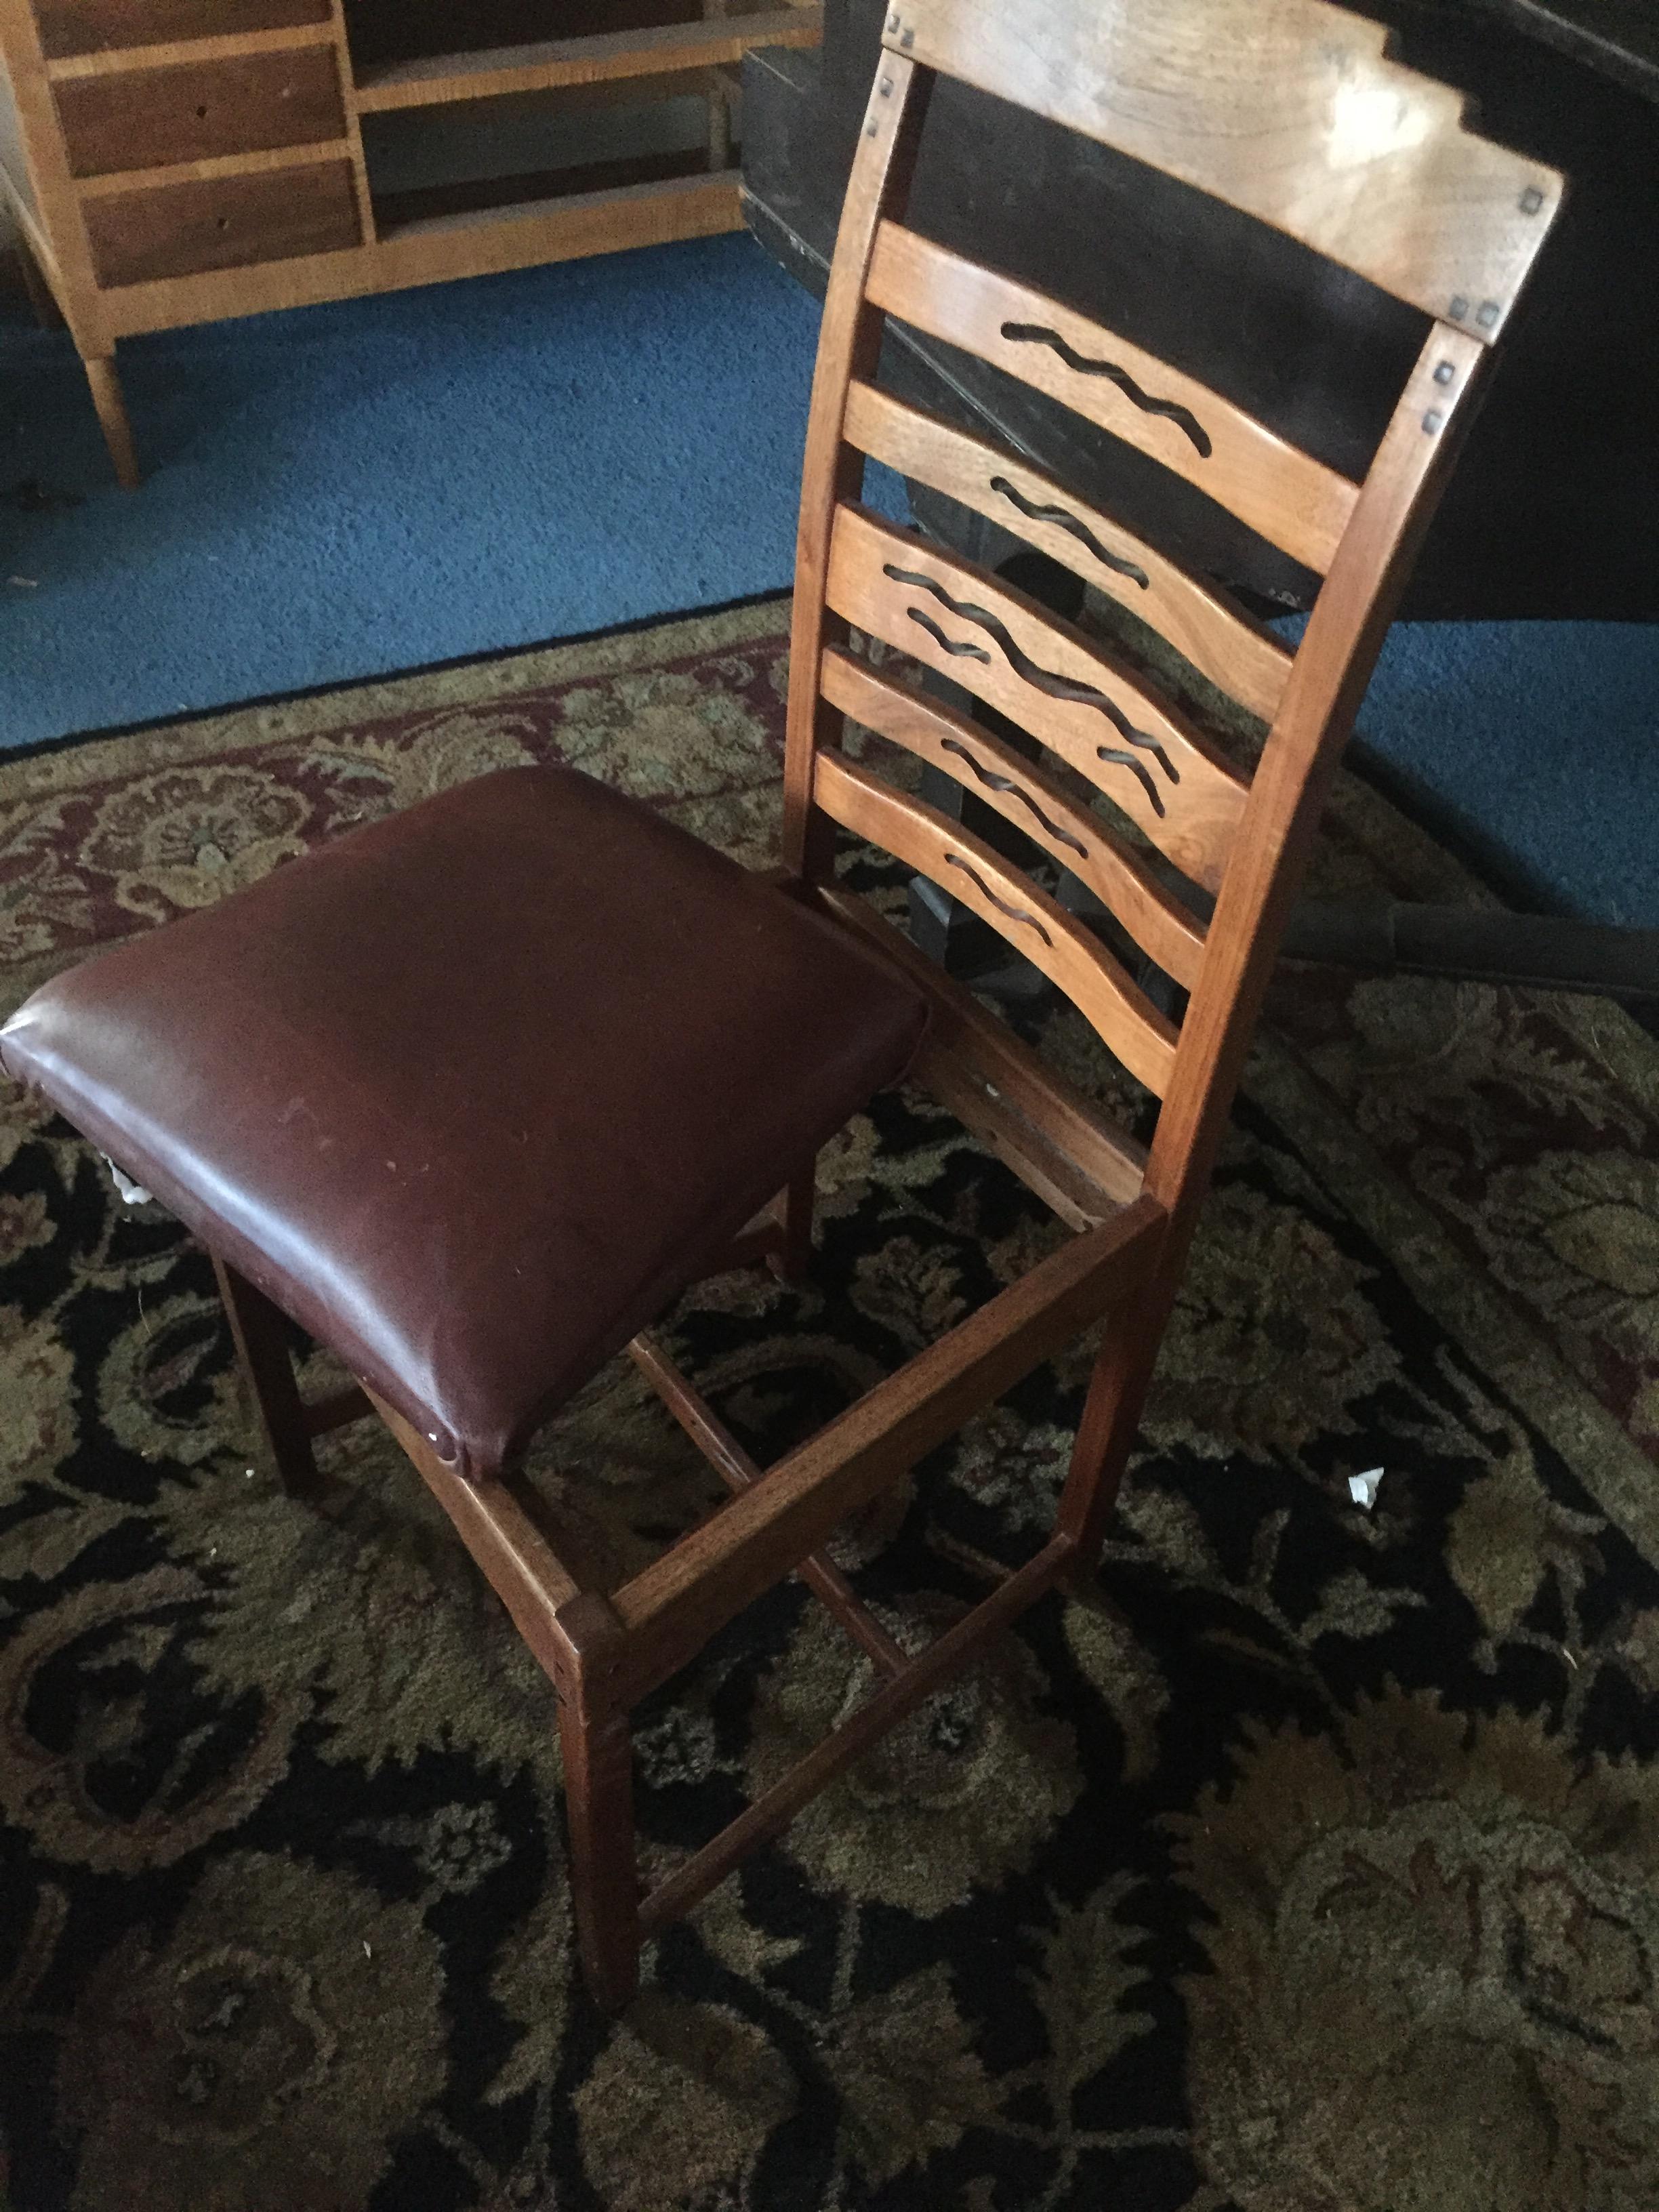
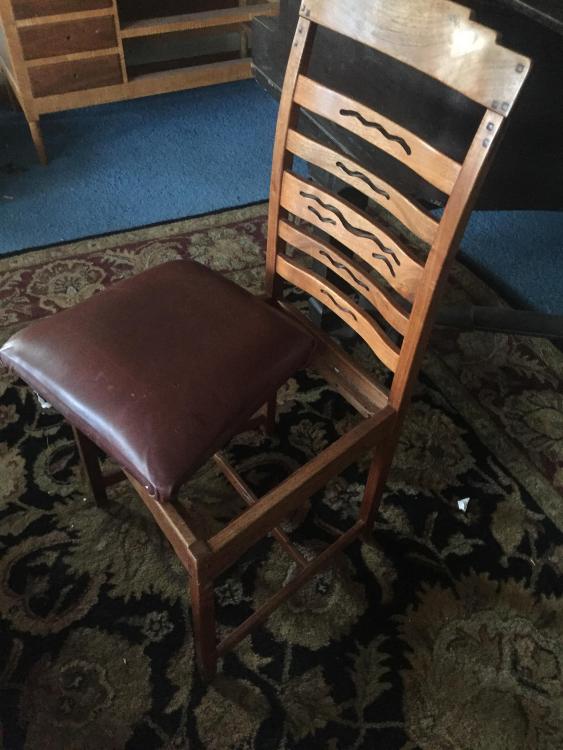
Ben, that is looking awesome! Great work! I’m going to second Jennifer’s recommendation for a sheet metal seat, but as a support for the veg leather et al. If you make the metal seat removable, then some future owner can replace the leather when (inevitably) it’s needed. For example, here’s the drop-in seat of a Greene & Greene-style chair I made some thirty years ago. The seat has been re-covered twice (and the leather is going to last a whole lot longer than the basic fabric that was there before).
-
What did you do in the shop today?
JHCC replied to Mark Ling's topic in Blacksmithing, General Discussion
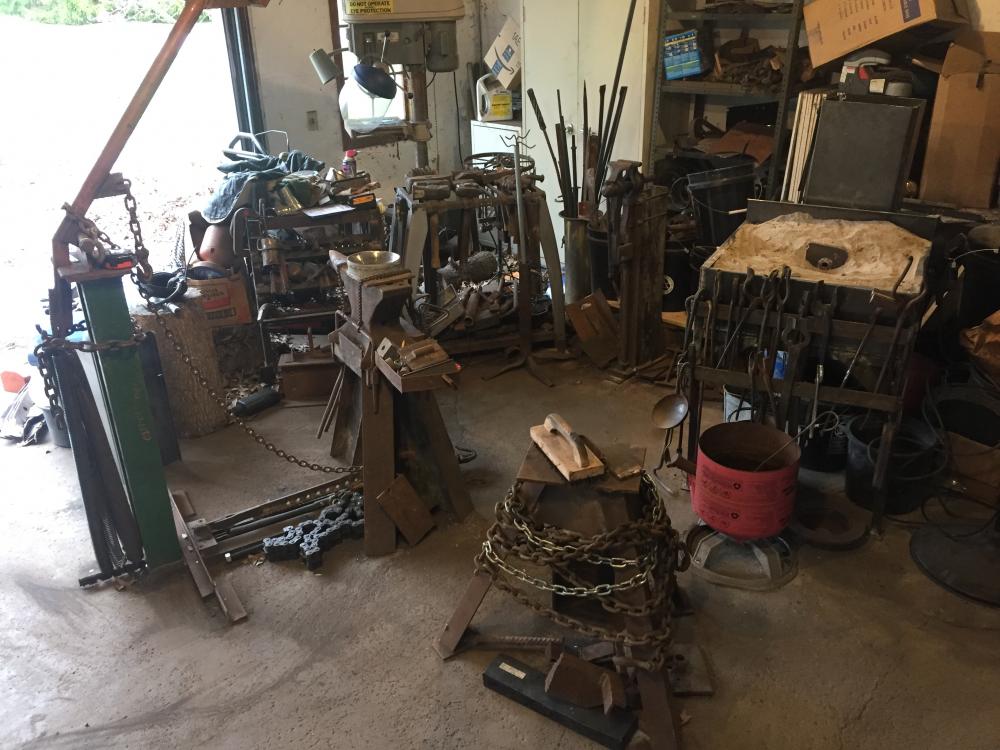
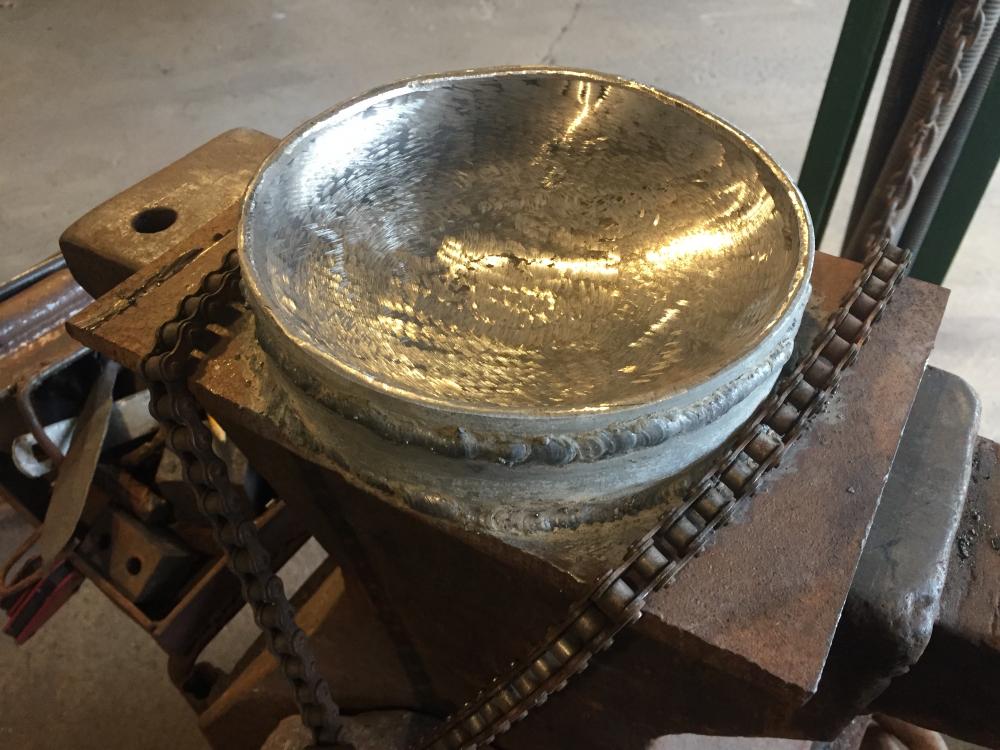
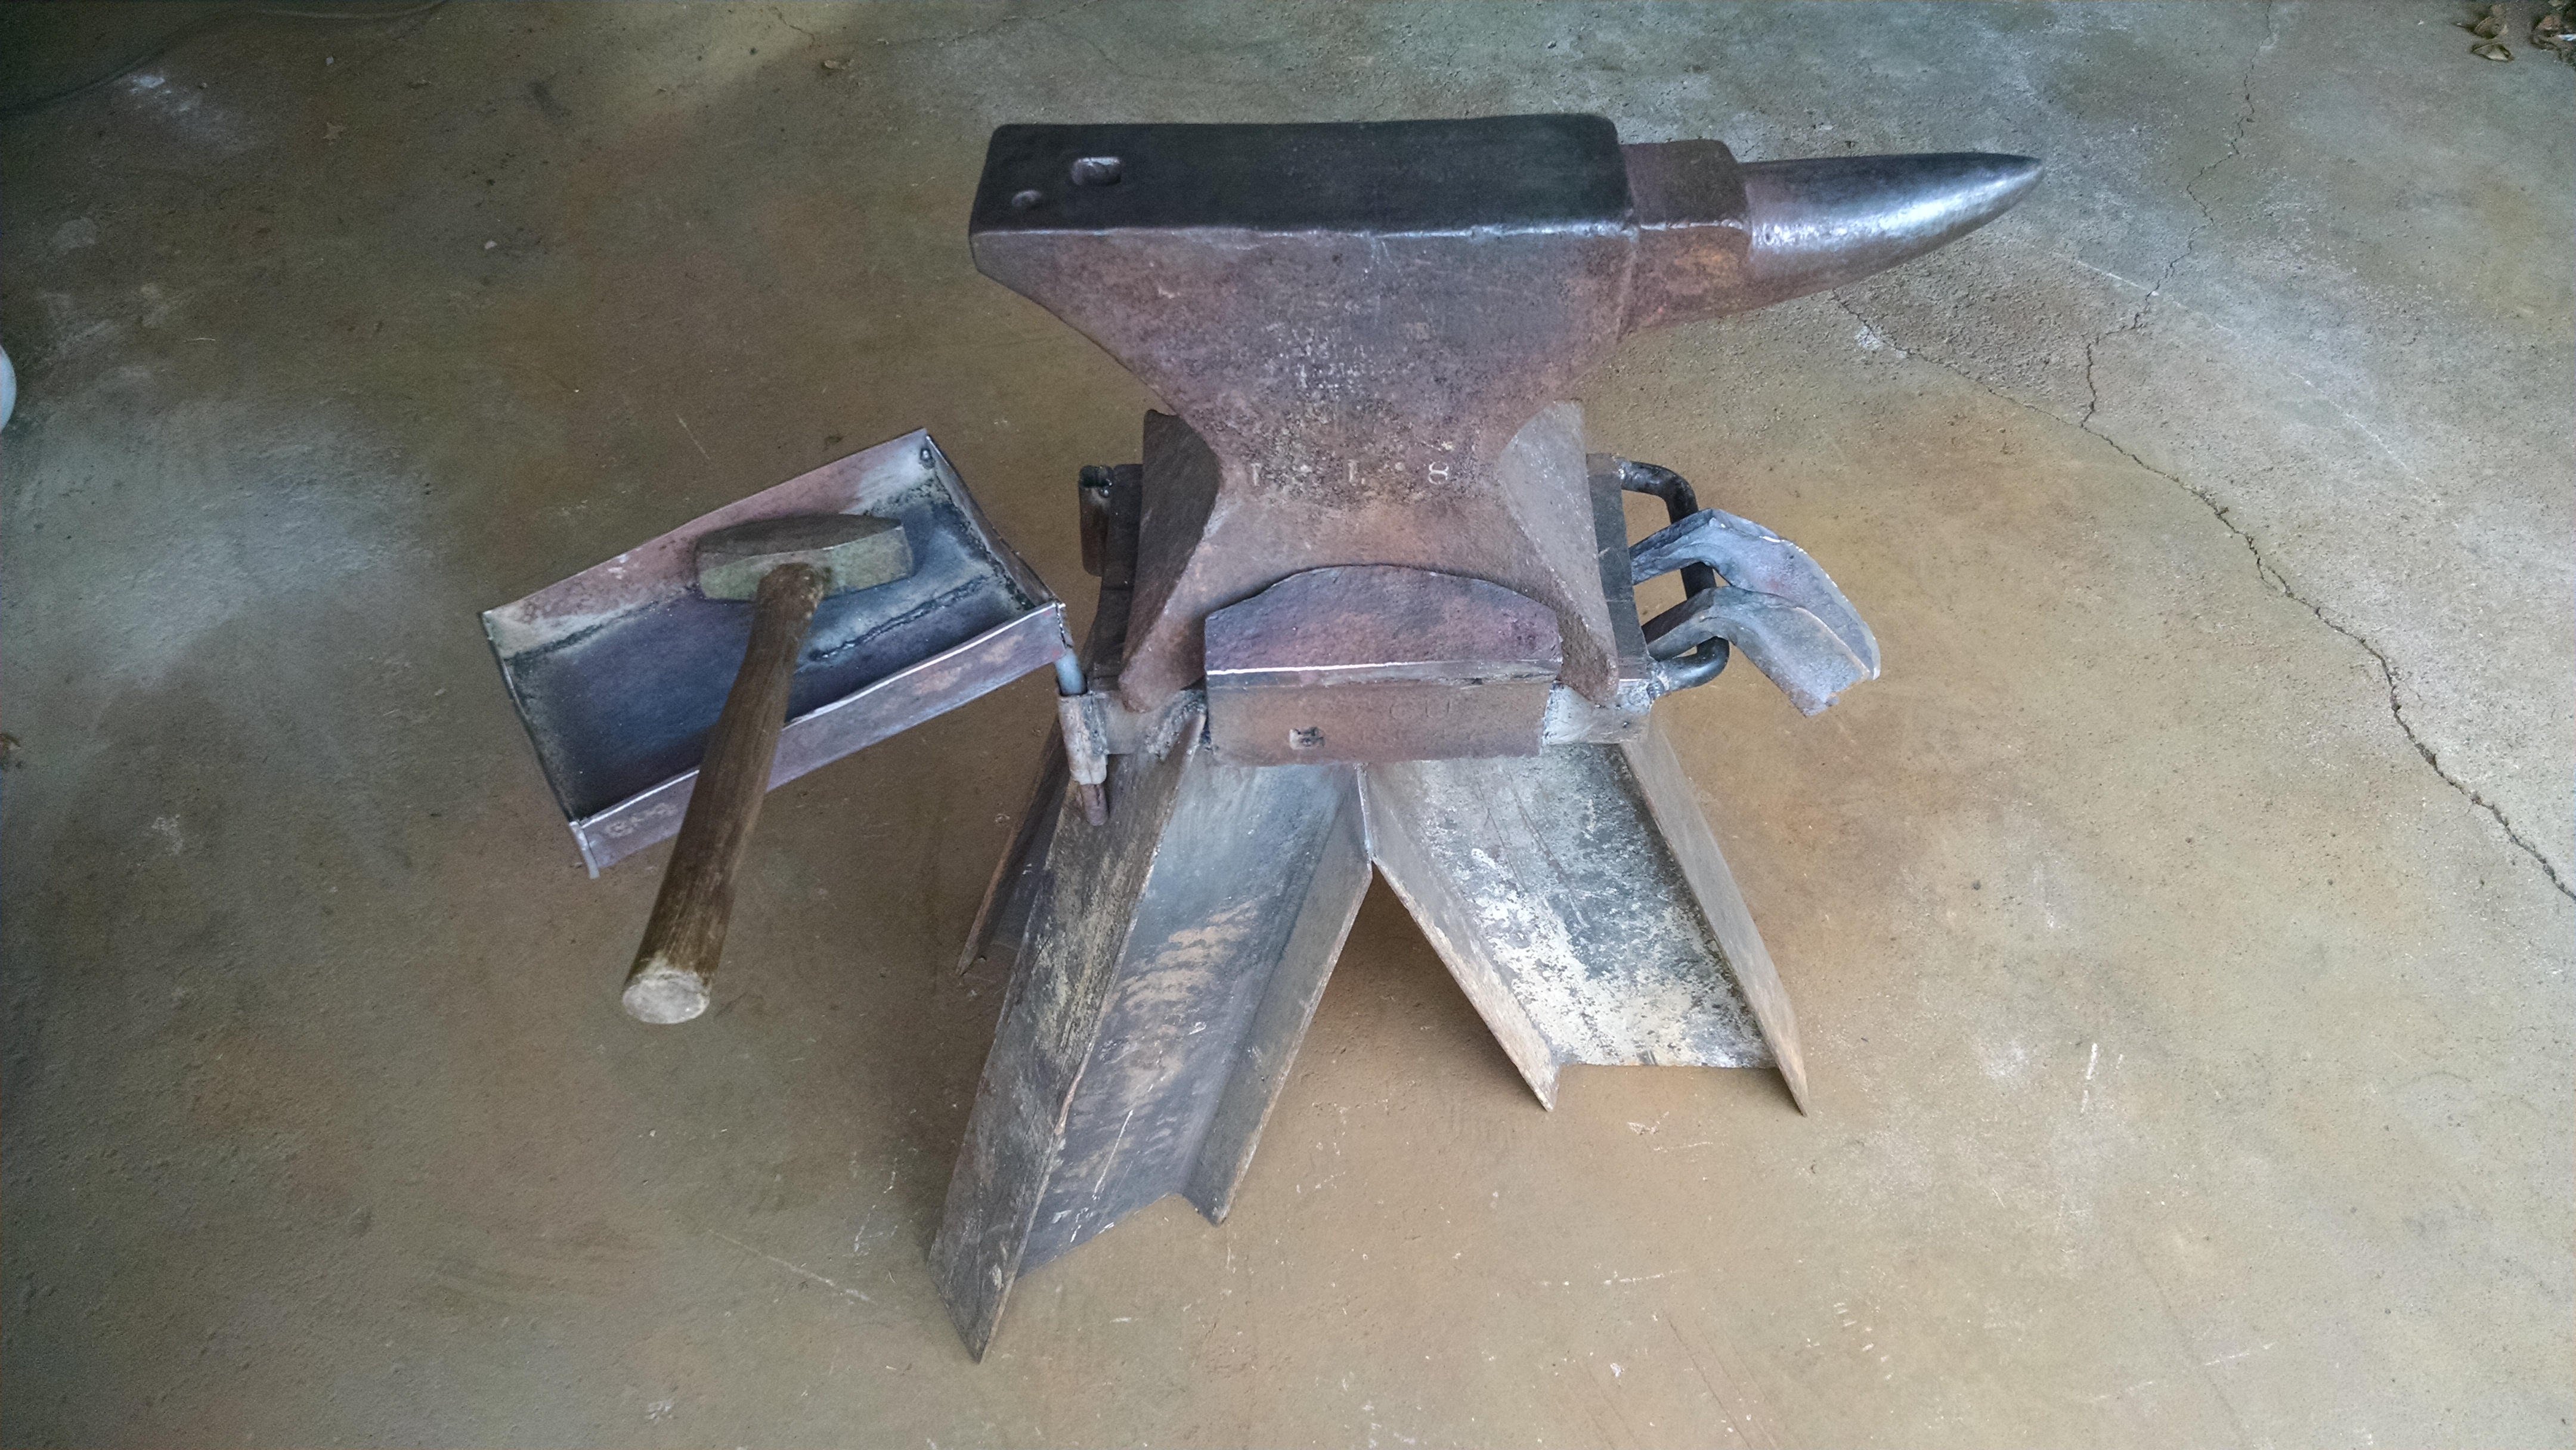
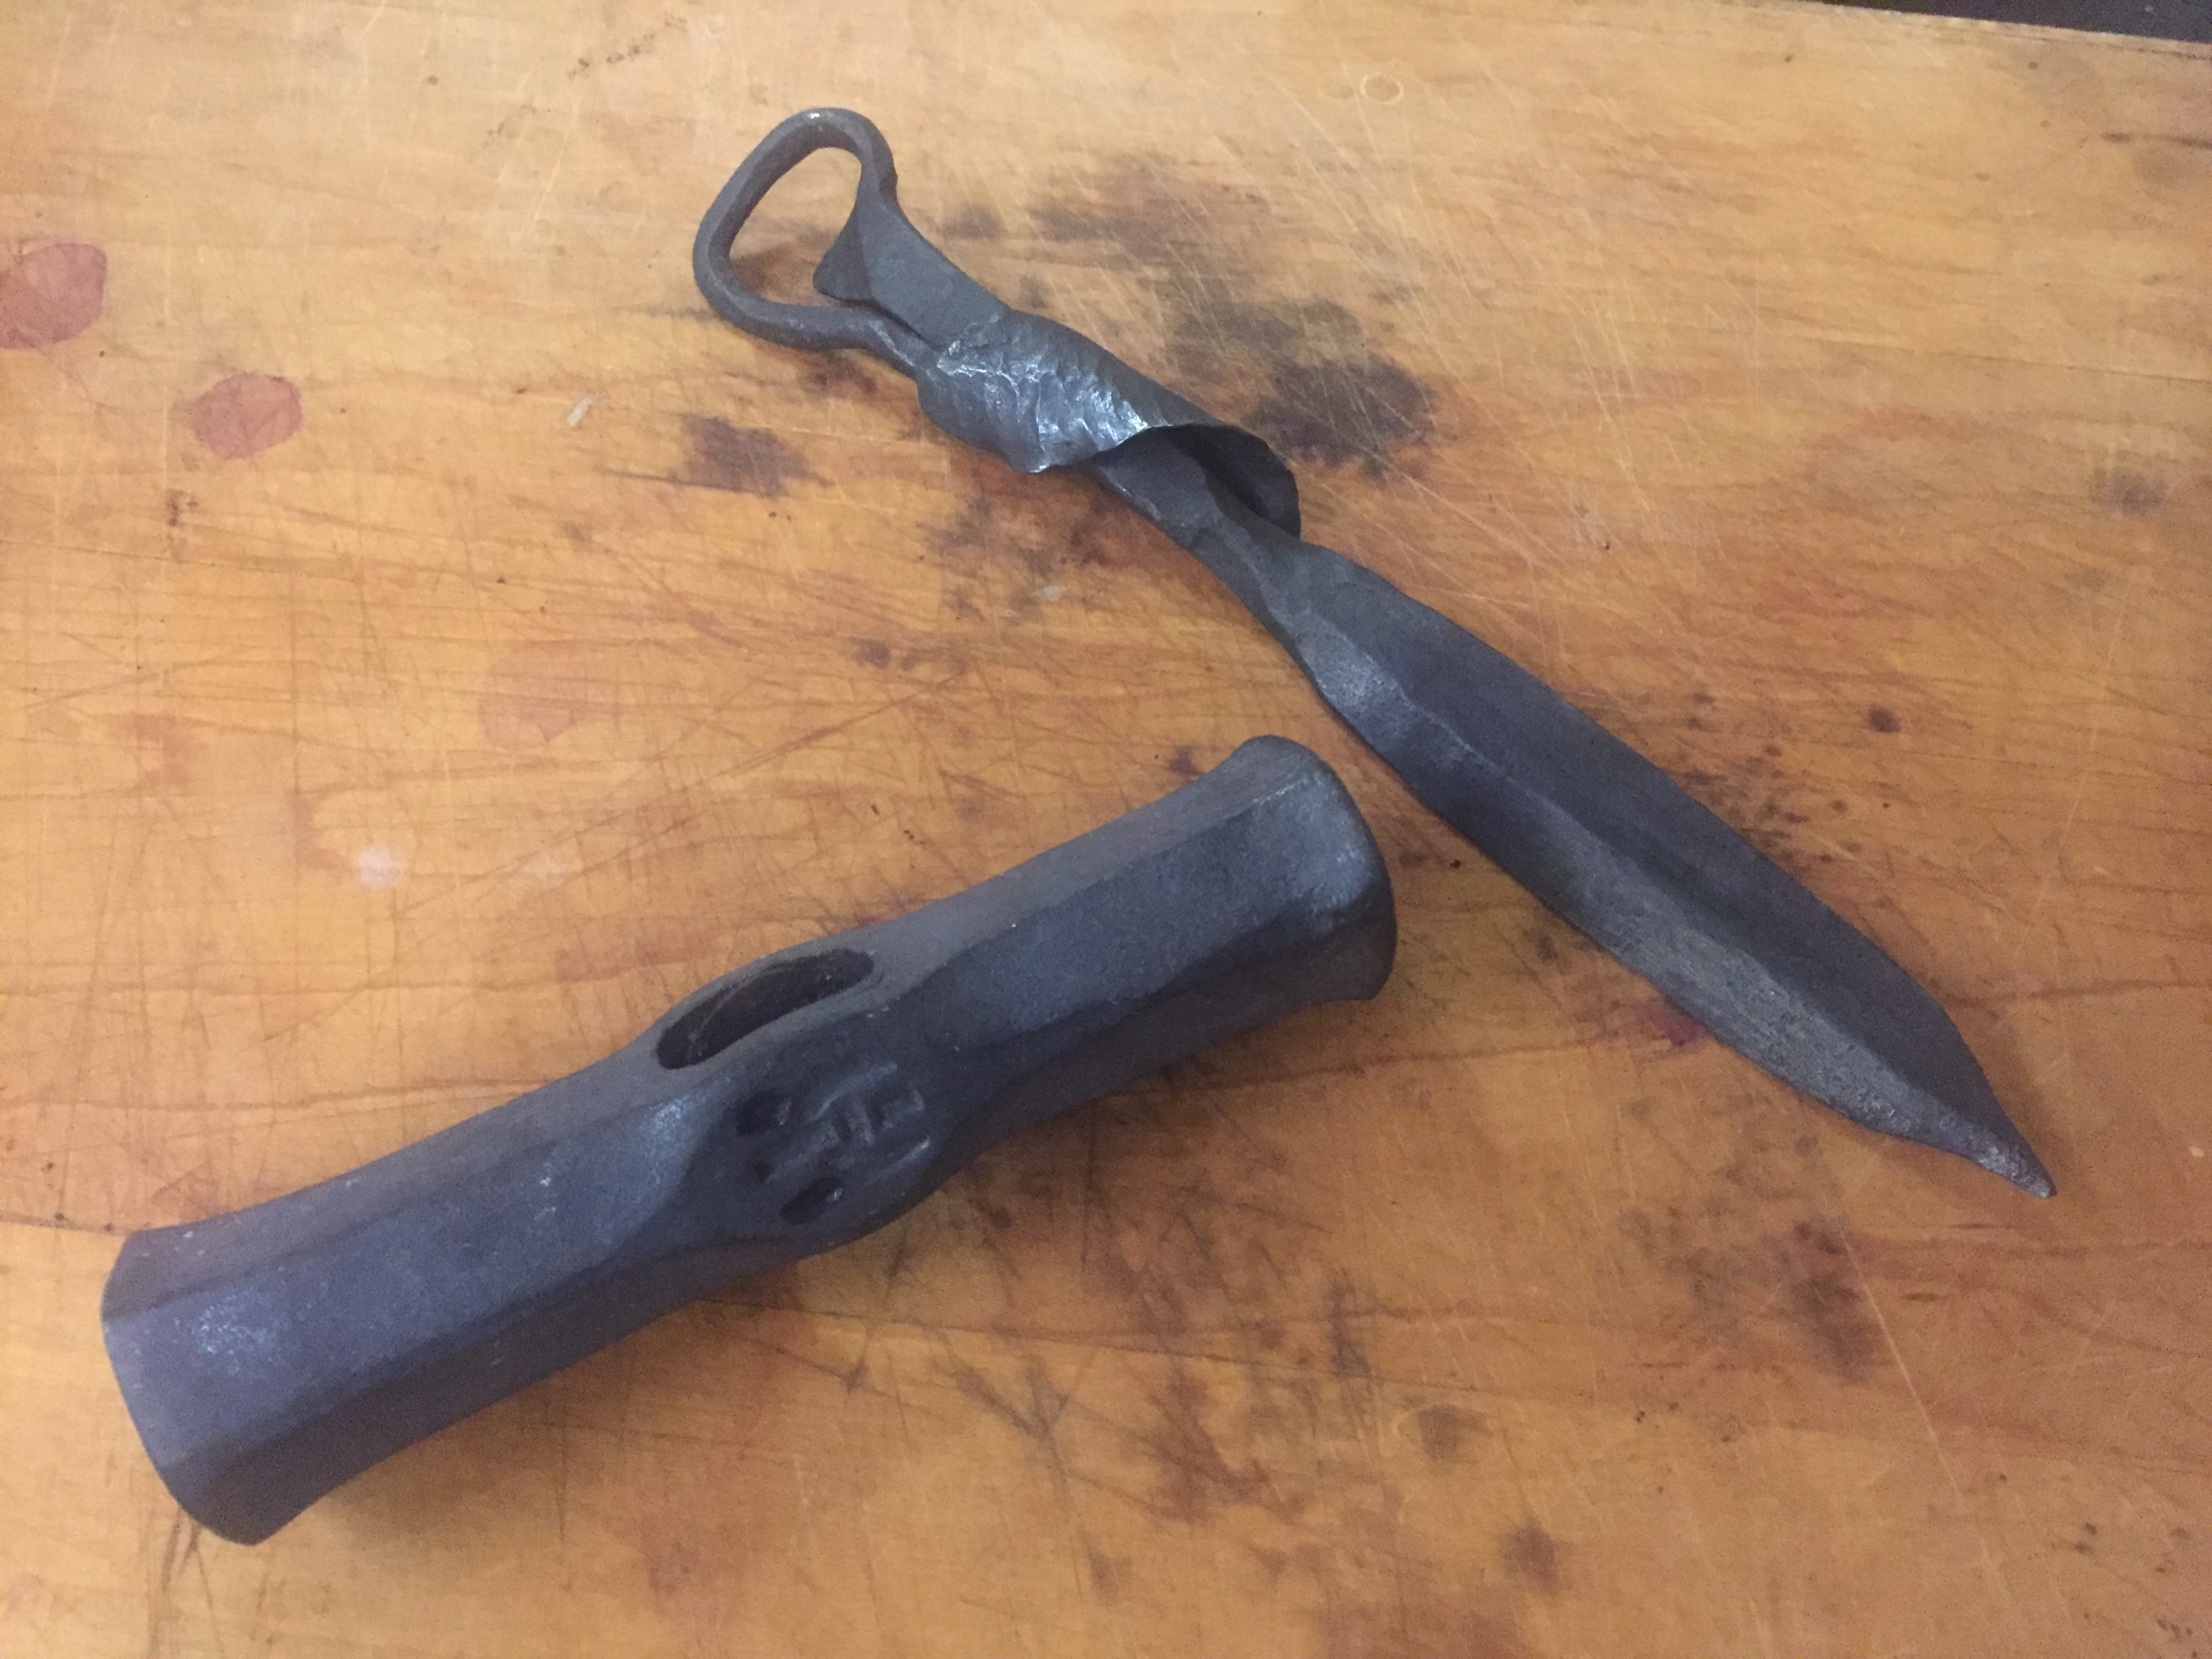
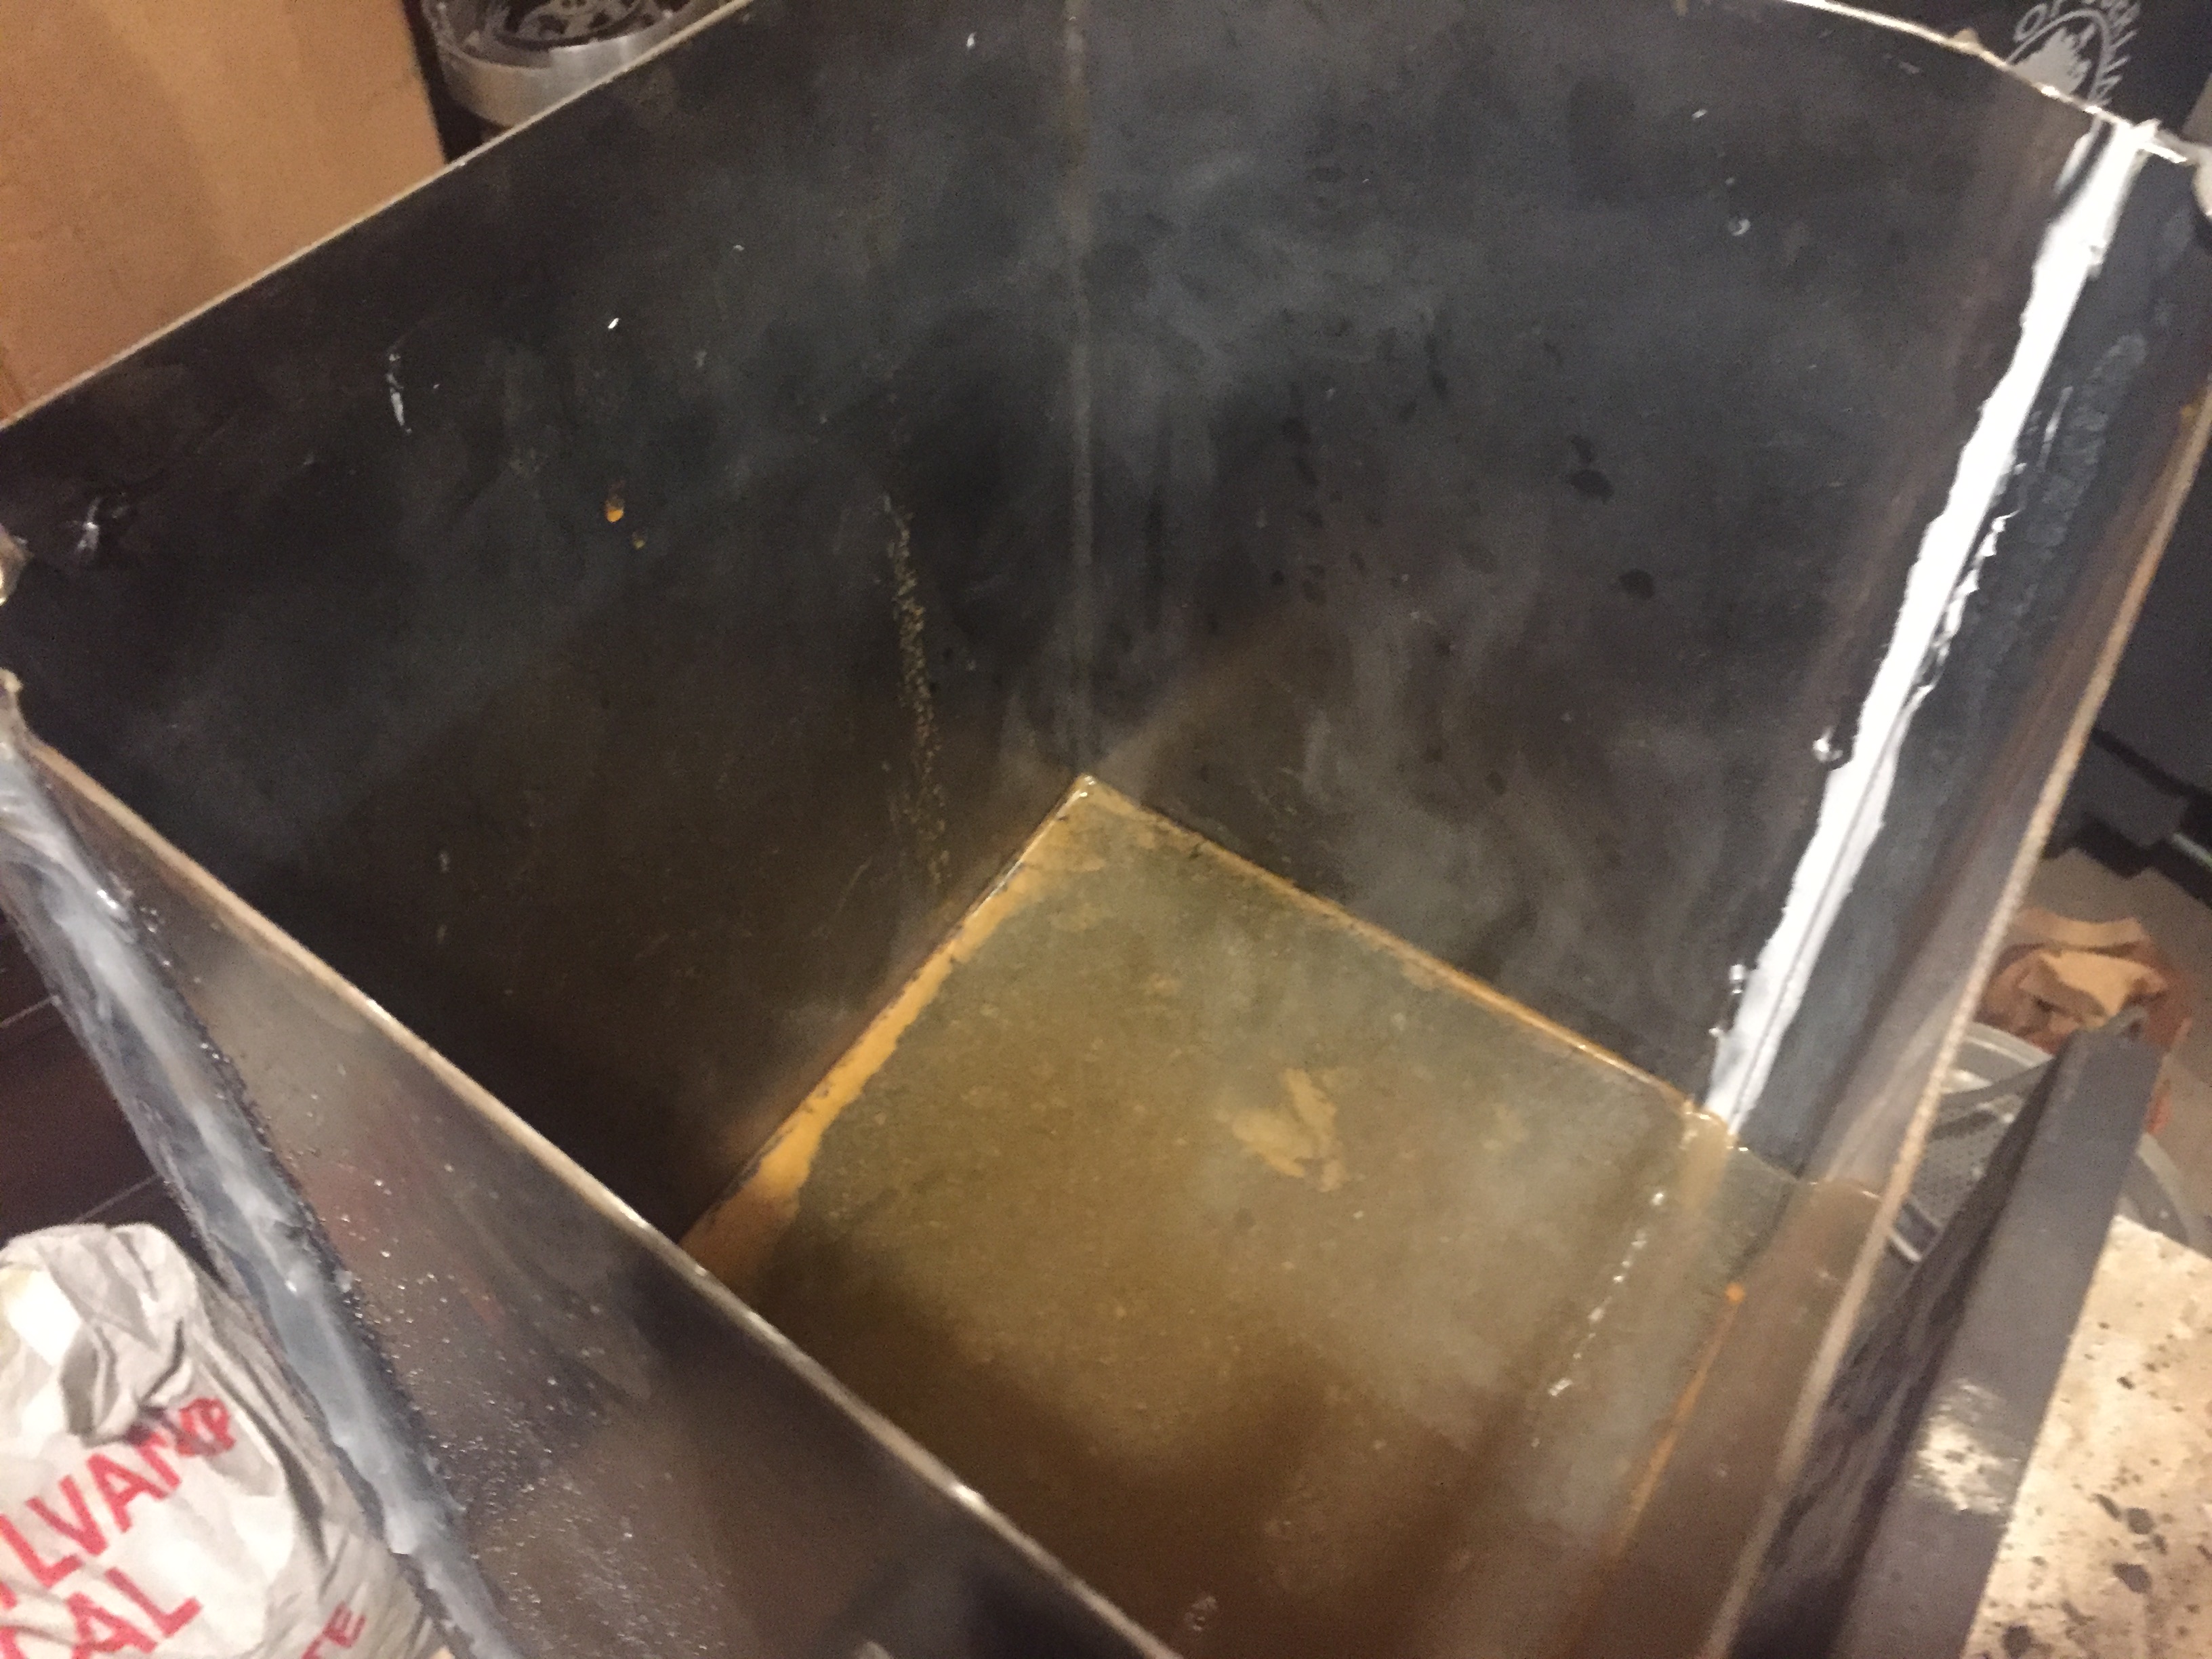
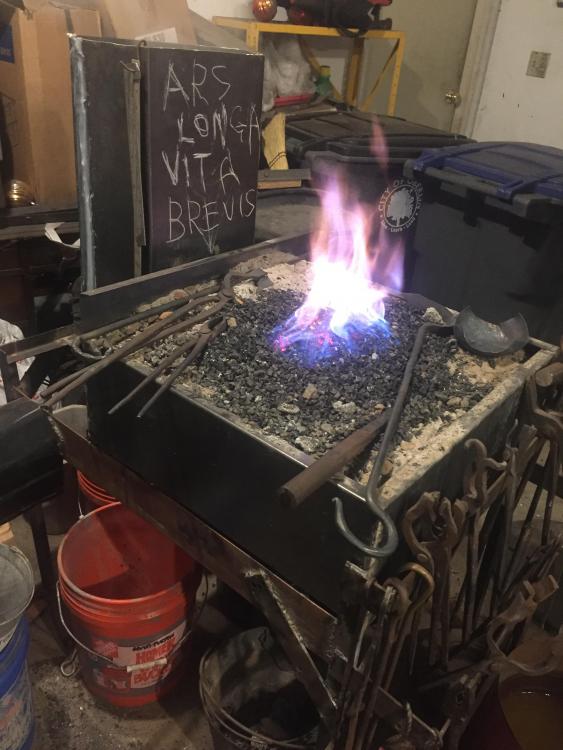
Thank you, Jennifer. It’s definitely worth the time, money, and effort that’s gone into it so far. Still considering a couple of tweaks, but nothing major. The single biggest difference is how easy it is to clean out the clinker, since it’s not sticking to the bowl or massing around the tuyere (or if it does, it’s easy to get out). In turn, since the clinker isn’t there to act like a heat sink, that means more efficient use of fuel and a more consistent, predictable, and effective fire. About it the only downside so far is that the hot spot is 3-4” farther back on the hearth than what I’m used to, but I suppose I’ll adjust. Here are the letter/bottle opener and hammer head: The latter still needs to be hardened, tempered, ground, and handled. I did a test heat treat of one of the offcuts; it wouldn’t harden in oil, but did in water.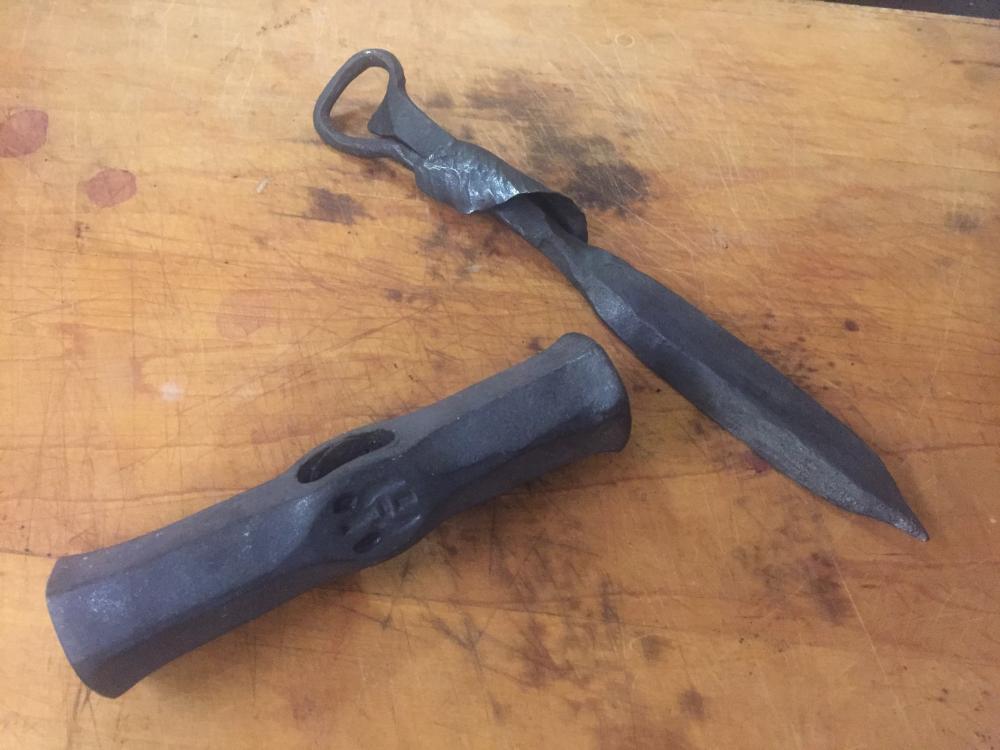
-
I was walking up our drive in Vermont one horn summer day on my way back from the swimming hole when I felt a cold touch right below my shoulder blades. When I turned around, I realized it was Pooka, the neighbors’ Great Dane.
-
New side blast with water tuyere & bosh (pic heavy)
JHCC replied to JHCC's topic in Solid Fuel Forges
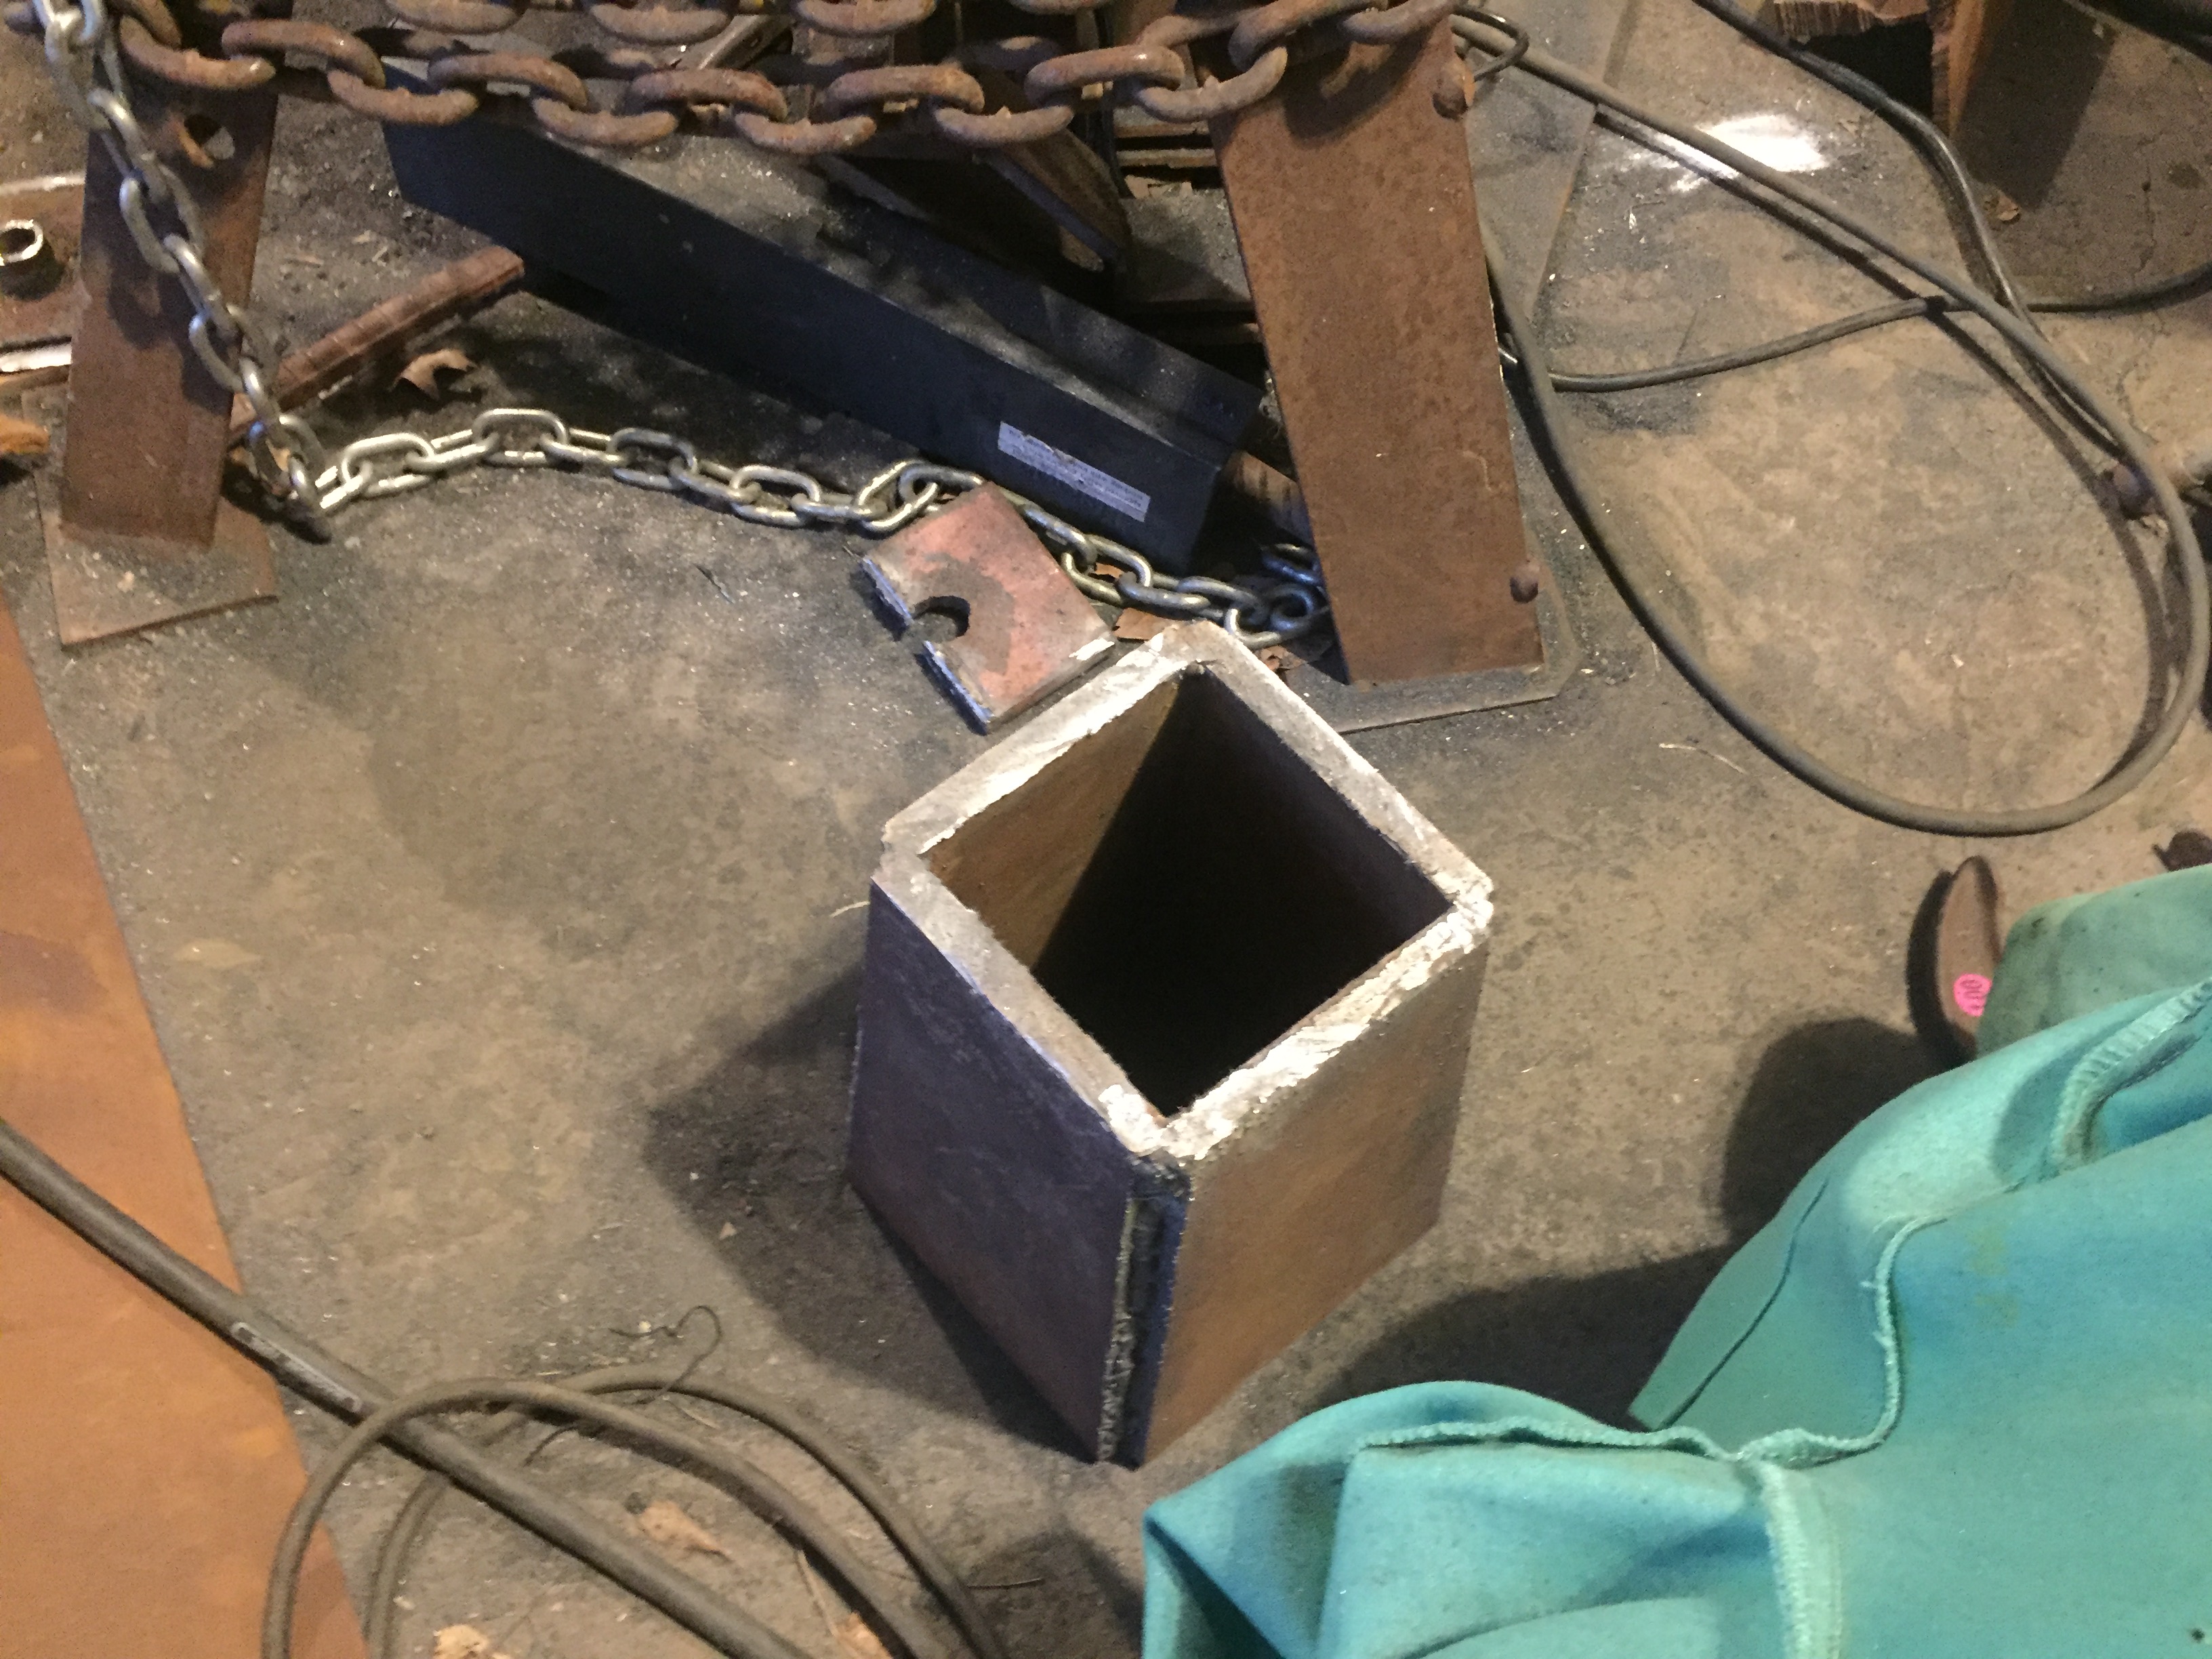
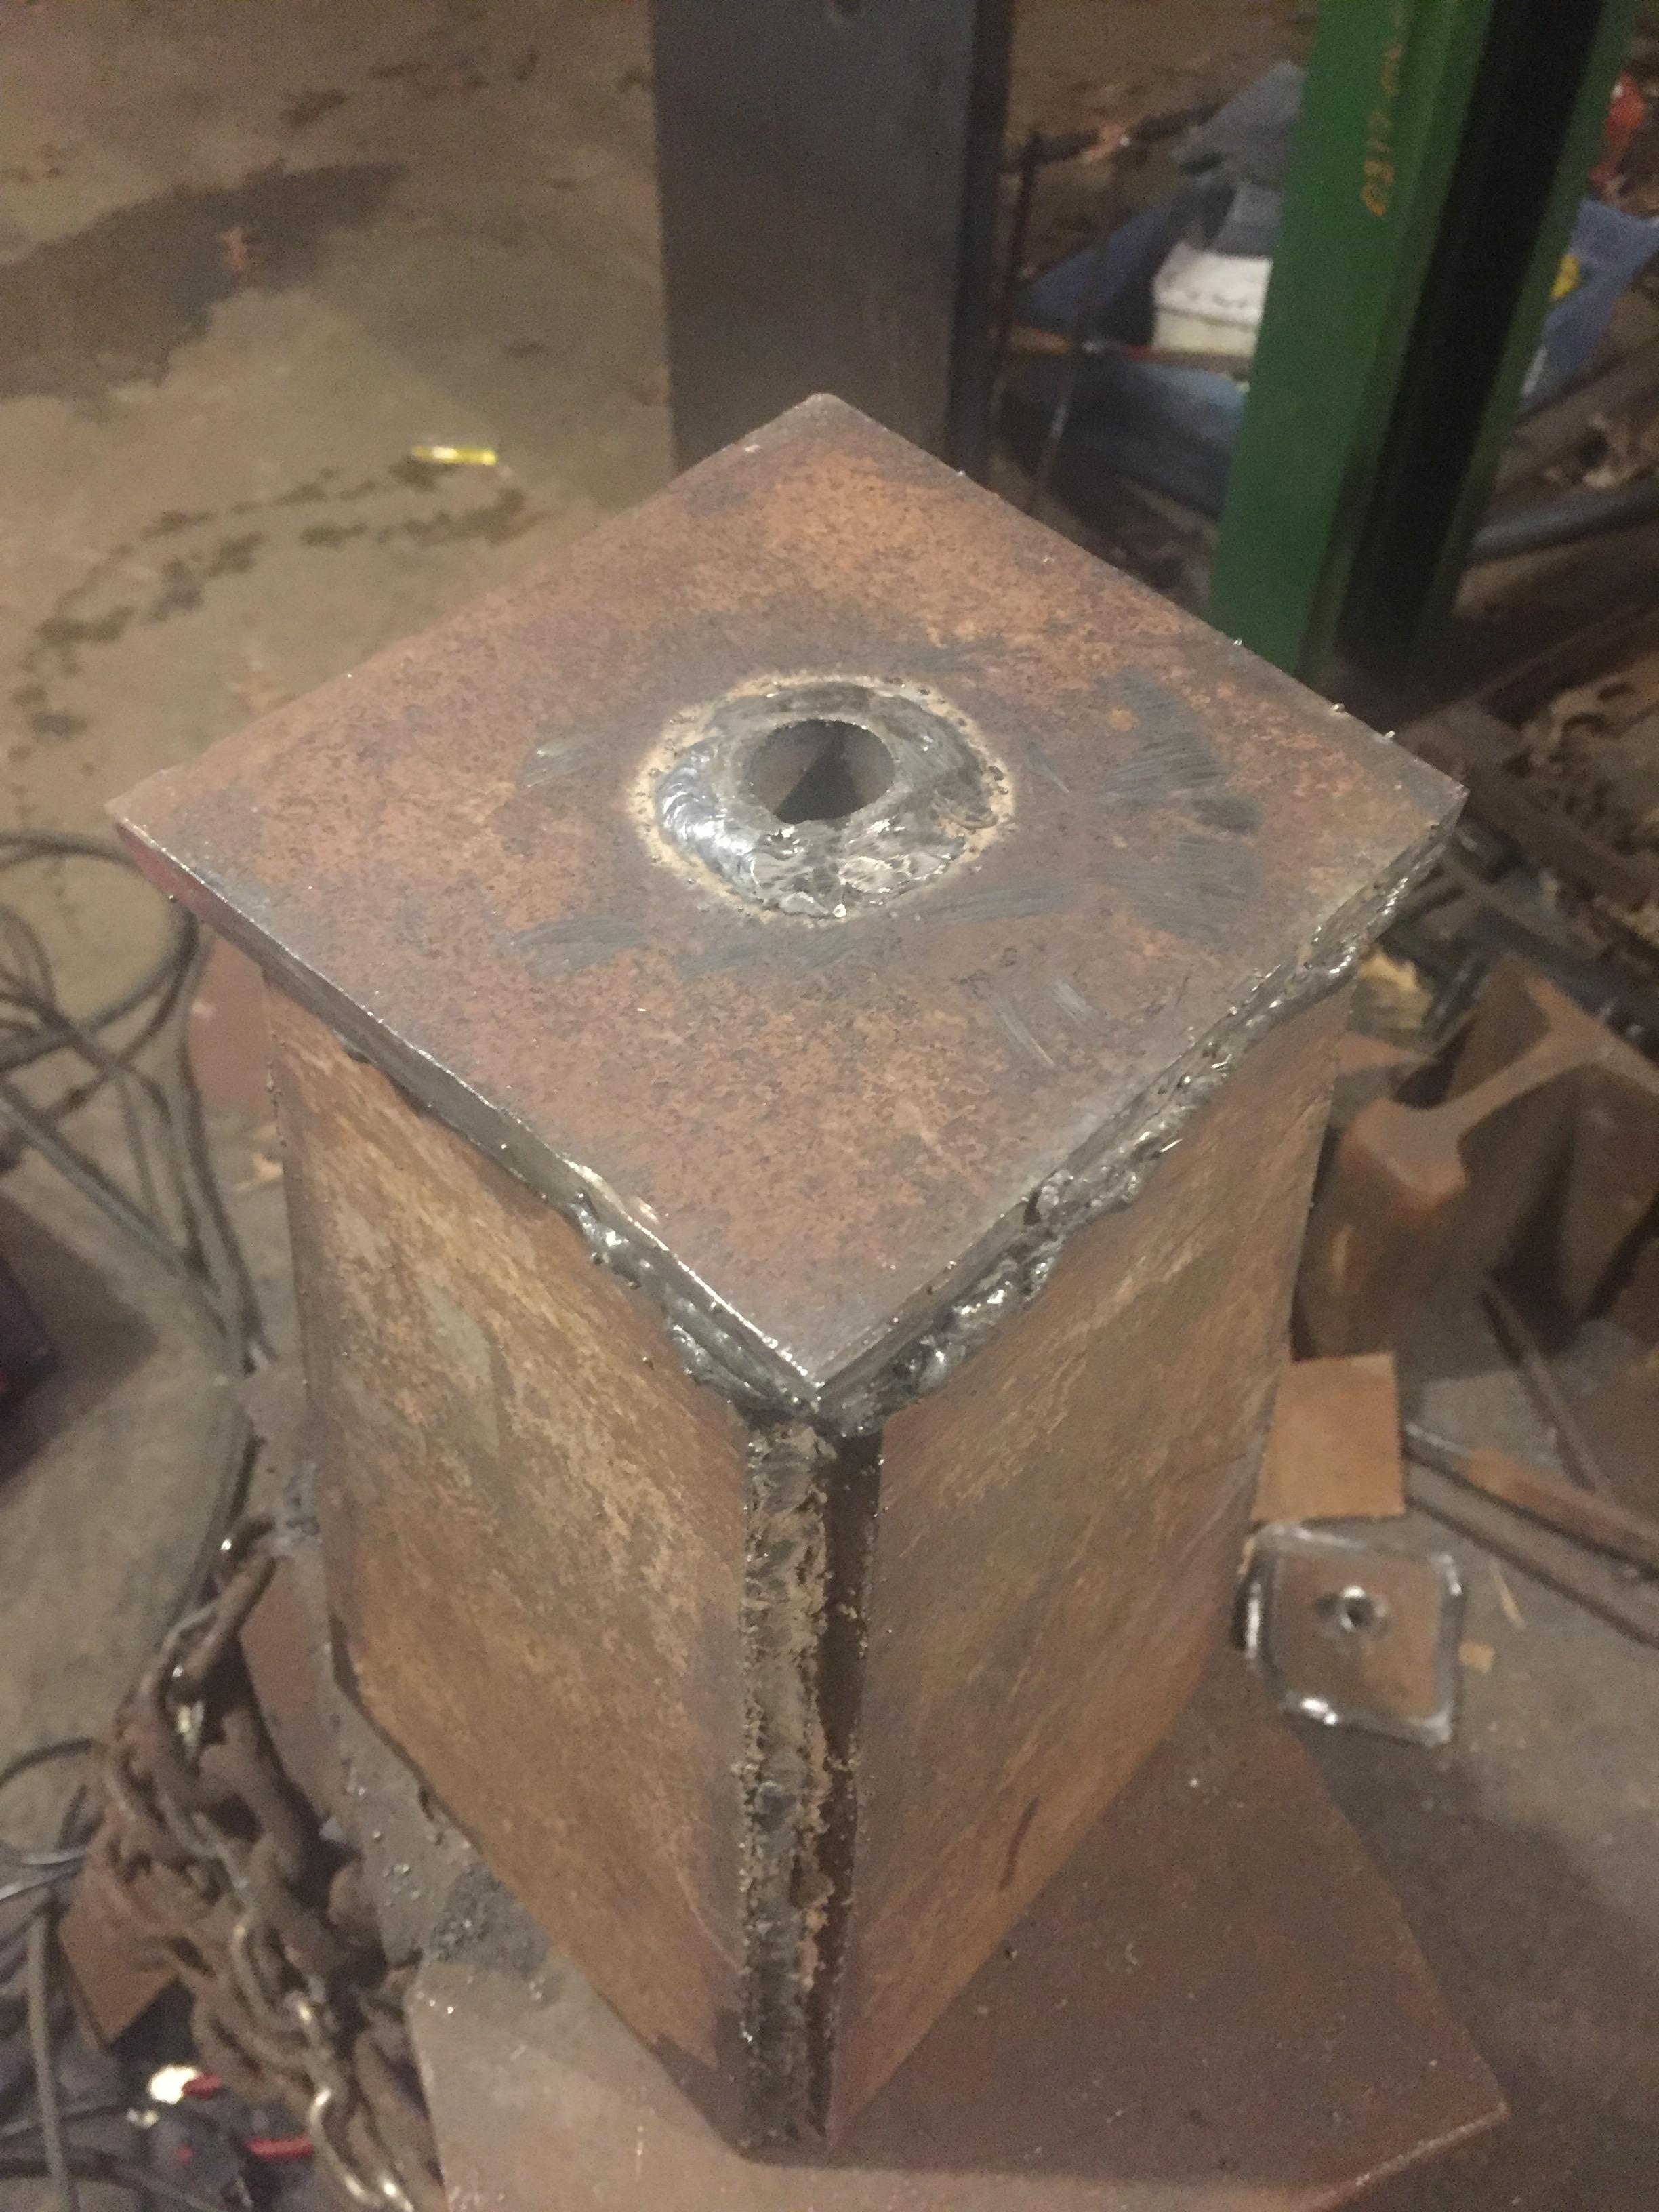
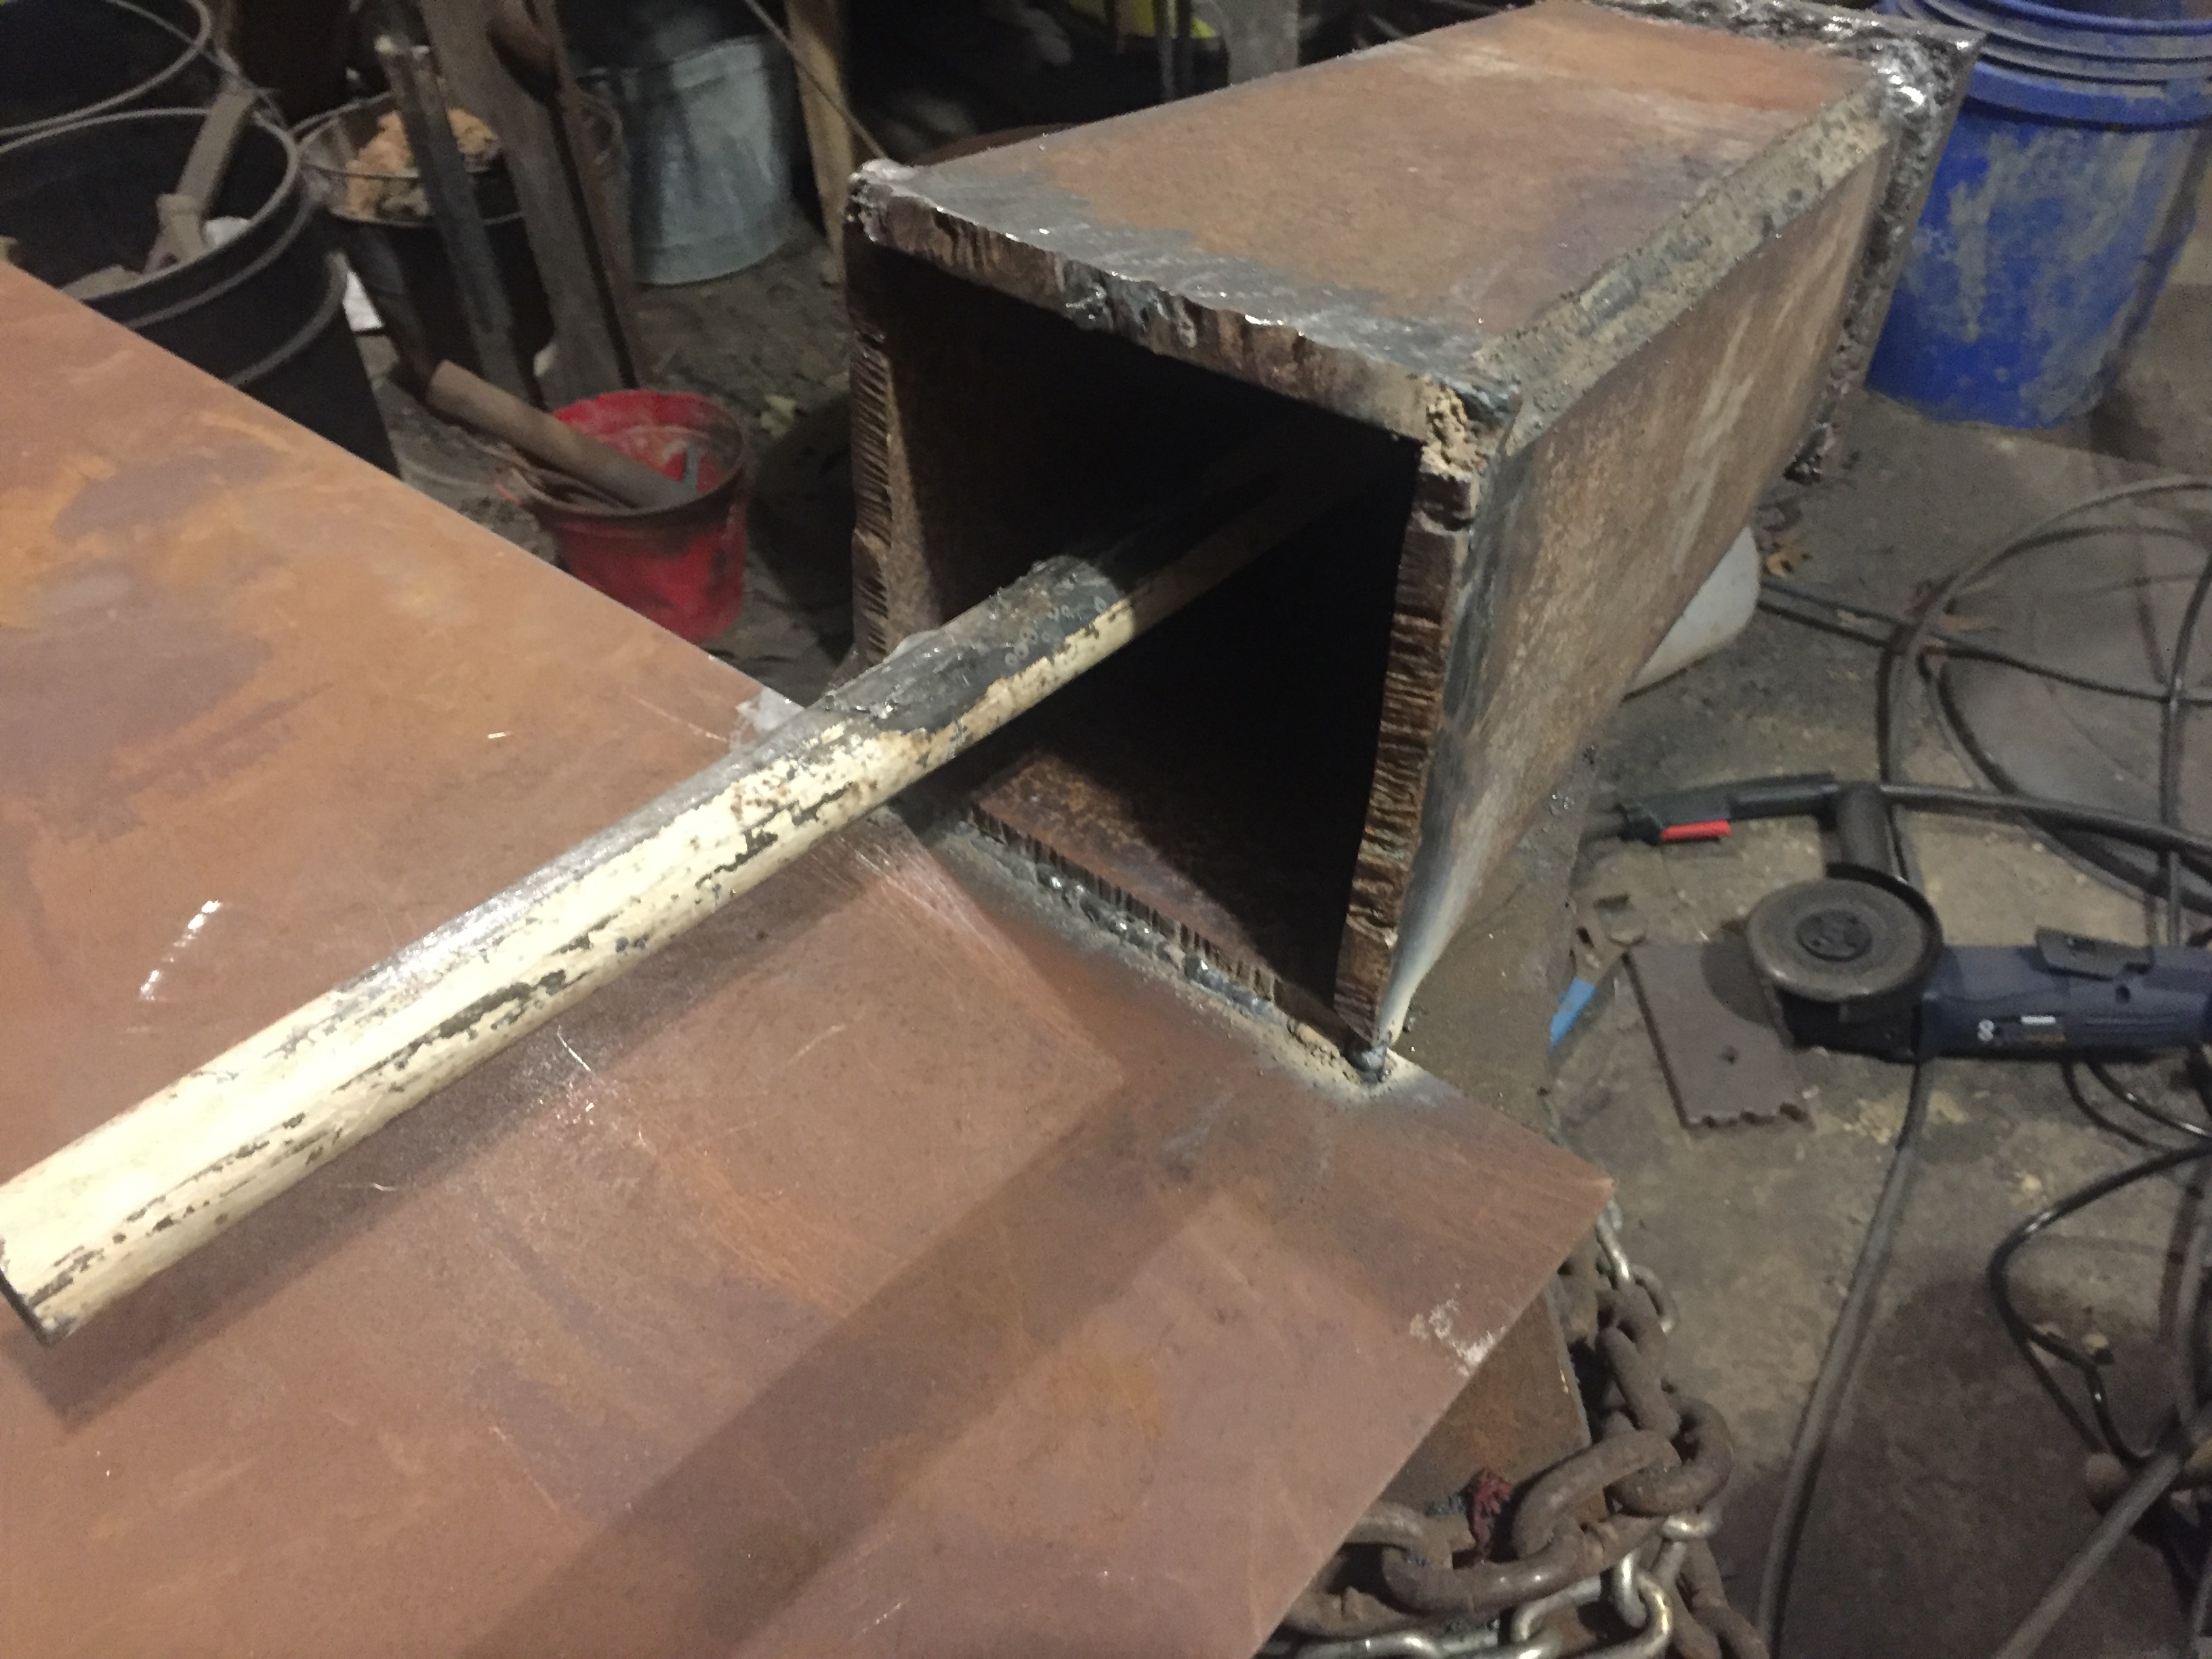
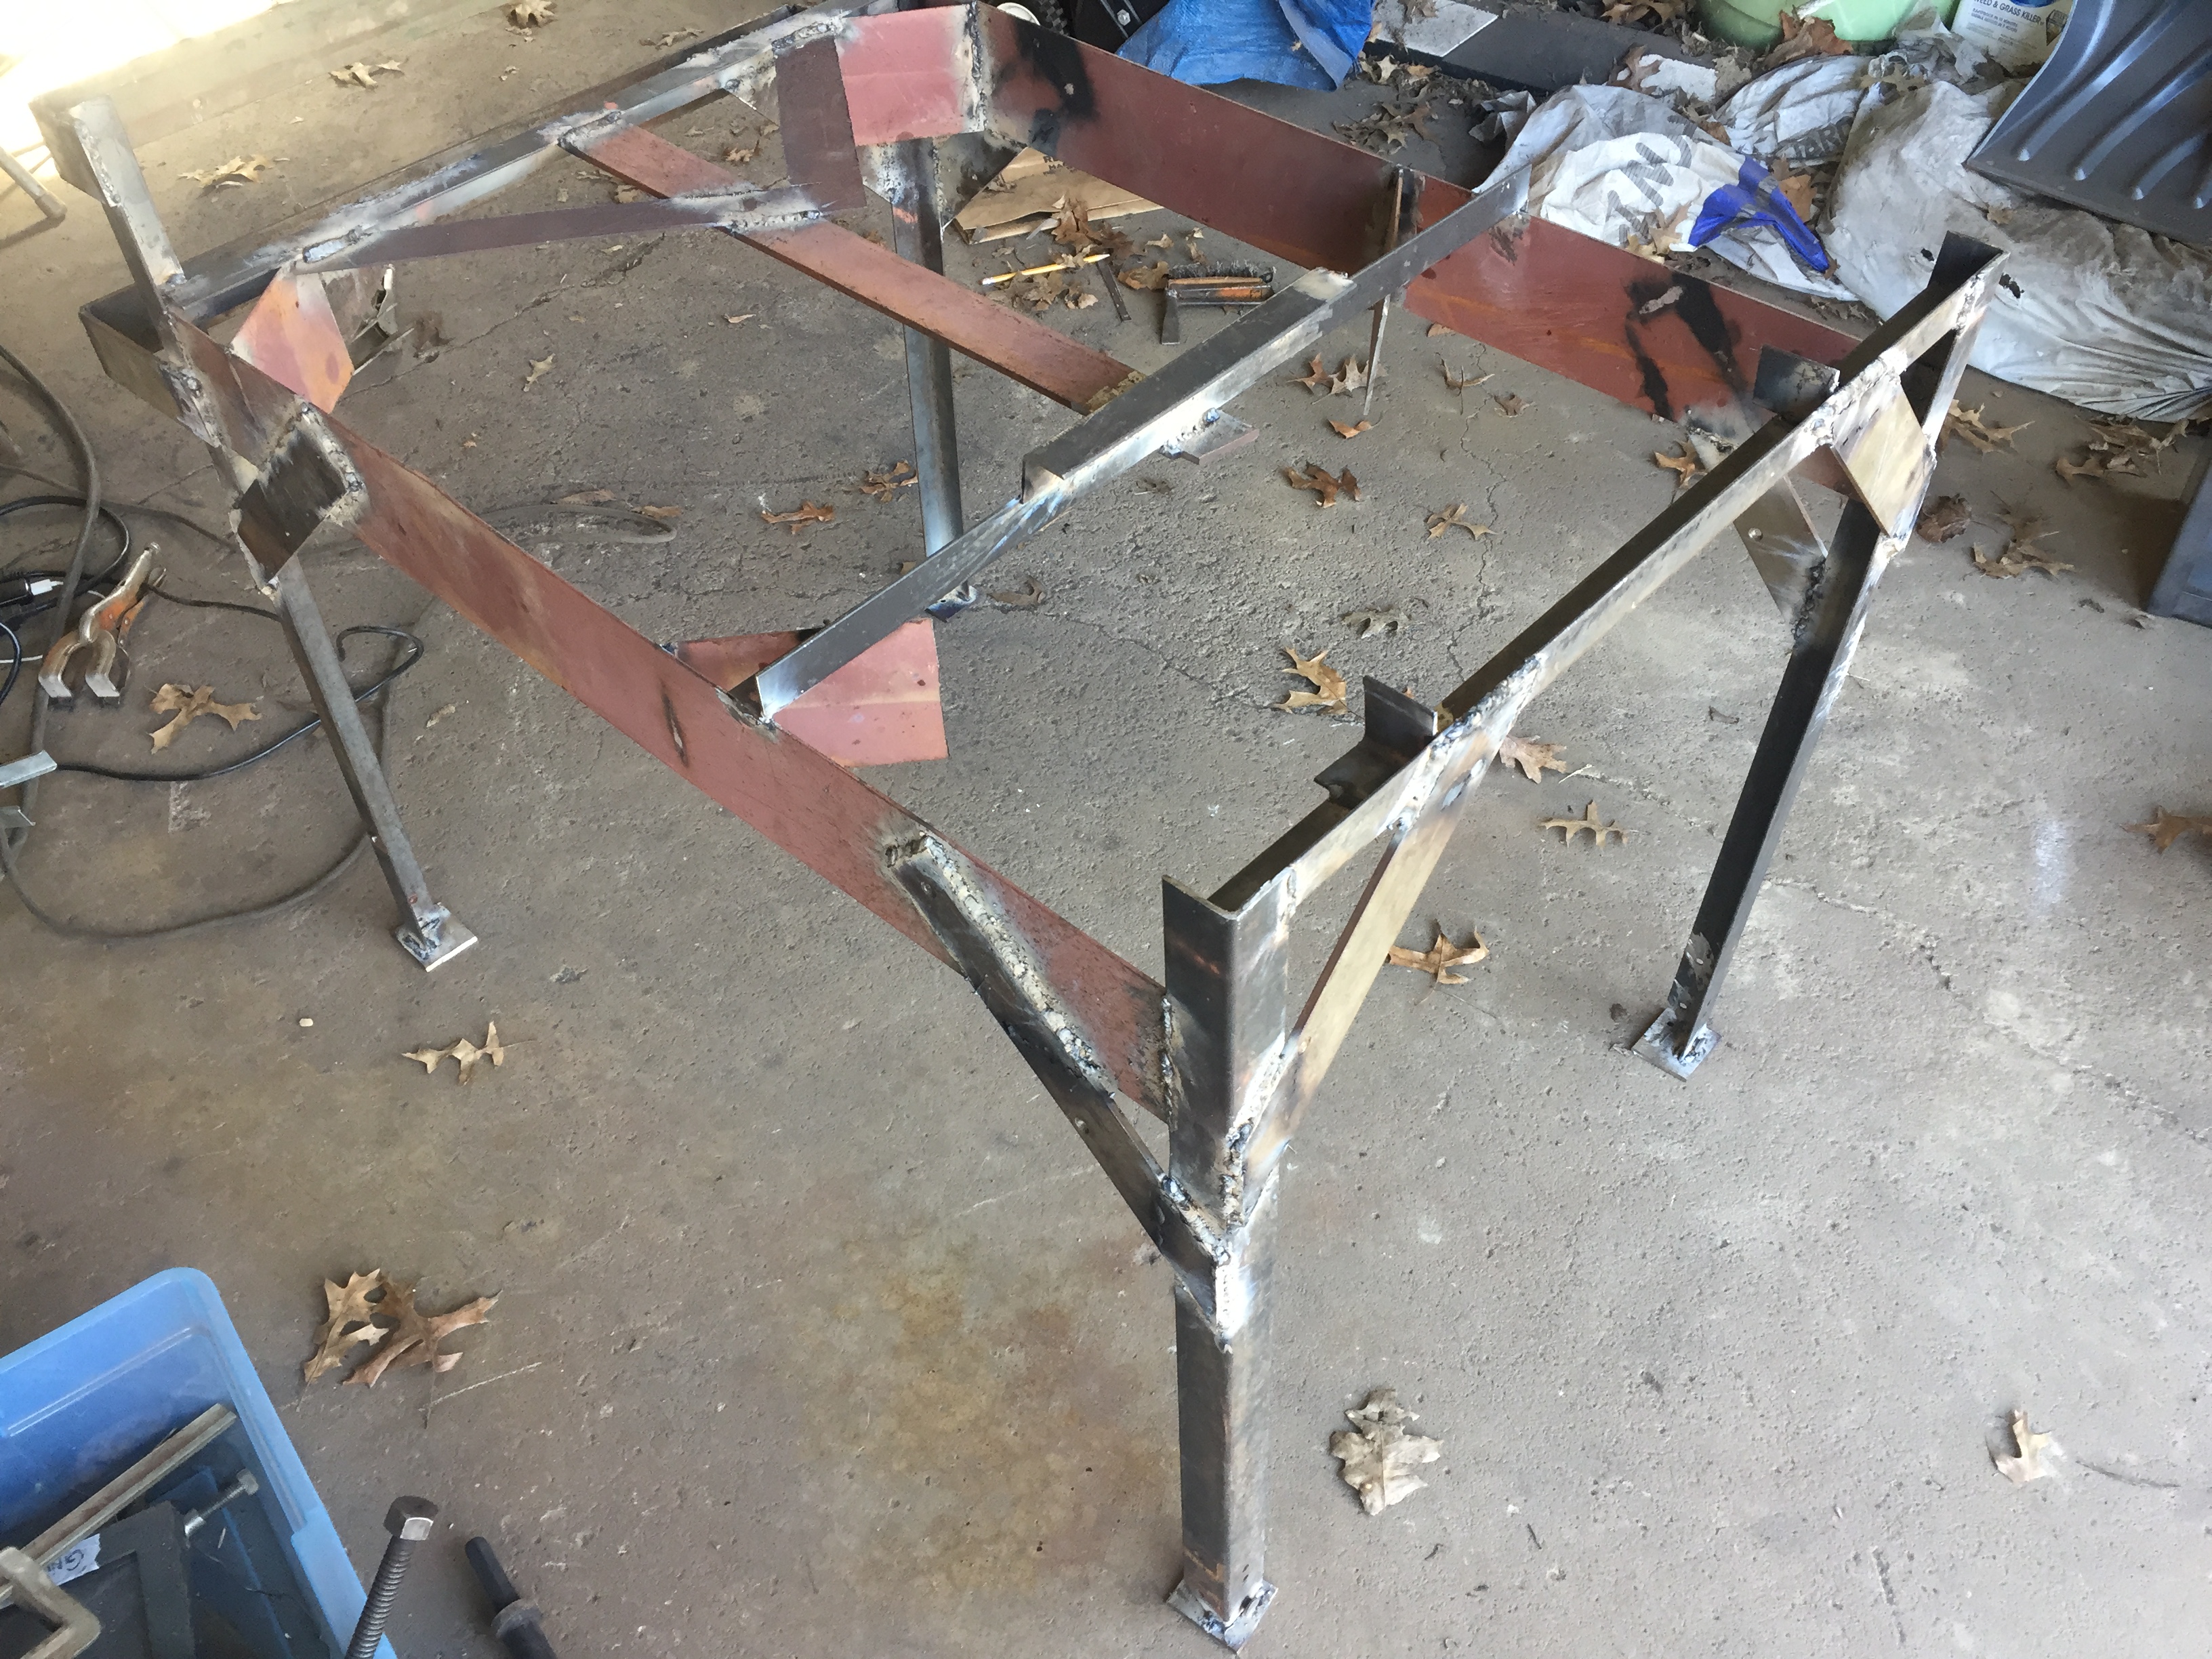
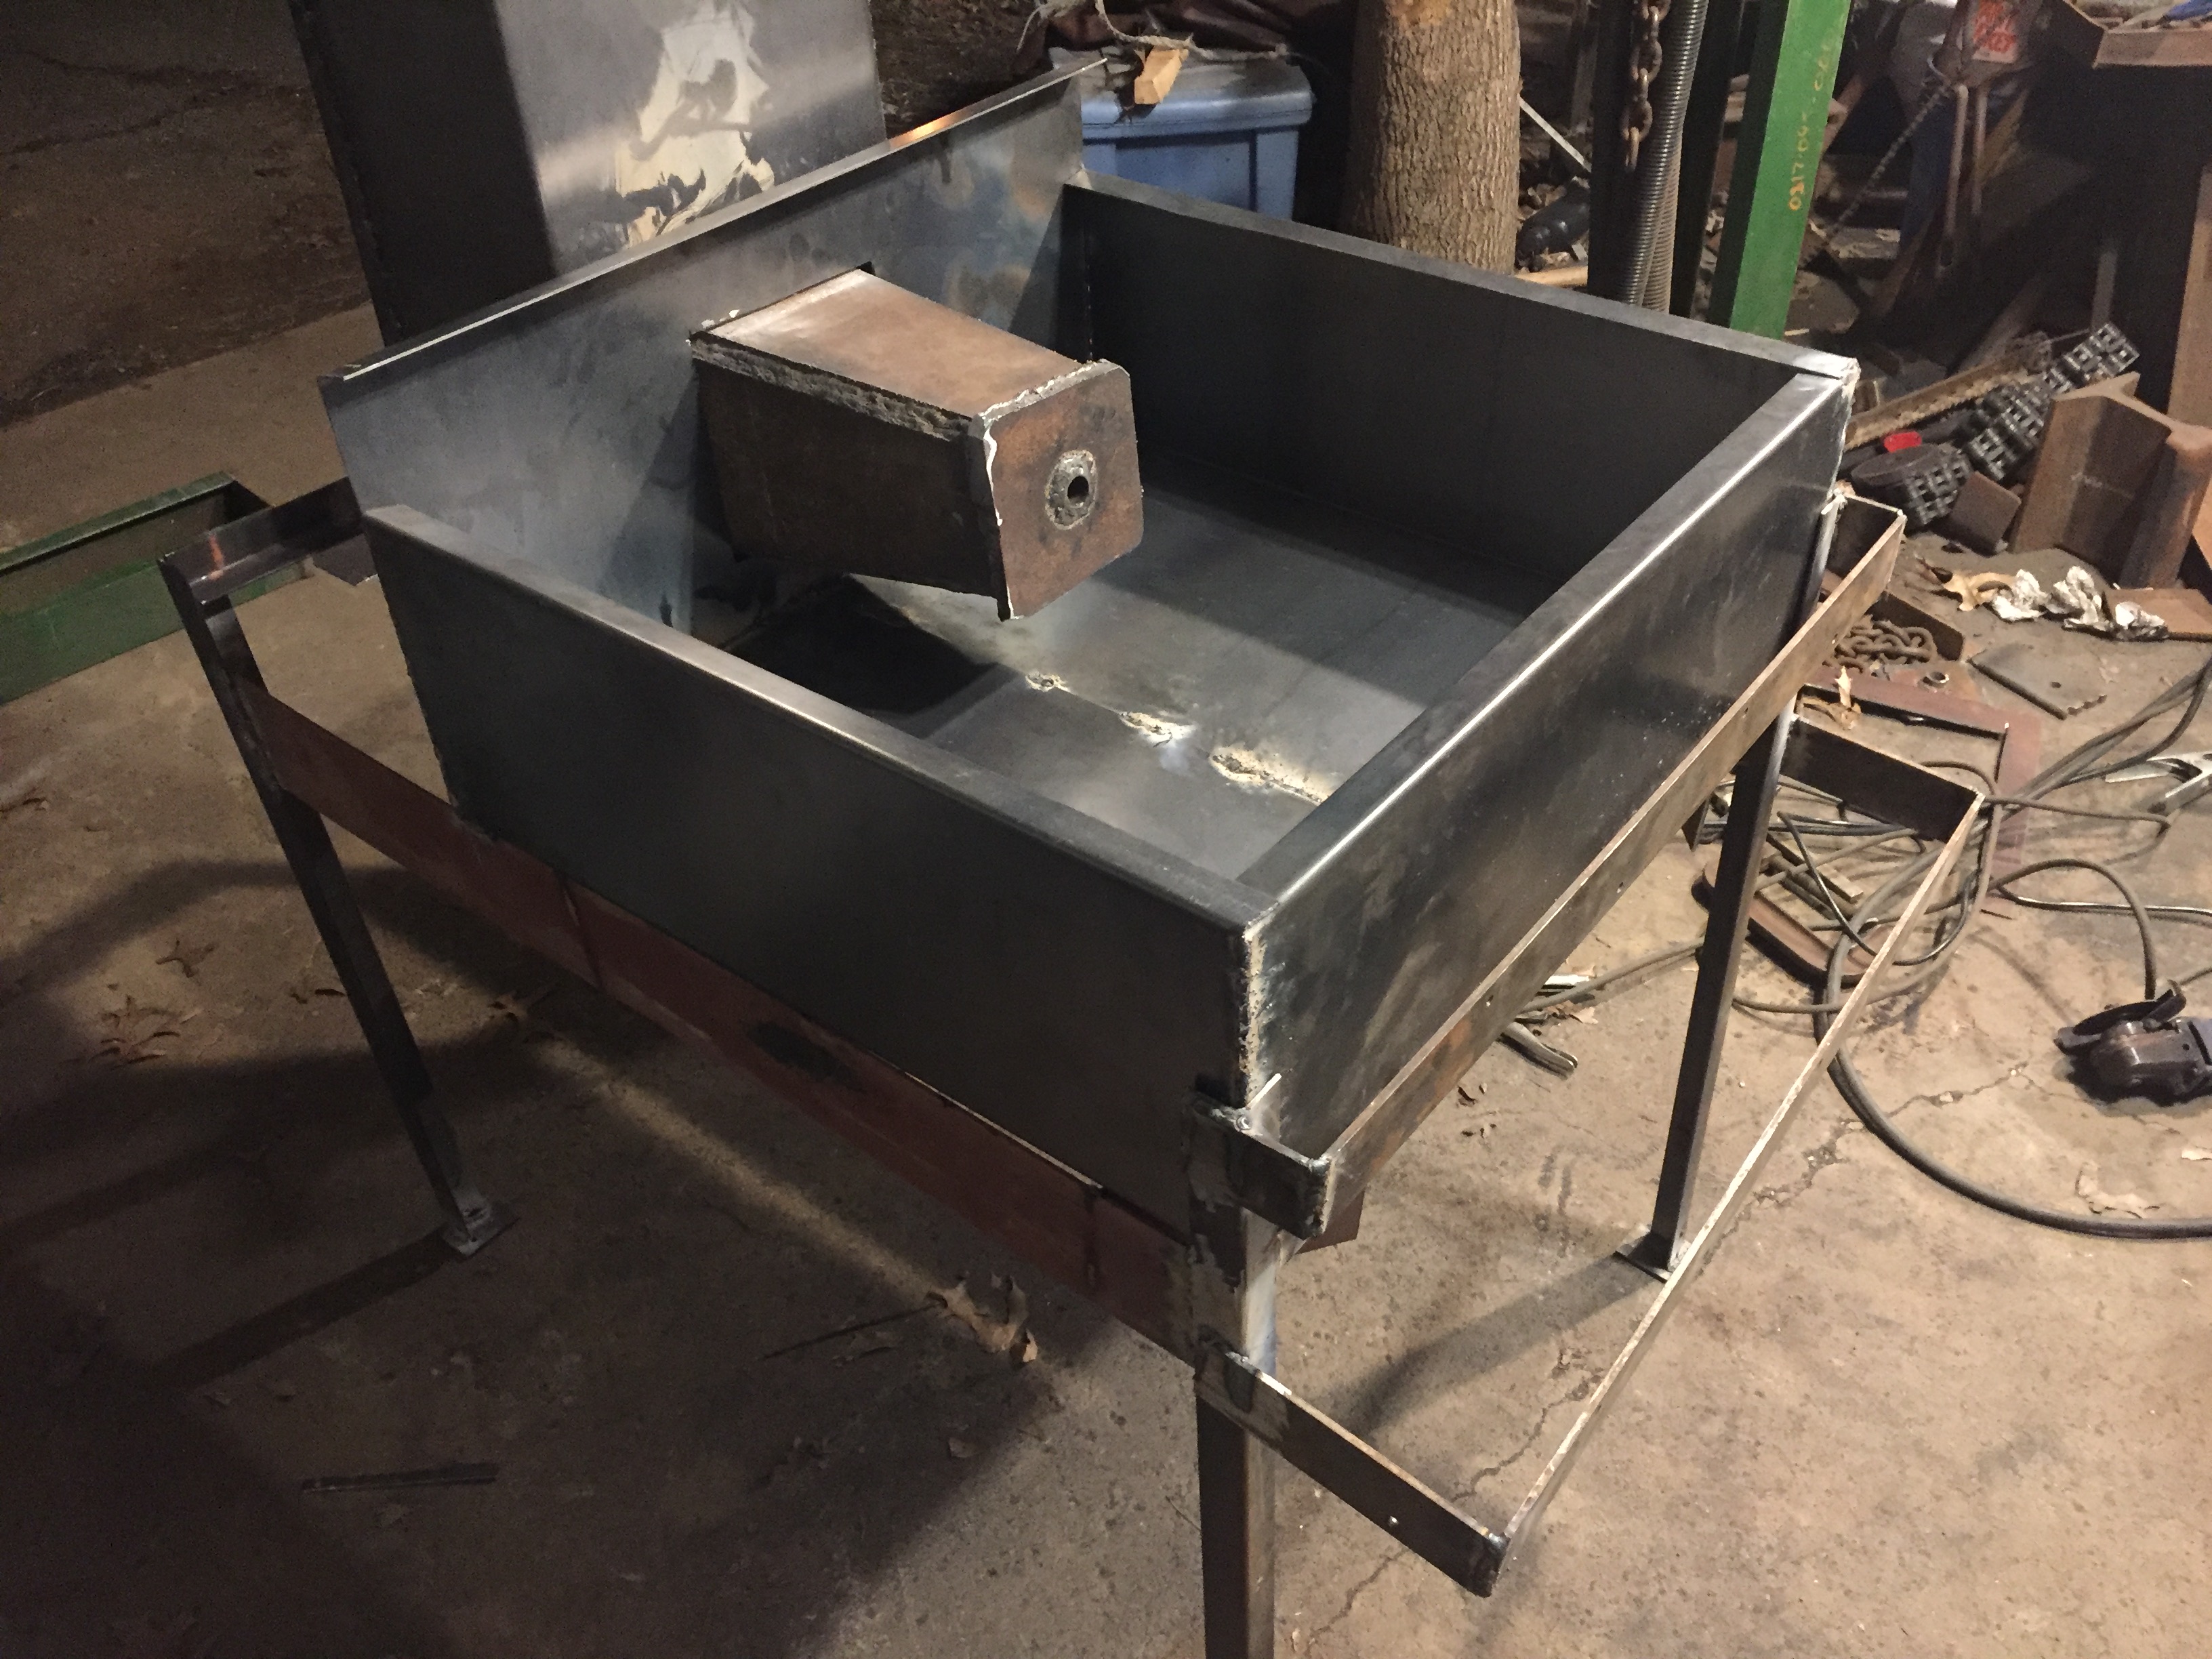
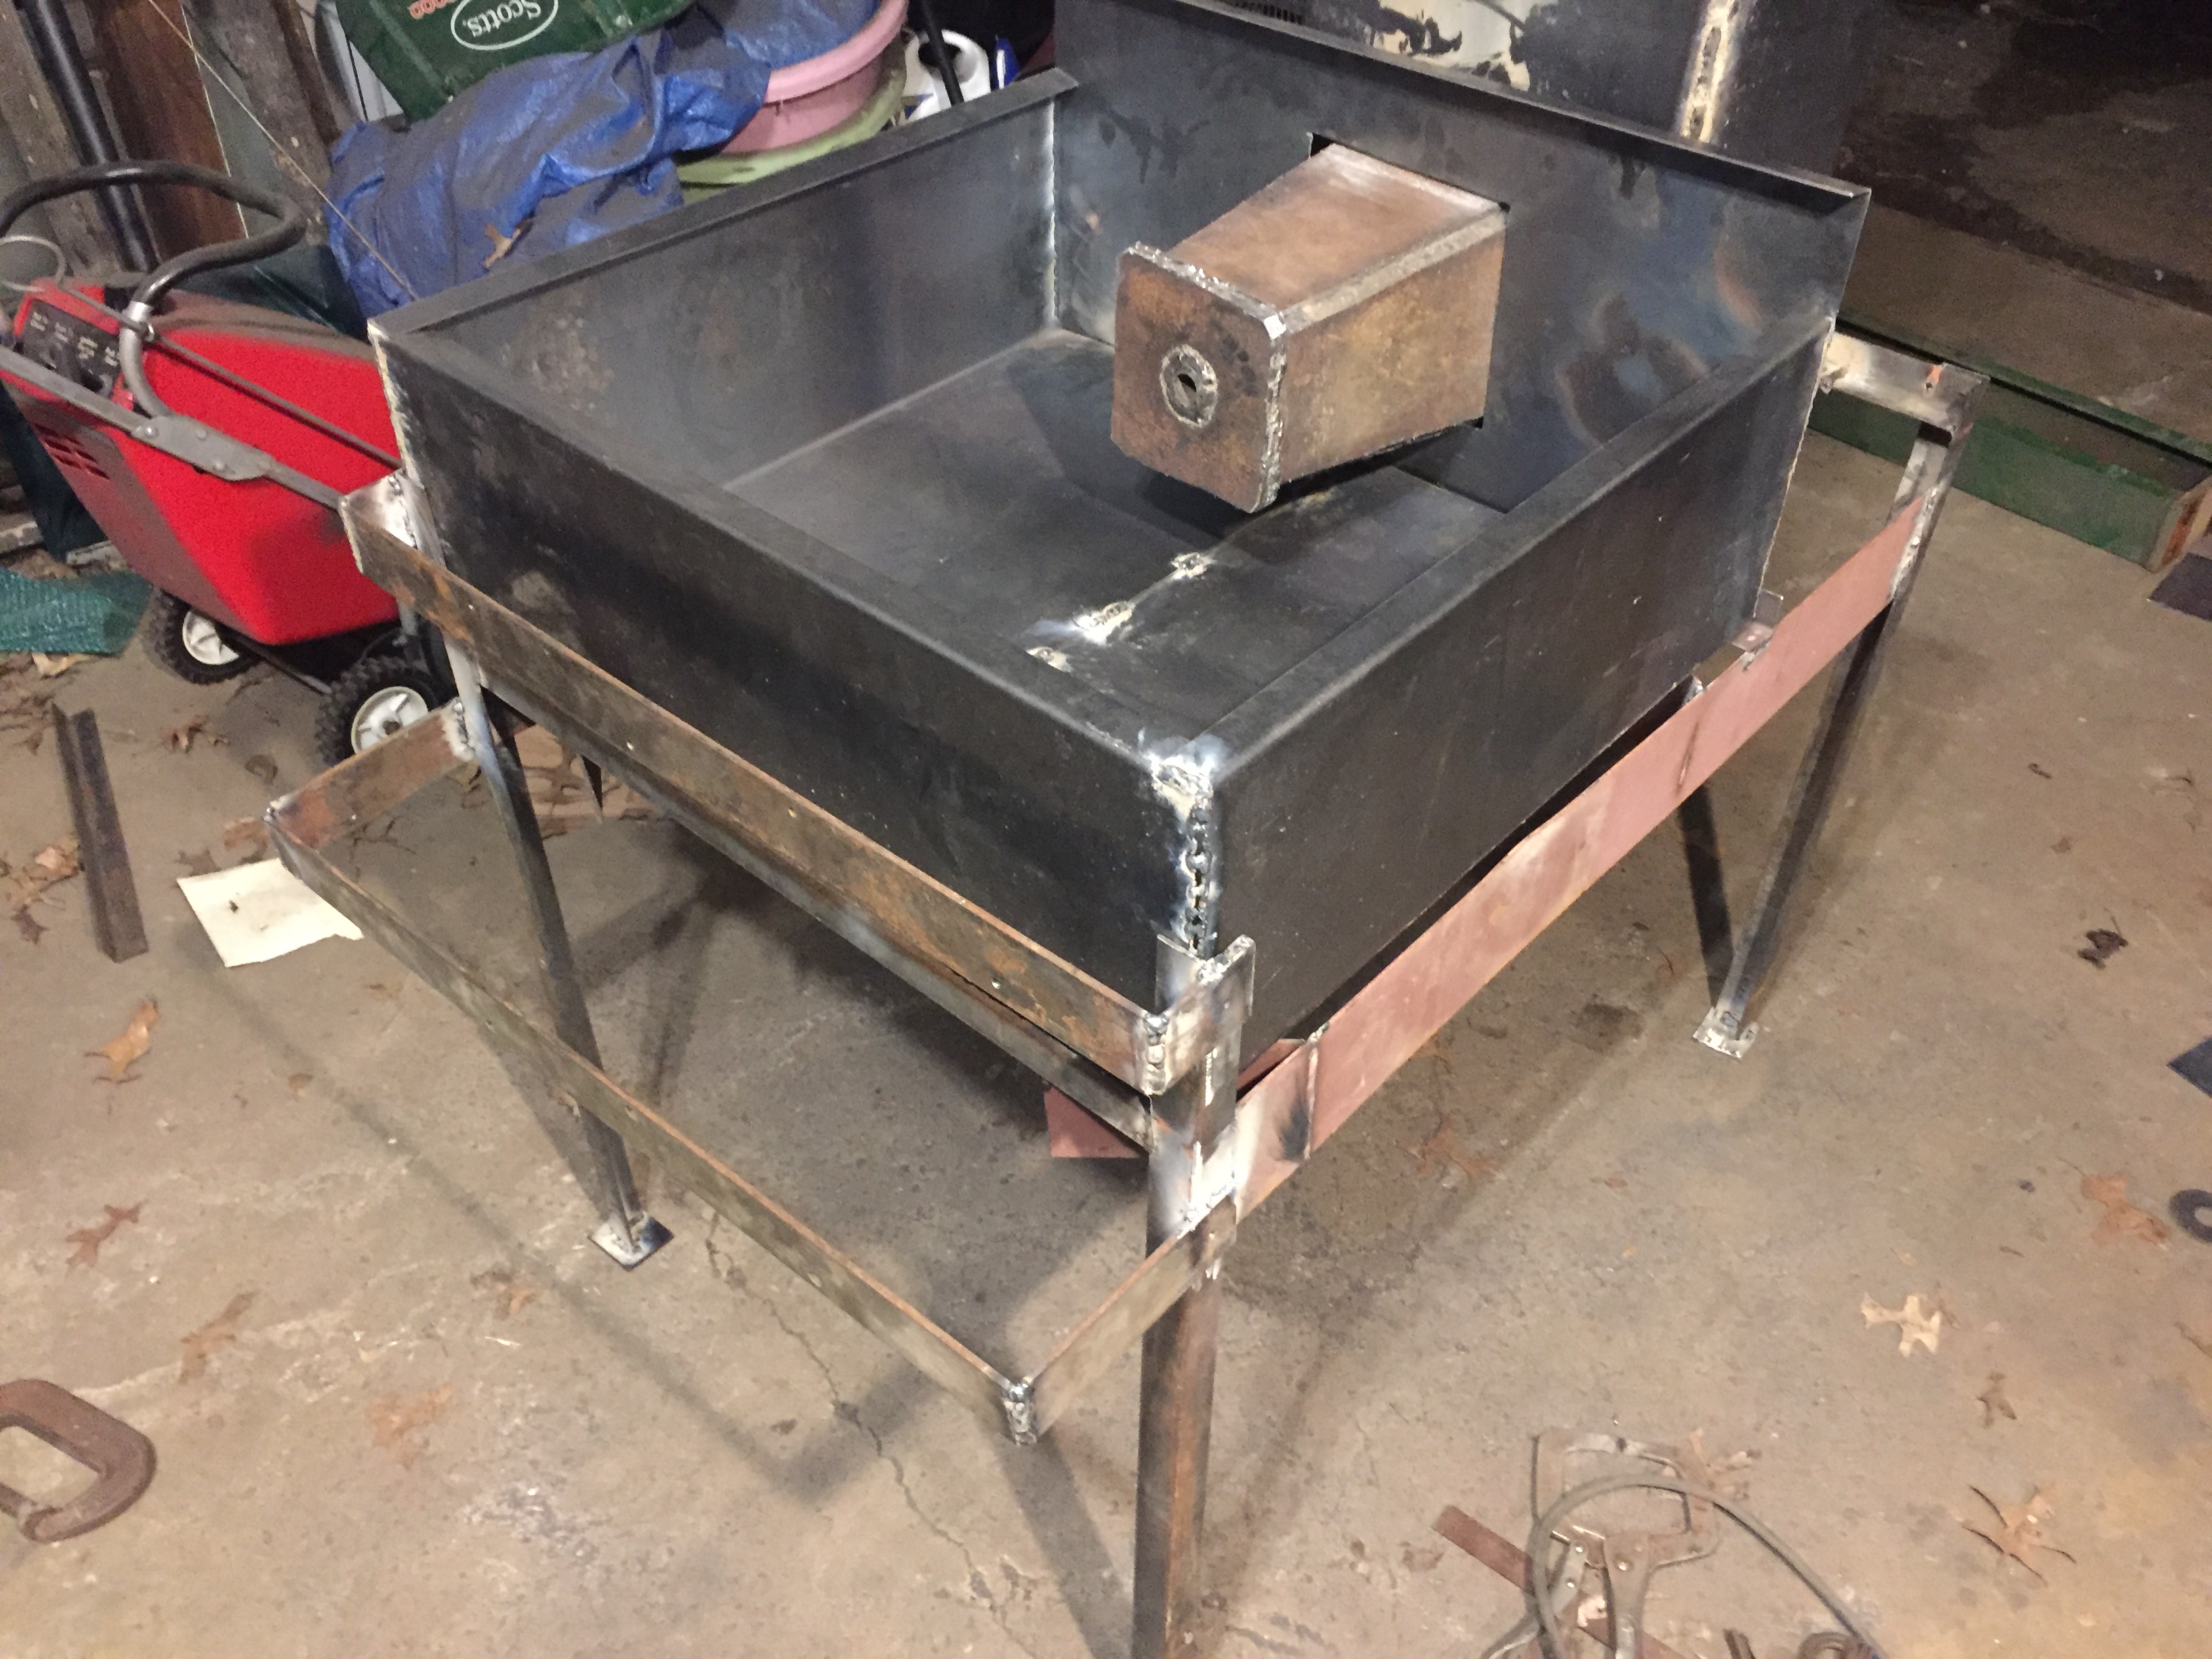
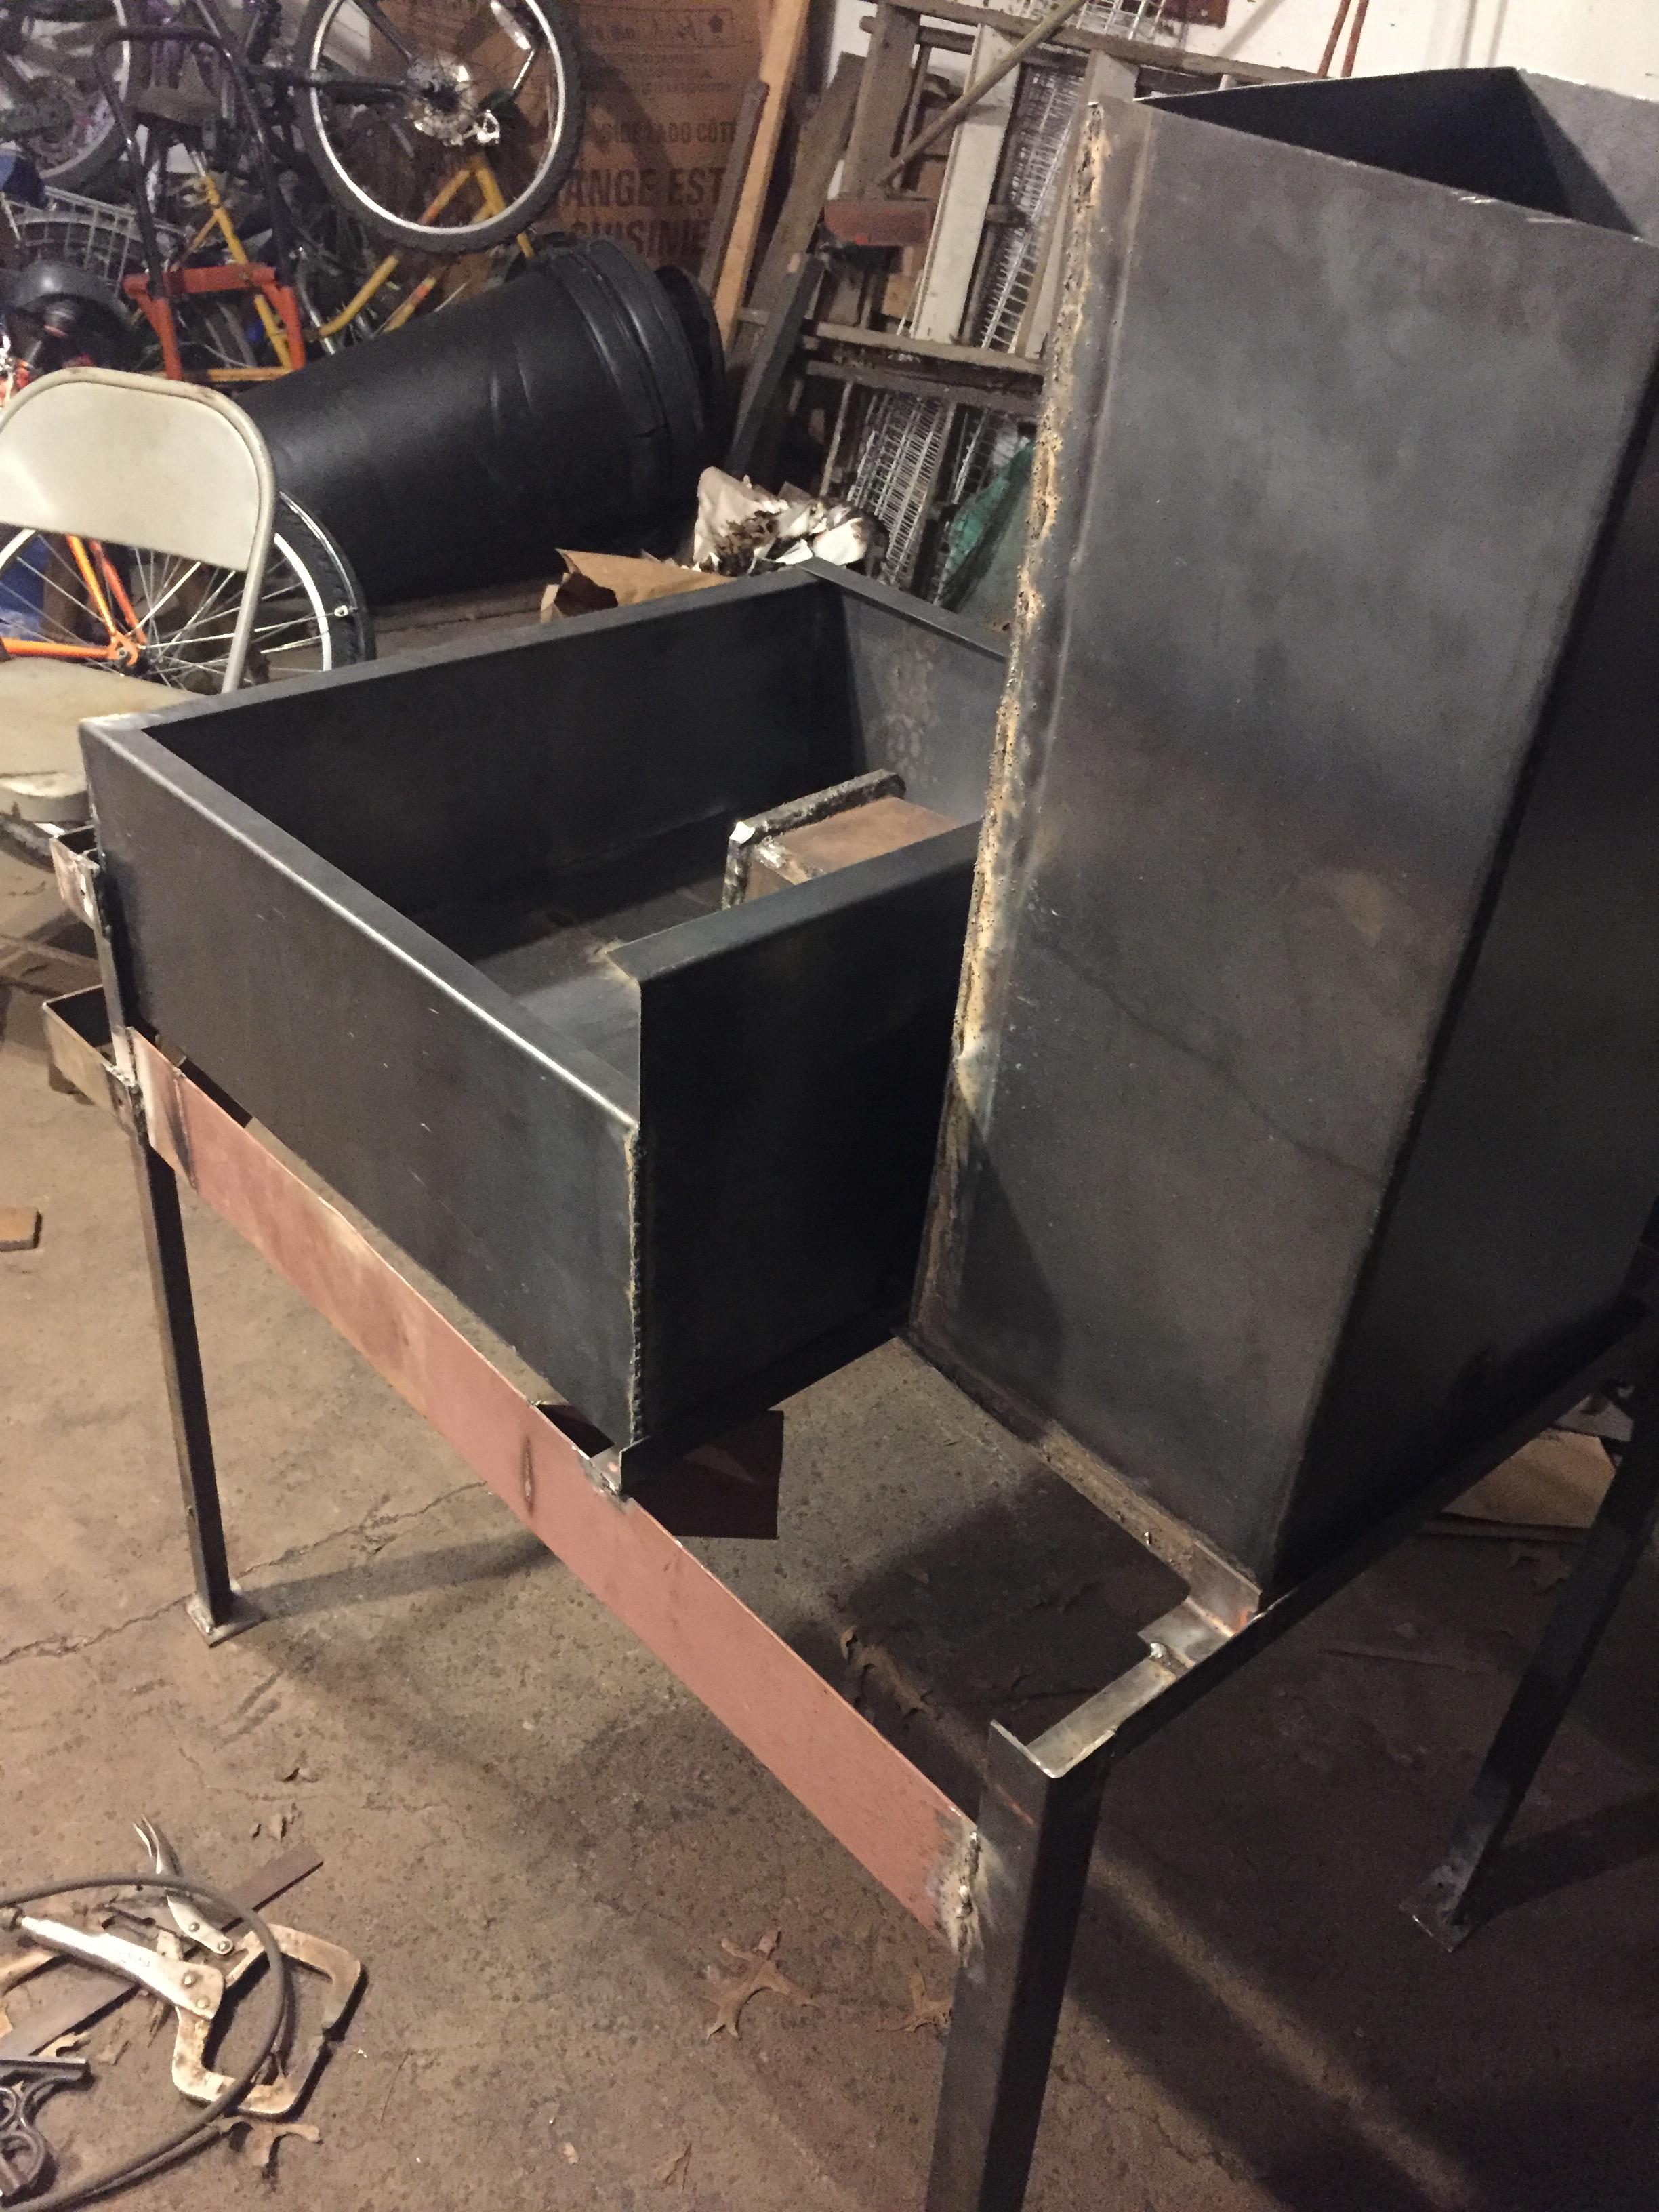
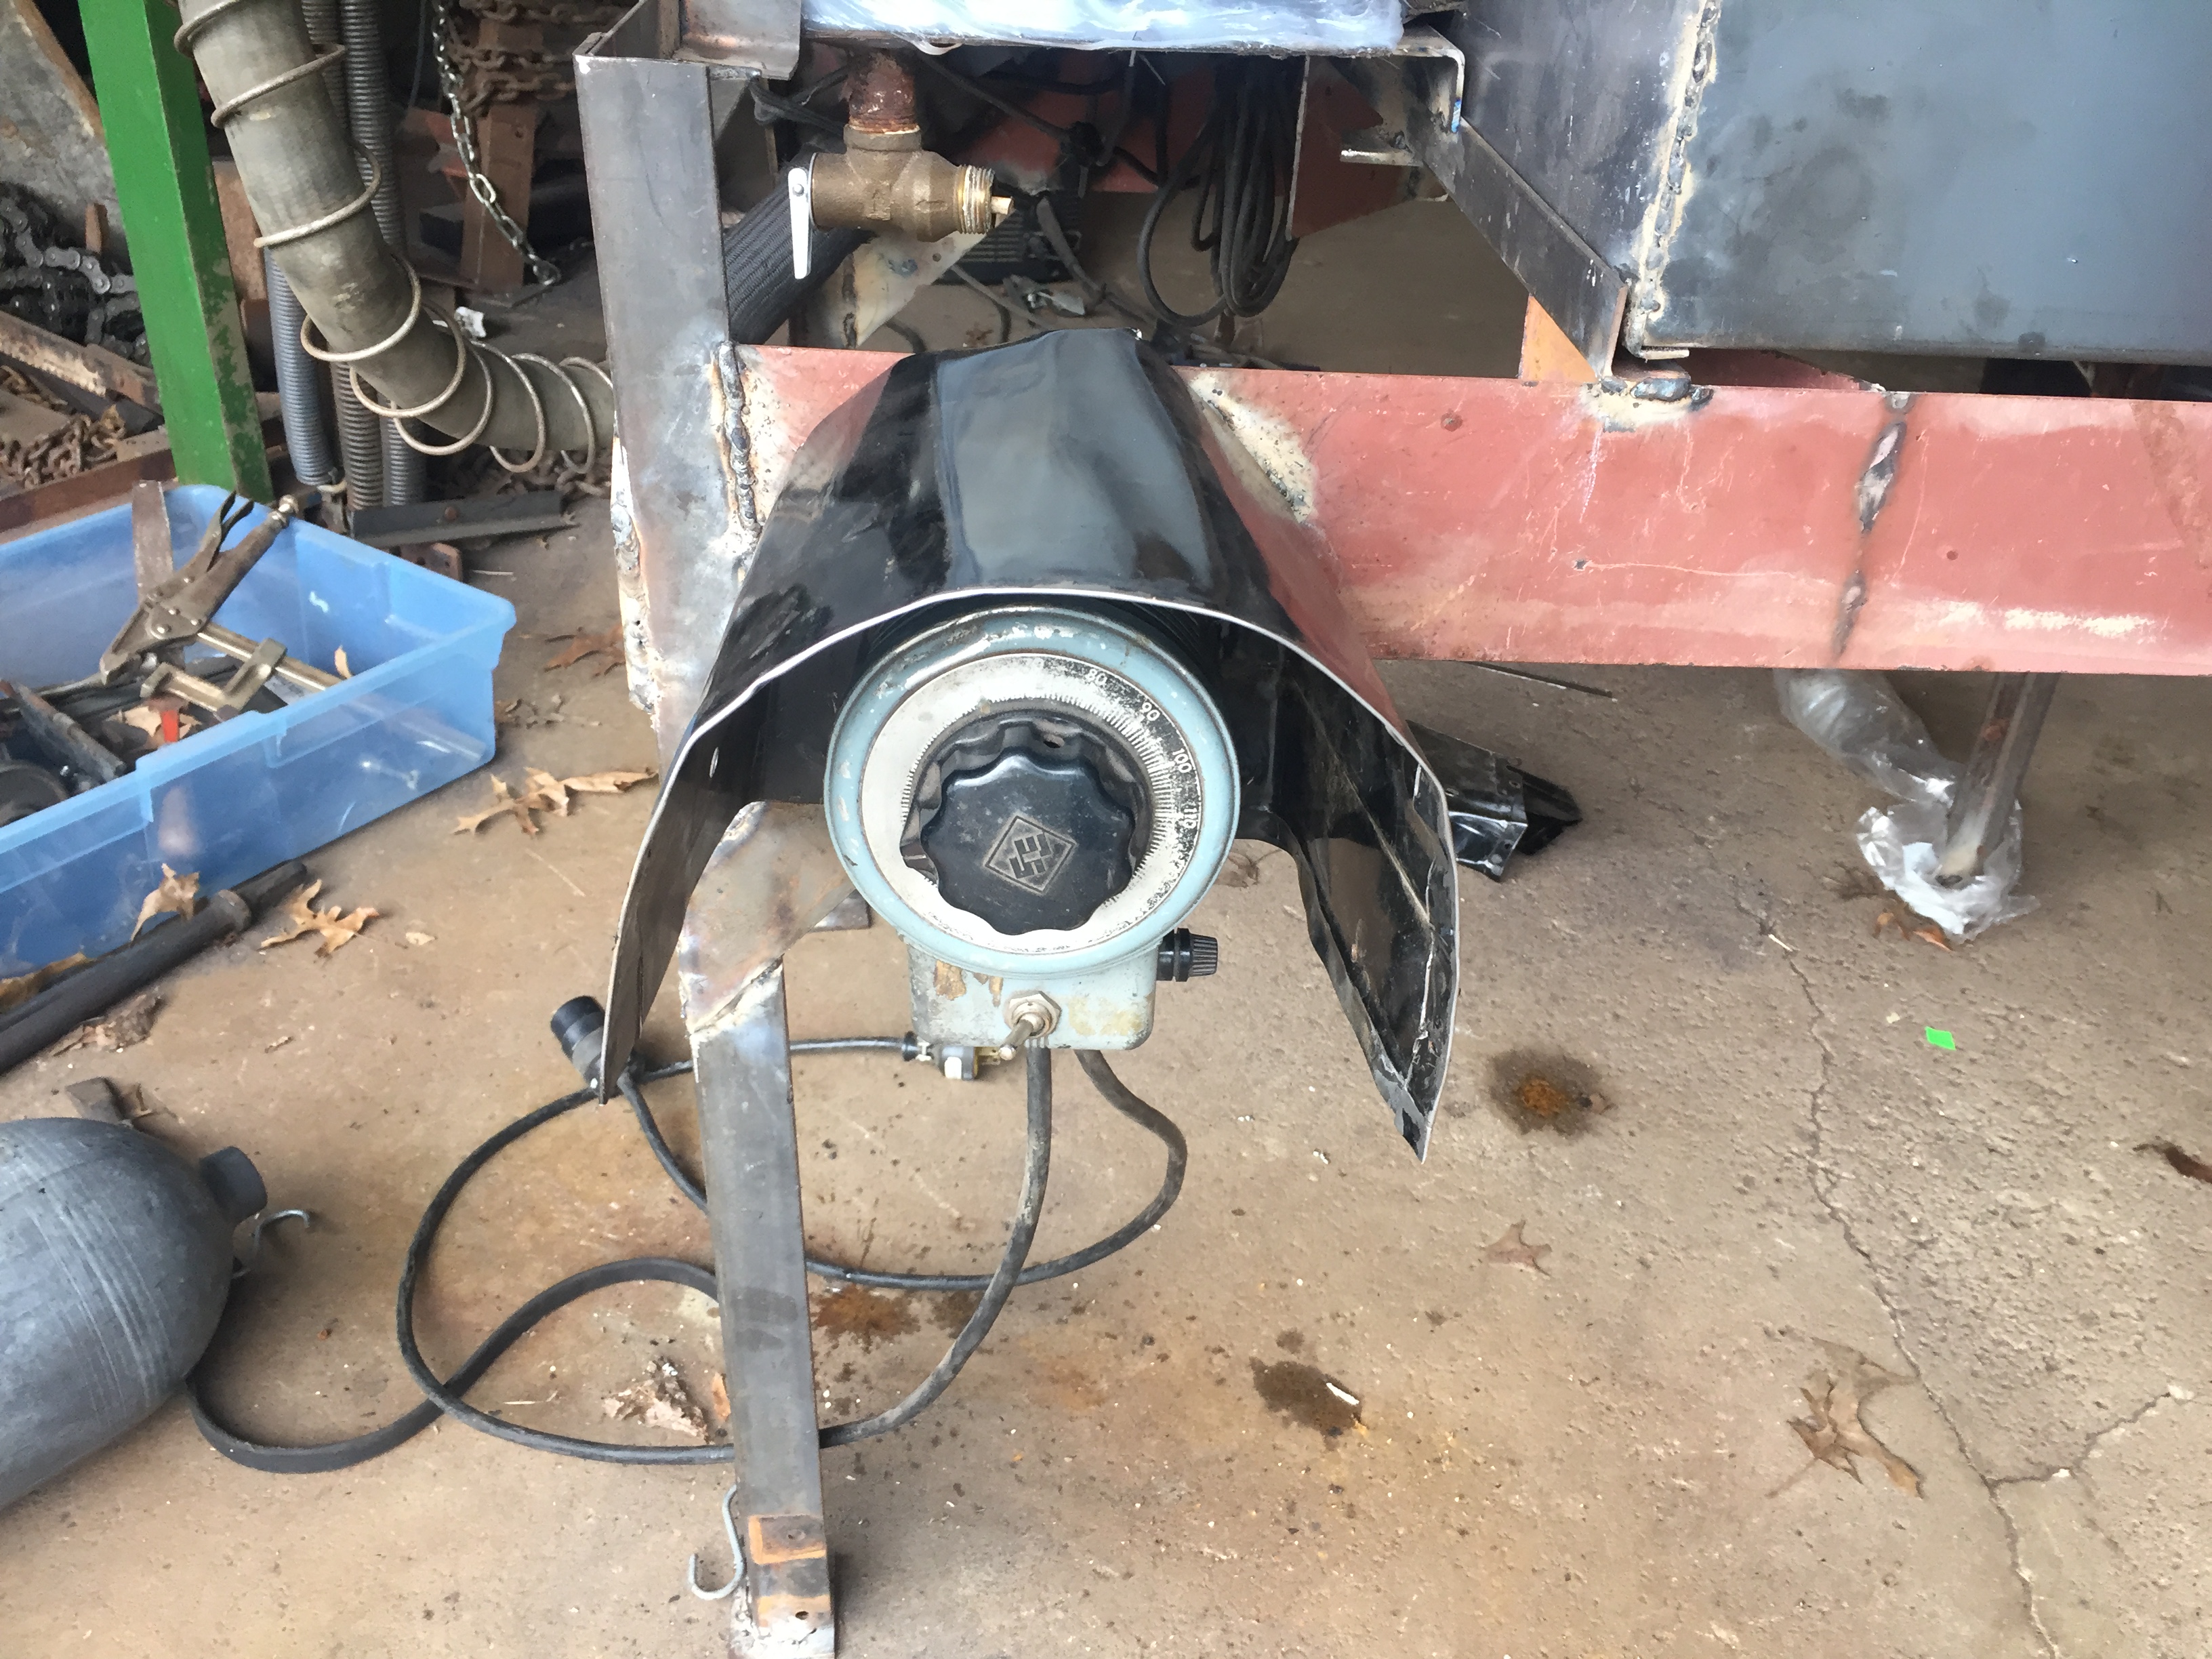
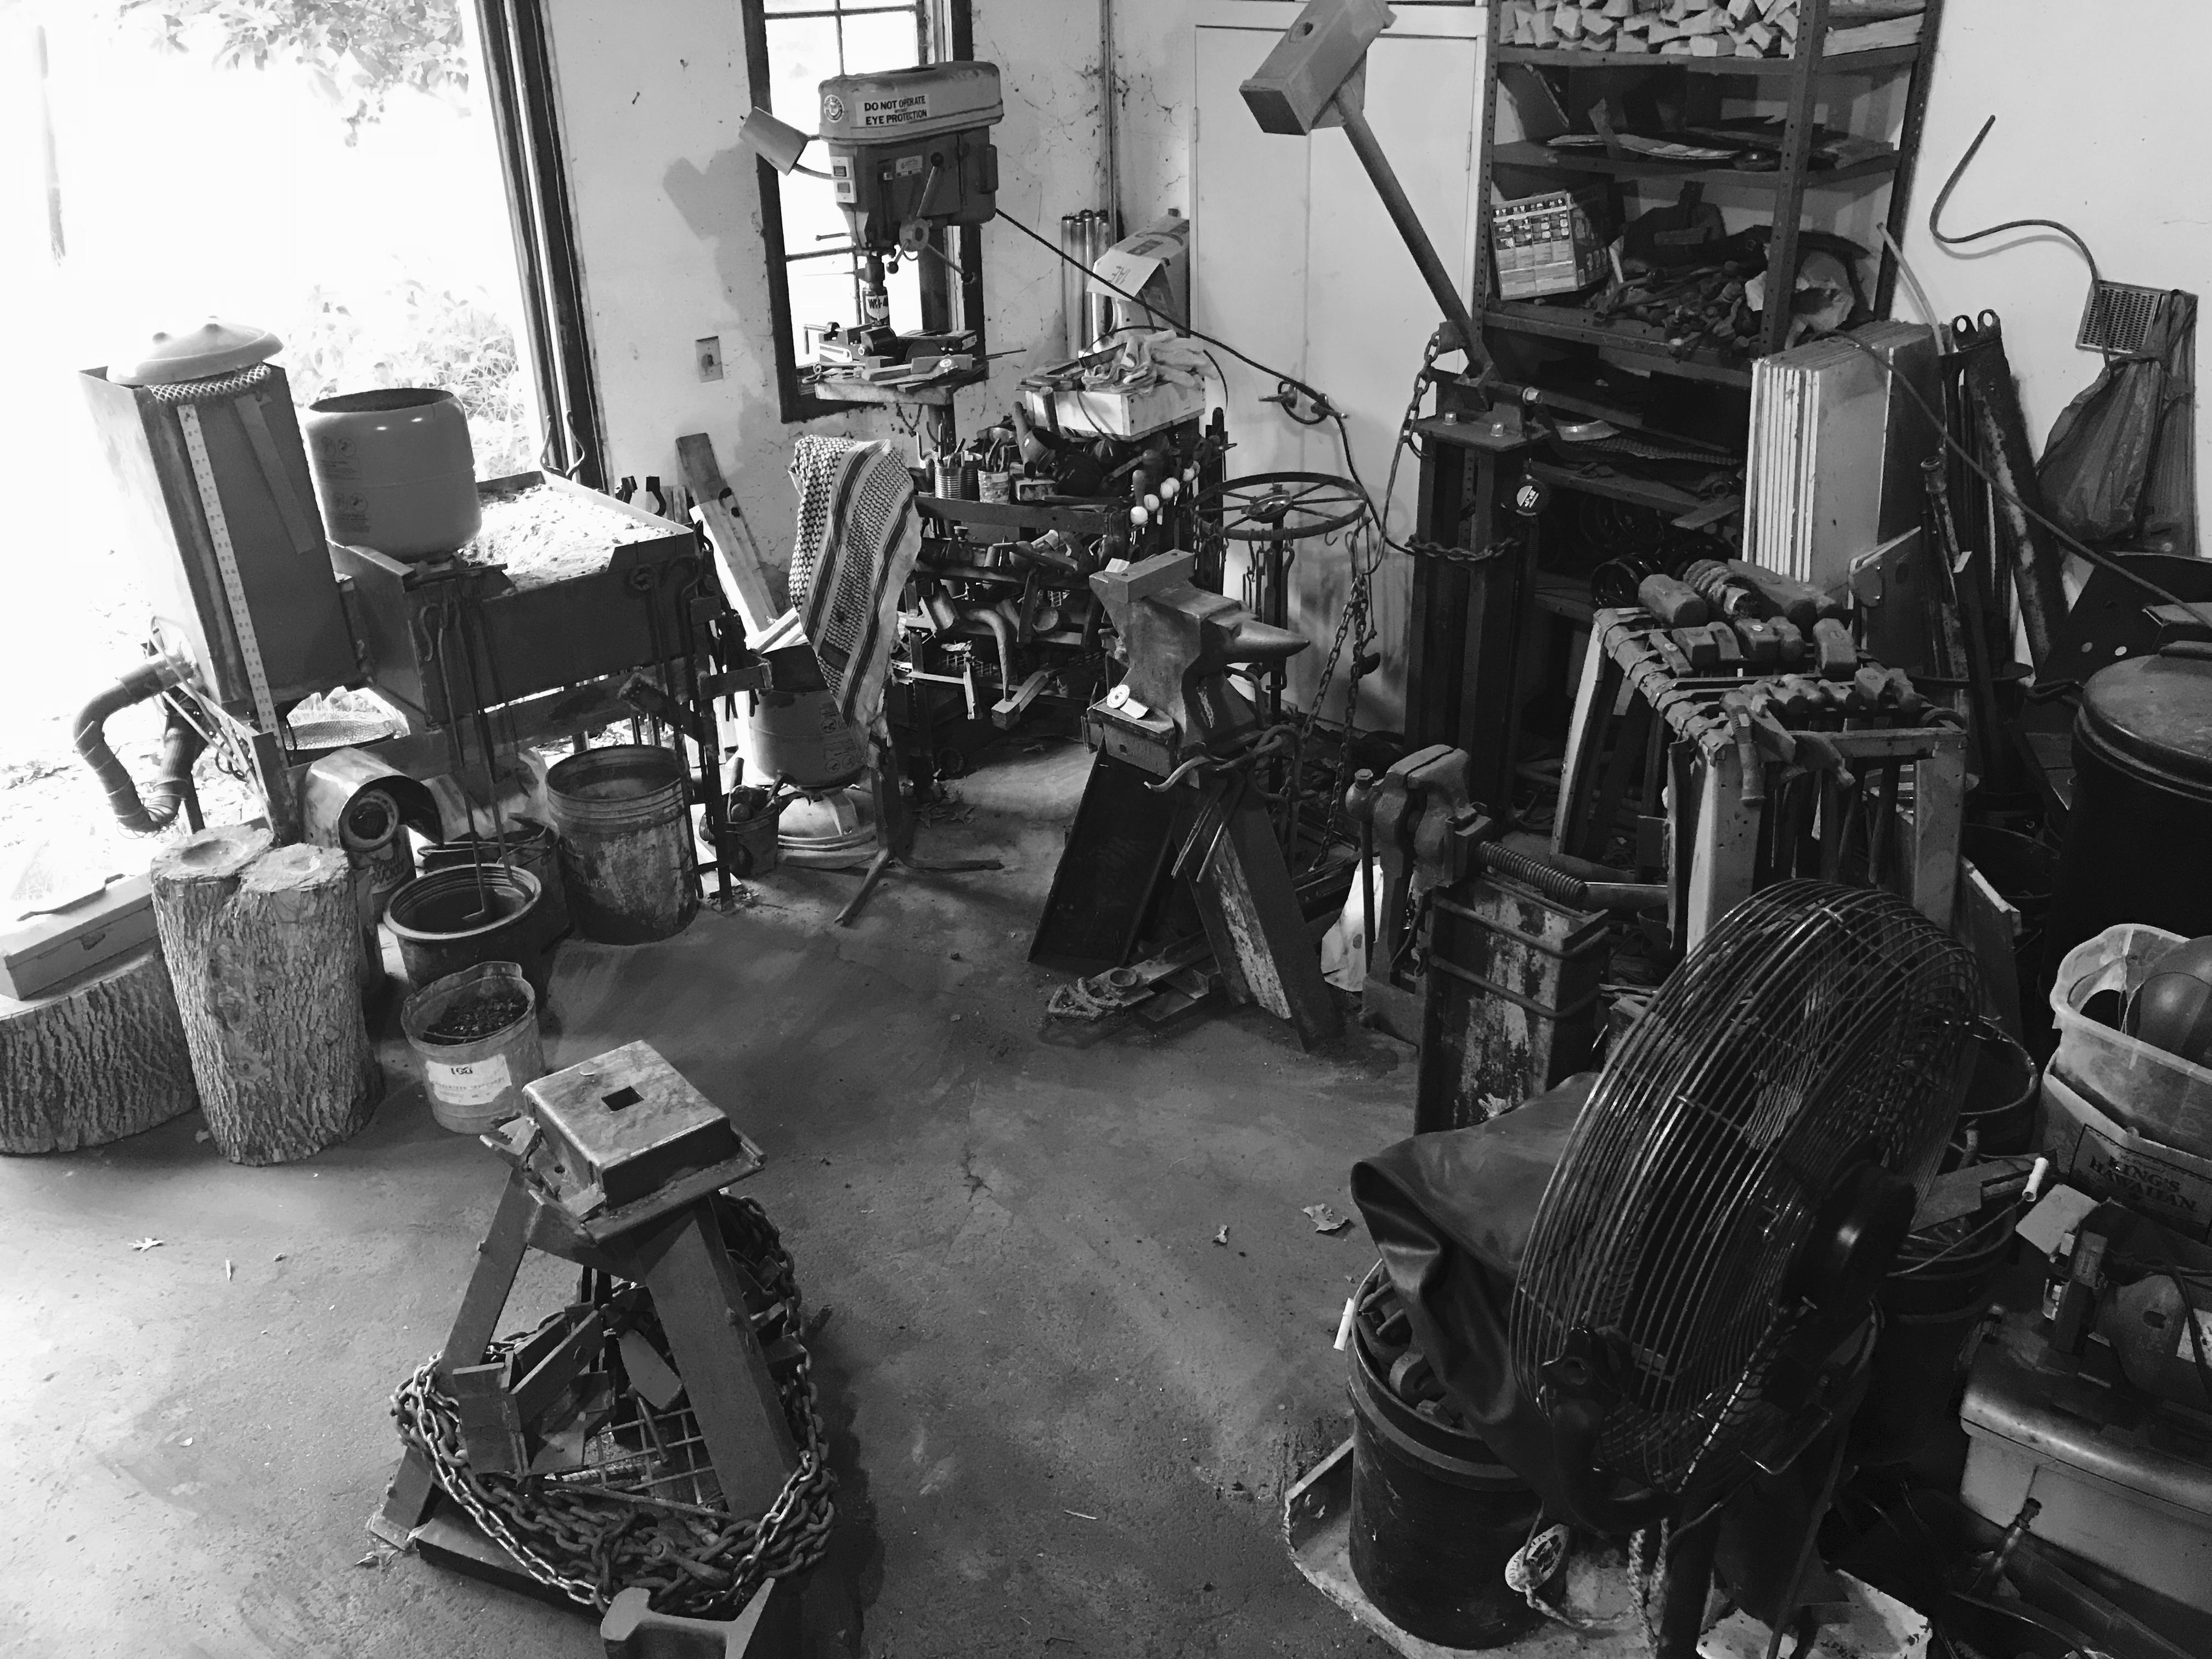
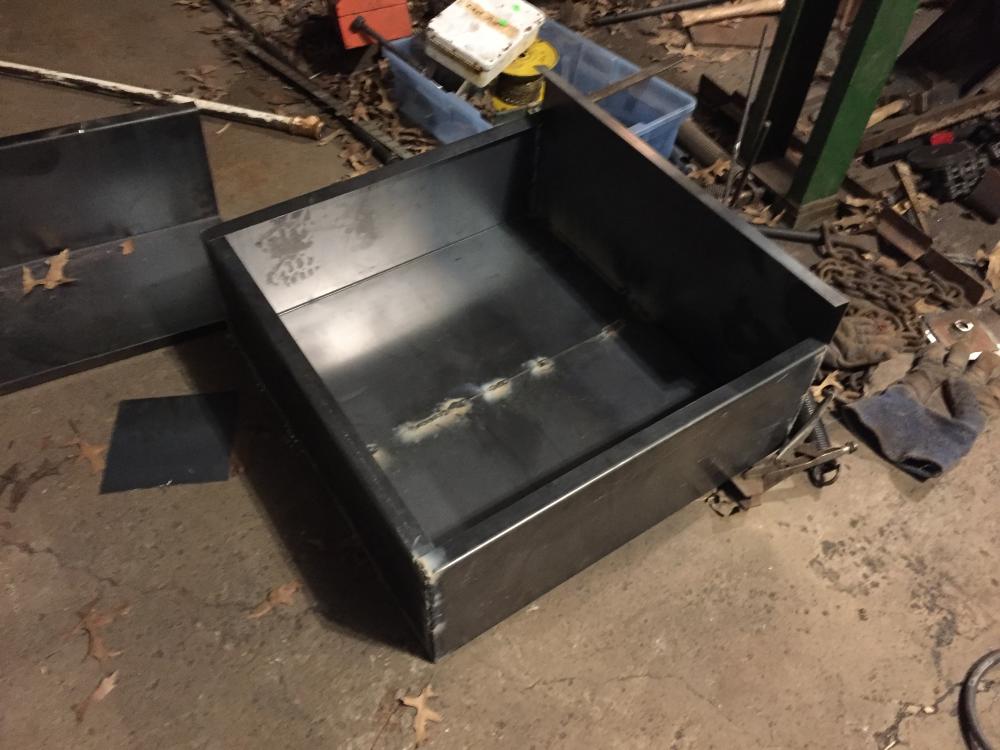
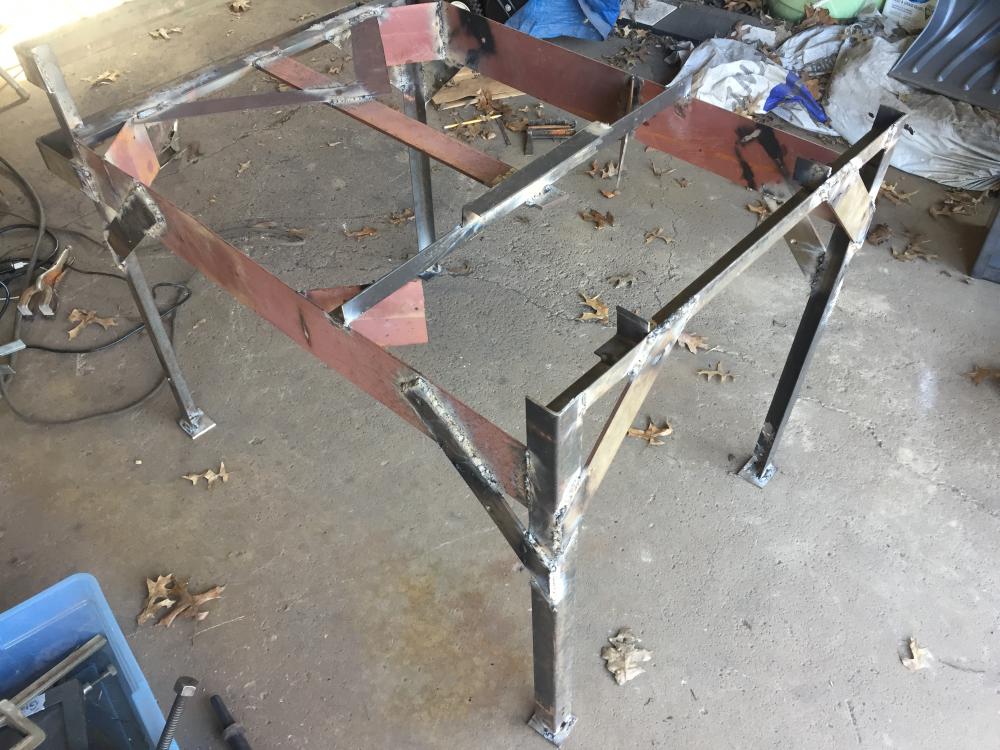
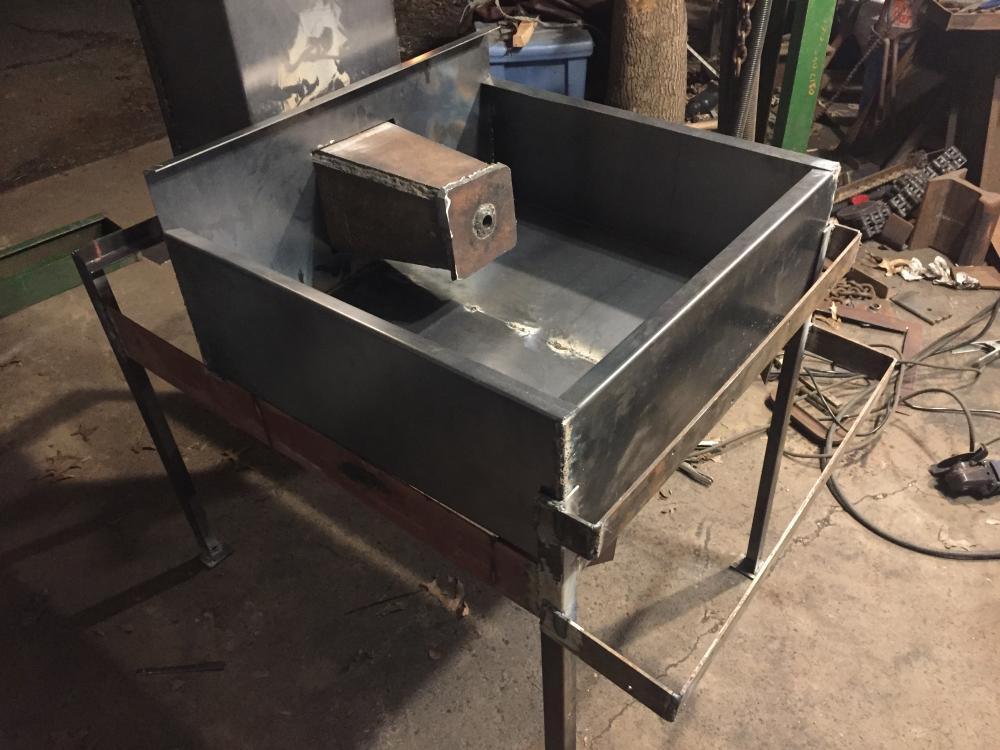
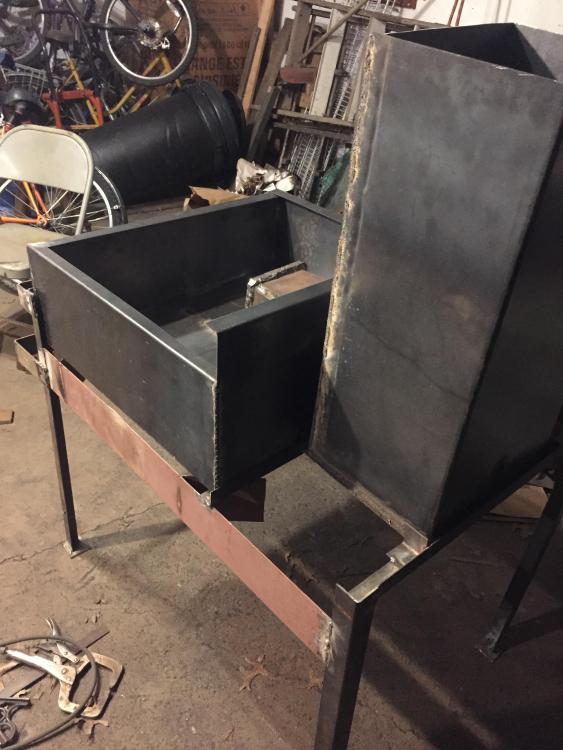
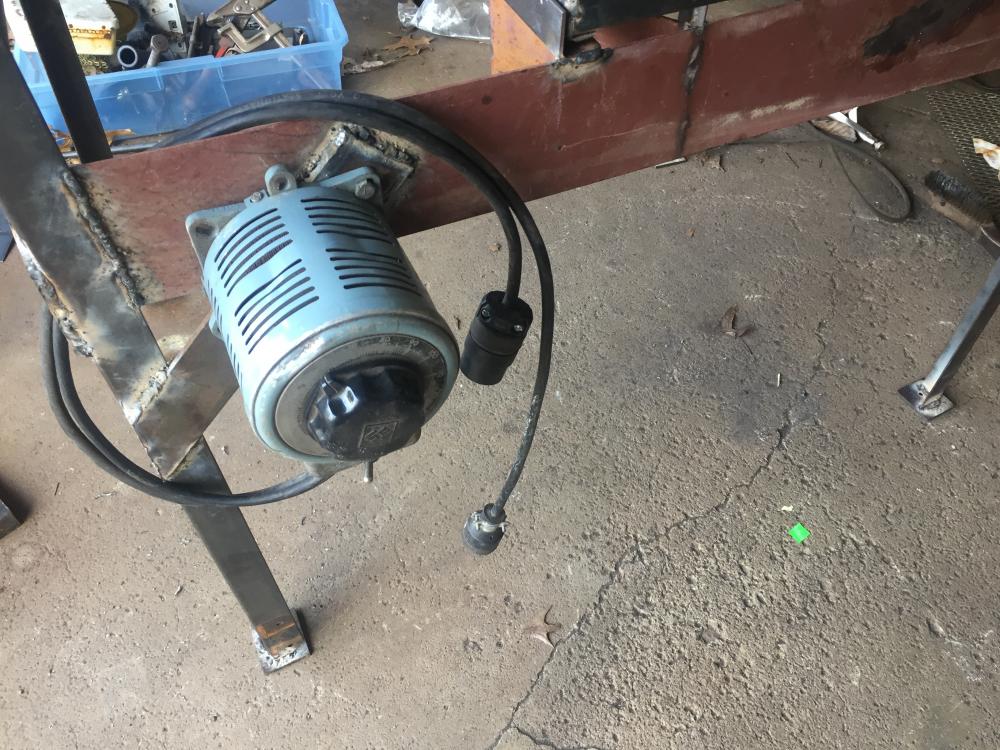
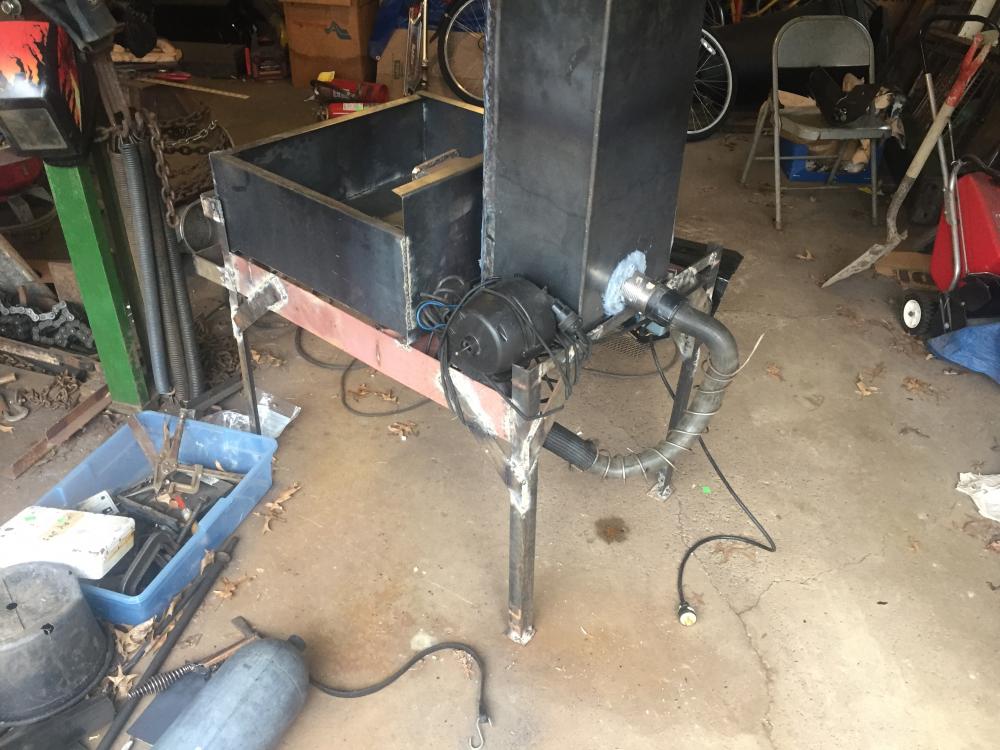
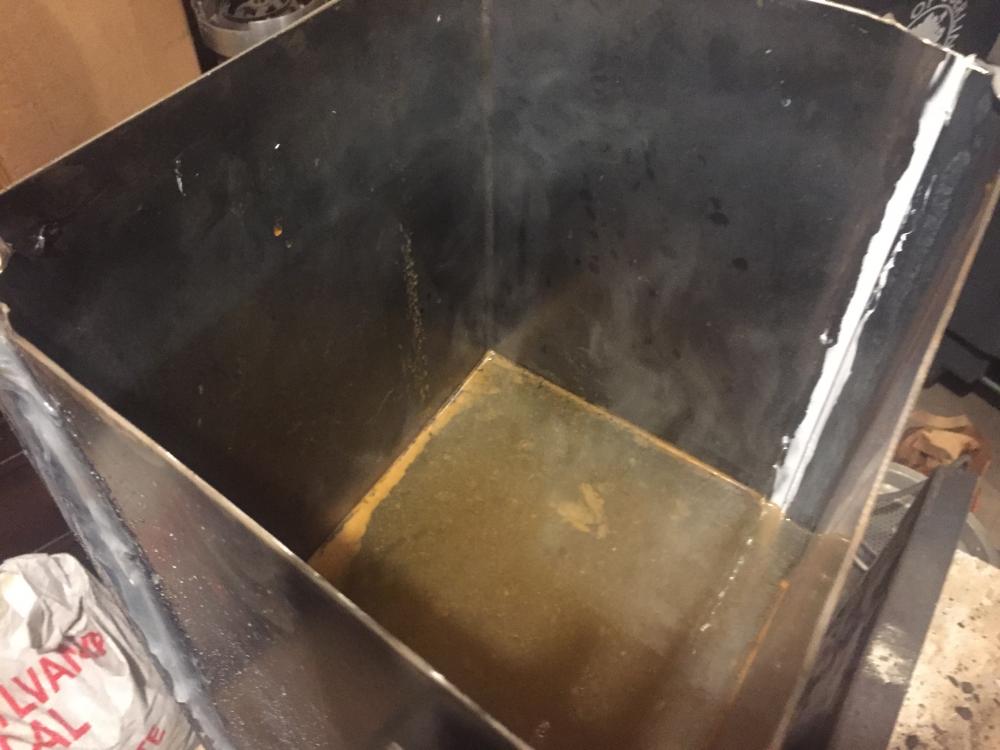
The tuyere proper is made of 1/2” plate, making a tapered box: The cap on the end is pierced by the air pipe, which is welded on both sides to prevent leaks. I spent a lot of time filling this with water, chasing down the leaks, grinding them out, and rewelding. I knew that I couldn't use any sealant on this part of the assembly, so all the joints had to be tight. Laborious, but worth it. Here’s the rear view of the tuyere, welded onto the bottom of the bosh. Note the air pipe passing down the center of the tuyere. Bosh all welded up. (This was a real learning experience. One thing I learned is that I’m not very good at welding 16 ga.) I welded on a short section of pipe to act as a drain, shown here with a cap to protect the threads. The forge pan welded up: And the frame, which is made of bed rails and random scrap. Lots of bracing, no wiggle-wiggle. Bosh and pan in place. Note the integral tong rack: Another view: Rear view: Air intake from the old JABOD. The cap on the bosh drain has been replaced with a salvaged pressure release valve from a water heater. This was also where I started to go a bit crazy with the silicone caulk, as the welds of the bosh had a bunch of leaks that I didn't want to bother chasing down. The silicone is rated to 400°F, and I knew that the bosh would never get above 212°F unless it boiled completely dry. A variac (variable transformer) to control the speed of the blower): Rear view with blower (stripped-down vacuum cleaner) and its connection (radiator hose): Added a shroud over the variac to keep off scale and dust: Put in place and filled with sand: FIRE!!! All in all, I’m very happy.


-
Admin guy and Frosty: there’s an apostrophe in Ma’am.
-
Progress!
-
The build for this has been documented piecemeal on the “What did you do in the shop today” thread, but I thought I’d put all the photos together in one place.
-
What did you do in the shop today?
JHCC replied to Mark Ling's topic in Blacksmithing, General Discussion
Well, I did get into the shop for a few hours, and the new forge is everything I could have wanted and more. Cleaning out the clinker is a breeze (see what I did there?), and the airflow is perfect. Made a new fire rake, finished up a bottle opener for a friend, and made a hammer I’ve been planning for a while (currently annealing in the hot box; pictures to come). So here it is! Steam! There is one tiny leak, and that’s in the drain valve. It’s a salvaged pressure release from an old water heater, and I suspect it may require more pressure to keep it fully sealed. There’s a bucket under it for now, and I’ll replace it if it becomes an issue.
-
What did you do in the shop today?
JHCC replied to Mark Ling's topic in Blacksmithing, General Discussion
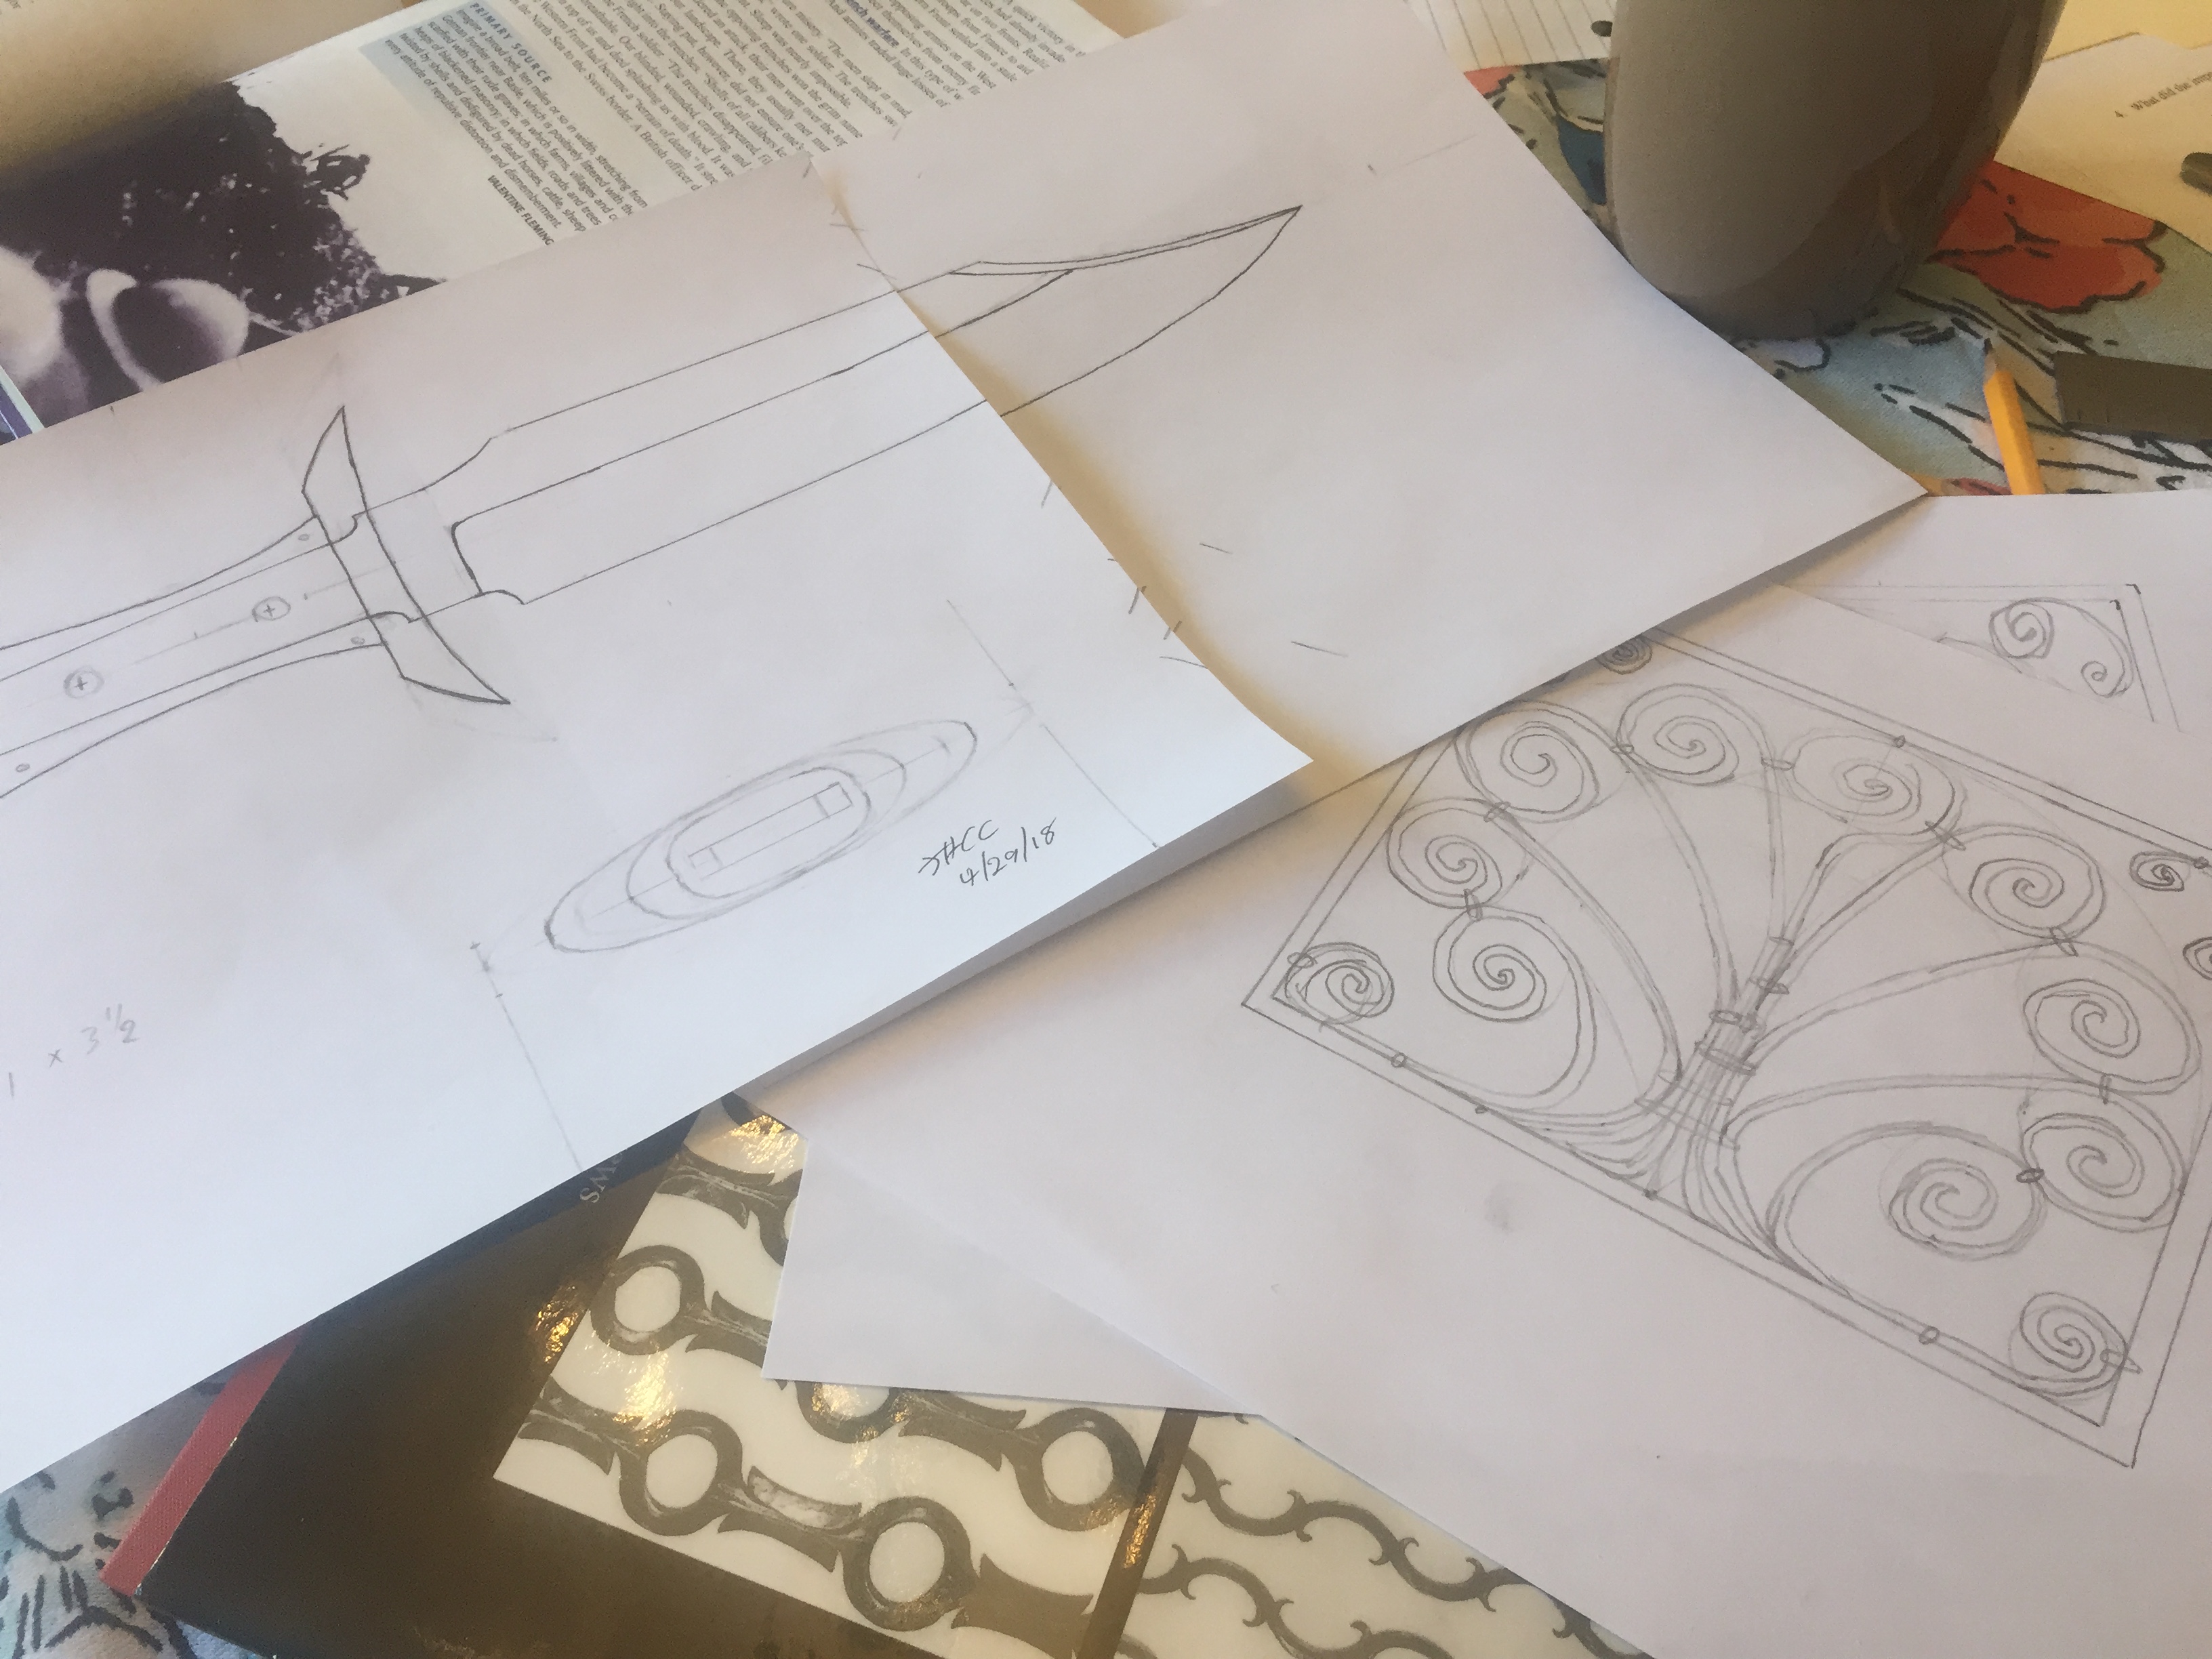
Still hoping to get in the shop later, but in the mean time (i.e., while helping my son stay on-task with his homework), we do some design work.
-
I had the same problem when I built a steel stand for my anvil. A nice layer of silicone caulk, and not only did the rocking go away, but it’s also a lot quieter.
-
Hi, Nick, and welcome to IFI! If you haven’t yet, please READ THIS FIRST!!!
-
What did you do in the shop today?
JHCC replied to Mark Ling's topic in Blacksmithing, General Discussion
Yes, it is. -
What did you do in the shop today?
JHCC replied to Mark Ling's topic in Blacksmithing, General Discussion
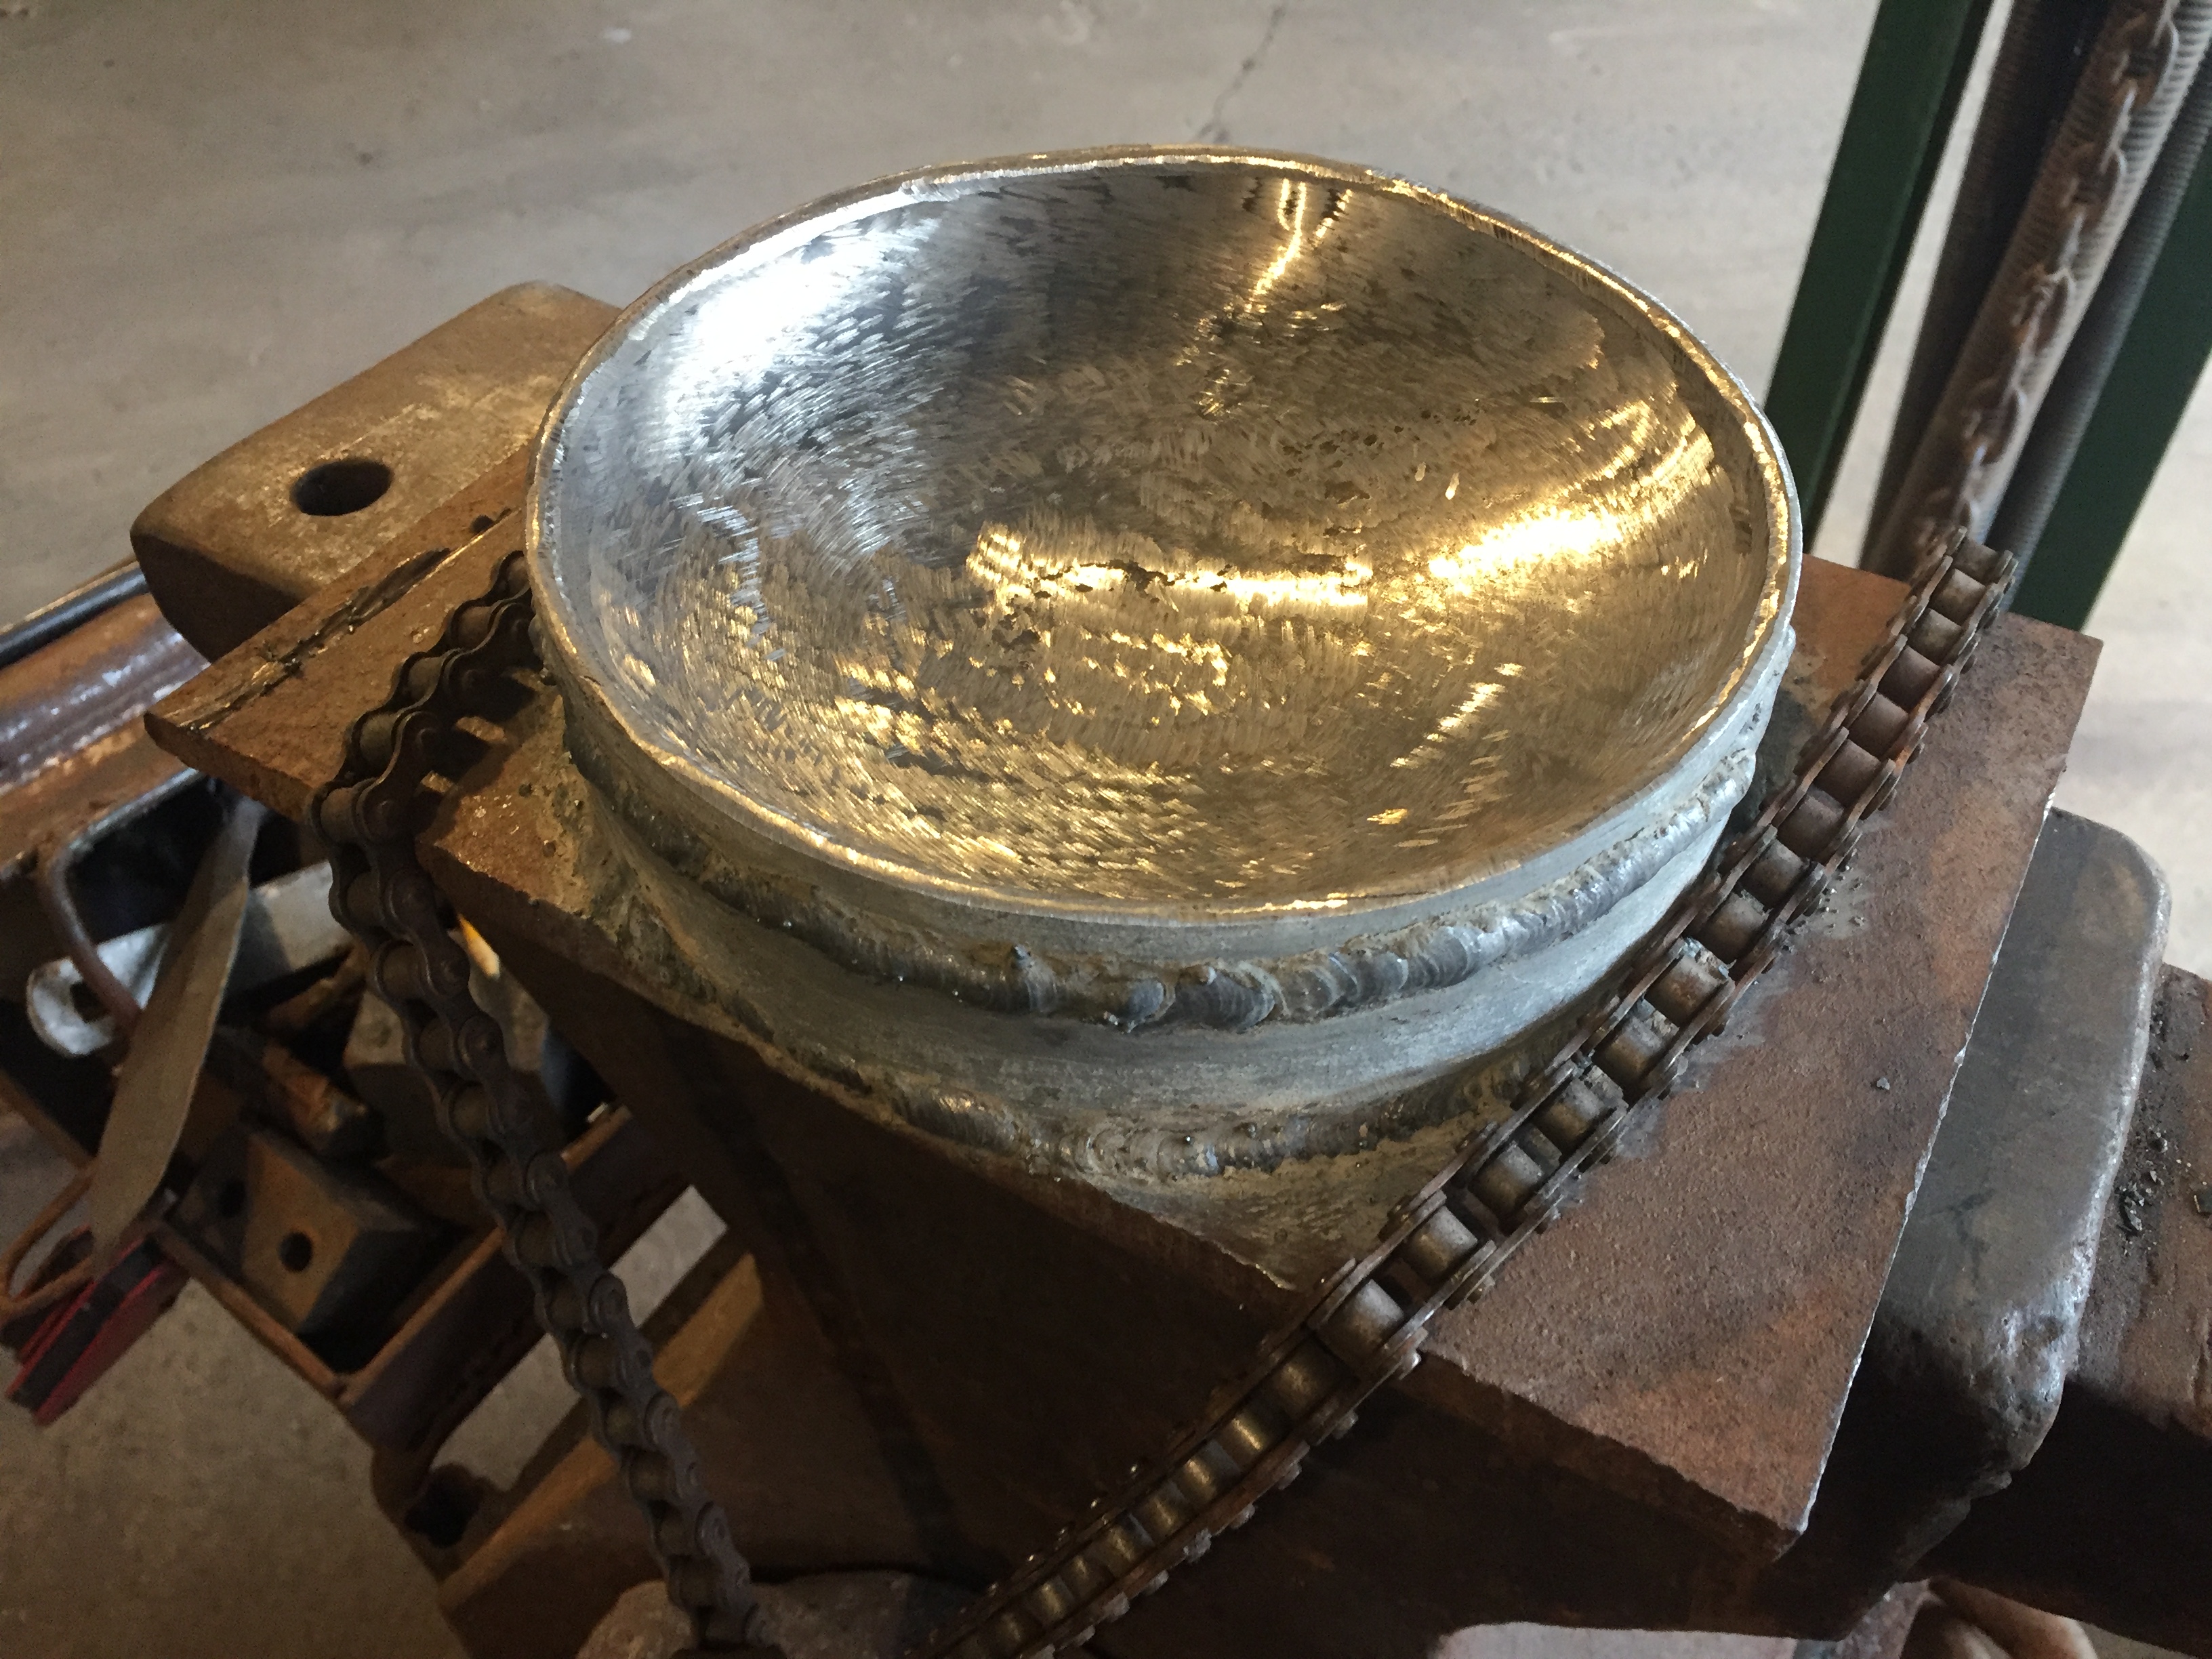
Very simple: that was the easiest shape to weld up from the sheet stock I had from the drop bin at my supplier. The hood isn’t an issue because, as noted before, I don’t have one. And here it is in situ: Probably won’t have a chance to fire it up today. Maybe tomorrow. I also welded up a dishing form. This is the end of a scuba tank cut off, inverted onto a ring cut from the same tank, and the whole thing welded on a piece of 3/8” plate.