Jesse17
-
Posts
50 -
Joined
-
Last visited
Content Type
Profiles
Forums
Articles
Gallery
Downloads
Events
Everything posted by Jesse17
-
Well, it's ugly rustic, but it's a start... Took me 3 hours of forging. Someone who knew what they were doing probably could have done it in an hour (or less). But, I'm pretty happy considering it's the first time I attempted anything this complicated. I don't have any kind of bending jig and sorely lack tooling. I did eventually get the hang of somewhat efficiently bending the coil toward the end. I think my next coil will only take 30 min. instead of the 1.5 - 2 hours I spent on this one. I obviously need to take an afternoon and make a lawn full of leaves. This one came out worst than my first one. LOL.
-
So, I've posted a picture of my anvil before, but here it is again... The holes in the corner are about 1.165" - 1.175" dia. And about 0.82" down the hole closest to the hammer, the hole steps down to just over 3/4" dia. I can't reach it with my calipers, and didn't think to make a compass or something like that to measure the hole. What would y'all do in this situation? At first I wanted to make some sort of adapter with a 1" hardy hole, but it would have to sit above the hole/anvil, and I don't know how deep it would need to be to accommodate most tools. On the other hand, it's not like the local Ace Hardware is selling Hardy tools, so I assume I'll end up making all my tools myself anyway. So do I really need a 1" hardy hole for anything. Maybe I should just make all my tools out of 1" round and taper them to fit in the just over 3/4" hole that's already there? Or 1.25" round and put a short taper on them to fit in the 1.17" hole? I know I can make something to go in my vise instead, but I really don't want to be hammering on the jaws of my vise all the time, when I have an anvil sitting right there next to it. Also, I need to make some hold downs for work pieces on the anvil. Maybe I should just weld some 3/8" or 1/2" I.D. pipe to the 2" bar that skirts the top of the railroad ties. Thoughts? Opinions? Guidance?
-
I'm good on the thumb placement, but I admit it nearly took two hands to straighten out my fingers after chocking the life out of the hammer the other day. I guess this is the wrong thread, but does anyone use rubber inner tube wraps on their hammers to make it easier to grip without as much force, and maybe absorb some of the vibrations. Or would that make it harder to control?
-
Sorry about the thread drift, but thanks for the tendinitis advise. I will check out the materials that SJS mentioned, as well as take it easy on that arm. But since I lay awake at night dreaming about the next chance I'll have to be at the forge/anvil, I just may have to learn to swing a hammer left handed.
-
Like j.w.s said, if that's a thermocouple that cuts off the gas if the flame is blown out, then it's not going to let gas though unless it's hot. If you can get a part to connect your gas hose directly to your other fittings instead of using that piece, that would eleminate that problem. Then, I think you have a couple of other problems. The inside pipe with your pin hole in the end, needs to extend to somewhere around/just past the center of your air intake T. It looks, to me, that yours barely enters the end of your black pipe, then your air intake is a few inches in front of it. Plus, you'll want a way to adjust the inside tube in and out a bit to tune your burner to run right. The other thing I've read is that while the regulator on a turkey fryer may let the gas flow out at 10 psi, the orifice is to small to allow the quantity of gas out that you need for the burner. I may be wrong on that, but I think I remember reading it a couple times.
-
I'm brand new to blacksmithing, and I've been dealing with a unrelated case of what I assume to be tennis elbow, since last August. I've played a little with using an 8# hammer with a short (broken) handle, in an effort to hammer more with my shoulder instead, and with less movement from my elbow. Unfortunately, I've found it quicker to use my 2.25# rounding/farrier hammer with a big swing, and that does NOT help my elbow/tenon any. Heck, at one point, while I was destroying some 3/4" round bar that was suppose to be a pair of Brazeal tongs, I actually hammered left handed (I'm right handed) for a while trying to save on my elbow. I'm thinking about grinding a more extreme round face on one side of the 8# sledge and see if that works any better as it's rounded now, but just barely.
-
Yeah, that sounds great. I'm just in the process of retooling my shop from a woodworking/storage shed to a woodworking/blacksmith shop. So I don't have much. Just a forge I built but am not finished with yet, an anvil I got off ebay and a couple hammers. I'm hoping to get a set of tongs made in the next couple days.
-
Hi reouxreanch. Nice to meet you. I'm in Miles City.
-
Hello! I've lurked on here for a while. Finally signed up and posted for the first time a few days ago. I didn't see this section before, so forgive me for the delayed introduction. I've been SLOWLY getting into knife making through material removal over the last two years. I've thought about building a forge, but it seemed like to big of a project, and didn't know if I would like forging. Then about a month ago a journeyman bladesmith invited me to his shop to forge a blade. It was and awesome learning experience, and getting to see his forge up close instead of just seeing stuff on the internet, motivated me to build one. Ironically, I see general blacksmithing being more immediately gratifying than knife making because you don't have to spend a week sanding the project after the fun part is over. Right now I'm having a ball playing around with it. I don't plan on it becoming a career, but there is a craft show in town here at Thanksgiving. I have set a goal to have enough finished items to rent a table there this year. Maybe I can at least pay for a tool or two. :) Anyhow, thanks for having me, and I look forward to leeching ah learning all I can from y'all!
-
That may happen. I have a good friend in Wasilla that I'm hopping to visit in the next year or two.
-
Thanks. It started as round stock. I should have worked the stem smoother, but I had never run my forge as hot as it was, so I was kind of distracted trying to keep an eye on it. Plus, I just have no idea what I'm doing. LOL Th leaf/stem joint is actually cracked almost through because of me accidentally knocking the leaf back and forth while drawing the stem out.
-
First, I'm no expert on this stuff. I just got done doing bunches of reading on another site before I came here, and I built a larger forced air forge, but from everything that I have read, you want 2" of the ceramic blanket. That will still give you about a 8' ID on your forge. That's a large area to heat. Even with a venturi burner, I don't know if you could get up to welding temps. I'm going to back out of this conversation now, because I'm really too new to be giving any advise. I just suggested the venturi burner thinking it would be an easy fix for your forge, but I forgot that venturi burners need a flared/bell/cone shaped piece at the end of the burner in the forge, and your insulation has to be formed around that. So it may not be that easy to change anyway. Plus, I really think you need more insulation.
-
I started out trying to make a leaf. Decided to go ahead and wrap it around the bar. So I guess it will probably be another steak turner.
-
Build a venturi burner and run it on a regular propane tank. Actually you'll probably need to manifold two 20# tanks together or get a larger tank so it doesn't freeze up. I think you might get away with using your 3/4" opening. How thick of insulation did you use?
-
I put a tapper on it initially (yes, I worked it round instead of squaring it up then rounding it) but I was worried about overheating the point while I worked the curves. So I didn't go too sharp with the point, then I came back and hammered the tip more after I drew out the area for the bends. Then after I got the bends and all done, I decided it should have a twist in the middle, so that's when I heated the heck out of it. But, I was only running the forge at 1700 -1800 °F so I probably didn't really overheat anything. I cut the end off and fixed it. The point is good now, but I didn't get my bends as nice this time. I think mostly because I didn't get it drawn out thin enough this time and tried making the bends to tight. Oh well, when I first tarted beating on this piece of steel it was just to try out the forge. I didn't actually plan to make anything with it, then the steak turner just sort of appeared. So I'm happy with it. Now for my next project I hope to make a pair of tongs after I find some suitable stock at the steel supply house tomorrow. The hardware store, nor my scrap treasure pile had anything thick enough today.
-
Thanks guys. So if I understand, do a short taper, then draw it out, then file it sharp, then bend it around into the hook shape. Is that about right? Why turn it at a low red instead of at a hotter temp? Is it more evenly heated through the whole bar since the outside cools faster?
-
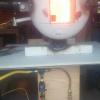
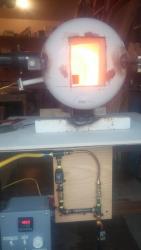
Hello! I'm new here. I've been getting into knife making the last couple of years, and am just finishing up my first forge. I was playing around with it today and ended up forging my first project, a meat turning hook... I am very happy with how it turned out considering it's my first attempt at doing the stuff I've been watching on youtube, but I noticed the end of the hook split. I was just doing this project for practice and to try out stuff. So I wasn't too concerned about keeping the tip from overheating, and I did cook it quite a bit while heating the middle section. On the other hand, I did dip the tip in water a couple times to try to keep it from overheating. So, I'm wondering if the split is from overheating, or a crack from quenching it, or something else?