

AnvilAntics
-
Posts
14 -
Joined
-
Last visited
Content Type
Profiles
Forums
Articles
Gallery
Downloads
Events
Posts posted by AnvilAntics
-
-
Lovely looking bit of machining on your dies!
It takes a fair bit of oomph to form the hot metal into such dies. Typically such items would be forged under much bigger hammers and/or presses than your 2cwt, but a Massey does have a great single blow.
I would try to forge the billet, with fullers or if you have rounded pallets, as close as possible to the shape. Making sure not to leave any sharp edges at the transitions, ie between shank at big end. It will take a couple of practice runs, you will want to leave just enough material to fill your dies, without too much flash.
If you are using a fancy material, check out it's specifications for forging temperatures. The hotter the metal, the easier it usually is to forge, but some alloys don't enjoy prolonged exposure to these high temperatures. Also keep in mind the chilling effect that your dies will have on the metal being forged.
Good luck and keep us posted, it is great to see you giving your idea a red hot go!
-
My thoughts and condolences go out to his family and friends.
Such an amazing character! His energy and passion were inspirational.
I don't think I thanked him enough for all his help with Masseys, Alldays & Onions and even obscure things like manual oilers on Pilkington hammers.....
Justin
-
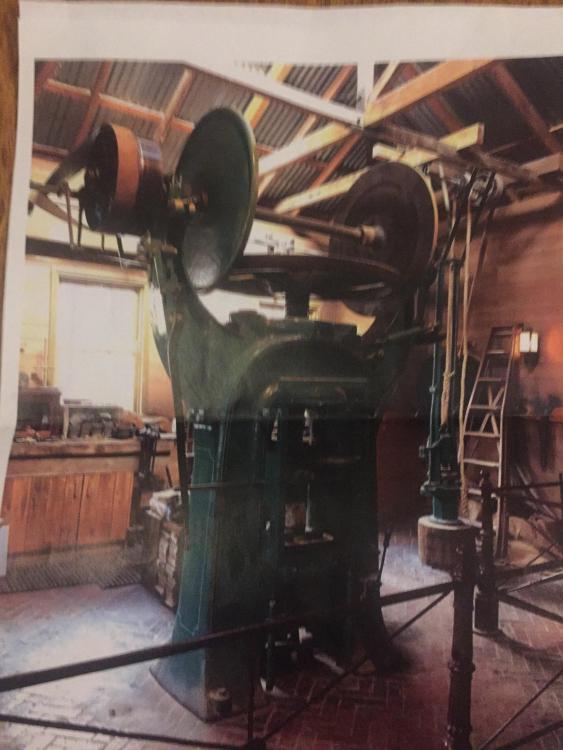
My apologies for the delay, I have not been back to get a proper image of the press in question. I have, however, found an old photograph of it, which I have attached.
Any information about the maker would be greatly appreciated.
Thanks,
Justin
-
G'day All,
Am looking at a friction screw press that is a long way from it's place of creation. It's currently residing in the southern hemisphere and I have very little information about it's origins.
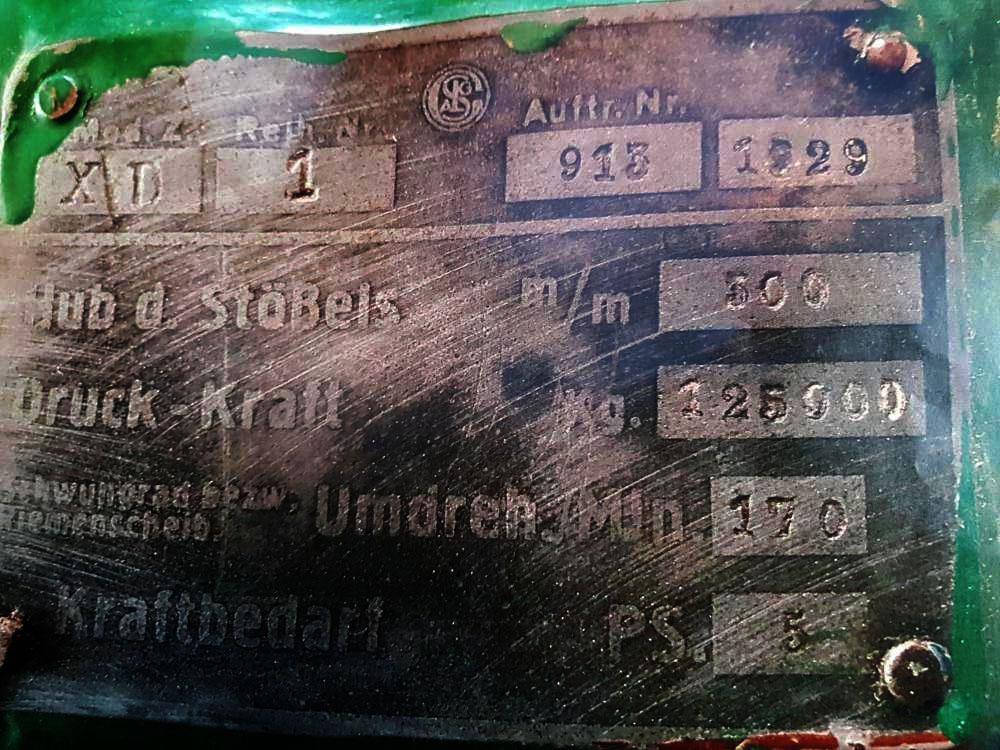
I took a photograph of the name/maker's plate (forgot to get one of the actual machine, but it is the usual configuration) and can make out the general inforation; stroke, rpm, lots of kg's, date and power requirements...
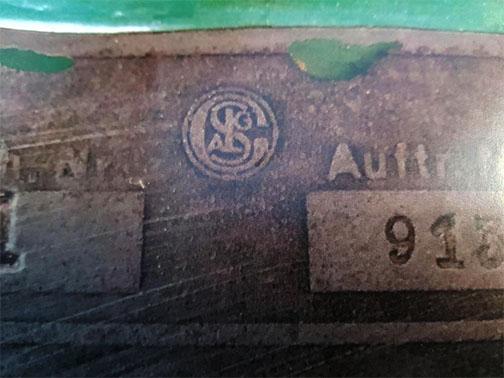
The makers symbol is, however, my slumbling point. It looks to contain C, S, L, A and G, but my favourite search engines fail to bring up anything obvious to my non-Deutsch speaking notice.
It is not vital that I know the maker, it is a lovely old press that works beautifully, but curiosity is getting the better of me.
If anyone out there could point me in the right direction I would be most grateful.
Thank you for your time.
Justin
-
On 23/08/2017 at 3:21 AM, JHCC said:
The hammer floated?
Sorry for not replying earlier, am very sad that you are selling your hammer.
I did not wish to make it seem difficult or expensive to install a hammer. There are so many different ways to do it, so many different scenarios and so many different outcomes. I was trying to describe what had worked best, in reducing transmission of vibration, for me in a couple of hammer installations.
Below is a "back of the envelope" sketch of what has worked really well for me. Please note that it is not to scale and the space between the inertia block and the pit wall is not as big as sketched...oh, the 300mm for the foundation pad is variable depending on hammer size and it id better to have the reinforcing x2, one closer to the base and the other closer to the top of the pad.
Trying to separate the hammer from the rest of the world is the name of the game. It doesn't have to take massive holes and massive amounts concrete.
On the unanswered floating hammer question......it didn't quite float but when in operation it did seem that way. The hammer was a 7cwt Alldays and Onion. It was installed very similar to the "sketch", but instead of isolation matting under the inertia block there were 5 (maybe 6?) mounting blocks that I was lead to believe were for either mounting large diesel generators on ships or in basements of hospitals. When the hammer was in use, it used to feel like it was rocking back and forth, but without too much transmitted vibration. On one occasion after some particularly heavy rainfall, we had someone from a neighbouring workshop comment that whenever we used the big hammer, they had water shooting up their wall........ There were some concerns about undermining of foundations, but it was worked out that the inertia block was working like a big diaphragm pump. Sump and a pump were installed. But when you were using the hammer it did feel like you were floating.

-
Image from an early copy of the Australasian Coachbuilder and Wheelwright Journal.

I stumbled across this one in Europe, but am unsure of it's origins.

Have saved the best until last.........most of you will have seen this one previously. It is on heaps of Southern Hemisphere Calenders!
-
Oh, it is also sometimes a good idea to include an option for a sump pump in the bottom of your inertia block hole.
Learnt that one the hard way.....
Justin
-
Soils vary such a great deal, as does the amount of moisture that can be around....just to add some extra variability. So it can be difficult to provide you with the perfect antivibration solution.
The above caveat out of the way, I'm a huge fan of using an isolated inertia block. Dig a big hole;
put a reinforced slab in the bottom (35 MPa is good);
put up some side walls that do not touch the edge of the bottom slab (this is to stop the surrounding soil from collapsing in);
put some vibration mitigating matting on top of the slab;
construct a suitable form for an inertia block (you mentioned that you previously had 4' deep concrete and I assume that it would have been slightly larger than the hammer's base, that would probably be a reasonable starting dimension, making sure that it does not touch the side walls);
you can either pour this in situ or if you have easy access to lifting gear you can do it elsewhere, you can also make allowance for hold down bolts (really long T-headed bolts work ace) and adjustments to working height;
Now you should have your inertia block sitting on some antivibration matting, which is sitting on the slab at the bottom of the hole. The hammer base (or standard, depending on yoir lingo) then needs to have something to sit between it and the concrete top of the inertia block. Lots of people use sawn boards, I'm a huge fan of using what we call form ply here. 3/4" thick is all I've used, it is just there to help bed the cast hammer base onto the concrete and even the 5cwt has not crushed it. I also use the ply to cover the void between the existing floor and the inertia block.
Lots of people just cut the slab around the base of the hammer, especially for smaller hammers. Sometimes the soil mechanics gods are smilling upon you and the vibrations are not travelling around the neighbourhood , but wuite often this is not the case.
If you look on this site for any posts on about this subject by Alan Evans or JohnN you will be well on your way to mitigating those vibrations and broken crockery.
Justin
-
Who doesn't love ametuer concreting hour.......unless it is a bridge.
I especially love the working height! As a retired second row forward I can appreciate raising the inertia block up an inch or two.
On a serious note, it's looking great!
Justin
-
For Mr Evans,
I am familiar with Daylesford, I'm about halfway between there and Ballaarat.
Sorry I missed you.
Sorry for the nocturnal wildlife disturbing your sleep AND sorry to Bevan for letting some clowns take them to NZ.
Did you have Michael C. from Co. Wicklow do some work with you?
Just to round off the Massey club...... I've got a 35 in the shed too.
Great progress photos Bevan!
Regards,
Justin
-
With the ability to be able to lift the inertia block out and back in, try whatever that is at hand. Was once told, by a vibration engineer, that strips of matting can often work better at reducing transmission than a one piece mat.
When you reinforce the slab at the bottom of your hole, I think you said 350mm. Run two lots of reo, one near the bottom surface and the other near the top surface. Just works a little better than a single centred bit of reo in this application.
It's ace that you've got the matting for under the anvil, that is a significant factor in having an efficient hammer. I do concur with Alan about sealing around the anvil, to stop scale etc from getting underneath. That and wedging it into it's concrete recess. Timber wedges are ideal, I only say that because when I lifted my 3cwt I discovered that it had been wedged with the cutoff tapered ends of leaf springs.
Give the concrete a bit of time to ripen before you wedge in the anvil.
I do recommend a sump.....Then you can have a regular home for your sump pump!
Great photos and great progress. I have done it a few times when working for other people and hence using other people's money, excavators and fancy isolation systems. Am doing it for myself and it's not a cheap or easy gig, but like Alan said, the green button day is worth the effort.
Justin
-
Sorry for delay, sent info today.
Loved the green tractor and trailer for removal of earth.
Have fun,
Justin
-
Have sent a PM. Mr. Forgemaster is probably the southern hemisphere's Massey expert, Mr Evans has posted some sensible advice and any info from John is gold (although I have heard that he is a bit busy at the moment). See if you can chase up some of their old threads on installing hammers.
Regards,
Justin
NB: Sorry haven't got back to you Phil, the Pilkington is still awaiting work. Need to make a new lube system to replace that which is not there.....

Alldays & Onions power hammer
in Power Hammers, Treadle Hammers, Olivers
Posted
If Alan Evans, Owen Bush or John N reply to this you will have all the information you need......but if they are otherwise engaged, here is a link to a useful thread that Alan posted a few years back.
The Alldays and Onion are a very simple and generally robust hammer. This one will need a bit of work, but if the dovetails on the ram are not damaged and water hasn't managed to work it's way into the cylinders, then most of the other repairs are manageable.
Two piece hammers also require extra care when installing, the distance between the top of the anvil pallet and the bottom of the RAM pallet (or die), is critical.
Have fun.