bird
-
Posts
26 -
Joined
-
Last visited
Content Type
Profiles
Forums
Articles
Gallery
Downloads
Events
Everything posted by bird
-
Yep. Not to be a jerk but I'm pretty sure I'd prefer to work in mine . I didn't use kiln shelf but I did use high alumina refractories and 2" of fiber all around. I might have to get a bit of ITC100 or some such and see if I can tell a difference though. Good point on temporary or removable mass.
-
So granted, I'm picky about my tools and made some aesthetic decisions as well as a few technical ones about limiting ceramic fiber exposure, but maybe the type of forge build I posted notes on a bit ago is pretty ok. I like it, but I'm always interested in improving. Fair point. I use that forge for anything from 3/8" up to 1 1/2" square when it's smallish volume works. For production forging and large heats I have a much bigger forge built similarly but proportionally more massive. I only run it when I must. Whether or not the forges can keep up with me or I with them depends entirely on how many parts I'm working at once. Maybe I'm just lazy (sometimes it seems hopelessly so) but there are plenty of moments in the process when I can only focus well enough on one or two parts and that's part of why I like to set up my forges for quick reheats. I can always dial the burner back and more or less match my number of parts to heating and working times, but waiting on heats is unprofitable. Very.
-
So I should cast thicker floors and use lighter walls for best performance? What do you think is an optimal wall/arch construction for balance of performance and durability?
-
So I don't have a technical material science background and I'll ask you to excuse me in advance if, in attempts at precision, I butcher the technical language. It seems like you're saying that thermal mass is still a good thing in our forges, but not all masses are created equal? We like high alumina refractory because it keeps more heat in our forges, or at least slows it's loss down much more than fire clay based products. I tend to think of forge mass as a reservoir of heat I can dip into to heat and reheat my steel. This is why forges I build tend heavy as I favor faster heats over initial start up time. Is this wrong? I have no empirical evidence but I swear I've worked in light mostly frax forges that visibly cool when I put steel in and I've always expected this to be reflected in longer heating times. Common sense suggests that unless we just use our burners like torches, we'd need hot mass to heat mass. But if my observation and reasoning are right, aren't we in a catch 22 where we need and rely on heat transfer for our heats?
-
For the same money or less you can build something better, but it will take time and basic skills. There's plenty of advice here on IFI to help you if you want to go that way. I can't speak to that forge in particular except to say it doesn't cost much. It doesn't look worse than the rest. I personally think that flat ceilings and rigidized fiber are bound to fail but lots of people use them all the time and fix or replace them as needed. It would get you started.
-
PS I misspoke. I didn't mean for safety, I meant for durability. I always turn the gas off at the bottle and bleed it through the regulator and valve so I'm not worried about heat back through the system as a safety issue. It's just about the longevity of the burner.
-
Probably no big deal either way but I'll still keep running my blower after the gas is off for one simple reason. Think of it like your car, or maybe my 25 year old truck: the engine is warm and I'm driving around town. I stop, and when I turn the truck off, the fan stops and the coolant stops circulating and for a few minutes, the engine can reach higher temps than it does during operation. Same thing with the gas forge. The burner always has cool air and gas flowing through it when running. Only the face gets hot. You can look acros it in the hot forge and see the shadows in the orifices telling you it's cooler just behind the face. So on the one hand, there is always a tremendous heat differential there, but if I turn the gas and air off simultaneously, the balance of the burner casting will get hotter than it does during operation. It should be fine, but the burner is the least consumable part and I'd rather not shock it.
-
Buzzkill: it isn't. Ribbon burners aren't supposed to be in the forge. It is just a flat face. The face of the burner is about an inch and a quarter back from the arch face on the top and about a half inch back at the bottom. The refractory is designed for thermal shock but to be safe I always run the air for a while after I turn the gas off. The insulation of the arch wall plus the air blast keep all but the face of the burner pretty cool.
-

-
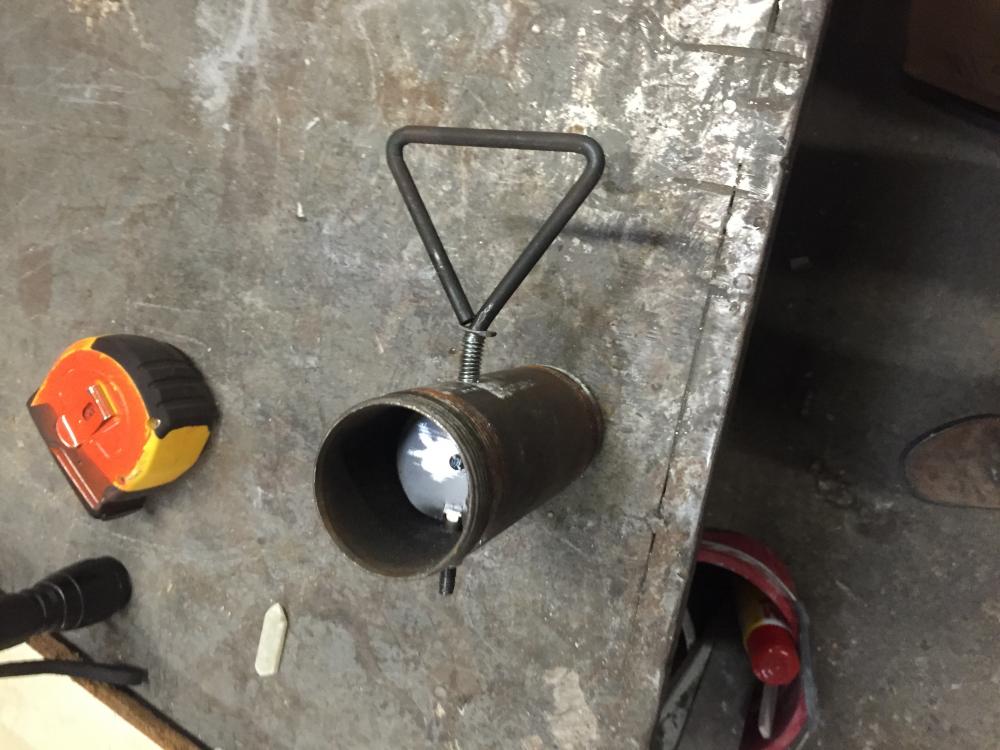
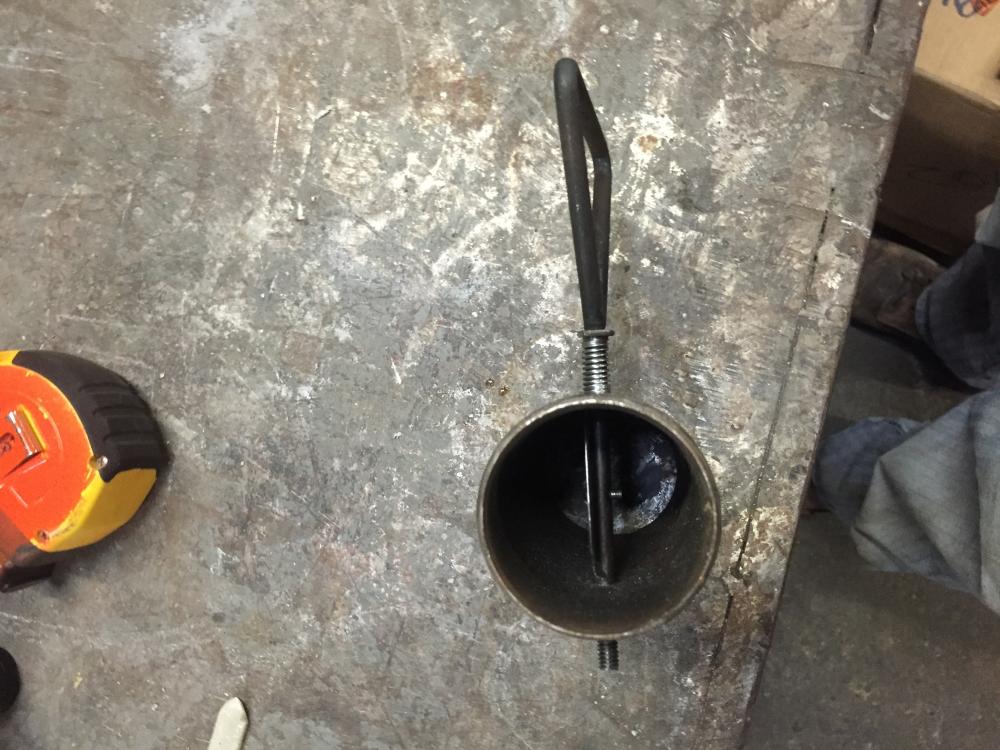
Mikey98118: I am nobody's expert on ribbon burners but they seem very forgiving. After asking around a bit for specs on forge volume vs burner port area vs mixing volume and not getting much (I'm sure it's out there) I just winged it and I lucked out. I'm very pleased. I had a Pine Ridge ribbon burner that's 4 1/2" x 6 1/2" that's not supposed to be used for smaller volumes than .75 sq ft. I basically made one about 2/5 that size. 11 crayon size orifices in a 2" x 6" face. A baffle at the gas-air mix inlet is just a piece of flat stock about 1/2 as long as the burner centered with a notch in one long edge. A needle valve on the gas and a homemade butterfly on the air and I am very tunable. I say go for it.
-
Scrambler82- glad to help. To be clear, the inner steel shell is a mold for the casting which is not part of the finished forge. A steel liner on the inside would just burn up. But you could take Frosty's idea and use a sonotube or stove pipe for the inner mold and be on your way. Frosty- a longer floor has crossed my mind, but I worried about the temp differential/ heat sink causing potential problems. I usually go with an adjustable sliding stock rest built onto the stand. Just some square bars sliding in square tubing welded to the underside of the table. Also to be clear, the burner isn't exactly built in. I made a plywood blank- the "core" - that was a bit bigger than the burner and fit it to the inner arch form to create a void in the casting so I wouldn't need to break it out later to fit the burner in. The burner is independent and bolted to the stand. For that matter, the whole design is "modular" in the sense that the burner, arch, and floor are all independent and may be rebuilt/ recast separately at any time without disturbing the other parts other than to unstack the unit. The finished forge is dry-stacked and only the bolts through the flange of the outer shell to the stand hold everything in place. Anyway, good ideas all. I'm no expert I just wanted to share what has worked for me and encourage people to think at least as much about the box as we do about the burner. Think less about how fast your forge heats, and more about how fast your metal heats and maybe save yourself from breathing ceramic fibers and building disposable forges at the same time.
-
having trouble forge welding
bird replied to fleur de lis's topic in Blacksmithing, General Discussion
A few people have mentioned fire maintenance and oxidation, but not enough. Limiting the available oxygen to your part is as key as heat and cleanliness. Limiting the oxygen will allow your steel to get hotter than it normally would without burning. (Nothing burns without oxygen.) And that heat is one good way to facilitate welding. Start at the beginning. You said you might break down and build a coal forge...what are you using now? Specifically, what's the depth of your firepot and where is your metal with respect to your air and fuel? It seems technius Joe differs (with some interesting reasoning) but most people will say oxidation is the enemy when you're forge welding. In the presence of excess oxygen, your steel will actually burn at lower temperatures. The fire will have oxidizing, neutral, and reducing (oxygen starved) areas, in that order, from where your blower enters the firepot. You need to heat for welding in a neutral to slightly reducing environment. In practice this means (varying slightly with firepot shape and blower power) you need to heat for welding about 3 1/2" -4 1/2" above your air inlet and have your work surrounded by fuel (that's consuming oxygen). Generally at least 2" of clean fuel over and around your work. If you are using a flat bottom bbq or rivet style forge, get a couple of fire bricks and build up the sides of your "pot" around the air inlet. Charcoal will have lots of orange sparks. Your steel will spark differently. Look for bright yellow "sparkley" sparks like from a 4th of July sparkler. Just a few. You shouldn't be able to see your part well. If you can there's not enough fuel around it consuming oxygen. A small taper that heats quickly can be a good tester: touch it to your part in the fire and see if it sticks a bit. If it does, you're ready. Finally, are you outdoors or indoors? Daylight will make your fire and part appear cooler than you read by color and make sparks harder to see. Work in shade if you can. Hope this helps. Good luck. -
Thanks for the comments/compliments guys. Scrambler82: you could use that tank, and maybe you should if your shop has a real big hammer, a crane, and a manipulator so you'd need a forge that big . I know if I had a 500 gal tank I'd be designing a whole hog smoker. Seriously, that's huge and heavy. Frosty's sonotube idea is a good one. The shell isn't structural in the finished forge. 18 or 20 gauge is plenty. Frosty: Good ideas. With a sonotube I'd still want to contain the fiber insulation but I guess rigidizer would probably be fine on the outside. Truth is I had a slip roll and brake handy but not a sonotube so for me the way I did it was the cheap and easy way. The half octagon was a purely aesthetic choice, but I am partial to the doghouse forge.
-
Not to throw a wrench at your plans but for the kind of control you want why not go electric?
-
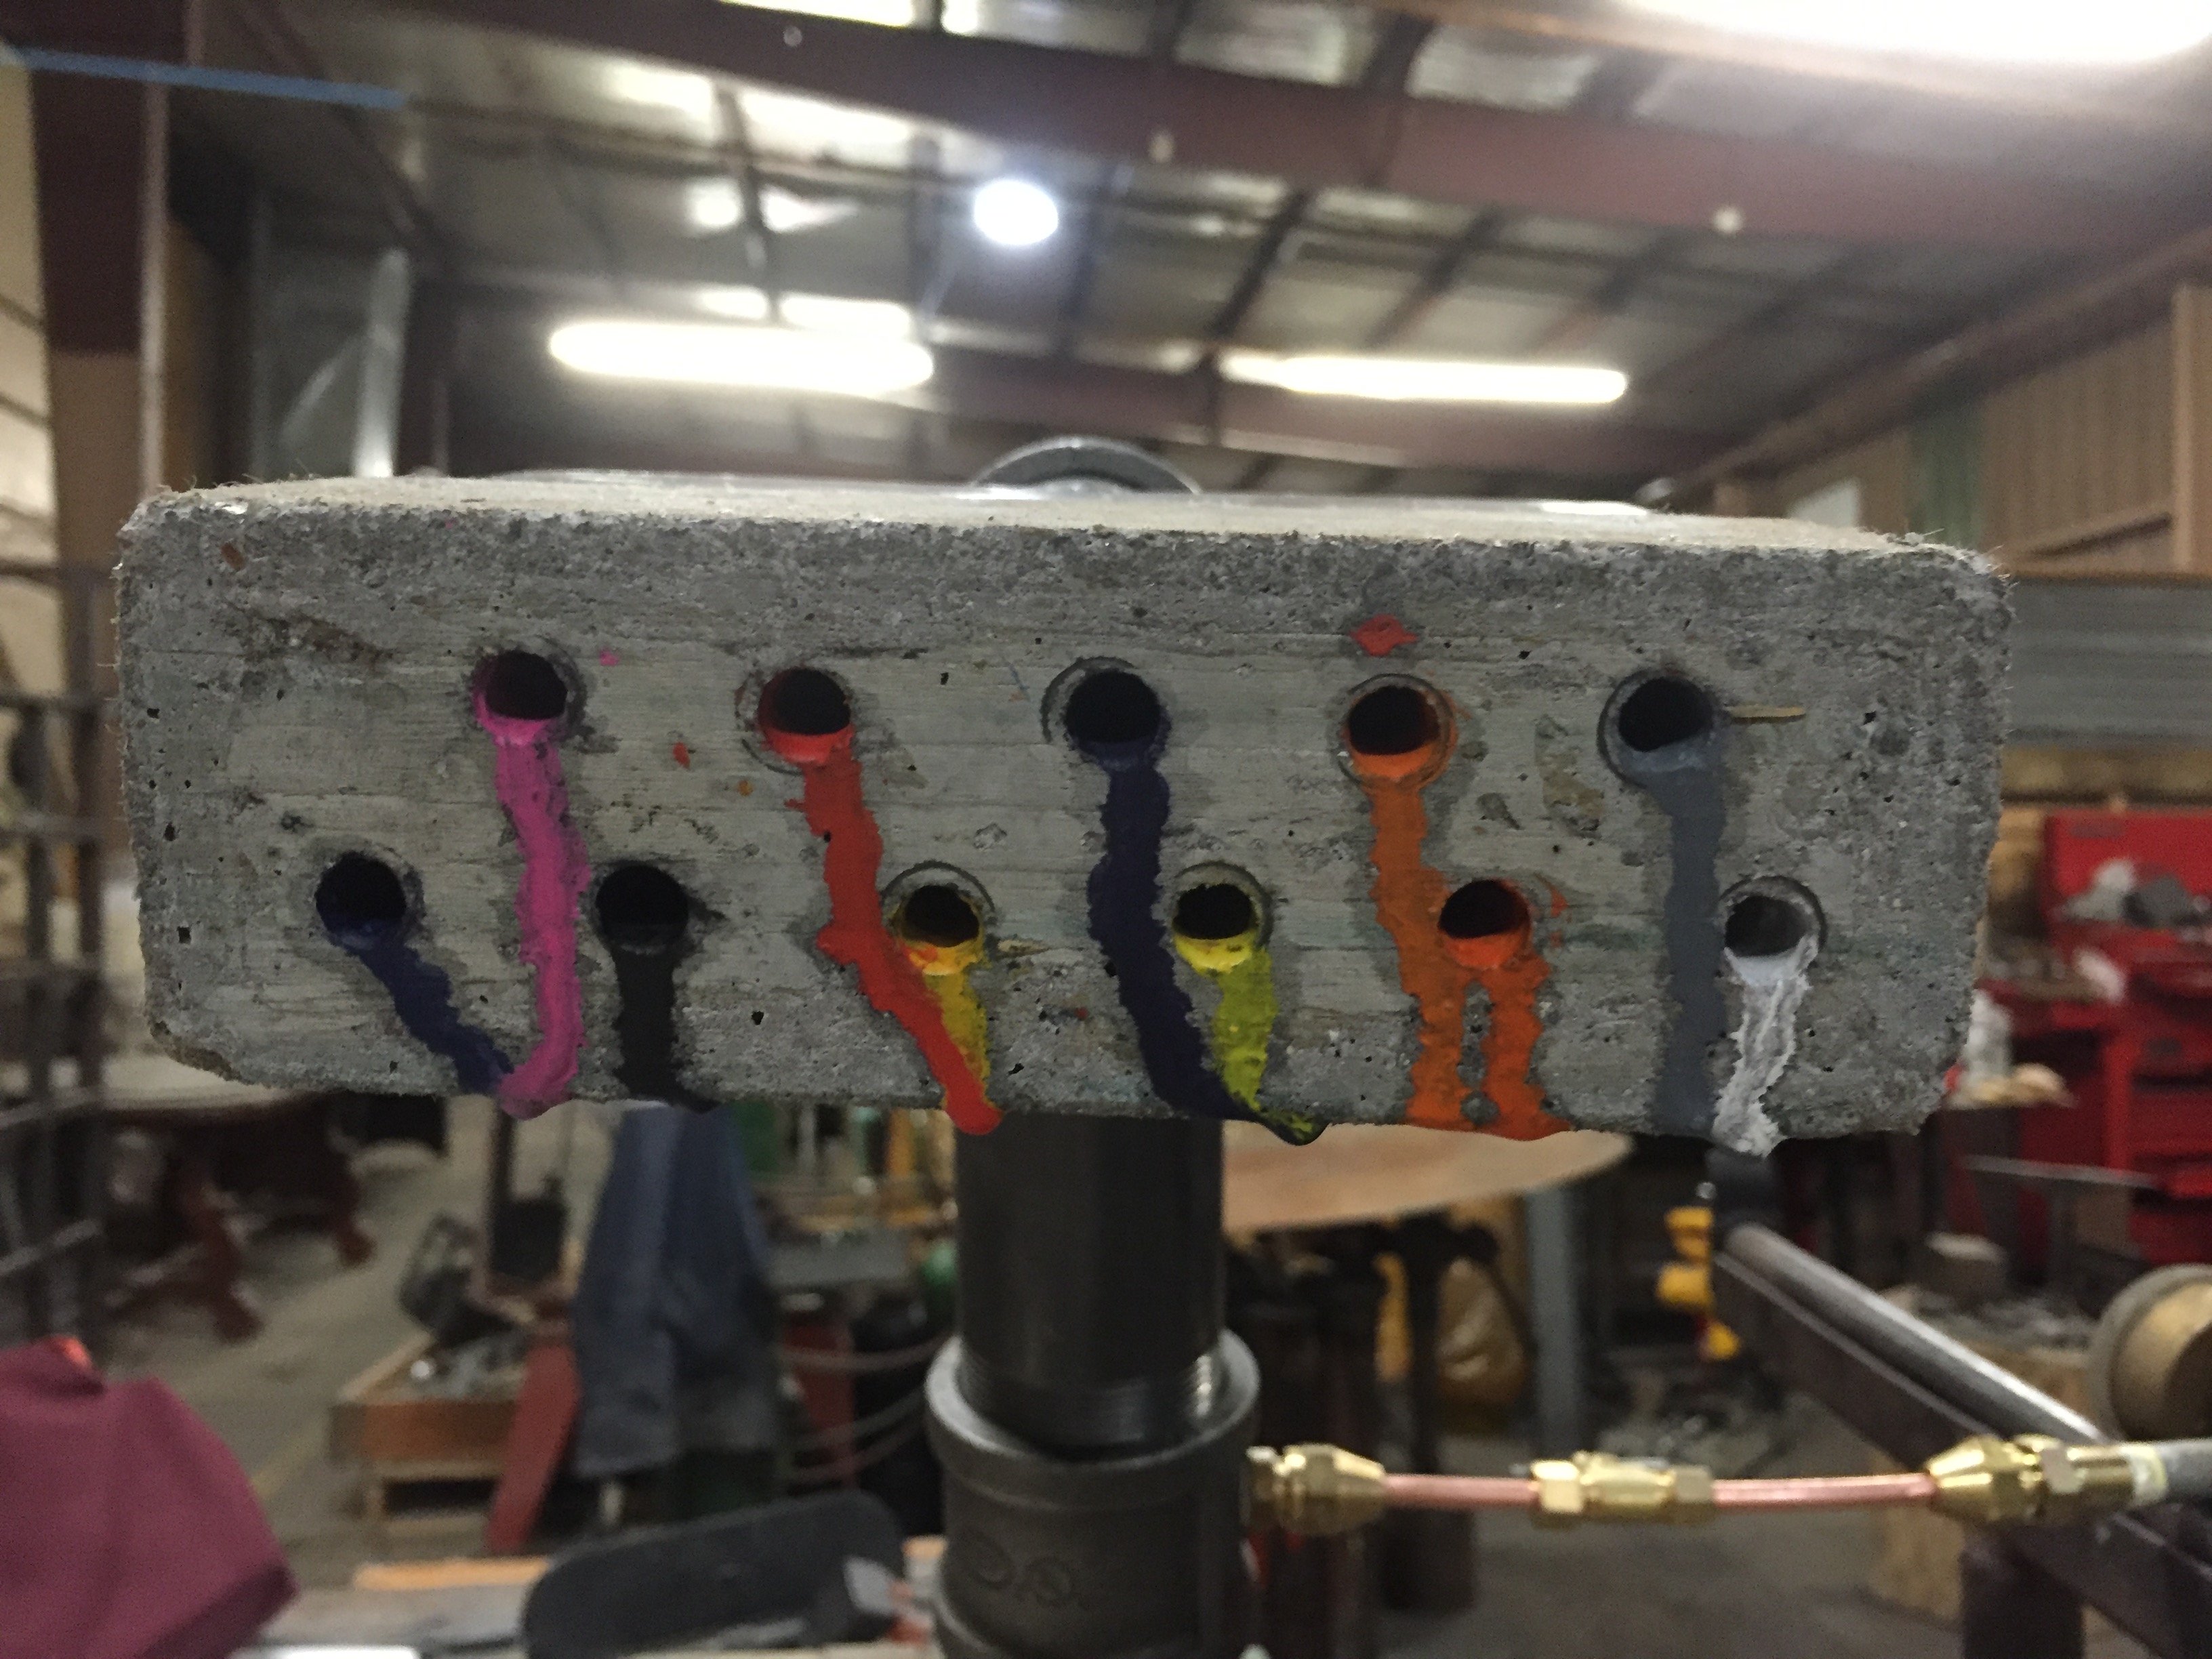
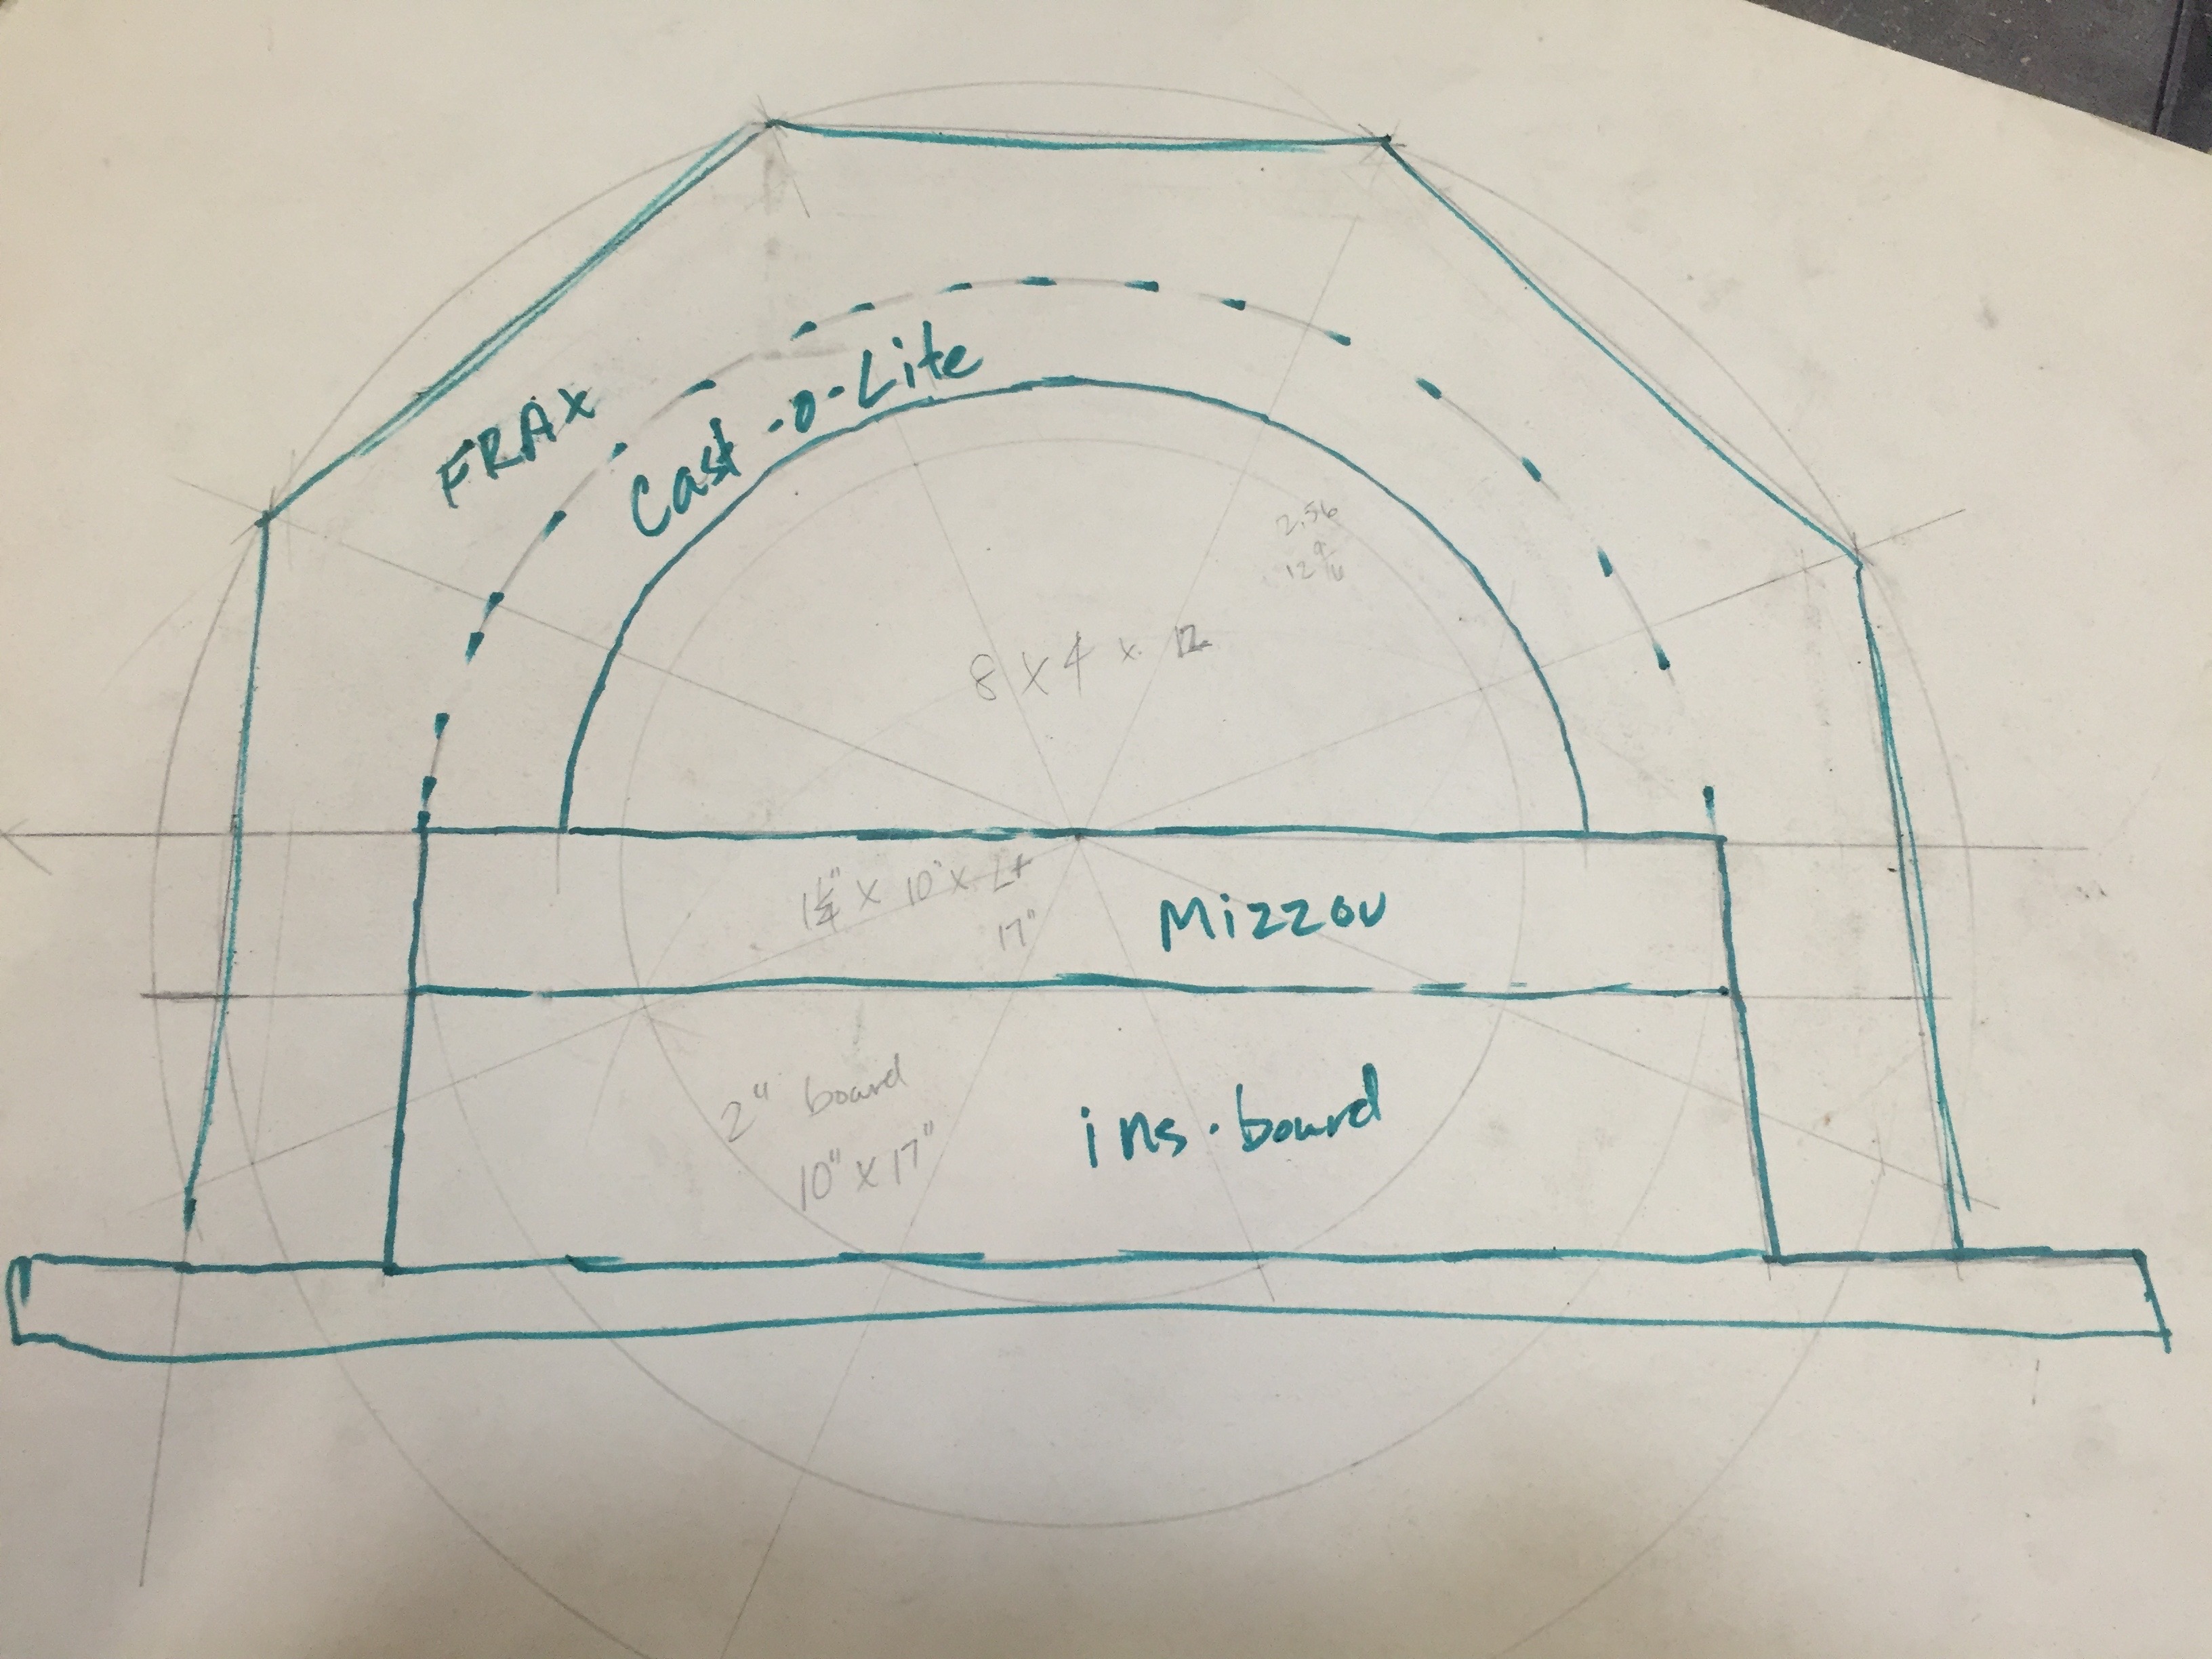
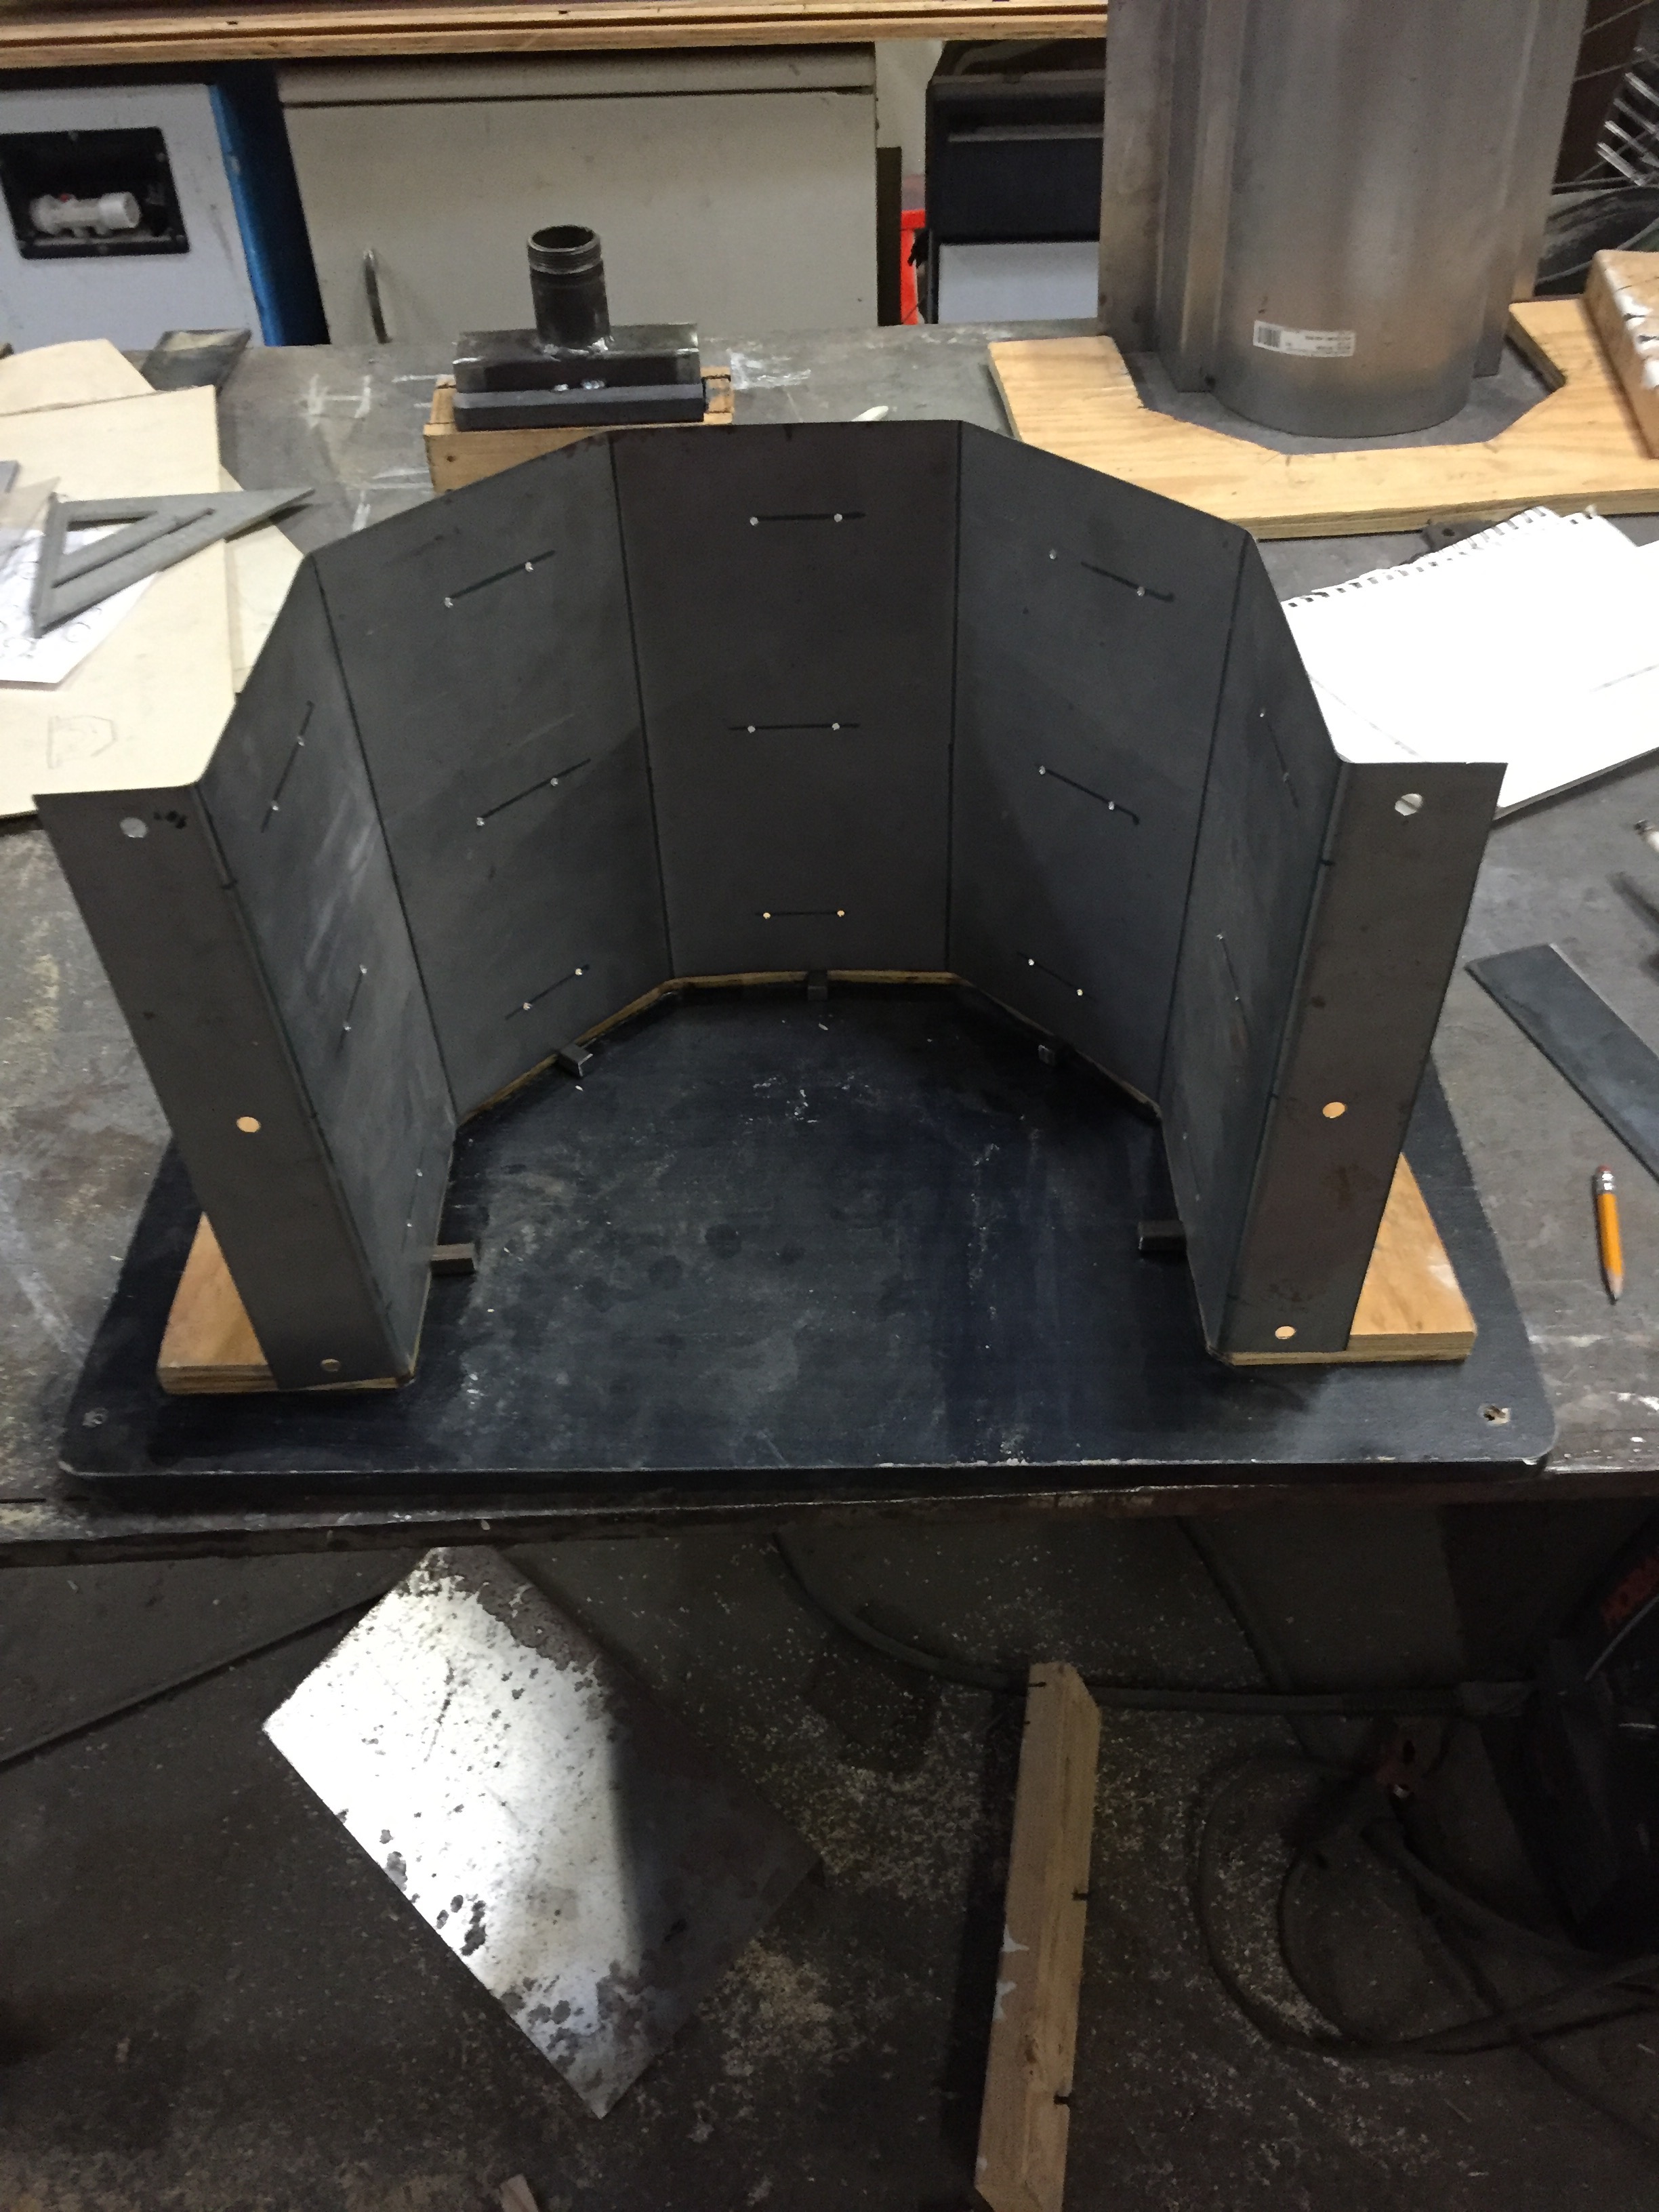
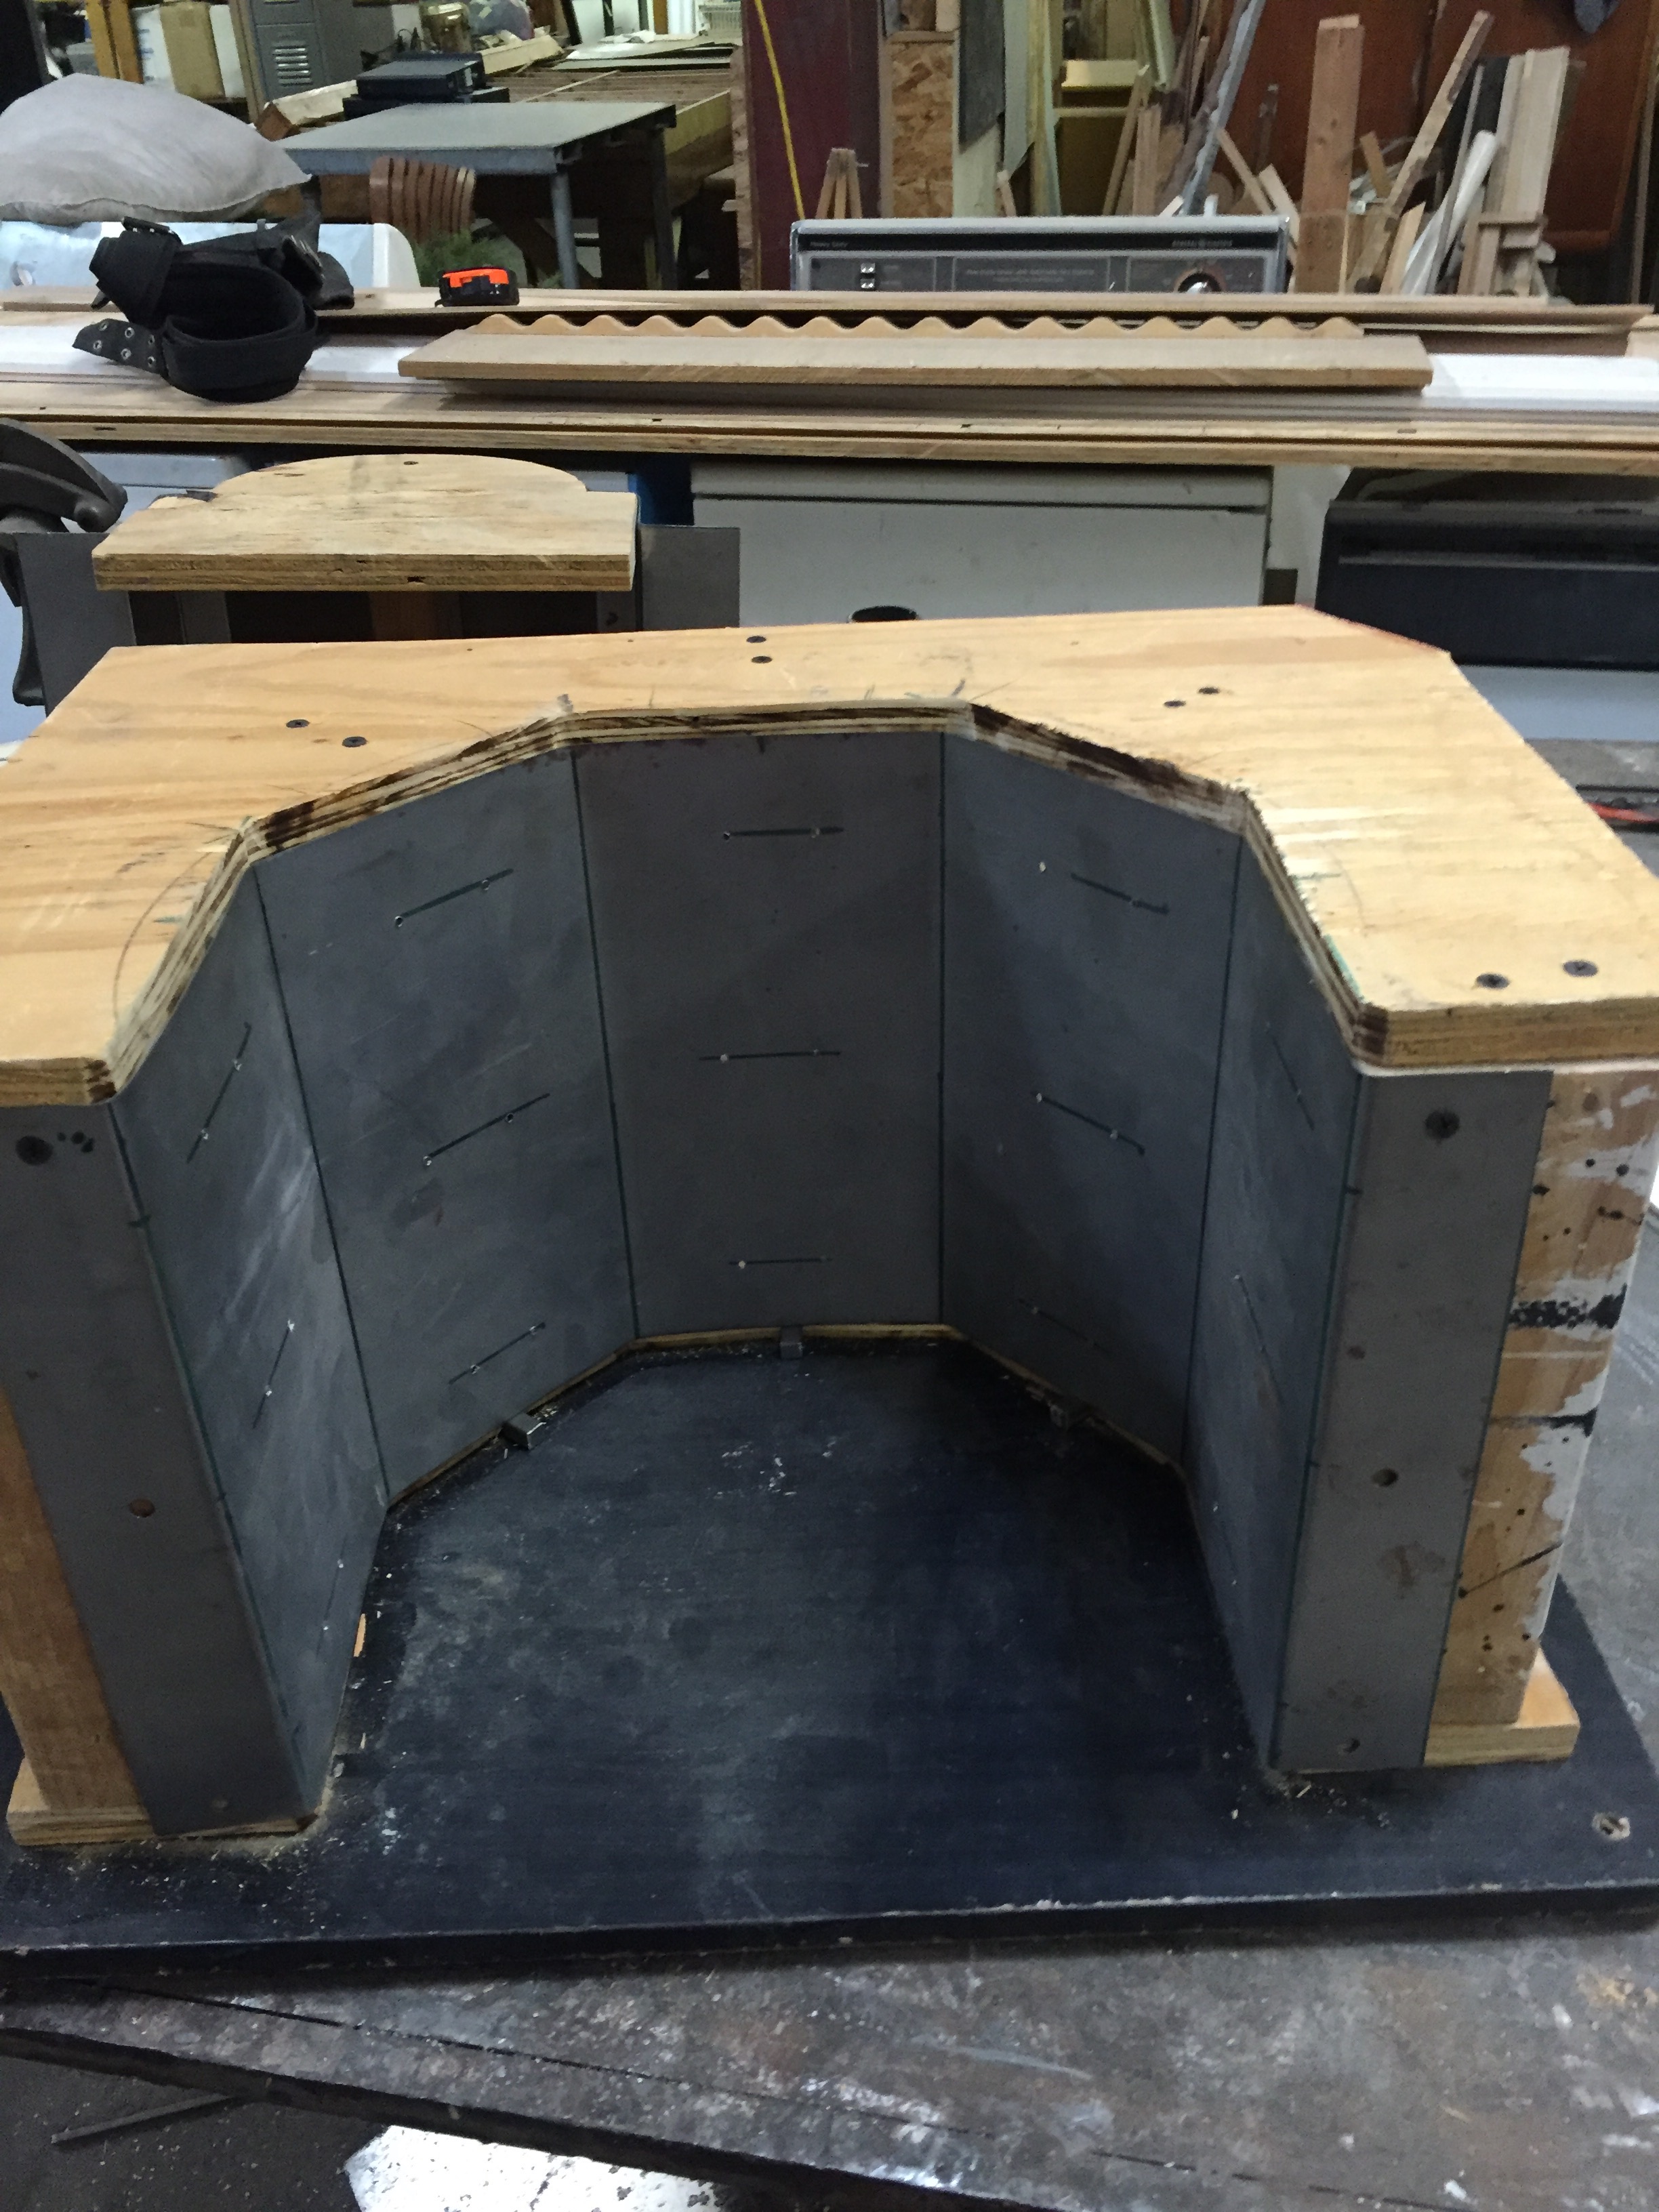
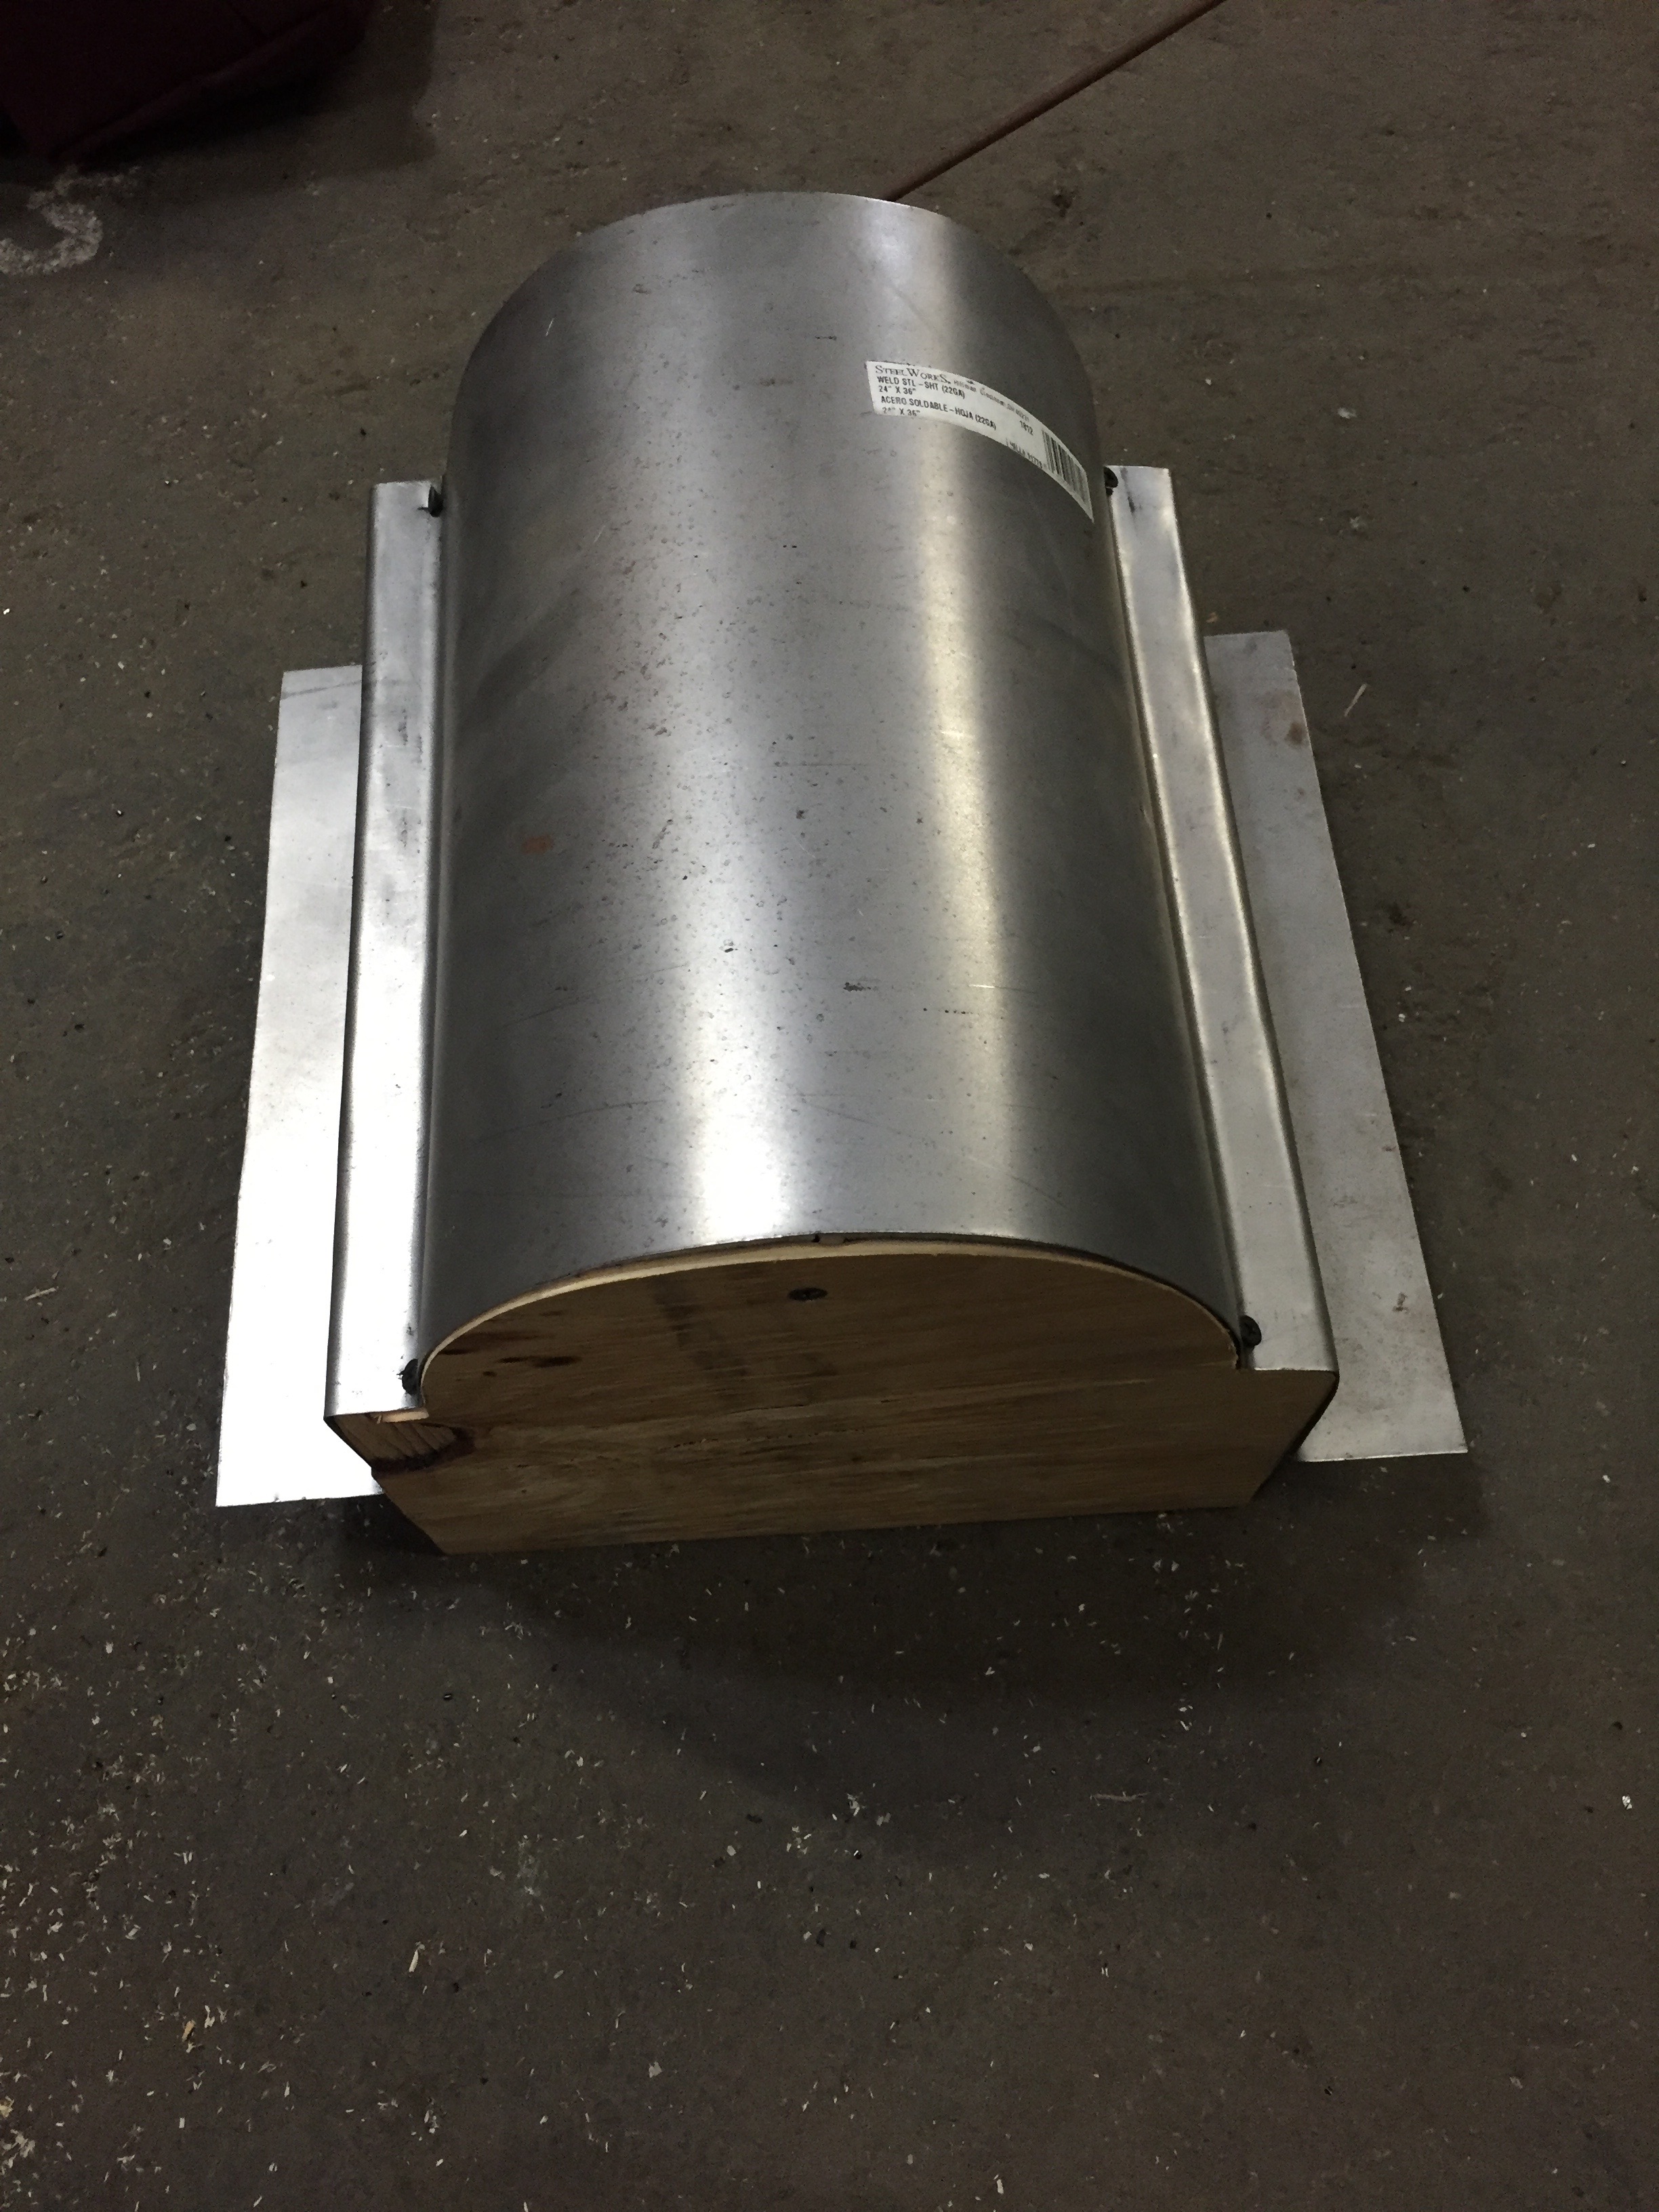
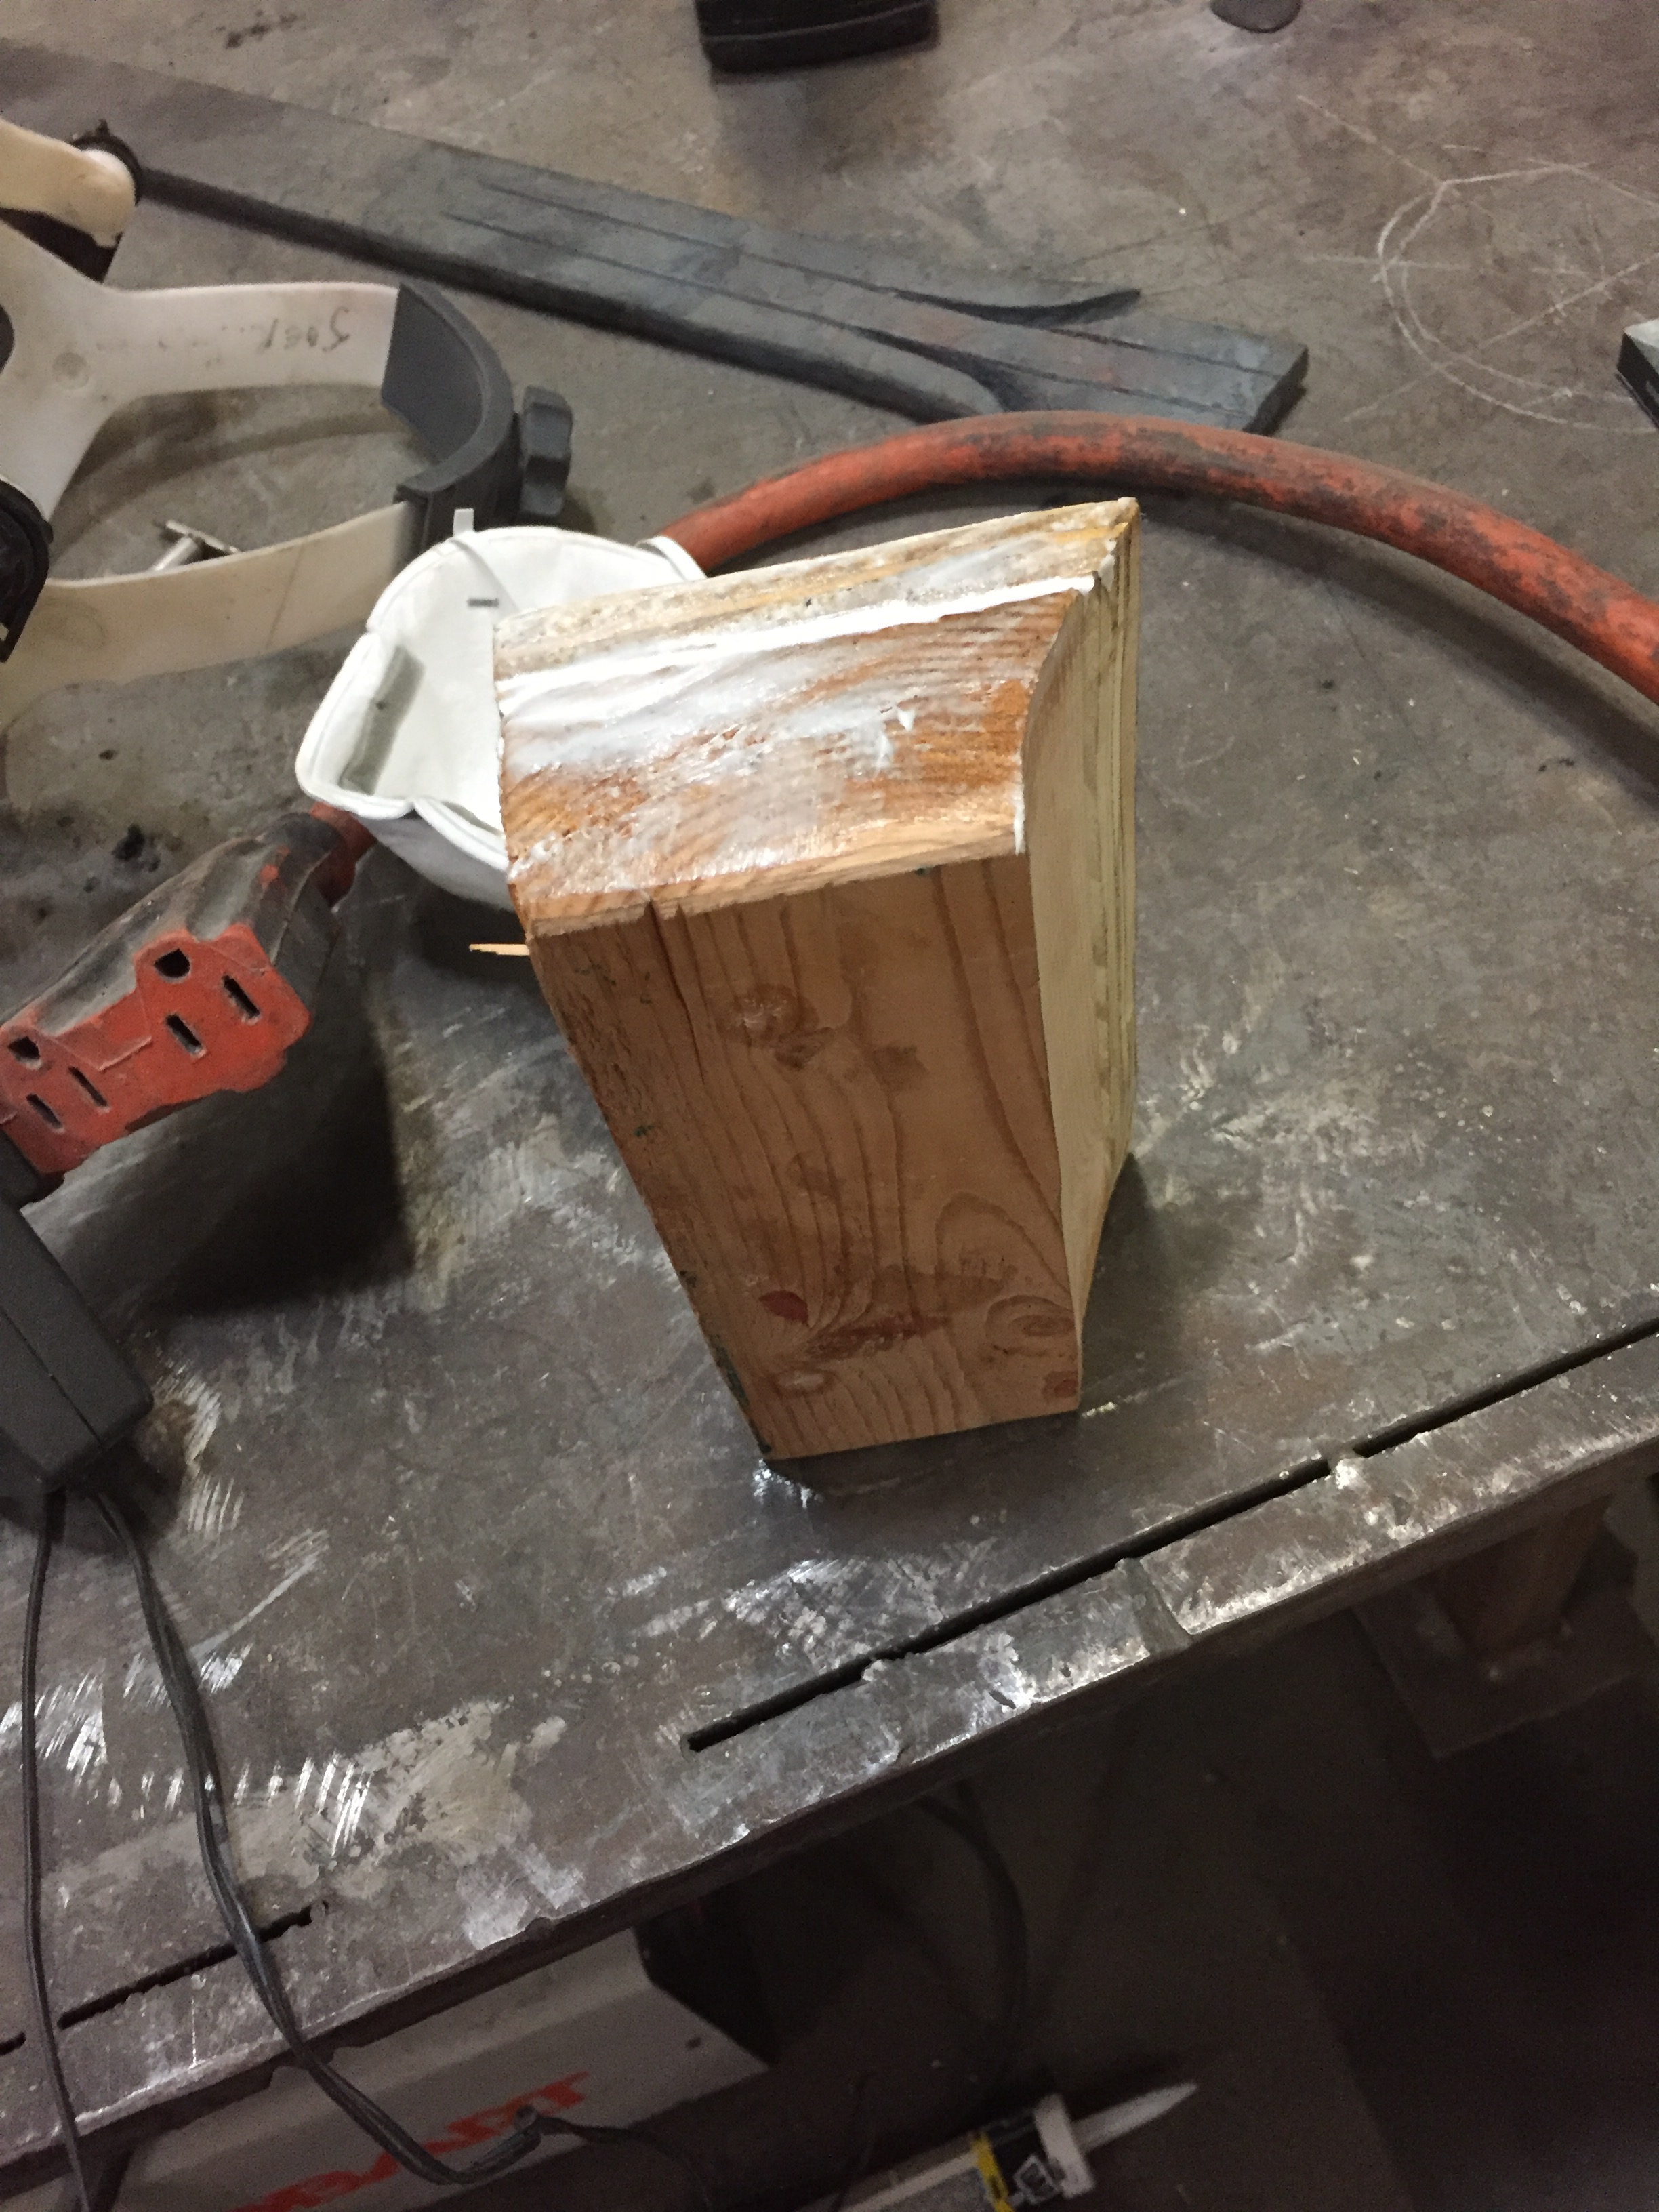
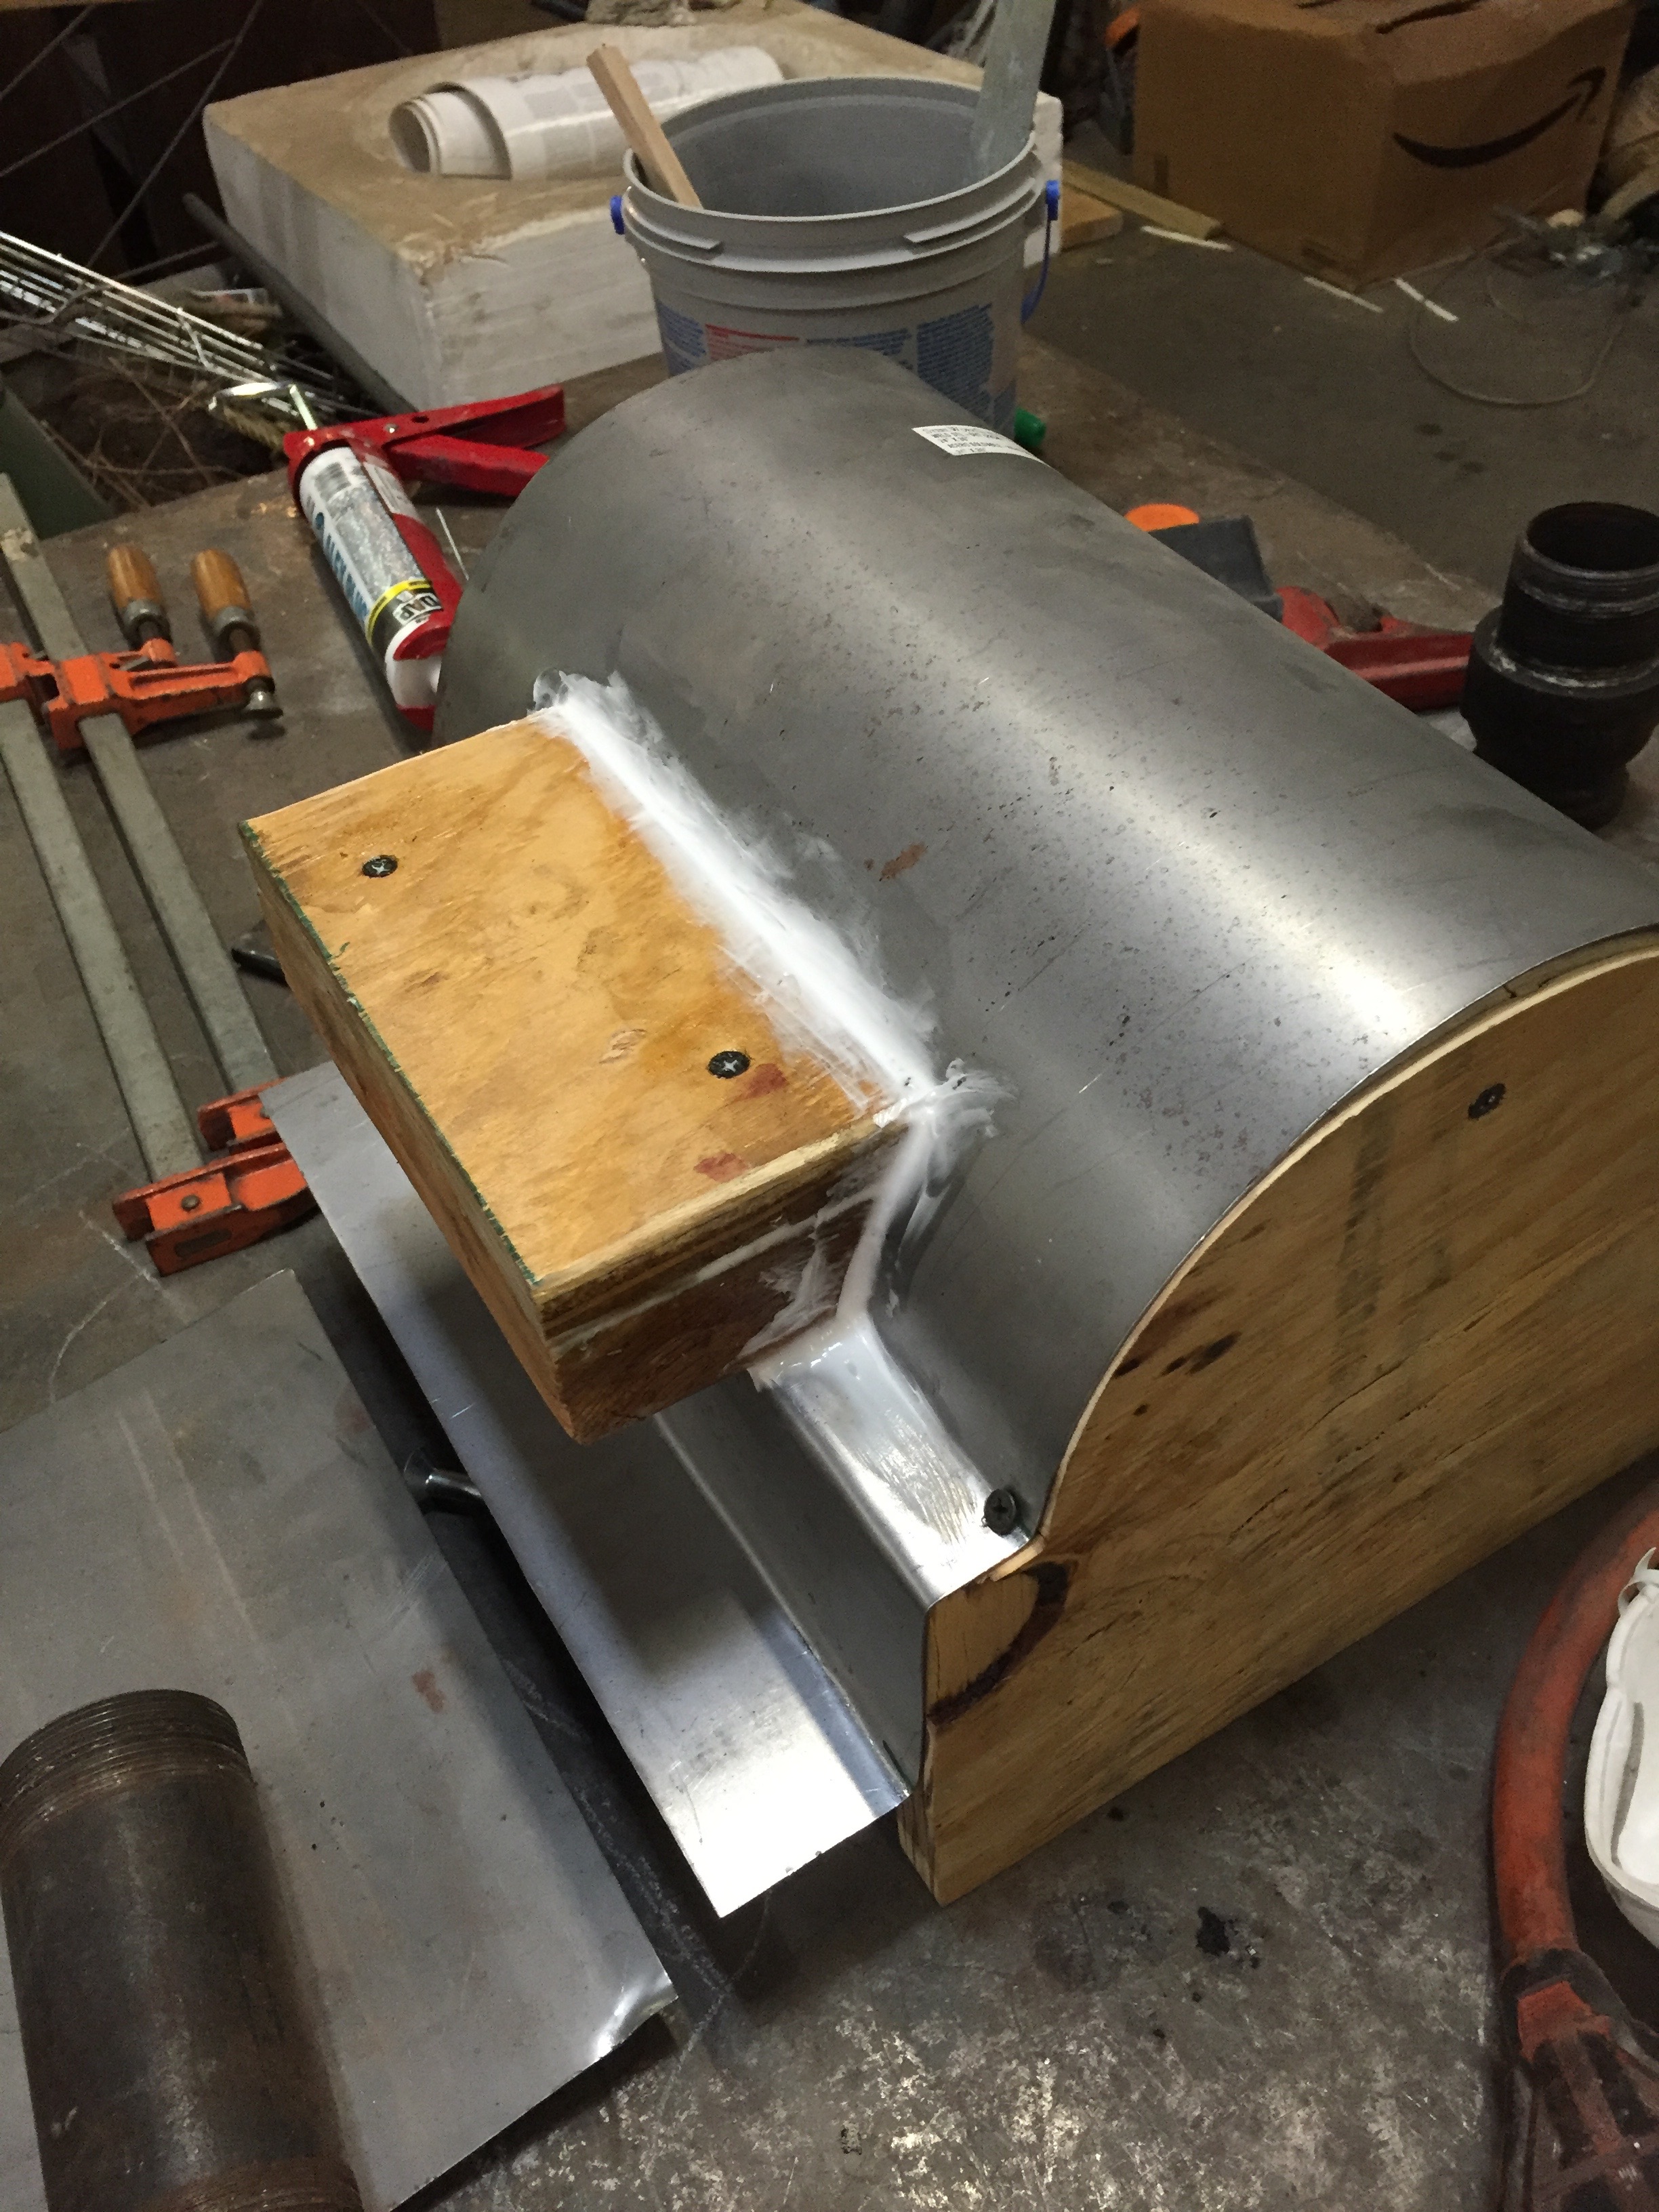
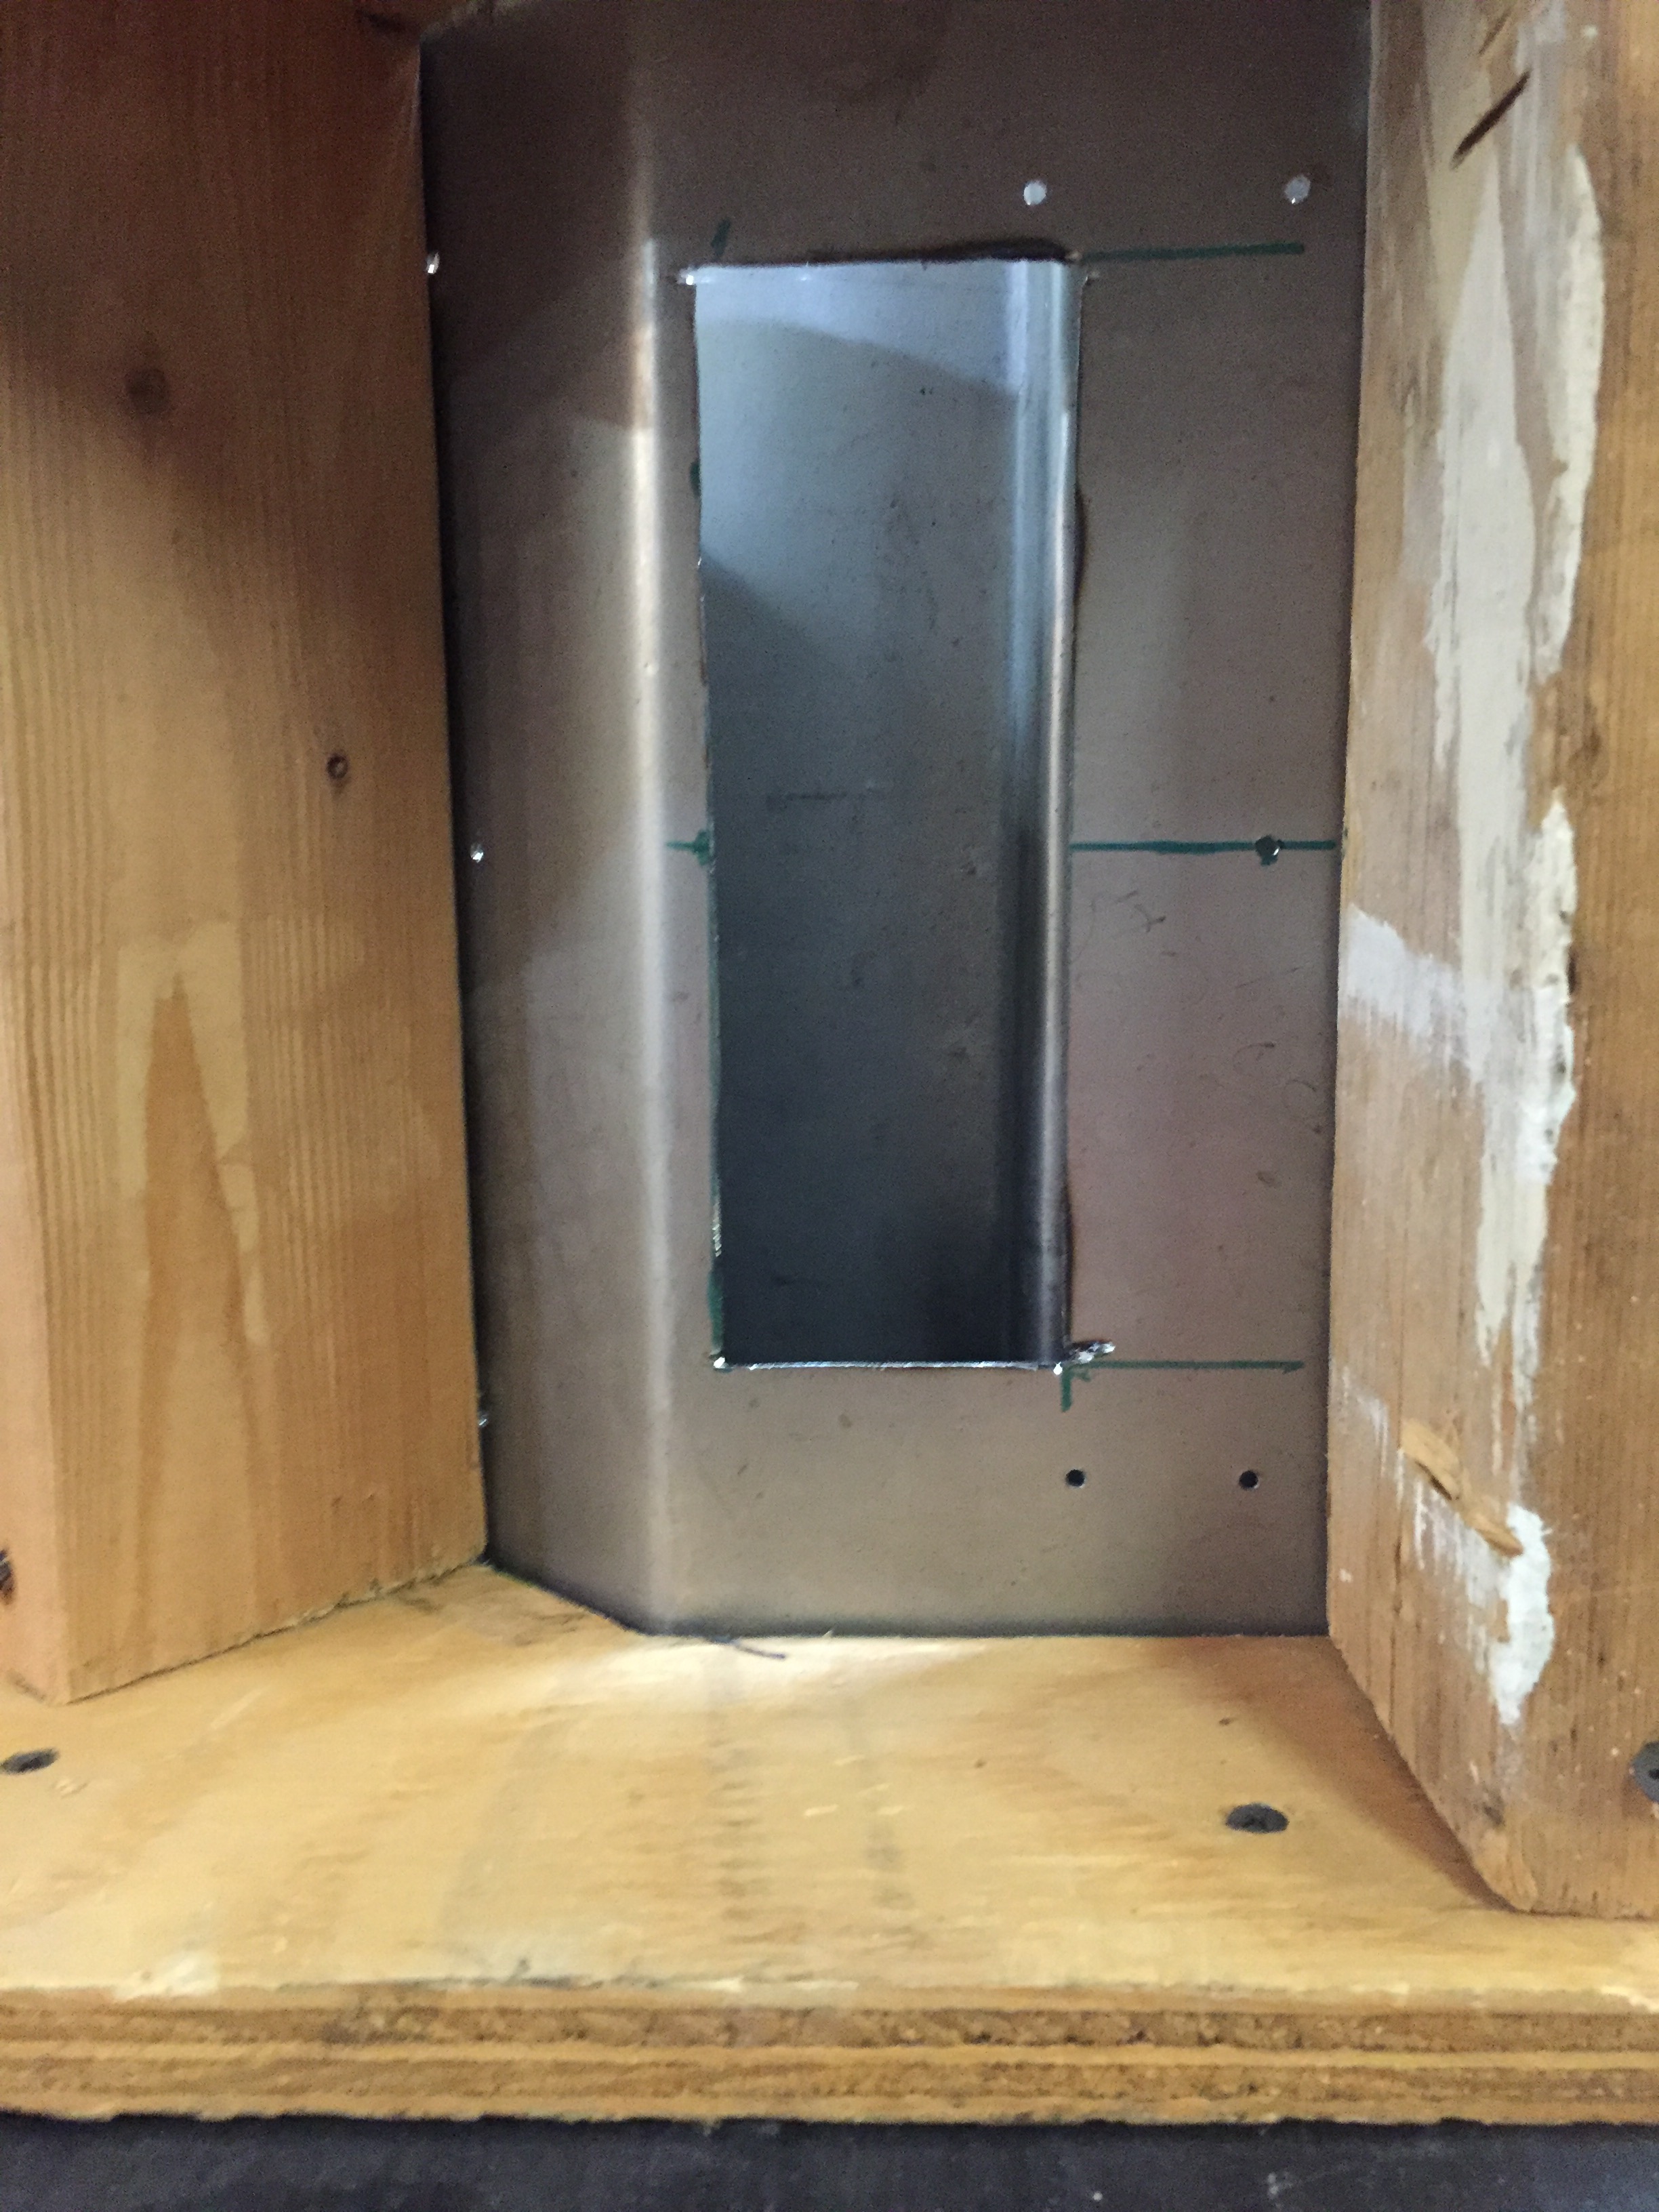
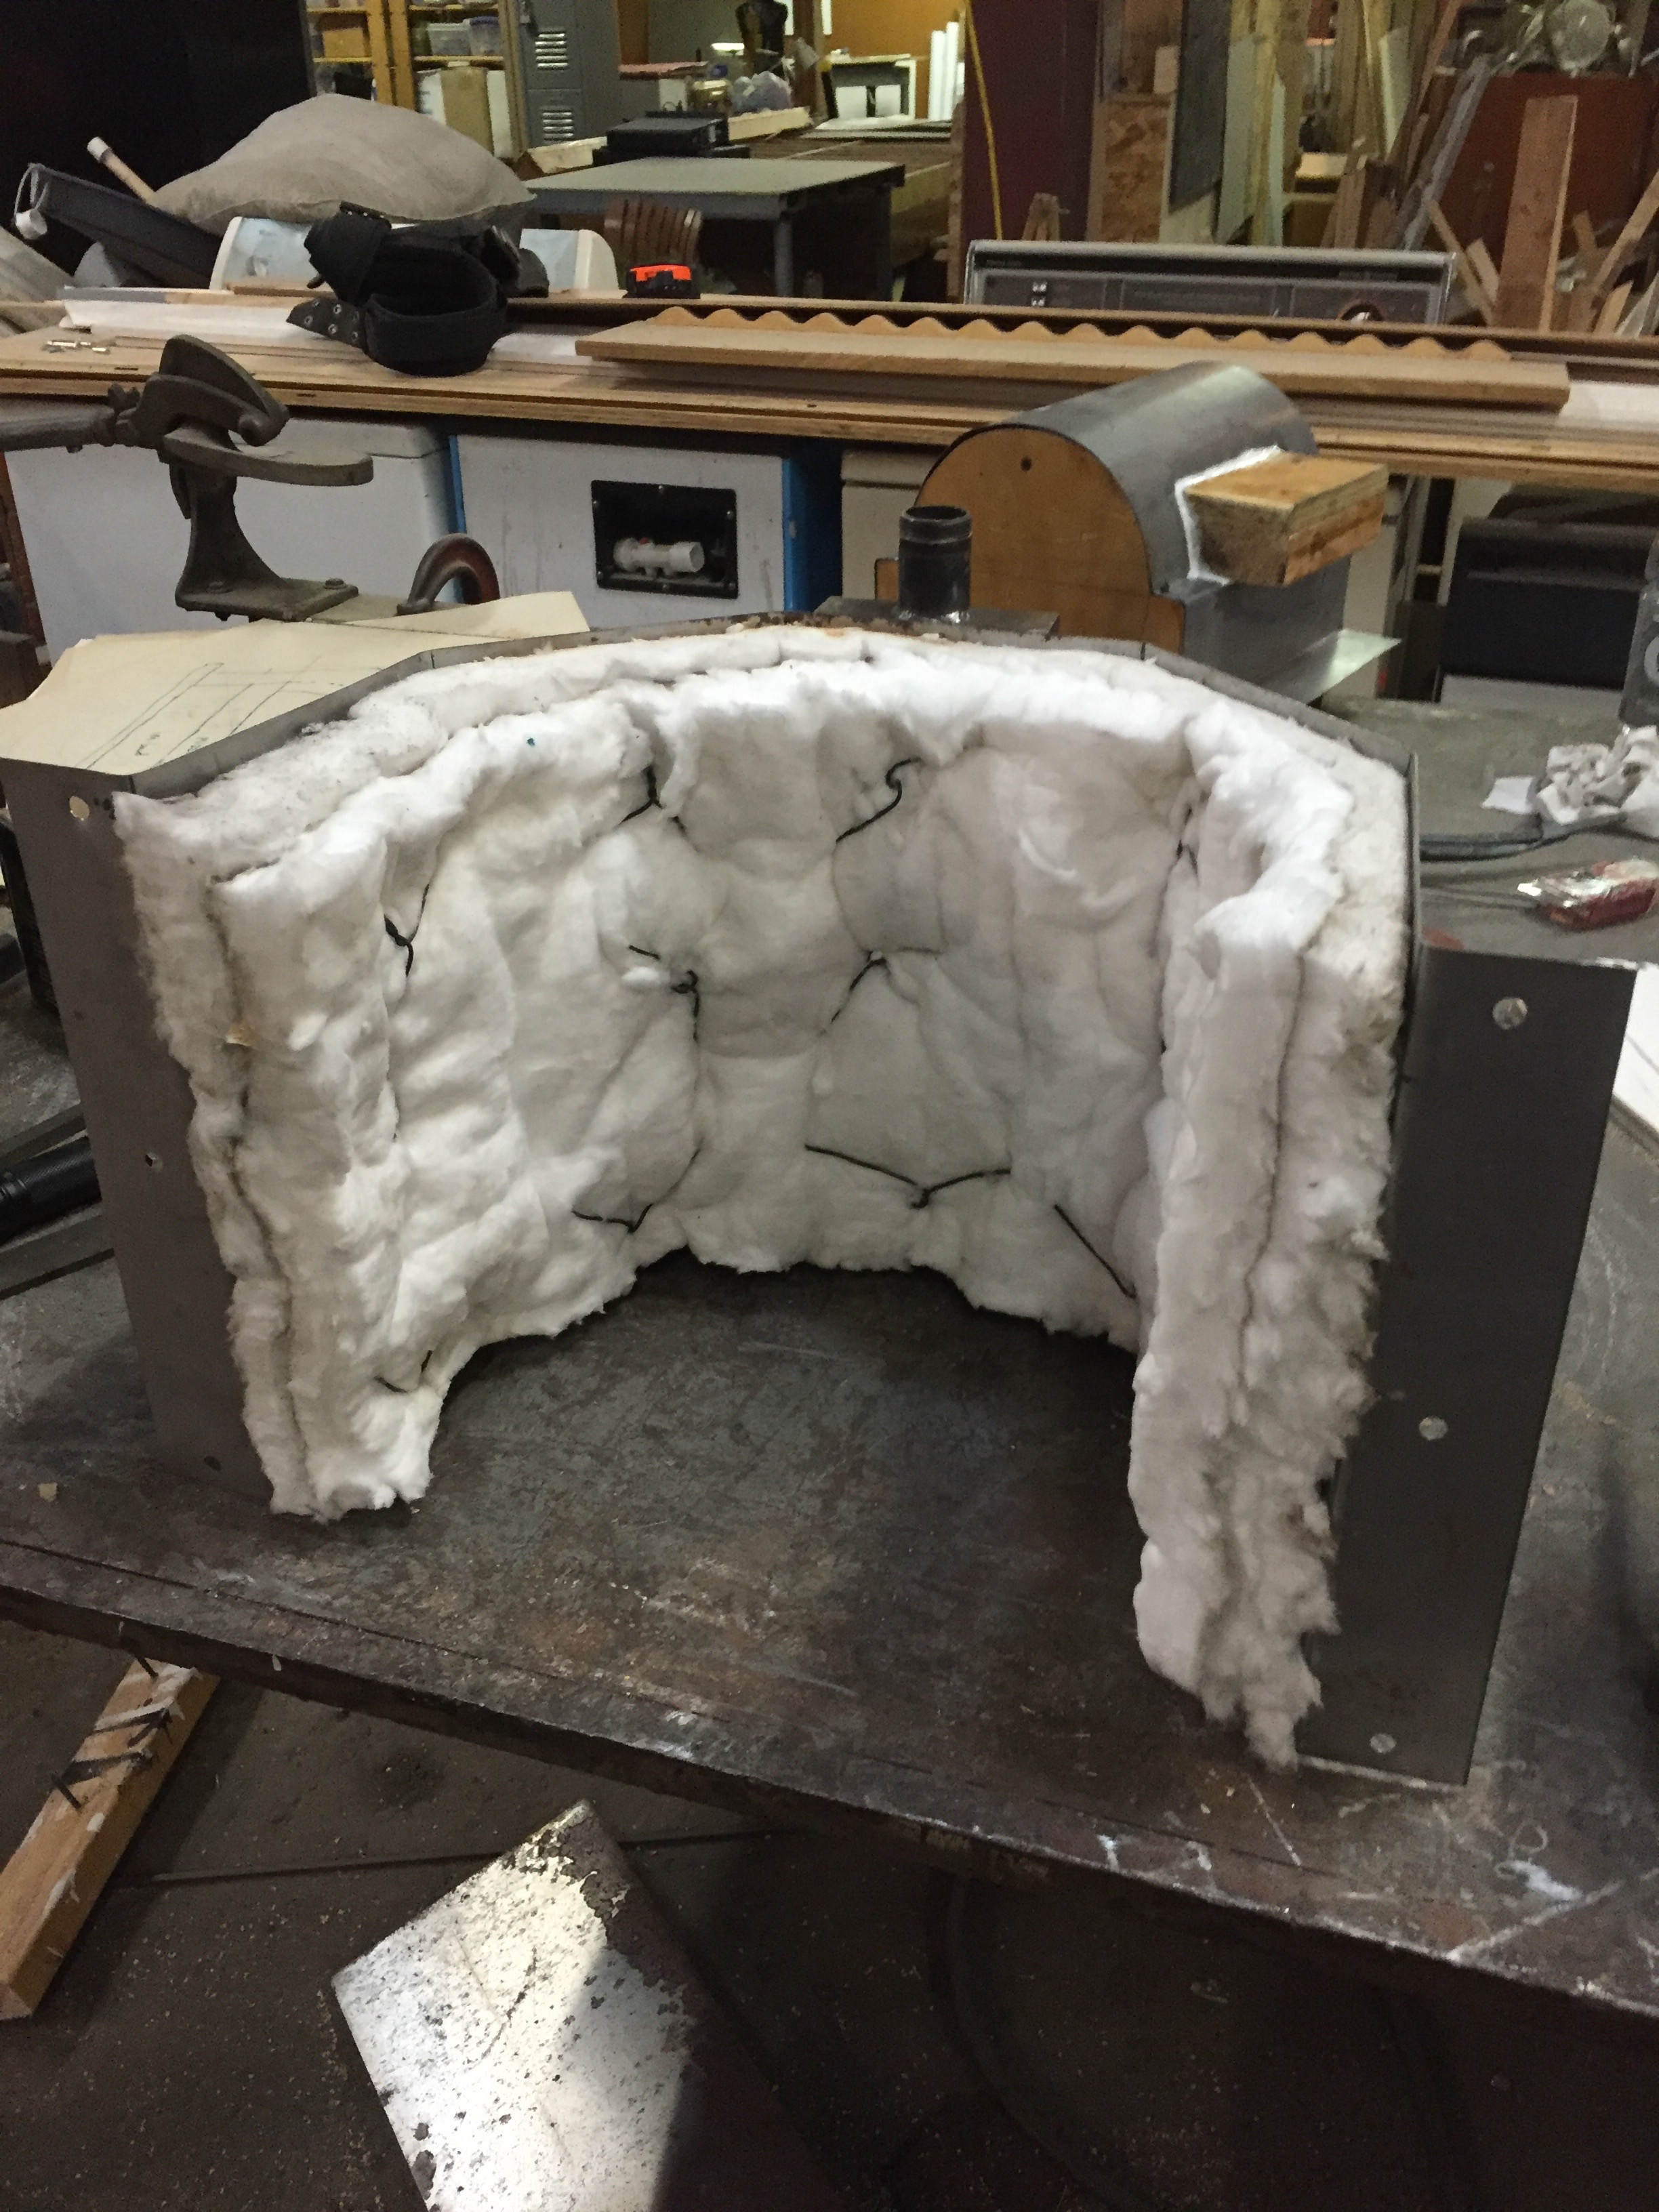
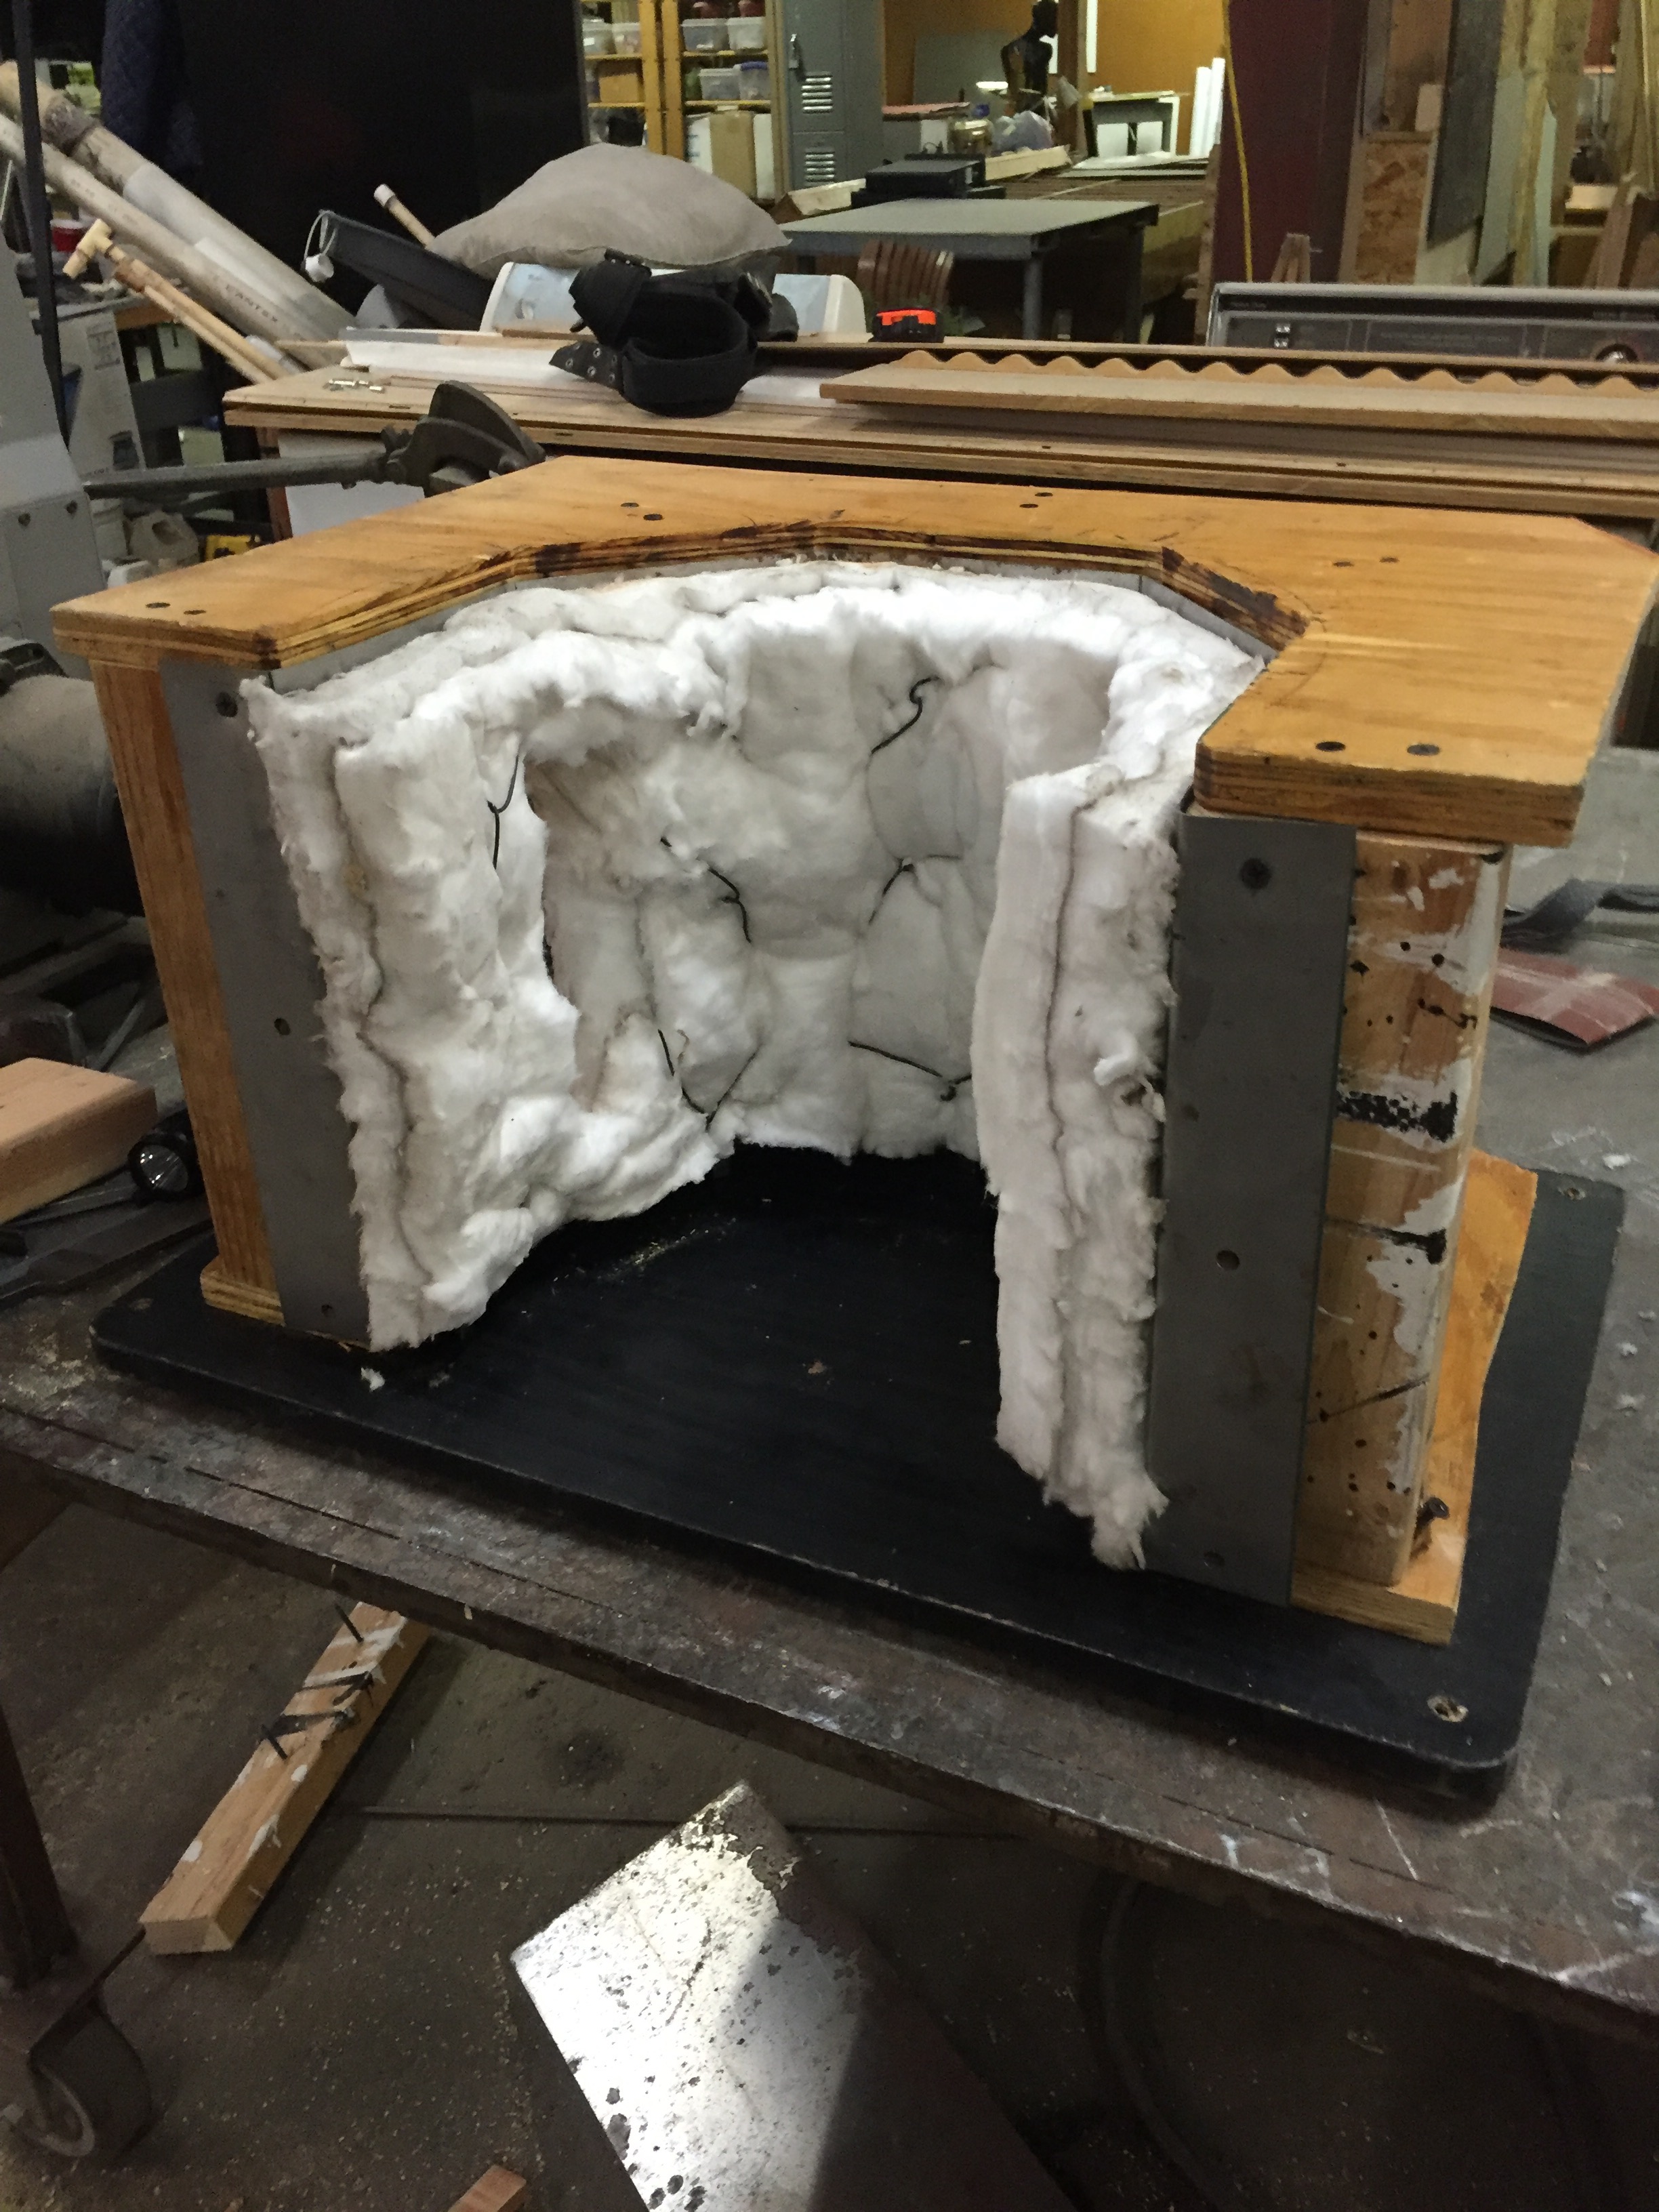
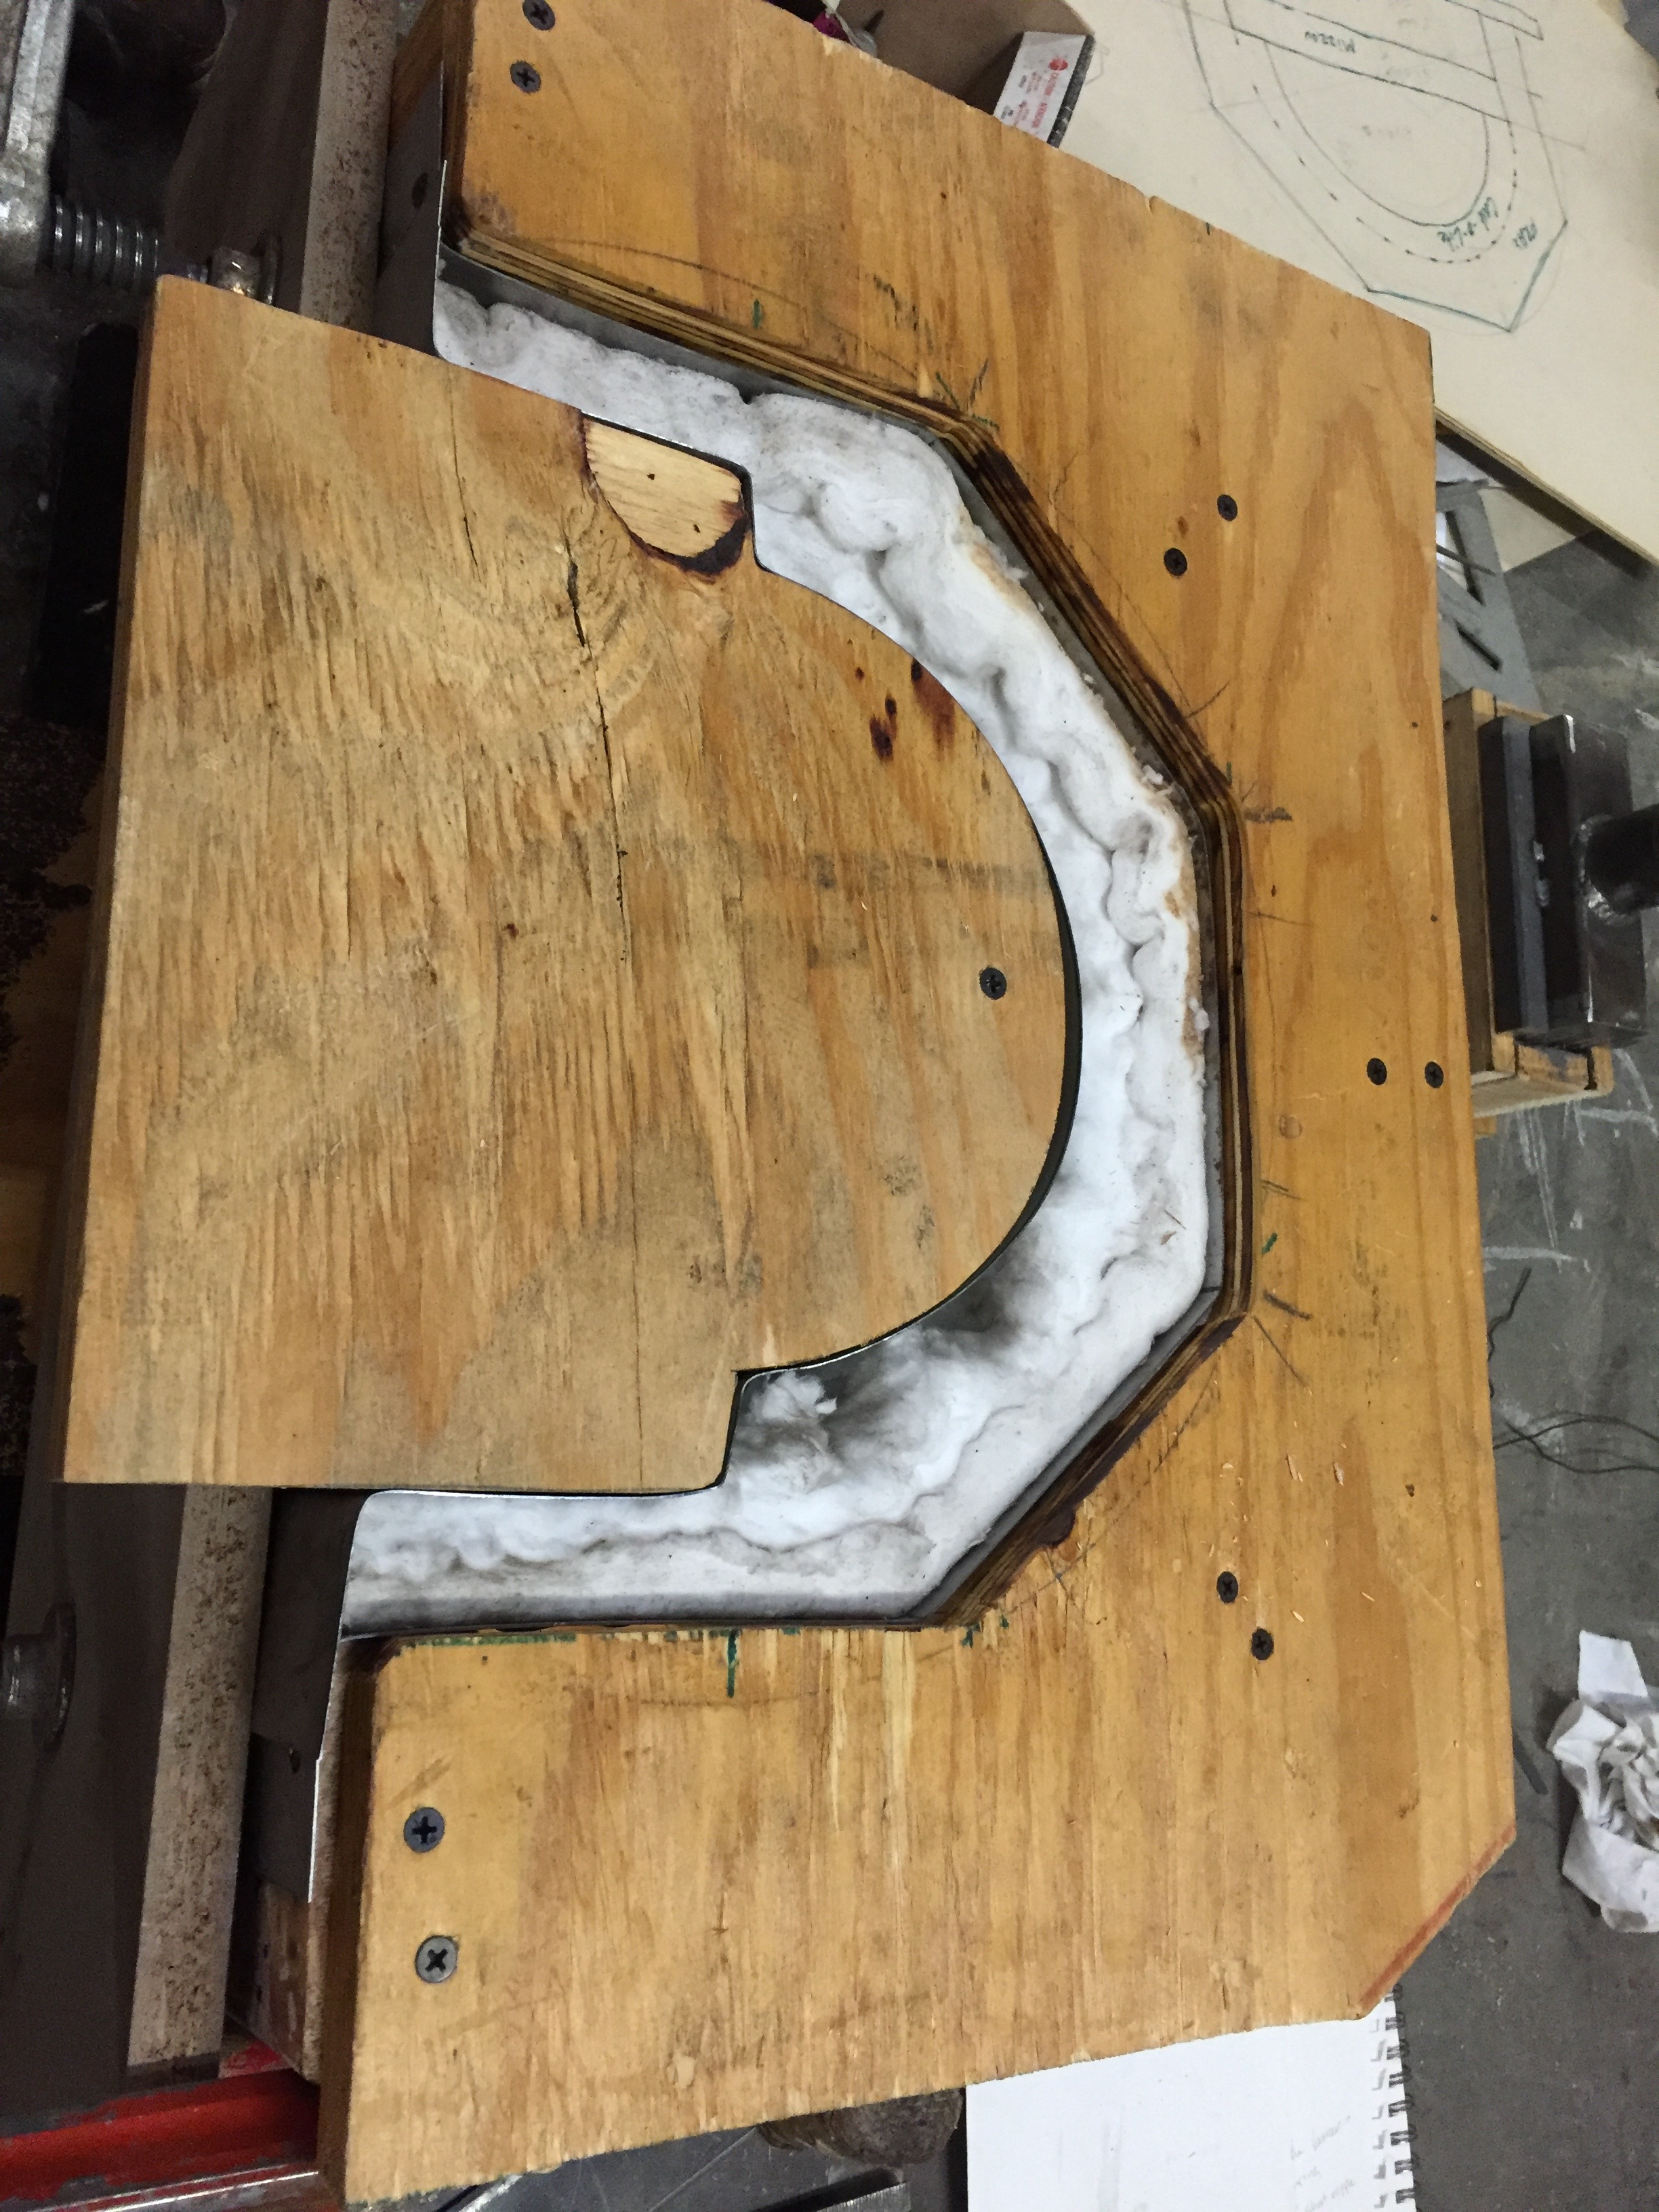
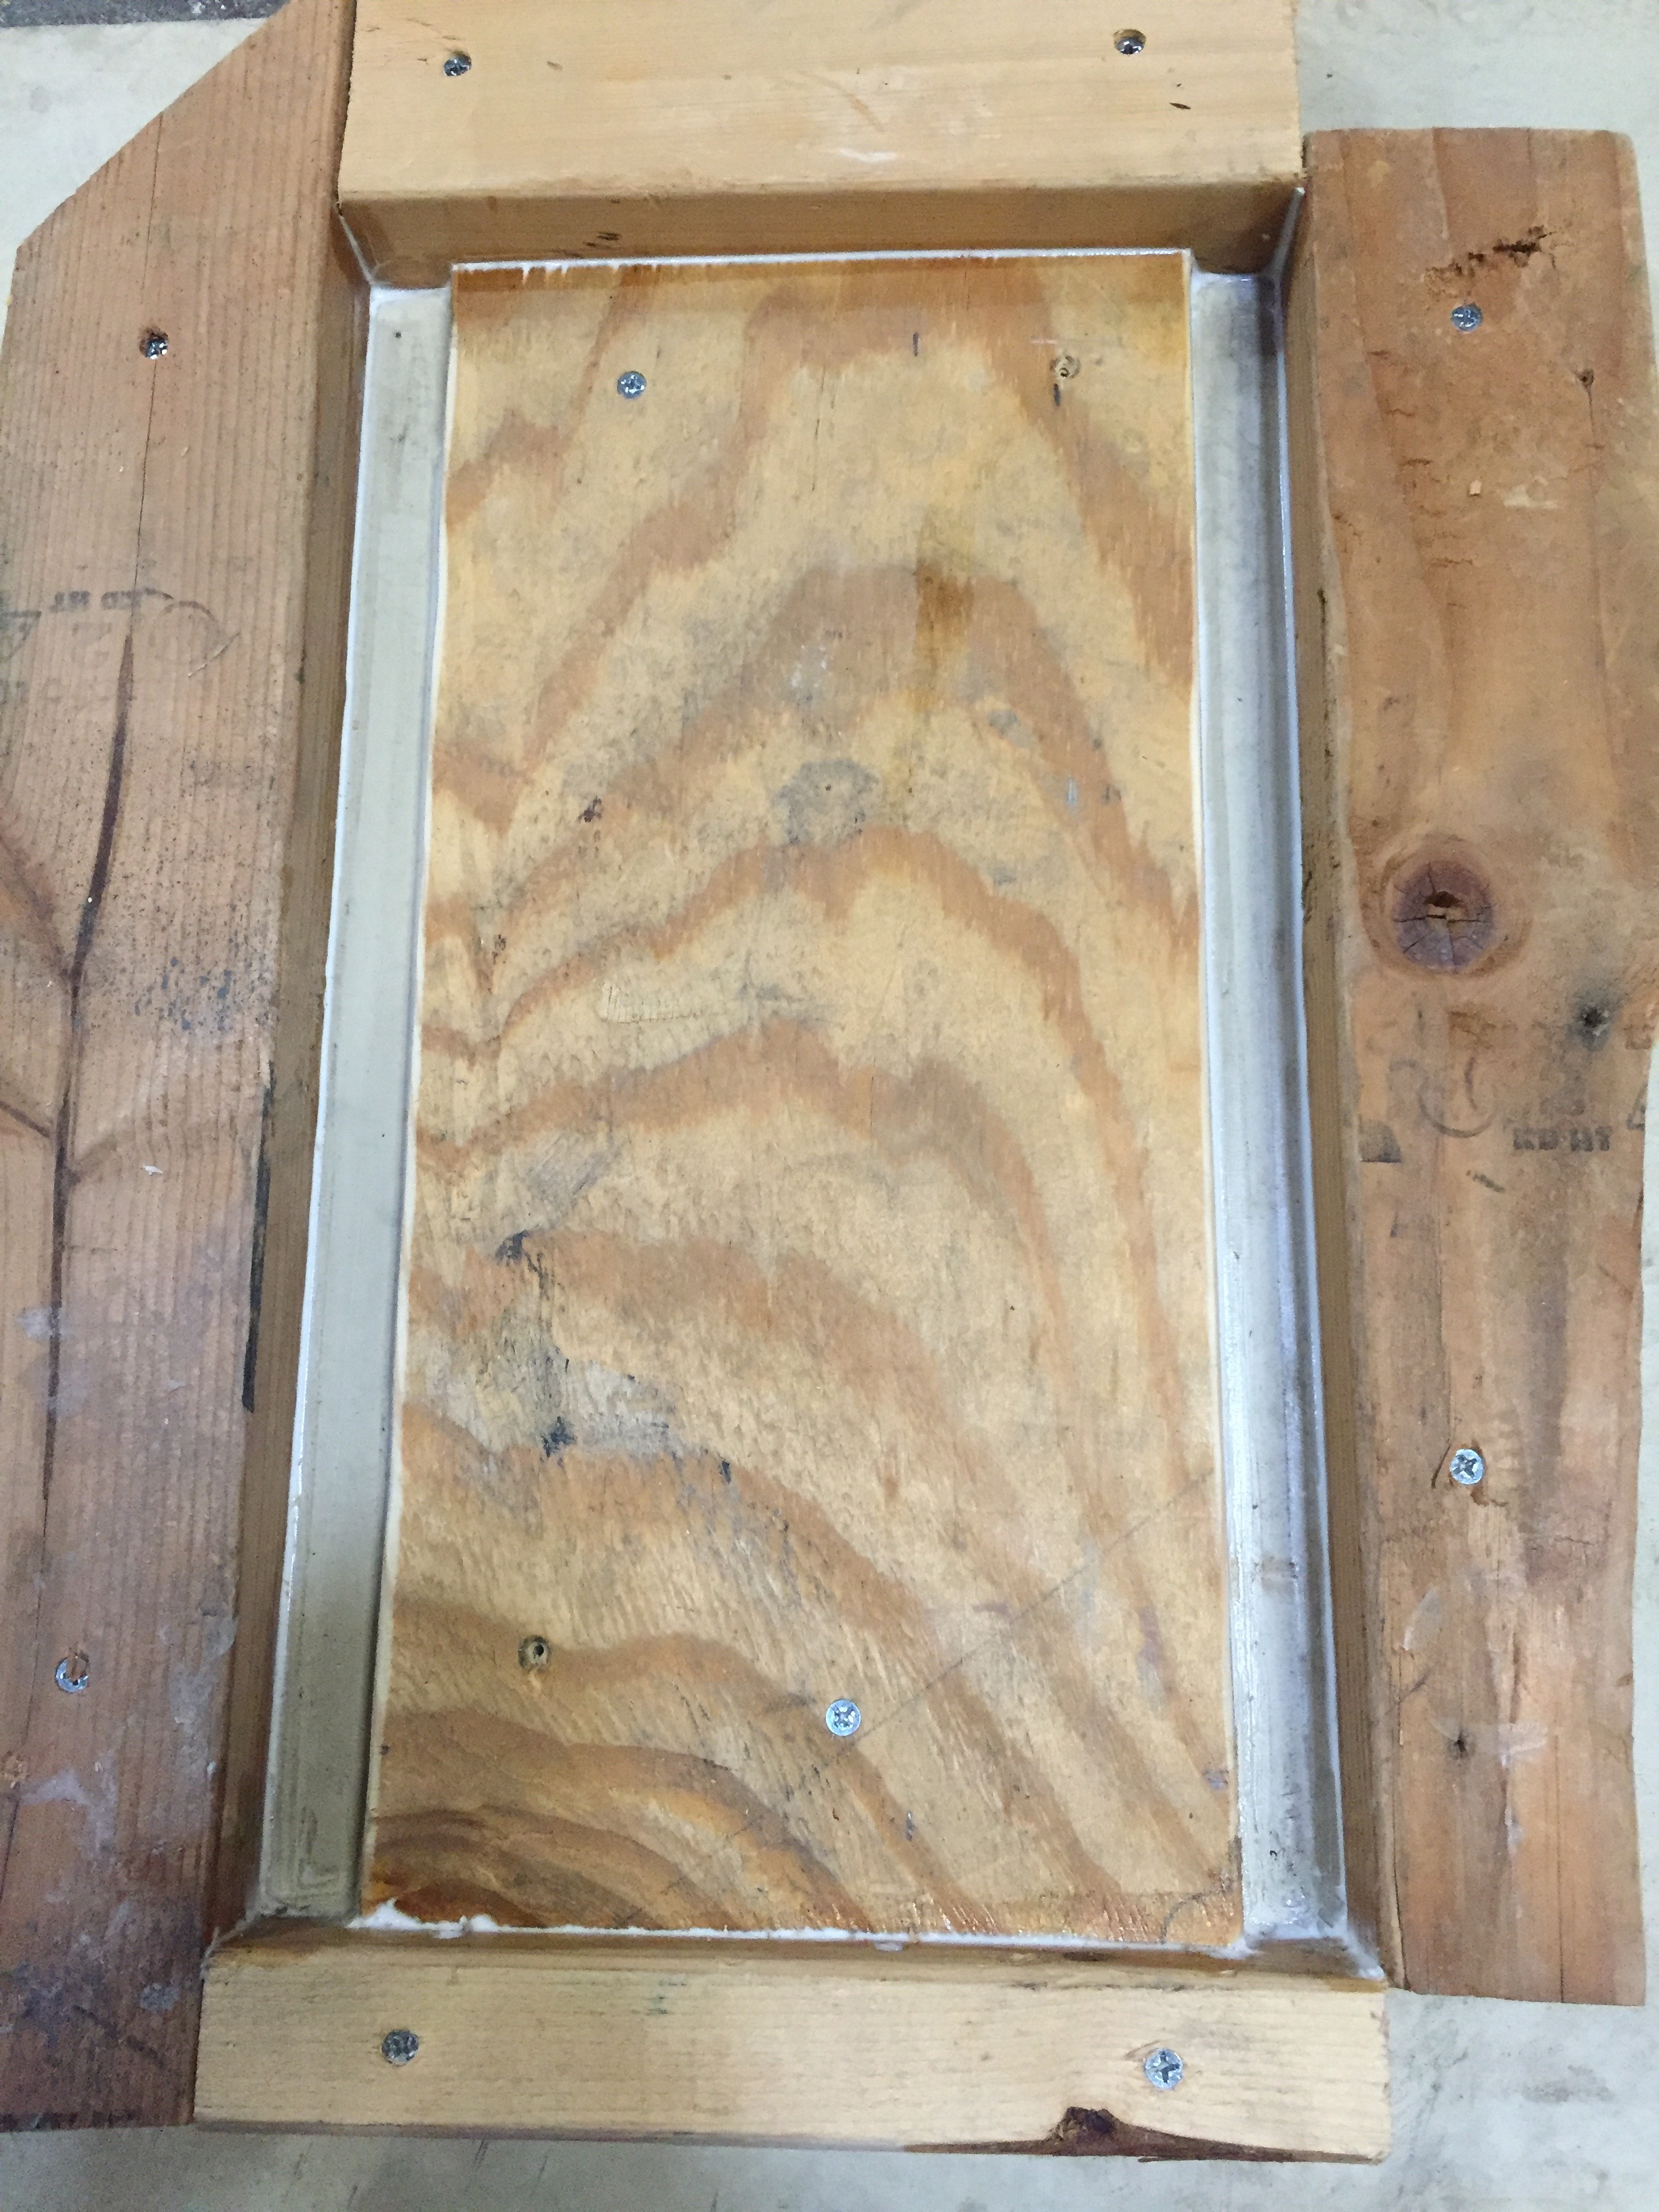
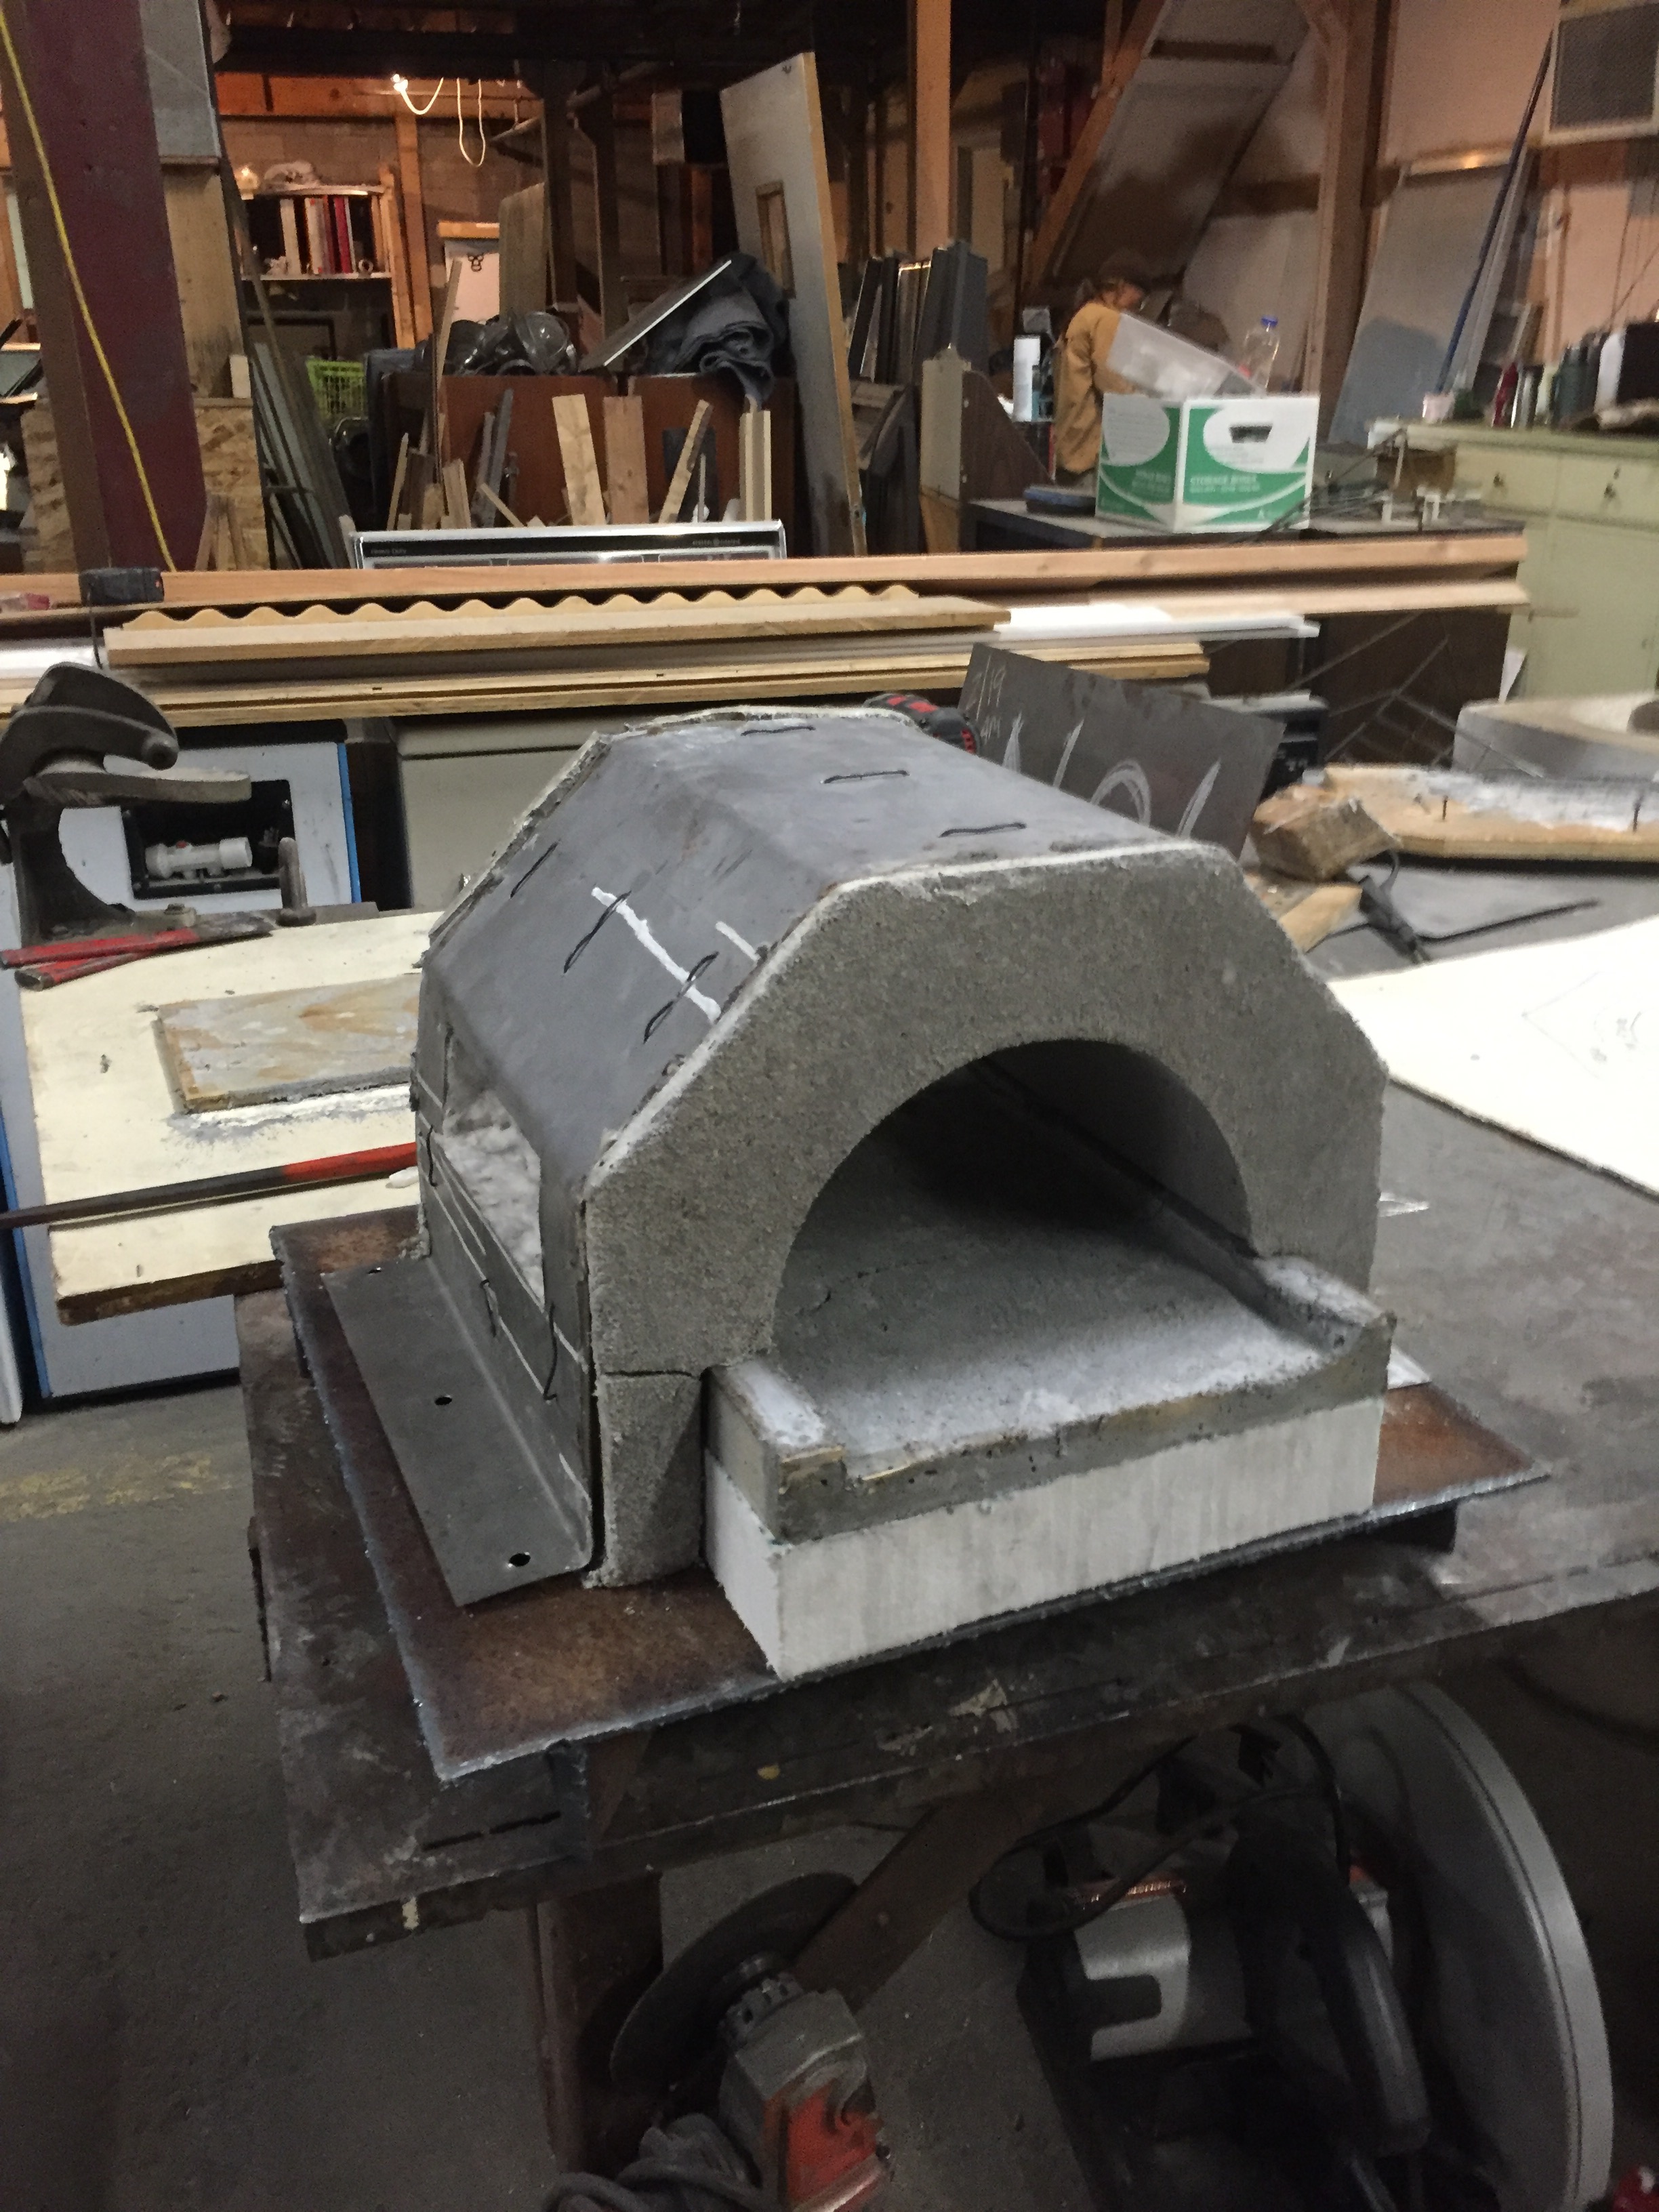
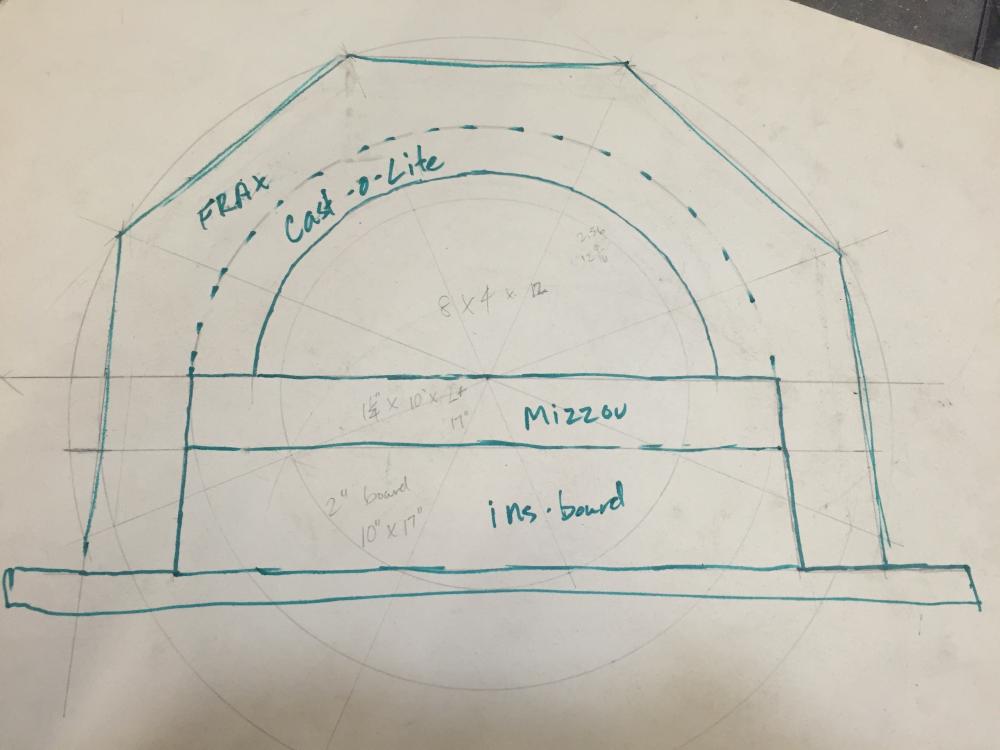
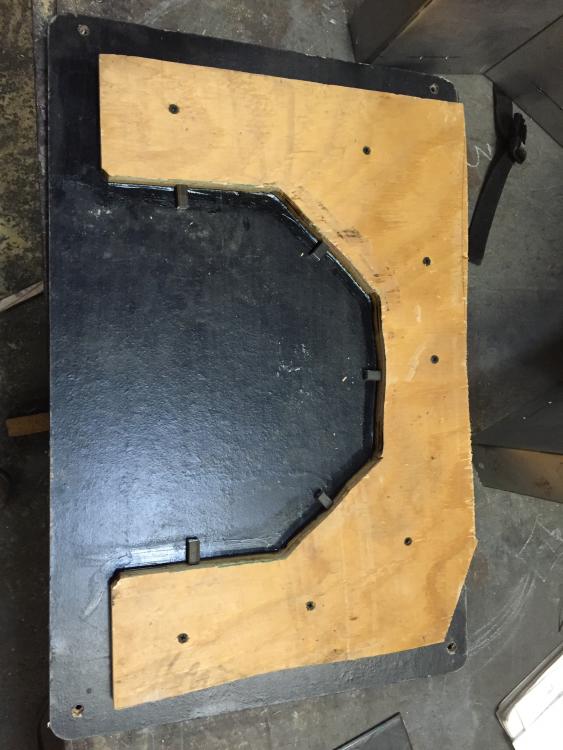
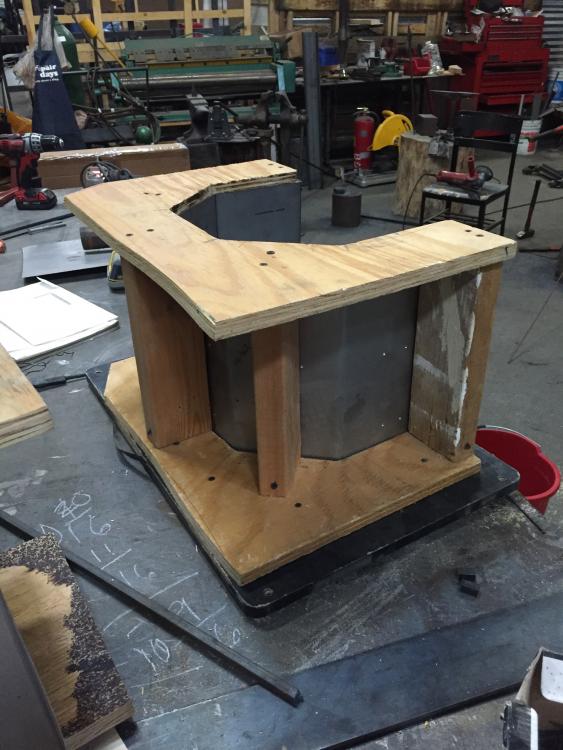
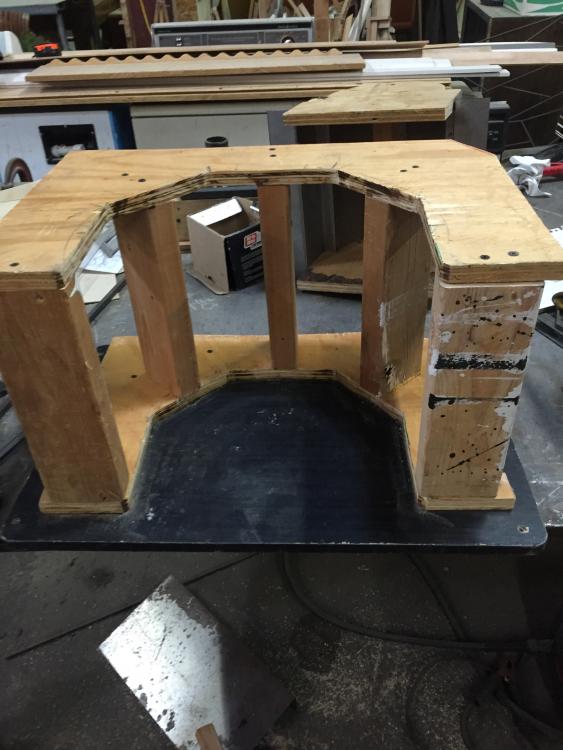
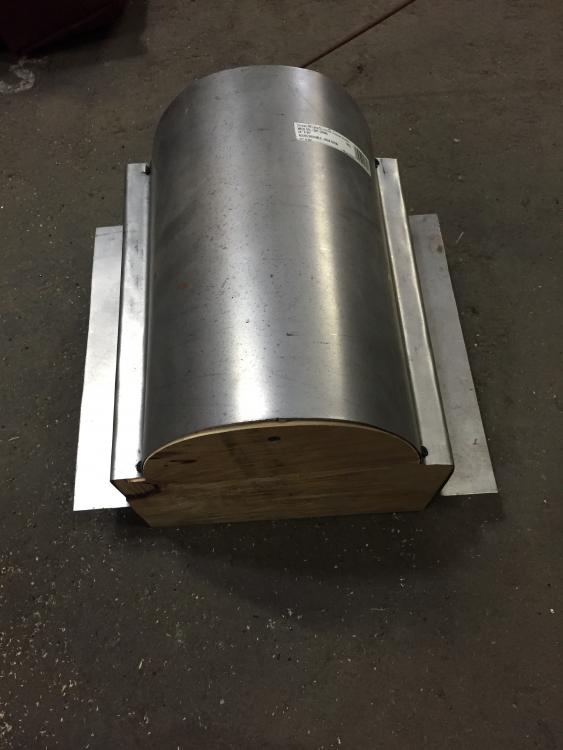
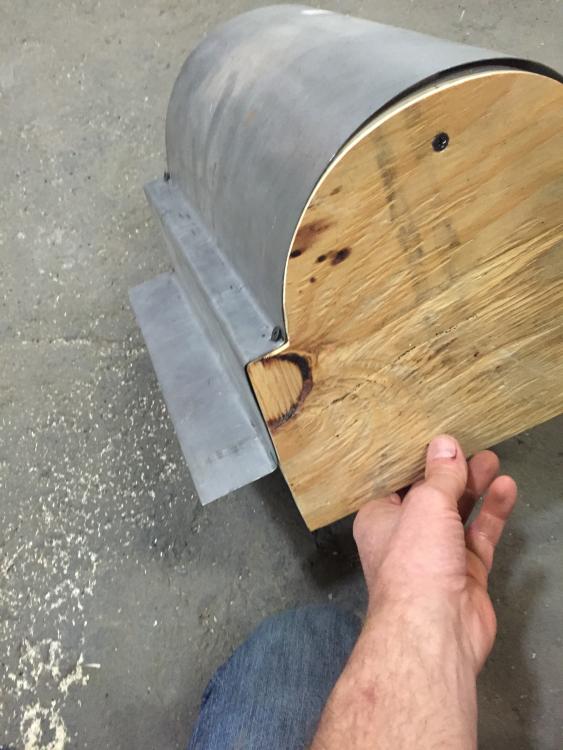
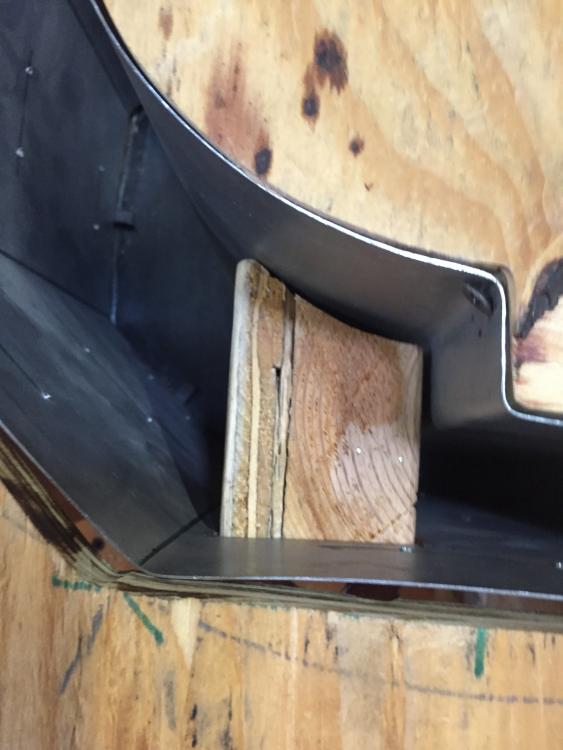
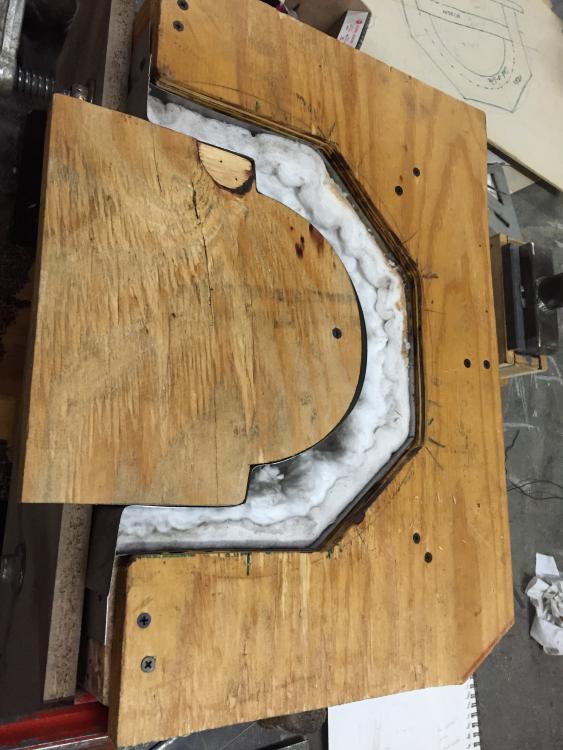
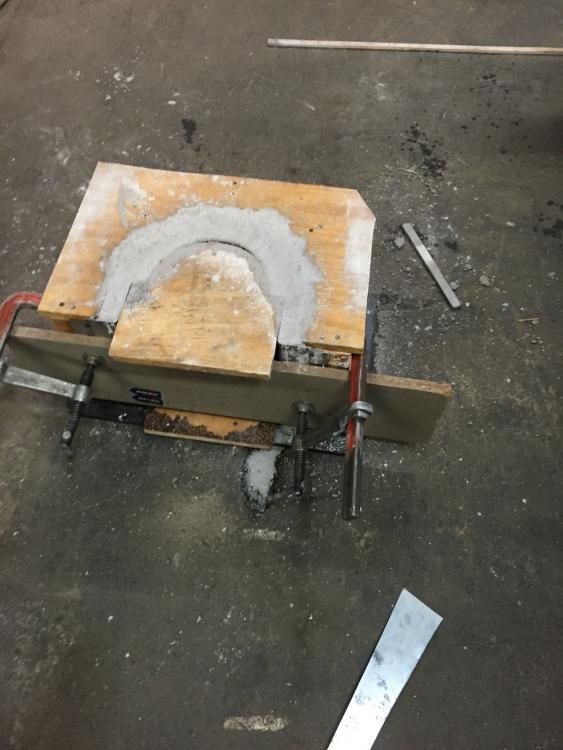
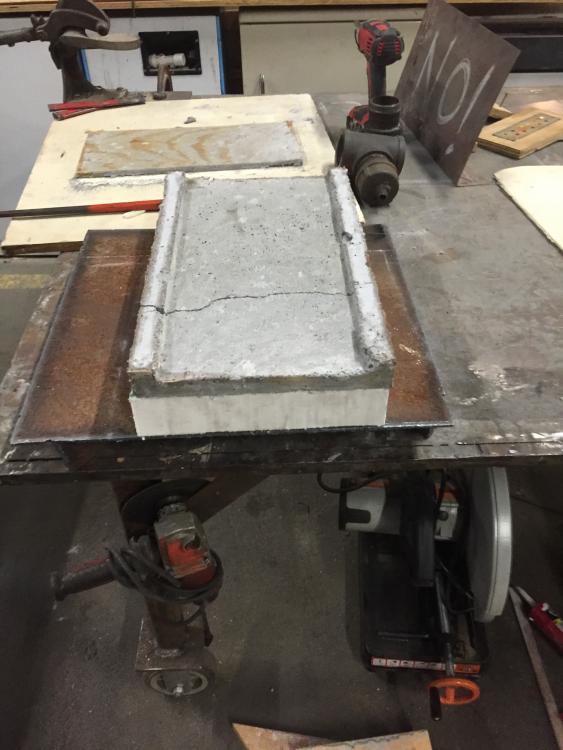
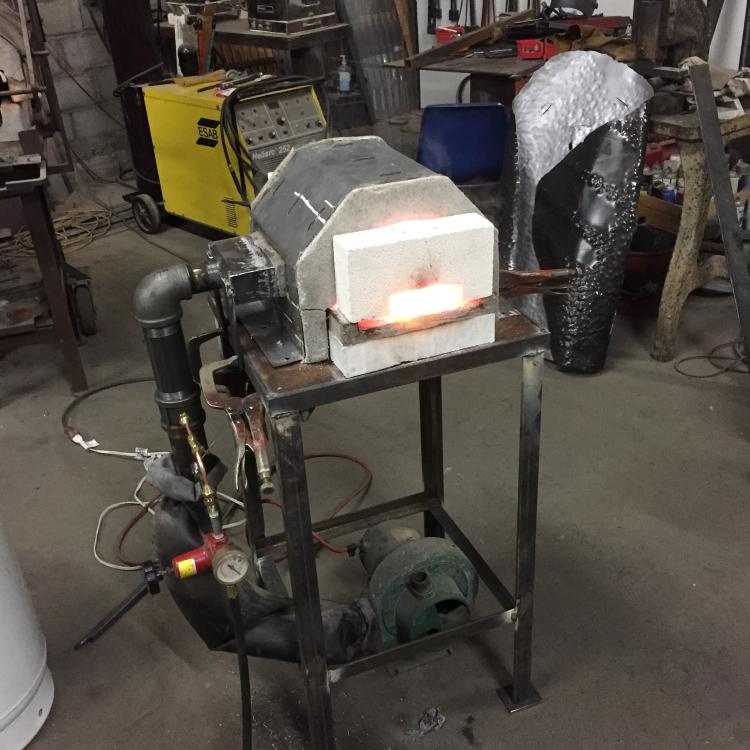
So there's a lot of talk about building burners and which design is better, but not so much about the box you put the burner in. To me, the box in the more important part. No matter how efficient your burner is, it is the box that will largely determine how hot the forge gets, how quickly you can get to work, how long you wait for heats, and how scaly your metal gets. Here are some of the things I want in a gas forge, and why I want them (Your desires may be different, and you'd want a different design. The design I'll show is not the one I'd build for example if I were a knife maker or if I only had a half-hour at a time to forge.): It should get hot and stay hot when I fill it with metal. Insulation is key, but so is thermal mass. I want enough of a heat sink to make sure the metal heats and re-heats quickly rather than the forge cooling significantly when I add the mass of metal. It should be durable. Who wants to spend lots of time building and fixing forges instead of using them? You should be able to adjust the atmosphere, at least from neutral to rich. Too much oxygen makes heavy scale and makes welding hard to accomplish. The burner matters here, but also, a forge should have doors. Without doors, it is hard to control the atmosphere except by gas pressure, which is wasteful. Doors should not prevent access to the whole chamber when necessary. Why build and heat a volume you can't access? If you use ceramic fiber blanket, it should not be where it can be abraded. If your forge or doors use a steel shell, keep the steel out of the flame path as much as possible. This goes to durability. when your steel burns up, does it expose fiber insulation? Does it open a gap around the burner? Will your roof buckle and cave in when heat gets between the insulation and the shell? None of these are good in my book. Quiet is nice. The shop is loud enough. For all of the reasons above, I cast forges from commonly available refractory materials and use ribbon burners. In the pictures attached, the arch is cast from 3000 degree lightweight insulating castable and the floor and burner head are cast from 3000 degree dense castable. The entire box is surrounded by 2" of fiber insulation. You can't see it on the arch because I made the castings slightly proud of the frax to keep the fiber out of the flame/abrasion path. The casting is also proud of the steel shell so that there is no steel to erode in the flame path and open gaps. This may look like a lot of work, but with assembled materials, it all took well less than three days, elapsed including the stand and plumbing. Not so bad when I have other forges built this way that have lasted close to ten years. For this rather small forge I did push the limits of casting with sections as thin as 1" for the floor but I think it'll hold up and I didn't want it to take forever to heat up. I did build the ribbon burner but there are other people here more expert than I am. It is 2" x 6" with 11 crayola size jets. I used a needle valve on the gas and a homemade butterfly on the air and it is very tunable and quiet. Image notes: 1 have a plan. 2 the base for the casting form. Note 3/8" blocks to lift steel shell off of floor and allow casting to extend beyond the steel shell. 3 the outside shell. Holes drilled are to wire the frax to the shell. Flange secures mold and will ultimately be bolted to stand. 4 outer shell in mold. Note that top of mold is also proud of shell so that casting will go beyond steel. 5-6 the outside of the shell mold. 2x4s support the shell and keep it from bowing out. 7-8 the inner shell- arch form. This will not be part of the finished forge. Don't forget the mold release. 9 the two halves of the mold mocked up. 10 the "core" for the burner. 11 the core mounted and caulked to the inner form. 12 DON'T FORGET MOLD RELEASE 13 the (not yet caulked) burner core fit to the inner arch and through the outer form. 14 opening for the burner core cut into the outer shell. 15-16 the frax wired onto the outer shell, and with the burner opening cut out. Note that the frax is shy of the top and bottom of the steel shell so that in the finished casting the frax will all be encapsulated in castable. 17 the nearly ready assembly. What this doesn't show clearly is that there is a little more than an inch of clear space between the frax and the inner arch. I will ram the castable onto the frax which will compress and compromise it some but will still leave me with more than 2" of insulation all around. 18 the casting in the mold. Be sure to really ram the castable into the bottom to fill in the lee of the burner core. 19 very simple mold for the floor. 1/2" plywood core makes the lip on which the arch will rest and gives me a seamless floor. 20 the floor casting sitting on 2" fiber board. (forgot mold release: cracked casting slightly. Sairset to the rescue.) 21 dry stacked and ready to burn in gently. 22 Ta daa. Bright lights mess with photography but it really is that hot. Forge floor is 8" x 12" and the opening is small enough to use a brick for doors. I'll probably eventually build doors that are easier to move around but I can get to work for now.


-
Thanks Wayne. I'm trying to do this quickly but you're right, I should probably just build the burner I need. I'm pretty particular about my forges. What i'm really looking for is a chart or formula that balances plenum area, open area of the burner, and forge volume for optimal performance. I'll probably just wing it anyway and hope not to blow up. Glad to know you have those VFDs though. I might need to hit you up when I move the Fairbanks.
-
I'm not great at searching this site so please excuse me if this has been covered but I'm looking for information on sizing a burner for a small forge. I prefer ribbon burners and I need to build a smaller forge. My big forge is wasteful for a lot of the work I do and I need smaller heats. I can't set up coal (as much as I wish I could) right now. I'm thinking of an interior volume in the neighborhood of 400 cubic inches. I'm also wondering if it might work to cast plugs into some of the holes in a larger burner. Goofy I know, but I have a pine ridge lp190 that I'm not currently using but it is designed for forge volumes of at least a cubic foot. Thanks for any help.
-
Right. So the basic formula that defines ROI is algebraic, but what seems more useful is the corresponding calculus that defines a curve which crosses (or fails to cross) 1 at some distance in time.
-
Well when you put it like that, I guess I was asking a lot. Thanks again for taking the time to answer so thoroughly. I'm sure to be evaluating everything for ever, but so far, so good. Sort of. It's all hypothetical. I do have a plan for a complimentary retail-market sideline and I've worked up a rough estimates for shop rate. It seems reasonable and I'm trying to apply it to past projects to see if the calculated rate and price align. Hit and miss. Maybe I can do better moving forward. As far as the ROI calculations, I think I understand the calculations you're describing, but I was trying to factor in time. You could have an ROI calculation that yields a value greater than one but whose duration to achieve that value is very long and that might change how a person should understand a potential investment, but I think for now i'll stick with getting going. If I learn anything interesting I'll try to share it.
-
RE: ABOVE As I look over what I just posted, I realize that those other expenses not specifically billable to clients are properly understood as components of overhead. Mostly I'm just trying to figure out how to stay above water while for a rough estimate, about a quarter of my time isn't billable. Maybe more as I start up. In the last paragraph what I'm looking for is a way to relate net productivity gains to costs over time.
-
Thanks to all and especially "rockstar" who seems to be a rare presence on the internet combining generosity, actual experience and articulation. There's great info here, but I expect I'm not the only one here looking for some small shop advice that is slightly different from what's been given so far. When it comes to bidding and overhead, how do you pros think about shop rates and billable hours? To put things in perspective, I've been earning my living as a blacksmith for almost twenty years, but mostly working for other folks. I took a stab at self-employment years ago, but I wasn't great at the business, partly from ignorance, partly from necessity. At any rate, I jumped at a day job that proposed to reward my most valuable skill set for once and chose it over barely making ends meet doing whatever came my way. Recently, a move for my wife's work and an assessment of the local market has compelled me (with much trepidation) back into self employment. Please don't take this as cocky, but the local market simply can't afford me as an employee, and there is a giant hole in the market relative to my most valuable skills (i.e. architectural forgings as opposed to fabrication) which could be good (have the market to myself) or bad (have to educate a clientele and build my own market.) In any case, I'm going to give it another go, and I'm trying to be much smarter and more conscious of running a business first and foremost. With all that in mind, I've been reading through this discussion and combining it with what's in the thread about bidding. It seems to me that small forging shops, are often in bidding positions less well defined than the competitive bidding situations presumed in the threads here. As often as not, my bid process begins with selling a potential client the idea that I can deliver something that they'll love living with, and ends with simplifying me design until I think I can meet their budget without going broke. Sometime it works, sometimes not. On the other hand, when it comes to overhead, more often than I am in a position to divide overhead between jobs, I'm thinking along lines like "I've got three, (or six, or twenty) weeks of work and the faster I can get it done, the faster I'll get paid", but I also need to cover expenses that aren't specifically billable to a client like marketing, networking, professional development, shop maintenance and the like. Relatedly, I expect that economists and business experts have real formulaic metrics to help indicate when capital investment is warranted. If anyone knows this stuff and is willing to share, I'd be grateful. What i'm thinking about is how to understand and structure capital investments in the shop as related to return on investment in the context of- and compared to- labor. That is, if a tool helps me do something faster, or adds to the capacity of the shop, when and under what circumstances is investment warranted? For an easy example, take a power hammer: it doesn't (at the scale of my work) do anything I can't do at the anvil, and it doesn't do everything I can do at the anvil, but it speeds the process so much that I can't imagine being competitive without one, so I have two. But if I think of how a hammer gets paid for, it isn't simply a matter of how much work it does that I get paid for, it seems like I should subtract from that the amount of work I could have done in the same time without the hammer. At the other end of the spectrum is a plasma cutter: I don't do much sheet work, I have a Beverly shear, and I'm pretty good with a torch so I've never been able to justify the expense of owning one. In the middle, (i.e. I really want a cold saw) it seems like there is a balance between the cost of any tool and how it effects productivity (a factor of labor), and I'm betting that somebody understands that balance in really useful ways. Grateful as always.
-
Taking others' ideas...is it OK?
bird replied to billyO's topic in The Business Side of Blacksmithing
On a lighter note, I'll give it to you… sort of. Those first two are funny. Maybe the big squish belongs in the public domain? Maybe it is an exploration of a technology. Maybe we need to see more work from Fred Christ and Tom Joyce in those series and it will become easy to tell. The second two are easy. Past that, you make my point for me. If you lived five minutes from Fred Christ's shop and couldn't tell his work from Tom Joyce's, I'd say you have bigger problems than needing to formulate your next post, but you can tell the difference. "Hand" or "Style," whatever you want to call it, the work of some smiths may be distinguished from the work of others. It is distinct. In the context of this discussion, my only point still is this: If the work is distinctive, you shouldn't copy or imitate it for profit without permission. Enjoy your Father's Day everyone. -
Taking others' ideas...is it OK?
bird replied to billyO's topic in The Business Side of Blacksmithing
To make my point, what I should do instead of name names is post images of work and let you and others attach names, but that's work and I can't get the pics on here right, so here's a few names off my list in no particular order (others' lists may vary): James Wallace, Tom Joyce, Albert Paley, Elizabeth Brim, Steve Yusko, Daniel Miller, John Medwedeff (these are just living Americans, there are more I could list) I'm not saying you should be able to recognize each of these person's works any more that I'd say you should be able to tell The Beatles from The Stones, or a Vermeer from a Rembrandt, I'm just saying that for people who chose to know these things, it isn't hard. We all show our influences, if we didn't we'd need to use another word. That's what influence is, but we reflect our influences like a fun-house mirror. Our influences come through us distorted by our experiences, our moment and place in time, our culture, and our attempts to understand the ever changing expectations our world has of blacksmiths. Ironwork today doesn't look different from that produced centuries ago just because of changes in technology, it is different because it is made for a different time and place. Standing on the shoulders of giants, we don't need to be giants ourselves to reach new places. -
Taking others' ideas...is it OK?
bird replied to billyO's topic in The Business Side of Blacksmithing
Seems like some of our language is getting in the way. There is a difference between "influence" and "imitation." The difference is what you put into it. Saying "there is nothing new under the sun" is not- and should never be- intended to justify or give license to copy anyone else's work. Think of forging like a language. The tools and techniques we use are like the syntax and grammar. The forged elements are like vocabulary. The fact that we all use the same words and structures in order to communicate doesn't mean that we can't write and say new things that have never been written or said before. Very few of us will ever be able to honestly say we have invented a technique for blacksmithing, but the application of techniques often yields unique designs. It isn't a matter of how well you copy or if you are capable of an exact replica. Paraphrasing is still plagiarism. We can probably all bring to mind a few smiths whose work is of a distinctive style that is recognizable as "theirs." Maybe even there are groups of smiths working in like style that may one day be referred to as a "school." They use the same techniques and processes we all use, and none of us should claim to work without influence, but still, some have managed to build a body of work that is recognizably distinct. That doesn't mean they don't have influences. It means they've gone beyond them. Learning aside, to copy someone's distinct work for profit is wrong. Even to mimic that style, without crediting the influence is wrong. If you copy someone else's work to learn from it, that should be viewed as something like journeyman work regardless of where in your career you might be. Claim the skills, such as they are, but give credit to the designer for the design. And if you copy the work of a living working craftsman, don't sell it without his or her permission. Absorb and process all your influences. Learn all the techniques you can use. Aspire to design work that is yours. Become an influence on others. Bottle openers have been around as long a bottle caps. Horses for longer. I call that public domain. If you discover a truly novel way to open a bottle, get a patent. PS: Matt- I bet you don't keep the "Samuel Yellin" stamp next to the treadle hammer. Now that would be wrong. Cheers! -
Ideas for Reforging a 867lb anvil bick.....
bird replied to basher's topic in Anvils, Swage Blocks, and Mandrels
I don't know why everyone wants you to weld and grind on that old beauty. It was made by forging and it looks like that horn hasn't broken, it's just been worked to it's new shape. All the metal is there. If you don't like the shape, hit it with a hammer.