mslisaj
-
Posts
48 -
Joined
-
Last visited
Content Type
Profiles
Forums
Articles
Gallery
Downloads
Events
Everything posted by mslisaj
-
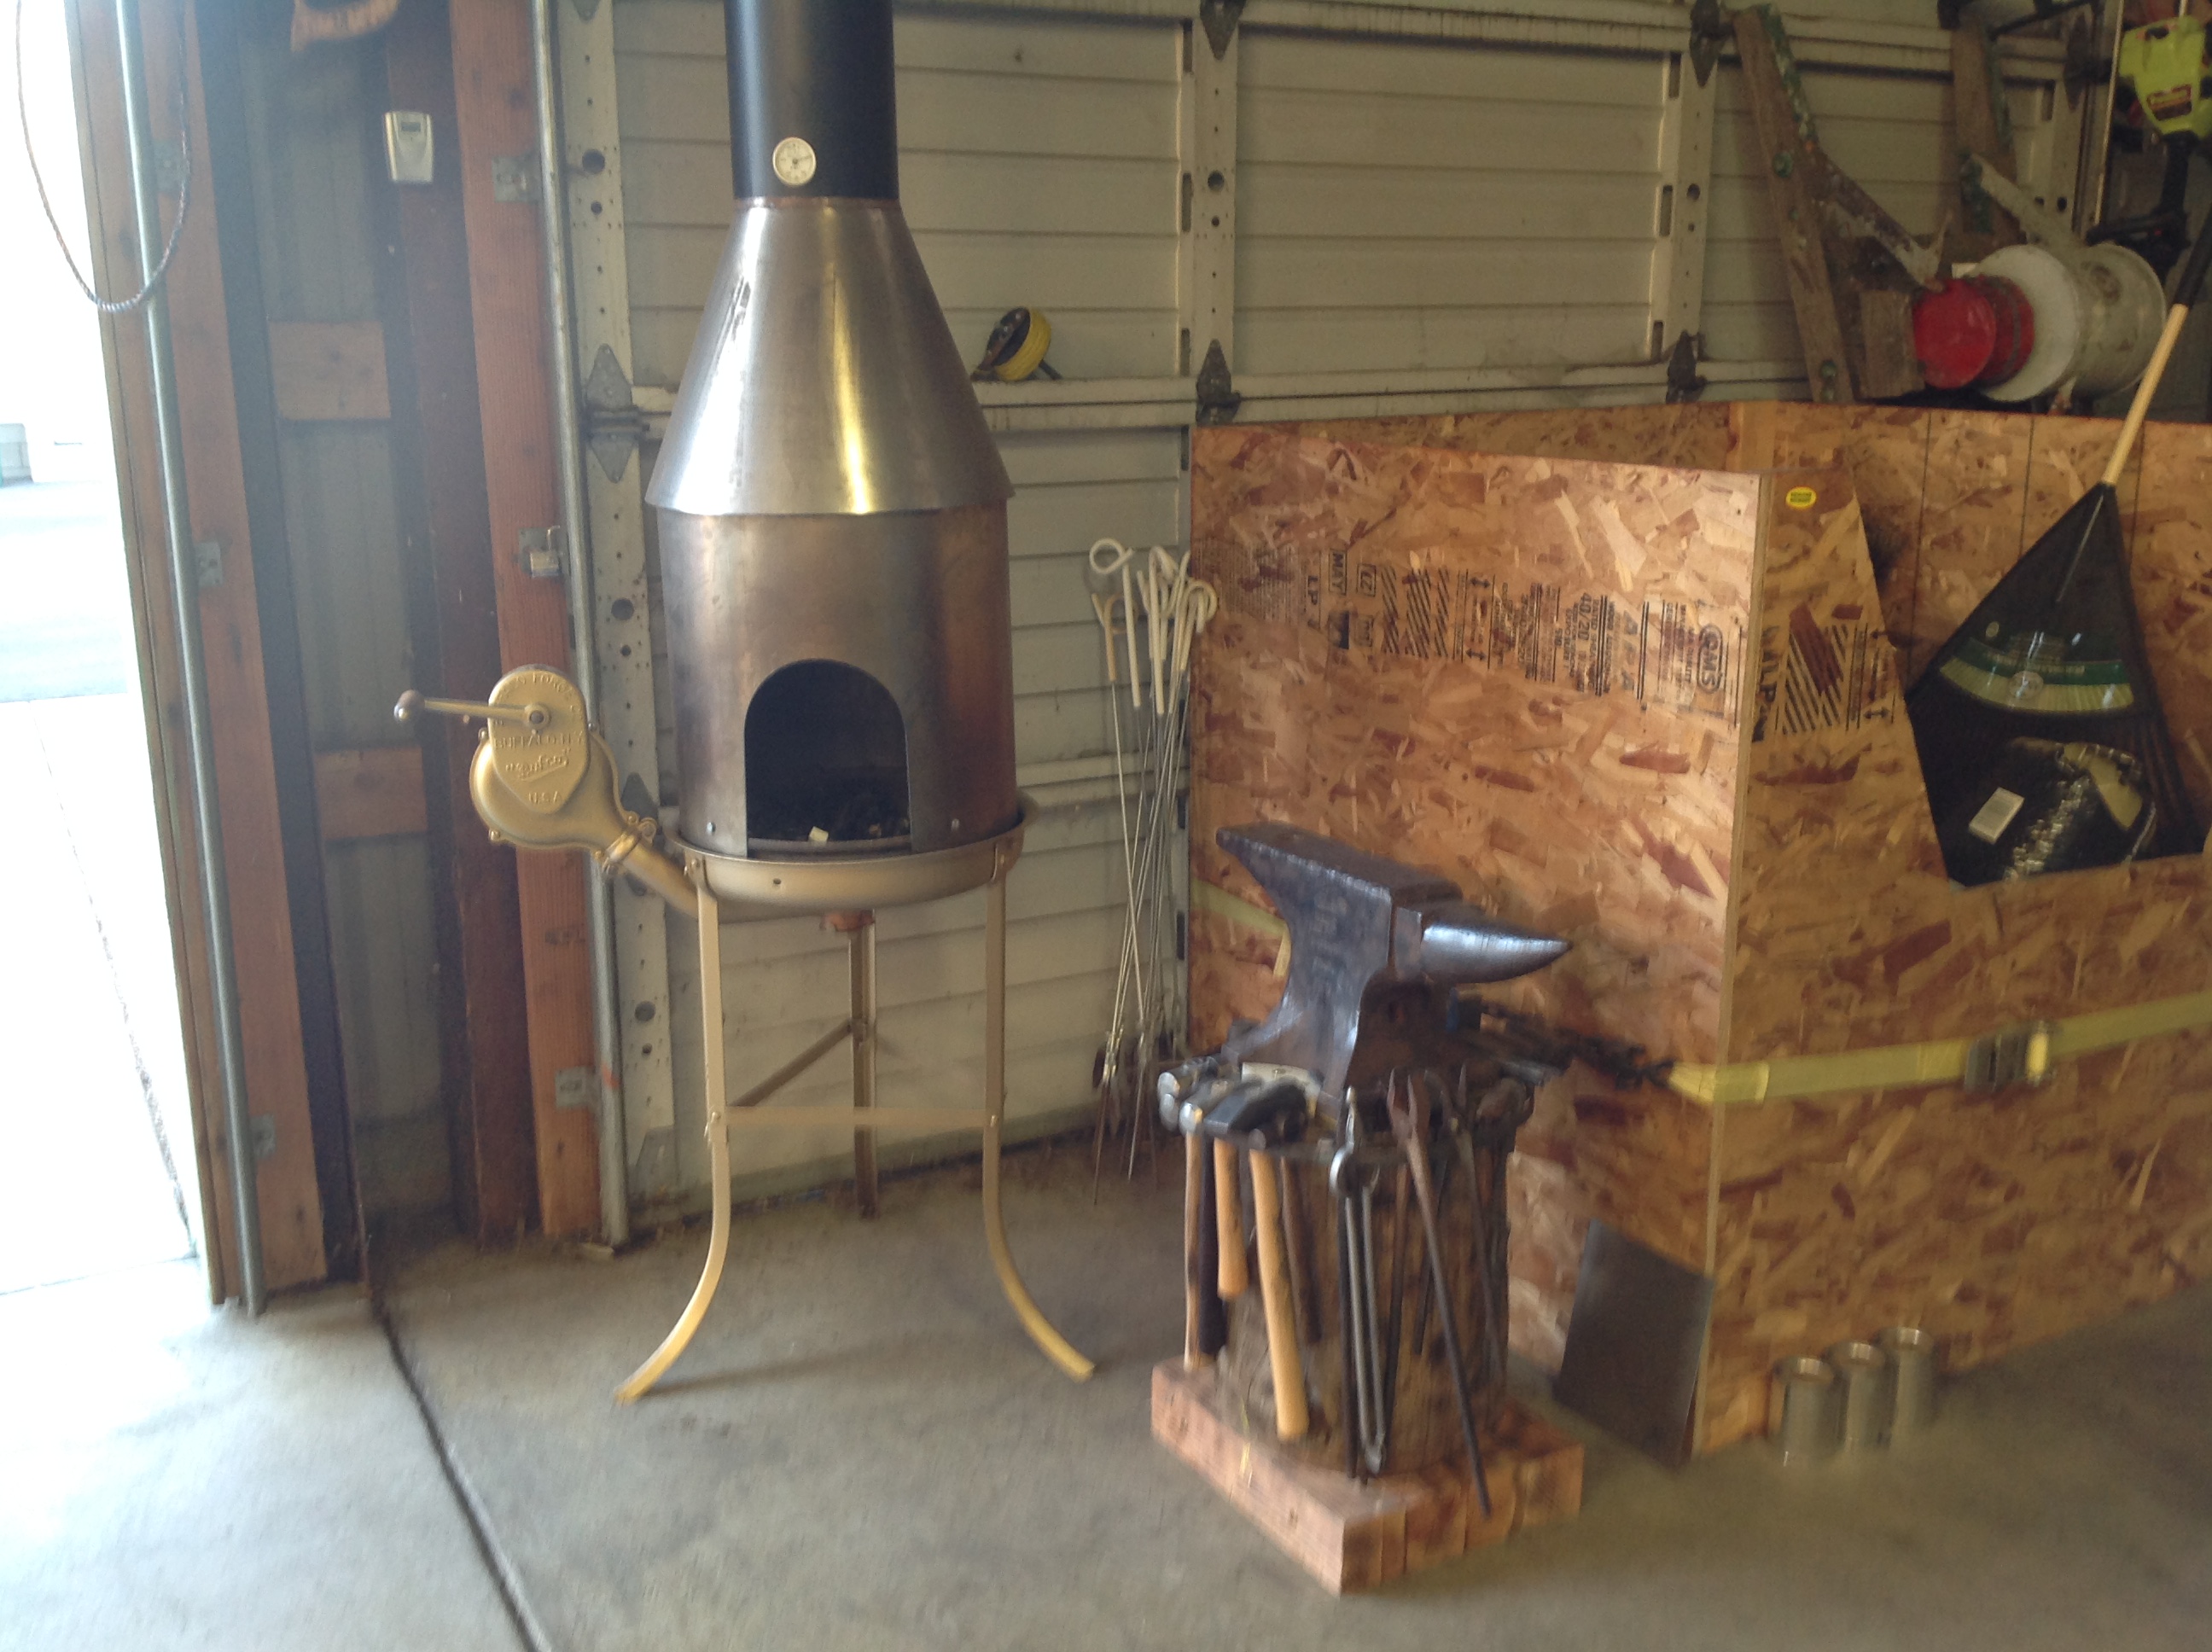
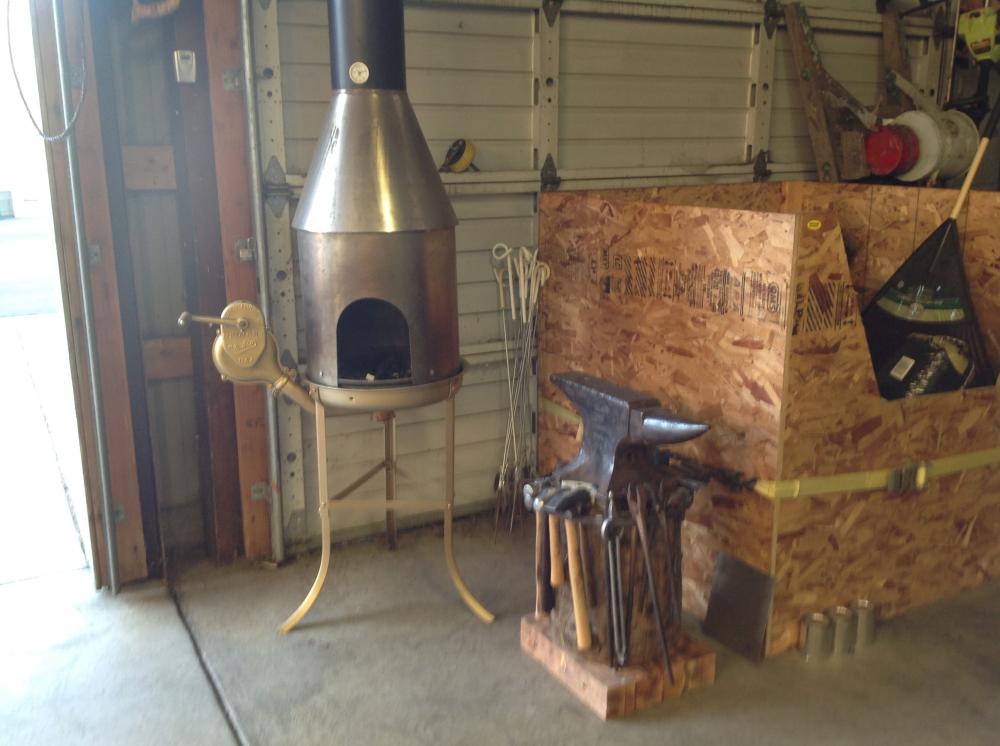
I have a lot of fun with this set up. I put it together over a year ago and works perfectly for me. Yes it's small but I am heating and pounding small things and enjoying it. Just wanted to share. Yes I did build the base for the anvil and set the height specifically for me. I also restored the entire forge and made the hood and chimney for it too. Happy Smithing, Lisa

-
Thanks Scrambler82 and Charles R. Stevens. It's always and on going project. I probably will have to post some more pictures as I have added more tools and hammers and while this is just a hobby for me it's fun to get the fire going and practice my hammering techniques. I haven't moved beyond making screwdriver blades and punches I enjoy the practice and it's fun for me to think I put all this together. I promise more pictures. Best Regards, Lisa :)
-
Stellar idea on the channel iron top. That would work nicely too. Although I have acquired with a lot of searching nice variety of hardy tools and one of them is a big square block that is hard and has shape edges too. So I am actually moving ahead with this project. I just need more time to practice the art and learn more. I can't believe how useful this anvil is in my daily work too. No longer do I beat up on my big bench vise as now I have a better place to do that kind of work. I have decided to leave the anvil alone as the "chips" are just part of the "history" of this anvil and are not detrimental to the way I use it at all. It has a pristine surface and fabulous rebound so I am not going to play with that at all. I so appreciate the continued advice and thanks for taking your time to comment. Best Regards, Lisa
-
Well Frosty, your response made me smile. I hope to learn the skills to make a pair of tongs or two. To have the facility and equipment to build a set of tongs for what you need and the talent to do it will be nice to work on.
-
Great point Charles and that is exactly what it looks like. It was drifted with a true 1.0" drift and in the cooling it shrunk down to this .975". But if this was a standard way to manufacture I would think the folks that make the "one inch" hardy tool would make it to .970". As I pointed out, it's not a big deal to make it fit but I was just curious that is was .025" undersize and if all hardy's, except the 7/8" holes were the same. Lisa
-
I have a Henry Wright 137# anvil. I got a couple 1" hardy tools for it and was surprised that they didn't fit. On closer examination and careful measurement I find out in stead of 1" or a little larger this hole is actually .975". Now I have measured this on the surface of the anvil where there is a lot of wear and tear but I have come up with the exact same measurement on the bottom of the heal also. Yes my new to me hardy's will just take a very little fitting to make them work but I was wondering what other folks hardy holes measure and if my is standard or .025" under standard. Just curious and I have the grinder to make it work but was just wondering. Thanks for your help. Lisa
-
Interesting that you can buy coke. I think where I live I'm lucky to be able to buy coal. So using pre-coked coal is probably not an option for me to buy. But I will get a hood/flue system worked out and then I'll be fine. There is a lot of good information out there on Flues and how they work and I am going to use that information to make a system that will work for me. Then green coal won't be an issue. Lisa
-
As soon as I work out the details of venting a flue on my forge I'm going to google some youtube instructions and see how to build tongs. That would be fun too and I do need more. You can never have too many tongs......................... :rolleyes: Lisa
-
Fabulous Idea. If I had a real ringer I would take this idea. But my anvil, for what ever reason is decent to use and does not have an obnoxious ring. If I work on the heal it will ring but again it's not a problem. So for now I am going to get my forge working better and going to start working some hot metal. Thanks so much for your comments Andy. :-) Lisa
-
Thanks Frosty. Well my anvil and Forge are kind of close together when I work. But at least they are all off the floor and look like they belong there. I just wish my father was alive to see it as I know he would be very pleased and proud. I'm always on the lookout for more tools. I'm going to go out and get a cross peen hammer and I think I will be set there. But tongs are hard to find. The gentlemen that sold me all you see there, minus the hammers was very fair with the pricing and wonderful to deal with. He also showed me how to use the nail too that is on the stump too. As soon as I get the drafting details worked out on my forge I'm going to start to really work with it and have fun. That is what it's all about for me anyway. I have no idea what to make other then the little exercises that Mike-HR gave me to work on and that will keep me busy for quite awhile. Thanks again Frosty. Lisa
-
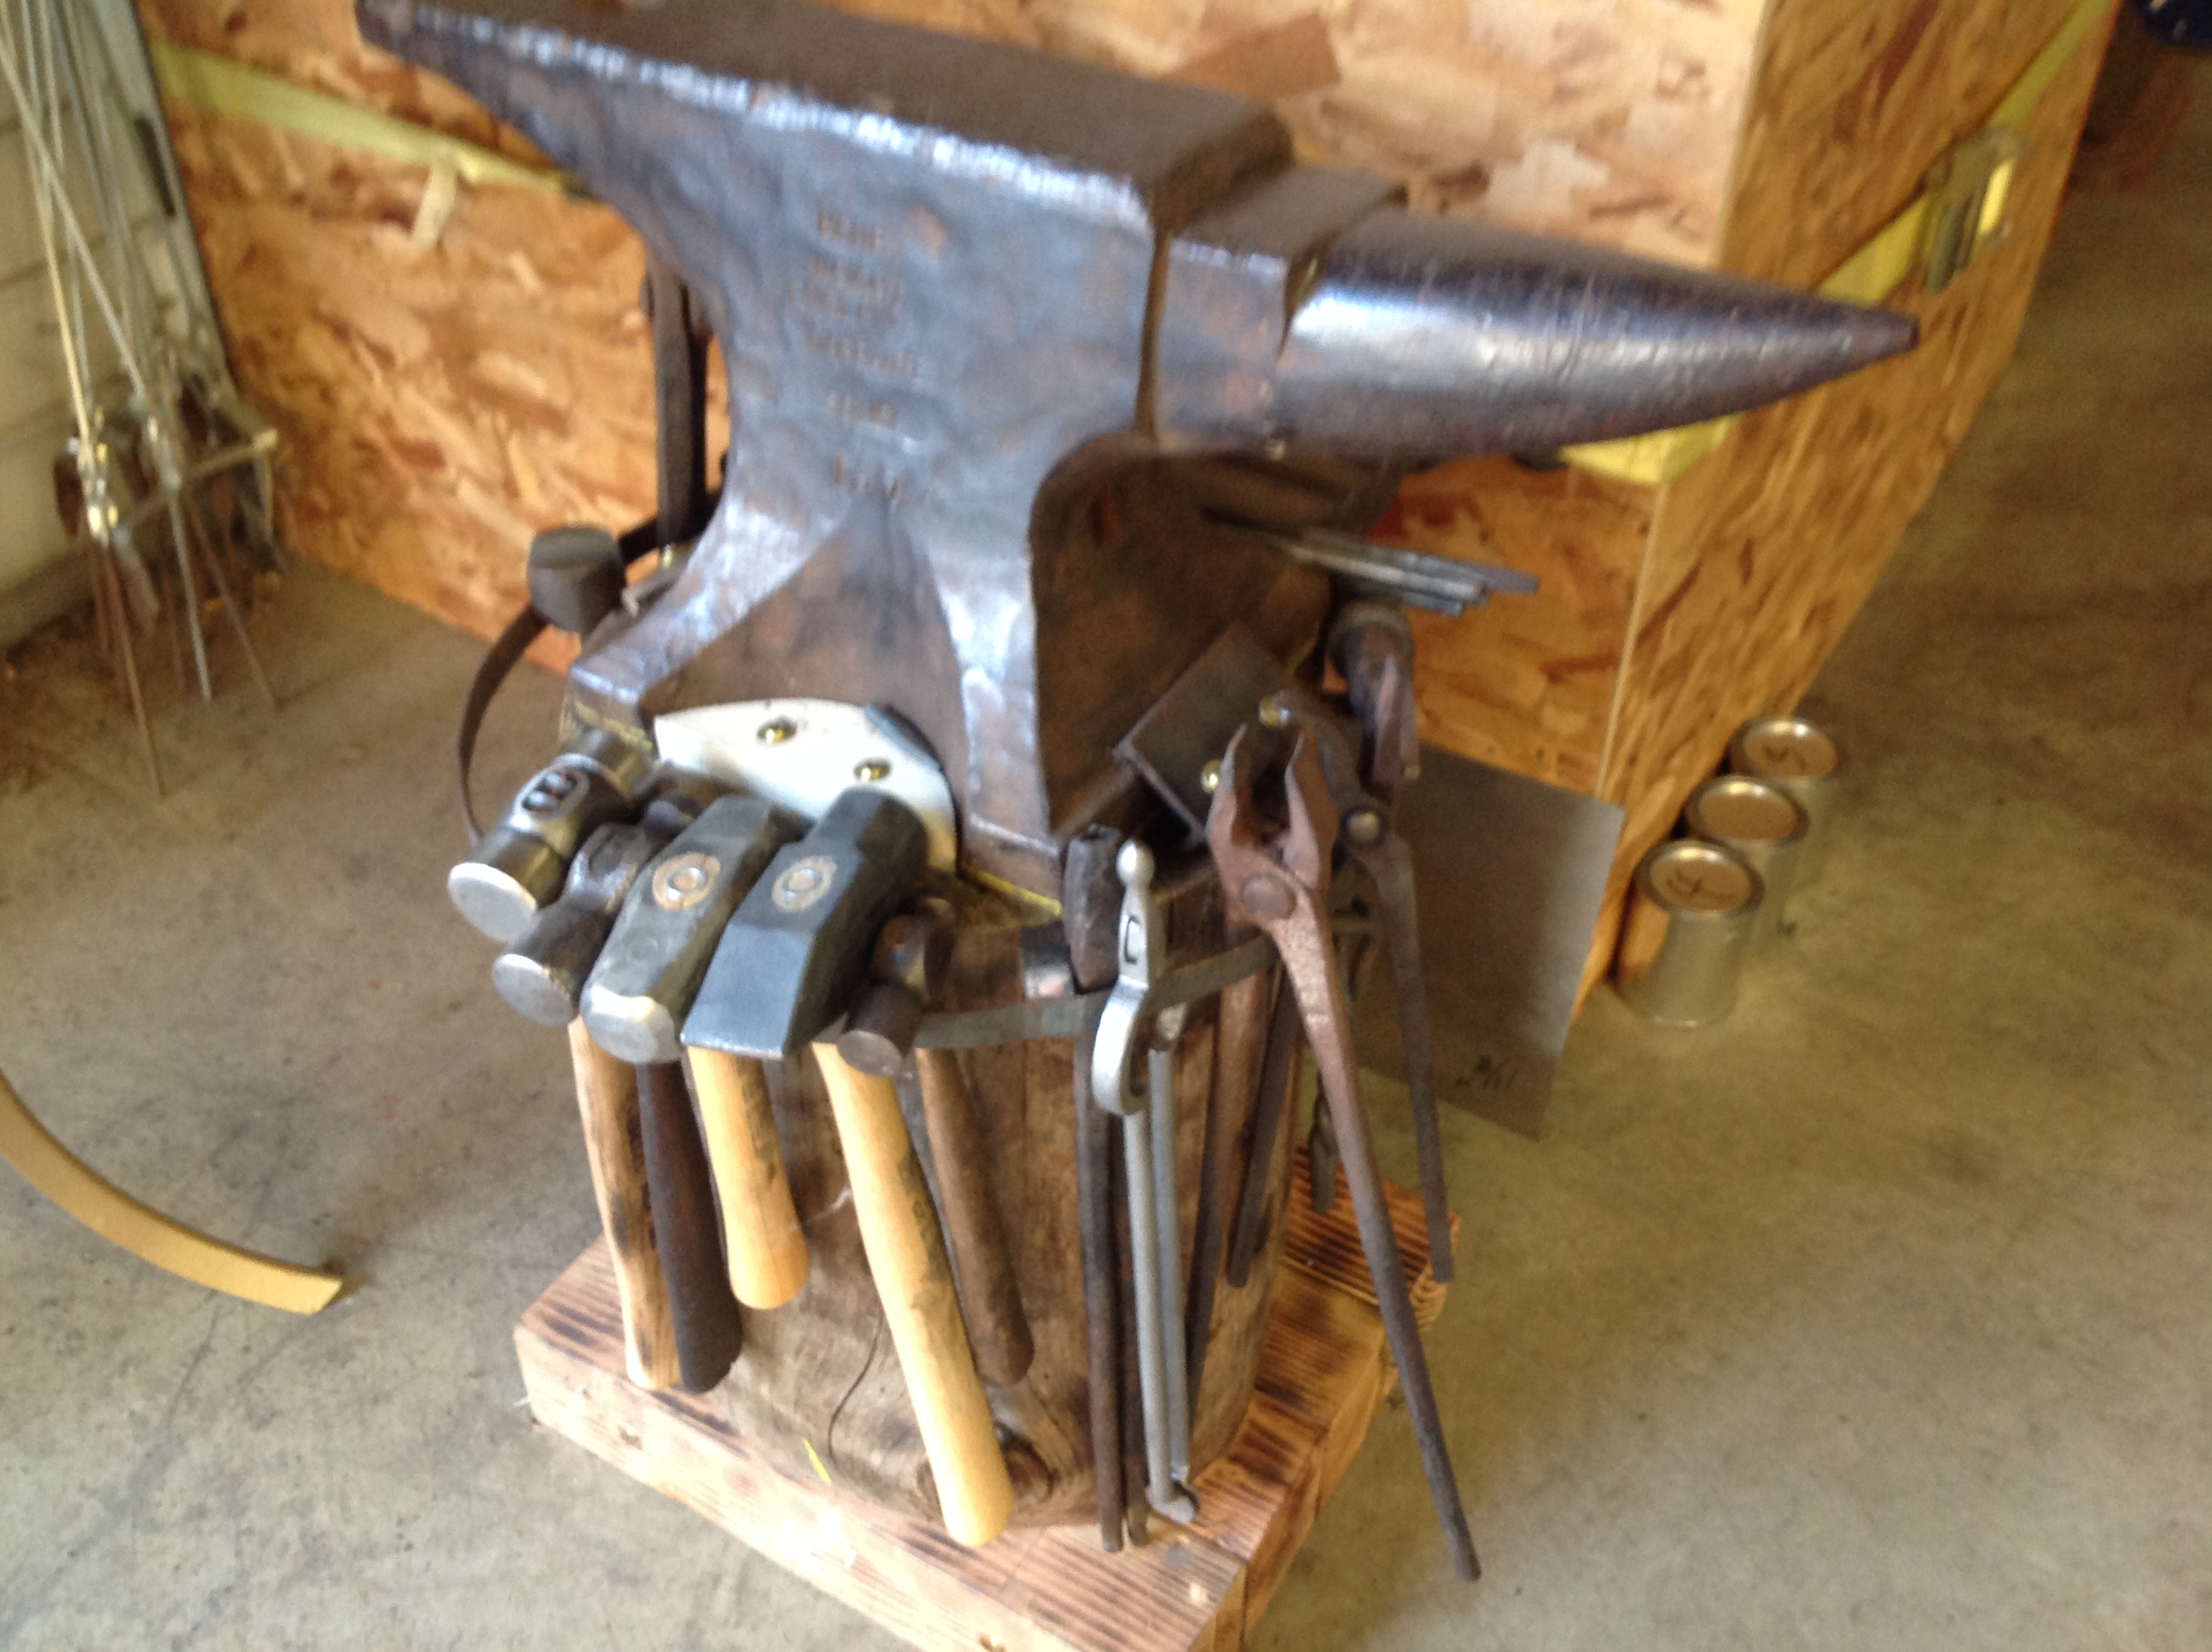
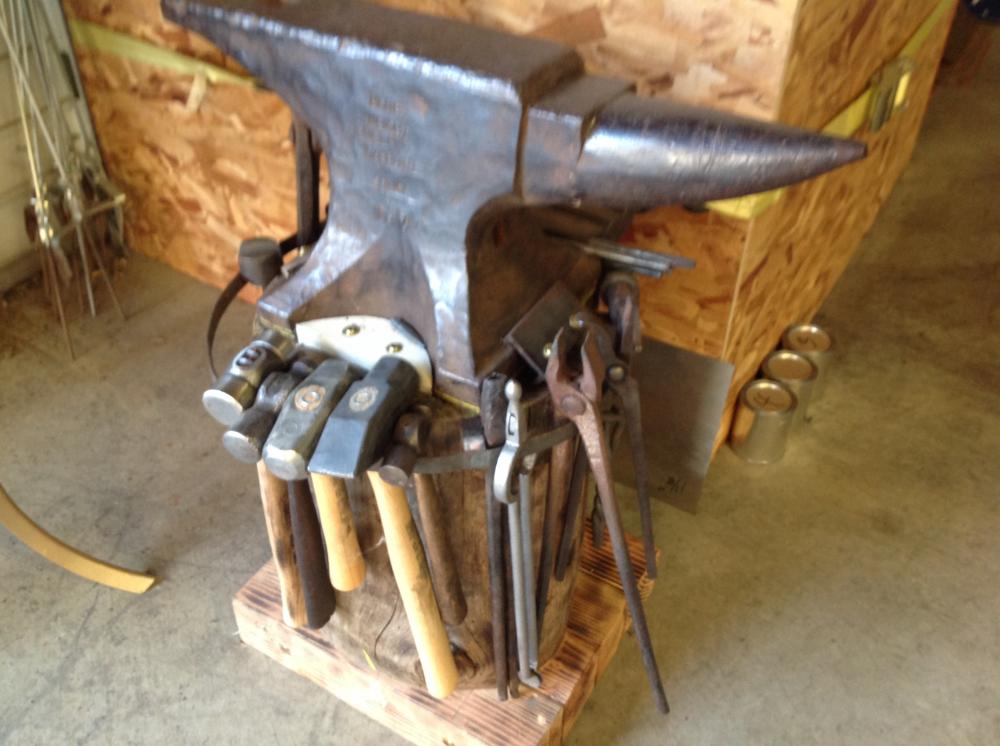
Here are some pictures and additions to my anvil stand. I finally got the tool holder build and I have all my blacksmith tools here with the anvil. I think it's a very workable set up. Comments and suggestions are always welcome. Lisa
-
Well I am new to coal and coke. So I believe I have to take my coal, burn it and coke my own. Is this correct? I have a ton of Bit coal and am breaking it up and adding it to my "coked" fire a little at a time and then when I am finished with the forge I cool the coke for the next time. More to learn..... ;-) Lisa
-
Well, like "novicesmith15" my learning curve on actual forging has come to a halt because I have to work the kinks out of my forge first. The forge itself works great and through trial and error I learned to build a bigger fire. But the smoke chasing me around the forge (because I have to move it outside) is too much to have a good hammering and learning experience. I have a very small Buffalo Forge and my actual forge area is only 16" in diameter. So what I am going to try is a 6" side draft flue. I have the six in pipe and I am giving up that much area in my fire pan. I am also going to put a skirt half way around the pan which will help support the flue pipe and I am going to attempt to construct a small hood over all this. I'm going to try to rivet all this together so I can just pick it up off the forge and move it all inside when it cools but when I get it done I will post pictures and results - good or bad. I am enjoying this hobby and a lot of it is the building this stuff for me but I also like to heat metal and get good and making shapes. But the coal smoke is the issue of the day now. Good thread "novicesmith15" and hope all this moves us forward in this trade. Lisa
-
Cheapest side draft hood I have seen yet!
mslisaj replied to BackyardBlacksmithin's topic in Chimneys, Hoods, and Stacks
Yes I did cut the rim in half. But I think you're also right that I needed a bigger fire and welding a strip of material around the inside to give more height is a great idea too. There is not much any of us can't do with a welder and an idea. But drafting the smoke away from me is going to be my first priority and also improving my fire. As usual I so appreciate the advice and idea's. Lisa -
Cheapest side draft hood I have seen yet!
mslisaj replied to BackyardBlacksmithin's topic in Chimneys, Hoods, and Stacks
Very interesting idea. The five gallon bucket would overwhelm my little Buffalo Forge pictured here but then we move down the tread and I find one from a paint can. Now that is a more doable size. Then I'm thinking maybe a 10" high shield running horizontally about a third of the way around the fire pan to add that wind protection and this may work really well. Also that "wind skirt" rived to the can would add some stability to this side draft chimney. Something to build and try. For us that have to work outside it's like a BBQ, no matter where you stand the smoke comes toward you. Thanks, Lisa -
Being you gentlemen have been so kind to offer suggestions and help and I previewed my Buffalo Forge here too. Below is the story and pictures of how I built my my fire pan for the little forge. I am sure you will find it interesting and I have been told numerous times "you like pictures" so here you go. I think next week I will build a fire in it, heat myself a piece of something and give it a go with my brand new Nordic Forge "Round Head" hammer that I was able to buy at my local farm supply store. Thanks again Gentlemen! Lisa '?do=embed' frameborder='0' data-embedContent>>
-
On the ring........... The only place this has a REAL ring is out on the heal. Over the base and the horn is more of a very nice clang. It rang like a bell sitting on the floor but I think it being bolted down like it is deadened the "bell". But I appreciate the advice and thank you for your comment. Lisa
-
Thank you gentlemen for the comments and compliments. I worked really hard to get it rock steady as I no way wanted a rocker anywhere with this set up. Any pro blacksmith would be happy to use this and have no complaints. As I collect hammers and tools I will be building a rack system to go around the stump to hold it. So it's a work in progress. Great idea about grinding the center out to get it flat. I knew that trick but then again I wanted full support and contact. I just took the time needed to get it perfectly flat and not have to shim out the unevenness. On the grinder guard, all my grinders and saws have all the original guards in place. On the big grinder in the picture I have used that machine for over 25 years and never once had a need to take that guard off. I do think what would happen if a wheel or blade failed and flew apart. This equipment is designed to eat steel and wood and can do a lot of damage to something soft like flesh. Besides the older I get the more respect I have for this stuff On the rubber backing pad and sanding disk. I had that stuff out on the bench but have only used it on my air grinder and it would not fit this machine. I was going to go out and buy the necessary stuff but I just got lazy and decided to try what I had and make it work. I had to be careful as the disk that I used would but in and for the finish work I had to keep it moving and use more of the flat wheel. But again I got the job done. If I had to do it again I would definitely get the correct "sanding" pad for it. So there you go gentlemen, I am so happy to have this all together and now just finish the forge and I'll be heating metal real soon. Just found a 2 pound rounding hammer and I feel like a blacksmith now. Thanks again, Lisa
-
Well the type of hammer that I think of is a "Rounding Hammer". I have many other various hammers that will certainly work but nothing like the design of a rounding hammer. In doing my research I'm finding that I may be able to buy one new even. But one with a little history would be nice too. But my next project here will be to make a rack that will fit around my stand to hold tools and hammers. I like this hobby. Lisa
-
Well gentlemen, yesterday I got busy and finally decided to build the stand for my anvil. I ended up raising the original stump that I got with the anvil, leveling the top and bottom and mounting it in this fashion. It came out really nice I think and works very well. Being I am moving away from the topic here of "should this new smith buy this anvil" to building my anvil stand the link below will take you to the build story and the pictures. Again thank you all for all your help and advice. Now I am looking to buy some tools to go with it all. I have one pair of tongs but I'm looking for others and I need the real blacksmith hammer too. I have noticed that you pro's use a special hammer and I am looking for one now. But this hobby and project are coming together nicely. Check out this link and thank you again for all your help and advice. Lisa '?do=embed' frameborder='0' data-embedContent>>
-
I wanted to start this new thread under this topic as I am kind of changing the subject. For all the men that gave me such good advice on buying my first anvil and what to look for I thank you. But for the last two weeks it's been sitting on the floor and I have been using it there but it needed a real stand of it's own. When I bought the anvil it came with the "stump" that he probably had been sitting on for the last 10 years or longer. it was too low at 18" and the top wasn't level. I have spent the last two weeks looking at options and I just got lost in the confusion as to what to do. So yesterday I had this idea or raising the stump I had and leveling and squaring it up. So that is what I did. I just happened to have four 4X4's that were 15" long left over from another project and when I laid them together and put the stump on them my height was about perfect. Well, I am a metalsmith and not much of a carpenter so I didn't have a belt sander but I had my big grinder and I had a brand new course grinding disk that I put on it. Then I went to work grinding this stump down to make it level and square. I used a big level as my straight edge too. I ground down one end and then flipped it over and went after the other side. When I was done and put it on the blocks it was the absolute perfect height for me. With the anvil the surface is exactly 30 1/2" high. Next I screwed the blocks together with some very interesting, kind of expensive wood screws that came with their own star drive tool bit. They were 5/16" X 5 1/8" long so I had plenty of bite. Then I used six more screws to screw this block base to the bottom of my stump. Then I placed my anvil on top and was very pleased BUT the anvil had a little rock to it. NO GOOD!! So I worked for about 90 minutes with the grinder leveling out the top and fitting the anvil to the stump so it was absolutely solid. I then made base clamps to bolt down the anvil and round wooden index plates to go in the indentations in the side of the anvil base. I used another gentleman's idea and took my torch and kind of "antiqued" everything so make it look kind of it's age. The anvil seems to be working perfectly. Rebound is like it was on the floor and the only difference I can tell is the loud ring is less and moderated now. But I am ready to heat some metal and give it a try when I finish my little Buffalo Forge. Here is the link to the original thread of how I found and the purchase process of this Henry Wright. '?do=embed' frameborder='0' data-embedContent>> Thanks for all the advice and I hope you like my project. Lisa
-
Thank you gentlemen for all your contributions, compliments and idea's. For now I tend to agree with Thomas that I can't do any grinding or repair on this anvil. Before I actually took possession of this anvil I was so concerned about the "edges". They looked awful to me and "I just had to fix them". But now that I have used it, albeit it's still sitting on the floor and I have to get busy with a stand, the edges aren't that bad compared to pictures I have seen. Besides my anvil has a smooth face, great rebound and it's flat and straight. It has the key factors going for it. The only cleanup I have done is with a wire brush and I'm very happy with the results. I want to finish my little forge, heat something up and make anything. But this whole hobby is a project for me and I am enjoying the trip along the way. If this anvil had some kind of keep flaw, like being aneled and no rebound then it may be worth playing with. But considering it's age and all the hammer blows it's endured in it's life it's truly in great shape. Great advice too about now using heaving blows on a hardy anvil with the fear of breaking off that heal. But as a woman I don't swing that big a hammer anyway but the advice is well taken to be careful. Again thank you gentlemen for all your advice and I appreciate it so keep it coming. Lisa
-
Hi Tony, That's a reasonable idea too. But the reality for me is right now the anvil is working for me fine. The more I get into this hobby I will be building a hardy anvil that will have the sharp edge. I have to commend you on your idea though as I don't see any reason that would not work too and you could be careful and preserve the great rebound of this anvil and not risk losing the temper through unwanted heating. For now, the edges are not an issue for me. I just love having an anvil instead of my good old vise to beat on.
-
Well I don't have pictures of my anvil stand as I have been working on restoring this old Buffalo Forge that was a garden ornament for the last 30 years. I'm going to put a rear braked drum in it for the actual fire pit and I think it will be just about perfect. Enjoy......... Lisa
-
Thanks Mike for the note. No big deal as I am still working on my forge and the stand for the anvil. You have a business and this is a hobby and I am in absolutely no rush. Good luck with everything and we will hook up. As far as your shops evolution, well it sure sounds good to me with "sharing ideas, libations and smoked pork products". Now that is a goal for me to work too also. Regards, Lisa