

rhitee93
-
Posts
252 -
Joined
-
Last visited
Content Type
Profiles
Forums
Articles
Gallery
Downloads
Events
Everything posted by rhitee93
-
I don't know where you read that using salt and lemon juice was good for removing rust spots from a blade, but I would call that very bad advice. Leaving it on for 2 or 3 hours is even worse advice. You have now etched the surface of the stainless steel. The only way back is to polish away the etched material. The metal polished mentioned above may work, but I suspect they are not going to be aggressive enough. You will probably have to back up to some very high grit wet/dry abrasive paper and work your way through finer and finer grits until you can get to the liquid polishes. Search for hand finishing or hand polishing blades, and you will find more than enough information to horrify keep you busy for hours. Good luck. There is nothing wrong with stainless replica wall-hangers. A stainless Glamdring replica is on the wall behind me as I type this...
-
It is nice to see it working A restored tool with clean pain is very nice to have, but there is some magic to the rat-rod (or rat-press ) concept too. Until recently, I had a 1972 Triump Spitfire. This car was the absolute bottom rung of the British collector car world, and mine was pretty much a rat-rod. Mechanically it was in great shape, and I put 6000 miles a year on it for the 6 years I owned it. However, it didn't have an interior, the top was useless so I never put it up, and the paint was in terrible shape. I like a show car as much as the next guy, but what I found with the Spit was that I could drive it any where and enjoy myself. No worries about dings in a parking lot, or picking up stone chips on the highway. I wouldn't even notice if it picked up another scratch. I could enjoy the car with no worries at all, and at the end of the day, I was still in the coolest car at the intersection 9 times out of 10. It's your press. If you want to run it a while as found, then go for it. You can always restore it later if the mood strikes you, but you can't take it back to the as found condition very easily.
-
Thanks guys, Kozzy, that drip is on the top of my list too. I could tell there was a leak somewhere, but couldn't trace it to the source fro sure until I saw the video. I wasn't about to start feeling around while it was running. My first job required me to carry a card in my wallet. It basically said that if this person comes into the ER with a high pressure injection injury, immediately amputate at the next highest joint. The press is only running at 2500 PSI right now because that was the default setting of the relief in the valve. I'll probably leave it there unless/until I need the full capacity. The pump unit will eventually go outside the shed in a lean to. In the video, it was running just outside the overhead door. I wear hearing protection when forging, but is still has to go. I'll eventually make foot controls for this. There are a lot of examples out there to follow.
-
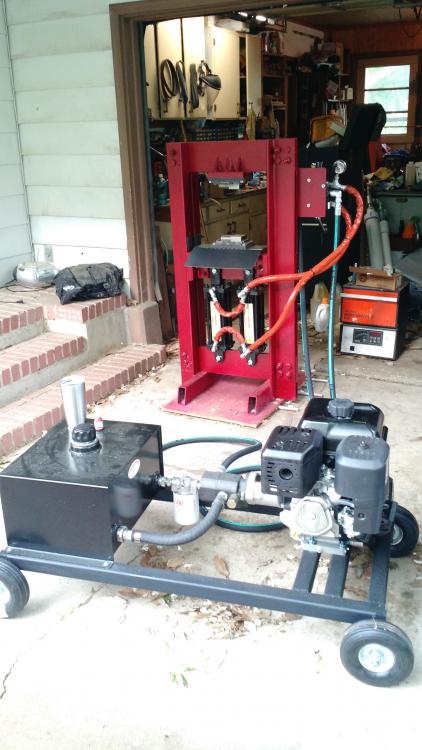
Hi All, I've been working on a forging press for the last few months, and I finally got it up and running over the weekend. Here is a video of me very clumsily trying to forge with it. (Its the first time I've ever used a press so I've got some learning to do) twin 4" cylinders at 3000psi will deliver over 37 tons. The two stage 22/7 GPM pump is driven by a 14hp engine. Eventaully, I'll put the pump assembly in a lean-to outside the shop, but for now it is sitting just outside the overhead door. In my eagerness to try it out, I forgot to make keepers for the dies, and they started to move on me. This is a pretty dangerous situation that needs corrected before I do anything else. I also need to make some depth stop "Kiss blocks" as this thing will pinch a 7/8" bar to less than 1/16" in a heartbeat. I built this to save my aging body from the wear and tear of drawing out patter welded billets by hand. Here is a pic: And a crummy little video: https://youtu.be/2emrPgn5EJ0
-
It is just bolted together for now. The plan was to bolt it together and then maker sure it was squared up before welding. The shear strength of the welds will be small compared to the bolts, but it will keep the frame from racking over time and use. It is the bolts, however that provide the strength. 200 tons worth in this case. You do not want to use grade 8 bolts in a structural steel application. You want A325 or A490 bolts. They have a different geometry than traditional hardware, with the biggest difference is that the shoulders are much longer so that the threads are not in the shear plane. FWIW, there are two-stage pumps out there with higher speed second stages. The pump I have is 7gpm at 3000psi and 22gpm at 700psi. However, it takes 14hp to run it!
-
I used 3x5x1/2" angle. The cylinders on there now are 4", but they are spaced far enough apart that I could go to 5" some day if I am inclined. I used two cylinders because it gave me the best force/$ that I could get at the time I bought my components. A lot of people raise concern over keeping the cylinders synchronized, and discuss special valves to make that happen. However, there are a lot of twin cylinder presses out there running that don't have any special consideration for synchronization so I rolled the dice. I've run it a couple of times using a small 1hp hydraulic unit. Other than being very slow with that pump, it seems to work fine. Hopefully I'll be able to put my 14hp pump unit together soon.
-
Just to give you a data point on your costs, I am nearing completion on a 40-ton dual cylinder press. This will be powered with a two stage pump that is 22/7GPM using a 14hp Brigs engine. I purchased everything new I had the large structural steel members machined at a local shop to the tune of about $500 (They supplied the steel) My total cost at this point is close to $2k. I think with some economies of scale and clever buying, your price point is pretty close. This is where I am today...

-
D2 is a bugger to forge!
-
Wow, that's striking!
-
I think this is your best work Theo, nice job.
-
Thanks again all. JPH, I understand exactly what you are saying. I like candy, so lets say it could have looked like two kit-kat bars back to back It wasn't until I got into this project that I appreciated how many variables are at play with a ladder pattern. I based my groove depth and spacing on info in one of your books, but scaled it a bit to fit a ball-end cutter I already had. Afterwards I realized that the desired spine width, the parent billet thickness, and the depth of cut are all locked into a relationship with each other. Dave, Sadly, no, I won't be there. I still have two seniors in high school, and lots of kid events to go to on the weekends. They'll be off at school next year, and I am thinking I may have more time for dad events
-
Lol, well thanks my friend, but I'm not your better, and there is plenty to criticize. I'll never make a perfect knife, but hopefully I'll keep trying until I am no more.
-
Thanks, I'll keep that in mind next time. It's an addictive pattern, so there will be a next time
-
Yeah, I took a page from JPH's book on the grooving, and it just worked. I did the grove and smash version since I had access to a mill, but no press. However, the deep slots I cut left me with some cold-shuts at the interfaces to the grooves. Next time I'll try the "Squish and grind" approach. Here is the slotted billet: And after forging flat: There were still a few small cold-shuts/inclusions that I couldn't get completely ground out. Next time, if I mill the slots, I won't go so far past the radius of the ball nose cutter in depth. Those deep vertical slots got me in trouble.
-
Here are a few pics of a knife I just finished up for an old friend. It is a 44-layer ladder pattern made from 1095 and 15N20. The guard and frame are nickle silver and the scales are Sambar stag. It is loosely patterned after the knives made by Wostenholm & Sons in the 1850s. This is my first ladder attempt, and as all such things it was quite a learning experience.
-
Thanks everyone! CMS3900, the owl inserts are pins (Like a lapel pin) I found online somewhere. I just removed most of the backing pin, and inset them in the wood.
-
I would form the oval ring, and solder the joint on it with a higher temperature solder. You can clean up the oval ring, and then join it to the oval plate with a lower temp plumbers type of solder. As noted above, this is feels like cheating, but I would be ok with it.
-
I had someone ask for a knife that had an owl theme, and this is what I came up with. The blade is 1095 sandwiched by 15N20. The handle is redwood burl with a naval brass guard that has been shaped to look like a raptor talon. I had some struggles with this one. The first blade delaminated, and got relegated to being broken to check the grain size. I had to make the guard 3 times because I kept getting it too hot and turning the brass into into cottage cheese. Here are a few in progress shots if you are interested:
-
Wow, that knife looks like it would be equally at home in hard use, or in a display case. This is a balance that I find very difficult to achieve.
-
1084 is a little easier to move, but it is much more forgiving from a temperature perspective. O1 can get cantankerous if you get outside of its forging temperature range. O1 will crack if its too cold, and crumble if its too hot where as 1084 will give you more of a warning before it self destructs.
-
The fit and finish are pretty good for a 3rd knife. If you drop the tang down a bit after the ricasso area, you can set it up so that your wrap is level with the spine of the blade. That, to my eye at least, would look a bit better. Treat yourself to some nicer material for your next one. I won't jump on the rail spike band-wagon, but it certainly looks like you will make good use of some nicer steel, and I bet you'll like the feel and performance better once you get rid of the heavy spike head at the pommel.
-
The additional pics make me think the handle is not over-sized after all. Something about the angle of the first picks make it look like the knife sort of swells at the handle.
-
Or that fact that most people today use "Ironic" to describe something that isn't?
-
I think is it pretty good. The fit and finish don't look as bad as you make them sound. From a design perspective, I think it would look a bit better if the ricasso was not curved on the bottom, ad was a touch longer. I also agree that the handle is a bit over-sized. I have had a hard time mastering that handle shape, so I'm impressed with the overall contours of the handle. It's just about 10% bigger than it needs to be.
-
Nice work. Your only mistake was trying it in the first place. Pattern welding is addictive, and now that you have started, you won't be able to stop. Cheers!

