jimaudio
-
Posts
16 -
Joined
-
Last visited
Recent Profile Visitors
1,930 profile views


-
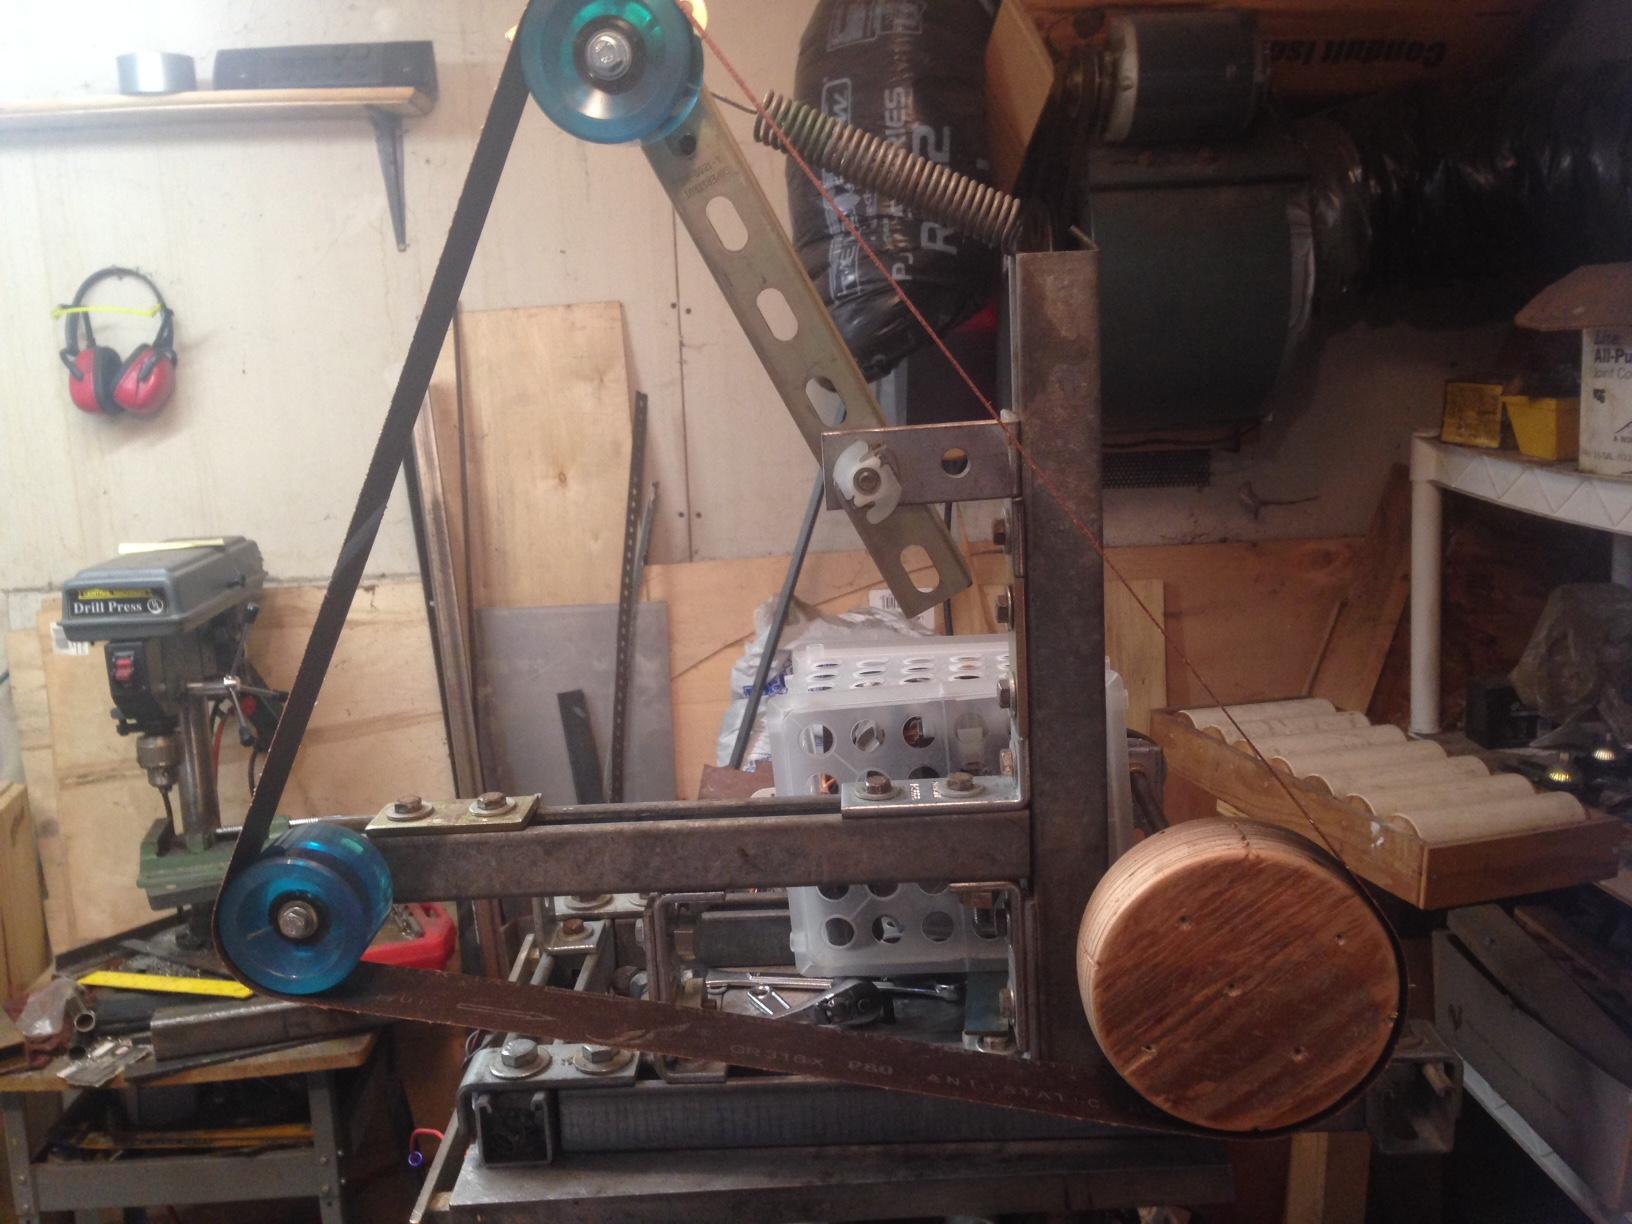
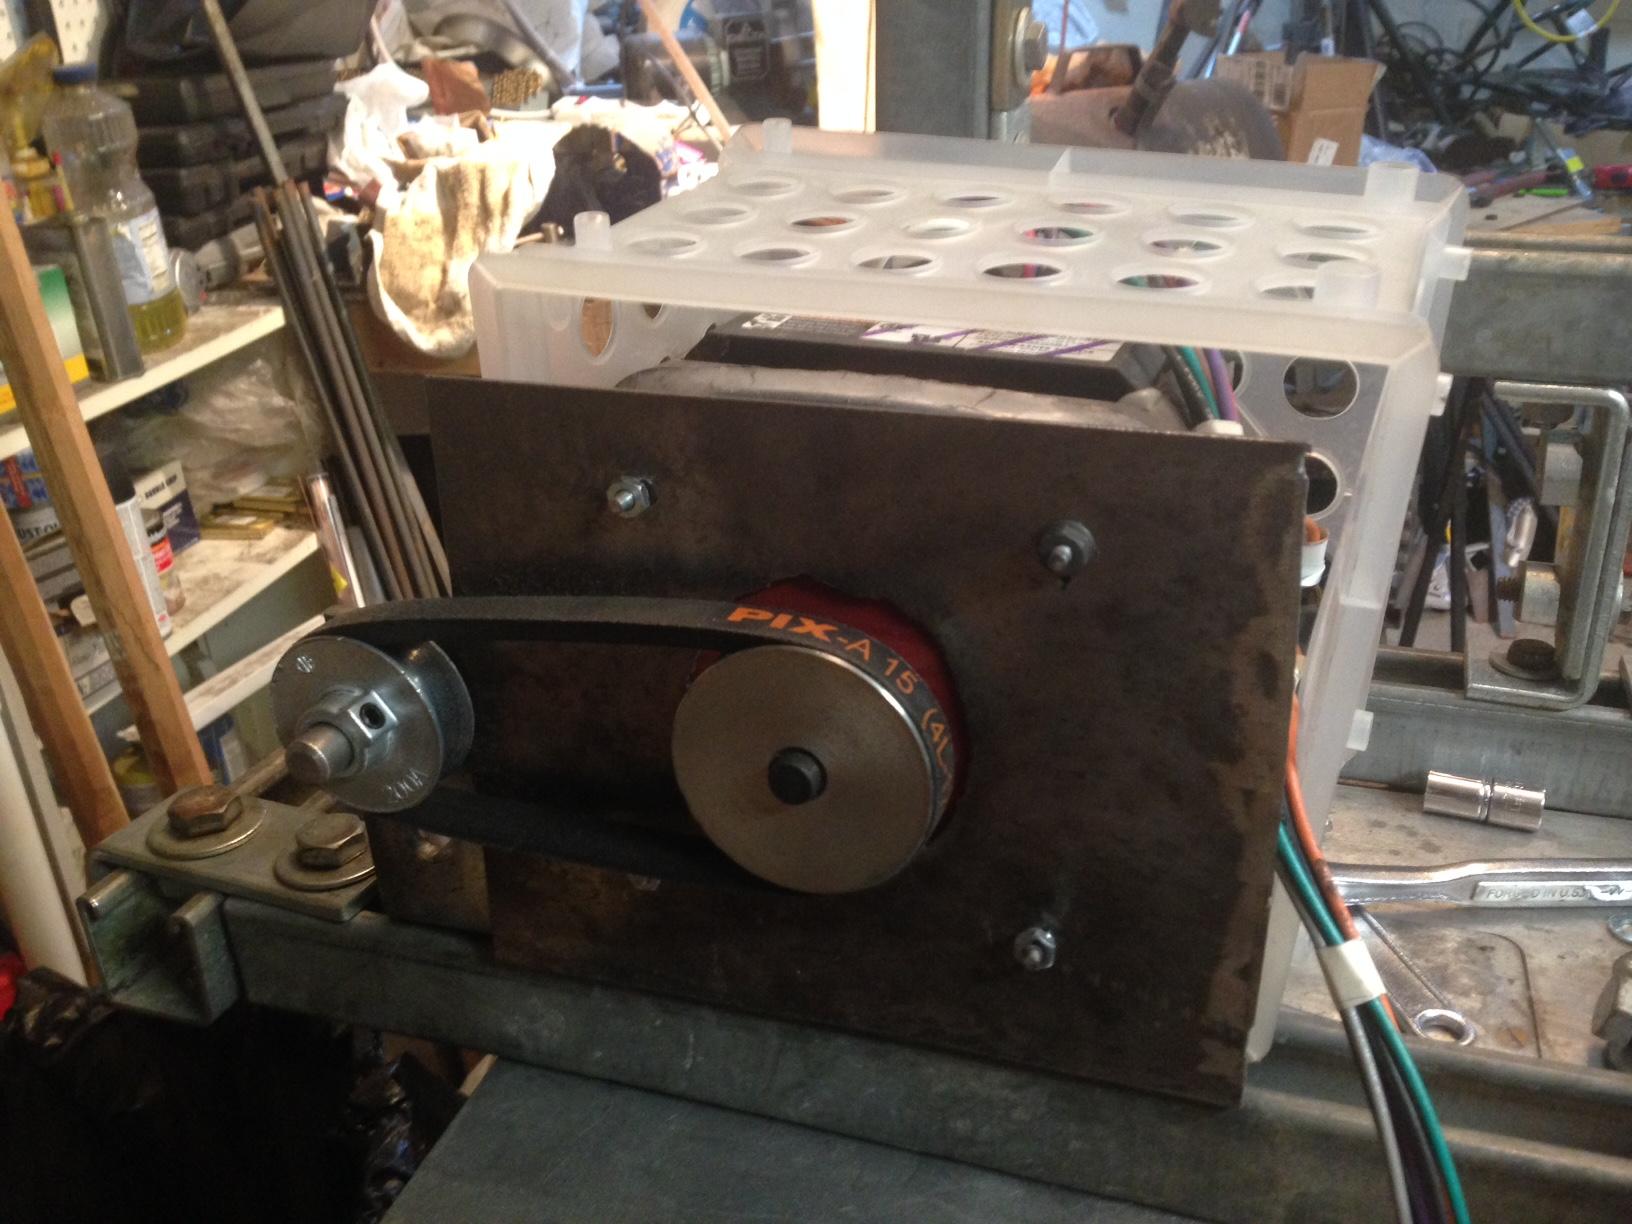
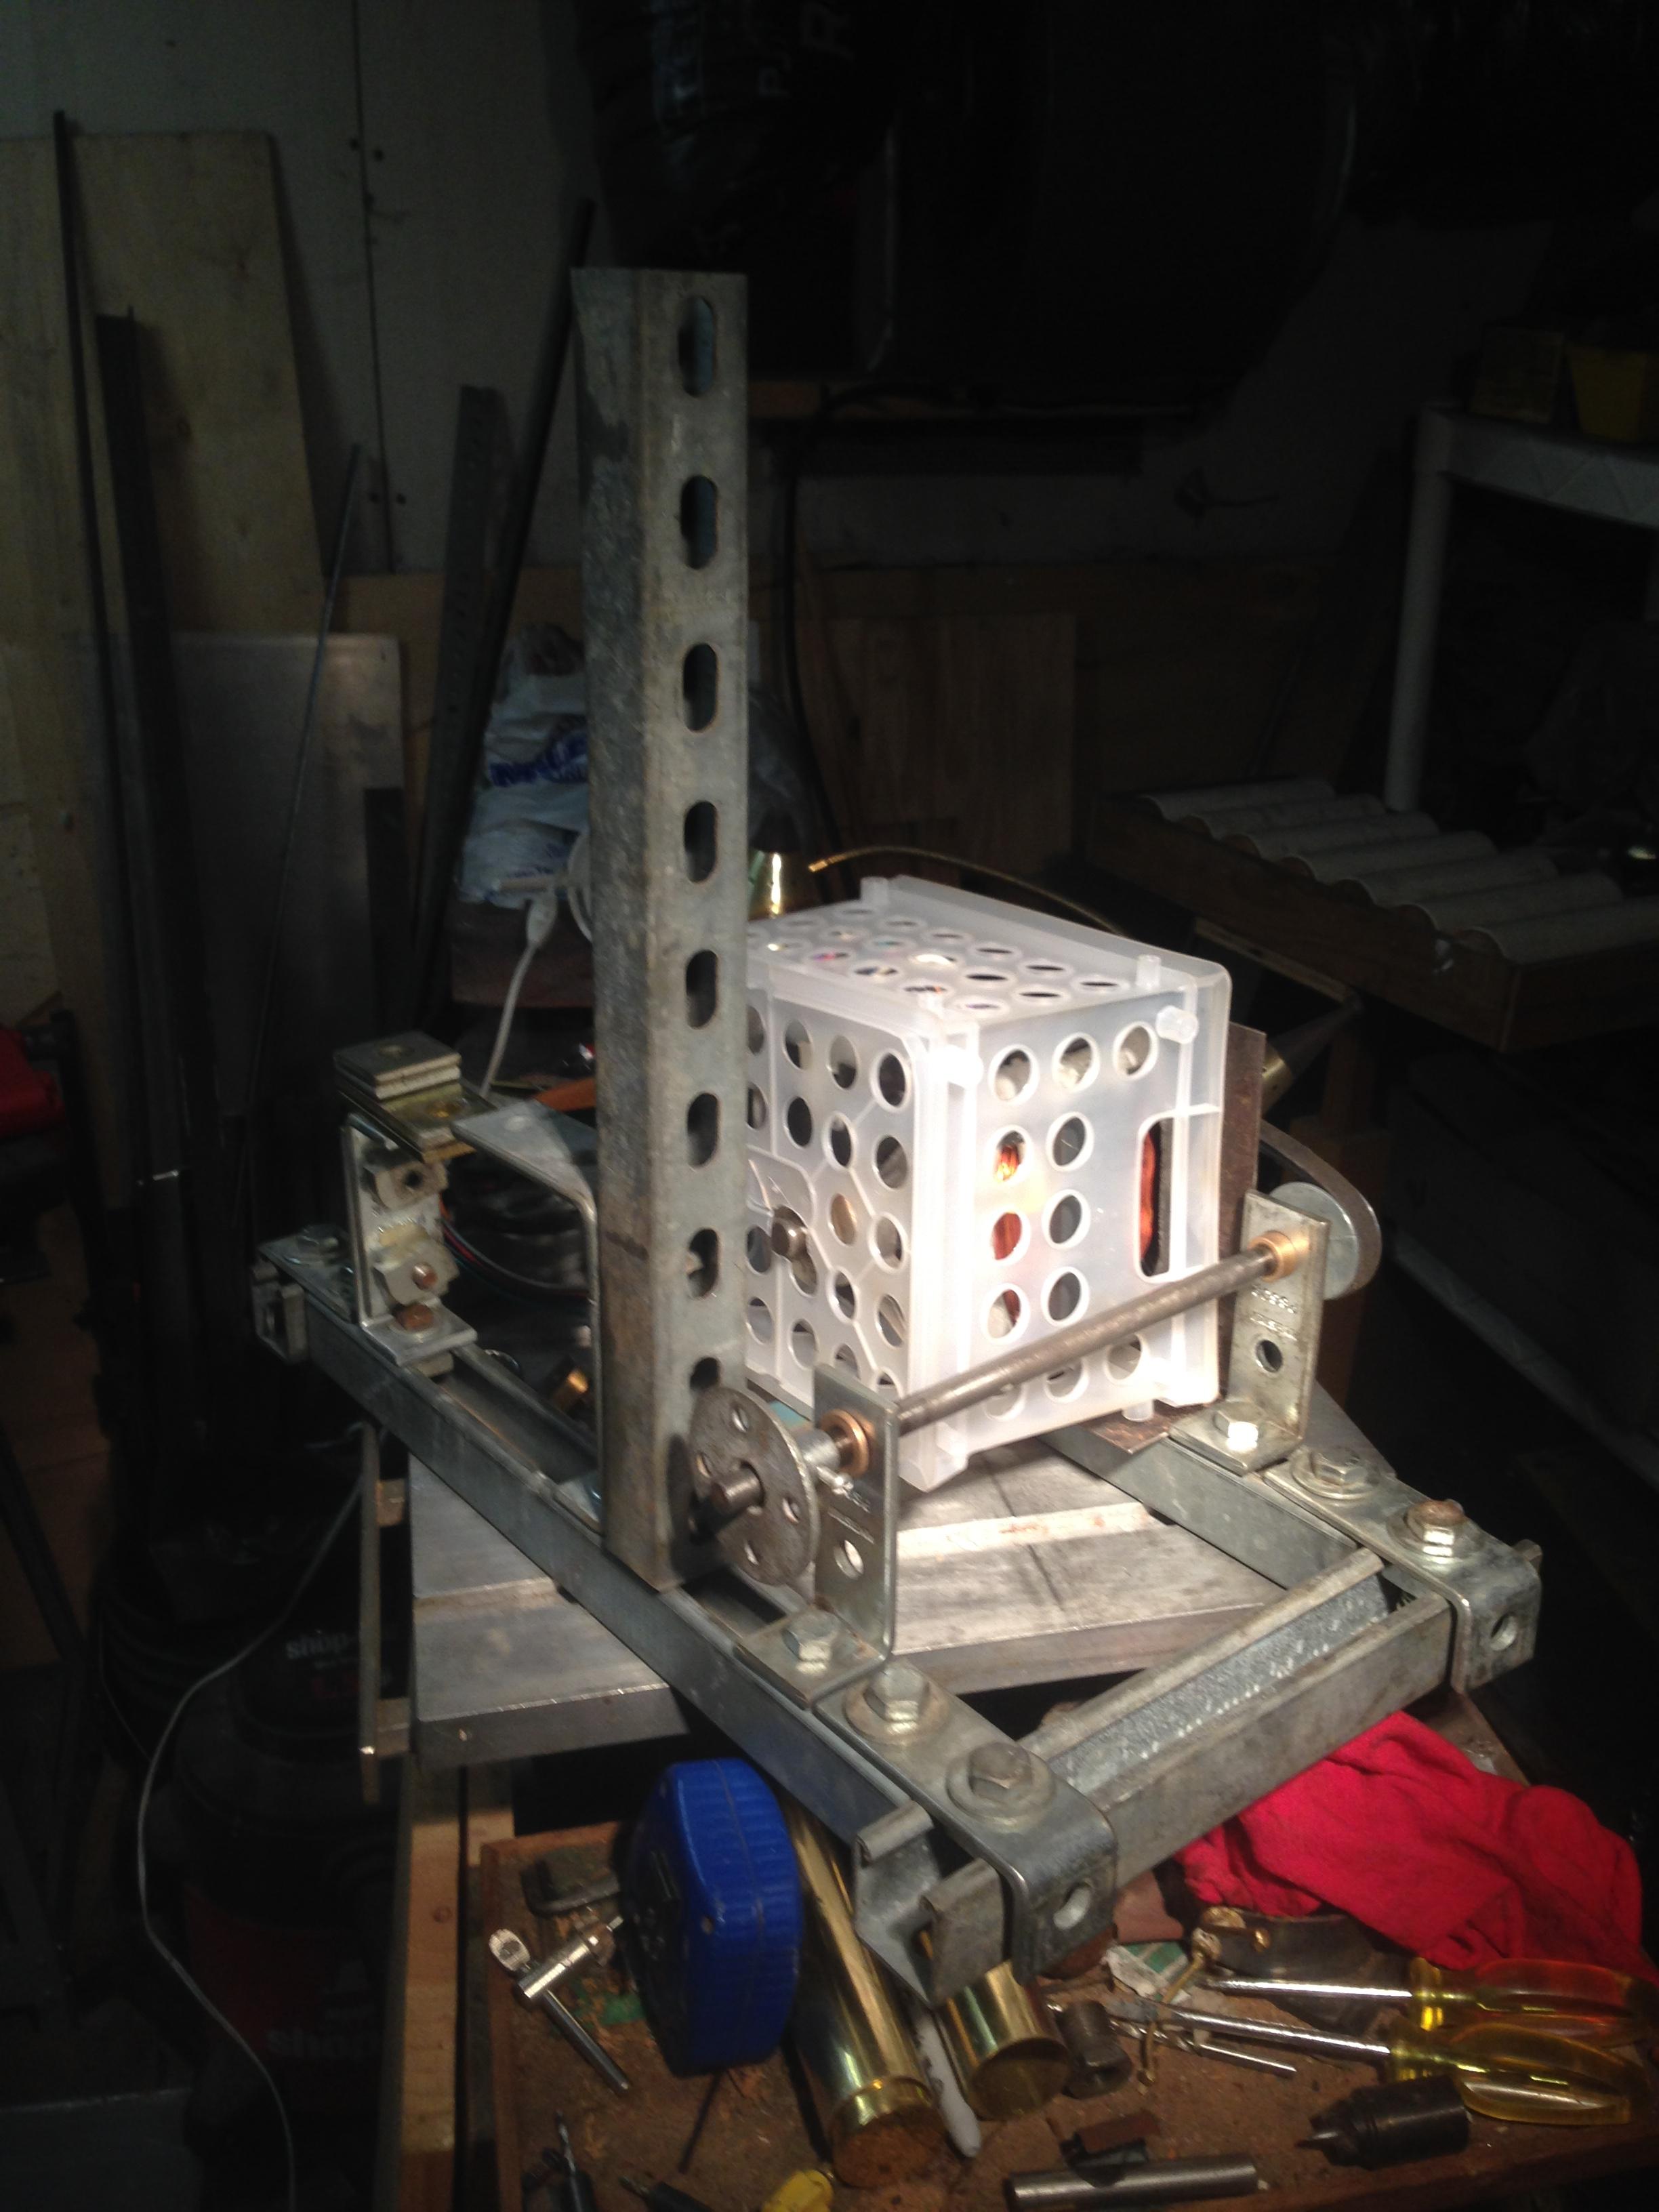
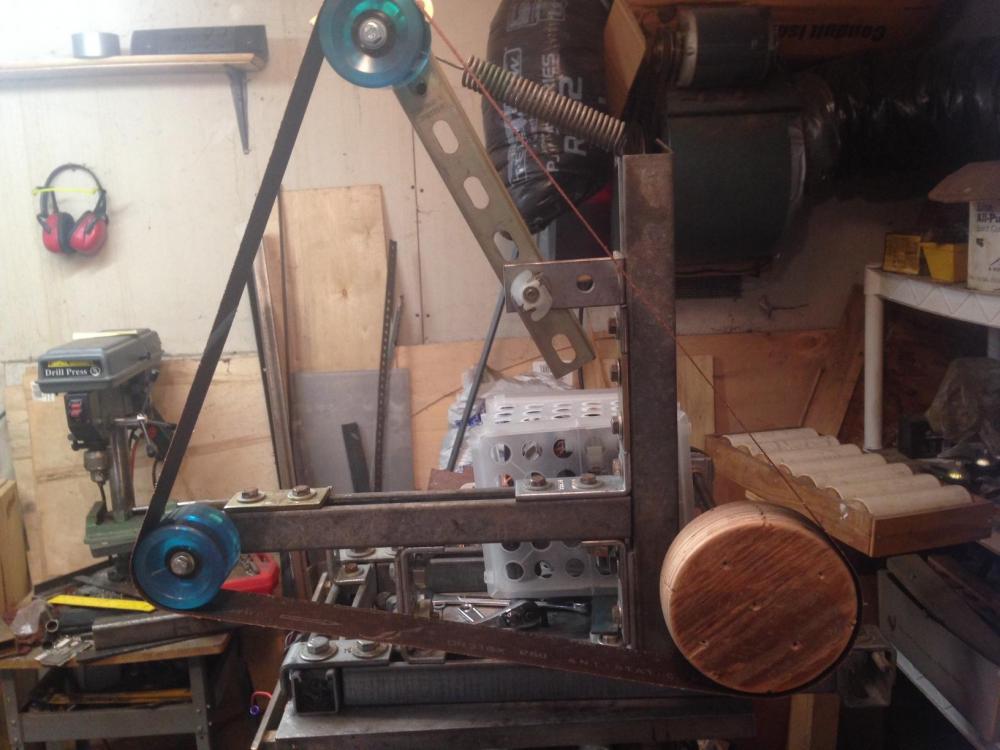
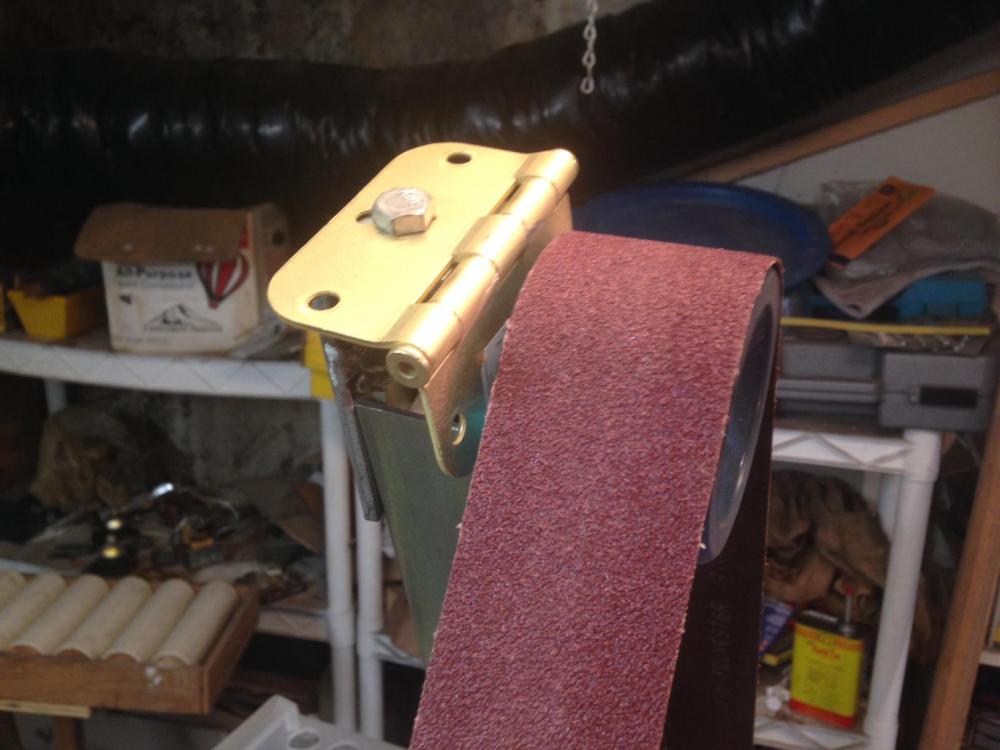
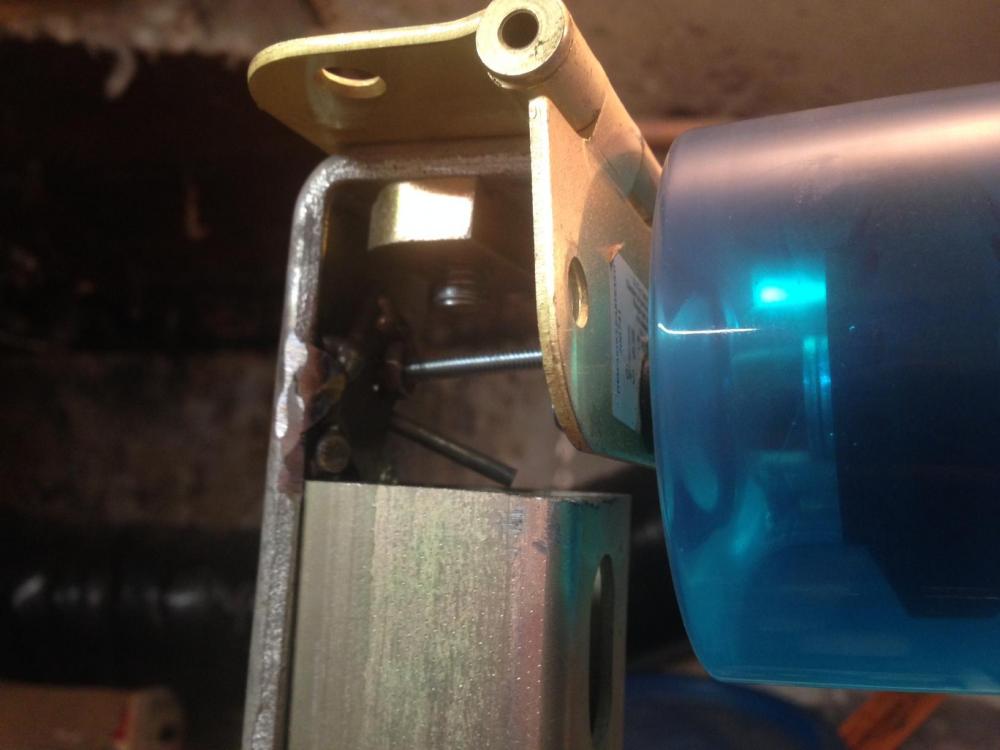
Not that I can't weld - I just didn't feel like it. I used 18 and 12 inch pieces of Unistrut and 3/8" and 1/2" nuts & bolts with the right angle brackets and plates. I did cheat and tack in an 8-32 nut for the tracking adjuster. I was going to epoxy a 1/4-20 t-nut into the hole but I ran out of epoxy and the 8-32 gives a finer adjustment. Motor is a 3/4 horse washing machine motor. 2 speeds - 1140 and 1750 rpm. With a 6" drive wheel I calculated the belt speed at about 2200 fpm on low, 3400 on high. Spring is from the same washing machine. For the jackshaft I drilled out a couple of the angle brackets and put 3/4" OD 1/2" ID bushings in them. Turned the drive wheel myself. The others are 3" longboard wheels with abec 9 bearings on M8 bolts. Total out-of-pocket cost was about $40 for the switches and wheels - had everything else laying around from other projects. I still need to enclose the motor better. The little crate is just a frame to hang some filter material on. Eventually I'll make a platen, too. Thanks for looking - Jim IMG_0949.MOV


-
Hi All- Haven't posted anything for a while so I thought I'd toss this in. Was at a friend's house for a New Year's celebration and their cheap little corkscrew broke when we were opening a bottle of wine. I remembered Hofi's instructions on how to make a corkscrew being posted a while back and made this for them today out of 3/8" hot rolled rod. Cheers!-- Jim
-
Sound deadening ideas
jimaudio replied to territorialmillworks's topic in Blacksmithing, General Discussion
Lots of stuff will work for treatment. For the best absorption you want soft right angles that don't let the sound reflect out. For hanging the fiberglass we use long sheetrock screws with fender washers so the screws don't pull through. Cheers!- Jim -
Sound deadening ideas
jimaudio replied to territorialmillworks's topic in Blacksmithing, General Discussion
I wish I had your problem. My shop is tiny with a low ceiling. But if I had to kill some reverb in my workspace I'd use this- Owens Corning 700 Series Fiberglass (703 is what I usually use). Comes in 4'x2' sheets, fire retardant up to about 400 degrees F. or more. In 25+ plus years of owning, operating and installing pro audio systems it's the best I've found yet. FIBERGLAS 700 Series Insulation Not too expensive, either. For this application I'd use the 1" 703. This place has it for fairly cheap-- Acoustic Panels, Owens Corning 703 / 705 I'd alternate the batts in a checkerboard pattern around the edge of the ceiling- wall, ceiling,wall etc. to kill the reflections in the corners up high. Continue the pattern all the way around the top edges of the room and then out onto the ceiling and wall surface as needed until you get the room as dead as you want it. If you're worried about bare fiberglass cover the batts with cheap cloth of your favorite color and get some spray- on fire retardant. Most theatrical supply places have fire treatment that you can apply with a simple squirt bottle. Hope this helps- Jim -
Being a Japanophile, I subscribe to a number of newsletters and forums. Once in a while something pops up that I can share with my other interests. Here's one-- Harema's Sakai Hocho - PukiWiki here's the newsletter that had the link- Hello from Japan! This is Kimono Flea Market ICHIROYA's News Letter No.320. It has been like a later summer here in Osaka. The temperature was more than 20C degrees 68F degrees). We assumed there must have been many tourists in Kyoto and other area in Japan. Yesterday, we visited Harema san's workshop. He is a first-class 'hocho'(kitchen knife) artisan-a blacksmith in Sakai. Sakai is in southern Osaka (next to Tondabayashi city where we live), and is the famous product center of hocho. Our friends from Germany knows him well, and she introduced us to him, so we could visit his workshop which is not open to everyone. His house is in the old town of Sakai, and his workshop is behind his house. He inherited his work from his father, and have made hocho through all his life. He says that it is necessary to train at least 10 years long to become a fully-fledged hocho artisan. His knives are made of steel and iron, and it is very difficult to joint these two different materials - very subtle temperature management is needed for welding(and of course, it needs be controlled in the very high temperature around at 1200 degrees C!). Everything looked black and sooty in the workshop- we have never seen the place like this before. In that sooty workshop, Harema who is in his 60's and was working silently in his white shirt. His shirt looked so white but it was because of the room which has no color except the blackish gray color. He was in a corner, in front of the furnace. There was a wooden box filled with coke beside the furnace. A stick of iron was hammered while it was red and a piece of steel panel was put together with iron and they became like one stick while we were watching. The stick looked so soft and making the shape looked amazingly easy with his unwasted motion. The red iron looked very soft, and amazingly with no yardstick, the piece became hocho(knife) shape. His sister was telling us(she was SO nice and sweet person), his right arm might be longer than his left harm because of years of hammering. Hammering has been done repeatedly by the machine(the very simple machine, manipulated by his foot)and by hand, both with heated iron and also when the iron was cooled off. Then cutting and grinding followed. When he started grinding, the long spark suddenly appeared in the sooty room, like fireworks. He completes all the procedure by himself except the sharpening(his brother is a sharpner). Working in the kobo(workshop)alone day after day-an old fan outside was seen from the small window. There was no airconditioner, so working in the workshop summer time must be a very tough thing. Wa-bocho(Japanese cooking knives)are quite different from western knives because of the blade. Curved blade with a single cutting edge is the characteristic of most of wa-bocho. In Japanese cuisine, 'cutting' is one of the most important skilles. For examples, taste of sashimi (fresh fish) is said to be determined by cutting skill. Good chef minds about fiber of fish meat and the surface of the cut meat. Good chefs want to use very sharp knives(hocho), and for real Japanese cuisine, they say they have to have wa-bocho. Harema san says that the secret of the hocho's edge is the angle of the edge. Usual edges of knives are made of straight lines, but Japanese hocho's edges are made of curve lines and its angle is way sharper than usual knives. (Please refer below figure). Chefs ask Harema san to make hocho for them and keep sending their hocho for sharpening or repair years after. We heard one chef brought his hocho which has been 20 years since it was made to Haremasan to make it usable again. There are chefs who cannot cook without his hocho. At the entrance of his house, the samples of hocho which his father made was placed in a glass case. We did not want to take interrupt his work, so we told Harema san only a short time watching will be good but he said, it might be once in a life time experience to come to such place, we could stay longer and see the whole process. We were so glad he kindly invited us and allowed us to watch his work. While watching his work, we were so impressed and imagined about his years of work in this workshop. It must be a solitary work but he looked satisfied and noble. Here are the photos of Harema san. Harema's Sakai Hocho - PukiWiki (If the link doesn't work, please click from top page of our Funfun-Japan.com. ) Funfun-Japan - PukiWiki Thank you very much for reading to the end! Today we will list various obi, sakiori obi, medashi & pattern sample bolts. We are very happy if you find your favorite among them. Have a nice weekend! Ichiro & Yuka Wada Kimono Flea Market "ICHIROYA" Cheers!- Jim
-
Coleman makes a straight adaptor that you can use to run the JTH7 off of a 20lb bottle. Less than $20 on Amazon as I recall. I've been using one in a little paint can forge i made a while back. Home depot has new 1gal. cans for about $5- put a fitting in the side to hold the torch and lined it with ceramic blanket coated with ITC 100 and put a chunk of firebrick in the bottom. Works great!- especially for small stuff. I stuck a digital thermometer probe in it after it was up to temp for about an hour and it said it was 1250 c on regular propane. Cheers!-- Jim
-
I got hired to fly down to Long Beach and run sound at the Ink N Iron festival last weekend. How can you call it that and not have any anvils around? The first one is the view from my desk--the second is me onstage. -Jim
-
Up here in Tacoma
-
Thanks guys! Unfortunately, it was a cheap treadmill that didn't have the motor- just a belt on a really slippery piece of plywood with a resistance fan geared to it. (Of course, I saved all of that stuff,too:D) I think some packing or spacers somewhere will be the easiest way to adjust the height-just haven't gotten to it yet. The 3/8" hot rolled rod that the linkage is made out of is the same stuff that I was putting the square tapered points on. It flexes some but the springs give as well so I'm not too worried about it. Frosty, it's perfect for a quick smash-it-flat or for long tapers. For more delicate stuff I'm trying to learn to use my new one (see below). Cheers!!-Jim
-
Hi all- First of all, I'd like to thank Glenn and everyone else for providing such a wonderful wealth of information on this site. I've been laying low for almost a year, trying to absorb as much information as I can and I thought it was time for me to share something as well. Here's something I came up with to help me make a lot of tapered points on round stock when my sister wanted a bunch of yard art kind of stakes. The frame is a workout treadmill that my buddy's girlfriend was getting rid of. I saw the pivot that it used to fold up for storage and thought that I could make use of it. I tore off the useless stuff and added a 12 lb. HF sledge and a piece of RR iron for the anvil. I used 1/2" rod for the hammer pivot and sleeved it so it would stay centered. 3/8" for the linkage rod and I welded together some pieces of a strip of 3/4" plate to make the base. I had to shorten the sledge handle to get it as close to the wall as I wanted when I rearranged the shop yesterday. I had the chain and eye bolts laying around from other projects, so the total out of pocket for this one was about $75 for the RR iron, 3/4" plate and springs. In the future I'll probably modify it so I can adjust the hammer height for tooling dies and stuff but for right now, it's great when the arm gets tired. Cheers!!-- Jim
-
used lawn mower blades
jimaudio replied to monkeyboy's topic in Knife making Class General Class Discussion
Here's the one that I just finished made from a lawnmower blade. Water quenched, then tempered. It's my second knife and is holding the edge pretty well. --Jim -
To glove or not to glove, a poll
jimaudio replied to Ramsberg's topic in Blacksmithing, General Discussion
I started out wearing gloves on both hands but got rid of the one on the hammer hand in the quest for better control. Tongs hand I use a cheap loose fitting HF welding glove so I can get it off quick if I need to. -Jim