

Chrispy
-
Posts
154 -
Joined
-
Last visited
Content Type
Profiles
Forums
Articles
Gallery
Downloads
Events
Everything posted by Chrispy
-
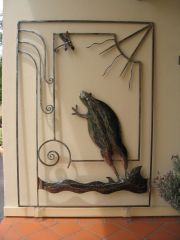 Frog wall panel
 -
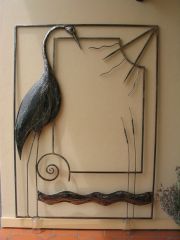 Brolga wall panel
 -
 Emu - Australian Wildlife.
 -
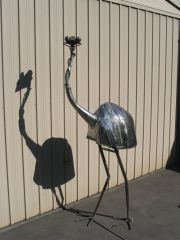 Emu - Australian Wildlife. Body made from 3 mm mild steel plate, head made from Trailer ball hitches and cultivator points. Flexible neck and free standing.
 -
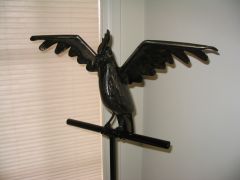 My 1st Parrot hand made from 3 mm mild steel
 -
Grinder sparks and windows
Chrispy replied to urnesBeast's topic in Blacksmithing, General Discussion
Shielding sparks from your bench or pedistal grinder is relatively easy by fitting appropriate gaurds. It's the stray sparks from angle grinders that seem to be attracted to glass from anywhere within your workshop. Some glasiers, Auto stores and security shops offer a protective film that can either be tinted or clear that can be applied directly to the glass. It won't prevent the glass breakage but it stops the zillions of small fragments from hitting the floor (kept intact). It is fairly resilient to sparks depending on how much heat is left in them after travelling across the workshop. It is easilly applied by wetting the window with water and a very small amount of dish washing detergent to allow the film to slip into position. All that is required is to squeegee the bubbles of air from between the film and glass by starting at the centre and working towards the edges. It may appear a bit blurry at first but as it dries it will become clear. It is exactly the same as window tinting that is applied to car windows. The tinted stuff is also helpful in insulating heat from outside. Not sure that it helps much in keeping the cold out. It can easily be removed / replaced by getting under a corner and working it off with a razor blade scraper. It is dirt cheap compared to replacing glass. Chris. -
Tzonoqua, I'm glad it's your workshop and not mine.... I'd spend all day looking out the window at that beautiful scenery and never get any work done. LOL
-
Finally moved into the new workshop
Chrispy replied to AdrianWood's topic in Blacksmithing, General Discussion
Great shop, layout and assortment of tools. ButI think you can do better with your layout table. lol:) I know it all takes time and can see your well on your way to the perfect shop. Yes they are right - "no shop is ever big enough. My shed floor, an extra 48 square metres is arranged to go in mid September then the brickwork straight after. Then there's the big job of laying out the tools to hopefully look as effective as your setup. Congrats Chris;) -
I Like your rebar. It turned out mush better than I imagines re bar would look' Enjoy your Beeennnnz.
-
Table I just finished and close ups of my lamp
Chrispy replied to Bryce Masuk's topic in Blacksmithing, General Discussion
Nice table Bryce. Alt5hough I have a preference to see drawn out ends on scrolls. Love the lamp - most interesting. ps great safety shoes you have there LOL -
Thanks Mark, I've looked on the net for something downloadable to no avail but did find the book listed with Amazon books. I have a friend that is a wizard in finding digitized books, I'll see what he can do for me. Also seriously considering buying the book as you indicated "it has been a Bible for yourself". That's a pretty good recommendation from highly reputable man.
-
Thanks gentlemen, The information provided has been most helpful. Special thanks to John B as I now have the complete PDF publication of Wrought Ironwork Pt 1 - 6 and The Catalogue of Drawings for Wrought Ironwork in my hot little hands which gives detailed drawings and patterns of what I enquired and a hole lot more. Ps It's a pleasure knowing there are so many genuine folks willing to help each other out and keep this tradition alive. Cheers Chris
-
Thanks John, I can always count on you good people coming up with the goods. I found a link in the gallery with a more accurate picture. I'll try my luck with the book but if anyone in the meantime has a template / pattern, my email address is csfuller@adam.com.au Heres the link. Thanks fellas. I found a suitable pattern on the artmetal web site. Thanks for giving me the name of the leaf "Acanthus" - most helpful.
-
Thanks Glenn, The only picture I have is a very poor quality shot emailed to me in a pdf format. I searched Elite Wrought Irons catalogue on the net and was able to find an image that will suffice. Unfortunately the product from EWI is made from 0.8 mm thin tin which is way too light for my application. Thanks all the same , I will keep your info at hand and upload a few of my pics to the gallery soon. ;)
-
Attached is a rough picture of the leaf thing. It is in the lower right hand corner. It hides the joint of the single lower scroll and the 4 branching scrolls coming out through the top. There are 2 fitted in this application - 1 either side of the joint. What is the name of the leaf and does anyone have a pattern / template that they are willing to share. I have a job pending that requires 18 in total and am thinking of having them Laser cut from 3 or 4 mm hot rolled sheet. I can figure out how to forge into shape and attach.I'm just looking for a reasonably decorative template (the easy way out) and the correct term for this style of leaf type collaring. Regards chris:)
-
yes i have a photo but it's too large to upload it. No nota vine it is more a flat leaf hammered into a 3 sided clasp that is presumably welded to 1 or both sides of a scroll joint. It is quite decorative and seen from both sides of the gate / fence etc.
-
Pardon my ignorance but what are cow magnets? Chris.
-
Can anyone help me with the correct term that is used for the style of leaf that is often used to conceal the joints of multiple scrolls. It appears to be a longish style leaf that wraps 3 sides of the joint and is visible and identical from both sides. I thought it was called a florentine. However I can not find a pattern on the net, books or a BP on how to make them. Any help will be greatly appreciated, (especially a pattern) then I'm capable of scaling it to suit the needs of the job request. Chris :)
-
HWHII, Some time back I made a 3 spring fullers but before assembling I mig welded rough beads to the inside arches of the half round sections (with the gas turned off to create rough lumpy weld deposits). I assembled the spring fuller and it did an excellent job of texturing (like bark) the 32mm ,25mm and 18mm heavy walled steel pipe (2 metre sections). Constant rotation is required and caution not to over texture it as the pipe can split. The pipe diameter will reduce as can be expected. It made an excellent trunk for a 5.7 metre Monstera Deliciosa sculpture which is now installed on a lift wall in a local old folks home. I'd post a picture except I'm on a mates computer and haven't access to my Pictures. Give it a try - there is very little expence and well worth the effort :-)
-
my first try at making something
Chrispy replied to mite5255's topic in Blacksmithing, General Discussion
Great work for your first try. Won't be long and you'll be a professional LOL -
Welcome to IFI. you will find all sorts of interesting stuff on this site and the folks very helpful.
-
Another forge welded bundle
Chrispy replied to brianbrazealblacksmith's topic in Metal Sculpture & Carvings
Excellent work Brian, bet your proud of your achievements. And rightly so. -
That's what I like to see - persistance. Keep it up - U will get there.
-
Thought I'd make it feal at home
Chrispy replied to Fe-Wood's topic in Anvils, Swage Blocks, and Mandrels
Great stand, I've been contemplating making a steel stand for my anvil but am currently between two minds. Do I scarifice my old tree trunk section which currently holds all my hammers and I assume absorbs a lot of the noise. It also has a few minor splits that are useful for forming leaves cold. Have you compared the noise level on your new stand against a timber block? Chris. -
Really nice bicks, I look forward to making some similar when I get my Power Hammer.