

Chrispy
-
Posts
154 -
Joined
-
Last visited
Content Type
Profiles
Forums
Articles
Gallery
Downloads
Events
Everything posted by Chrispy
-
I love the design, especially the candy shapes. How did you go about making the scroll patterns on the candy? Did you make a scroll from round spring steel and just top fuller it in? Great work Thanks for sharing.
-
Nice work smithy1, great looking and functional. :)
-
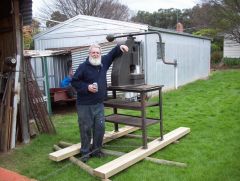 I have one just like it and have made a few tooling blanks. will get to put it inside the shed extn soon. Currently resides under the carport. Is that a BEER in your hand? :rolleyes:
 -
Hey Colleen, Hows the recovery going? must be about 4 months now. Keen to see more of your beautiful work. I hear it's snowing up there this time of the year.
-
Kenny, Great work , Keep it up. Here is a link to an Australian sculptor who does similar work. Greg's work is generally as big as a tree often larger. Maybe you will find some inspiration from his work. It's most likely copywrghted but the inspiration you get won't be. Good Luck. www.gregjohnssculpture.com/
-
Possibly the cheapest set up would be - to get hold of an old pair of bolt cutters and dismantle them to recover the jaws. weld the jaws to a suitable block which could be attached to your press. Ideally you would need to set up a backstop that could be adjusted to meet your required cut length if multible cuts are required. Also think about how each pellet will drop out. perhaps a bottomless shute to dump them into a container below.
-
Thanks Spears, I quite like the odd hammer mark on some of my work as it indicates to the viewer (or new owner)that it is hand made. It makes multiple sets "one offs" and is often characteristic. It's an interesting stand, not your normal run of the mill style that you see commercially. I have often wondered about the durability of the bristles from garden / yard brooms. It Seems that they may work well so must give them a try. keep up the Great work. regards, Chrispy :D
-
-
Hi Colleen, All the best for a speedy recovery. But remember to take everyones advice on taking it easy. Look on the bright side of things, now you can sit back and be pampered, sketch book in hand and draw up all the things you think about making in the future. More beautiful work as usual. Take Special Care. Chrispy.
-
This computer game is a xxxx liar!
-
You must have a lot of time to spare. How many hours to make this masterpiece? I reckon you'd find it difficult to let it go (at any price). Everything looks forge welded. Care to share your texturing technique?
-
Good work Johan, I figured orchids would be difficult to make, especiallt the open flowers but you have gone and simplified it . It looks realistic. Even the closed buds and air roots leave no doubt as to the type of plant it emulates. Just fantastic.
-
great work, keep it up! You must be the apple of your Dad's eye. I tied a simple knot in the ends of a piece of 6 mm rod, bent it in halves and twisted it together to make a key ring and gave it to my Dad, He couldn't comprehend how I did it. Everyone wants one but how do you charge friends of family for what takes just a few minutes.
-
Truly a talented smithy. I had reservations on how far one could push a piece of metal before getting unsightly creases. Your demo has enlightened me. I must give this a try soon. I bet your proud of your work.
-
Really nice sprout. Great to see something rather different. Forged? Wow you have a lot of attention to detail. Any problems forging the bronze? Was it solid stock and plate or Brass tubing from the beginning.
-
Yeah Sask, a great housewarming gift. As DennisG says, get ready for the orders!
-
Great looking tree. I like the fire place set in the background too. Your work? if so what did you use for the bristles on the brush? I have had no end of trouble trying to source the brush part here in SAust. Do you know a supplier or did you make it yourself from something?
-
Remarkable Colleen, A bit more sunshine wouldn't have made a skerick of difference. They look glorious out there - Like they were meant to be there. I hope you found a good home for them. :)
-
 Great work - love the fire breathing dragon!
 -
Colleen, You never cease to amaze me! More beautiful work. I happen to like Rust (provided it's not in my car ) There's always the option to lock the rust in with an application of Wax (Bees wax, Turpentine and Raw linseed oil made to a paste) over the top. Burnish it in and it turns orange rust to a much richer chestnut colour. It might be a bit difficult to apply as you have some restricive spaces on your flowers. In Austrlia we have a clear finish called Permalac which stands up well to the elements in arid and cold costal areas but is reasonably expensive. I like DennisG's suggestion of pearl automotive finishes. That could provide an interesting outcome. Cheers, Chrispy
-
Colleen, They are fantastic. I wish they were in my yard. They'd be quite a talking piece. Are they an Asiatic lily ? They look very similar even to the same style of closed flower pod. Gorgeous work, I love them, along with all of your work. Keep it up. Cheers, Chrispy :)
-
You are just SO talented. I have seen a lot of your work posted here and always look forward to seeing more. I love the background scenery and as stated before, I'd find it hard to get any work done coz I'd be too busy admiring your beaut environment. Excellent work as usual.
-
I love your work - both are equally beautiful and certainly artwork. I like the butterfly the most . That is an unusual twist on the body section - one I haven't seen used before now.
-
Great work Oscar. I love the design. ;)
-
I am currently struggling to create a refractory for my Gas Forge. I have a friend who is an industrial chemist who is trialing a few options. He is using coarse fly ash and aluminium oxide and some other (unknown to me) household chemicals that generate heat when mixed and create tiny little air bubbles (Looks like Aero Chocolate but its gray). The sloppy mixture increases like expanding foam to fill the required space but gets too airy and won't support itself and collapses just prior to setting. We are still playing around with quantities, hoping that may solve the problem. When we tested the dried tile from the bottom of a plactic container mould it has fantastic insulation qualities, and dosn't break down with direct heat from my oxy acetylene torch. 10 - 15 minutes of intense heat directed onto 1 spot leaves the tiniest glazed mark. The sample is 1 inch thick and no heat is evident on the back surface. The glaze spot dries hard when the heat is removed and dosn't seem to be weakened or fatigued in any way although while the flame is in contact with the refractory the glaze is sticky but self supporting. If he works it out and is willing to let me know the recipe I will pass on the details in a new thread. Sorry I cant be much help at the moment.:)