

GraphicH
-
Posts
16 -
Joined
-
Last visited
Content Type
Profiles
Forums
Articles
Gallery
Downloads
Events
Posts posted by GraphicH
-
-
Quote
There is a choose file button below the text window as you type.
This is actually what I did, the files were uploaded and can be downloaded, for example if you hover over the first attachment you should see:
https://www.iforgeiron.com/applications/core/interface/file/attachment.php?id=163258They seem to embed fine though if I copy and paste the links from above here, so Ill just do that:
-
Frosty,
Yeah that's why I did the bench test and only ran it for a minute or so, it did not behave properly and this is gas so I'm not going to use it if it doesn't work like I expected. I don't think I'm going to use this build at all, it was more trying something out. For a lot of reasons I'd rather build singular burners that are more modular, I think I should try to just get a single burner right before I try multiples. Also, out of curiosity when you say its B-A-D, what are we talking about here in terms of failure (I am guessing explosions).
Here are some pictures:16qXapmRhkZoGVFyYvAoqkkYyH5_8C-HA 174vZmnW2kPgDW74ceJOkHim8MfGM0iDg 16x-ON6kPBX3zhS-FDXi7EWfSvARd3A9_ 16vHjZgDlwnZOuzv1iHxNzYEl9Rk61htc 16kn1mWJNXjxxr8yIa4a9CAuqsHmlFjxi
Frosty,
I just found your burner designs, they're both simpler (less to get wrong) but more detailed. I'm still curious about tips you can give me (especially safety tips). -
Recently got a double venturi built, following the design in this video
https://www.youtube.com/watch?v=hqFDRBZZPWQ
So I have it built and I'm testing it but even at around 10 PSI I've got no visible flame coming out the end. Its putting out a TON of heat, but even adjusting the flanges, no flame. In all the videos I've watched most people have blue or yellow jets, but even though the burners are roaring and putting out heat, just no flame at all. Is that norma? -
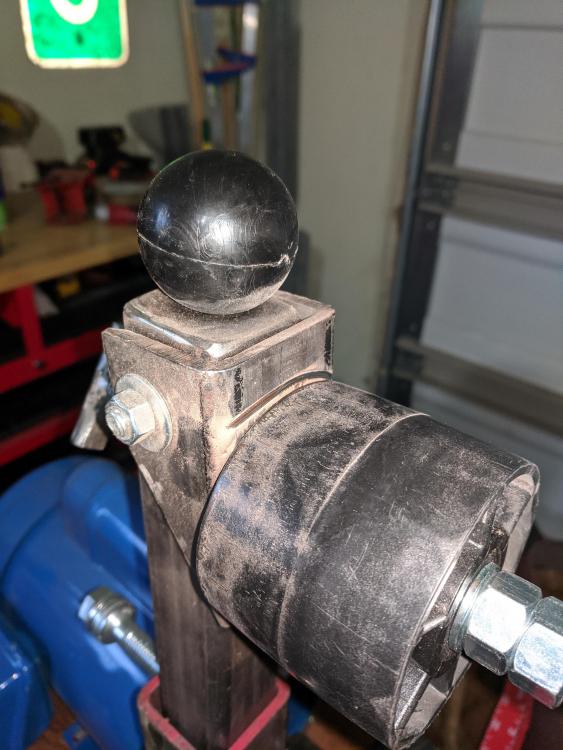
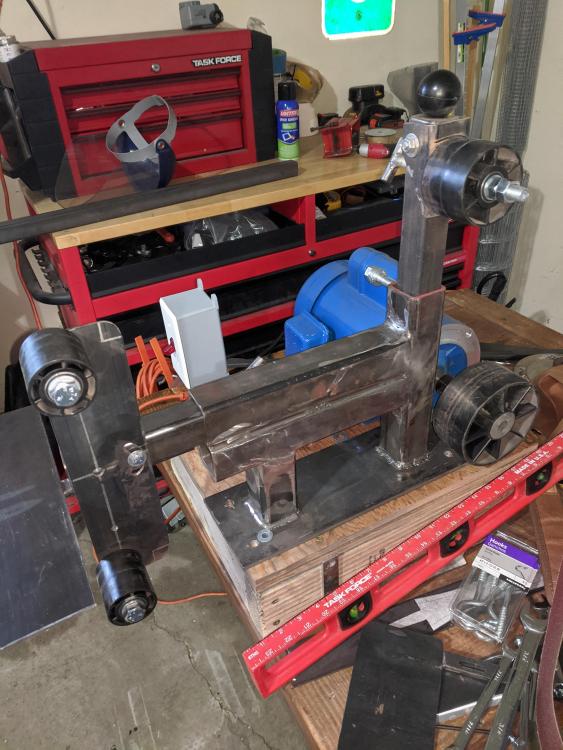
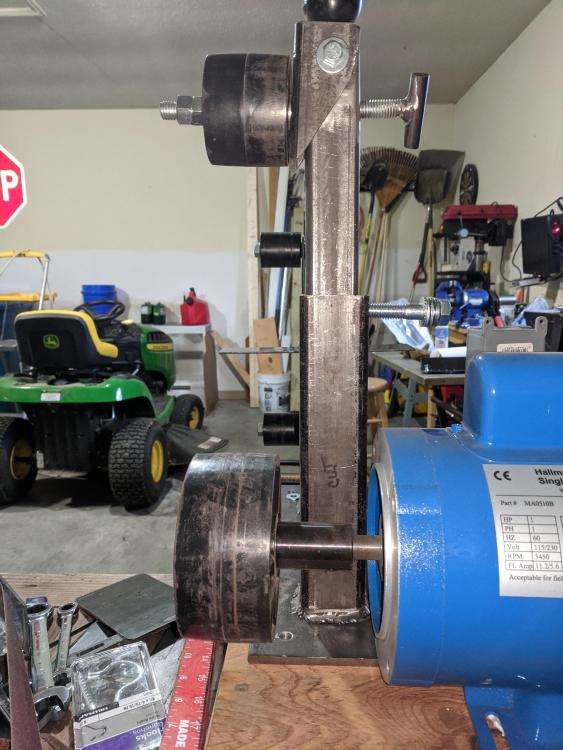
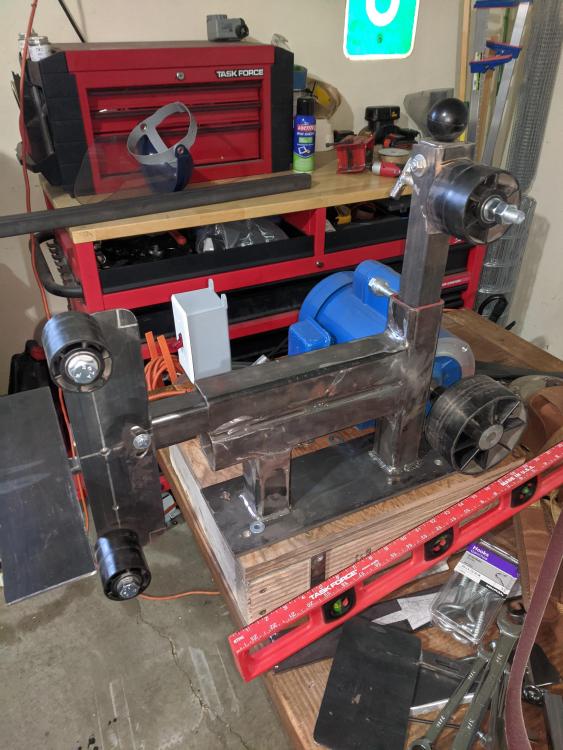
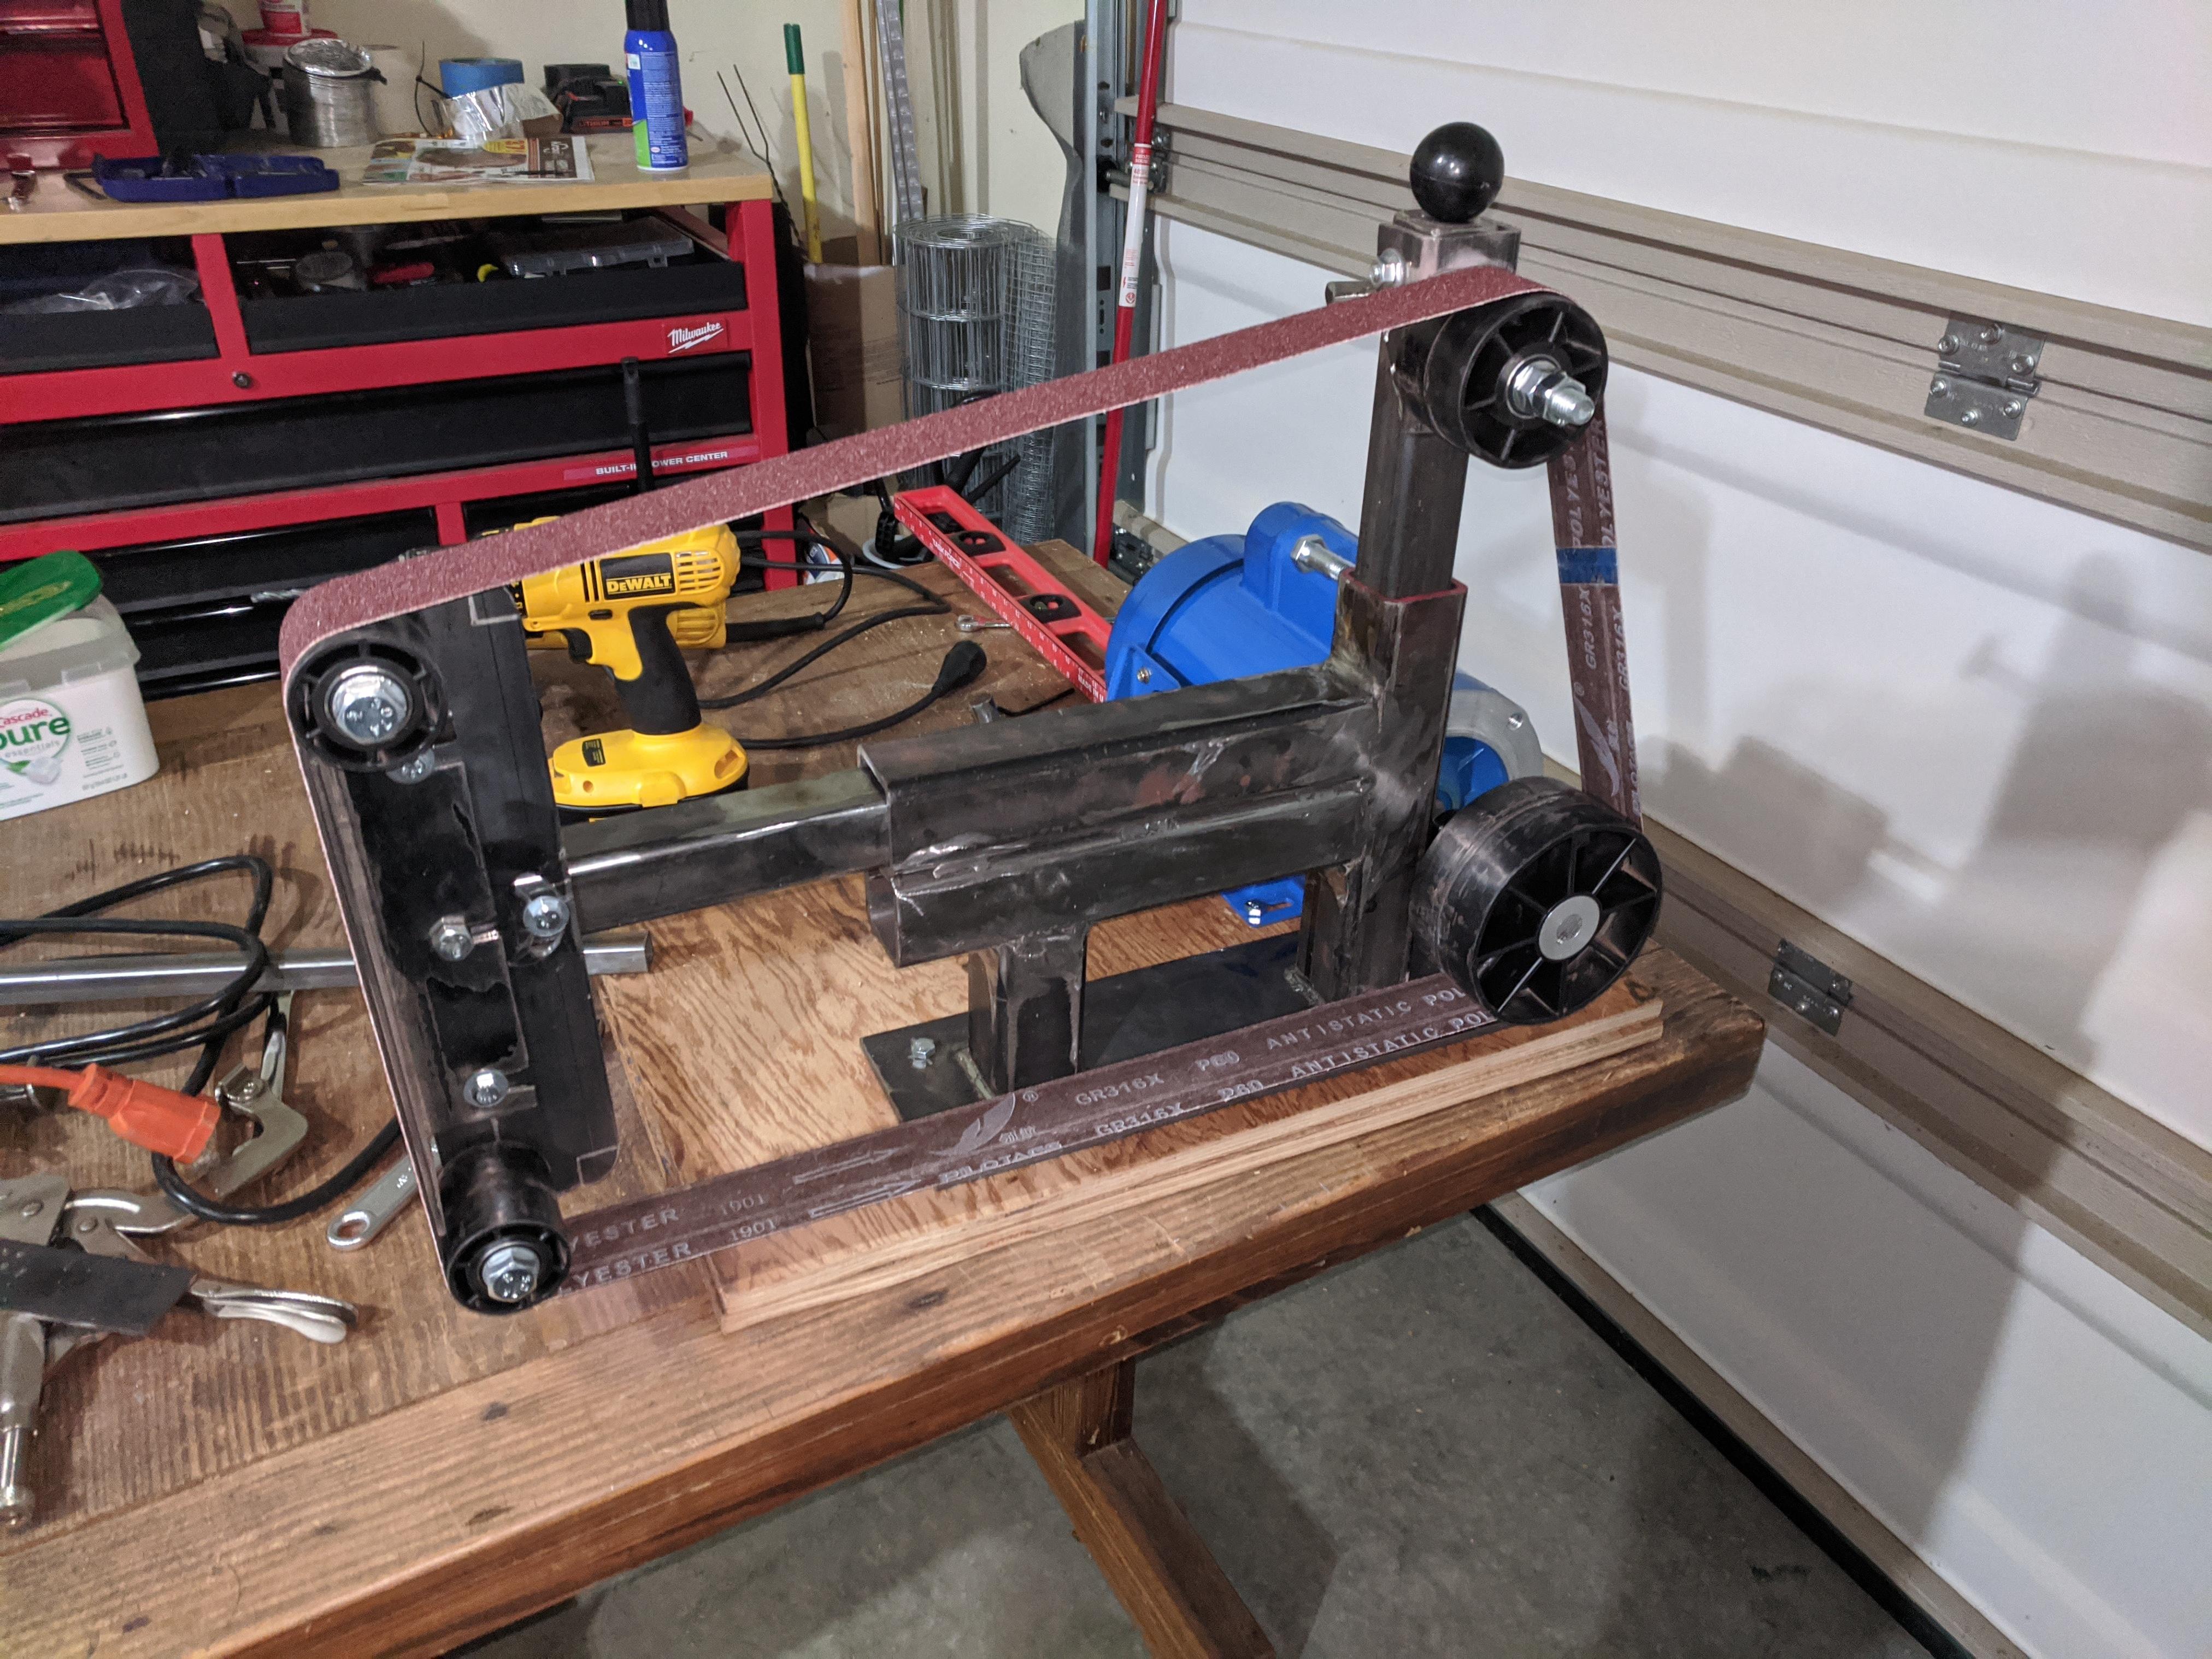
Alright update video. I think I'm good now, first off @ThomasPowers your advice was the best! I contacted Dan C. he was super helpful gave me a lot of things to try. @Kozzy I think you're right, having the two crowned wheels (tracking and drive) do make things more complicated, it took me a while to get things situated so that the tracking wasn't "touchy" and I'm pretty sure it has to due with both the drive wheel and the tracking wheel being crowned. @John in Oly, WA Your advice on the D-Plate was spot on: the thinner plate was definitely flexing, and on top of that the thinner plate made it that much harder to get the idlers aligned with the tracking wheel. Besides taking some of the suggestions here and the ones Dan gave I also welded 1/8th inch bar to the top of the tool arm and the "front" of the tracking arm, then ground these down for a tight fit in the frame. One problem with using this tube steel is there's a lot of "play" in the arms that reeks havoc on getting things well aligned, if I were to do this over I think I'd use tube steel for the arms but figure out a different way to build the frame so that the arms fit with 0 play into it.
-
21 hours ago, John in Oly, WA said:
Also, your D-backing plate is too thin. Way too much potential for flexing. Should be minimum 1/4" thick. 3/8" thick would be even better.
Yeah I'm definitely going to change that since I have thicker plate laying around, and its not helping with the alignment issues.
-
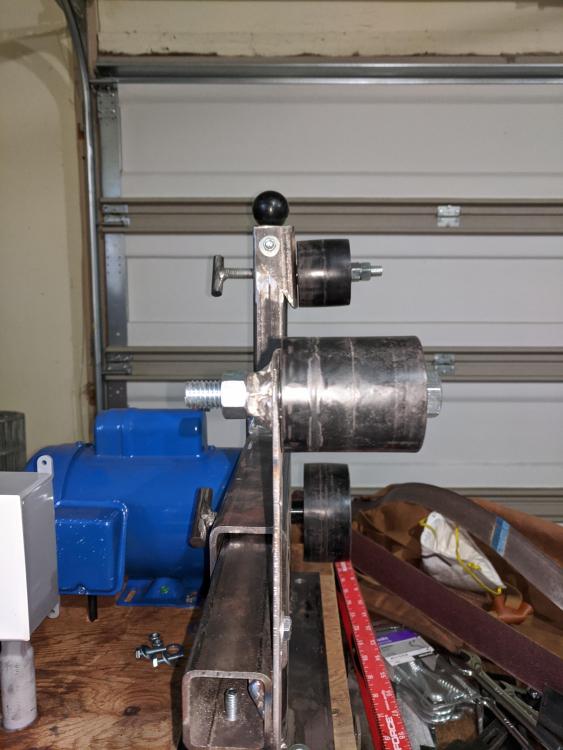
I mean that makes sense I'd just never heard it before and lots of these things look like they have crowning on both. I've actually got the thing running smooth on 3 rollers:
But you can see its still hanging off the drive and idlers by a good half inch. That's what makes me think the biggest issue right now is the alignment, and specifically that of the tracking wheel, its like it needs to move back towards the motor a bit. For getting an uncrowned tracking wheel do you have any suggestions on where to buy? I can't fabricate one / modify the one I have, I don't have a lathe.
-
14 hours ago, Kozzy said:
Um...your tracking wheel is crowned.
Aren't most crowned? All the DIYs for this kind of grinder recommend a crowned tracking wheel, including the one I linked. Seems to be a common enough recommendation. Considering I "eyeballed" the alignment of the pulleys, that's probably where I should start. going to do alignments with the straight edge.
-
1 hour ago, ThomasPowers said:
No actually, I'll probably hit them up too. I think this is a pretty popular design and figured there are tips for general alignment issues. Just putting out feelers everywhere.
-
Built a 2x72 Grinder based on some designs found here . Right now I'm having a lot of issues with tracking that I think are due to alignment problems. A lot of stuff I'm reading mentions using straight edges to fix alignment issues, wondering if there are any other tips, or even better, possibly designs that are easier to build for those who are less experience with welding and overall precision. I've attached some images below with what Im working with. So I've had this running and have used it but in the first image you can clearly see the belt is riding all the way over to the tracking hinge and rubbing there, clearly no good. It definitely has to be my alignment is awful just not sure how to adjust it. Another question I had is how "tight" should the belt be, right now I try to get a pretty good amount of tension, but the sticky post in this forum seems to say that's not great. I wish the image links on that post weren't missing.

-
Rinsing propane tanks isn't helped by letting it soak any length of time, the mercaptan oil is the oderant added so you aren't surprised by a leak. In extremely unlikely cases the mercaptan oil itself can be a fire, explosion hazard as it soaks into the pores of the steel and evaporates when heated. However it is easily removed by adding a little chlorine bleach to the rinse water, just fill the tank, let it sit for a few minutes and empty it.
That's a really great tip!
Seems most people are suggesting I just go with the wool and a wash, with a firebrick base. I suppose since this is my first gas forge I should really try to keep it as simple as possible and just do that.If I were going to do the zirconium silicate + kaolin is there a place online I could buy these things?I've had trouble finding high temperature materials/supplies in my area, not really a market for it here I guess.Ebay appears to be my friend.For the wash, what kind of consistency do you mix to, like how many parts water to the 70/30 mix of the zirconium & kaolin?I see in ceramics a slip is about the consistency of heavy cream, so I guess just make up the 70/30 mix and then eye-ball it to a good consistency? Great tip on the Zirconium+Kaolin mix that will save me a ton of money over ITC100 (which frankly, I didn't want to buy at that price). Why is ITC100 so expensive?
Sorry for all the questions, I really am in the dark about all this, all the advice is greatly appreciated.
Gunny,
I might try the jigsaw like you say, the circular saw is a little unwieldy for me. -
Was actually going to cut off the top a circular saw and a cutoff wheel, like in that video I linked -- still have to build something to hold the tank in place. Cutting it across the circumference is tricky because the tank likes to spin and the saw likes to kick. I probably will leave some water in the tank when I cut, probably help cut down the number of airborne metal flakes any way, that stuff got in my nose when I cut a helium tank up for my coal forge. Probably going to wear a mask this time.
Just found out today my neighbor has a 300# Peter Wright in his garage, with a stand. Barely been used. Said his old man bought it in the 60s and used it around the shop occasionally. When he said I could borrow it I about died, thing is beautiful and my hammer bounces like a super ball off the face. Step up from the RR Track I'm using now for sure. -
Cutting into a propane cylinder is a bit nerve wracking though
Yeah I was worried about that, but I thick it'll be okay, filled it up with water and let it sit in the sun until about half the water evaporated. I've had it laying around with the valve removed for a while so I think it should be okay. Probably fill it up and dump it out a few more times before I cut it.
-
Check this video out for building a propane forge. I built mine from it. Love it.
http://www.youtube.com/watch?v=VxzdqcPzXj8
Here is a pic of mine.
'?do=embed' frameborder='0' data-embedContent>>
I put 2 inches of kaowool in, coated it with Plistix, put a firebrick in the bottom which brought the floor up the same level as the opening I cut. I have a smaller opening at the back end for longer stock. I have a handle on top you can see in the photo. Two more just like it for "legs" to keep it from rolling. It roars.
And check out Wayne Coe's site for some of the supplies. Not sure of everything he carries but I got my Plistix 900 from him. Fast.
Oh I saw this on the front page the other day. Do you just use firebrick for the floor? I wanted to add a refractory layer to the design to give it more durability, I hear that just the wool and a refractory coating wears out quickly. I'm also worried about the dust it gives off if it breaks down, hear its pretty bad for you
Read the tutorial on my Forge Supplies page on my web-site. Contact me if you need more help.
Thank you very much! I think I understand the tutorial though pictures would be great if you have them. Is the refractory mortar layer very thick? I didn't really see anything about how thick to apply it, maybe I missed that part.
-
Background
I've built a break drum forge in my back yard. Currently I'm using metallurgical grade coal I get from a local supplier, I enjoy using coal a lot, but winter is coming, and I can't use it close to the house (girlfriend hates the smell/dust/smoke, sure the neighbors don't appreciate either). I have 2 old standard sized LP tanks, and I wish to make a forge out of one. I've already taken the proper precautions to make the tanks safe to work with.
My Questions:I want to use a combination of insulating wool blanket and refractory cement, preferably a castable. How thick should the blanket layer be? How thick should the refractory layer be? Can I even use a castable for this, or do I need to use something that packs? My plan is to modify


Burner Flame
in Gas Forges
Posted
That's a relief!
0.025 I've read a few places that smaller is potentially better but no one actually gave a reason, I do have a few other parts laying around.
Oh for sure, I expect to fail at this I'm comfortable with my first (second, third?) attempt not quite working as I expected. I just want to make sure that as I'm failing, I'm not blowing up my garage, because if the blast didn't kill me, my wife surely would.
I think actually I'm just going to go with your design (I found it tooling around). I may still play around with this one though if you think it can be saved, but I was already considering something different, I'm not exactly a fan of how the choke plate works.