
Gunny
-
Posts
15 -
Joined
-
Last visited
Content Type
Profiles
Forums
Articles
Gallery
Downloads
Events
Everything posted by Gunny
-
I built this one and it works great. I have nothing to compare it with though since it is my first and only burner at this point. I would say the needle valve makes all the difference. If you are using the adjustable regulater he recommends I guess you could do it with that but I don't know how difficult that would be. It would not allow the very small adjustments that are needed, at least not as easily. I run my regulator wide open. The needle valve at about 5 for start up, then after a couple minutes open it up to 7. ROAR. I think a good thing about this burner is that it is forgiving, meaning you have several points of adjustment and tweaking so being perfect on the build is not a requirement. One difference I have on mine is that he chokes his with kaowool completely. I only choke it about half, otherwise I dont get the burn. Choke meaning where he stuffs kaowool in the top of the mount tube around the burner tube. Another is that I use a wire feed tip instead of a mig tip. Maybe they are the same thing though I dont think so. It's all they had at the store. Got my needle valve on ebay for about $25.00. I have a picture of my forge fired up under my profile.
-

Gas Forge Advice (Kaowool + Castable Refractory)
Gunny replied to GraphicH's topic in Insulation and Refractories
Dang, wish I knew about buttering before. Oh well, One more time. GraphicH Nice find on the PW. Move it over yourself. Then when he wants it back he might change his mind and give you a good deal. I think there are hundreds/thousands of good anvils out there holding things down. The owners just don't realize the demand for them so they sit or go to scrap. Shame. A jigsaw with a good blade will cut it well also. Dont know that I would leave any water in it if I was cutting with electric tools though. -
Gas Forge Advice (Kaowool + Castable Refractory)
Gunny replied to GraphicH's topic in Insulation and Refractories
If you are using a air tool cutting disk leave it filled with water. I use air tools. Water - good idea. I didn't think of that. Next time. -
Gas Forge Advice (Kaowool + Castable Refractory)
Gunny replied to GraphicH's topic in Insulation and Refractories
Actually, I mis spoke. The youtube video is for the burner. The forge itself was kind of what I had seen with paint cans, and other cylinders that people used for forges. I am sure I am not the first one to use a propane can though. It is heavy steal and very durable. I worried a bit about the durability of the lighter cans. I have a tendency to over-build stuff anyway. The burner works really well. It takes a bit of tweaking to find the right settings on the needle valve and I had to adjust the choke on the mount tube. He had his choked completely but mine would not burn that way. I have to have it about half choked. The front opening is just slightly larger than the fire brick. The real trick is getting the kaowool in. It isn't nearly as flexible as it appears and it can crush. I don't know if crushing is bad but it probably does not help. I used one inch and put in two layers. Then circular pieces for the front and rear. Yes, the fibers will break down and you don't want to breath them. I painted a good coat of Plistix inside, another neat trick. Took a couple days to dry. I would start the forge up just to get a little heat in there to speed up the drying. I think I am going to put a second coat in also. Wayne has a good price on the Plistix. I have a full fire brick in the bottom. You will want to put the brick in while the Plistix is still wet to shape the bottom and then you can pull it back out. I also put a thinner slab of fire brick on the wall opposite the burner to help bounce the heat. I dont know how hot it gets but I am at forging temps while my buddy still has caustic smoke billowing out of his coal. I like coal but propane is so much easier and portable. I pick my forge up in hand and propane tank in the other and I am on my way. Cutting into a propane cylinder is a bit nerve wracking though. I had mine vented and the I shot a hole in the bottom from a good distance away just in case. It was a lead projectile so it shouldn't make a spark but who wants to take that chance. Then with my air compressor I would jet air inside the hole to work out any remaining gases and still let it sit for a couple weeks. When you cut the opening I think you could go larger and not loose much heat. That would also make it a little easier with larger or odd shaped pieces that I find difficult. I have toyed with the idea of continuing the opening around to the side about half way on my next one. Then I could block the side opening with a fire brick but pull it out if i had the larger pieces to work on. The hole in the back is much smaller and is used to push longer stock through. I will get a couple pics of the inside cold and put them up. Hope this helps. -
Gas Forge Advice (Kaowool + Castable Refractory)
Gunny replied to GraphicH's topic in Insulation and Refractories
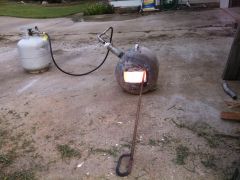
Check this video out for building a propane forge. I built mine from it. Love it. http://www.youtube.com/watch?v=VxzdqcPzXj8 Here is a pic of mine. '?do=embed' frameborder='0' data-embedContent>> I put 2 inches of kaowool in, coated it with Plistix, put a firebrick in the bottom which brought the floor up the same level as the opening I cut. I have a smaller opening at the back end for longer stock. I have a handle on top you can see in the photo. Two more just like it for "legs" to keep it from rolling. It roars. And check out Wayne Coe's site for some of the supplies. Not sure of everything he carries but I got my Plistix 900 from him. Fast. -
Iron Stand - A Beginner
Gunny replied to PeregrineStudios's topic in Blacksmithing, General Discussion
LastRonin, We seem to always be most critical of our own work. To you it may not meet the standards you set for yourself but to others it's magic and "wow". From the picture, I think it looks pretty good. I am farely new at the ironworking. First I had to figure out what chase and repousse were. -
 Hey Dodge. Thanks. We lost the thread we had going with the time travel thing. Got out and made my first leaf tonight. Not bad but I need to work on it.
 -
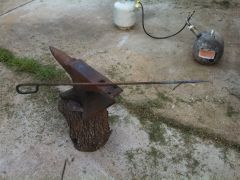 Nothing fancy, Just made a poker to pass some time and try out my "new" 120# Trenton.
 -
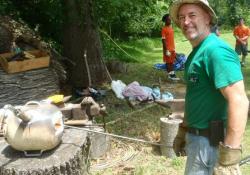
Fired up the forge today for the first time in a while.
-
Haven't made one but what about using a splitting wedge, (for splitting firewood), cut or grind the wedge end off a couple inches to give you a flat surface. Then weld your square plate on the ground end and a 12 inch bar for a handle on the side. The striking end is already soft by design. Seems simple enough but I don't know what I don't know. Gunny
-
Anvil I.D. - From the family farm
Gunny replied to Gunny's topic in Anvils, Swage Blocks, and Mandrels
Yeah, I bought it sight unseen and mostly because it was from the family farm. I might not have bought it if I had seen it first but I am still glad I have it. I don't figure it is worth much. I might try to grind the face down a bit since I dont think I can make it any worse. I plan on getting a better anvil when opportunity presents but it works for now. Thanks for the info. -
Anvil I.D. - From the family farm
Gunny replied to Gunny's topic in Anvils, Swage Blocks, and Mandrels
Oh, From south western Wisconsin if that helps at all. -
I bought this from my Great Uncle's estate sale. DIdn't even know he had an anvil. My dad remembers the anvil from when he was a boy in the late 40s but does not know if it was fairly new then or not. It is cast, but iron or steel I am not sure, likely iron. one foot has an 8 indicating 80 lbs. The other foot has a small 3, barely readable. I can see but not read the numbers to either side. Guessing this is a date and the placement seems to be xx3x but again, not sure. No other markings that I can see. Unfortunately, it was not used for blacksmithing but more for a heavy item to beat farm machinery parts against, cold. Pretty tore up. I have used it and it is fine except for the lack of a flat surface.19 inches long, 3 1/2 inches wide, 8 1/2 inches high, 7/8 inch hardy hole, 1/2 inch pritchel. Anybody have a best guess? Pics attached.