
Kal
-
Posts
85 -
Joined
-
Last visited
Content Type
Profiles
Forums
Articles
Gallery
Downloads
Events
Everything posted by Kal
-

Melting and recasting stainless steel?
Kal replied to SCI-FI's topic in Smelting, Melting, Foundry, and Casting
I think your best and easist path would be to cut the block into strips. Then sandwich them into a bar and TIG weld the edges back into a more or less solid. Because of all the chrome, about 18% and nickel, about 11% 304 won't forge weld so TIG or MIG with SS wire are about the only options. -
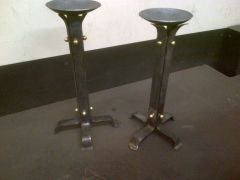 Reproduction Roycroft strap candle sticks
 -
Blacksmithing as a way of meeting people
Kal replied to ThomasPowers's topic in Blacksmithing, General Discussion
I have to agree that a great precentage of people I've met through blacksmithing are the most helpful, friendly, and encouaging. I know there are smiths out there who keep 'trade serects' and won't tell you anything, but I have yet to meet one. -
I don't know if it will work on an anvil but back in the day, we cracked the side of an engine block of a 426 hemi. Those things were too expensive to just scrap it so we drilled and tapped a series of holes along the entire crack starting just past the end of the crack. After each screw was put in place it was ground off even with the surface and the next hole placed to overlap the first. It took a long time but the fix worked, no more water leaks.
-
It's a good looking anvil and no matter where it was made if you like and it gives good service that's all that really matters. Enjoy
-
Zom, are you sure that is a Hay Budden? All of the HBs that I have seen including my 190# say they were Manufactured Brooklyn NY on the bottom line. Course I could easily be wrong.
-
One more thing about punching the hole, you've got to keep it hot. If you try to strech it out once it cools it will tear.
-
Back when I used to make steel in 200 ton batches, we would tap stainless out of the furnace around 2650 and the fancy alloys around 3000. In both cases there was all kinds of supper heat in the steel to allow us to pour it. The alloy steels 4140 or 8620 for example were actually run into a second ladle that was housed in a vacum tank so it had to be much hotter for the extra handling. So 2700 should be fine.
-
Need ideas for products for a craft fair
Kal replied to EarthJuice's topic in The Business Side of Blacksmithing
Those nails are the ones the are used to put together concrete forms. The idea being that you can drive them in tight with the first head and still easily pull them out with the other head once the concrete sets. -
It's kind of primative but it was the first one that actually opened bottles.
-
I've used muiratic acid to clean an old badly rusted hammer head. It had been sitting in a basement for years. I was really surprised how well it turned out. I just dropped it in a jar full. One thing to keep in mind, the fumes from that stuff will rust everything in the shop and it isn't too good for your lungs either so do it outside.
-
You can give it a brass/golden look by brushing it with a brass brush while it's black hot. The brass transfers from the brush to the steel.
-
These are my first attempts at Chrismas ornaments. The large one is really too heavy for most trees and neither one is very straight. Something to hang in my shop. :) Merry Christmas to All y'all
-
The adjustable legs allow for uneven ground at demos. The one disadvantage is that the legs get in the way when cleaning up the shop.
-
You might get in touch with one of these guys. My first blacksmith class at John C Campbell Folk School was taught by them. They're both based in Missouri. http://www.washingtonforge.net/ Pat McCarty Bob Alexander, you have to email him through the folk school web site.
-
Idea for a christmas tree topper....
Kal replied to BackyardBlacksmithin's topic in Metal Sculpture & Carvings
I liked the ornament idea enough to give it a try. The first one turn into scrap. The second is made out of 3/16 round and is a little heavy. The other is 1/8 round stock. Neither one of them is very straight but a good learning experince none the less. I tried to forge weld the first with no success so the other 2 are mig welded into a large lump on each end. Then they are drawn out. The finish is from a brass brush. -
A31238 is the serial number it can tell you the manufacte date. The 312 may be a weight.
-
The weight of blacksmiths hammers through history
Kal replied to Everything Mac's topic in Hand Hammers
I use a 1000 gr, 2.25# for most work with an 800 gr for small stuff and when I get tired. -
Yours looks like a classic old time screwdriver. I still have one that my Grandfather used to drive wood screws into tables & chairs.
-
I made mine by stamping a simple CK into a piece of mild steel then heating the pein of a ballpein hammer to almost melting point. Once the hammer was hot, I hit it into the stamp mark to make the stamp.
-
Here's a view of my post vise in a portable stand that one of the guys in our group(ABBA) made. One of the things that make it nice is that by adjusting the chain lengths you can make up for uneven ground.
-
One tip I learned from Steve Williamson is that once you have cut the horns/ears, lay them back down next to the stock. By being against the main body of stock they are not likely to burn off.
-
New to blacksmith...need advice on anvil and forge
Kal replied to Tacuff1414's topic in Anvils, Swage Blocks, and Mandrels
I gave $400 for my 190# HB that is in about the same condition as the one in the pictures. You can find another gun a lot easier than you can a good anvil. -
For those who like to make wizards and other things out of railroad spikes this jig can come in handy. It's made by cutting most of one side off a piece of square tubing. Fold one end over and weld it shut. Attach a piece of 3/8 square stock to the bottom to hold it in the vise and lock the spike in place.
-
My old Champion hand blower from 1901 is nothing more than a gear box that turns the impeller. The impeller itself is a series of flat paddles.