

craig
-
Posts
245 -
Joined
-
Last visited
Content Type
Profiles
Forums
Articles
Gallery
Downloads
Events
Posts posted by craig
-
-
Can you take a picture of it ?
-
Craig, check the tailgate section in Saltfork web site.( http://www.saltforkcraftsmen.org ) Diana Davis has small, about 6", scrolling pliers for sale. IIRC, they are $5.00 p/pair + shipping of course. They are excellent for this type of work. I love mine.
Thanks for the link, I'll have to check it out !! -
i actually saw this video a while back and have made a few roses useing the guidlelines intailed in it. so if the person who posted the video on here is the same person who made it i thank you very much, i've made quite a few of the ladies around here happy with them
Well I didn't make the video...but it's a good one !! -
Thanks so much Craig. I have some copper sheets my mom used for a project around WWll. She died young and I'd like to make some Roses from that copper for my little girl's seventh birthday so she somehow has something from the grandma she never got to meet. My mom's name was Rose and I named my little girl Maggie Rose so I guess it will be a fitting gift if I can pull it off.... thanks again, Eric
Good luck Eric, and make sure to post pictures once you've made a couple !!
Another thing, I ground the teeth and sharp edges off a pair of needle-nose pliers to do the final shaping so they don't get too marked up...seems to work ok...though it would be better to have a pair of nice small scrolling tongs -
Just a note about the copper...you don't need the torch to do the shaping...just anneal before assembly and you're good to go !!
-
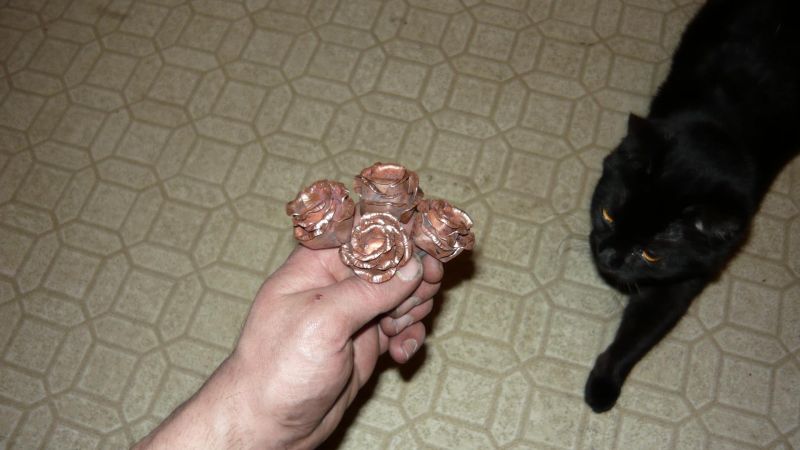
Eric asked for some info... so here's a quick description how these were made...
I used a hacksaw to split 3 short lengths (use the length that when unrolled and flattened will give you a square) of copper pipe, I think these were made from 5/8 " pipe.
I used 3 layers of copper which were all approx the same size and each one had 4 petals cut out on them with tin snips and then filed smooth.
Most of the methods used can be seen in the two videos I'm attaching, I stole some ideas from each of them...
The only thing I really did differently was punch a square hole (to mount on the shank of the nail which was forged square) and offset the center layer...that way they don't turn at all.
-
That bottle opener is cool !! It makes me think one-legged elephant...now I wanna try making one, only shorter, bent 90, and with a flat foot so it will stand on it's own :P
-
That's a nice looking blade, I like it !!
-
I think that looks pretty awesome, I would have destroyed the entire thing welding/trying to weld the hooks on.
Good job !! -
Looks cool, what is the approx. weight of it ?
-
Cool Mark, nice stuff I really like that snail !!
-
I agree with "the spirit" !!
Though I was working under one of the original rules that is must cut hair or something like that...
It's like that story I always see repeated in the forums about the honed beer can shaving hair...but that doesn't mean it's going to function very well as a knife. -
One more thing...in my opinion, to get that nice razor sharp shaving edge, it's all in the hand-work with fine grit anyways. You're not getting a shaving sharp knife with the grinding wheels I have at my disposal

So is the objective here to make ugly razors ? Or quick, useful, no-frills cutting tools ?
Just wondering so I know what I'm doing next time around ;) -
The only thing I didn't like about this challenge is that the sharpening time is included...
I like the part about starting from round or square to maximize hand forging. But to get the edge fast without using my crank grinder I knew I had to get the steel as thin as possible as quickly as possible, basically "minimizing" the forging (aka-the part of bladesmithing I like most) time to get more sharpening time in. Which in a way, sort of defeats the purpose.
If the objective is to go without electricity, why allow electric blowers ? Since I'm sure crank blowers are much more common than crank grinders...not a huge deal for me as I DO have a hand crank grinder...but it just doesn't seem fair for the guys who don't. Maybe that's why we only had two blades finished.
I'd rather see a 20-30 mins forging time limit, then sharpen with only files and hand stones outside of the time limit.
Or you could just say "no stock removal except for edge grinding" or something to that effect. -
Not sure why there were not more entries, but it sure seems to me that Phil wins this hands down.
Aww man !! Rich obviously didn't see my sweet "micro-beater" :lol: -
I agree mchann, the beauty is the simplicity...my only advice is to make a sheath for it so you can carry it with you...that's something I really gotta start doing
-
Hey Phil, that looks a lot more appealing to the eye than mine does, that's for sure.
Nice job !! -
Tryouts for landmine disposal crew :rolleyes:
-
Unless I'm reading my writing wrong, I'm pretty sure that's what I said as well

But I know what you mean now in any case. Thanks for the tips !! I can't wait to try making one. -
I filed them in. Using a three square file (as I would for sharpening a saw), I cut them in just before I went to HT the blade. then once the HT was finished I went back over and sharpened them. They could've been filed in post HT, but it was going to be much harder work
Traditionally teeth were/are mostly chiselled in from the side, so you punch out a triangle of steel. Presses and hand held punch/bolster sets were both used. I guess odd shape/sized saws and early saws were just filed like mine, its just slower if you don't have the tooling set up for punching.
cutting the teeth is the easy part. forging the blade thin and straight (its V shaped cross section) with no twisting is the tricky bit! I could've made life easier for my self by cutting the teeth into a flat bar, heat treating it and then grinding the taper in I expect.
Cool thanks, but by V shaped cross section you mean the spine or back of the saw is thinner than the cutting area ? -
Those are some nice looking tools Dave, I'd like to try to make a saw sometime as most of the "woodworking" I do is cutting up small scraps for fuel...how did you make the teeth ? Forged in over a butcher style hardy ? Cut out with chisel or file ?
-
Beauties !!
-
Craig,
I missed your vid showing the spring in your knife. I think that is outstanding. What was you HT process. It seems to have worked well and you did it without heat treat oven,pyrometer, quenching salts, etc. Not that high tech is bad, just another way to view the world. Simple is beauty.
Thanks for you effort. Lets get others submitted. Due to holidays, is the first of the year too long or too short of an entry period?
Bob
I just eyeballed the temperature, quenched in mineral oil, tempered in the forge, and cooled in the snow. The whole process took about a minute. -
http://www.youtube.com/watch?v=0rLvGk3FmOI
I noticed when I was straightening out the warp that it was really springy...I was like "I wonder if this thing will even break ??"
Hot bluing damascus
in Finish and Polish for Knives
Posted
Looks good Mark !! I'm glad they turned out !!