
SJS
-
Posts
458 -
Joined
-
Last visited
Content Type
Profiles
Forums
Articles
Gallery
Downloads
Events
Everything posted by SJS
-
Jerry Hoffman had a design in the "Blacksmiths Journal" that is till available for a modular little gas forge, and you could stack them end for end to do longer heats. The drawings are also available in the book "Shop Drawings for blacksmiths." If you combine all the info from the Arizona article, with the modular concept. You could get a real nice versatile forge. A note about 1 vs 2 burners, the guy who wrote the article said that with the testing they did, a single 1" burner seemed to be more fuel efficient than 2 smaller burners. Other people like multiple burners, just some interesting info to consider...
-
Most people end up liking what they get used to... What might really help is to go to one of the local blacksmiths association meets and get to try out different fire pots. A few blacksmiths are antisocial trolls, but lots of guys would be interested in helping a new guy out, and letting them try their kit... It is easy enough to fabricate a firepot, a steel pot wont last as long as a cast iron pot, but you built the first one you can always build another one. There are several commercially cast pots. The Laurel super heavy duty fire pots used to be EXCELLENT, but I'm not sure if you can still get them, they certainly AREN"T listed on their website, you would have to call to see if you can still get the blacksmiths line of product??? If your happy fabbing up a pot to try, have fun. There are several good threads here that even have cut patterns as I remember. If it turns out you don't like it, build another one, or buy a nice heavy cast one... Then there is always the option of building a side blast forge. There are lots of ways to get the steel hot, and then there is the question what do you want to make with your forge, that affects whether you want a small shallow firepot, or a big deep fire pot. And whether the work would be best suited for a round, or a rectangle, or square fire pot??? If you can test drive a few, and find one that you really like that's great. If you just want to strike out and do some experimenting that's great too, discover what you like, invent something... :-) Make something!
-
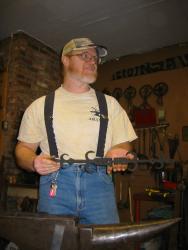
Here are some hammer eye tools that I just finished grinding last night, Got some new belts for the 2x48 belt grinder and slicked them down... Hope to get to try them out soon... I have another hammer eye drift that I did several years ago, which is a bit thinner. These drifts are a bit thicker. All made out of S7 1 1/8" lathe drops, maybe 4-6" long. I try to NEVER strike them with a forging hammer, I either use a cheap beater, or a copper, or brass hammer...
-
Got a couple new belts for the 2x48 belt grinder and had some other tools that I was cleaning up from rough forging on a 100#LG, and needed to rotate through the tools as the heated up, so I finished grinding the axe, still need to do the hardening and temper, but looks nice now;-)
-
Its just important to know yourself, some people don't handle frustration, if you know that about yourself, build bigger, better, faster, more!!! if you are patient you can enjoy a slower press that you have to be creative with... I am not a good match for a mechanical hammer, I much prefer an air hammer... That's just me knowing myself, other people can do great work with a mechanical hammer, and their cheaper... He wasn't impugning your character;-)
-
Lillico and Clifton, along with Steve Parker, and Kurt Farenbach, have changed how I think about Blacksmithing. They have influenced me hugely... I think in terms of Volume, and isolating stock, and focusing the power of the hammer. Clifton teachs VARP: Volume, Area, Resistance, and Power... The more Volume of steel you are working the greater Power you need to forge it effectively. If you focus the Power you have available on a smaller Area you do more work... Resistance is determined by Alloy, Heat, Area, and Volume. If the stock is high alloy, you need more power. If the stock is hotter that generally reduces the resistance. Being too ambitious and attacking too large an area you either need more power, or you will be going slower than you could be... If you focus on a smaller Area you can squeeze the metal out faster and overcome the resistance more easily with the Power available. With control and good tools you can do all kinds of wonderful things... Plus I just Love power hammers, particularly utility and self contained air hammers, they add so much CAPACITY to a shop... An ill mannered mechanical is almost worthless to me. An air hammer is like a huge tireless polite and precise striker, you can do marvelous work alone.
-
The insecure and incompetent often make up for what they don't know and can't do, by being very vehement in their beliefs... Not to mention touchy and defensive ;-)
-
Project Ideas to Teach Upetting?
SJS replied to Willow Brookes's topic in Blacksmithing, General Discussion
He is an interesting old bird, I'm sure he wont mind... ;-) Plus you can always blame it on the obnoxious auto correct;-) -
I think you need to find a copy of J.W. Lillico "Blacksmith's Manual Illustrated" and then after you read that, beg, borrow, steal, or buy the Clifton Ralph power hammer tapes. A utility hammer like the Iron Kiss, is perfectly suited for this kind of work... Its just a question of are you interested in doing that kind of work... I love this kind of stuff, since your willing to cough up this kind of cash for your hobby, I will assume this will have atleast some allure... Come over to the POWER HAMMER SIDE OF THE FORCE;-) Something else to consider is that the 100, and the 150 can hit as lightly as the 50, so you can work 1/4" stock on them too, but you can also do 2"... Something else to think about... I had a 90# BULL hammer, and I have played on a fair number of bigger hammers, 400# Chambersburg, 250# Eire, 650# Niles, Bement, Pond, 250# LG, 100#LG, and a Sahiliner... With control more is better... If you haven't been bitten by the tool making bug, or the power hammer lust infection, the 50 will be fine;-) I just want to be able to forge anvils sometime before I die... I have the overhead crane rails... need a monster hammer, and a big enough forge ;)
-
The Arizona Artist Blacksmith Association, has a plans section, there is a gas forge article... They mention that a longer distance between the burner and the wall resulted in better combustion... Its a good read.
-
Let me talk you into the next size up :) you get just a little more clear space between the dies. You can fit more tooling and furniture under the dies. The little bit of extra weight of the tup, adds a bit, but is less important than the extra air... More stroke is good:-) A power hammer is more than just drawing out. Some of the smaller air hammers have only 6" of air between the dies. The Ironkiss 50 has 9", the 75# has 11". If you try to punch a hole in 2" stock there is nearly 4", if you slip a bolster under it you get maybe 5"-6"... The 75 will still have enough stroke to have full power, the 50 will handle it, the smallest Kuhn will be pretty weak with only an inch or two of stroke. More is better;-) Just some things to think about. Most guys don't think about furniture on the bottom die, and space for top tools. If 99% of what you do is just drawing, the 50# is more than adequate, and it still has 9". With more weight and the option to lengthen the stroke the 75# can hit harder...
-
A brand new Emerson 100# anvil is 600$, the Kohlswa is heavier, has better lines, and the edges aren't that bad... They just provide you Less reason, not to properly radius the edges. ;-) If you have been looking for years, go ahead a pull the trigger, buy this one. If you are really lucky, after you get this one anvils will fall out of the sky all around you, and you will have lots to choose from. But right now this is the only girl at the dance who doesn't have a partner, shut up and dance;-) You will be surprised at how much fun you will have...
-
Project Ideas to Teach Upetting?
SJS replied to Willow Brookes's topic in Blacksmithing, General Discussion
Vaughn's suggestion about shouldering in a tenon, and then using a monkey tool to upset the stock to give it a pleasant swell at the base, is really good. I was trying to think of things were I use upsetting... I used to make some prick spurs where I upset the stock to get the mass to forge a nice prick out of it. One that might be suitable for your class is to upset maybe 1/2" round and then forge a ball on the end of the bar, then taper back and do a leaf on the other end. Then they can forge a hook out of the blank. If you were to have them upset both ends, then they could get a larger leaf out of the stock... You could also finish the ball end in a swage to show them another technique, or even an acorn. Then you could use curved chisels to make an oak leaf on the other end. I thought about decorative rivets... You could show them how to upset them out of smaller stock, and then do the same thing shouldering in a tenon and cutting the rivet off of larger stock. You could also make more of upsetting in your scarffing in preparation for the forgewelds. If I remember correctly you want to be able to reduce the starting thickness by at least 1/3, and to get the most strength out of the weld you need to do 3 welding passes. So to still end up with enough mass in the weld area, so that you can work it down 3 times and still keep you finish thickness even with your parent stock, you need to upset at least a little...;-). Hope those help. -
Peter Ross has a video out on "Forging a Compass," and I know I have seen articles on how he does the more complicated hinges for the wing dividers and compasses before.
-
Yep the deep punching gives the effect you want, and sets the beak apart without making it dangerous (probably prudent;-) I still like to use an eye punch that is made like a snap, and I punch deep with them, and use them to upset the brow. I often use several punches in combination, to punch pupils in the eyes, and to get an aggressive look, or a cartoon look. My dad used to draw these cartoon sailor cats, and I made an eye punch that looks just like what he used to draw they are a lot of fun...
-
I almost commented on the French pattern hammers on the rack;-), I am much more familiar with German tools and anvils, but those are lovely.
-
Not a fabricated anvil, just a top plate that fits in the hardie hole, and has tabs to keep it from rotating. The anvil looks Italian or Spanish, lovely little pig type anvil, you can see another one just behind it the first picture... Don't remember where Pascalou is from in Europe ;-)
-
Power Hammer vs Hydraulic Press
SJS replied to Zachary's topic in Power Hammers, Treadle Hammers, Olivers
To elaborate further on what Ric said, you need to redesign your tooling for both a power hammer, and for a press. If your tooling is too tall it will bottom out and possibly damage the dies, the tooling, and you. There is a thread on another forum where they were talking about "Why you shouldn't slot punch hammers, under a power hammer!" or something like that. The thread opened with a picture of a longer slot punch/ slitting chisel? smooshed permanently into a hammer head, that they were trying to do under a Nazel B5;-) You can slot punch hammer heads all day long under a power hammer if the tooling is designed for it and the hammer driver knows what they are doing. The process wasn't inherently bad, it was operator error... ;-) Just because you can fit a particular tool under the dies, doesn't mean you can safely, or effectively use it under that hammer. If the punch had been made so the cutter was 7/8 the thickness of the stock being punched, and had a broader end to strike. Like you would get if you forged the slot punch out of H13, and cut it to length, and then welded it to a paddle out of mild steel with a thin handle. Then you could safely do the punching. Much as it grieves me to say it, (I LOVE hammers;-) but you are probably better served by a press, doing the type of work you are focused on, and with the other limitations. You could get a small mechanical hammer to do what you want, if it had a brake, and was well tuned, and you learned how to make it do all those things... Mechanicals have a steeper learning curve, than a air hammer, or a press. John Larson who makes the Iron Kiss hammers, will build his hammers with more clear space between the dies, and even the 50 has 9" to start with, and the larger sizes come with 11" standard, and you can jump that up. -
John that is a nice looking little owl, the thing that bothered me the most with that example was the hollow eyes... I like making character and animal faces, and eye punches to get different effects. About the only things I will put hollow punched eyes on is a dragon or a gargoyle, and I rarely do that... Eyes have so much potential to add detail and character... I still don't really "like" the folded design:-) but it does have some interesting potential. I generally just dive in with lining chisels, and butchers, and punches. But the lower part of your wings and tail do look really nice wrapped around the body like that... Maybe prep the details on the wing and the chest, then take a very short heat and faggot weld the end of the bar, then put it into a ball swage,,, Then you could refine the shoulder, and the transition to the wing, and finish punching the details onto the head and face. It will likely be summer or fall before I get a chance to try one though... Got too many irons in the fire as it is, without adding another project to the list;-) I will grab the images for the bucket list of forging projects.
-
Looks much better than it did;-)
-
Early Trenton Broke at waist need advise
SJS replied to Sluicebox's topic in Anvils, Swage Blocks, and Mandrels
Build a nice metal stand for it to fit around the U-bolt and let it ride... If the crack gets a lot worse, then fix it... -
If you don't want the wings to show around the head, forge down the 'stem' on the 'leaf' that you are using for the wings a bit more. You could even fuller a groove on the back of the owls head that you could lay the 'stem' down into so it was less visible. I would also fuller under the head to set it off from the body more. What you have so far does look pretty good, I was kinda surprised I liked it. I didn't like the sound of the technique when I saw it in the thread earlier;-) A little more definition and maybe some checking on the body and it will look really nice;-)
-
A lot of the tooling in the industrial shops if it was hardened at all was tempered back nearly to 1000, part of the time they would just normalize and use that. The reason behind this is they didn't want it to fatigue in use and blow up in their faces, and you didn't want it to damage the dies on the hammer. They wanted those big ol flat dies to stay nice and flat! with maybe a slight hollow in the sweet spot from wear. They didn't want the flat dies turned into texturing dies. Fancy air hardening tools made from S7 and H13 can damage your dies. Using simpler steels for most things is safer, most of the tools you will make, it isn't imperative that they out last you. If you have to reforge, or remake a paddle, some other tool, its better than having a "Superior" tool explode in your face, or damage your hammer! I love S7 and H13, and I use it A LOT. BUT you need to be careful with it, the struck ends can spal, especially if you beat on it with a hammer with a hardened face... ie most of our good forging hammers! Plus you will scar your forging hammer, unless you can differentially harden your air hardening tools ( which is possible, but not easy... You can also design the tools so you have a milder backing steel that gets struck, welded to the air hardened steel. You have to use the right rods, (Harris Missile weld is a decent choice...) and good technique. Done correctly these tools can last a long time, and can be rebuilt and last even longer... You have to inspect them frequently and when there is signs of cracking in the weld and the striking pad, its time to rebuild it... I have chisels made from S7 that I have cut 100s of feet of steel with, (I do A LOT of designs with split work...) But I ALWAYS use a copper hammer to drive them... (After an unfortunate incident where I was using a forging hammer on a running cutter, and it spalled at a demo, a little boy in the front row caught a very small piece of the S7... THANKFULLY they didn't make a big deal about it, but I wont use anything but a soft faced hammer on air hardened steel now... I would like to keep my house and my kit, and I felt bad, and would feel even worse if someone lost an eye because I wasn't smart enough to take ALL of the proper precautions... Remember wisdom is the ability to learn from someone else's mistakes, WITHOUT having to make them yourself...
-
Some people like to do several different radius's along the edge to provide a different shoulder to work on, on both the near and far side of the anvil. I have to say the Brooks is ugly compared to the Peter Wright :-), but is in marvelous condition. I dislike the THICK London pattern, that the Brooks has, I much prefer the longer horn and thinner heel that the PW has. Function over Form, the face and the edges are where you do the bulk of your work, the thick heel and horn only come into play occasionally. The PW is useable, but would be much nicer with less wear on those edges. It is hard to see such a pretty old girl looking so abused and downtrodden... Trading her to someone who could do a quality repair to those edges in exchange for a forge would be ideal, or at least partial credit toward a forge... ;-)