
SJS
-
Posts
458 -
Joined
-
Last visited
Content Type
Profiles
Forums
Articles
Gallery
Downloads
Events
Everything posted by SJS
-
 Grant Sarver's rule of thumb was 25 CFM per 100# of the tup.... Yah I would think you would need at least a 500-1000 gallon air receiver, and 3" lines and regulator... urgh unless you can find them on salvage that's gonna hurt. But definitely a fun toy, does it have the treadle, or do you have to have a driver?
 -
identifying grades of steel by their application
SJS replied to grisaille's topic in Blacksmithing, General Discussion
There is the junkyard and railroad steel list under Pages at the top menu here... There is also destructive testing on your mystery steels. Basically forge you big hex bar down to between 1/2" and 1/4" flat and cut it up into 4 equal sections. Get your quenches ready and let one air cool, quench one in warm oil, one in water, and one in salt water. See which one you like the best. Use a file to test hardness, and break in the vice to test toughness. Some steels have to be tempered to not break, others will do fine. Of course some may quench crack and shatter in water so... Always use proper PPE, like safety glasses, protective long sleeves and gloves for destructive testing. Lots of grades of steel are available in hex, could be 4140, 1085, or any number of steels, or letters for that matter;-) S1... You can also take it to a yellow heat and see if it crumbles into cottage cheese, then it is definitely a hot short steel, so maybe it could be a resulfurized steel like 1145, or more likely a 1095, or high alloy steel... -
More Flow, More better... ;-)
-
It is very pleasantly squat, and I would recommend a suitably short handle at least to start with. A 4# will tear you up if you don't have good technique and built the muscle to handle it. You may get to the point where you can use a 16" handle on that hammer, and swing it all day long, but there is a REAL good chance you will end up hurting yourself... Ask me how I know;-) In my twenties my favorite hammer was an 8# hand sledge, in my 30s I was working too hard and too long, and trashed the tendons in my elbows with a 4# rounding hammer with a 16" handle, didn't do ANY recreational forging for 6months to a year. Thankfully I don't still need to wear the tennis elbow braces on both arms... Remember worldly wisdom is learning from someone else's mistakes without having to make them your self... Work smarter, not harder, and harder on your body is right out! ;-)
-
Since it doesn't look like a traditional cutlers hammer, I would assume it is due to wear. The guy who trained me to shoe horses had a clipping hammer that the face had tilted that direction because of pulling clips so many years with it. The other option is that the smith had bad eyes, and had set his anvil too high and had to dress the heel of the hammer to be able to strike flat without tearing his shoulder up;-)
-
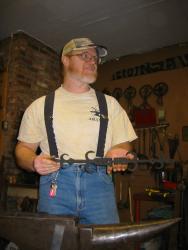
It is a caulking vice, they are handy for most blacksmith vice operations, but they were designed to forge heel caulks on horse shoe blanks before turning them into shoes. They also made jaws/inserts for bolt heading. I have a Wells Bros that is mounted in my portable shop for doing demos, they are very handy... Love mine, would love to have a set of bolt heading jaws (might have to see about making a set in my copious free time... ;-)
-
Old hammers were harder, new hammers are tempered more, but I still shatter the edges of hammers, and its not like I am denting my anvil all the time. Apparently I just hit hard;-) maybe on colder or thinner stock than I should...
-
Be Sure to block off the first weekend in JUNE for the IBA Conference always a lot of fun, maybe not as big or impressive as SOFA's Quadstate round up the last weekend in September, but fun and close.
-
When the power hammer is up and running gonna do a bunch of axes, and I think a cheap 2# hammer would make a nice double bit battle axe. Also have a pile of wrought iron tires that would look good as a pile of forgewelded traditionally forged axes:-)
-
On the trailer ready to be off loaded at the pumpkin festival. Then from the side looking at my merchant tables. From the front with the "door" open forming a nice porch to work under. Its about 8 x 8 with door being 6 1/2' long and about that high off the ground.
-
Low grade wrought iron I have heard called "muck bar" a lot was apparently used for iron tires and cheap fences. It was refined enough to hold together mostly;-) really high grade architectural grade wrought has a very good reputation, Samuel Yellin and Julius Schram both speak rhapsodically of its virtues. Low grade wrought can be further refined, by welding it back on itself a few times at high heat. The process consolidates the wrought, expels more of the silica slag, and refines the grain structure, and in general makes it easier to work. Wrought likes to be worked at high heat, and massaged into shape. If you try to move it too quickly you can have problems with it tearing and delaminating. I have seen in old books where they recommend punching a hole in the wrought and then slitting back to the hole to prevent the cut from splitting past where you wanted it to end (I have done this even in modern steel, it does leave a nice rounded bottom to your cut.) I have done some work with wrought and never had much of a problem with it, (except for a bad weld in a shear steel seax that I did at a hammer-in at my farm in Attica,) but maybe I am just lucky... ;-)
-
Nope north of Zionsville on 421 just south of 32;-)
-
and if you are interested in building an "inline" treadle hammer, I believe the plans are still available for sale...
-
The weirdest thing someones asked you to make
SJS replied to Smithy.Travis's topic in Blacksmithing, General Discussion
I had a kid at a demo at the farmers market ask me if I could make a nail, I didn't have a nail header with me but said I would try to free hand one, drew the point out to 3 1/2" cut it off and hung it over the far edge of the anvil and forged a perfect pyramidal head for it. I was so impressed with myself;-) I tried to make a couple more, since it had turned out so nice, neither was nearly as nice as the one I gave the kid. Last year I think?? a guy had some strapping banders, that he needed some part for, I had a blast, and he had two working banders, and a replacement part for when the OE one failed because it was potmetal in a situation where it would have been better forged. I had a kid this weekend ask me if I had ever forged a toy car! swords, axes, dagger, I understand was totally caught off guard being asked if I had ever forged a toy car... I did a mid fourteenth century Italian curb bit for a perchron, needed a 5 or 5 1/2" mouth on it and I forged a bunch of mounting hardware to build the bridal on, and did some bronze bit bosses. Was really cool, might have a pic somewhere... I was asked to do a two handed sword for a friend of mine's son's wedding, (he was at my wedding when he was little, and thought that when we cut the cake with my wedding sword, it was pretty cool) So I did a test piece, which turned out pretty nice, and then did the real sword as a demo "sword forging for dummies, with power hammers!" I stamped Ephesians 4:16 into the ricasso it turned out pretty nice, his younger brother also got married and I needed to do another one in a hurry and didn't have a working power hammer available to me, so I had to have a friend slap one out on his LG250 and I finished forging it and did the grinding and hardened and tempered it, I had my friend finish hilting it, never got a pic of the finished sword it looked pretty good when I was done with the blade. Various blades from comics and video games,,, -
Tried to add some more text to the above post, going between my phone and the desktop neither of which had great signal this morning in the rain... So I will try this;-) We have been in the new house for two years, and my in laws found some surplus cabinets the my wife repainted and did a crackled finish on, but she hated the brushed aluminium utilitarian hardware on them. So we have been doing without for two years like I said, since the other hardware had been an odd size, and none of the big box stores carried anything with that spacing... So I do a pumpkin festival every October just north of Zionsville, and momma wanted me to make some nice stuff for us instead of selling all the cool things;-) First thing she asked for were some stand off hooks for her antique flour sifter collection. So I had some 3/16" x 1/2" stock and cut it up into 6" piece. I put two center punch marks on them at 2" and 2 1/2". I necked the hook end from the 3" point and the slit the other end down to the 2" mark and then punched at the 2 1/2" mark. I folded the tines of the heart out into a T, and drew them to points ant broke the corners, then I shaped the hearts. The to finish I rolled a curl and back bent the hook, and then rolled the hook free hand to accept about a 1" rod. Then I bent the standoff so the belly of the hook was 2 1/2" off the wall. Tweaked everything so they looked nice, and wire brushed the snot out of them. I wanted some more hooks, so I used a rod parter(shear) and cut some 3/8" round to 6" and did the same with it, very similar volume;-) For the drawer pulls I wanted to use 3/8" square for the handles, but was fresh out. So I did have some 1/2" square, and took a guess of 6" to start with. In hindsight 5" would have been better, or I could have turned the mounting pads perpendicular to the twist and that would have given me my 4 1/4" spacing between holes on center. Anyway I marked the boundaries of the twist 3" in the center, then 1" on either side for the area I was going to fuller, which left 1/2" on either end for the bosses I was going to flatten. I fullered with my 4# rounding hammer over the horn and broke the corners on the fullered area. Then I just flattened the bosses making sure to round up the shape before finishing making it as flat as I wanted. Then I used a nice round straight pien hammer and my caulking vice to bend the offsets. To get the handles scrunched down enough I had to switch to a sharper straight pien to get the stems bent in quite a bit. Kept checking to see when I had the holes exactly 4 1/4" apart, the wire brush and let cool. Momma likes them and only 8 more to do... :-)
-
Finally got around to making drawer pulls
-
The other trick you can use is to make your rivet forge deeper! You could use 1/8 x 6 and bend a ring or C that fits inside your rivet pan. To do larger stock you need a deeper fire. You could use DRY fire brick, or angle iron. I would water the edges if the fire with a ring made of thin sheet, and would NOT water a fire built up with bricks!!! No one wants a hot brick spalling into your face!!!
-
Swing the Hammer/Standing at the Anvil?
SJS replied to SReynolds's topic in Blacksmithing, General Discussion
Getting around to commenting on authors as "Authorities" on the subject;-) Wenger like Bealer blacksmithed, but didn't come out of a solid well established blacksmithing tradition. Bealer knew things from reading old books, Wenger learned what he needed to know to make tools he wanted but couldn't afford as a starving artist;-) Neither would I consider authoritative. As far as the thumb on top of hanmmer handle school like Donald Streeter, and Joe DelLaronda??? They were able to use that method and not cripple themselves some how... I can only assume they both have/had a light grip on the hammer that didn't feed back as much energy into their joints, or they were men of iron and it didn't matter... Streeter's book is great in my opinion, except the hammer technique section:-) Haven't read Joe's book yet. I try to advocate for the Hammer to do all the work, attempting to push the hammer deeper into the steel past where your swing carries it is pointless and counterproductive!!! Punching the steel with a hammer is also less effective and self destructive. There are several schools of hammer technique that work well, Hofi's ergonomic hammer technique is very good if you learn it early enough;-) Brian Brazeal has fabulous hammer technique, there are several European traditions that work well, and the fast and furious long handled small headed farrier's technique can be very effective (just be careful of the stress on your elbow;-) But standing way out away from the hot steel and flapping your arm and hammer like a chicken not so much;-) I just spent the weekend demoing at a Pumpkin Festival, and I was remembering this thread while I was working, and I was all over the place;-)... One minute I was standing with my hip up against the anvil right on top of the steel, and then the next heat I was back off the anvil quite a bit and whaling. I try to do what works for me:-) -
Go with the side draft pattern, "hoods" look nice but often don't draw the smoke out of the shop well. A properly proportioned side draft will draw nicely. I have seen many shops with a nice steel hood over the forge that just gets used as a chalk board, because they also installed a nice side draft flue close to the fire. I have been entertaining the idea of putting a hole in the side of the pipe that I could stick a propane torch to jumpstart the draft, once the fire is going it pulls just fine, sometimes it needs a little help to get started. Newspaper lit and stuck up the flue also works to get the draw going, and is cheap...
-
Got some pictures finally had to search and search to figure out what this thread was called;-) got the steel wagon wheel tong rack sitting on a three footed base with the sleeve off of a halogen lamp stand that broke. Got the 2" steel mesh in iron in the hat, and welded up s frame for it. The little metal table I got from my father in law for free and is very handy to have around;-)
-
Have gotten 12 hours of sleep in the last three days... But I got I done enough, loaded, and delivered. Plan on adding a black smith sign, and a side draft chimney but that will have to wait... Spent more than I should have cause i was in a hurry and facing a deadline, also bought tools to make the job easier. Here is a good pic in progress that you can see the caulking vice attached. Next is the shop with the door closed on the flatbed ready to unload. Next I got some shots with the door up and my setup for the show.
-
Howdy;-) 32oz, been insanely busy still haven't cleaned her up and finished her yet. Got to finish my portable historic looking blacksmiths shop and haul it down to the pumpkin fest grounds to work in this weekend....
-
Swing the Hammer/Standing at the Anvil?
SJS replied to SReynolds's topic in Blacksmithing, General Discussion
I pay very little attention to where I am standing or how I am moving... I pay strict attention to what the steel is doing when I hit it ! TO be honest most of the time I don't really think about what I need to do differently to get the steel where I want it to go, I just watch the steel move into the shape I want it to be, but I have been forging for a long time. I passively notice in passing that a particular procedure is uncomfortable, or fatigues my back or neck, or that I move back from the anvil a bit when I am swinging a longer handled hammer. I am always thinking about what I want to do next, and what I hope to get done in this heat, and I do think about improving efficiency. But the mechanics of how I get things done is mostly unconscious now, that's just how I do things. If I have a decent sized Hofi/Czech style hammer or a short hafted hand sledge I will generally be very close to the anvil. I have seen a number of excellent blacksmiths demonstrate hammer technique like this, and move a lot of metal fast, and with a high degree of skill and precision. There are a lot of different 'traditions; and 'schools' of thought -
Swing the Hammer/Standing at the Anvil?
SJS replied to SReynolds's topic in Blacksmithing, General Discussion
For lighter work I do stand very close to the anvil and my face is generally pretty much directly over the face of the anvil, unless I am working off the near edge. If I am working over the far edge then I tend to lean over the anvil even more:-) For heavy forging i will try and stand up more, but the hammer often whips by my ear or higher. 30years of blacksmithing, and I've placed in more than few forging contests so it works for me;-)