TMIB
-
Posts
41 -
Joined
-
Last visited
-
Update: I found out today that they are planning to run 3/4" pipe. Thanks for the help. Just to clarify, so we are on the same page, these forges run best at 20 psi. That's the way I've been running them off of individual tanks. I can drop them lower than that a bit once they really warm up, but 15-20 psi is the normal working range.
-
At the camp smithy, we are looking to replace our 100lb propane tanks with a single large tank leased from a propane supplier. The tank would be located outside the smithy, with lines run underground from the tank to the posts of the smithy building. We currently have 5 gas forges; 4 single burner forges (from Studio 4 Forging in Seattle) and one 2 burner forge I made myself running burners from Zoeller Forge. I typically run all these forges these at around 20 psi. Right now we have them individually run to regulators on 100 lb tanks. The propane supplier says that the maximum pressure they can legally run in the underground line is 30 psi. Assuming we can run 1″ pipe, am I going to be able to get 20 psi at 5 running forges running off the same feed line?
-
I think that would be an excellent second project! All of our axe yards follow scout guidelines/regulations, and are roped or otherwise barricaded off. (most of the time the scouts make lashed rope & post fences, as it's a great exercise for them to refresh their knot and lashing skills) In fact, a good portion of our campsite fences and barricades, gates, etc. are all done with twine and logs in the 3-4" diameter range. In this wet environment though, rot is a serious issue, so anything intended to be more permanent needs to be treated properly. The twine & log solution is ideal for troop sites & non-permanent axeyards, as it's low-impact to the environment. For the smithy area, I could easily see a lot of uses for more durable woodcraft hurdles- a barrier to keep folks away from the coal bin, used instead of rope around our axeyard, etc.
-
You bring up some very valid points. Bear in mind though that this isn't Arizona or Oklahoma, and those kind of temperatures are not common. I take safety very seriously at our smithy. We get 200+ boys coming through during the resident camp every summer, plus JROTC groups, and low income youth groups, at risk youth groups, etc. Many of these young folks have no exposure to the trades at all, and have never swung a hammer of any kind, let alone done metalwork of any sort. While I don't want to coddle them, I also make judgement calls in regards to what is and is not appropriate in the smithy. For example, I don't let them wear gloves. That's a whole debate that could be continued on another thread, but by teaching them to understand and control the heat in the metal they are working with, instead of hiding it, we don't have to worry about a complete novice grabbing a hot bar with a glove. They use long stock or tongs, and cool it when the held end starts to get warm. Moving through our smithy, they are taught to clear a path first, moving everyone out of the way, *then* go back to the forge and get their hot metal, before calling out "hot metal to the ____" (indicating where they are going) The two areas brought up here- boots and long pants, are interesting points- I require closed toed shoes and encourage but do not require boots. I have no way to provide boots for participants, and many of these young folks do not own or cannot afford a decent pair. There's a range of course, some of these kids would have no problem with it, and probably own a few pair already. However we are working with light stock, and there is little danger of serious injury to the feet if they are wearing shoes and socks. Likewise for that one particular summer I let them wear shorts, though I still required aprons. While some light burns from hot scale could occur, the risk of any serious injury is minimal. I require them to bring a water bottle, and if I don't see folks drinking enough water, I'll enforce it by kicking everyone out for 5 minutes to go drink. This is an interesting topic for discussion, but I'd like to request your indulgence and get back to the original topic, perhaps starting the discussion of safety equipment and clothing on another thread. I don't want the discussion directly associated with our camp if possible. We have some parents that get upset the moment a scout gets so much as a blister, and unless we put them in a full asbestos suit, there's going to be some tradeoffs. A parent reading this could get the wrong impression of our program and it wouldn't take much more than a phone call or two to shut down a program that serves hundreds of youth every year.
-
Hah, yeah good call. Normally my rule in the smithy at camp is no open-toed shoes, long pants required. That particular summer it hit over 100 degrees in the shade. I let them wear shorts in the smithy that week, but everyone has to wear aprons. I didn't see the no-socks guys, I'll have to remind my staff to keep an eye out for that in the future.
-
No problem, just wanted to make sure we were talking about the same thing. Thanks!
-
Take a look at the sketch image I posted and the "driven pintles" picture. Are those what you had in mind?
-
Straps with tabs at 90 degrees is so brilliantly simple it eluded me. Thanks! (No that's not sarcasm, I didn't really picture that until you said it) The big posts are 18' apart, which is why I have a double-gate planned, rather than adding another post on the end of a 9'-10' gate. Someone else suggested that if we have the gates swing in, we could subdivide the smithy, but I don't picture a scenario where that is ever going to be a realistic need. Having them swing out only is likely, plus if I have cable running from the top of the post to the end of the gate, it won't swing inward anyway, due to the angled wood supports from the posts to the roof. I don't really think I need swing out gates in the back, I might go with a lift-out wall there, though I am trying to plan for what the area might look like in 50 years. If things continue like I expect they will, the area behind the smithy will be cleared back, and having a gate on the back may be valuable.
-
thanks for the great thoughts. Unfortunately, there's another building on one of the short ends of the smithy and a berm on the other short end, so the long sides are my best bet to get equipment in and out, since that is where there is room for gates to swing open. If I do straps on the long sides for the gate hinges, do you think it would look odd to have the fixed walls on the short sides attached with driven pintles instead of a second strap on the corner posts? Chimneys on the large forges is certainly something I have on my list of improvements. Right now we have a pretty constant wind from one of the short sides, but I want to put up some canvas or other heavy tarp material there that can be rolled down as a wind block. Having chimneys on the forges at that point will be very nice.
-
I'd like some feedback on this plan, (plus I have some specific questions toward the end.) The smithy building at the Camp Hahobas Boy Scout Camp is a 20'x40' open-side pole building. We used trees harvested from the property for the uprights, and it lends a lot to the atmosphere of the smithy to have the nice look of the wood posts. However, I'd like to add a low wall around the smithy; something to help block wind, direct foot traffic and provide a simple barrier. I've decided on a 3' wood wall. That'll be tall enough to be effective, but short enough that the kids observing can see over it comfortably. However instead of a fixed wall, I want them to be able to swing open to move equipment in and out easily. Between the posts on each side is an 18' span. I plan to have two "gates" covering each of these. These will likely be rough-cut cedar 4x4's with 2x6's as facing. On the ends of the building we have door sills already cast into the concrete footing, so the walls on those end will not swing. Instead they will be fixed on each end (but could theoretically be lifted out). Some pictures may help: Here's a couple views of the smithy today. The rope around the edges is where the "walls" will go. Smithy view 1: http://i.imgur.com/0ayXbsV.jpg Smithy view 2: http://i.imgur.com/87FLLsV.jpg Here's a rough sketchup picture of what the walls may look like: Sketch: http://i.imgur.com/YltvCEU.jpg The "gates" will swing on strap hinges, I'm figuring 2"x1/4" stock. I haven't decided on simple rolled eyes or rolled & welded. With the number of hinges needing to be made, I'm likely going to make a hinge roller tool, like the one in Donald Streeter's book (https://youtu.be/cUg8xdDcNz4) Since a 9' wood wall is going to be pretty heavy, I'm also looking to support the gate end with a tie that goes back to the top of the posts. This can be cable or rod with a turnbuckle in the middle, or perhaps a forged chain. I was originally thinking of driven pintles for the hinges, kind of like these: Driven pintles: http://i.imgur.com/iOSPuOo.jpg However, I 'm wary about something that's going to damage the posts, or work its way out over time. I like the simplicity of them though. Then I thought of those really great looking post wraps I saw all over Government Camp at the Western States conference: Post wraps: http://i.imgur.com/0hSXr3V.jpg With those, I thought maybe I can use pintles like these: Pintle plate: http://i.imgur.com/6CwOpsr.jpg and use the same bolts that close the post wraps to bolt them to it. The issue there is that on the corners, the pintles are 90 degrees to each other, not 180 like they are on the middle posts. I could add a second strap that just connects to the short walls, but that's not as clean. What do you think? Any glaring problems with this plan?How long do you think I should make the strap hinges? Is 2"x1/4" strap going to work?Rolled eye vs. rolled and flat welded- here's a rolled & welded strap: http://i.imgur.com/JFVvIMb.jpg I'm concerned about the rolled eye opening. Even though the end of the gate will be supported by a tie, I'm sure at some point it'll have kids hanging on it, so I'm leaning towards rolled & welded.I was looking at 1/2" pintle pins, do you think that's enough or should I go larger? 3/4"?Lastly, do you think the wraps around the posts with the pintles bolted to them is better or worse than driving pintles into the posts? (both in terms of asthetics and durability)
-
Ah that makes sense. I was not working with a striker for this portion though, so that wouldn't work for me. I switched back and forth between the anvil horn to spread it faster, then flattening on the anvil corner (near, then far) and eventually just used a chunk of railroad track to finish flattening, since I could hang the hammer faces off the sides. Thanks!
-
Thanks Brian! I wish I could afford the time off work to come learn from you in person. :) This was a fun project, and I learned a lot just from this first one. When you flatten the "cheeks", do you use anything to raise the hammer off the anvil face? I ended up using the corner of the anvil so the edges of the hammer faces could hang freely over the edges without impacting.
-
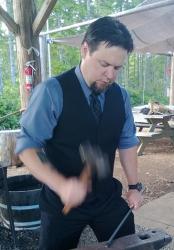
I finished the first hammer today. I say "first" since I plan to take what I've learned from this one and make more. It turned out ok, particularly since I was mostly just looking at pictures of what others have done in order to make it. (thanks to folks that offered advice and links to videos!) On the next one, I'll concentrate a bit more on symmetry, and remember to use bolsters every time I put the drift through. There were a few times when I was putting the drift through just to use as a handle, and ended up knocking flats on the edges of the faces. I've got a temporary, store bought hammer-handle on it now, but I'm planning to make my own handle to go on it. (I'm considering forging a drawknife first, then using the drawknife to make the handle) Final weight came out at 3.3 lbs. Here it is: What do you think? What should I do differently on the next one? --TMIB
-
Thanks Brian. I am looking forward to meeting Alec and seeing him demonstrate at the conference. I will likely keep trying on my own until then though. Even though I will make mistakes, I learn a lot by going hands-on, and I will get more out of the demonstrations if I have tried it myself first. It gives me a good context and I will be able to catch some of the things the demonstrator does that might have slipped by me otherwise. Plus it's always cool to have that "a-ha!" moment when a demonstrator shows a way to do something easily that I had struggled with. The cupping tool didn't take too long once underway, despite not having a helper for most of it. I will make another one soon to improve, and to put the mistakes of the first one to use helping make the second one better.
-
I started punching the eye for the hammer, but stopped after just a little bit. I was having trouble working efficiently without losing too much heat from the steel. (Again, a striker would really have helped here.) I was only gaining a small distance per heat, and noticed that I was marring the lower portion of the billet on the vise edge. I will try again sometimes when I can have someone help. When you punch the eye for the hammer, how do you typically keep it from moving/rolling? Do you use some kind of jig? In order to avoid the marks from the vise, I was thinking of a couple of round bars tack welded down to a plate with a hardy shank. The billet would sit on these (similar to a v-block for drilling) Edit: I looked through some pictures of folks making some hammers with Brian- it looks like the way to keep it from moving is to have more than one set of hands. :) (one smith to hold the steel with tongs and to hold the slitter, the other smith to strike it.) anyway, here's the small amount of progress on the eye: