Beebs
-
Posts
22 -
Joined
-
Last visited
Recent Profile Visitors
1,566 profile views


-
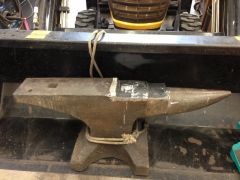
300 lb Hay Budden Robb Gunter Restoration
Beebs replied to Beebs's topic in Anvils, Swage Blocks, and Mandrels
Thanks for all the kind comments. I spent a lot of time researching and planning the repair but never really found anywhere that had all of the information in one place. Hopefully this helps someone else with their repair project. Tim, great suggestion with the black paint to remedy the emissivity issue. I will try it out next time I have a chance. -
300 lb Hay Budden Robb Gunter Restoration
Beebs replied to Beebs's topic in Anvils, Swage Blocks, and Mandrels
Step 6) Enjoy! Here are a few photos of the final product. I am pretty happy with the appearance. Time will tell as to how durable the repair will be. All told I have about 16 hrs and $325 (including the cost of anvil, but not the cost of tools and any leftover materials) in it. On the ball bearing rebound test the repaired area rebounds approx. 70-80% compared to 80-90% on the original top plate. http://www.iforgeiron.com/gallery/image/37081-anvil-final-weld-area/ http://www.iforgeiron.com/gallery/image/37077-anvil-after-top-side/ http://www.iforgeiron.com/gallery/image/37079-anvil-final-in-bucket/ http://www.iforgeiron.com/gallery/image/37080-anvil-final-on-floor/ I'd be happy to try to answer any questions on anything on the repair I may have missed. -
300 lb Hay Budden Robb Gunter Restoration
Beebs replied to Beebs's topic in Anvils, Swage Blocks, and Mandrels
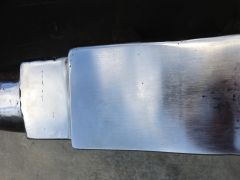
Step 5) Finish Grinding I did the finish grinding using a combination of a 7" grinder with a coarse cup wheel, 4" grinder with flapper sanding discs, 4x24 belt sander and a small pneumatic angle head grinder with a scotch brite pad for the final finish. The belt sander gave a nice straight and flat surface after getting it close with the coarse cup wheel. I used a straight edge on spacers with a dial caliper to check the straightness of the grinding process as it progressed. http://www.iforgeiron.com/gallery/image/37078-anvil-checking-straightness/ As you might imagine the final grinding was the least enjoyable part of the process. It took quite a while (approx 6 hrs) to complete and was both mentally and physically tiring. I broke it up into 3 or 4 blocks to spread out the fun. If I were to do it again I would try putting the anvil in the milling machine and use a heavy duty carbide fly cutter instead of grinding. I was originally afraid it would be too hard to cut but now I don't think it would be. -
300 lb Hay Budden Robb Gunter Restoration
Beebs replied to Beebs's topic in Anvils, Swage Blocks, and Mandrels
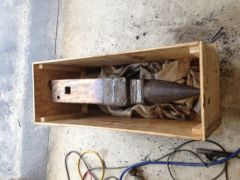
Step 4) Welding After getting all the welding gear setup and ready to go I preheated the anvil evenly to 400 deg f. using the weed burner. This took about 45 min. I checked the temperature with the optical pyrometer. I noticed considerable differences in the indicated temperatures from the anvil sides and top. I attributed this to differences in the emissivity of the different areas. The shiny top plate was reading about 150 deg lower than the sides. I used a small drop of water to verify the top was hotter than the 200 deg being indicated and then used the sides to indicate the temps for the rest of the process. In hindsight I wish I would have had a appropriate temp stick to verify the optical pyrometer readings. I laid down 6 passes of the 3/16" Stoody 2110 build up rod. I had the welder set between 175 and 200 amps DC rev. The 2110 went on nice and flat. The most difficult part was getting the buildup beyond the edges far enough to ensure a straight and smooth edge after grinding. Neither of the Stoody rods work well in any welding position other then flat. I used a pneumatic needle gun to remove the slag and stress relieve the weld after each individual pass. I used a straight edge on spacers to verify the buildup height was adequate on both the 2110 and 1105 I stopped the 2110 approx. 1/8" below the top of the top plate. I lightly ground the last 2110 pass before starting the 1105 rods. I laid down 3 passes of the 18" 1105 surfacing rod on top of the 2110 at approx 100 amps DC rev on the welder, using the same needle gun to remove the slag and stress relieve the weld. The 1105 did not go on nearly as flat as the 2110. During the welding of both the 2110 and 1105 I had to stop several times and let the anvil cool due to excessive inter-pass temps over 400 deg. The table area was considerably worn and I build it up while I was at it with just the 2110 rod without any of the 1105 surfacing rod. The welding process took considerably longer than I had planned (approx 6 hrs). Once you start, you are pretty well committed to finish, so give yourself plenty of time. Mig welding would have been much faster but the high inter-pass temp problem would have probably been much worse. I used about 9 lbs of the 2110 rod and about 3 lbs of the 1105 rod. http://www.iforgeiron.com/gallery/image/37084-anvil-post-welding/ After welding I evenly reheated the anvil to 400 deg. using the weed burner. Surprisingly I used less than 1 - 20lb propane cylinder for the entire pre and post heating process. I had a second cylinder standing by if needed though. You would not want to run out of propane in the middle of the heating process. Once the anvil was hot I quickly installed the box sides and filled the box with 4 cu. ft. of vermiculite. http://www.iforgeiron.com/gallery/image/37082-anvil-in-box-1/ http://www.iforgeiron.com/gallery/image/37083-anvil-in-vermiculite/ I checked the anvil approx 27 hrs later and it was still too hot to hold your hand on it. At about 52 hrs it was still slightly warm. -
300 lb Hay Budden Robb Gunter Restoration
Beebs replied to Beebs's topic in Anvils, Swage Blocks, and Mandrels
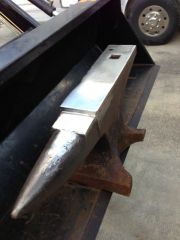
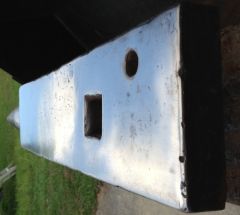
Step 3) Surface Prep I ground the missing plate section to clean metal. Then I ground back the remaining top plate to a straight edge plus approx. 3/8" to ensure a good bond of the old plate. Last I ground slight chamfer on old top plate edge to help with weld tie in to old plate. http://www.iforgeiron.com/gallery/image/37076-anvil-after-prep-grind/ -
300 lb Hay Budden Robb Gunter Restoration
Beebs replied to Beebs's topic in Anvils, Swage Blocks, and Mandrels
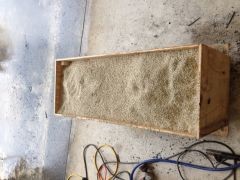
Step 2) Fabricate Heat Soak Box. Calculate box volume to ensure you will have enough Vermiculite to adequately cover the anvil for the extended cool down phase. Calculating the box volume is pretty easy (LxWxH) but calculating the volume of the anvil to deduct from the box volume can be a little more difficult if you try to do it geometrically. I did a calculation of the anvil volume by determining the weight of 1 cu ft of mild steel (490 lbs) then dividing the anvil weight by this value to determine the approx. volume of the anvil i.e. 300/ 490 = .61 cu. ft. Originally I was trying to get by with just one bag of Vermiculite. I made the mistake of calculating the box size based on the size of the top plate. Fortunately I realized before I went too far that the anvil base is considerably wider then the face and it would determine the minimum box width. Once I realized I could not get by with just one bag of Vermiculite I optimized the box size to use most of the 2 bags I would have to buy. I ended up with a box that was approx 2" longer, 3" taller and 2" wider than maximum anvil dimensions. I fabricated the box and left the top and bottom panels separate from the 4 sides. I placed the anvil on the bottom panel before welding. This allowed me to place the 4 sides over the anvil after post weld heating and put the top on after filling the box with Vermiculite. -

-
-
-
-

-
-

-
-