

DClaville
-
Posts
241 -
Joined
-
Last visited
Content Type
Profiles
Forums
Articles
Gallery
Downloads
Events
Everything posted by DClaville
-
very nice looking frosty DC
-
very nice. I might have to make some maybe in Stainless for healthy food reasons DC
-
-
It has 3 air intake slots. I have just made them so big that it is possible to blow out the flame no matter what gas pressure and then i have full control of it with the choke ring that slides over it to ajust the air intake. thanks DC
-
thanks for this tread it is some good info DC
-
so true so spot on. Glenn mate i know how ya feel... even tho i already have more tools then lots of other bladesmiths and blacksmiths i know i still feel like i got to little and always needs to use a tool i have seen but not have.. hehe and yes reading about it is not the same but i do like to read about it tho and then try out the things and ideas i get from the books well i think any blacksmith has it this way in some amount and yes we can never learn enough but we can learn more faster with lovely nice forums like this where people give away their best tips and secrets for others info ain't it just great DC
-
okay i am yet novice at this forum will have a look at that. here is a sketch 5 mins in paint. hehe the jet can be moved in and out to a max of the 1/3 in from the input end cant see much deffrence in the flame when i move it in and out but will tune it to find the best setting when the forge is ready the total length is 35cm. DC
-
Frosty: When you say BP ? hehe okay i didn't know that, i build it after John N's design shown over on BB. i took this design since it looked "to me" easy to make and it looked highly effective. the jet is around 1/3 in from the end and the burner is the same DIA inside all length. ill try to make a sketch today. DC
-
the rest of the pics and a extra gas valv ill put in just before between the burner and hose and a pic of it burning at 0,8 bar. DC
-
sorry for the wait but here are some detail pics of the burner parts and gas injector more in next post. DC
-
nice yeah it is a good feeling to make some thing new for the first time and yes show of some photos.. DC
-
To glove or not to glove, a poll
DClaville replied to Ramsberg's topic in Blacksmithing, General Discussion
i use no gloves when forging normally some times on the left holding hand when punching or working with really short stock but no tongs that can hold it. and never on the hammer hand it takes away all of the feeling of the hammer and i need that to work good with it. and yes i get bit, burnt some times but i don't care my hands are kinda numb to pain anyway.. DC -
i am not sure but i don't think O1 is used it many part that are at the sizes you want when they are thrown away. and if you still are at the stage you describe id stay to car/truck springs both coil and leaf kinds. they make use full knifes and are easy to forge and cheap and easy to find. and other things such as ball bearings and roll bearings from big machines and such are really good steel it is a bit harder to forge but make really good blades wear resistant and strong edge and some rebar also makes good blades keep on forging and show your work here DC
-
hmm thingys i have made uver the past years some fun some hard be depends on how you take em on. candle holder, toilet paper roll holder, rack for hanging jackets and such, and of course knifes and maybe a fork (bit hard) door hinges always fun but kinda need a door to hehe.. DC
-
this is a good looking sword Sam as always and yeah come on we want to see it done... hehe Daniel C
-
take some waste oil (not toxic kind hehe) and fill in the sand to make it a bit more solid so the anvil don't move around when you work on it dry sand and it will surely take some time to suck up the oil buts it's worth it. I have also used a sand box before but for the looks i am now I'm using stumps of Larch wood and find it very good any soft type of wood it best be course it takes away a lot of the ringing so id prefer any kind of pine/soft like wood over oak and such. but you loss some back-springing effect. and yeah it looks like a good anvil but nimba's have never bee in my taste DC
-
Thanks Frosty and Blafen will try to get some then before i get it started up for real. DC
-
Brian what i did was just to took a round bar of brass and turn a longer part of it thinner and then drill a hole in it. or wait drill the hole before you turn it so it will keep some strength in the end i drilled a little bigger hole to cut to fit a screw on MAG/MIG welding tip i used 0,6mm (that gives a hole of 0,7mm) and in the closed end of the burner i drilled a hole fitting the smaller part of the gas injector and then drilled a hole sideways in it and cut for a screw to hold the injector in place. in the larger end i drilled and cut for screwing in some of the smallest "standard" fittings used for gas hope this helps a bit i am haveing some problems with this card reader thingy on this PC so might have to wait for tomorrow and then ill post some pics of the burner parts in close view DC
-
Tinbender feel free to do so Frosty I'll give every thing inside a coat of itc 100 and the wool will first get a good spray with fiber hardener. when i say flame holder i might mean the same thing as a flare as you speak of that is tapper inside to shape the flame, and i will have the end of it 10-15mm. inside the hole for it the the isolation will hold the actual flame. when you say kaolin slip what is that and do you have a link for some of it and its normal use ? yeah i have also been thinking the same thing with the doors and i hope the slack i have made is enough i used a 1,5mm spacer when welding. Matt yeah it sure is nice to have a lath the wool you see in the pics are not the high temp ceramic wool but some "normal" (rockwool) used for isolating houses and such i have just used some of it to try out how the inner size of the chamber would end up like. and thanks all for the nice words and time used to answer DC
-
Hi finally i have gotten some where on my project of building a gas forge so i will make a post and ask you lot to help me if you'd be that kind and tell me what you think and what you would add, edit, redo, remove and what you find good and bad. please hehe i will post a few pics but since there are many of them id ask you to take a look at the links to photobucket and see all the pics if you like i have tried to do it as (step by step) as possible but there might be a few big jumps in there so ask me here if there is something i shall try to explain or make some close up off links The forge The burner photo 1 seen from the side photo 2 the forge seen from one of the ends still needs to get a diamond disc and cut the fire brick in half so the door can slide to each side it is a part of and old gas bottle, the ends are 3mm steel plate the end holes are both 18cm. wide and one is 6cm. high and the other is 8cm. so that i can keep a small hole when only working with small stuff and still has a chance of working with lager stock such as axes which i plan on making. it will get 2 inches/5cm. of ceramic fiber wool and a hard brick as floor and will give it some fiber hardener and then a layer of ITC 100 on it i have welded some 12mm. Stainless steel pins in the bottom to support the floor so it wont strain the wool and break the fiber hardener and ITC 100 underneath it there is two 30x30mm square pipe with bolt to be tightened to hold a "land"/"tong rest" (not sure what it is called in English) the same "land" fits both ends and I will also make a longer one later on. The specs are outside: L. 35cm D. 29,5cm inside the chamber will be L 25cm and D. 14cm with out the ends isolation L =length D = diameter in some of the pics i have put in some normal house isolation to try out the inner fit of the floor and find the positions for the end holes/openings The burner is all made of Stainless 316 steel and some brass for the gas fittings. it is a 1 inch pipe whit a end cap tic welded in the end and air grooves are drilled and cut out and a thing SS pipe as a choke ring over the air holes. it is made after looking on John N's burner and others as well and thanks for the answers given by you John and others on the way much appreciated. i am still toying with the flame holder and has not yet made the final one, but have made 6 different prototypes and will wait to try em out in the forge when i get it done and the make the final one in SS 316 and some thick stock to take the heat. here are a pic of it, for more pics please see the links above photo3 none of it is done yet and a lot can still chance I plan on making a hand forged handle on the top so it easily can be moved around. and the legs are 3/4 inch pipe so i will make longer legs of 1inch pipe that fits over em if it needs to stand by it self i also plan on being able to take this with me to different places and forge if ill be lucky enough to make it for some hammerings and what do you think abut painting will it last? and what pain to use i am very happy with this but know that there might be some places where improvements can be made and id like this to be as good as possible thanks for looking and reading my long novel hehe and all comments good bad and advise is much appreciated and tanks in advance for the help and if you are sitting there and wanting to make your own forge feel free to ask if there is any thing you want to know how i did regards DC (i have posted the same post on British blades)
-
Rigidizer and ITC-100, alone or Both???
DClaville replied to DC712001's topic in Insulation and Refractories
this is some nice info thanks for it. now i just need to get some rigidizer :/ Daniel CL. -
Most important tools in the shop
DClaville replied to philip in china's topic in Tools, general discussion
Me forge blower and coals.. hammers can forge with out it.. anvil hard to work with out it but it can be done.. tongs anvil tools cutters,fuller,dies and so on Hardening tubs oil and water vise bench grinder with stone and wirebrush welder angle grinder borax and so on.. Daniel CL. BTW is it possible to get a non automatic plasma/laser cutter to use like a kind of "wood band saw style" only for metal ? i know it would not be safe but very useful :D -
Send Me Your Anvil Pics...
DClaville replied to cbl4823's topic in Anvils, Swage Blocks, and Mandrels
this is my anvil 70kg. i don't know much about it so if any one know something then plzz tell me Daniel CL. -
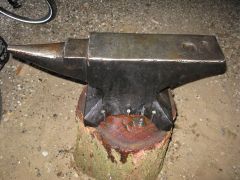
From the album: My Pics
it is a anvil.. :P on a wood stand.. and it is oiled up cuz im going away for a bit.. -
Thanks Daniel CL.