

Meisenmann
-
Posts
45 -
Joined
-
Last visited
-
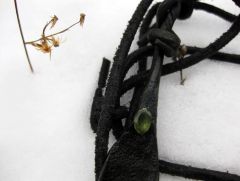
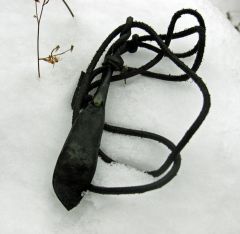
Hi! I forged a small leafy kind of pendant for my girlfriend. We're together for 4 years now, I hope she likes it...I myself almost never like what I made I would have liked to make some veins and so on but I had no idea how. I tried some chisels but it looked way too artificial and square edged. So I had to settle for just trying to give some flow and texture with my ball peen and some small tweezers. The gem is a small Perdidot/Olivin I bought and set into a small socket that I had drilled with an engraving tool. She likes green and nature, so I hope it is a fitting combination. Until now I have forged knives most of the time, doing other things is still very hard for me. Need more training Anyway, here are two pictures.
-
-
-
cracked spear
Meisenmann replied to Mark Wargo New2bs's topic in Axes, Hatchets, Hawks, Choppers, etc
I think the cracks developed due to stresses at that location when it was too cold. I worked the blade itself while putting stress on this transgression between bolster and tang, and that area due to being much thinner cooled down quick. If it doesnÄt work I'll cut off the tang and forge down the bolster to recycle the forged blade material, it won't be an integral anymore, but at least the work wasn't for the trash bin that way. -
cracked spear
Meisenmann replied to Mark Wargo New2bs's topic in Axes, Hatchets, Hawks, Choppers, etc
I have the same problem with a half-integral knife I forged out of c105. At the transition between tang and bolster I have many of these small fissures and cracks. I ask myself if this can be "repaired" by bringing it up to welding heat (with flux) and weld these fractures together again. -
I don't really understand. You ask in what medium you should quench but also ask if you should harden the knife? quenching = hardening, as far as I understand it. It doesn't really matter how you make the knife, you will have to harden the material. Use all the important heat treating steps.First normalise several times. Harden in veggie oil if you do not want to see your knife go "ping"...especially concerning files I would stay on the safe side. After hardening comes tempering in your toaster oven, 30 to 60 minutes at 200°C do the trick and you will very likely not see it shatter if you did your heat treatment right.
-
Heat Treating, The bloke method.
Meisenmann replied to gonefishin's topic in Heat Treating Knives, Blades etc
I'd say you should re-organise your steps a little bit. If you do it in this sequence, you are making your job harder. You are hardening the blade before you shape it with hand tools. You should change that. 1.) Forge the blade roughly to shape 2.) normalize your blade several times. You can also go above nonmagnetic and quench the blade (use veggie oil). 3.) soft-anneal your blade if you quenched it, otherwise it will be very hard. 4.) Finish the shape of your knife with your preferred tools. Prepare the bevels and the edge (leave enough material there, from a half to one millimetre), be it a bench grinder oder files. If you are using machines, do not get the blade too hot (no colours). Finish the surface to for example 240 to 400 grit. 5.) Harden the blade. Use vegetable oil for nearly all steels. 6.) Temper the blade using your toaster oven. I temper two times, approx. 40min for each cycle. Watch the colours. You want a straw colour. 7.) Clean the blade with sandpaper and apply desired finish up to the grit you want. 8.) Make handle 9.) Sharpen knife. Avoid all procedures that develop heat or sparks like the devil avoids holy water. Otherwise you could have skipped heat treatment anyway. -
From the practical standpoint I know the Kunai to be more of a gardening tool and makeshift stabbing/baton-weapon, throwing it is more anime-esque as far as I know. Making one interests me too, but I am at a loss too how to make one so I am very interested in your thread :)
-
Hi! This weekend I tried myself with some bottle openers. There were two birthdays at hand and I needed some little presents. I will keep the smallest one and give away the two others as presents. To be honest, I hope they like them because they look kind of....feral. Forged out of square stock, I used an old leather belt that I cut into some strips for a nicer feel and grip. I thought of making leather scabbards for them, but time ran short.
-
Well, it is my second sheath. My first one is my past experience in leather working For the first one I used the wrong leather, it was too thin and didn't have the "hard stuff in between" (for lack of an english term for it...), which ended in the sheath getting looser and looser. This time it was more coarse leather (soaked it in water to work with it), I applied linseed oil and beeswax like the last one. This leather gets way more sturdy. I would really like to be able to do the stitches the scandinavian way (like on these puukko sheaths), but for the moment I have to be content with this type until I get the hang of the other technique. But it makes me very happy that you like it :)
-
Thanks everyone :-) @ new guy No, made the sheath myself, it is also my second attempt at a leather sheath ^^ @ Ecart I am afraid there will be much time between this and my next knife (well, there is a small one part-finished, that could be finished in some weeks). Problem is, while being at university, I can't forge anything. Only during the holidays :(
-
Hey, i like the shape too! Make sure to sharpen it cleanly later, that is still one of my problems. For a handle: I would drill two holes into the tang for small stainless-pins. Glue the scales on with epoxy. If the knife shall be used for outdoors work (bird and trout knife?) with water contact, you could take a very dense wood like ebony. Make sure to seal the lines where wood meets metal, avoid water creeping beneath the wooden scales. Then apply tung/linseedoil over the days until the wood can't take up any more, polish it afterwards.
-
Hi folks, After my first KnifeShapedObject and my first knife, I finished my second one sometime ago... It is forged of 1.2842 (C 0,9 Si 0,1-0,4 Mn 2,0 Cr 0,2-0,5) and Bubinga with a try at wire inlay with silver. Well, I am not really satisfied with it, but I guess at my current "experience level" it is quite okay. I can't really make an exact bevel when sharpening by hand and waterstones. It always ends up as a quite convex grind (even though it gets sharp, it doesn't look that good to me this way).
-
Whoa, thanks a lot for the extremely long answer! I will try out your advice with the water, sounds very interesting, I had never thought of that... And there is no problem with cracks in the steel due to this procedure? Well, of course, there are no "lakes" on the anvil, but it was something I asked myself while reading. The rest seems to be practice, I can quite accept that Practice is the thing I lack most. I would really like to forge every weekend. But my forge is at my parents place, most of the year I live in an appartement near university in another town - no forging there Again, thanks a lot for your long and detailed answer :)
-
A very beautiful piece! What I ask myself: How did you hammer the "bevel" (hope that is the right word for it) that clearly? When I try to do that, I end up with a pock-marked surface with a very zig-zaggy "bevel" Can you give some tips? I could imagine the many heats one needs to get that detailed results would not be benefitial...simply, what is your secret? ;)