

don schad
-
Posts
82 -
Joined
-
Last visited
Content Type
Profiles
Forums
Articles
Gallery
Downloads
Events
Everything posted by don schad
-
Chambersburg utility hammer valving.
don schad replied to Monel's topic in Power Hammers, Treadle Hammers, Olivers
I'm still tuning mine up, but one thing to check is the fit of the throttle lever linkage into the throttle valve. This should be a square shaft into a square hole. After being used for 80+ years, mine was more like an oval shaft into a square hole. The result was a large degree of motion of the lever before it would engage and turn the throttle valve (i.e. backlash). A few degrees of play in the valve connection could end up being inches in the treadle. I had to build up the corners of the throttle control shaft with welding rod and then file to fit. Also make sure it is lubed and the packing gland is not too tight. Don -
Has anyone built a kit MZ75/100 hammer?
don schad replied to setlab's topic in Power Hammers, Treadle Hammers, Olivers
My IK does have good control when approaching the dies, but I am frustrated with an overall short stroke due to banging into the cylinder on return. With the adjustable stroke the upper 3rd or so is off limits. I don't think that Ken's kit would help with this (too much stroke for too little cylinder), but if/when I get into reworking everything that was something I was wondering about. The motion/control looks very interesting. Thanks for your comments. -
Has anyone built a kit MZ75/100 hammer?
don schad replied to setlab's topic in Power Hammers, Treadle Hammers, Olivers
Hi Judson - do you know how many BPM you are getting when your machine is running flat out? I've seen the videos and they typically focus on slow control (which looks super), but not the more rapid blows. Do you think that your tup weight is appropriate for the valving (i.e. not too big)? Also, regarding your comment on the up stroke - is it always banging at the top of the up stroke or is it hitting the top when parking after you let off the treadle? I am considering converting my Iron Kiss to use this system. Thanks, Don -
I've moved away from this machine I think. It isn't 100% clear who the manufacture is, and I don't think I want to get into a project if things go bad. Thanks though.
-
Hi all, I am considering purchasing an older Anyang 165 two-piece hammer. At present the age of the machine is not known, but it is at least 20+ years old. I have read about some of the older machines having a problem where they get very hot. I don't know if this is a problem which can be fixed or not. But I am also wondering if there are other problems or if people have thoughts on these older machines. Are they comparable to the current crop in terms of reliability and quality? I am also considering purchasing a new 88, but this other machine just came up. Is the control on these older 165s less then on the current 88s? I would love to hear any experiences or thoughts. Thanks for your thoughts, Don
-
Evaluating a Beaudry-Champion #4 (100#)
don schad replied to don schad's topic in Power Hammers, Treadle Hammers, Olivers
Hi all, Thanks for your replies, this is helpful information. I will be sure to closely examine the arms and rollers, among the other items suggested. I have a 50# LG which I am happy with, and I have been thinking of getting a larger machine to augment it, but I haven't really been looking. Then out of the blue I got a call from some one wondering if I were interested in this hammer, so I figure it can't hurt to look. I also came across a thread in the forums about motor mounting for this type of hammer. I'm not sure what set up this hammer has, although he did say it would require a motor also, so that might be useful also. Again, thanks - your comments are appreciated. Don -
Hi all, I am going to look at a non-running 100# Beaudry-Champion - #4 hammer in the near future. I don't know too much at this point, except that the owner hasn't run it either and the sow block is not in good shape/was repaired in some dubious manner. I was wondering if anyone could suggest specific problem areas or things to look for when I inspect it? Anything specific to check or look out for? Areas of wear to be concerned about? How about parts/rebuilding such a machine - I assume there isn't anything available, but can things be reasonably forged/fab/machined? Finally, what would be the value of a well running #4? Based on their reputation I would think better then a similar sized LG? Any thoughts or experience welcome. Thanks, Don
-
I had a very interesting experience yesterday, which I would like to share. I have a typical routine for starting up the power hammer (LG) which includes wiping down the hammer dies from the oil and scale which builds up over night from dripping out of the ways. My routine was interrupted yesterday, and I hadn't cleaned the dies when I pulled a 2"x 3/16" flat which had some minor cupping in the end out of the fire. I saw the mess, but I didn't want to waste the heat, and I didn't think too much about the messy dies. My intent was to take a couple of gentle hits to make it flat, so I continued and put the piece on the die cup down, and made a firm blow - boom! I was completely surprised to have an explosion occur at impact! It was like someone popped a large balloon, complete with a shower of oil and scale sprayed across the room. It took me a moment to figure out what happened, not relating the explosion to a routine power hammer strike, something that otherwise should have been a crisp wack. In the end I figure that the oil was trapped in the cupped area getting super heated/boiling, when I brought the head down the compression of the cup caused the oil to flash and it blew up. It was one of those times that you know your safety glasses were a good investment. don
-
I found that I 1 brick seemed most effective for me, but it still required quite a lot of huffing-and-puffing from me. Where are those apprentices when you need them? I definitely agree this is a problem. It looks like the forge might be undersized with respect to the piping, and the location of the bellows and forge make it hard to have some bends on the way. The forge was built in the relocated historical building and the blacksmithing equipment acquired during the construction of the forge back in the 1970's. Unfortunately the forge and bellows were never an active matched set in a working blacksmith shop so it didn't get optimized over time. Hopefully I can get things improved a bit so that more energy can be spent hammering and less pumping. Thanks for all the input. don
-
Yes, thanks for this suggestion. I did checked and clean out the pathways when I got just the tiniest of puffs with my first pulls of the lever. The equipment was unused for quite a while and it was a bit clogged with coal/ash but I didn't displace any families. Thanks, don
-
Interesting, what gives them away as modern day bellows? They did look to be in relatively good condition when I treated the leather, with a patch on the back side, but beyond that they looked "old". There are a couple of small leaks, but in my estimation they weren't accounting for the low volume at the firepot. The top and bottom chambers are the same size, although the last person to use them (10+ years ago) had put two bricks on top to restrict the expansion of the top chamber. Thanks for your input! don
-
Hi all, I am working to open up the disused historic forge at the historical society in my town. The smithy has a leather bellows which is generally in good shape, although the performance was lacking. After I started a fire the other day I found that it was pretty difficult to get a sufficient amount of air into the fire. It was enough to keep the fire going, but I was never able to get the fire above a light orange. At least part of the problem is, no doubt, the plumbing from the bellows to the firepot. This appears to be "historic" 1 1/2" muffler pipe with two 90deg bends before entering the tuyer. In addition to this I am wondering if the bellows themselves aren't on the small size, although I don't know how these things would be sized for a firepot or a particular forge. The dimensions are 29"W at max width, 18" both extended up and down, 43" long. The output is a 1 1/2" outlet. Fortunately the forge is a 19th century one, and there is a rotary blower there so I am going to likely use that one instead. Hopefully this will work better, and it should at least be in a better position relative to the forge. Any thoughts or recommendations are welcome. Thanks, don
-
Hi, I built one out of 3/16 diamond plate, because that is what I had. Mine is just a 12" square tube which extends about 4' through the wall. No smoke shelf. I have a 12" galvanized spiral pipe (22 g or something?) for the chimney, which fits over a circular male flange on the outside top of the square. I figure not having the edge of the spiral pipe directly exposed to the heat/fumes will prevent it from rusting away. Chimney is very light and is fully supported on the tunnel. While I agree that 3/16 is pretty heavy-duty for the chimney I theorize that once the extra mass of the tunnel gets hot it really maintains the draft. I find that this design does work very well, esp. after is has been running for a while. The lower edge of mine is about 4" over my firepot, with the end cut on a slope such that the top edge is mid-firepot or so. I am planning on raising it up a bit more as I think that it would catch more smoke during startup before the draft gets really established and provide some additional room under it. My blower might be a bit don
-
Tool holder is a big improvement over a C-clamp.
-
Hi all, This thread has been quiet for a while, but for what it is worth I finished a tool holder a while back. This is for a 50# Little Giant. The hardy hole is tube forged down to l" inner square, and tapped for a clamping screw. I can use a full 1" square hardy or a piece of l" flat bent to 90 and tighten it up with the screw. The flats have seemed to hold quite fine thus far. The whole thing is held tight by tapered wedges which go through the hole in the sow block and pull it tight. The bottom die can be removed with out removing the holder. don
-
duplicate
-
Round stock as fuller in power hammers?
don schad replied to Blackcat's topic in Power Hammers, Treadle Hammers, Olivers
It's not like we're over-thinking this, but in the context of forging locomotive brake parts, I'm sticking with cable, not some old twig! ;) Not that it matters, but I still have another good-old reference which I can't find, which perhaps has the original reference. This mystery reference described building spring swages in two parts and bolting them together, one side flat the other with an offset bend. Originally I was thinking this was Lillico, but I don't see this in there. So perhaps it's in this other reference. Now I need to find this just as sanity-check! The setup from Kim Thomas looks pretty good. I like the table on the PH, I've been meaning to do that myself. -
Round stock as fuller in power hammers?
don schad replied to Blackcat's topic in Power Hammers, Treadle Hammers, Olivers
Judson, I'm not sure if this is where I originally saw it, but in Lillico's book (Blacksmith's Manual Illustrated) there are a couple of pictures which appear to have this type of handle. I can't find any mention in the text, but from the picture it looks to be cable looped around with a ring to tighten it up (see page 35, figure 10 and page 39 fig 3). -
Round stock as fuller in power hammers?
don schad replied to Blackcat's topic in Power Hammers, Treadle Hammers, Olivers
Here is a link to a link to a power hammer tooling description put together by Clay Spencer: http://www.iforgeiron.com/topic/11550-power-hammer-tooling-described/ Somewhere I saw a reference to using stiff cable as tooling handles also. These would be good for reconfiguring as Peacock describes and protect your hands from vibration. -
Perhaps going through a wall then up could be an option. I replaced part of my exterior wall with masonry (cinder-block), and put the pipe through that (a "Hofi style" side draft). Once outside it uses the HVAC spiral pipe (22 g I think) to go straight up. I don't know how long it will last, but at $45/10ft section replacement cost wouldn't be terrible if it lasts a few years. don
-
Is a treadle hammer used much?
don schad replied to KeithSS's topic in Power Hammers, Treadle Hammers, Olivers
I have only two arms, so unless you are driving something into the same spot I don't find this works well. I think most use handled tools so the biggest danger I find from a TH is hitting something off center and having it shoot out. Same can happen from FP. Both can be fine tools suited for different approaches. -
Is a treadle hammer used much?
don schad replied to KeithSS's topic in Power Hammers, Treadle Hammers, Olivers
One advantage that a treadle hammer has over a flypress is that switching tooling is only a matter of picking up the different top-tool (assuming you are using flat dies), so you can do multiple operations with different tools quickly. With a flypress you need to swap out tooling in the ram, which in most cases likely requires a bit of time (not something you can do within a heat). -
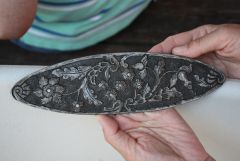 That is wonderful. It is correct that this is thick plate worked from only the top? Is metal being removed (chiseled out?) or just pushed around? Is this chasing? Engraving? Thanks, don
 -
high speed cutlers power hammer project.
don schad replied to basher's topic in Power Hammers, Treadle Hammers, Olivers
Perhaps this is similar to what you are interested in: http://www.iforgeiron.com/topic/5589-depew-in-action/ Depew helve, I think there is a BP for a cloned version. don -
Yes, I ended up doing pretty well. I picked up a hearth/blower/champion whirlwind tuyere on my way to get turkey last week. The table was loaded with about 600# of firebrick (I could not lift it out of the truck with my tractor until I removed the first course of bricks). A bit rusty but I have removed all the bricks and am going to clean it up. The fire bricks trapped a lot moisture between them and the table/firepot so there is some heavy rust on the table, but it is still pretty solid (Didn't collapse under all those bricks). don