billyO
-
Posts
544 -
Joined
-
Last visited
Content Type
Profiles
Forums
Articles
Gallery
Downloads
Events
Everything posted by billyO
-
San-mai can be more difficult to make a decent looking blade than a standard damascus billet with more layers. In order for it to look good (IMO), you have to keep the core centered in the billet while forging. So make sure you flip the billet regularly to forge from both sides evenly, or you can make sure you change sides of the billet each heat, and don't lose track... Good luck and be sure to post pics.
-
There's no Don't worry (I'm sure you're not), there's nothing you can do to offend me.
-
*sigh* I suppose that's possible. But I'll err on the side of being kind, honest and respectful the way I was taught. If you want to take offense, I apologize and expect the same kindness and respect while you correct my faux pas. If, instead, you choose to get offended and thus feel like I deserve less in return, then you are not worth my time, I will walk away and do my best to erase you from my memory.
-
Fair enough, I suppose. But I tend to keep things simple, and I (and most people) want to be treated with respect and kindness. If someone is insulted by that, then I'm not sure what to say, but I will do my best to limit my interaction with them. .
-
As far as I know, there is only one. Treat everyone as you want to be treated.
-
Especially seeing as how they had a male on the opposite side in stereo, showing that there is no gender for blacksmiths
-
tapers on a picket fence... help needed
billyO replied to JW513's topic in Blacksmithing, General Discussion
This is all it takes. Don't look at the initial 'failures' as a waste of time so long as you pay attention and learn from your mistakes. Maybe not, but try. It's easy to forge things half-assed, much better to forge things well. It's been said that 5 minutes at the anvil will save an hour at the vice (or grinder). This is possible too. Again, I'd suggest making them as perfectly and exactly identical as possible. This shoudl be relatively easy, and as Frosty mentioned, either method should take only a minute or 2 max for each one of those. -
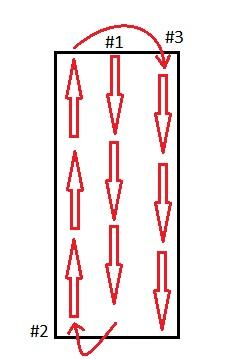
Good morning, mpc. Any luck? Another thing I thought of that I didn't see mentioned was the importance of proper hammering pattern when using flux. When I was using borax for flux, I'd make sure that I tapered the edges of each piece when grinding and prepping the billet, to give the flux an easier escape path for the weld-setting hammer blows. I would also make sure that my first hammer blows ran down the center of the billet, forcing the flux out to the sides (and preventing it from getting trapped and creating a void in the billet), before hammering on the sides. They say pictures are worth 1000 words:
-
Help getting smooth finish
billyO replied to JK Scotland's topic in Blacksmithing, General Discussion
Welcome to the addiction, JK. If you haven't yet, do a search for colors of hot steel, and realize this is just a representation. How much ambient light you have in the shop will change how the colors look. If you can keep the piece over 1600F (870C) when forging, you can avoid much of the scale. -
Those look great, Ron! I'm going to have to bookmark this page. Thanks for sharing.
-
Thanks for sharing the chuckles over my morning coffee, Frosty and Saibumi.
-
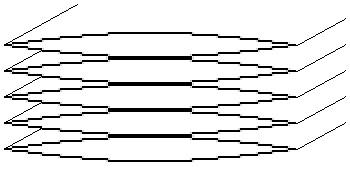
A couple of things stick out to me, based on my reading of your description of your process. The first thing that came to mind is what others have mentioned, specifically what was the atmosphere in the forge? Secondly: I'm not sure what you mean by this. Did you get all the mill scale off each piece? When I make a billet, I don't worry about cleaning with acetone, I just make sure that I've ground each mating surface down to bare steel before putting the pieces together (and avoid touching said surfaces with my bare fingers after grinding to keep oils off). Finally: This is hard to know what you did. The first hits with a hammer have to be firm enough to 'set' the weld, but not too firm to cause any movement (shearing) between the layers which will prevent welding. I usually do 2-3 heats where I'm only focused on setting the weld and not trying to do any forging to shape until I feel (and I'm referring to actually feeling through the hammer, as opposed to some other abstract 'feeling') the billet turn into one solid piece opposed to a number of layers of individual pieces. Only then should one start forging to shape. Apart from feeling the billet turn solid, you can also see if the whole piece cools down and changes color uniformly or if some parts seem to cool off faster than others, indicating separate pieces. Also, not sure what you mean here. How deep did you grind? If all you did was grind off the scale, it's possible to still see the weld lines and still have a solid weld. Here's an example of a billet I was working on last year that shows what I'm talking about. This was a solid billet after welding but before drawing out. You can easily make out the layers of 1080 and 15N20 but the weld is solid.
-
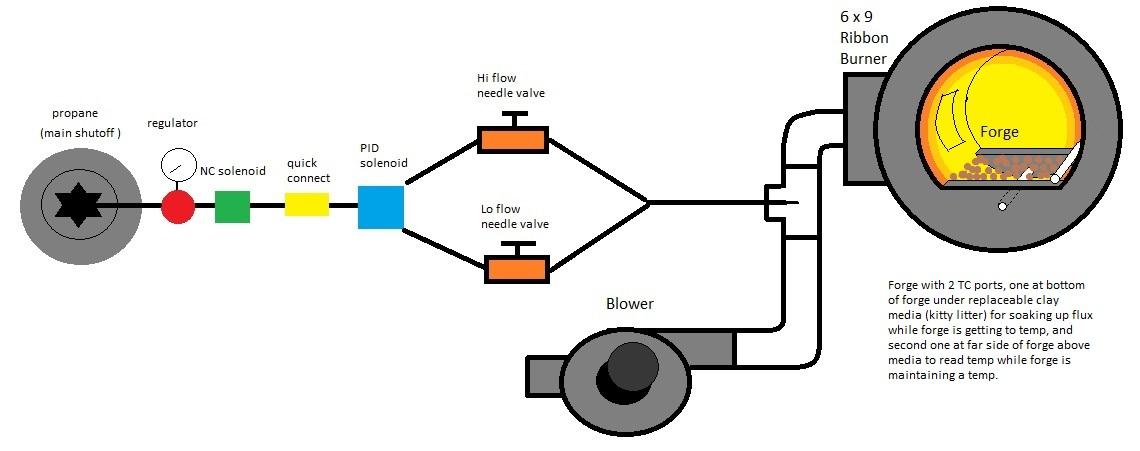
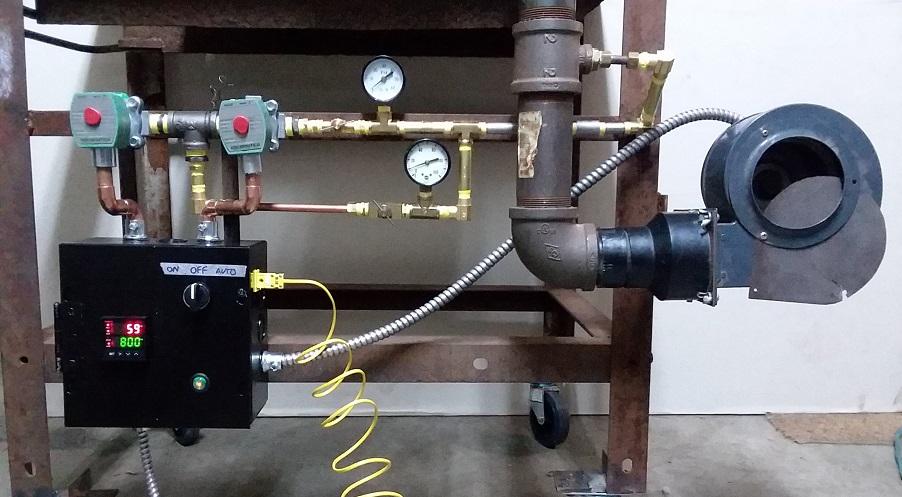
Hello all. I've finally been able to get the forge running, once to dry it out and once for a test of the controller today. Hopefully we'll get to some forging soon. Here's links to a couple of videos of the controller in action today. The second one is sped up to save time if you want.
-
Good evening, all. Here's the progress from this week. I've got everything plumbed in (except the propane tank), wired up and just now plugged it in and flipped the power switch on. No sparks! The main NC valve clicked open, the blower started, and when I turned the high flow switch to 'ON', that valve clicked open, and clicked shut when turned back to off. Nothing happened when I turned it to 'AUTO', but I'm not sure if that's something I need to worry about yet because I haven't done anything to program the PID. I think it's time to hook up the propane and fire it up!
-
Well done, my brother! My only complaint is that I'm now late in starting my errands for the day.....
-
No head hanging needed, Dan. Hold it high! Me to on both points. Hopefully it'll be early next week when I can post a video.....
-
Hi Dan. Thanks for the thoughts. You do realize you're opening a can of worms when bringing up the venturi/ribbon burner question, right? But I won't go there.... Yes, I think you're right about having cold air entering the forge without fuel, which is why I'm having in a Low flow (or idle, if you will) line that will allow a minimum amount of fuel to keep the flame going and the PID will add more fuel through the Hi flow line to increase the temp as needed. I think it will be OK, because over the past number of years that I've been using my forge, I've pretty much left the air flow alone, unless when welding Damascus billets, then I cut the flow enough to create a reducing atmosphere.
-
If the paddle switch is wired only to the main NC valve, will this be an issue? The SPST main power switch starts the blower, so as long as that's working, the gas solenoid should open, no?
-
Now that's an intriguing thought... Thanks Buzzkill! I'll start looking into it.
-
Hello Hans. Thanks. While I can't see how either of those would be a bad idea, I don't think they are necessary for my application. (Well, at least in regards to the break protection, as I strap my 100# tank to the shop wall to prevent accidental tipping or moving.) And I think the flame arrestor is taken care of through the NC valves. As long as the blower is operational, (keeping the gas supply valve open) there should be no risk for a backflash to occur? (I am thinking about trying to figure out how to wire the NC valves in such a way that if the blower fan stops working for some other reason than loss of power, they close. But so far, everyone I've talked to has said this would involve adding some sort of flow meter to the blower output, and that will have to be a future project for me.)
-
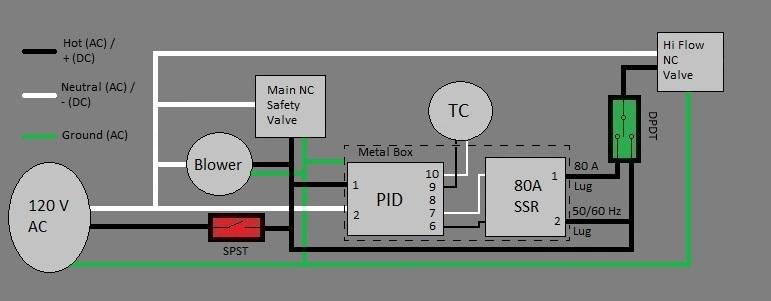
Hello all. I hope the new year finds everyone healthy and safe. After quite a bit of reading, research, and numerous drafts, here's my final wiring diagram: I'm now waiting for all the components to arrive and hopefully will get this plumbed in and fired up next week.
-
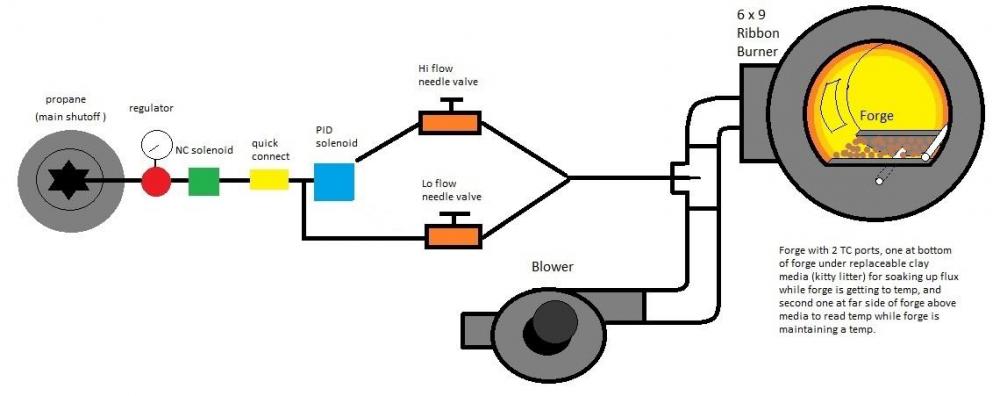
Thanks for the ideas, Latticino. From all the conversations I've had over the past year or so, both online and in person, modulating the air-flow, while great in theory, doesn't seem to be worth the hassle. Also, my brain finally decided to engage after a number of folks suggested that instead of having a 3-way solenoid choosing between HIGH and LOW flow lines, I'm going to have a LOW (or Idle) flow line that's always open and use a 2-way solenoid (MUCH less expensive, btw) to open/close a second, HIGH flow line that will merely allow more propane to be added to the mix. Here's the new schematic:
-
OK, it seems as if there is at least a passing interest from some folks, so I'll go ahead. I'm aware of that but I've seen and used a few forges over the past 5-6 years with this kind of set-up. Thanks for the link, Buzzkill, I had already seen that thread. My main reason is not necessarily to hit and maintain a specific, tight temp range, but rather to help conserve fuel. John Emmerling has a forge with a similar set-up and when I was at his shop a few years ago, I noticed that his gas solenoid was cycling on/off every 1-2 seconds while at a welding heat, and I thought to myself that he must be using almost 1/2 the propane that I use with my burners running 100% of the time. From what I've read on other knifemaking and blacksmithing forums is that folks say that with this set-up, they are able to maintain a relatively tight temp range (+/10 deg F) which will come in handy if I decide to break away from my current 1080/O1/15N20 damascus focus and start forging blades with other steels that require tighter heat control. And hopefully it will be effective in the 650-700F range for forging aluminum so that I don't have to keep checking the stock with a stick. (say that 5 times fast...) And finally, folks claim that they use this type of system for more accurate heat treating and while I have a JenKen Fiber Front Loader 24 HT oven, it might be nice to have a backup, just in case. Here's a rough schematic of what I'm thinking: Since doing this sketch, I've decided that the first green box (NC solenoid) is a bit overkill because the blue box (which should be labeled PID controlled solenoid) will also be a NC valve wired in parallel with the blower so that if the blower stops, so does the gas flow. On point that has been raised on one of the other forums was that a PID controller might not be the best thing, because during operation, the solenoid is either fully open to the low flow or high flow branches and not the best for the varying output from the PID controller (sorry if my electrical vocabulary is inaccurate) and one party suggested using a simple thermostat instead of PID controller. Again, thanks for the thoughts.

-
Hello all. I couldn't find anything on iforgeiron about this when I tried searching multiple phrase combinations, which kinda surprises me. If there are threads about doing this, feel free to redirect me. Is this something that the community would be interested in following and willing to help me with my design? Thanks and happy new year.
-
Hi Snuffy. Thanks! I used a friend's 30-ton press with a 5" diameter ram and sunk them into rings made from 2" round. It was easy once we figured out how fast we needed to move and how deep to sink them before cracking. The titanium lost heat really fast just walking from the forge to the press and it wasn't until I preheated both the ram and ring to a red heat before dishing did we have success. Fortunately it only took 2 failures to learn that.