
Candidquality
-
Posts
386 -
Joined
-
Last visited
Content Type
Profiles
Forums
Articles
Gallery
Downloads
Events
Everything posted by Candidquality
-
The only dumb question is the one you don't ask. Welcome. and feel free to ask away. Might even try a search or two first, since there's a lot of information already around. We all have to start somewhere. I decided to start in the middle and work both ways See you around
-
Interesting application of Neoprene. It would definitly be better than nothing as it would partially seal the area creating a air pocket that would be the actual insulating factor, but the particular design these are for(wetsuit) is designed to allow water(and this also air) through. I might use it to stop a draft or for a gasket material around a window. but not for a sheet of insulation. Now if you decide to use it to fill up a space inside the walls and it's shredded, it could actually be very effective (all that air trapped and movement restricted). If you happen to get on that's designed for insulation it will have glass added to it (from 50 to 80 precent) and normally won't be able to be burned. But that wasn't what you mentioned. As far as fire is concerned. it's a synthetic rubber wth a flash point of under 500 degrees(think tire). but you already know not to catch it on fire.
-
I finally had the chance to pull the covers off the grinding/polishing wheels and see what it is we use here at work. It's a 8S ESL deburr and finishing wheel from 3M. We have both the medium and fine. If you've never had a chance to use a bench grinder with a polishing wheel, these things are amazing. Their cost is about $60 each for a 6"x1" wheel, but I have to say it's more than worth it. I think it would be great for anyone who knows the polishing process as these can be much more aggressive than anything done by hand still, but it's not a bad place to start learning either. I just thought i'd mention it in passing as I'm planning on buying a Baldor motor and a couple of wheels at Christmas time. If anyone happens to decide to get one to try, let me know what you think. It's almost better than sliced bread.
-
Be sure to keep us posted on what you figure out about the venting up there. I think it would be very handy to know. And welcome.
-
Actually very nice. I don't get much time to reply recently. Kind of surprised that you've made so many. For some reason I had it stuck in my head that you were just starting out. Looks like you've done quite abit already. Good luck and hope to see more soon. and that hilting technique
-
From my understanding, anything that can break up oil can break up the creosote. Though I'd recommend testing it on a small concealed area before actually making a mess of things, since brick is so porous. You might wind up with many discolored bricks instead of a few isolated spots. Of more concern to me would be the fact that there is that much creosote buildup. The light foamy stuff is an indication that it's caught fire inside the tube! this can cause a lot of heat very quickly and can last a while(I know you saw that when you burned it outside). I'm sure it's been installed with fire safety in mind. but watch out for that. If you are getting so much buildup that it's dripping back out you must be using very green wood or not burning a very hot fire. The creosote forms when the hot smoke vapors condense on the cold flue(tubing, whatever it's in contact with), this is nothing but unburnt fuel. Same problem exist in the home fireplace, but that's not as easy to see or clean as what you have. I would definitely check how well this heater is functioning, fuel type, etc. All that goo is your money stuck to the walls instead of heating the house. Best time to buy your wood is the spring, and let is cure for the entire summer. Get that thing burning and it can sound like a low flying jet with the amount of air it's trying to suck up the tube. Sorry if it's a bit of a rant, but i'm a bit cautious when fire and buildings are concerned. Anyway, keep us posted on what you find out.
-
"Raising a norman helmet". I think a search on that will give you an idea of what to expect. I honestly haven't paid attention if anyone here makes armor or not. I know a few have come through stating they make chain, I even think there's a blueprint on the easiest way to coil it. As for titanium, it would depend on the grade(about 20 different ones or so) and your supply of it. It's extremely plentiful as a raw material, but for some reason there seems to be a shortage of it processed currently raising the prices. I have a few small plates of it around here that I've yet to take the time to play with. I've also never seen it polished, but for some reason it's stuck in my head that it would not take a shine. It would however, be light and sturdy. You might want to check into the prices of the sheet stock size you'd need and see the prices before you go much further into the idea. I'd say you might want to try working with a cheaper material as well, to get some practice. But this metal behaves a bit differently than most. Good luck with the idea though.
-

Heat treating this tool.....???
Candidquality replied to Stu in Tokyo's topic in Heat Treating, general discussion
Great pics. You can't really do much to harden mild steels. Pretty much anything with less than 40 points of carbon won't be hardened by heat treatment. I think you could buy some case hardening compound(or do it the old way of wrapping it in bone or hoof chips then encasing in clay and baking it for a week or so, as the carbon compounds decompose the carbon is free to bond with the surface of the metal.) but this will still only harden a thin layer on the surface. I personally think that that size stock would be more than adequate without hardening. You mentioned when you made it that you had a difficult time bending it even with the heat you were applying. Do you really have a concern that it will bend or flex during use? If not, I say leave it as it is. If you truly are concerned, then simply buy some higher carbon steel and forge away, as it will only take a few minutes to get the desired shape now. I also think that the oil may be a bit small for a piece that size, as you want to be able to submurge it completely(any part above the oil surface will allow the oil to burn) and still have some room to wiggle it around( to keep the bubbles off the surface and ensure all parts cool equally). Normally that's the advice given for blade making, and a large thick piece should be much more forgiving than a thin blade. Ok, I've rambled enough. The above is to be taken with a grain of NaCl. -
Yeah. I heard that all you have to do is set out some honey and you'll catch them when they fly by....as opposed to vinegar when you have enough and don't want to clutter up the place.;)
-
Pics look great! And just because there's cracks doesn't mean it's a total loss. I've known several who've developed cracks and such then simply patched with a satanite or something similar, and kept right on going. Looks like you're well on your way to getting there. It's always amazing the first time you get the steel that hot in short order. Still haven't forgotten when I did that 15 years ago. Good luck and keep us posted.
-
Some very interesting knives you have in your gallery. Glad to have you aboard. Seems as if you are doing very well for only being at this for a year. I'll have to use my translator when I get home but some of those blade styles I've not seen before. Were they your unique design or a design commonly used in your neck of the woods? Very nicely done.
-
something I'm sure you've been made aware of, but thought i'd include it on the off chance you haven't. Forge and Burner Design Page #1 Even with the ventilation, it would be nice to know what you've got to breathe. Http://www.kidde.com is the new link location
-
I think we knew what you meant. but thanks for the clarification, especially since i live in the same state as you and wouldn't want to start anything ;)
-
YESTERYEAR FORGE Hammer-in
Candidquality replied to yesteryearforge's topic in Blacksmithing, General Discussion
Worked like a charm. Definitely makes you appreciate the power version. -
Powdered Steel tanto ( aka canned damascus )
Candidquality replied to oakwoodforge's topic in Knife Making
Thanks for showing us how you did that. Very interesting. Definitely going to have to get off my rear and try it. looks too interesting. one question though. is it hard to remove the square tube after the welding process? and if so, why not use something like stainless foil as a barrier inside? -
You're going to love it here then. Welcome to the group. if you haven't figured it out yet, feel free to ask any questions and we'll be happy to answer them. If you are full time smithing though it might be a few of us asking you questions. Just as a heads up we have a live blueprint session every tuesday night that'll keep you swimming in fresh ideas, and have about 350 recorded blueprints to keep you occupied in the meantime.
-
Powdered Steel tanto ( aka canned damascus )
Candidquality replied to oakwoodforge's topic in Knife Making
Actually seeing that on the piece of wood made me think. Have you ever tried to reproduce a wood pattern using the powdered steels? Seems that it would take a little forethought, but would be possible. Nice blade btw. -
Horse-shoe-nail-spoon-jig
Candidquality replied to Mr Smith's topic in BAWA Blacksmiths Association of Western Australia
Back to the topic at hand. Why is there a hole in the lower section of the tool? Was it simply how it worked out or did you add that later as a self cleaner for the scale? -
That a stainless or aluminum counter? looks like agood fit. How about a three dimensional relief of a man swinging a hammer at an anvil? might be a bit of a challenge, but i tend to go for the hard stuff anyway. BTW, what is that little beauty next to it. reminds me of an old 53 merc I had in another life.
-
I would recommend going here Books by Jim Hrisoulas Some great books and when he's not so busy you might see him lurking around here. Nothing beats having a hands on instructor in the room with you. But these might help you past a few problems you might have run into.
-
Definitely a place to start from. I think you might want to extend the steel a bit further into the handle though. I think the basic rule of thumb is to have the steel at least 3/4 into the handle for stability. Have you had a chance to pick up any books yet? If not it might give you a leg up and help you get past some of the harder things to learn on your own. Whatever you do just keep at it untill you get where you want to be.
-
Metallurgy of Steel for Bladesmiths
Candidquality replied to Woody's topic in Heat Treating Knives, Blades etc
Definitely an interest. Sent you a pm with the addy. Thanks for the offer. Edit: Have to add that is some great information. Though the 8mb file size might throw you off a bit. They are definitely a must have in my opinion. Thanks again for the information. -
ASO: Anvil Shaped Objects
Candidquality replied to primtechsmith's topic in Anvils, Swage Blocks, and Mandrels
Hopefully this works. haven't posted a pic in the new forums before, so here goes. Slightly modified RR track anvil with swage ability. I wanted something light I could run around without too much hassle. Probably be handy to keep around later when I do find a decent anvil(and a shop to put her in). I did another mod on it of drilling 4, 1/2 inch holes to allow the use of lag bolts to attach to a stump or bench. Though the rr spikes do see to be an appropriate way to hold this one down . http://www.iforgeiron.com/gallery/showphoto.php/photo/1691/ppuser/268 -
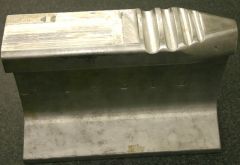 Slightly modified RR track anvil modified to allow for the most common swage sizes of round. Weight approx 40# Lightweight use, but a good starter.
 -
Welcome. Glad you have the hammers, but there's a whole lot more to it. Above all, be safe. Feel free to ask questions. We have an amazing group of guys(and gals) who are more than willing to give you a hand and point you in the right direction. Most of us won't recommend knife making to start with, but if that's your passion then go for it. Just remember it takes years of practice and learning quite a few tricks to get it down. As long as you don't expect perfect results overnight, you'll be fine.